A recent Google Chrome update has broken the drag-and-drop feature in the Downloads bubble that previously allowed you to drag and drop downloaded files onto any website or tab in the browser.
Google Chrome’s downloads menu originally appeared in a bar at the bottom of the browser, but this changed last year when it was replaced with a downloads bubble, which appears within the toolbar.
Google Chrome download bubble Source: BleepingComputer
As first reported by BleepingComputer, hundreds of users are now saying that the drag-and-drop feature no longer works after recent Google Chrome updates.
“Specifically files can’t be dragged into another chrome window, or be used to open a new chrome window (opening the file with chrome),” reads a post in the Google support forums.
“Dragging onto local desktop or into other programs seems to work fine. The downloads page, also works fine. Only the downloads bubble. I was able to recreate the issue by updating chrome, my current version is: 127.0.6533.73 (Official Build) (64-bit).”
In a Chromium issue found by BleepingComputer, Google Chrome engineers say reports about this bug began on July 29th and affect versions 127.0.6533.73 and 126.0.6478.185.
Google determined it was caused by a new performance-enhancing feature, ‘UIPumpImprovementsWin,’ which was rolled out to 50% of the Chrome Stable users on Sunday night.
A fix has been created by rolling back the UIPumpImprovementsWin change, which should be rolled out to users soon.
A Chinese hacking group tracked as StormBamboo has compromised an undisclosed internet service provider (ISP) to poison automatic software updates with malware.
Also tracked as Evasive Panda, Daggerfly, and StormCloud, this cyber-espionage group has been active since at least 2012, targeting organizations across mainland China, Hong Kong, Macao, Nigeria, and various Southeast and East Asian countries.
On Friday, Volexity threat researchers revealed that the Chinese cyber-espionage gang had exploited insecure HTTP software update mechanisms that didn’t validate digital signatures to deploy malware payloads on victims’ Windows and macOS devices.
“When these applications went to retrieve their updates, instead of installing the intended update, they would install malware, including but not limited to MACMA and POCOSTICK (aka MGBot),” cybersecurity company Volexity explained in a report published on Friday.
To do that, the attackers intercepted and modified victims’ DNS requests and poisoned them with malicious IP addresses. This delivered the malware to the targets’ systems from StormBamboo’s command-and-control servers without requiring user interaction.
For instance, they took advantage of 5KPlayer requests to update the youtube-dl dependency to push a backdoored installer hosted on their C2 servers.
After compromising the target’s systems, the threat actors installed a malicious Google Chrome extension (ReloadText), which allowed them to harvest and steal browser cookies and mail data.
StormBamboo attack flow (Volexity)
“Volexity observed StormBamboo targeting multiple software vendors, who use insecure update workflows, using varying levels of complexity in their steps for pushing malware,” the researchers added.
“Volexity notified and worked with the ISP, who investigated various key devices providing traffic-routing services on their network. As the ISP rebooted and took various components of the network offline, the DNS poisoning immediately stopped.”
In April 2023, ESET threat researchers also observed the hacking group deploying the Pocostick (MGBot) Windows backdoor by abusing the automatic update mechanism for the Tencent QQ messaging application in attacks targeting international NGOs (non-governmental organizations).
Almost a year later, in July 2024, Symantec’s threat hunting team spotted the Chinese hackers targeting an American NGO in China and multiple organizations in Taiwan with new Macma macOS backdoor and Nightdoor Windows malware versions.
In both cases, although the attackers’ skill was evident, the researchers believed it was either a supply chain attack or an adversary-in-the-middle (AITM) attack but weren’t able to pin down the exact attack method.
A novel Linux Kernel cross-cache attack named SLUBStick has a 99% success in converting a limited heap vulnerability into an arbitrary memory read-and-write capability, letting the researchers elevate privileges or escape containers.
The discovery comes from a team of researchers from the Graz University of Technology who demonstrated the attack on Linux kernel versions 5.9 and 6.2 (latest) using nine existing CVEs in both 32-bit and 64-bit systems, indicating high versatility.
Additionally, the attack worked with all modern kernel defenses like Supervisor Mode Execution Prevention (SMEP), Supervisor Mode Access Prevention (SMAP), and Kernel Address Space Layout Randomization (KASLR) active.
SLUBStick will be presented in detail at the upcoming Usenix Security Symposium conference later this month. The researchers will showcase privilege escalation and container escape in the latest Linux with state-of-the-art defenses enabled.
In the meantime, the published technical paper contains all the details about the attack and the potential exploitation scenarios.
SLUBStick details
One way the Linux kernel manages memory efficiently and securely is by allocating and de-allocating memory chunks, called “slabs,” for different types of data structures.
Flaws in this memory management process may allow attackers to corrupt or manipulate data structures, called cross-cache attacks. However, these are effective roughly 40% of the time and typically lead to system crashes sooner or later.
SLUBStick exploits a heap vulnerability, such as a double-free, user-after-free, or out-of-bounds write, to manipulate the memory allocation process.
CVEs successfully used in the researchers’ experiments Source: stefangast.eu
Next, it uses a timing side channel to determine the exact moment of memory chunk allocation/deallocation, allowing the attacker to predict and control memory reuse.
Using this timing information raises the success of the cross-change exploitation to 99%, making SLUBStick very practical.
Measured success rates Source: stefangast.eu
The conversion of the heap flaw into arbitrary memory read-and-write primitive is done in three steps:
Free specific memory chunks and wait for the kernel to reuse them.
Reallocate these chunks in a controlled manner, ensuring they get repurposed for critical data structures like page tables.
Once reclaimed, the attacker overwrites the page table entries, getting the ability to read and write any memory location.
SLUBStick overview Source: stefangast.eu
Real-world impact
As with most attacks involving a side channel, SLUBStick requires local access on the target machine with code execution capabilities. Furthermore, the attack requires the presence of a heap vulnerability in the Linux kernel, which will then be used to gain read and write access to the memory.
While this may make the attack appear impractical, it does introduce some benefits to attackers.
Even for attackers with code execution capabilities, SLUBStick provides the ability to achieve privilege escalation, bypass kernel defenses, perform container escapes, or use it as part of a complex attack chain.
Privilege escalation can be used to elevate privileges to root, allowing unlimited operations, while container escape can be used to break from sandboxed environments and access the host system.
Additionally, in the post-exploitation phase, SLUBStick could modify kernel structures or hooks to maintain persistence, making malware harder for defenders to detect.
Tampering with ‘/etc/passwd’ data Source: stefangast.eu
Those who want to dive deeper into SLUBStick and experiment with the exploits used by the Graz University researchers can find them in the researcher’s GitHub repository.
As platform engineering continues to grow in popularity inside enterprises, an all-new training curriculum is being launched that will provide one of the first platform engineering certifications in the industry.
The training and certification, offered by the global platform engineering developer’s community PlatformEngineering.org, will begin on Aug. 6 and include two courses and a certification exam that will help IT administrators gain new skills in this burgeoning field.
The courses include an eight-week Platform Engineering Fundamentals class and an MVP (Minimum Viable Platform) to IDP (Internal Development Platform) course, followed by a certification exam combining platform engineering theory with hands-on tasks. Each of the courses will be held for eight to 10 weeks with live, interactive, online meetup sessions taught by platform engineering experts and some of the top platform architects in the industry, according to the group. The live nature of the courses will provide instant feedback, back-and-forth Q&As and an up-to-the-minute feel for the instruction. The live sessions are expected to run for up to 2.5 hours per class module.
“The number-one question from the community is ‘How do I become a platform engineer?’” Luca Galante, the lead instructor and vice president of product and growth for platform engineering vendor, Humanitec, told The New Stack. “So, we wanted to create a resource for IT admins [based on] the three or four years of really good content we have under our belt.”
ngrok is a secure unified ingress platform for developers. It combines reverse proxy, firewall, API gateway and global load balancing to deliver apps and APIs. Over 5 million developers use ngrok for testing webhooks and previewing apps, including the world’s top technology brands.
The certification course will be a combination of theory and hands-on internal developer platform building. The first course, the fundamentals instruction, is ready to go for the students and includes eight weekly modules on topics from an introduction to platform engineering to how to build an internal developer platform. Other modules include getting started with reference architectures, designing golden paths for developers, finding the right abstractions, infrastructure platform engineering, how to build minimum viable platforms and selling your minimum viable platforms to key stakeholders inside enterprises.
The second course is still being developed, but it will go beyond the basics to teach full rollout strategies and adoption paths across multiple workflows and teams, according to the group.
The fundamentals course is priced at $2,149, but registrants can use the code EARLYBIRD20 when registering to drop the price by 20% to $1,720. Once the development of the second course is completed, Galante said he expects that a special bundle price will be available for the combined courses and the exam for the students in the program.
The curriculum is being built to ensure that students who successfully complete the courses and exam will be able to demonstrate an elevated level of understanding and knowledge of platform engineering, from its theory to firsthand skills and expertise.
By using one of these custom, standardized internal developer platforms (IDPs) and tools inside a company, developers are freed to do their core work activities, rather than spending valuable time searching for applications they need to create and test their code. These IDPs provide developers with the best code-building tools in an easy-to-use environment built to provide automation, standardization and flexibility for busy application developers.
Who Is Interested in Platform Engineering?
Many of the first students coming into the new certification program are individuals who want to learn the skills and fundamentals for their own edification, said Galante. “They are DevOps engineers or some junior engineers that want to have these skills. But we are already seeing teams purchasing the course. And we are getting applicants from large companies where they have systems administrators or IT admins who they want to upskill to become platform engineers or upskill their existing platform team to educate them around best practices.”
The guest lecturers who will participate in the courses include experts like Manuel Pais, co-author of the book, Team Topologies, and Ajay Chankramath, former head of platform engineering at the technology consultancy Thoughtworks.
An Enrollee Shares Why He Is Taking the Certification Course
Giovanny Velez, a platform engineering technical lead for a cloud-based applications vendor in Colombia, told The New Stack that he is taking the certification coursework to gain more experience and understanding of this still-emerging technology from a reliable and knowledgeable source.
“This platform engineering course and certification will significantly boost my professional growth and career prospects and will validate my expertise, increasing my credibility and making me a stronger candidate for advanced roles,” Velez wrote in an email. “It will open new career opportunities and potentially accelerate my path to senior positions.”
Velez said the courses will also teach him industry best practices and innovative tools that will improve his problem-solving abilities and help him stay current with the latest trends in platform engineering. “This knowledge is essential in our team as we are starting to implement the practice, and it helps us to streamline the process,” he said.
Velez, who is paying for the course himself, said he learned of the program after seeing announcements on the PlatformEngineering.org webpage and in its Slack channel.
“The program will also provide valuable networking opportunities, connecting me with other professionals in the field,” he said. “These connections can lead to knowledge sharing and future collaborations. Overall, I think that I will be more prepared to tackle the challenges of modern, cloud native environments and deliver increased value in my role. I see this field growing constantly and I see more job offers in the market.”
As lead for his company’s recently formed platform engineering team, Velez said the company is working to establish communication channels and that he will share his experiences with the course at his company “so the rest of the teams know what we will be doing and how.”
Analyst Reactions to Platform Engineering Training
Two analysts contacted by The New Stack said they believe that platform engineering training and certifications are a smart move for enterprises.
“Training is always smart, particularly if it is done by a company that offers related products and services because they will be up to date on the kind of unique, new and changing problems that IT is dealing with,” said Rob Enderle, principal analyst with the Enderle Group.
Enderle said he often hears from IT managers that employees are learning on the job rather than getting advanced training, which is creating huge deployment and operational problems.
“They need training like this to reduce those problems,” he added. “Learning on the job or from some obsolete lesson plan continues to be problematic. I recommend training from current practitioners so that those learning can hit the ground running and become immediately able to do the job right. It makes for better implementations, and it makes employees more valuable and less likely to get laid off.”
Another analyst, Dan Olds, CEO of Olds Research, agrees.
“The concept of platform engineering is what the hyperscale organizations — think Amazon, Google, and Meta — pioneered to allow them to efficiently operate at vast scale,” said Olds. “The idea behind it is to have a specific set of development tools — and only that set — which pays dividends when it comes to scalability, reliability, support and troubleshooting, to name a few. This is something that is catching on with other large organizations that have lots of applications in flight all the time as it simplifies the development, deployment and support functions.”
Such an approach simplifies the overall application development/deployment and life-cycle management processes for companies, said Olds. “In many organizations today, developers are able to pick and choose from a huge slate of development tools, which can lead to problems down the road when it comes to deployment, troubleshooting and the inevitable changes — unless those functions are performed by the engineer or engineers who actually developed the app. Standardizing development tools ensures that everyone is using the same size building blocks and understands how they fit together.”
Olds said he recommends that enterprise IT shops should investigate platform engineering, along with their counterparts in a company’s business units.
“I can see where this approach would increase the speed of application development and result in smoother deployments,” he said. But at the same time, while this holistic platform engineering approach can be beneficial for organizations, a potential problem could be getting all developers on board with it.
“I think that it might be a hard sell to some developers,” said Olds. “They are experts at the set of tools they use and have reasons why they do not use alternatives. It might take some work to get them out of their comfort zones and get them on board with this new approach.”
React and its virtual DOM paradigm has been at the forefront of frontend development for a decade now, but there’s been a swing towards simplicity and web-native features in more recent frameworks. Astro is a great example; and it also now has the support of Netlify, a leading player in the current web landscape.
Earlier this month Netlify announced Astro as its “Official Deployment Partner,” which in practice means it will contribute $12,500 each month “towards the ongoing open source maintenance and development of Astro.”
As Netlify CEO Matt Biilmann noted, Astro was “the first framework to popularize the idea of island architecture, where islands are interactive widgets floating in a sea of otherwise static, lightweight, server-rendered HTML.” As part of the new official partnership, Netlify will help Astro roll out a related new feature: Server Islands. Astro defines this as a “solution to integrate high-performance static HTML and dynamic server-generated components together.”
Astro concept drawing of server islands.
How Is Astro Different to React Frameworks?
We’ll get back to server islands shortly. But first, let’s look at why Astro has become a trending framework. Conceptually, the main difference between Astro and the React-based frameworks that came before it is this: most of the work is done server-side, instead of client-side. Here’s how Astro’s founders explained it in their introductory post, back in June 2021:
“Astro renders your entire site to static HTML during the build. The result is a fully static website with all JavaScript removed from the final page. No monolithic JavaScript application required, just static HTML that loads as fast as possible in the browser regardless of how many UI components you used to generate it.”
Astro is perhaps closest to a static site generator, like Eleventy and Hugo, but it also cunningly incorporates other approaches too — including React itself. “In Astro, you compose your website using UI components from your favorite JavaScript web framework (React, Svelte, Vue, etc),” wrote the founders in 2021. The trick was, that all of that complexity was rendered into HTML in the build phase, meaning it was never foisted onto the user.
Astro creator Fred K. Schott demoed the product in April 2021.
But undoubtedly the key to Astro’s subsequent success is the “islands architecture.” That’s because, for a web application of any scale, chances are JavaScript will be needed at some point. But whereas previous frameworks, like Angular and Next.js, focused on client-side rendering — the so-called single-page application (SPA) approach — Astro wanted to limit client-side rendering to certain parts of an app (the “islands”). While both Angular and Next.js can implement partial hydration and server-side rendering, Astro’s architecture inherently avoids client-side JavaScript by default, unless explicitly required.
“When a component needs some JavaScript, Astro only loads that one component (and any dependencies),” explained the Astro founders. “The rest of your site continues to exist as static, lightweight HTML.”
Astro credited Jason Miller with coining “islands architecture,” pointing to an August 2020 article on Miller’s blog. He in turn credited Etsy frontend architect Katie Sylor-Miller for coining the “Component Islands” pattern in 2019.
There was some skepticism about “web islands” when they were first discussed in 2021.
In April 2021, Astro creator Fred K. Schott demonstrated Astro for the first time. He acknowledged that “partial hydration” (a key part of the islands architecture) had been difficult to achieve in practice to this point. He said that frameworks like Next.js and Gatsby had to try and “take this application and pull it apart” if they wanted to implement partial hydration. That could cause significant problems, so Astro took a completely different approach.
“What we try and do is, by default, it’s all server-rendered,” said Schott in the April 2021 podcast. “So by default, you’re speaking this language of a server-rendered document, and then individual components, instead of being pulled out of an application, are actually being injected into a document. So it’s a totally different kind of static-first approach, where the result is that you actually have to opt into all of your payloads, and everything becomes much lighter as a result.”
Server Islands
Fast forward to 2024 and Astro has become a rising web framework. As well as the technical advantages outlined above, Astro offers a kind of ‘back to basics’ approach to web development that harkens back to early Web 2.0 frameworks, like Ruby on Rails and Django, which were also server-rendered. Now that Astro has become a viable alternative to the likes of Next.js, it is trying to expand its capabilities. Enter “Server Islands.”
In its announcement post, Astro referenced the original islands architecture as “interactive client-side components.” With Static Islands, the idea is to add “dynamic server-generated components” to the mix as well. In practice, you use “server:defer” to defer running a particular component until after the page loads. So it’s a kind of caching mechanism, similar perhaps to Next.js “partial prerendering” — or at least “solving the same problem,” as Schott said on X.
Server islands comparison to Next.js tech.
In a recent four-and-a-half-hour podcast with Ryan Carniato, the creator of Solid.js, Astro developer Matthew Phillips discussed Server Islands. “What it really is, is a way to differentiate types of content to run at different times,” he explained, adding later that Server Islands “essentially cache different parts of your page differently.”
Carniato noted that when Astro first came out, they positioned the client-side islands as being “interactive,” whereas the rest of the HTML was “non-interactive.” He pointed out that Astro is now using the word “static” to indicate the non-changing content, and “dynamic” to mean a server-side island — for example, an “x rooms left” button on an Airbnb-type website, which requires checking with a database.
Ryan Carniato and Matthew Phillips discuss server islands.
Note that although Server Islands are different to traditional Astro islands, a component can be both at the same time. Netlify explains this well in a recent blog post:
“It’s worth clarifying that Astro Server Islands are different to standard Astro Islands, which improve performance by allowing you to selectively ‘hydrate’ components, i.e. load JavaScript only for components that need it, instead of making the entire page interactive. In fact, a component can be both an Island and a Server Island!”
Back to the Future
One can’t help but wonder whether Astro is slowly falling into the same trap as Next.js, in that it will get progressively more complex over time. But the concept of Server Islands isn’t that difficult to grok, so currently it feels like a sensible extension of the core “islands architecture” concept of Astro.
What I love about Astro is that it gets us back to that server-based paradigm that we grew up with on the web in the 1990s (at least, those of us of a certain vintage), and which early Web 2.0 frameworks like Ruby on Rails and Django extended. But Astro adds component-based development to the mix, including options to use React and Vue, which makes it an entirely modern approach.
Ultimately, anything that takes the bulk of the JavaScript load away from the client (read: end users) is a good thing, and Astro is certainly helping in that regard.
“After giving it a lot of thought, we made the decision to discontinue new access to a small number of services, including AWS CodeCommit,” AWS Chief Evangelist Jeff Barr wrote, sharing a prepared message on the X social media service Tuesday.
Although existing customers can continue to use CodeCommit for the time being, AWS has stopped accepting new customers. And it has not given a date on when the service would be shuttered.
“While we are no longer onboarding new customers to these services, there are no plans to change the features or experience you get today, including keeping them secure and reliable,” Barr wrote in an extended Tweet. “We also support migrations to other AWS or third-party solutions better aligned with your evolving needs.”
How to delete a CodeCommit repository — after migrating to another service (AWS)
“After migration, you have the option to continue to use your current AWS CodeCommit repository, but doing so will likely require a regular sync operation between AWS CodeCommit and the new repository provider,” the cloud giant provider advised.
Nonetheless, the service had trouble gaining a foothold in the competitive code repository market, despite the natural appeal for AWS shops to stick with AWS for additional services.
TNS Analyst Lawrence Hecht noted that, in last year’s JetBrains survey, 3.2% of the developers surveyed used CodeCommit. Even among developers whose company primarily uses AWS for the cloud, only 9% used AWS CodeCommit.
Those same AWS-centric accounts were much more likely to say their company was using BitBucket (39%), GitLab (45%) and GitHub (63%)
“That is not a large user base, but it will be interesting to see where those people will migrate to,” noted Hecht in a Slack message.
https://datawrapper.dwcdn.net/p0BfG/1
One place where AWS CodeCommit has a strong userbase was Japan. In the JetBrains survey, 11% of developers said their company uses it, a larger user base than BitBucket in that market.
Despite the marginal use of CodeCommit, many observers still had feelings about the matter.
“Given AWS is a competitor to Azure, it’s so odd to see AWS making a business case for their customers to move” to Microsoft, wrote Gergely Orosz, author of the Pragmatic Engineer newsletter, in an X thread.
“To me, this is a clear sign to not adopt any dev-related tooling from AWS. It’s not the business they want to be in,” replied Acorn Labs chief architect and co-founder Darren Shepherd.
For GitLab, AWS shuttering CodeCommit is a sign that the market for code hosting has matured.
“The market has moved from point solutions to platforms that address the entire software development lifecycle,” wrote Emilio Salvador, GitLab vice president for strategy and developer relations, in a statement. “Buyers are now looking to platforms that provide one workflow that unifies developer, security, and operations teams with integrated native security.”
GitLab has set up two options for migrations from CodeCommit, using either self-managed GitLab or through the GitLab.com hosted service.
“Self-managed customers can install, administer, and maintain their GitLab instance on bare metal, VMs, or containers. GitLab.com requires no installation,” Salvador explained.
Other companies in the space are focusing on how their products can help in the transition.
“Migration to a new source code management tool is always challenging, The right considerations and migration strategies can significantly help with the process,” wrote Patrick Wolf, principal product manager at Harness, a DevOps software provider, in an e-mail to TNS. “Some important considerations for selecting a new Source Code Manager are integration with a DevOps platform, security and governance features, and developer productivity features.”
Video and gaming streaming service Netflix has released as open source the workflow orchestrator that its army of data scientists and analysts use every day to understand user behaviors and other large-scale data-driven trends.
The Maestro workflow orchestrator, released under an Apache 2.0 license, was designed to support hundreds of thousands of workflows and has completed up to 2 million jobs in a single day for the media company.
How Maestro Works
According to company engineers, it is highly scalable, extensible and able to meet strict service level objectives (SLO) even during spikes of traffic.
It is built on top of a range of open source technologies, namely Git, Java (21), Gradle and Docker.
Percona is widely recognized as a world-class open source database software, support, and services company for MySQL®, MongoDB®, and PostgreSQL® databases. We are dedicated to helping make your databases and applications run better through a unique combination of expertise and open source software.
Maestro can be evoked from the cURL command line, which provides the ability to create, run, and delete a workflow and an associated batch of data. The workflow is defined in JSON, and the user’s business logic can be packaged into Docker images, Jupyter notebooks, bash scripts, SQL, Python, and other formats.
Behind the scenes, Maestro manages the entire lifecycle of a workflow, handling retries, queuing, and task distribution to compute engines. Not only does it support Directed Acyclic Graphs (DAGs) — table stakes in the AI-driven world of 2024 — but also cyclic workflows and multiple reusable patterns, through for each loop, sub workflows, and conditional branching.
“It supports a wide range of workflow use cases, including ETL pipelines, ML workflows, AB test pipelines, pipelines to move data between different storages,” a group of Netflix engineers collectively wrote in a recent blog post announcing the release. “Maestro’s horizontal scalability ensures it can manage both a large number of workflows and a large number of jobs within a single workflow.”
Birth of Maestro
Netflix is no stranger to open source software, having released many tools it developed internally as open source. System stress-testing tool Chaos Monkey was released in 2011, and inspired a whole generation of chaos testing tools. Other open source projects that Netflix has spun off include the routing gateway Zuul and the microservices routing engine Conductor, since deprecated.
Netflix first let the world know about Maestro in 2022 in a blog post that explained its origins. The orchestrator then being used, called Meson, was straining under the workloads of thousands of daily jobs, particularly around peak usage time.
“Meson was based on a single leader architecture with high availability. As the usage increased, we had to vertically scale the system to keep up and were approaching AWS instance type limits,” the engineers wrote in the 2022 post.
Worse, the workloads were expected to increase by at least 100% per year, and the sizes of the workflows were expected to grow as well.
From the start, Maestro was designed to be highly-scale and extensible. It was built on a DAG architecture, where each workflow was comprised of a series of steps. And each step can have dependencies, triggers and other conditionals. The business logic of each workflow is run in isolation, guaranteeing SLOs are met. All the services are designed to be stateless so they can be scaled out as needed.
The Registry Editor is a powerful application that allows you to access and edit the configuration settings of the Windows operating system.
The Windows Registry is a database containing various settings used by the operating system and installed software applications.
However, it is essential to be careful when using the Registry Editor, as making incorrect changes to the Registry can cause serious problems with your system, including preventing it from booting correctly.
The Windows Registry database stores the configuration options and settings for the Windows operating system and software installed on your computer.
The Registry is organized in a hierarchical structure containing keys and values, with five different ‘root’ keys at the top, as shown below, that serve a particular purpose.
The Windows Registry Editor showing the five root keys Source: BleepingComputer
The five different root keys in the Windows registry and their purposes are:
HKEY_CLASSES_ROOT (HKCR): This key stores information about file associations and OLE object classes.
HKEY_CURRENT_USER (HKCU): This key stores information about the current user’s settings and a specific user’s preferences for various applications.
HKEY_LOCAL_MACHINE (HKLM): This key stores information that affects the entire computer, regardless of the logged-in user. These settings are for the computer’s hardware, operating system configuration, and software settings that affect all users.
HKEY_USERS (HKU): This key stores information about all users who have logged on to the computer.
HKEY_CURRENT_CONFIG (HKCC): This key stores information about the current hardware configuration of the computer.
For the most part, you will be modifying keys and values under the HKCU and HKLM root keys.
Registry keys are like folders containing other keys and values used to organize and group related settings.
For example, the HKEY_CURRENT_USER key contains settings for the current user account, such as a user’s desktop wallpaper, installed application preferences, and personal settings.
While keys are like folders, Registry values are the files stored within them, containing the specific settings for a particular key. They can have different data types, including text, numbers, and binary data.
There are several different types of registry value data types:
REG_SZ – A string value that contains text data, such as a username or folder path.
REG_DWORD – A numeric value that contains a 32-bit integer.
REG_QWORD – A numeric value that contains a 64-bit integer.
REG_BINARY – A value that contains binary data, such as an image or sound file.
REG_MULTI_SZ – A string value that contains multiple strings separated by null characters. This is often used for lists or arrays of values.
Each registry value type is used for a specific purpose, and understanding them can help you better manage and customize your Windows operating system.
Viewing Registry keys and values in the Windows Registry Editor Source: BleepingComputer
However, for the most part, when editing the Registry, you will be modifying REG_SZ values for text data and REG_DWORD for numeric data, as they are the most common data types used to stored user-editable data.
Using the Windows Registry Editor
The Windows Registry Editor is a software application created by Microsoft and built into all versions of Windows that allows you to edit the data in the Registry.
The Registry Editor application is located at C:\Windows\regedit.exe,and for the most part, requires administrative privileges to use it properly.
To open the Registry Editor, press the Windows key + R to open the Run dialog box. Next, type “regedit” in the search box and press Enter. If you are shown a prompt asking if you would like to allow the program to make changes, select ‘Yes‘ to continue.
When the Registry Editor is opened, you will see that the window is divided into two panes. The left pane displays a hierarchical tree structure of the Registry’s various keys (folders) and subkeys (subfolders).
The right pane displays the values and data associated with the selected key in the left pane.​
The Windows Registry Editor Source: BleepingComputer
To open a specific Registry key, use the left pane to navigate to the key you want to edit. Then expand a key and click on the plus sign (+) next to it.
To collapse a key, click the minus sign (-) next to it.
When you click on a key in the left pane, the values stored within it will be shown in the right pane.
Now that we know how to navigate the Windows Registry let’s learn how to modify data stored within it.
CREATE A NEW REGISTRY KEY
When configuring new settings in the Windows Registry, you may need to create a key at some point.
Use these steps to create a new key in the Registry:
Right-click on the key you want to create a new subkey under in the left pane.
Select New -> Key.
Enter a name for the new key and press Enter.
CREATING A REGISTRY VALUE
As Registry values contain the data that configure how an application or Windows works, it is common to need to create Registry values.
Use these steps to create a Registry value:
Navigate to the key where you want to create the value.
Right-click on the key and select “New” and then select the type of value you want to create. The kinds of values you can make are explained in the previous section.
Give the new value a name by typing it in the box that appears.
Double-click on the new value to edit its data.
Enter the desired value data and click OK.
RENAMING REGISTRY KEY
Sometimes you may need to rename a Registry value, such as when introducing a typo.
To rename a Registry key, please follow these steps:
Navigate to the key you want to rename.
Right-click the key and select Rename.
Enter the new name for the key in the editable field.
Click anywhere to save the changes.
RENAMING A REGISTRY VALUE
Sometimes you may need to rename a Registry value, such as when introducing a typo.
To rename a Registry value, please follow these steps:
Right-click the value you want to rename in the right pane and select Rename.
Enter the new name for the key in the editable field.
Click anywhere to save the changes.
EDITING REGISTRY VALUE DATA
To make changes to a Registry value, follow these steps:
Double-click on the value you want to edit in the right pane.
The Edit dialog box will appear.
Enter the new value for the key in the ‘Value data’ field.
Click OK to save your changes.
EXPORT A REGISTRY KEY
It is possible to export Registry keys and all their subkeys and values to a registry file.
A registry file ends with .reg, and when you double-click on one in Windows, it will import the data back into the Registry. Exporting a registry key helps create a backup before you make changes to the Registry.
Right-click on the key you want to export in the left pane.
Select Export.
Choose a location to save the exported key and give it a name.
Click Save.
IMPORT A REGISTRY KEY
If you had previously exported a key, you could import its data into the Registry by importing the file using these steps:
Click on File -> Import.
Navigate to the location where you saved the exported key.
Select the key file and click Open.
DELETE A REGISTRY KEY
If you need to delete a Registry key, use the following steps.
Right-click on the key you want to delete in the left pane.
Select ‘Delete‘from the context menu.
Confirm that you want to delete the key by clicking Yes.
Note: If you delete a key, all subkeys and values underneath them will be deleted too!
Note 2: You should only delete a registry key if you know it will not cause issues with your computer!
DELETE A REGISTRY VALUE
If you need to delete a Registry value, use the following steps.
Right-click on the value you want to delete in the right pane.
Select ‘Delete‘ from the context menu.
Confirm that you want to delete the value by clicking Yes.
Note: You should only delete a registry value if you know it will not cause issues with your computer
When done using the Registry Editor, you can close it by clicking on the X in the Window or clicking on File > Exit.
With these steps, you should now be able to use the Windows Registry Editor to navigate and edit the Registry.
However, it is vital to be careful when making changes to the Registry, as incorrect changes can cause severe problems with your system.
Researchers are warning of threat actors increasingly abusing the Cloudflare Tunnel service in malware campaigns that usually deliver remote access trojans (RATs).
This cybercriminal activity was frst detected in February and it is leveraging the TryCloudflare free service to distribute multiple RATs, including AsyncRAT, GuLoader, VenomRAT, Remcos RAT, and Xworm.
Campaigns attributed to the same activity cluster Source: Proofpoint
The Cloudflare Tunnel service allows proxying traffic through an encrypted tunnel to access local services and servers over the internet without exposing IP addresses. This should come with added security and convenience because there is no need to open any public inbound ports or to set up VPN connections.
With TryCloudflare, users can create temporary tunnels to local servers and test the service without the need of a Cloudflare account.
Each tunnel generates a temporary random subdomain on the trycloudflare.com domain, which is used to route traffic through Cloudflare’s network to the local server.
In a report today, cybersecurity company Proofpoint says that it observed malware activity targeting law, finance, manufacturing, and technology organizations with malicious .LNK files hosted on the legitimate TryCloudflare domain.
The threat actors are luring targets with tax-themed emails with URLs or attachments leading to the LNK payload. When launched, the payload runs BAT or CMD scripts that deploy PowerShell.
Two attack chains used in the campaign Source: Proofpoint
In the final stage of the attack, Python installers are downloaded for the final payload.
Proofpoint reports that the email distribution wave that started on July 11 has distributed over 1,500 malicious messages, while an earlier wave from May 28 contained less than 50 messages.
Malicious email sample Source: Proofpoint
Hosting LNK files on Cloudflare offers several benefits, including making the traffic appear legitimate due to the service’s reputation.
Moreover, the TryCloudflare Tunnel feature offers anonymity, and the LNK-serving subdomains are temporary, so blocking them does not help defenders too much.
Ultimately, the service is free and reliable, so the cybercriminals do not need to cover the cost of setting up their own infrastructure. If automation is employed to evade blocks from Cloudflare, the cybercriminals can abuse those tunnels even for large-scale operations.
BleepingComputer has reached Cloudflare for a comment on the activity reported by Proofpoint, and a company representative replied with the following statement:
Cloudflare immediately disables and takes down malicious tunnels as they are discovered by our team or reported on by third parties.
In the past few years, Cloudflare has introduced machine learning detections on our tunnel product in order to better contain malicious activity that may occur.
We encourage Proofpoint and other security vendors to submit any suspicious URLs and we will take action against any customers that use our services for malware.
Operating in ‘kernel-space’ – the most privileged layer of an operating system, with direct access to memory, hardware, resource management, and storage – is vitally important for security products. It enables them to monitor ‘user-space’ – the non-privileged environment where applications run – and protect against malware that executes in that environment, even when it tries to evade detection. But kernel access also allows security products to counter more insidious threats within the kernel itself. As we’ve reported previously, for example, some threat actors use BYOVD (Bring Your Own Vulnerable Driver) attacks, or attempt to get their own malicious drivers cryptographically signed, in order to access kernel-space and take advantage of that elevated level of access.
However, from a security standpoint, working in kernel-space comes with its own risks. A wrong step in this environment – such as a bad update to a kernel driver – can cause outages. If the driver in question starts at boot time, when the operating system first loads, that can lead to prolonged impacts, potentially requiring affected hosts to be started in a recovery mode to mitigate the problem and allow the machines to boot normally.
Sophos’ Intercept X Advanced product uses five kernel drivers as of release 2024.2. All drivers are extensively tested* with applicable flags enabled and disabled, and shipped with new flags disabled. (Sophos Intercept X and Sophos Central use feature flags to gradually enable new features. Feature flags are deployed through Sophos Central. New features are typically ‘guarded’ by feature flags – turned off unless the flag is enabled – so that the feature can be rolled out gradually and potentially revised before wider enablement.)
In this article, in the interests of transparency, we’ll explore what those drivers are, what they do, when they start, how they’re signed, and what their inputs are. We’ll also explore some of the safeguards we put in place around these drivers to minimize the risk of disruption (such as staged rollouts, as mentioned above; we provide an example of this later in the article), and the options available to customers when it comes to configuring them. It’s also worth noting that Intercept X Advanced and all its components, including the kernel drivers, has been part of an external bug bounty program since December 14, 2017; we welcome scrutiny via external bug bounty submissions, and we foster a culture of collaboration with the research community.
* ‘Testing’ refers to a range of internal testing, including Microsoft-provided tools and verifiers
Overview
The following table provides an at-a-glance overview of the five kernel drivers which are part of Intercept X Advanced release 2024.2.
Sophos ELAM driver: can prevent execution of malicious boot start drivers
SophosED.sys
3.3.0.1727
File System Driver
Boot Start
Yes
WHCP+
The main Sophos anti-malware driver
Sntp.sys
1.15.1121
Network Filter Driver
System Start
Yes
WHCP+
Sophos Network Threat Protection driver
Hmpalert.sys
3.9.4.990
File System Driver
System Start
Yes
WHCP+
Sophos HitmanPro.Alert driver
SophosZtnaTap.sys
9.24.6.3
Network Filter Driver
On Demand
Yes
WHCP+
Sophos Zero Trust Network Access (ZTNA) Tap driver
Table 1: An overview of the kernel drivers in Intercept X Advanced2024.2 * Microsoft Windows Early Launch Anti-malware Publisher + Microsoft Windows Hardware Compatibility Publisher
Figure 1: A conceptual depiction of user-space/kernel boundaries and where Intercept X Advanced components operate
SophosEL.sys
What it does: SophosEL.sys is the Sophos Early Launch Anti-Malware (ELAM) driver.
Inputs: This driver has one input – a blocklist of known-bad drivers which must be prevented from executing as boot start drivers at machine startup. This blocklist, located at the registry key below, is set by Sophos user-space threat detection logic when it detects a malicious driver. At the next boot cycle, SophosEL.sys ensures that this driver is not loaded.
Customer options: Customers can configure remediation and allowed items in the Threat Protection policy from Sophos Central.
Additional measures: Any Microsoft or Sophos-signed driver is exempt from cleanup/blocking.
SophosED.sys
What it does: SophosED.sys (Endpoint Defense) is a boot start driver, started during ELAM processing and before many other kernel drivers are loaded, Windows user-space is initialized, and the system drive is mounted. It has three broad responsibilities:
Providing tamper protection for the Sophos installation and configuration
Exposing system activity events to Sophos user-space components for protection and detection
Recording low-level system activity events to the Sophos Event Journals for after-the-fact forensics and analysis
Inputs: Since SophosED.sys starts before the filesystem is available, its entire configuration is provided through its service key. Note that all the below inputs are under HKLM\SYSTEM\CurrentControlSet\Services\Sophos Endpoint Defense.
* The configuration password is hashed with PBKDF2-SHA512 and a salt
System Activity Events inputs
The Sophos Central Threat Protection policy supports multiple configuration options, which Sophos user-space processes write to the SophosED.sys registry key, so that they’re available when the driver is loaded.
If a subkey exists with a DWORD value Enabled =1, event journals are enabled
DACLs; Sophos Tamper Protected
Customer options: Customers can configure disk limits and manage exclusions in Sophos Central Threat Protection policy.
Additional measures: If a driver facility is available (based on a combination of Customer Policy plus Sophos flag), then Sophos user-space processes can configure various parameters at runtime:
A bitmask of mitigations to apply per-process
What events to enable or disable for each process
The amount of time the driver should wait for a response from user-space (or whether it should be an asynchronous notification).
Sntp.sys
What it does: Sntp.sys (Sophos Network Threat Protection) is a kernel driver that registers for various Windows Filtering Platform events to intercept and potentially modify network flow data. Depending on features enabled by Sophos Central Threat Protection and Web Control policies, different filters and callouts are registered.
Inputs: Feature configuration is communicated to the driver from one or more of the following user mode processes:
SophosNtpService.exe
SophosNetFilter.exe
SophosIPS.exe
SSPService.exe
User-space processes communicate with the driver via the Windows Driver Framework, using IOCTLs, Read, and Write. Communications to and from the driver are protected, only accepting connections from authorized and authentic Sophos processes.
Customer options: The filter driver intercepts network traffic by browser and non-browser processes based on the policies defined in Sophos Central. Processing of the intercepted traffic is performed in user-space by SophosNetFilter.exe and SophosIPS.exe, which may send modified content back to the driver (for example, to display a block page for malicious content).
Additional measures: Customers can add individual sites to their allow or block list in Sophos Central.
Hmpalert.sys
What it does: Hmpalert.sys enforces Sophos CryptoGuard, which detects and prevents bulk encryption of files by ransomware. It also configures what exploit mitigations are enforced as processes are executed.
Inputs: Hmpalert.sys has a number of inputs, including several registry subkeys and IOCTLS.
Customer options: Customers can enable/disable exploit mitigations and manage exclusions in Sophos Central Threat Protection policy.
Additional measures: N/A
SophosZtnaTap.sys
What it does: SophosZtnaTap.sys is a Sophos-built OpenVPN TAP driver. If the customer deploys the Sophos Zero Trust Network Access (ZTNA) agent, the driver intercepts DNS lookups for managed applications, and redirects traffic for those applications to the applicable Sophos ZTNA gateways. ZTNA applications and gateways are configured through Sophos Central policies and stored in the registry.
Inputs: Inputs into SophosZtnaTap.sys are via a registry subkey.
Customer policy (ZTNA Applications, Gateways, and certificates)
DACLs; Sophos Tamper Protected
Customer options: Customers can manage their ZTNA-protected applications and gateways from Sophos Central.
Additional measures: N/A
Gradual deployment example: CryptoGuard ExFAT
Sophos CryptoGuard has protected against bulk encryption on permanent disks for over a decade. Intercept X version 2024.1.1 introduced a new feature, CryptoGuard ExFAT, which extends this protection to ExFAT partitions (typically found on removable USB drives).
CryptoGuard ExFAT development and testing took place in September 2023 through March 2024. This feature was guarded by the flag ‘hmpa.cryptoguard-exfat.available.’
Sophos Engineering ran the software internally with the flag enabled (our ‘Dogfood release’) starting March 22, 2024.
Intercept X version 2024.1.1 was released to Sophos, then to customers using our gradual software deployment process, between May 21, 2024 through June 6, 2024. At this stage the feature was still dormant for everyone apart from Sophos engineers.
The ’hmpa.cryptoguard-exfat.available’ flag was enabled using our gradual flag enablement process, between June 10, 2024 through June 26, 2024.
Customer control
Customers can select a fixed software version (Endpoint Software Management: Fixed-term support, Long-term support). This locks the software and flags until the customer selects a different software package. Customers who use the ‘Sophos recommended’ option receive new software periodically. Aside from software rollouts, they also receive gradual feature-flag enablements for new features in the software, as with a normal software release. Sophos has evolved this process to improve stability and avoid enabling new events globally for all customers.
Conclusion
Kernel drivers are fundamental to the Intercept X Advanced product – and to robust Windows endpoint security, in general – but we also acknowledge that operating in kernel-space is not without its risks.
In this article, we’ve walked through the kernel drivers in Intercept X Advanced (as of release 2024.02), what they do, how they’re signed, what their inputs are, the control customers have over their management, and additional safeguards we’ve put in place – including gradual, phased rollouts of new features, and exemptions to minimize the risk of disruption.
While no safeguard can ever eliminate risk altogether, we wanted to share the details of our drivers in the interests of transparency, and to explain in depth how we approach the complex problem of trying to protect our customers from threats, in as safe a manner as possible.
BitTorrent is often characterized as a decentralized file-sharing technology. However, its reliance on centralized indexes runs contrary to this idea. Over the years, several ‘indestructible’ alternatives have been proposed, including the relatively new Bitmagnet software. With Bitmagnet, people can run their own private BitTorrent index, relying on DHT and the BEP51 protocol.
When Bram Cohen released the first version of BitTorrent in 2002, it sparked a file-sharing revolution.
At the time bandwidth was a scarce resource, making it impossible to simultaneously share large files with millions of people over the Internet. BitTorrent not only thrived in that environment, the protocol remains effective even to this day.
BitTorrent transfers rely on peer-to-peer file-sharing without a central storage location. With updated additions to the protocol, such as the BitTorrent Distributed Hash Table (DHT), torrent files no longer require a tracker server either, making it decentralized by nature.
In theory, it doesn’t always work like that though. People who use BitTorrent, for research purposes or to grab the latest Linux distros, often use centralized search engines or indexes. If these go offline, the .torrent files they offer go offline too.
Decentralizing Torrents
This problem isn’t new and solutions have been around for quite a few years. There’s the University-sponsored Tribler torrent client, for example, and the BitTorrent protocol extension (BEP51), developed by ‘The 8472’, that also helps to tackle this exact problem.
BEP51 makes it possible to discover and collect infohashes through DHT, without the need for a central tracker. These infohashes can be converted to magnet links and when paired with relevant metadata, it’s possible to create a full BitTorrent index that easily rivals most centralized torrent sites.
Some centralized torrent sites, such as BTDigg, have already done just that. However, the beauty of the proposition involving DHT is that centralized sites are not required to act as search engines. With the right code, anyone can set up their own personalized and private DHT crawler, torrent index, and search engine.
Bitmagnet: A Private Decentralized Torrent Index
Bitmagnet is a relatively new self-hosted tool that does exactly that. The software, which is still in an early stage of development, was launched publicly a few months ago.
“The project aims to reduce reliance on public torrent sites that are prone to takedown and expose users to ads and malware,” Mike, the lead developer, tells us.
Those who know how to create a Docker container can have an instance up and running in minutes and for the privacy conscious, the docker-compose file on GitHub supports VPNs via Gluetun. Once Bitmagnet is up and running, it starts collecting torrent data from DHT, neatly classifies what it finds, and makes everything discoverable through its own search engine.Bitmagnet UI
Decentralization is just one of the stated advantages. The developer was also positively surprised by the sheer amount of content that was discovered and categorized through Bitmagnet. This easily exceeds the libraries of most traditional torrent sites.
“Run it for a month and you’ll have a personal index and search engine that dwarfs the popular torrent websites, and includes much content that can often only be found on difficult-to-join private trackers,” Mike tells us.
After running the software for four months, the developer now has more than 12 million indexed torrents. However, other users with more bandwidth and better connections have many more already. This also brings us to one of the main drawbacks; a lack of curation.
Curation
Unlike well-moderated torrent sites, Bitmagnet adds almost any torrent it finds to its database. This includes mislabeled files, malware-ridden releases, and potentially illegal content. The software tries to limit abuse by filtering metadata for CSAM content, however.
There are plans to add more curation by adding support for manual postings and federation. That would allow people with similar interests to connect, acting more like a trusted community. However, this is still work in progress.
Another downside is that it could take longer to index rare content, as it has to be discovered first. Widely shared torrents tend to distribute quickly over DHT, but rare releases will take much longer to be picked up. In addition, users may occasionally stumble upon dead or incomplete torrents.
Thus far, these drawbacks are not stopping people from trying the software.
While Bitmagnet is only out as an “alpha” release it’s getting plenty of interest. The Docker image has been downloaded nearly 25k times and the repository has been starred by more than a thousand other developers so far.
Caution is Advised!
Mike doesn’t know how many people are running an instance or how they’re using them. Bitmagnet is designed and intended for people to run on their own computer and network, but people could turn it into a public-facing search engine as well.
Running a public search engine comes with legal risks of course. Once there’s serious traffic, that will undoubtedly alert anti-piracy groups.
Even those who use the software privately to download legitimate content might receive complaints. By crawling the DHT, the software presents itself as a torrent client. While it doesn’t download any content automatically, some rudimentary anti-piracy tracking tools might still (incorrectly) flag this activity.
There are no examples of this happening at the moment, but the potential risk is why Bitmagnet advises users to opt for VPN routing.
Impossible to Shut Down
All in all, Bitmagnet is an interesting tool that uses some of BitTorrent’s underutilized powers, which have become increasingly rare in recent years.
The idea behind Bitmagnet is similar to Magnetico, which first came out in 2017. While that no longer appears to be actively maintained, it remains available on GitHub. During these years, we haven’t seen any takedown notices targeting the software.
Mike hopes that his project will be spared from copyright complaints too. The developer sees it simply as a content-neutral tool, much like a web browser.
“I hope that the project is immune from such issues, because the source code contains no copyright infringing material. How people choose to use the app is up to them – if you access copyrighted content using a web browser or BitTorrent client, that does not make the vendors of those apps liable.”
“Bitmagnet cannot be ‘taken down’ – even if the GitHub repository were threatened by an illegitimate takedown request, the code can easily be hosted elsewhere,” Mike concludes.
Researchers from Delft University of Technology plan to amplify their BitTorrent client “Tribler” with decentralized AI-powered search. A new demo shows that generative AI models make it possible to search for content in novel ways, without restriction. The ultimate goal of the research project is to shift the Internet’s power balance from governments and large corporations back to consumers.
Twenty-five years ago, peer-to-peer file-sharing took the Internet by storm.
The ability to search for and share content with complete strangers was nothing short of a revolution.
In the years that followed, media consumption swiftly moved online. This usually involved content shared without permission, but pirate pioneers ultimately paved the way for new business models.
The original ‘pirate’ ethos has long since gone. There are still plenty of unauthorized sites and services, but few today concern themselves with decentralization and similar technical advances; centralized streaming is the new king with money as the main motivator.
AI Meets BitTorrent
There are areas where innovation and technological progress still lead today, mostly centered around artificial intelligence. Every month, numerous new tools and services appear online, as developers embrace what many see as unlimited potential.
How these developments will shape the future is unknown, but they have many rightsholders spooked. Interestingly, an ‘old’ research group, that was already active during BitTorrent’s heyday, is now using AI to amplify its technology.
Researchers from the Tribler research group at Delft University of Technology have been working on their Tribler torrent client for nearly two decades. They decentralized search, removing the need for torrent sites, and implemented ‘anonymity‘ by adding an onion routing layer to file transfers.
Many millions of euros have been spent on the Tribler research project over the years. Its main goal is to advance decentralized technology, not to benefit corporations, but to empower the public at large.
“Our entire research portfolio is driven by idealism. We aim to remove power from companies, governments, and AI in order to shift all this power to self-sovereign citizens,” the Tribler team explains.
Decentralized AI-powered Search
While not every technological advancement has been broadly embraced, yet, Tribler has just released a new paper and a proof of concept which they see as a turning point for decentralized AI implementations; one that has a direct BitTorrent link.
The scientific paper proposes a new framework titled “De-DSI”, which stands for Decentralised Differentiable Search Index. Without going into technical details, this essentially combines decentralized large language models (LLMs), which can be stored by peers, with decentralized search.
This means that people can use decentralized AI-powered search to find content in a pool of information that’s stored across peers. For example, one can ask “find a magnet link for the Pirate Bay documentary,” which should return a magnet link for TPB-AFK, without mentioning it by name.
This entire process relies on information shared by users. There are no central servers involved at all, making it impossible for outsiders to control.
Endless Possibilities, Limited Use
While this sounds exciting, the current demo version is not yet built into the Tribler client. Associate Professor Dr. Johan Pouwelse, leader of the university’s Tribler Lab, explains that it’s just a proof of concept with a very limited dataset and AI capabilities.
“For this demo, we trained an end-to-end generative Transformer on a small dataset that comprises YouTube URLs, magnet links, and Bitcoin wallet addresses. Those identifiers are each annotated with a title and represent links to movie trailers, CC-licensed music, and BTC addresses of independent artists,” Pouwelse says.
We tried some basic searches with mixed results. That makes sense since there’s only limited content, but it can find magnet links and videos without directly naming the title. That said, it’s certainly not yet as powerful as other AI tools.
In essence, De-DSI operates by sharing the workload of training large language models on lists of document identifiers. Every peer in the network specializes in a subset of data, which other peers in the network can retrieve to come up with the best search result.
A Global Human Brain to Fight Torrent Spam and Censors
The proof of concept shows that the technology is sound. However, it will take some time before it’s integrated into the Tribler torrent client. The current goal is to have an experimental decentralized-AI version of Tribler ready at the end of the year.
While the researchers see this as a technological breakthrough, it doesn’t mean that things will improve for users right away. AI-powered search will be slower to start with and, if people know what they’re searching for, it offers little benefit.
Through trial and error, the researchers ultimately hope to improve things though, with a “global brain” for humanity as the ultimate goal.
Most torrent users are not looking for that, at the moment, but Pouwelse says that they could also use decentralized machine learning to fight spam, offer personal recommendations, and to optimize torrent metadata. These are concrete and usable use cases.
The main drive of the researchers is to make technology work for the public at large, without the need for large corporations or a central government to control it.
“The battle royale for Internet control is heating up,” Pouwelse says, in a Pirate Bay-esque fashion.
“Driven by our idealism we will iteratively take away their power and give it back to citizens. We started 18 years ago and will take decades more. We should not give up on fixing The Internet, just because it is hard.”
The very limited De-DSI proof of concept and all related code is available on Huggingface. All technological details are available in the associated paper. The latest Tribler version, which is fully decentralized without AI, can be found on the official project page.
Attackers can hide their attempts to execute malicious code by inserting commands into the machine code stored in memory by the software interpreters used by many programming languages, such as VBScript and Python, a group of Japanese researchers will demonstrate at next week’s Black Hat USA conference.
Interpreters take human-readable software code and translate each line into bytecode — granular programming instructions understood by the underlying, often virtual, machine. The research team successfully inserted malicious instructions into the bytecode held in memory prior to execution, and because most security software does not scan bytecode, their changes escaped detection.
The technique could allow attackers to hide their malicious activity from most endpoint security software. Researchers from NTT Security Holdings Corp. and the University of Tokyo will demonstrate the capability at Black Hat using the VBScript interpreter, says Toshinori Usui, research scientist with NTT Security. The researchers have already confirmed that the technique also works for inserting malicious code in the in-memory processes of both the Python and the Lua interpreters.
“Malware often hides its behavior by injecting malicious code into benign processes, but existing injection-type attacks have characteristic behaviors … which are easily detected by security products,” Usui says. “The interpreter does not care about overwriting by a remote process, so we can easily replace generated bytecode with our malicious code — it’s that feature we exploit.”
Bytecode attacks are not necessarily new, but they are relatively novel. In 2018, a group of researchers from the University of California at Irvine published a paper, “Bytecode Corruption Attacks Are Real — And How to Defend Against Them,” introducing bytecode attacks and defenses. Last year, the administrators of the Python Package Index (PyPI) removed a malicious package, known as fshec2, which escaped initial detection because all its malicious code was compiled as bytecode. Python compiles its bytecode into PYC files, which can be executed by the Python interpreter.
“It may be the first supply chain attack to take advantage of the fact that Python byte code (PYC) files can be directly executed, and it comes amid a spike in malicious submissions to the Python Package Index,” Karlo Zanki, reverse engineer at ReversingLabs, said in a June 2023 analysis of the incident. “If so, it poses yet another supply chain risk going forward, since this type of attack is likely to be missed by most security tools, which only scan Python source code (PY) files.”
Going Beyond Precompiled Malware
After an initial compromise, attackers have a few options to expand their control of a targeted system: They can perform reconnaissance, try to further compromise the system using malware, or run tools already existing on the system — the so-called strategy of “living off the land.”
The NTT researchers’ variation of bytecode attack techniques essentially falls into the last category. Rather than using pre-compiled bytecode files, their attack — dubbed Bytecode Jiu-Jitsu — involves inserting malicious bytecode into the memory space of a running interpreter. Because most security tools do not look at bytecode in memory, the attack is able to hide the malicious commands from inspection.
The approach allows attacker to skip other more obviously malicious steps, such as calling suspicious APIs to create threads, allocating executable memory, and modifying instruction pointers, Usui says.
“While native code has instructions directly executed by the CPU, bytecode is just data to the CPU and is interpreted and executed by the interpreter,” he says. “Therefore, unlike native code, bytecode does not require execution privilege, [and our technique] does not need to prepare a memory region with execution privilege.”
Better Interpreter Defenses
Developers of interpreters, security-tools developers, and operating-system architects can all have some impact on the problem. While attacks targeting bytcode do not exploit vulnerabilities in interpreters, but rather the way that they execute code, certain security modifications such as pointer checksums could mitigate the risk, according to the UC Irvine paper.
The NTT Security researchers noted that checksum defenses would not likely be effective against their techniques and recommend that developers enforce write protections to help eliminate the risk. “The ultimate countermeasure is to restrict the memory write to the interpreter,” Usui says.
The purpose of presenting a new attack technique is to show security researchers and defenders what could be possible, and not to inform attackers’ tactics, he stresses. “Our goal is not to abuse defensive tactics, but to ultimately be an alarm bell for security researchers around the world,” he says.
China-linked advanced persistent threat group APT41 appears to have compromised a government-affiliated institute in Taiwan that conducts research on advanced computing and associated technologies.
The intrusion began in July 2023, with the threat actor gaining initial access to the victim environment via undetermined means. Since then, it has deployed multiple malware tools, including the well-known ShadowPad remote access Trojan (RAT), the Cobalt Strike post compromise tool, and a custom loader for injecting malware using a 2018 Windows remote code execution vulnerability (CVE-2018-0824).
APT41 is an attribution that several vendors use to track a loose collective of China-nexus threat groups that have been engaged in a broad range of cyber espionage and financially motivated cyberattacks around the world, going back to 2012. Members of the group such as Wicked Panda, Winnti, Barium, and SuckFly have plundered and pillaged trade secrets, intellectual property, and other sensitive data from organizations in the US and multiple other countries in recent years.
Most recently, Mandiant reported observing members of the group targeting global shipping and logistics companies and organizations in the technology, entertainment, and automotive sectors. The US government indicted several members of the Chengdu-based APT41 in 2020, though that has done little slow it down.
Academic Research: A Valuable Cyber Target
Researchers at Cisco Talos discovered the intrusion when investigating abnormal activity involving attempts to download and execute PowerShell scripts in the Taiwan research institute’s network environment last year.
“The nature of research-and-development work carried out by the entity makes it a valuable target for threat actors dedicated to obtaining proprietary and sensitive technologies of interest to them,” Talos researchers Joey Chen, Ashley Shen, and Vitor Ventura said in a report this week. Over the course of the intrusion, APT41 actors broke into three systems in the target environment and stole at least some documents from there, they said.
ShadowPad is malware that researchers first discovered embedded in the source code of NetSarang Computer’s Xmanager server management software back in 2017. That supply chain attack impacted several NetSarang customers in the APAC region. Initially, researchers believed that APT41 was the sole user of the backdoor. Over the years however, they have identified multiple groups — all of them China-linked — that have used the RAT in numerous cyber-espionage campaigns and software supply chain attacks.
With the attack on the Taiwanese research institute, APT41 used two different ShadowPad iterations — one that leveraged a previously known packing mechanism called “ScatterBee,” and another that used an outdated and vulnerable version of Microsoft Input Method Editors (IME), the Cisco Talos researchers said.
ShadowPad & Cobalt Strike Anchor Espionage Effort
The attackers used ShadowPad to run commands for mapping out the victim network, collecting data on hosts, and trying to find other exploitable systems on the same network. Cisco Talos also found the APT harvesting passwords and user credentials stored in Web browsers from the compromised environment, using tools such as Mimikatz and WebBrowserPassView.
“From the environment the actor executes several commands, including using ‘net,’ ‘whoami,’ ‘quser,’ ‘ipconfig,’ ‘netstat,’ and ‘dir’ commands to obtain information on user accounts, directory structure, and network configurations from the compromised systems,” the researchers said. “In addition, we also observed query to the registry key to get the current state of software inventory collection on the system.”
As part of their attack chain, the threat actors also deployed the Cobalt Strike post compromise tool on the victim network using a loader they cloned from a GitHub project. It’s designed to evade antivirus detection tools.
“It’s important to highlight that this Cobalt Strike beacon shellcode used steganography to hide in a picture and executed by this loader,” the researchers said. “In other words, its download, decryption, and execution routines all happen in runtime in memory.”
A Fortune 50 company paid $75 million to its cyberattackers earlier this year, greatly exceeding any other confirmed ransom payment in history. The beneficiary of the payout is an outfit called Dark Angels. And Dark Angels isn’t just effective — in some ways, the gang turns so much of what we thought we knew about ransomware on its head.
Sure, there have been other big amounts forked over in the past: In 2021, Illinois-based CNA Financial was reported to have paid a then unprecedented $40 million ransom in order to restore its systems after a ransomware attack (the company never confirmed that figure). Later that year, the meat manufacturer JBS admitted to paying $11 million to end a disruption affecting its factories. Caesars Palace last year paid $15 million to make its ransomware disruption problems go away.
But those figures pale in comparison against the $75 million in equivalent Bitcoin paid by the aforementioned large organization, which Zscaler chose to keep anonymous in its 2024 annual ransomware report, where the payout was first recorded. The dollar amount has also been corroborated by Chainalysis.
Meet the Dark Angels
Dark Angels first appeared in the wild in May 2022. Ever since, its specialty has been defeating fewer but higher-value targets than its ransomware brethren. Past victims have included multiple S&P 500 companies spread across varied industries: healthcare, government, finance, education, manufacturing, telecommunications, and more.
For example, there was its headline-grabbing attack on the megalith Johnson Controls International (JCI) last year. It breached the company’s VMware ESXi hypervisors, freezing them with Ragnar Locker and stealing a reported 27 terabytes worth of data. The ransom demand: $51 million. It’s unclear how Johnson Controls responded but, considering its $27 million-plus cleanup effort, it’s likely that the company did not cave.
$27 million would have been the second-largest ransom payment in recorded history at the time (after the reported CNA payment). But there’s evidence to suggest that this wasn’t just some outlandish negotiating tactic — that Dark Angels has good reason to think it can pull off that kind of haul.
Dark Angels Does Ransomware Differently
Forget everything you know about ransomware, and you’ll start to understand Dark Angels.
Against the grain, the group does not operate a ransomware-as-a-service business. Nor does it have its own malware strain — it prefers to borrow encryptors like Ragnar Locker and Babuk.
Its success instead comes down to three primary factors. First: the extra care it can take by attacking fewer, higher-yielding targets.
Second is its ability to exfiltrate gobs of sensitive data. As Brett Stone-Gross, senior director of threat intelligence at Zscaler explains, “If you look at a lot of these other ransomware groups, their affiliates are stealing maybe a few hundred gigabytes of data. Sometimes even less than 100 gigabytes of data. They usually top out around, maybe, one terabyte or so. In contrast, Dark Angels are stealing tens of terabytes of data.”
In that, Dark Angels differs only in degree, not in kind. Where it really separates itself from other groups is in its subtlety. Its leak site isn’t flashy. It doesn’t make grand pronouncements about its latest victims. Besides the obvious operational security benefits to stealth (it’s largely escaped media scrutiny in recent years, despite pulling off major breaches), its aversion to the limelight also helps it earn larger returns on investment.
For example, the group often avoids encrypting victims’ data, with the express purpose of allowing them to continue to operate without disruption. This seems to defy common wisdom. Surely the threat of downtime and media scrutiny are effective tools to get victims to pay up?
“You would think that, but the results say otherwise,” Stone-Gross suggests.
Dark Angels makes paying one’s ransom easy and quiet — an attractive prospect for companies that just want to put their breaches behind them. And avoiding business disruption is mutually beneficial: Without the steep bills associated with downtime, companies have more money to pay Dark Angels.
Can Dark Angels’ Wings Be Clipped?
In its report, Zscaler predicted “that other ransomware groups will take note of Dark Angels’ success and may adopt similar tactics, focusing on high value targets and increasing the significance of data theft to maximize their financial gains.”
If that should come to pass, companies will face much steeper, yet more compelling ransom demands. Luckily, Dark Angels’ approach has an Achilles’ heel.
“If it’s a terabyte of data, [a hacker] can probably complete that transfer in several days. But when you’re talking terabytes — you know, tens of terabytes of data — now you’re talking weeks,” Stone-Gross notes. So, companies that can catch Dark Angels in the act may be able to stop them before it’s too late.
The U.S. Department of Justice (DoJ), along with the Federal Trade Commission (FTC), filed a lawsuit against popular video-sharing platform TikTok for “flagrantly violating” children’s privacy laws in the country.
The agencies claimed the company knowingly permitted children to create TikTok accounts and to view and share short-form videos and messages with adults and others on the service.
They also accused it of illegally collecting and retaining a wide variety of personal information from these children without notifying or obtaining consent from their parents, in contravention of the Children’s Online Privacy Protection Act (COPPA).
TikTok’s practices also infringed a 2019 consent order between the company and the government in which it pledged to notify parents before collecting children’s data and remove videos from users under 13 years old, they added.
COPPA requires online platforms to gather, use, or disclose personal information from children under the age of 13, unless they have obtained consent from their parents. It also mandates companies to delete all the collected information at the parents’ request.
“Even for accounts that were created in ‘Kids Mode‘ (a pared-back version of TikTok intended for children under 13), the defendants unlawfully collected and retained children’s email addresses and other types of personal information,” the DoJ said.
“Further, when parents discovered their children’s accounts and asked the defendants to delete the accounts and information in them, the defendants frequently failed to honor those requests.”
The complaint further alleged the ByteDance-owned company subjected millions of children under 13 to extensive data collection that enabled targeted advertising and allowed them to interact with adults and access adult content.
It also faulted TikTok for not exercising adequate due diligence during the account creation process by building backdoors that made it possible for children to bypass the age gate aimed at screening those under 13 by letting them sign in using third-party services like Google and Instagram and classifying such accounts as “age unknown” accounts.
“TikTok human reviewers allegedly spent an average of only five to seven seconds reviewing each account to make their determination of whether the account belonged to a child,” the FTC said, adding it will take steps to protect children’s privacy from firms that deploy “sophisticated digital tools to surveil kids and profit from their data.”
TikTok has more than 170 million active users in the U.S. While the company has disputed the allegations, it’s the latest setback for the video platform, which is already the subject of a law that would force a sale or a ban of the app by early 2025 because of national security concerns. It has filed a petition in federal court seeking to overturn the ban.
“We disagree with these allegations, many of which relate to past events and practices that are factually inaccurate or have been addressed,” TikTok said. “We offer age-appropriate experiences with stringent safeguards, proactively remove suspected underage users, and have voluntarily launched features such as default screen time limits, Family Pairing, and additional privacy protections for minors.”
The social media platform has also faced scrutiny globally over child protection. European Union regulators handed TikTok a €345 million fine in September 2023 for violating data protection laws in relation to its handling of children’s data. In April 2023, it was fined £12.7 million by the ICO for illegally processing the data of 1.4 million children under 13 who were using its platform without parental consent.
The lawsuit comes as the U.K. Information Commissioner’s Office (ICO) revealed it asked 11 media and video-sharing platforms to improve their children’s privacy practices or risk facing enforcement action. The names of the offending services were not disclosed.
“Eleven out of the 34 platforms are being asked about issues relating to default privacy settings, geolocation or age assurance, and to explain how their approach conforms with the [Children’s Code],” it said. “We are also speaking to some of the platforms about targeted advertising to set out expectations for changes to ensure practices are in line with both the law and the code.”
Cybersecurity researchers have disclosed details of a new distributed denial-of-service (DDoS) attack campaign targeting misconfigured Jupyter Notebooks.
The activity, codenamed Panamorfi by cloud security firm Aqua, utilizes a Java-based tool called mineping to launch a TCP flood DDoS attack. Mineping is a DDoS package designed for Minecraft game servers.
Attack chains entail the exploitation of internet-exposed Jupyter Notebook instances to run wget commands for fetching a ZIP archive hosted on a file-sharing site called Filebin.
The ZIP file contains two Java archive (JAR) files, conn.jar and mineping.jar, with the former used to establish connections to a Discord channel and trigger the execution of the mineping.jar package.
“This attack aims to consume the resources of the target server by sending a large number of TCP connection requests,” Aqua researcher Assaf Morag said. “The results are written to the Discord channel.”
The attack campaign has been attributed to a threat actor who goes by the name yawixooo, whose GitHub account has a public repository containing a Minecraft server properties file.
This is not the first time internet-accessible Jupyter Notebooks have been targeted by adversaries. In October 2023, a Tunisian threat dubbed Qubitstrike was observed breaching Jupyter Notebooks in an attempt to illicitly mine cryptocurrency and breach cloud environments.
Free Download Burp Suite Professional for Windows PC is a reliable and practical platform that provides a simple means of performing security testing of web applications.
It gives you complete control, combining advanced manual techniques with various tools that seamlessly support the entire testing process.
Burp Suite Professional Overview
Burp Suite Professional is easy-to-use and intuitive and does not require you to perform advanced actions to analyze, scan and exploit web apps. It is highly configurable and has useful features to assist experienced testers with their work.
The main window displays all the available tools you can choose from and set each one’s settings the way you want. The application is designed to work alongside your browser and functions as an HTTP proxy; thus, all the HTTP/s traffic from your browser passes through the utility. If you want to perform any testing, you need to configure the browser to work with it.
Features of Burp Suite Professional
Coverage of over 100 generic vulnerabilities
Cutting-edge web application crawler accurately maps content and functionality.
Burp Scanner includes a full JavaScript analysis engine
Detect server-side vulnerabilities that are completely invisible
Project files to save your work incrementally in real-time
Export beautifully formatted HTML reports of discovered vulnerabilities.
Configuration library to quickly launch targeted scans with different settings.
Optionally report all reflected and stored inputs.
Burp Proxy allows manual testers to intercept all requests and responses
HTML5 WebSockets messages are intercepted and logged to a separate history
The Decoder tool lets you convert data between common encoding schemes and formats used on the modern web.
Clickbait tool generates working clickjacking attacks against vulnerable application functions.
Burp helps eliminate browser security warnings.
Burp supports invisible proxying for non-proxy-aware clients
System Requirements and Technical Details
Supported OS: Windows 11 / Windows 10 / Windows 8.1 / Windows 7
Processor: Multi-core Intel Series or above, Xeon or AMD equivalent
Free Download PrivacyRoot Secure Delete Professional full version standalone offline installer for Windows; it is an effective tool to erase files and folders securely.
Overview of Secure Delete Professional
This is a straightforward but very effective tool to erase files and folders securely. After using this tool, selected files and folders will not be available for recovery. We have attached several security options to choose the level of security you need (this reflects the processing speed).
You can use this application in 3 ways. First, you can securely drag and drop files or folders you want to delete to the software’s main window.
Moreover, you can choose the needed files or folders by clicking the “Add files” link. Or, the third way, you can click any file or folder in Windows Explorer, and in the popup menu, choose “Send to” and choose “Secure Deleter.” That’s easy!
Features of Secure Delete Professional
Securely erases files
Convenient interface
Security guaranteed
Light on resources
Technical Details and System Requirements
Supported OS: Windows 11, Windows 10, Windows 8.1, Windows 7
Free Download Heidi Eraser latest version standalone offline installer for Windows; it removes sensitive data by overwriting it several times.
Overview of Eraser
This program is an advanced security tool for Windows that allows you to remove sensitive data from your hard drive by overwriting it several times with carefully selected patterns.
It is currently supported under Windows XP (with Service Pack 3), Windows Server 2003 (with Service Pack 2), Windows Vista, Windows Server 2008, Windows 7, 8, 10 and Windows Server 2012, 2016.
Features of Eraser
Erases residue from deleted files
Erases MFT and MFT-resident files (for NTFS volumes) and Directory Indices (for FAT)
Free Download Fort Firewall’s latest version standalone offline installer for Windows. It is a simple firewall for Windows with lots of rich features.
Overview of Fort Firewall
Protecting your computer against threats on the internet usually means one has to filter internet access more strictly. What better way to do that if not by using a firewall? Windows comes packed with a firewall by default.
If you’re not satisfied with it and are looking for more ways to control and monitor your PC’s access to the internet, Fort Firewall could be one particular way to go.
As far as its features are concerned, you get the complete package. Start with filtering content by network addresses or grouping the apps on your PC. Limit internet access and speed or usage for specific applications.
Features of Fort Firewall
Filter by network addresses, application groups
Support wildcards in program path names
Application group speed limits
Stores traffic statistics
Graphical display of bandwidth
Based on the Windows Filtering Platform (WFP)
Technical Details and System Requirements
Supported OS: Windows 11, Windows 10, Windows 8.1, Windows 7
Free Download Antivirus Live CD full version standalone offline installer for Windows. It is an official 4MLinux fork, including the ClamAV scanner.
Overview of Antivirus Live CD
This software helps you protect your computer against viruses. It’s designed for users who need a lightweight live CD, which will help them to protect their computers against viruses. It automatically updates its virus signature databases by using ethernet, WiFi, PPP, and PPPoE.
All partitions are mounted during the boot process to be scanned by ClamAV. The Antivirus Live CD ISO images are fully compatible with UNetbootin, which can be used to create an easy-to-use Antivirus Live USB.
Features of Antivirus Live CD
An official 4MLinux fork
Including ClamAV scanner
A lightweight live CD
Protect computers against viruses
Fully compatible with UNetbootin
Technical Details and System Requirements
Supported OS: Windows 11, Windows 10, Windows 8.1, Windows 7
Free Download InterCrypto Advanced Encryption Package for Windows PC. It is a robust software solution designed to secure your confidential documents. With a range of powerful encryption algorithms, this tool ensures your sensitive data remains protected from unauthorized access. Whether dealing with personal files or professional documents, this package offers advanced security features to keep your information safe.
Overview of InterCrypto Advanced Encryption Package
It is designed for those who prioritize data security. It employs a variety of robust encryption algorithms to provide comprehensive protection for your files. This tool is essential for anyone needing to secure sensitive information against potential threats.
Powerful Encryption Algorithms
It stands out due to its use of multiple encryption algorithms. It supports well-known standards such as AES (Advanced Encryption Standard), Blowfish, Twofish, GOST, and Serpent. Each algorithm offers a unique level of security, making it possible to tailor the encryption process to your specific needs.
AES Encryption: AES is renowned for its strong security and efficiency. It is widely used for encrypting sensitive data and is a standard in the industry.
Blowfish Encryption: Known for its speed and effectiveness, Blowfish is a versatile encryption algorithm suitable for various applications.
Twofish Encryption: As a successor to Blowfish, Twofish provides enhanced security features and is ideal for encrypting larger data sets.
GOST Encryption: This Russian encryption standard is notable for its robustness and is used in various government and military applications.
Serpent Encryption: Offering a high level of security, Serpent is known for its resistance to cryptanalysis.
User-Friendly Interface
Despite its advanced features, the tool has a user-friendly interface. It allows beginners and experienced users to navigate its functions easily, ensuring you can encrypt and decrypt files without extensive technical knowledge.
File Encryption and Decryption
With this software, encrypting and decrypting files is straightforward. Users can select individual files or entire directories for encryption. The decryption process is equally simple, making it easy to access your data when needed. This functionality ensures that you can manage your encrypted files efficiently.
Customization Options
One critical feature of the tool is its customization options. You can choose various encryption algorithms and settings to match your security requirements. This flexibility allows you to adjust the protection level based on your data’s sensitivity.
Compatibility and Performance
The software is compatible with various Windows operating systems, ensuring broad accessibility. It performs efficiently, even with large files, without causing significant delays, making it suitable for personal and professional use.
Free Hard Disk Space: 200MB or more is recommended
Conclusion
InterCrypto Advanced Encryption Package is a powerful tool for securing sensitive data. Its array of strong encryption algorithms and user-friendly interface offer robust protection and ease of use. This software ensures your confidential documents remain safe from unauthorized access, whether for personal or professional purposes.
Tens of thousands of cameras have failed to patch a critical, 11-month-old CVE, leaving thousands of organizations exposed.
New research indicates that over 80,000 Hikvision surveillance cameras in the world today are vulnerable to an 11 month-old command injection flaw.
Hikvision – short for Hangzhou Hikvision Digital Technology – is a Chinese state-owned manufacturer of video surveillance equipment. Their customers span over 100 countries (including the United States, despite the FCC labeling Hikvision “an unacceptable risk to U.S. national security” in 2019).
Last Fall, a command injection flaw in Hikvision cameras was revealed to the world as CVE-2021-36260. The exploit was given a “critical” 9.8 out of 10 rating by NIST.
Despite the severity of the vulnerability, and nearly a year into this story, over 80,000 affected devices remain unpatched. In the time since, the researchers have discovered “multiple instances of hackers looking to collaborate on exploiting Hikvision cameras using the command injection vulnerability,” specifically in Russian dark web forums, where leaked credentials have been put up for sale.
The extent of the damage done already is unclear. The authors of the report could only speculate that “Chinese threat groups such as MISSION2025/APT41, APT10 and its affiliates, as well as unknown Russian threat actor groups could potentially exploit vulnerabilities in these devices to fulfill their motives (which may include specific geo-political considerations).”
The Risk in IoT Devices
With stories like this, it’s easy to ascribe laziness to individuals and organizations that leave their software unpatched. But the story isn’t always so simple.
According to David Maynor, senior director of threat intelligence at Cybrary, Hikvision cameras have been vulnerable for many reasons, and for a while. “Their product contains easy to exploit systemic vulnerabilities or worse, uses default credentials. There is no good way to perform forensics or verify that an attacker has been excised. Furthermore, we have not observed any change in Hikvision’s posture to signal an increase in security within their development cycle.”
A lot of the problem is endemic to the industry, not just Hikvision. “IoT devices like cameras aren’t always as easy or straightforward to secure as an app on your phone,” Paul Bischoff, privacy advocate with Comparitech, wrote in a statement via email. “Updates are not automatic; users need to manually download and install them, and many users might never get the message. Furthermore, IoT devices might not give users any indication that they’re unsecured or out of date. Whereas your phone will alert you when an update is available and likely install it automatically the next time you reboot, IoT devices do not offer such conveniences.”
While users are none the wiser, cybercriminals can scan for their vulnerable devices with search engines like Shodan or Censys. The problem can certainly be compounded with laziness, as Bischoff noted, “by the fact that Hikvision cameras come with one of a few predetermined passwords out of the box, and many users don’t change these default passwords.”
Between weak security, insufficient visibility and oversight, it’s unclear when or if these tens of thousands of cameras will ever be secured.
Lockbit is by far this summer’s most prolific ransomware group, trailed by two offshoots of the Conti group.
After a recent dip, ransomware attacks are back on the rise. According to data released by NCC Group, the resurgence is being led by old ransomware-as-a-service (RaaS) groups.
With data gathered by “actively monitoring the leak sites used by each ransomware group and scraping victim details as they are released,” researchers have determined that Lockbit was by far the most prolific ransomware gang in July, behind 62 attacks. That’s ten more than the month prior, and more than twice as many as the second and third most prolific groups combined. “Lockbit 3.0 maintain their foothold as the most threatening ransomware group,” the authors wrote, “and one with which all organizations should aim to be aware of.”
Those second and third most prolific groups are Hiveleaks – 27 attacks – and BlackBasta – 24 attacks. These figures represent rapid rises for each group – since June, a 440 percent rise for Hiveleaks, and a 50 percent rise for BlackBasta.
It may well be that the resurgence in ransomware attacks, and the rise of these two particular groups, are intimately connected.
Why Ransomware Has Bounced
Researchers from NCC Group counted 198 successful ransomware campaigns in July – up 47 percent from June. Sharp as that incline may be, it still falls some ways short of the high-water mark set this Spring, with nearly 300 such campaigns in both March and April.
Why the Flux?
Well, in May, the United States government ramped up its efforts against Russian cybercrime by offering up to $15 million for prized information about Conti, then the world’s foremost ransomware gang. “It is likely that the threat actors that were undergoing structural changes,” the authors of the report speculated, “and have begun settling into their new modes of operating, resulting in their total compromises increasing in conjunction.”
Hiveleaks and BlackBasta are the result of that restructuring. Both groups are “associated with Conti,” the authors noted, Hiveleaks as an affiliate and BlackBasta as a replacement strain. “As such, it appears that it has not taken long for Conti’s presence to filter back into the threat landscape, albeit under a new identity.”
Now that Conti’s properly split in two, the authors speculated, “it would not be surprising to see these figures further increase as we move into August.”
To exploit the vulnerabilities so they can then be repaired, ethical hacking identifies weaknesses in computer systems or networks. Hackers exploit a range of methodologies to identify dangers and eventually enhance safety. They can break into networks or computers using Linux-based operating systems. To stop cybersecurity threats, there are various applications. The field of hacking is highly broad and includes a wide range of activities.
In the modern cyber world, several types of attacks take place per hour. A hacking operating system is the most fundamental tool needed by any hacker. The Linux kernel typically serves as the foundation for operating systems that specialize in hacking.
These best OS for hacking are cutting-edge functioning systems because they come with several ethical hacking and penetration testing capabilities.
What is Ethical Hacking?
In revealing potential data breaches and network risks, ethical hacking is a legitimate method that involves finding flaws in an application, system, or organization’s infrastructure and getting beyond system security. In order to find vulnerabilities that harmful hackers can exploit or eliminate, ethical hackers search the system or network. It may secure the data to wedge attacks or neutralize them.
In addition to assessing the system’s defences, the enterprise that controls the system or network permits Cyber Security professionals to carry out such actions. Therefore, this process is planned, approved, and—more importantly—legal, in contrast to malicious hacking.
Of course, there are many different factors to consider in this precise and frequently lengthy system. Integrating the best operating system for hacking can enhance the efficiency and effectiveness of ethical hacking endeavors. An ethical hacker also referred to as a white-hat hacker will search for vulnerabilities using a variety of techniques. Additionally, they will carry out several other activities related to general cyber security. This may consist of:
Identifying weaknesses
Testing for penetration
Collecting information regarding entry points
Infrastructures being scanned for weaknesses
Exploiting flaws to gain access to systems and networks
Concealing their presence and avoiding detection
Putting together analyses and reports for the attempts
Let’s discuss the leading operating systems for ethical hacking in 2024, equipped with robust tools, specifications and features.
1. Kali Linux
XDA Developers
It is the most widely used ethical hacking OS. It is a Debian-based Linux – based operating system developed for penetration testing and digital forensics. It is financed and maintained by Offensive Security Ltd. The greatest and most widely used operating system for hackers is Kali Linux. It includes the first Nexus device open-source Android penetration test. The forensic mode is another excellent feature of the Kali Linux operating system.
Features:
Testing for penetration is possible.
Both a 32-bit and 64-bit version of this platform is available.
Kali Linux can be updated.
This OS supports complete disc encryption.
The network-based Kali Linux installation can be easily automated and customized.
Support for live USB installations.
Forensic work can be done using its forensics mode.
System Requirements:
2 GB of RAM
20 GB of disk space
32- or 64-bit CPU (single-core) with 2 GHz speed or better
High-definition graphics card and monitor
Broadband internet connection
2. Parrot Security OS
To give ethical hackers the best-in-class experience of penetration and security testing in real-world systems, Parrot Security OS is built on Debian GNU/Linux and integrated with the Frozen box OS and Kali Linux. Additionally, the Frozen box team intends to use it to offer vulnerability evaluation and mitigation, computer forensics, and anonymous Web browsing.
Kali repositories are used by Parrot Security OS for a variety of package updates and to include new tools.
Features:
It is offered as resource-constrained, lightweight software.
The source code is available for reading and modification.
Offers assistance from professionals to aid you with cybersecurity.
The distributed infrastructure of this hacker OS includes dedicated CDNs (Content Distribution Network).
This operating system can be shared with others.
System Requirements:
There is no need for graphic acceleration.
RAM must be at least 320MB.
It needs a dual-core CPU running at least at 1GHz.
It can boot in legacy and UEFI modes as well
The operating system installation requires at least 16GB of hard disc space.
3. DEFT Linux
The Hacker News
Digital Evidence and Forensic Toolkit, or DEFT, is an open-source Linux distribution. It is constructed around the DART (Digital Advanced Response Toolkit) software and is based on Ubuntu. It includes numerous well-known forensic tools and files that are useful to ethical hackers, penetration testers, IT security experts, and other people.
Features:
It is based on the Lubuntu system and includes free penetration testing and digital forensics software.
Complete support for logical acquisitions in iOS 7.1, Android, and Bitlocker-encrypted drives.
Digital Forensics Framework 1.3
System Requirements:
A 200 MHz X86 CPU and 128 MB of RAM are the minimal requirements.
Since DEFT Zero is a Live MODE edition and is based on Lubuntu, it takes a unique approach.
4. Samurai Web Testing Framework
Samurai Web Testing Framework is essentially a live Linux system that is already set up to function as a platform for web pen-testing. The framework includes a variety of open source and free hacking tools for finding weaknesses in websites. For web penetration testing, it is frequently referred to be the ideal operating system.
Features:
Samurai Web Testing Framework is an open-source project that focuses on exploiting websites.
It has already been set up for web pen-testing.
Features that can be used to target the website for the attack.
It includes tools like WebScarab (a tool for evaluating web security applications) and ratproxy (a program for running a web proxy server).
System Requirements:
2 GB of RAM
20 GB of disk space
32 or 64-bit CPU (single core) with 2 GHz speed or better
5. NodeZero Linux
NodeZero is a free and open-source Linux distribution for penetration testing that uses the Ubuntu repositories for updates. It includes a collection of fundamental services that are necessary for performing a variety of tasks, together with more than 300 penetration testing tools. The dual-arch live DVD ISO image of the Linux distribution, which supports both 32-bit and 64-bit computing architectures, is available for download.
Features:
System memory diagnostic tests
Hard disk booting
Install direct
Safe mode booting
Text-mode or debug mode
System Requirements:
2 CPU (physical or virtual)
8GB RAM
20 GB free HDD space
6. Linux Kodachi
Based on Ubuntu 18.04.6, the Linux Kodachi operating system will give you a private, non-forensic, and anonymous operating system that includes all the characteristics that someone who cares about privacy would need to be secure.
Kodachi is incredibly simple to use; all you need to do is boot it up on your computer using a USB drive, at which point you should have a fully functional operating system with established VPN and Tor connections as well as an active DNScrypt service.
Features:
Automatic connection to a VPN (all network traffic)
Automatic connection to the Tor network (browser traffic)
Automatic DNS encryption
System Requirements:
2 CPU (physical or virtual)
8GB RAM
20 GB free HDD space
7. Blackarch Linux
Medium
It is an Arch Linux-based best distro for hacking and for penetration testers and security researchers. It is regarded as the best OS for hacking distribution for security researchers to use to undertake application-based and web security testing because it comes with over 1,600 tools. It is a serious rival to Kali Linux and Backbox in terms of tool diversity and usability.
Features:
Several window managers in a live ISO. Blackarch gets out of the way so users can complete their tasks without interruptions
Different architectures are supported
An installer that supports source-based construction
More than 1800 tools
Install the packages one at a time or in groups
System Requirements:
2Ghz Quad-Core Processor.
6 GB Random Access Memory (RAM)
50 GB Disk Space.
High-definition graphics card.
8. Network Security Toolkit (NST)
On both 32-bit and 64-bit platforms, the Network Security Toolkit Linux distribution is based on Fedora. The goal of this bootable live CD was to give you access to the top open-source network security tools for penetration testing. This user-friendly hacking distribution turns x86 PCs through an ethical hacking tool that may be used for network traffic sniffing, intrusion detection, network packet creation, network/host scanning, etc.
Features:
Multi-Tap Network Packet Capture
Web-Based Network Security Tools Management
Host/IPv4 Address Geolocation
Network/System Monitoring
Network Intrusion Detection
Network Interface Bandwidth Monitor
Web-based Snort IDS Integration
Active Connections Monitor
System Requirements:
A i686 or x86_64 compatible CPU (Core 2 series or later)
At least 512MB of RAM (we recommend at least 1024MB if you want to use a graphical desktop)
A DVD drive and BIOS capable of booting from a DVD
A supported Ethernet (NIC) Adapter or WIFI card
9. BugTraq
For in-depth analysis and notification of software security vulnerabilities, BugTraq is a clarification mailing list. The foundation of the global security community on the Internet is BugTraq. It is the best OS for penetration testing.
Features:
A wide range of pentesting tools are available on Bugtraq, including mobile forensic tools, virus testing labs, tools created by the Bugtraq-Community
audit tools for GSM,WIFI, Bluetooth, and RFID
integrated Windows tools
ipv6-focused tools, and standard forensics and pentesting tools.4
System Requirements:
1GHz x86 processor.
512 MB of system memory (RAM)
15 GB of disk space for installation.
Graphics card capable of 800×600 resolution.
DVD-ROM drive or USB port.
10. Cyborg Hawk Linux
The most sophisticated, potent, and still stunning penetration testing distribution ever made. lined up with the best tools for professional ethical hackers and cyber security specialists.
Utilize Cyborg to streamline security throughout your IT infrastructure. It is true power stems from the knowledge that a tester needs a powerful and effective system, one that gains from a robust variety of tools and is combined with a stable Linux environment.
Features:
Includes over 750 penetration testing tools
Cyborg Hawk is and always will be completely free
Has the capacity to be utilised as a live operating system
Mobile Security, Wireless Security, Forensics, Stress Testing, Reverse Engineering, and Exploitation Toolkit
Full support for virtual machines. Version 1.1
It now has a repository of its own
Stable and dependable
Support for a range of wireless devices
Everything is in its proper position and the menu is well organised
An injected kernel that was patched
System Requirements:
Memory: 4 GB.
Graphics Card: NVIDIA GeForce 510.
CPU: Intel Core 2 Duo E8400.
11. Live hacking OS
Several tools and programmes enabling ethical hacking, penetration testing, and mitigation verification are included in the Linux distribution Live Hacking.
This “Live DVD” for Ubuntu runs directly off the DVD without requiring it to be installed on the hard drive. Again, when the system has booted, you may use the included tools to test, verify, ethically hack, and carry out penetration testing under your own system to make sure it is protected from external intrusions.
Features:
There are two variations of it.
The first is a command-line operating system with quick setup and minimal hardware needs.
The GNOME desktop environment is included in the second edition to provide a more graphical user interface.
System Requirements:
A fast Pentium 3 or any Pentium 4 class processor.
For the desktop version 512MB of memory is required with 1GB recommended.
For the command line version just 128MB of memory is needed.
12. BackBox Linux
BackBox is a Free Open-Source Community Project that aims to improve and secure the IT environment by fostering a culture of security. It is more than just an operating system for ethical hacking. All of this while utilizing only Free Open-Source Software, showcasing the Community’s strength and promise.
Features:
It aids in tasks like vulnerability analysis and computer forensics.
Design carefully to eliminate duplication.
It uses the fewest resources possible from your machine.
This hacker operating system offers a user-friendly desktop setting.
allows you to practise attacking a network or application.
It provides both speed and stability.
System Requirements:
A 32-bit or 64-bit processor.
512 MB of system memory RAM (256 MB in case there will be no desktop manager usage and only the console)
4.4 GB of disk space for installation.
13. Pentoo
Pentoo is a Live CD and Live USB created for security analysis and penetration testing. Pentoo Linux, which is based on Gentoo Linux, is offered as a 32- and 64-bit installable liveCD.
Features:
Both 32-bit and 64-bit versions are accessible
Wi-Fi drivers with packet injection patches
Support for secure boot is included in full UEFI
CUDA/OpenCL program for enhanced cracking
Kernel 4.17.4 with all necessary injection patches
several tools for hacking and pentesting
System Requirements
1GHz x86 processor.
512 MB of system memory (RAM)
15 GB of disk space for installation
Graphics card capable of 800×600 resolution
DVD-ROM drive or USB port
14. Blackbuntu
Specifically created for information security professionals and students, the penetration testing distribution is based on Ubuntu.
Features:
It is built using Gnome 2.32.0, Linux 2.6.39, and Ubuntu 10.10.
Only systems with the 64-bit (x86 64) instruction set architecture can run BlackBuntu.
System Requirements:
1GHz x86 processor
768 MB of system memory (RAM)
10 GB of disk space for installation
Graphics card capable of 800×600 resolution
DVD-ROM drive or USB port
What are the Key Concepts of Ethical Hacking?
Four fundamental protocol principles followed by hackers are:
Be lawful: Before entering and conducting a security evaluation, get the necessary approval.
Establish the scope: Establish the assessment’s parameters to ensure that the ethical hacker’s work is legal and within the organization’s permitted restrictions.
Inform about vulnerabilities: All vulnerabilities found even during evaluation should be reported to the organization. Give suggestions for repairing these vulnerabilities.
Be sensitive to data: Cybersecurity professionals may need to accept a non-disclosure agreement in addition to other terms and conditions requested by the evaluated firm, depending on how sensitive the data is.
The Preferred Operating Systems of Professional Hackers
According to claims of high-risk hacking, some hackers use Microsoft Windows to remain undetected. Since Windows is a popular target for hackers, they must employ Windows-only environments in order to use Windows-based malware, the.NET framework, Trojans, or viruses. Hackers create a lightweight bootable ghost image that cannot be traced back to them using inexpensive disposable laptops that buy off Craigslist. These computers include unique SD card and USB ports that, if necessary, are simple to trash, bury, or even ingest.
Several attackers go above and above by adding additional readable storage for operating system read-only divisions and restricted persistent local storage. Some, the worried kind, go even further and include a hotkey panic button for instant RAM cleaning.
A compact, encoded SD card is produced with the bootable OS ghost image. The laptop burner is then methodically separated and discarded. The physical destruction of the RAM, hard drive, and network card is given particular care by the hackers. Such computers are occasionally destroyed with a blowtorch or a sledgehammer.
Ethical Hacker Skills and Certifications
Broad computer expertise is necessary for an ethical hacker. They frequently specialize in one aspect of the ethical hacking field, becoming subject matter experts (SME)
All ethical hackers need to possess:
Proficiency with scripting languages
Linux Skills
Technical Expertise
Expertise with operating systems
Profound understanding of networking
Strong basis in information security principles.
The Cyber Security certification has focused on the latest security threats and advanced attack vectors with a practical real-time demonstration of the new hacking techniques. This will boost your career and help you change the meaning of hacking for the world!
The following are some of the most well-known and obtained certifications:
Students learn about current hacking methods, exploits, security trends, possible attacks, and how to use professional tools to compromise systems in CEHv11 successfully.
2. Offensive Security Pen 200 (OSCP)
The foundational training for utilizing the Kali best Linux OS for hacking offered by Offensive Security is called Penetration Testing with Kali Linux (PEN-200).
The user’s emphasis is on practical learning instead of merely lectures and academic study, and its “Try Harder” campaign promotes both critical thinking and problem-solving.
You’ll need a firm foundation in network theory, and knowledge with Windows, Linux, and Bash/Python will be helpful.
3. GIAC Penetration tester
Another certification offered in the area of ethical hacking is SANS GPEN. The most well-known certification offered by the SysAdmin, Networking, and Security (SANS) institute is the GIAC Penetration Tester (GPEN). It mostly discusses in-depth technical techniques for verifying from reporting and scoping onward.
4. SEC542: Web App Penetration Testing and Ethical Hacking
SEC542, which emphasizes on testing and ethical hacking of enterprise online applications, is an additional choice from the SANS Institute to take into account.
The main objectives of SEC542 are to teach participants how to identify web explanation vulnerabilities, how to exploit them, and what tools and strategies attackers can employ to infiltrate this kind of software.
5. CREST
The CREST certification exams and programs are widely recognized in numerous nations. The UK, Europe, Asia, and Australia are some of these nations. This exam aids in recognizing and instructing qualified pen testers. This non-profit organization serves the needs of a technical information security market that calls for the assistance of a controlled and organized services sector.
Within the international technical cyber security sector, CREST supports the development of high-quality expertise, competence, and reliability.
Looking to boost your ITIL knowledge? Join our unique and engaging ITIL Foundation Classes! Discover the secrets of IT service management in a catchy and concise way. Don’t miss out on this opportunity to enhance your skills. Enroll now!
Conclusion
I hope this article will help you in selecting the best OS for ethical hacking. It’s intriguing to explore the area of ethical hacking and penetration testing. There has never been a better time to master ethical hacking for people who are interested in this area of computer security. As the cost of cyberattacks rises, there will undoubtedly be an increase in demand for people with these talents. Jobs in ethical hacking can pay well and provide job security.
The shades of ethical hacking range from black to white to grey. Black hackers use their skills for malevolent purposes, while white hackers use it for good. One of the most sought-after skills for any IT security specialist is ethical hacking, which is the primary means of bolstering network security. The KnowledgeHut’s Ethical Hacking course has focused on the latest security threats and advanced attack vectors with a practical real-time demonstration of the new hacking techniques.
Frequently Asked Questions (FAQs)
1. Is Parrot OS better than Kali?
Parrot OS is superior because it provides tools and an interface that are simple enough for beginners to utilise. However, both Parrot OS and Kali Linux offer a variety of tools that students can employ.
2. What operating system do most hackers use?
Linux is the best operating system for hackers. This is due to two key factors. As an open-source operating system, Linux’s source code is first and foremost freely accessible.
3. Do hackers use VPN?
At least not when it comes to hacking, hackers don’t really use VPNs. They should not be utilised for anonymity because it is far too simple to identify them.
4. What is Kali Linux used for?
An open-source, Debian-based Linux system called Kali Linux is designed for different information activities like computer forensics, reverse engineering, and penetration testing.
5. Can I hack without Linux?
I frequently observe this widespread misunderstanding. Many people believe Kali Linux is necessary for all hacking activities. Regardless of the OS or distribution a user uses, anyone with solid networking and system security skills can break into a system.
6. Can I use a virtual machine to run a hacking OS on my existing operating system?
Yes, you can use a virtual machine to run a hacking OS by using virtualization software like VMware, VirtualBox, and more.
The largest password compilation with nearly ten billion unique passwords was leaked on a popular hacking forum. The Cybernews research team believes the leak poses severe dangers to users prone to reusing passwords.
The king is dead. Long live the king. Cybernews researchers discovered what appears to be the largest password compilation with a staggering 9,948,575,739 unique plaintext passwords. The file with the data, titled rockyou2024.txt, was posted on July 4th by forum user ObamaCare.
While the user registered in late May 2024, they have previously shared an employee database from the law firm Simmons & Simmons, a lead from an online casino AskGamblers, and student applications for Rowan College at Burlington County.
The team cross-referenced the passwords included in the RockYou2024 leak with data from Cybernews’ Leaked Password Checker, which revealed that these passwords came from a mix of old and new data breaches.
“In its essence, the RockYou2024 leak is a compilation of real-world passwords used by individuals all over the world. Revealing that many passwords for threat actors substantially heightens the risk of credential stuffing attacks,” researchers said.
Password leak checker
Has your password been leaked online? Find out with our password leak checker tool in seconds and take action to protect your data today.Check if your password has been leaked
Credential stuffing attacks can be severely damaging for users and businesses. For example, a recent wave of attacks targeting Santander, Ticketmaster, Advance Auto Parts, QuoteWizard, and others was a direct result of credential stuffing attacks against the victims’ cloud service provider, Snowflake.
“Threat actors could exploit the RockYou2024 password compilation to conduct brute-force attacks and gain unauthorized access to various online accounts used by individuals who employ passwords included in the dataset,” the team explained.
Post announcing the leak on a hacker forum. Image by Cybernews.
Not the first rodeo
The RockYou2024 compilation did not just fall from the sky. Three years ago, Cybernews published a story about the RockYou2021 password compilation, the largest at the time, with 8.4 billion plain text passwords.
According to the team’s analysis of RockYou2024, attackers developed the dataset by scouring the internet for data leaks, adding another 1.5 billion passwords from 2021 through to 2024 and increasing the dataset by 15 percent.
The RockYou2021 compilation, an expansion of a data breach from 2009, included tens of millions of user passwords for social media accounts. Since then, however, the compilation has ballooned exponentially. Most likely, the latest RockYou iteration contains information collected from over 4,000 databases over more than two decades.
The Cybernews team believes that attackers can utilize the ten-billion-strong RockYou2024 compilation to target any system that isn’t protected against brute-force attacks. This includes everything from online and offline services to internet-facing cameras and industrial hardware.
“Moreover, combined with other leaked databases on hacker forums and marketplaces, which, for example, contain user email addresses and other credentials, RockYou2024 can contribute to a cascade of data breaches, financial frauds, and identity thefts,” the team said.
Attackers’ user profile. Image by Cybernews.
How to protect against RockYou2024?
While there is no silver bullet to protect users who had their passwords exposed, impacted individuals and organizations should take up mitigation strategies. The Cybernews research team advises to:
Immediately reset the passwords for all accounts associated with the leaked passwords. It is strongly recommended to select strong, unique passwords that are not reused across multiple platforms
Enable multi-factor authentication (MFA) wherever possible. This enhances security by requiring additional verification beyond a password
Utilize password manager software to securely generate and store complex passwords. Password managers mitigate the risk of password reuse across different accounts
Cybernews will include data from RockYou2024 in the Leaked Password Checker, allowing anyone to check if their credentials were exposed via the latest record-holding exposed password compilation.
With RockYou2024, we witnessed a second record-breaking compilation leaked online in 2024. Earlier this year, Cybernews discovered the Mother of all breaches (MOAB), comprising an astounding 12 terabytes of information, spanning over a mind-boggling 26 billion records.
A new iteration of a sophisticated Android spyware called Mandrake has been discovered in five applications that were available for download from the Google Play Store and remained undetected for two years.
The applications attracted a total of more than 32,000 installations before being pulled from the app storefront, Kaspersky said in a Monday write-up. A majority of the downloads originated from Canada, Germany, Italy, Mexico, Spain, Peru, and the U.K.
“The new samples included new layers of obfuscation and evasion techniques, such as moving malicious functionality to obfuscated native libraries, using certificate pinning for C2 communications, and performing a wide array of tests to check if Mandrake was running on a rooted device or in an emulated environment,” researchers Tatyana Shishkova and Igor Golovin said.
Mandrake was first documented by Romanian cybersecurity vendor Bitdefender in May 2020, describing its deliberate approach to infect a handful of devices while managing to lurk in the shadows since 2016. The malware has yet to be attributed to a threat actor or group.
The updated variants are characterized by the use of OLLVM to conceal the main functionality, while also incorporating an array of sandbox evasion and anti-analysis techniques to prevent the code from being executed in environments operated by malware analysts.
The list of apps containing Mandrake is below –
AirFS (com.airft.ftrnsfr)
Amber (com.shrp.sght)
Astro Explorer (com.astro.dscvr)
Brain Matrix (com.brnmth.mtrx)
CryptoPulsing (com.cryptopulsing.browser)
The apps pack in three stages: A dropper that launches a loader responsible for executing the core component of the malware after downloading and decrypting it from a command-and-control (C2) server.
The second-stage payload is also capable of collecting information about the device’s connectivity status, installed applications, battery percentage, external IP address, and current Google Play version. Furthermore, it can wipe the core module and request for permissions to draw overlays and run in the background.
The third-stage supports additional commands to load a specific URL in a WebView and initiate a remote screen sharing session as well as record the device screen with the goal of stealing victims’ credentials and dropping more malware.
“Android 13 introduced the ‘Restricted Settings’ feature, which prohibits sideloaded applications from directly requesting dangerous permissions,” the researchers said. “To bypass this feature, Mandrake processes the installation with a ‘session-based‘ package installer.”
The Russian security company described Mandrake as an example of a dynamically evolving threat that’s constantly refining its tradecraft to bypass defense mechanisms and evade detection.
“This highlights the threat actors’ formidable skills, and also that stricter controls for applications before being published in the markets only translate into more sophisticated, harder-to-detect threats sneaking into official app marketplaces,” it said.
When reached for comment, Google told The Hacker News that it’s continuously shoring up Google Play Protect defenses as new malicious apps are flagged and that it’s enhancing its capabilities to include live threat detection to tackle obfuscation and anti-evasion techniques.
“Android users are automatically protected against known versions of this malware by Google Play Protect, which is on by default on Android devices with Google Play Services,” a Google spokesperson said. “Google Play Protect can warn users or block apps known to exhibit malicious behavior, even when those apps come from sources outside of Play.”
mIRC is a software that allows you to communicate, share, play or work on IRC networks.across the world, whether in multi-user group conferencesor private one-on-one discussions.Communications are instantly transferred using windows.It is possible to define a chat group and send messages to multiple peoplesimultaneously.This software provides users with a file transfer protocol.It tracks exchanges to ensure that data is transmitted to its recipient.It is also able to send encrypted files to keep them secure.
mIRC allows the creation of scripts to accomplish certain tasks.For example, it can automatically launch applications that send pre-set messages.It can also launch functions using commands entered on a dedicated console.
(Note: For best image quality, it is best to view this tutorial using Google Chrome.)In this odyssey we will try to uncover the
secret of the Keygens . Watch out!
Olly is getting closer to the galaxy…
“OPERATION mIRC”
LIMITATIONS• 30 days trial•
Bad Nags
THE TOOLS• PROTECtiON iD v.6.6.7 (http://pid.gamecopyworld.com)
•
OllyDbg version 1.0.10.0 – select Odbg110.zip (http://www.ollydbg.de/)
• Visual Studio Professional 2013 with Update 4 (www.microsoft.com/visualstudio/eng/download)
(About Visual Studio: Take a good look at the
cOsMoS .)Before we begin, let’s not forget to work on a copy of the mIRC executable
, a copy that we will name
mirc_CrAcK .
At the same time, let’s create a shortcut of
mirc_CrAcK , which we will place on the desktop.
PROGRAM ANALYSISLet’s open
PROTECTiON iD , making sure that everything circled in red is enabled or checked.
Next, let’s
drag and drop the executable to
PROTECTiON iD .
Following this procedure, we see that the executable is not encrypted or compressed.
PROGRAM ANALYSIS UNDER OLLYDBG 1.0.10.0To see what
mIRC has in store for us, let’s run it under
Olly .
Olly stops at address
00F8 4F6C .(A clarification all the same: each time Olly is restarted
, the first 4 signs of the addresses change,so it is normal that you do not have exactly the same address.By the way, I would apply a different grease to the last 4 signs – those remain the same – like this,you will distinguish them more easily.)
From here, let’s execute a
[F9] .And there you have it! The
mIRC interface is displayed. Let’s click on the
[Continue] button .
Hey! Here’s a
nasty Nag :
mIRC reminds us that this version is
limited to 30 days !”If you have your registration…”. No! but let’s activate the link ”
here ” anyway.
And hop! another
nasty Nag !
ANALYSIS OF THE UGLY NAGIn fact, to use
mIRC in its commercial version and more precisely in its unlimited version,This asks us to enter our
first name ,
last name and the registration
code received by email.Obviously, since we did not purchase the license right, we do not own the Registration
Code .That’s not nice!
Fortunately, there is a way for us to recover this Registration
Code .Let’s assume that it is an algorithm that generates the
Code by retrieving the input from the ”
Full Name ” field .The difficulty lies in situating this algorithm in the program.It’s not simple, but there is a solution: the solution is called an
API (Application Programming Interface).
SendDlgItemMessage : This function is to send a message to a specified control in a dialog box.(Regarding
mIRC , after the
Code is generated by the algorithm and checked, it would send us amessage like:
Code is good or
Code is bad.)
Let’s start by entering the ” Full Name ” and ”
Registration Code ” fields .
Let’s not click the [OK] button just yet .
To retrieve this
API , let’s go back to the main
Olly window .Next, let’s press
[Ctrl+N] ; now we are in the
imports window ; let’s sort them by
type .
Let’s go find
SendDlgItemMessage . Hop! there it is. Let’s put a
BP on each of them marking theirpresence in the program:we select it
> Right click in the window > Set breakpoint on every reference .(There are 426 of them! Shown in the lower left corner of
Olly .)
Let’s go back to the main
Olly window with
[Alt+C] ; let’s activate
mIRC by clicking on the
[OK] button .
Olly ‘s first stop on a
BP of the
SendDlgItemMessageW API . There is nothing that could interest us there.Let’s delete this BP with the [F2] key .
Let’s continue with
[F9] and, once again, activate the
mIRC window by clicking on
[OK] .Second stop of
Olly on a
BP of the
API SendDlgItemMessageW . Here, nothing interesting.Let’s delete this
BP with the
[F2] key .
Let’s continue with
[F9] …, and hop!
Olly stops a third time on a
BP of the
SendDlgItemMessageW API withoutthat we need to intervene in the
mIRC window . And here, friends, it starts to get very interesting.Before going further, let’s delete all the
BPs placed on our
API :
[Ctrl+N] > we are back in the windowimports;
SendDlgItemMessageW API must be selected
> Right-click > Remove all breakpoint .And there you have it. Next, let’s activate an
[Alt+C] to return to the main
Olly window .Now let’s step through the routine by activating
31 x F8 and carefully observing what
Olly displays in the
main window ,
registers and
stack , up to
the CALL whose address on my PC is
00EB C9C7 .By the way, let’s immediately place a
BP on this
CALL with
[F2] (we will keep this
BP throughout our analysis,because it will be our reference point, so
don’t delete it ).We will enter this
CALL with
[F7] , because the previous 2 command lines contain our entries, and Ithinks that these will probably be used downstream of this subroutine.
How are we going to localize this algorithm?In order to generate the famous
Code , the program retrieves each character of our
name and processes it via the algorithm.To carry out this process, the program uses a system of loops; it is thanks to these loops that we will be able tospot this algorithm. Since
Olly displays this system, let’s start looking for these loops.We are at the beginning of this subroutine. Let’s activate
36 x F8 in order to arrive at the
CALL at address
00EB AD33 .As before, the
registers and
stack show some very interesting values.Let’s enter this new
CALL with
[F7] .
We are now on the first command line of this subroutine.
From this command line, let’s press
56 x F8 to go to address
00EB AB60 .This address is truly the starting point of our analysis, because the elements that we have been looking for from the beginningare located from this address. In order to follow my comments, I advise you to trace this subroutine atusing the
[F8] key , and this, up to the address
00EB ABB4 . There, we place a
BP with
[F2] .In this part, to understand the flow of the program, it is important to observe, line by line, the
registers , the
stack and the ”
info ” area of
Olly .
00EB ABB4 is the address that will allow us to discover the start of the algorithm and calculate its length.Let’s start by discovering the beginning by
right-clicking on the address displayed in the ”
info ” area of
Olly .Next, select ”
Follow address in Dump “. (Reminder: on your PC, the addresses are different.)
The first hexadecimal value in the algorithm starts with
0B . (Be careful!
0B is not an address, but avalue; so on your PC it should also be
0B .)
Next, to know the length of the algorithm, we will have to do a little calculation.At address
00EB ABB4 , the reasoning is as follows:the segment address
SS:[003F 81C8 ] represents the start of the algorithm; its content
SS:[ESP+ECX*4+14]tells us its length.Let’s calculate
ESP+ECX*4+14 :• Let’s open the Windows Calculator;• Let’s select “Hex” (yes! we are in hexadecimal);• In the registers,
ESP is equal to
003F 81B4 (on my PC);•
ECX will have the value
26 (yes, because – note that we are in a loop – at the address
00EB ABBC the line ofcommand displays
CMP ECX,26 . If
ECX is arithmetically greater than
26 , the
JLE on the next line does notdoes not jump and goes through the
XOR ECX, ECX returning
0 to
ECX .In this loop, the command lines clearly show that
ECX will never be larger than
26 .So here is the operation to be carried out:
003F 81B4 + 26 x 4 + 14 = 003F 8260. Let’s remember this address.
Let’s go back to the
Dump . The address
003F 8260 represents the last hexadecimal value of the algorithm.
003F 8258 =
0A
003F 8259 = 00
003F 825A = 00
003F 825B = 00
003F 825C =
04
003F 825D = 00
003F 825E = 00
003F 825F = 00
003F 8260 =
10
The values forming the algorithm are these: (obviously, the
0B 09 0C 0B 0A 08 0A 0A 10 08 04 06 0A 0C 10 08 0A 04 10We have localized the algorithm, but to realize a
KeYgEn , this is not enough.
CODE FORMFinding the form of the
Code is quite simple, because we have clues: our
name is processed twice.The first time, the program retrieves our
name in this first loop.
Then it processes our
name in the first loop linked to the algorithm.
The second time, the program retrieves our
name in this second loop.
And finally, it processes our name again in the second loop, also linked to the algorithm.
Other clues:
2D in ASCII character is equal to the dash ”
– “.”
%ld-%ld ” in Visual C++: we are in the presence of two variables of type long, separated by a hyphen.Combined with printf, the output might look like this:
12345-67890 .There is no doubt, thanks to all these clues, we can remember that the form of the
Code is two numbersseparated by a dash.
Now, let’s note the instruction lines (in yellow), they will be used to program our
KeYgEn .First loop.
Second loop.
Before closing
Olly , if necessary, let’s delete all
BP ,
except one (as I said before),the
BP at address
00EB C9C7 . Let’s close
Olly with
[Alt+X] .
THE BIG MOMENT HAS ARRIVED TO MAKE OUR KEYGEN. LET’S LAUNCH VISUAL STUDIO!On the start page, click on
New Project… .
Next, in the “
New Project ” window , select
Windows .
To create our
KeYgEn , let’s select
.NET Framework 2.0 and Windows Forms Application… Visual Basic .
Let’s fill in the fields by naming our folder and listing its location.
Let’s close the ” New Project ” window by clicking on
[OK] .At this point we discover the graphical interface, it is in some way a work plan which will allow usto carry out our project.To the left of this space is
the toolbox containing objects called
controls , they will be used to create
TexBox ,
Labels ,
Buttons , etc. In the center, this form, called ”
sheet ” (Form1), will represent the interface ofour
KeYgEn .Above, in the toolbar, the
[Start] button will allow us to generate the code or events enteredpreviously and to appreciate or not the result. (It also allows you to save the project.)
To the right of this space is the
properties window .It will allow us to configure the objects that we have placed in the form (Form1);we will be able
to choose a color, enter text, specify a position , etc.The icons in the red box are important because they will allow us to displaydifferent
property options .
Let’s select the first icon representing the
list by category ,
and the third representing the
properties .
The main areas of work having been presented, we can begin the creation of our
KeYgEn .Let’s go back to this ”
sheet ” (Form1). The graphics on this one are really very basic.Let’s give him a real visual of
KeYgEn .
Normally this shape is selected by default. If it is not, let’s select it.By the way, from now on we will no longer call it form, but
KeYgEn .Let’s change its name:
Properties > Design > (Name) => Enter Keygen
After entering, to generate the values,
click on the main window of
Visual Studio “Form1”.
(Get into this habit when you want to generate property values . There are other ways to generate values,we will see this during this adventure.)Let’s change its dimensions:
Properties > Layout > Size => Let’s enter 285; 255 (Let’s generate the entered values.)
Let’s remove the Windows graphics:
Properties > Appearance > FormBorderStyle > [Click on the small arrow] => Select None
(Let’s generate the selected value.)
Let’s color the background of our
KeYgEn in black:
Properties > Appearance > BackColor => Let’s enter 2; 2; 2 (Let’s generate the entered values.)
Position of our
KeYgEn on the screen:
Properties > Layout > StartPosition > [Click on the small arrow] => Select CenterScreen
(Let’s generate the selected value.)
TopMost position on screen:
Properties > Window Style > TopMost > [Click on the small arrow] => Select “True”
(Let’s generate the selected value.)
When we display our
KeYgEn on the screen, it would be nice to be able to move it using our mouse cursor.To get this, we’re going to enter a bit of code.I’m not going to embark on a programming course, because that’s not the goal of this adventure,and it would be much too long; nevertheless, I will bring some information, in particular, when we convertthe algorithm structures and the two loops in
Visual Basic .
Let’s start by activating the ” Events ” icon (circled in red).
Properties > Mouse > MouseDown => Let’s type Keygen_MouseDown (Let’s generate the entry.)
By generating the input, we arrive in the Visual Studio programming space .
In the
Public Class part , we will declare an
Instance and
variables .When you want to add a space to the left of the lines of code, use the
[Tab] key on the keyboard.To perform a line return, press the
[Enter] key on the keyboard.
When we have finished entering the lines of code, let’s return to the space of our
KeYgEnby
clicking on the Form1.vb [Creation]* tab .
So far, nothing too complicated. Now, let’s do the same with
MouseMove .
Properties > Mouse > MouseMove => Let’s type Keygen_MouseMove (Let’s generate the entry.)
Once again, by generating the input, we return to the
Visual Studio programming space .Let’s write these few instructions inside a
conditional structure .
Then, as before, let’s return to the space of our
KeYgEn .After all this achievement, it is time to appreciate the result: let’s click on the
[Start] button .
Our
KeYgEn begins to take shape; it appears in the middle of our screen;we move it with our mouse cursor.To stop debugging and return to the space of our
KeYgEn , let’s click on the
[Stop] button ,as shown in the image below.
Now, we are going to associate a music with our
KeYgEn . Well yes!, it’s still better!To begin with, we need to prepare a music file whose format is
.wav . Then we need to loadthis file in
resources .In the menu bar
PROJECT > [last line of the context menu]
Properties… > [on the left, in the list]
Resources > Add a resource [activate the small arrow] > Add an existing file…
Windows Explorer opens, allowing us to select the
.wav file that we have previously prepared.Remember to select
All Files (*.*) or Audio (*.wav)Then, let’s click on
[open] … and there you have it!
Let’s go back to the GUI – where our
KeYgEn is – by clicking on the
Form1.vb [Creation] tab .Then…,
Properties > Behavior > Load => Enter Keygen_Load
Next, let’s go to the programming space by clicking on the
blue Load rectangle ,because we have some codes to write.
Here we are. Let’s write these 2 lines of code:
Tip: When our input cursor arrives on
SoundPlayer(My.Resources.Visual Studio IDE automatically displays the name of our wav
file (blue rectangle: My_Music ),then you just have to press the
[Tab] key on your keyboard so that it appears after
My.Resources.(Remember to enter a closing parenthesis after
My_Music , see previous image.)
The 2 lines of code having been written, let’s return to the graphical interface by clicking on the
Form1.vb [Creation]* tab .Now we’re going to add an image to our
KeYgEn . Head over to the
toolbox , and in there,Let’s select
PictureBox .
Next, let’s hover our mouse cursor over our
KeYgEn . At that point, the cursor will take the form of
the PictureBox icon with a small cross-shaped mark.Let’s place this icon in the corner of our
KeYgEn as shown in the image below:
Then, to form the image block, let’s drag and drop a little further down to the right:
Let’s adjust the image block to our
KeYgEn .
Don’t forget to select the Properties icon .
Properties > Layout > Location => X enter 0 ; Y enter 0Regarding the entry of positions , validate this by clicking once on the blue rectangle of
X , then
Y.
Let’s size the image block to 285 x 146 pixels.
Properties > Layout > Size => Width enter 285; Height enter 146 (Validate.)
Before loading an image into the
resources , we need to prepare it:choose a theme, colors, create a shape, etc., it’s up to you.A word of advice: to avoid deformation of the latter, it is preferable that its dimensions are identical to the blockimage we created in our
Keygen (285 x 146 pixels).Regarding the choice of the format of your file, it differs depending on the type of image and the desired effect:gif or animated gif; jpg; png (if your image contains transparencies).When this image is created, we return to
Visual Studio , we select the image block that we hadpreviously made, then
right click in this block > Choose an image…
In the… window, select
=> Project resource file: > Import…Windows Explorer opens, select the
file format , then our
image file , then
Open > [OK] .
Here we are with a beautiful
KeYgEn !If you want to launch your
KeYgEn using the Visual Studio [Start] button , you
will notice that by placing theyour mouse cursor over the image you just created, you cannot move it within your screen space.This is normal…, as we did with the background of our
KeYgEn , we must code the object or controlcorresponding to the image block.This must be applied to every object created. (We’ll see this a bit later.)Now, to correlate with the
nasty Nag of
mIRC Registration , we need to create the
input fields ,buttons
, etc.You have learned how to create an image block, now we will use an object (
Label ), it is exactly the sameprocedure, it is only the tool that changes.To begin with, using this object, we will create a sort of “text block” in which we will enter ”
Full Name “.Let’s head over to the
Toolbox and select
Label .
Then, using our mouse cursor, let’s drag and drop it just below the image block created previously.Have you noticed ?When we create an object or a block – during drag and drop – information about the dimensions ofthe object is displayed in the lower right corner of our screen. This is useful because it allows us to get as close as possiblethe intended dimensions. Then, to refine the dimensions, just go to the
properties , as we havepreviously done for the image block.
Before entering the text, let’s choose its color. Let’s check that the
Label1 object is selected.Afterwards…,
Properties > Appearance > ForeColor > [Click on the small arrow] System => select “GrayText” .
Regarding the background color, there is no need to intervene, because when we created the background color of our
KeYgEn (2; 2; 2), this remains the default background color.Moreover, we only need to pay attention to the
BackColor role (image above), to see that the coloris a black referenced 2; 2; 2.That’s it for the color. Now let’s enter the text:
Properties > Appearance > Text => Let’s enter Full Name (Validate.)
This being accomplished, let’s position our object in the space of our
KeYgEn :
Properties > Layout > Location => X enter 8; Y enter 146 (Validate.)Regarding its dimensions, there is no need to be interested in it, because the
AutoSize role sets ”
True ” by default, therefore,The dimensions apply depending on the text (number of typographic characters; font; weight; body).
Now we’re going to create a
control that allows us to enter our name.To do this, let’s head over to the
Toolbox and select
TextBox .
As before, let’s drag and drop just below ”
Full Name “.
When creating this
control , I notice that the
BackColor role no longer displays 2; 2; 2 by default.It’s touchy computing! So let’s always be vigilant and apply our background color:
Next, let’s change the appearance defining the edge of the frame:
Properties > Appearance > BorderStyle > [Click on the little arrow] => Select “FixedSingle” .
As I told you before, this control is reserved for the text that we will enter,we will therefore adapt the appearance of this text to the visual of
KeYgEn .Let’s apply some grease:
Properties > Appearance > Font > Bold > [Click on the little arrow] => Select “True” .
Let’s apply a color:
Properties > Appearance > ForeColor => Let’s enter 184; 1; 15 (Let’s validate.)Let’s apply a position (the entered characters will be displayed centered):
Properties > Appearance > TextAlign > [Click on the little arrow] => Select “Center” .
Now let’s place our
control – precisely – in the space reserved for it:the position :
Properties > Layout > Location => X enter 12; Y enter 161 (Validate.)the dimensions :
Properties > Layout > Size => Width enter 150; Height enter 20 (Validate.)
Come on! For the ”
fun ” part, let’s click on the
[Start] button of
Visual Studio , turn up the volume of our speakers and enjoy!
Let’s close by clicking on the
[Stop] button . Friends!, this is just the beginning, the best is yet to come!Let’s continue by creating a second
Label which we will call ”
Registration Code “.Let’s head over to the
Toolbox and select
Label .
As before, using our mouse cursor, let’s drag and drop this objectjust below the
control (
TextBox1 ) that we just made.The first
Label we created is called ”
Label1 “, this one is called ”
Label2 “.Let’s check that the ”
Label2 ” object is selected.Before entering the text, let’s choose its color (the same as ”
Label1 “):
Properties > Appearance > ForeColor > [Click on the small arrow] System => select “GrayText” .
By the way, we notice that the
BackColor role correctly displays the background color 2; 2; 2.Let’s enter the text:
Properties > Appearance > Text => Let’s enter Registration Code (Validate.)
Let’s position our object precisely:
Properties > Layout > Location => X enter 8; Y enter 185 (Validate.)
Now we will create a second
control , it will have the function of displaying the
Code generated by the algorithm.The first
control is named ”
TextBox1 “, this one is named ”
TextBox2 “.To do this, let’s head over to the
Toolbox and select
TextBox .
As before, let’s drag and drop just below ”
Registration Code “.
Let’s not forget to select our
control (
TextBox2 ), then apply our usual background color:
&H4, &H6, &HA, &HC, &H10, &H8, &HA, &H4, &H10}Now let’s enter this algorithm into the programming part of
Visual Studio .
Let’s double-click on the black background of our
KeYgEn , in order to access this space.
If necessary, let’s go back up to the top, in the
Public Class Keygen section .First, let’s declare the
data variable :
Dim data() As Integer(
Dim = statement [declares and allocates];
data = variable name;
As = as;
Integer = Type).I advise you to take the time to enter these lines of code (read yourself), because programming does not allowno errors, no failures.
Once this is done, let’s click on the [Start] button , in order to generate these lines of code…
…then, on the
[Stop] button …
…and finally, let’s click on the Form1.vb [Creation] tab , in order to return to our
KeYgEn .
That’s it! For now, let’s close
Visual Studio ; we’ll come back to that later.Now we need to analyze and convert into
VB the two loops discovered under
Olly .Let’s start with the first loop.
MOV EDX,3 => With this instruction, the program initializes
RoL l IaPrO from the fourth character, i.e. (
l ).This requires us to enter (in the ”
Full name ” field) at least 4 characters, so as not to generate the Code
0-0 .
We will create a procedure [the
Function statement ] that returns a value (this value will be the first partof
the Code ):
Function hash1(ByVal name As String) As UIntegerInside this structure, let’s declare our
variables :
Dim i As UInteger, hash As UInteger, p As UIntegerThe
variable p represents the string of values of the algorithm. By giving it the value
0 , we associate it with the firstelement of the algorithm (
&H B ):
p = 0Next, let’s create a
repeating structure (loop) with
For…Next statements .The command line below represents the loop counter:the
variable i = its starting value (
3 ) to its ending value (length of the name
RoL lIaPrO ), decremented by
1 each timeiteration:
For i = 3 To name.Length -1Correspond to :
MOVZX EDI,WORD PTR DS:[ESI+EDX*2]
INC EDX
CMP EDX,EAXThe command line below represents – at the first iteration – the multiplication between the fourth character of
RoL l IaPrO [ Asc(name.Chars(i)) ] and the first value of algorithm
B [ data(p) ] . The hash
variable is the equivalentof
EBP , it retrieves the sum of the operation and keeps it in memory. Therefore, at the second iteration, the newamount will be added to the one kept in memory, etc.
hash += Asc(name.Chars(i)) * data(p)Correspond to :
IMUL EDI,DWORD PTR SS:[ESP+ECX*4*14]
ADD EBP,EDIThe
variable p is incremented by
1 step at each iteration. Therefore, at each return, the calculation will be based on the valuenext step of the algorithm.
p = p + 1Correspond to :
INC ECXInside the
Function hash1 structure , let’s insert another structure called a
conditional loop .The command line below means: if the
variable p is greater than
26 (hexadecimal),then, the
variable p will recover
0 .In this case, the
variable p is reset to the first value of the algorithm, i.e.:
&H B
If p > &H26 Then
p = 0
End IfCorrespond to :
CMP ECX,26
XOR ECX,ECXThen, the
Next statement is associated with the
For statement . When the program arrives at this statement, itincrements or decrements by the step specified in the command line
For i = 3 To name.Length -1 .Here, the step is
-1 . So,
Next will decrement by 1 step along the length of the name
RoLlIaPrO each loop cycle.
NextCorrespond to :
INC EDX
And finally, the Return instruction to return the value to the calling code (the sum stored in memory by the hash
variablewill be returned on this same
variable , and at each loop cycle a new sum will be added to it. At the lastloop cycle, this value [
sum ] of the calling code will represent the first part of the
Code [
Registration Code ]).
Return hashEssential instruction at the end of the structure:
End FunctionThe analysis and conversion to
VB of the first loop is complete.Now let’s take care of the second loop, this one is almost identical to the first one.The difference lies in this sense:so that the second part of the
Code is not identical to the first part, some instructions have been added.To better understand, let’s go back to this second loop.
The analysis will focus – mainly – on the differences between the two loops.Let’s start by creating a second procedure [ the Function
statement ] that returns a value(this value will be, this time, the second part of the
Code [
Registration Code ]), we will name it
hash2 :
Function hash2(ByVal name As String) As UIntegerInside this structure, let’s declare our
variables :
Dim i As UInteger, hash As UInteger, p As UIntegerThen, the
variable p having value
0
p = 0To better understand the next part, I advise you to consult the previous image as often as necessary.Let’s create the
repeating structure (loop) with
For…Next statements .Let’s begin…
For i = 3 To name.Length -1Be careful, because the difference is there, inside this structure.Added line of code:
Asc(name.Chars(i – 1))It corresponds to:
MOVZX EDI,WORD PTR DS:[ESI+ECX*2-2]This line of code creates, on the name
RoLlIaPrO , a decrement of
1 typographic character compared to the linecommands
MOVZX EBP,WORD PTR DS:[ESI+ECX*2] .They are identical, it is the
-2 that creates the difference. (One is retrieved by
EDI , the other by
EBP .)Then these two command lines multiply each other.The multiplication between these two command lines occurs under the
IMUL EDI,EBP instructionI hope this doesn’t sound too complicated; I’m trying to be as specific as possible, however,I expect – from some of you – this question:why is
RoLlIaPrO
decremented by
1 character, while the code indicates
-2 ?Isn’t that a good question? Here’s the answer:When we analyze the two loops under
Olly , let’s look towards the
Dump .
The hexadecimal numbers representing the RoLlIaPrO typographic characters are separated by the codehexadecimal
00 of zero value (no character). Therefore, between
2 characters, the decrement value is
-2 .On the other hand,
VB does not use this hexadecimal code
00 between
2 characters, so the decrement value is
-1 .
Well, let’s continue…, and enter this famous instruction:
hash += Asc(name.Chars(i – 1)) * Asc(name.Chars(i)) * data(p)The rest is identical to the first procedure (
Function hash1 ):
p = p + 1
If p > &H26 Then
p = 0
End If
Next
Return hash
End FunctionAnd there you have it! Now it’s time to open
Visual Studio and go back to the space where our
KeYgEn is located .We have just created the program that will generate the
Code in the ”
Registration Code ” field.Let’s enter this program in the space dedicated to it, and to do this,
double-click on the black background ofour
KeYgEn :
If necessary, let’s go back up to the top, in the ”
Public Class Keygen ” section.Let’s place our mouse cursor at the end of the algorithm, just after the closing curly bracket (see the image below)[red circle]), then execute the [Enter] key on our keyboard
twice .This procedure allows us to introduce a new structure taking into account spaces.And here, let’s enter our program (image below).
To generate these lines of code, click on the
[Start] button , then on the
[Stop] button ,and finally, on the
Form1.vb [Creation] tab : we have returned to the space of our
KeYgEn .Our program is ready, but not quite. To generate the
Code (
Registration Code ) by activating the button
[GeNeRaTe – mIRC v7.41] , we need to program it.As shown in the figure below, let’s access its own structure by
double-clicking on this button.
We arrive in this structure named
Button1_Click .
As shown in the image below, let’s enter the two lines of code. Be careful to respectthe spaces between signs and words.
MouseDownBackColor role which, I remind you, specifies the color of theclient area of the button as soon as we produce a mouse “click” within the limits of the
control .
Properties > Appearance > FlatAppearance > MouseDownBackColor => Let’s enter 184; 1; 15 (Let’s validate.)For this to work, the
FlatStyle role must rely on ”
Flat “.
Properties > Appearance > FlatAppearance > FlatStyle > [Click on the little arrow] => Select “Flat” .
Before entering the text, let’s select its color:
Properties > Appearance > ForeColor > [Click on the small arrow] System => select “GrayText” .
Now let’s enter the text:
Properties > Appearance > Text => Let’s enter cOpY (Validate.)
Let’s arrange our
control precisely:the position :
Properties > Layout > Location => X enter 228; Y enter 200 (Validate.)the dimensions :
Properties > Layout > Size => Width enter 57; Height enter 20 (Validate.)
And there you have it! The graphic design of the button allowing us to save the
Code in the “Clipboard” is finished.Now, in order for this button to generate the desired event when activated,we need to associate a line of code with it.By
double-clicking on this button, we access the space that will allow us to enter this line of code.
We are in the structure of the button
[cOpY] named
Button2_Click .
Next, let’s enter the line of codes as shown in the image below:
When we are done, let’s go back to our
KeYgEn space by clicking on the
Form1.vb [Creation]* tab .
Then, as before, let’s click on
[Start] to generate our program.
For the last time, let’s close our
KeYgEn using the
[Stop] button in
Visual Studio .Now we will create the
[cLoSe] button .Let’s head over to the
Toolbox and select the Button
control .
Let’s drag and drop it next to the
[GeNeRaTe – mIRC v7.41] button .
Before we go to the
properties , let’s not forget to select this
control named ”
Button3 “.Verification: In the
properties , the
BackColor role of this object must be 2; 2; 2.(This color reference must be displayed by default, otherwise, enter manually.)As before, regarding the
Cursor role, let’s choose the ”
Hand ” parameter :
Properties > Appearance > Cursor > [Click on the little arrow] => Select “Hand” .
Next, let’s remove that ugly border around the button:
Properties > Appearance > FlatAppearance > FlatStyle > [Click on the little arrow] => Select “Flat” .
Let’s select the text color:
Properties > Appearance > ForeColor > [Click on the small arrow] System => select “GrayText” .
Let’s enter the text:
Properties > Appearance > Text => Let’s enter cLoSe (Validate.)
Let’s arrange our
control precisely:the position :
Properties > Layout > Location => X enter 228; Y enter 228 (Validate.)the dimensions :
Properties > Layout > Size => Width enter 57; Height enter 20 (Validate.)
The graphic design of the button allowing us to close our
KeYgEn is complete.
Now, like the [cOpY] button , so that this button generates the desired event when activated,we need to associate a line of code with it.By
double-clicking on this button, we access the space that will allow us to enter this line of code.
We are in the structure of the button
[cLoSe] named
Button3_Click .
Next, let’s enter the line of codes as shown in the image below:
When we are done, let’s go back to our
KeYgEn space by clicking on the
Form1.vb [Creation]* tab .
Then, as before, let’s click on
[Start] to generate our program.
Now we can close our
KeYgEn using the
[cLoSe] button .
Our
KeYgEn is almost finished!Remember, when we integrated the image into the space of our
KeYgEn , we noticedthat
by placing our mouse cursor – inside this image block – we could not move itin the
screen surface.To remedy this, we need to associate the name of the objects that are relevant to this incidenceto the structure of
” MouseDown ” and that of ” MouseMove “.These objects are:The object containing the image with the
property name ”
PictureBox1 “.The object representing the label ”
Full Name ” with the
property name ”
Label1 “.The object representing the label ”
Registration Code ” with the
property name ”
Label2 “.To apply this,
let’s double-click on the background of our
KeYgEn :
We’ve returned to the Visual Studio programming space .Each object name must be followed by a comma, so remember to enter a comma after
MouseDown(see red circle).Reminder: to make your entry easier: use the ”
listbox “, this is automatically displayed when the cursorof your mouse arrives at the appropriate place.You have two solutions for use: when you have selected the name, you
double-click on it
or you press the [Tab] key .
After entering, here is the result:
This being done, let’s return to the space of our
KeYgEn by clicking on the
Form1.vb[Creation]* tab :
Then, as we usually do, let’s generate these lines of code by clicking on
[Start] .Now we can move our
KeYgEn by placing our mouse cursor on all of its surfaces, except, of courseheard, on buttons and input fields. Let’s close our
KeYgEn and
Visual Studio .However, we still have one small detail: to launch our
KeYgEn , we need to activate an executable.Under
Visual Studio the executable icon is not customized, it is a default visual,so we’re going to change that.
To begin with, we need to prepare an .ico file . We can grab a pre-made graphic from the Internet,but, if you have imagination, I strongly advise you to create a graphic in Illustrator or Photoshop.In Photoshop, save your file in
PNG-24 , this allows you to preserve the transparencies of your creation.Next, download
IconWorkshop (publisher:
axialis.com ), in order to convert your
PNG file to
.ico .When our ”
.ico ” file is ready, let’s open
Visual Studio and then access the general properties of our
KeYgEnby clicking on
Project > Properties…
After this action, we access a window, then we select the
Application tab .
Then, let’s select
<Browse…> , in order to reach our ”
.ico ” file.
We select it…,
Open …, and there you have it!
Let’s save this procedure by clicking on the
[Start] button , then, following this last generation,Let’s close our
KeYgEn by clicking on the
[cLoSe] button . Now we can close
Visual Studio .Where is the executable?Remember, when we opened
Visual Studio to create our
KeYgEn , we named a folder enlisting its location.It is from this folder that we will retrieve the executable of our
KeYgEn , the directory of which is as follows:
name of our folder\bin\Debug\
Obviously, you can copy, move or upload this executable.To continue working on
mIRC , I advise you to create a copy of this executable on your desktop.Good! Now it would be time to test the
Code that we obtained thanks to our
KeYgEn .This time, let’s launch our
KeYgEn via the executable; enter our name in the ”
Full Name ” field; click on the
[GeNeRaTe – mIRC v7.41] button , in order to generate the
Code , and finally, click on the
[cOpY] button , to copy it into the”Clipboard”.Let’s launch
mIRC via its shortcut on the desktop.
In the ” About mIRC ” window ,
mIRC gives us an indication:”If you have your registration, please enter it here”. Yes, of course, we have it! So, let’s click on ”
here “.
Let’s enter our name in the ”
Full Name ” field. Then, let’s activate the
[Ctrl+V] keys , in order to paste our
Codein the ”
Registration Code ” field, then start the entries by clicking on the
[OK] button .
It does not work ? !
Our
Code is good, yet… it doesn’t work.In your opinion, do you know why? I imagine that some of you have the answer.Here is the answer :The
Code is not enough to unlock the program, there is a second protection.The answer is in the window title: ”
mIRC Registration “.Yes! We have to register our
Code via the Internet. Are we blocked?No! Don’t worry, we will fix that.Let’s think for two seconds…: in a
nasty Nag , there is a
[Register] button ,This means that there is a registration address somewhere in the program.Let’s close
mIRC and open it under
Olly . Then,
[F9] .
mIRC displays the ”
About mIRC ” window, click on ”
here “:
The ” mIRC Registration ” window opens. As before, let’s fill in the fields and then click the
[OK] button .
Olly stops at the
BP we had left in place.It is thanks to this
CALL that we discovered the two loops and the algorithm.
Let’s advance through the routine by pressing
7 x [F8] , so that we are at address
011B C9E6 .By executing the
CALL located at address
011B C9E1 , we discover that it creates an alphanumeric string.This string is actually generated by an algorithm from our
Code .So your channel will be different from mine.This has a very important role since it will establish the link with the
mIRC server , in order to identify our
Codeand thus, validate it by a response to our computer.(By the way, there is software that can intercept server responses.)
Our goal is to bypass the action of this link.Noticed :when you execute the
CALL located at address
011B CA41 , you will see, by projecting yourself towards the
stack ,that it will generate the Internet address allowing us to register our
Code .See (below) the contents of the
stack at the time of execution of this
CALL :
For now, we are still at address
011B C9E6 .Let’s go on…
26 x [F8] , and we are at address
011B CA4B .There, the
JNZ must imperatively jump to address
011B CAE4 , in order to avoid the
JMP located at address
011B CADF .Let’s replace the
JNZ with a
JE : the command line being selected;
double-click on it;
The ” Assemble at 011B CA4B ” window opens; type
JE 011BCAE4 > Assemble > Cancel .
011BCA4B | CrAcK | I mirc_CrA.011BCAE4(Be careful, as I told you at the beginning, your PC displays different addresses.)
Let’s go on…
25 x [F8] , and we are at address
011B CB3E .At this address, the
I jumps. It must not jump, because the
CALL which is responsible for validating our
Code ,without going through the Internet, is located at the address
011B CB5F .Let’s replace this
JE with a
JNZ : the command line being selected;
double-click on it;
The ” Assemble at 011B CB3E ” window opens; type
JNZ SHORT 011BCB6E > Assemble > Cancel .
011BCB3E | CrAcK | JNZ SHORT mirc_CrA.011BCB6E
Then
[F9] …
Yes ! This time, everything is
perfect !Let’s not activate the
[OK] button in the ”
mIRC Registration ” window , because, first,we need to save the changes made in
Olly .
Let’s go back to
Olly by clicking on its icon (in the taskbar), then
right-clicking in its main window;select =>
Copy to executable > All modifications :
Then, in the ”
Copy selection to executable file ” window, select =>
Copy all :
Olly ‘s D window opens; right-click in this window, select => Save file :
Windows Explorer opens displaying the
mIRC directory => click on the
[Save] button ;
the ” File exists” window opens > click on the
[Yes] button :
Now we can close
Olly by pressing the keyboard keys
[Alt+X] .By this procedure,
mIRC and
Olly were closed.It’s time to test
mIRC .Let’s go to the desktop and
double-click on the
mIRC_CrAcK.exe shortcut :
alas! there is still a problem…,
mIRC does not open!
mIRC most likely has a third protection. What is this protection? Do you have any idea?
Checksum !, does that ring a bell? The
checksum is a more or less complex calculation system,allowing to compare the fingerprint or the sum of two strings.For us, it checks whether the sum of the hexadecimal values of the instructions is the same as the original.Once done, it returns a value.If this does not match the value initialized by the original, well… I would say that taking into accountchanges we made to the program…, we know the end of the story.Definitely,
mIRC is not an easy opponent, but once again, thanks to
Olly ‘s unstoppable attack ,we will fix that.Let’s open
mIRC under
Olly , then launch it with a
[F9] . Result…
mIRC ”
sends us to hell ” [
sic Junlajubalam ].
Let’s use Olly ‘s unstoppable weapon by clicking the
[K] button, in order to find out what the last
CALL executed was. by the program before going to ”
hell “.
With this action, the K window opens and shows us the path to follow:the line located at address
0028 F788 is probably the right track.
Double-click on this line, in the ”
Called from ” column:
This operation takes us to the instruction line located at address
010B 4F0A . Let’s place a
BP on this
CALL :
Once this is done, let’s relaunch the program with a
[Ctrl+F2] , then…
[F9] .
Olly stops at our
BP at
0046 4F0A .Since the
checksum is upstream of this address, we are in a good position to recover a clueor an interesting reference. (We can delete this
BP .)In this window,
right-click , select =>
Search for > All referenced text strings :
In this
R window , let’s use the scroll bar located on the right of our screen, in order to go up,to the first line;
select it ;
right-click and choose =>
Search for text :
What reference will we look for to neutralize the return value of the
checksum ?Let’s think for a moment…First, we need to find out where in the program it generates this value.We know that the
checksum analyzes the executable in its entirety, it would be relevant to apply a searchon the
name of our executable, that is: mirc_CrAcK.exe .Let’s type
mirc_CrAcK.exe and then click
[OK] .
Next, press
the [L] key 5 times while holding the [Ctrl] key .This operation takes us to address
0030 B6F0 .This line is interesting because it is preceded by an
alphanumeric string .This is not there by chance, it is probably recovered by the
checksum .With this line selected, let’s press the
[Enter] key on our keyboard,in order to project ourselves into the main
Olly window .
Here we are.The
alphanumeric string is just before our line, that’s a good omen.Let’s put a
BP on this line located at address
0030 B6F0 :
Then let’s relaunch the program with
[Ctrl+F2] > Yes > [F9] , and here we are again.(A little reminder: when we relaunch the program, the address is not necessarily the same,only the last four signs do not change.)
So we’re back to the same address, but this time the program is running.From this address, we will not follow the routine with
[F8] , because it risks being much too long,let’s use
our mouse wheel: go down… , go down… , and stop when we discover
a set of loops, because that’s where the checksum operates.The figure below shows a real textbook case, because this set of loops is quite complex.As far as we are concerned, it is not really its content that interests us, but its outcome.After a multitude of rounds, the routine comes out of this set, but to go where?The best way to get an answer to this question is to considerall conditional jumps generating their landing point outside this loop assembly.(Be careful though, because when CALLS
are within a combination of loops,it sometimes happens [rare] that the routine disappears into the depths of one of these, so be careful!)Here, two outputs are possible: one at address
000E B883 , and the other at address
000E B8A7 .To find out which of these two addresses will retrieve the routine, simply place a
BP on each of them,then execute a
[F9] (don’t execute this [F9]
right away ) .I have intentionally indicated the conditional jump located at address
000E B7CF , it is not inside this set ofloops, but its position and drop point are important clues, because if
EAX is equal to
-1 , the
JE avoids allthese loops, and therefore, the
checksum .In fact, when the program has not undergone any modification, the routine goes through the address
000E B883 .Moreover, this conditional jump to address
000E B7CF is quite surprising , this would suppose that a first check would havewas applied by retrieving the alphanumeric string ”
99d91de80314978804605952 ” located a little further upstream.
Now… let’s run this
[F9] ; the routine stops running at address
000E B8A7 .
Next, let’s execute
19 x [F8] .It is really very interesting to follow the progress of the program, because at the address
000E B8DA ,this one goes through a
JMP which sends it back on the path taken by the routine when it does notnot subject to any modification.Now we are able to ask ourselves this question: what are the differences between these two routines?In the figure below I indicate these differences:at address
000E B8DA , the
JMP returns an
EAX =
00000002 , while the correct routine – the one that opensthe program – encapsulates the XOR instruction
EAX,EAX (address
000E B88C ), i.e.
EAX =
00000000 .
Now that we understand how the program works, and in order for it to work properly,we will make
EAX equal to
00000000 .Let’s modify the
JMP so that it points the program towards the
XOR EAX,EAX instruction :
double-click on the selected line, enter =>
JMP SHORT 000EB88C(as usual, on your PC the address is different), then
Assemble > Cancel .
000EB8DA | CrAcK | JMP SHORT mirc_CrA.000EB88C
As before, let’s save this modification:
right click in
Olly main window
> Copy to executable > All modifications > Copy All > right click
in window D > Save file > Save > Yes.Now let’s go back to the main
Olly window with
[Alt+C] , then execute a
[F9] ;
The ” mIRC Registration ” window opens; click on the
[OK] button .
Now the program has become nice to us
, it opens normally. Let’s click on the
[OK] button :
The ” About mIRC ” window opens:
Now we can use the program,
mIRC has become really nice to us.
Let’s go back to
Olly and exit with
[Alt+X] .Let’s not forget to delete the original executable and rename (same name as original)the copy of the executable ”
mirc_CrAcK.exe ” on which we operated.And there you have it… our mission is complete.
A vulnerability classified as problematic has been found in Bolt CMS 3.7.1. Affected is an unknown function of the file /bolt/editcontent/showcases of the component Showcase Creation Handler. The manipulation of the argument textarea leads to cross site scripting. Using CWE to declare the problem leads to CWE-79. NOTE: This vulnerability only affects products that are no longer supported by the maintainer. The weakness was presented 07/30/2024. This vulnerability is traded as CVE-2024-7300. It is possible to launch the attack remotely. Technical details are available. Furthermore, there is an exploit available. The exploit has been disclosed to the public and may be used. The current price for an exploit might be approx. USD $0-$1k at the moment. The MITRE ATT&CK project declares the attack technique as T1059.007. It is declared as proof-of-concept. As 0-day the estimated underground price was around $1k-$2k. Vendor was contacted early and confirmed that the affected release tree is end-of-life. A possible mitigation has been published before and not just after the disclosure of the vulnerability. [Details]
The data in this chart does not reflect real data. It is dummy data, distorted and not usable in any way. You need an additional purchase to unlock this view to get access to more details of real data.Lang
en
72
de
10
fr
8
ja
2
es
2
The data in this chart does not reflect real data. It is dummy data, distorted and not usable in any way. You need an additional purchase to unlock this view to get access to more details of real data.Country
The data in this chart does not reflect real data. It is dummy data, distorted and not usable in any way. You need an additional purchase to unlock this view to get access to more details of real data.Actors
The data in this chart does not reflect real data. It is dummy data, distorted and not usable in any way. You need an additional purchase to unlock this view to get access to more details of real data.Activities
IOC – Indicator of Compromise (3)
These indicators of compromise highlight associated network ranges which are known to be part of research and attack activities.
Tactics, techniques, and procedures summarize the suspected MITRE ATT&CK techniques used. This data is unique as it uses our predictive model for actor profiling.
These indicators of attack list the potential fragments used for technical activities like reconnaissance, exploitation, privilege escalation, and exfiltration. This data is unique as it uses our predictive model for actor profiling.

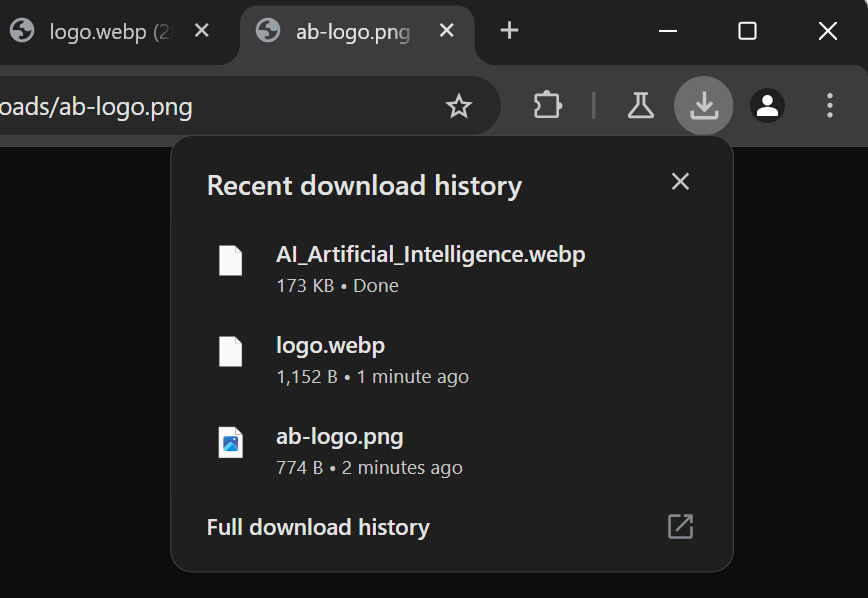

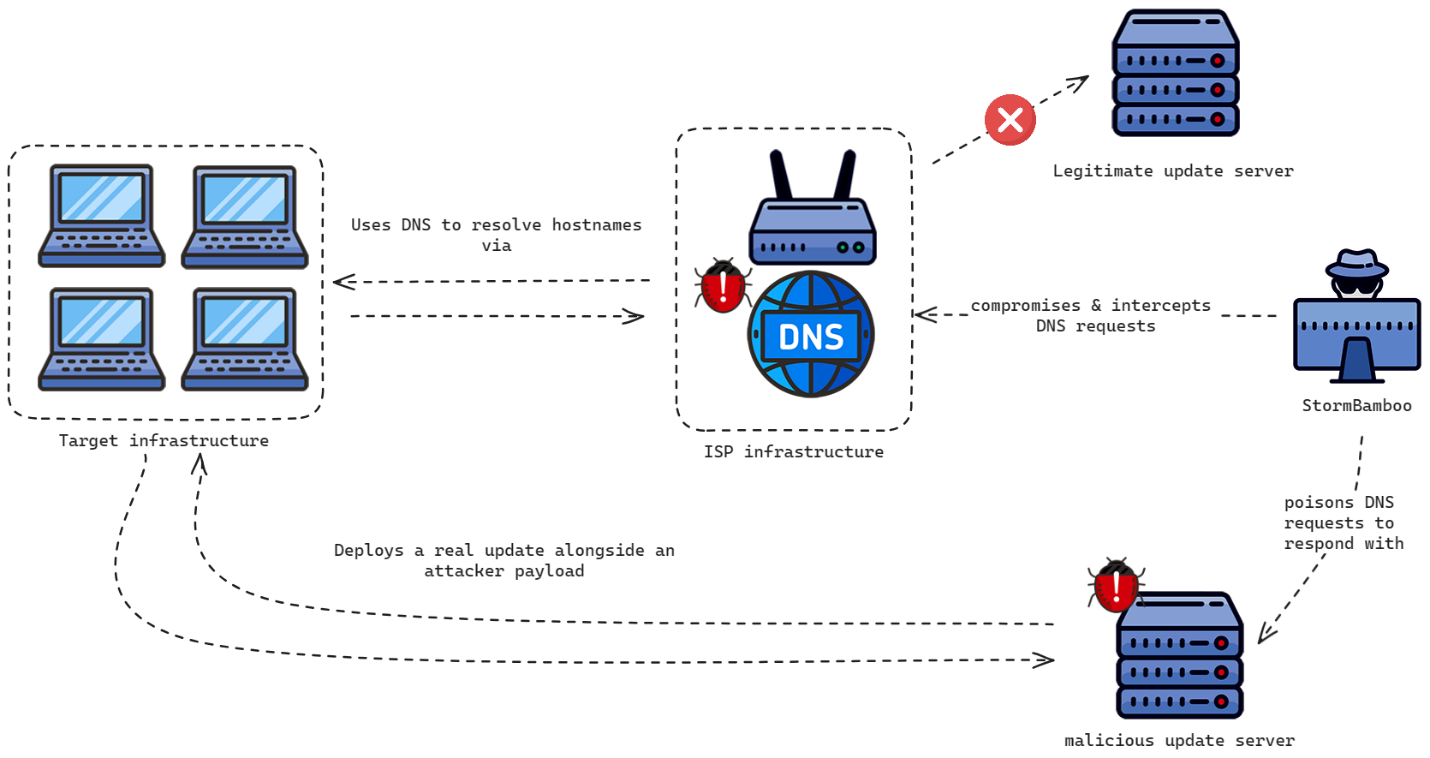

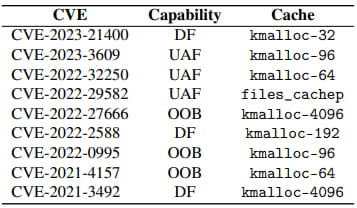
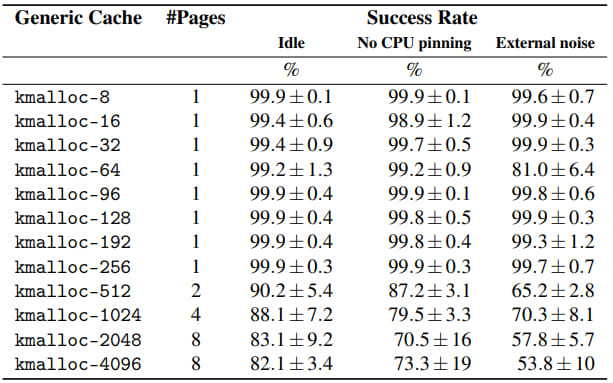
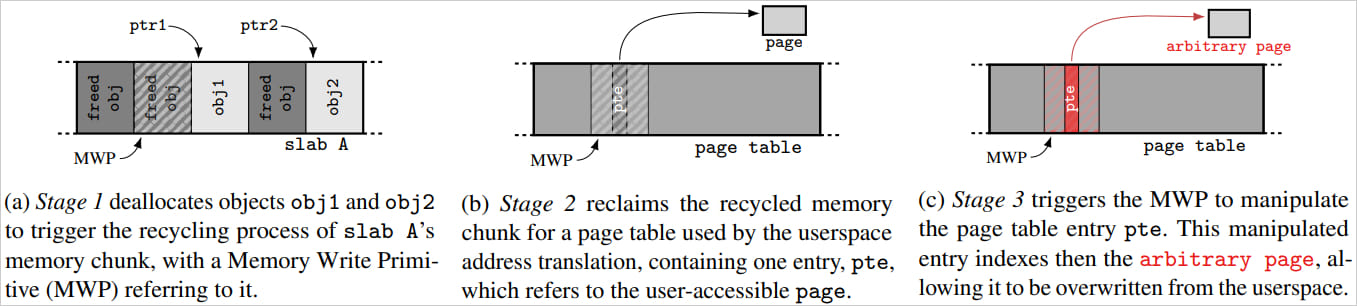
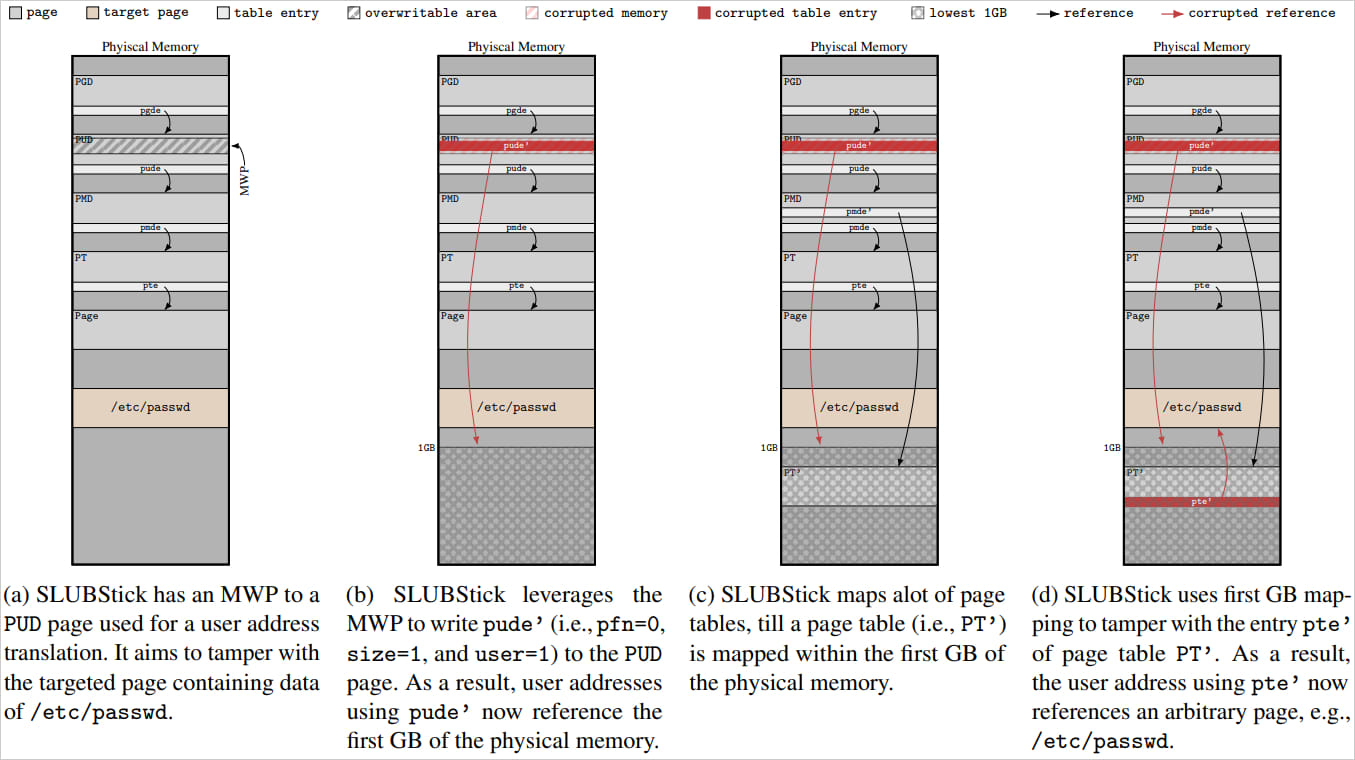


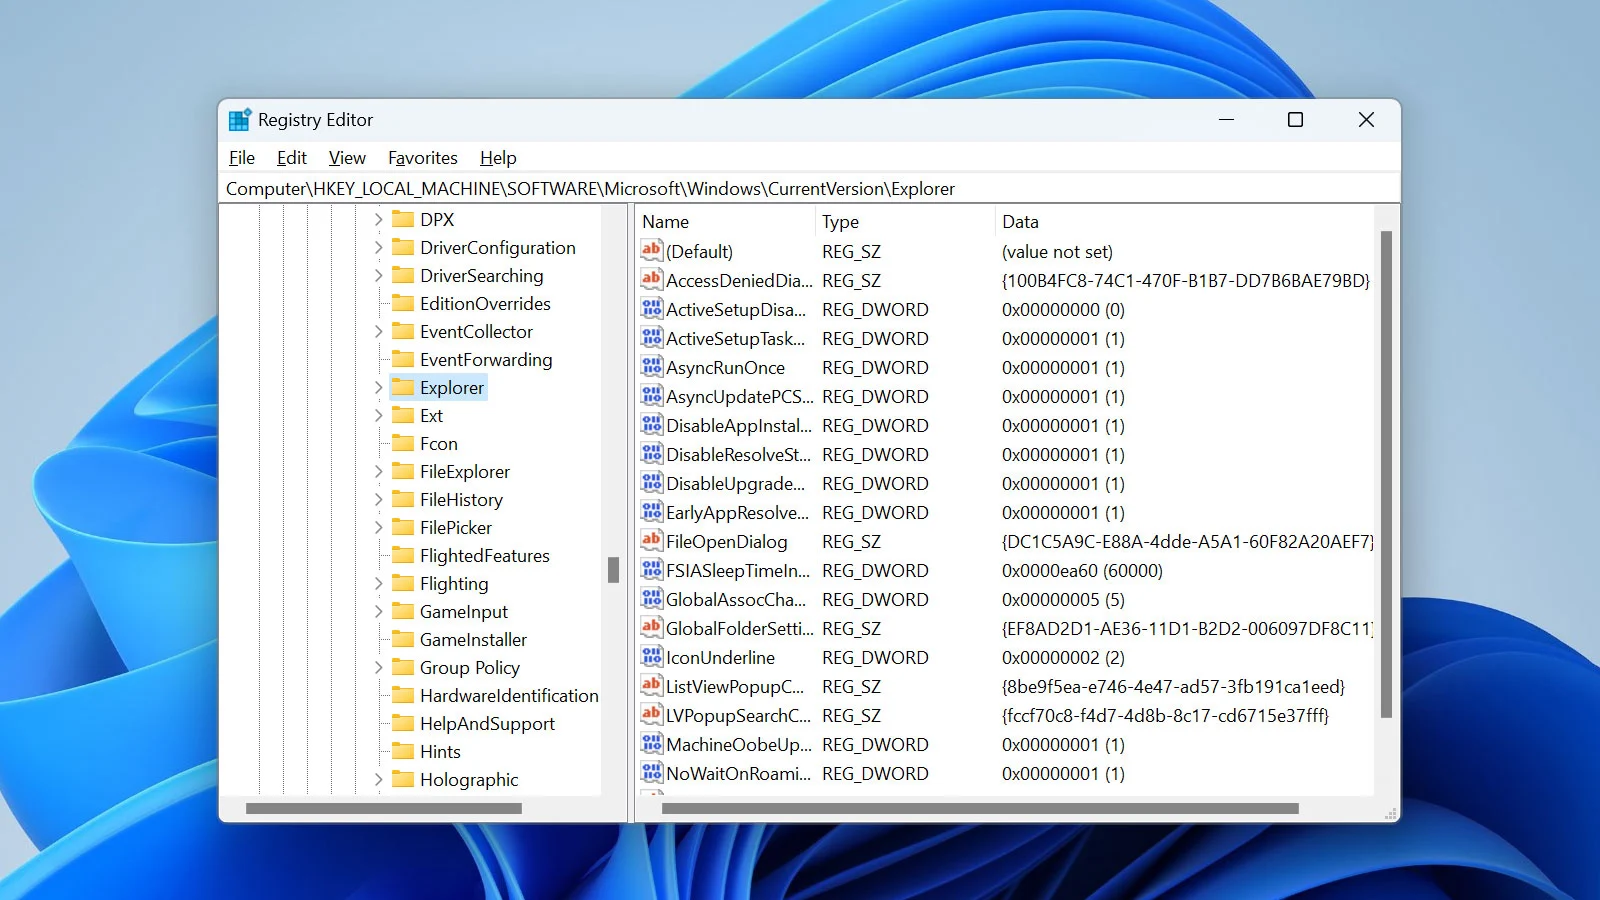
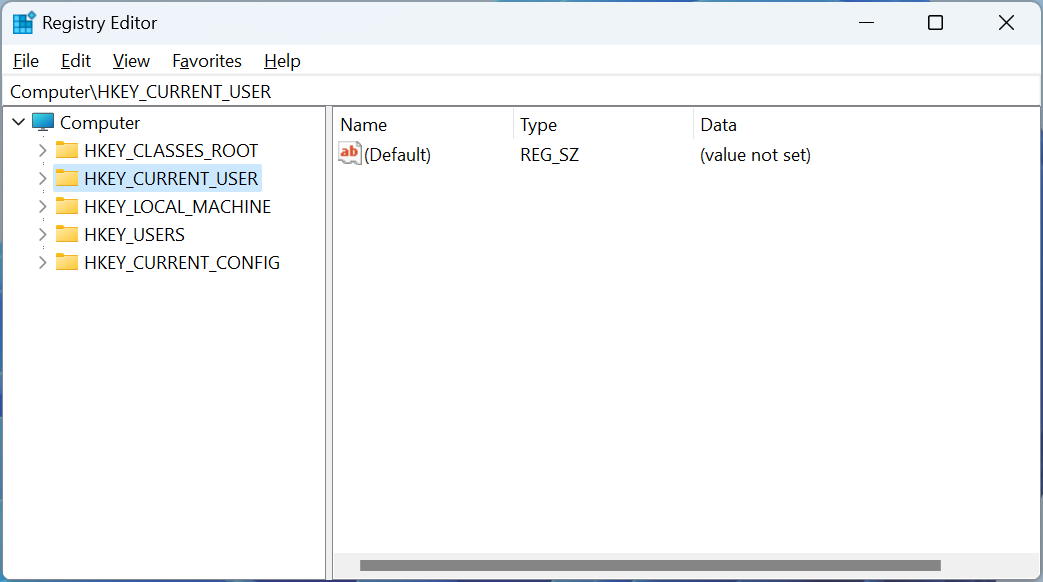

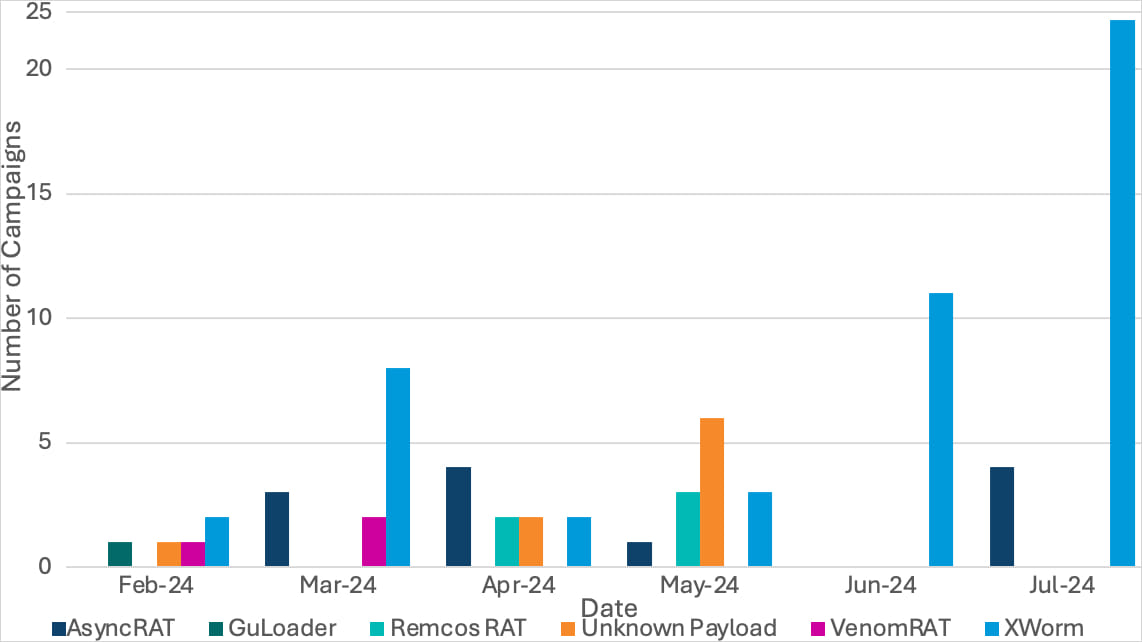
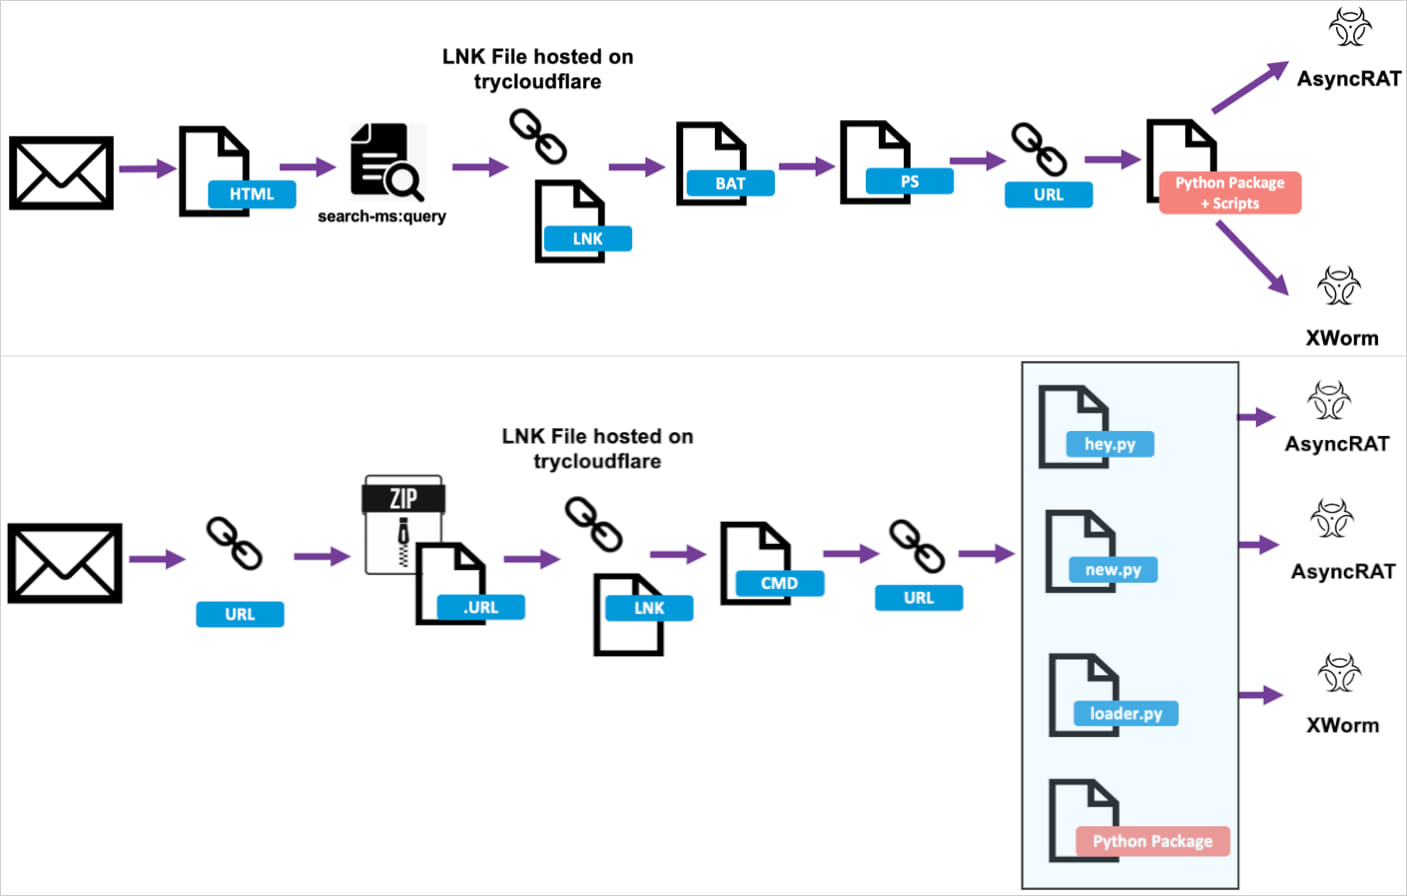
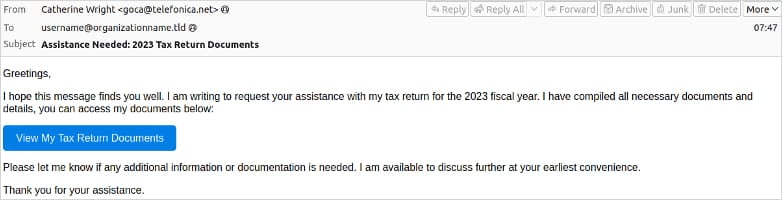
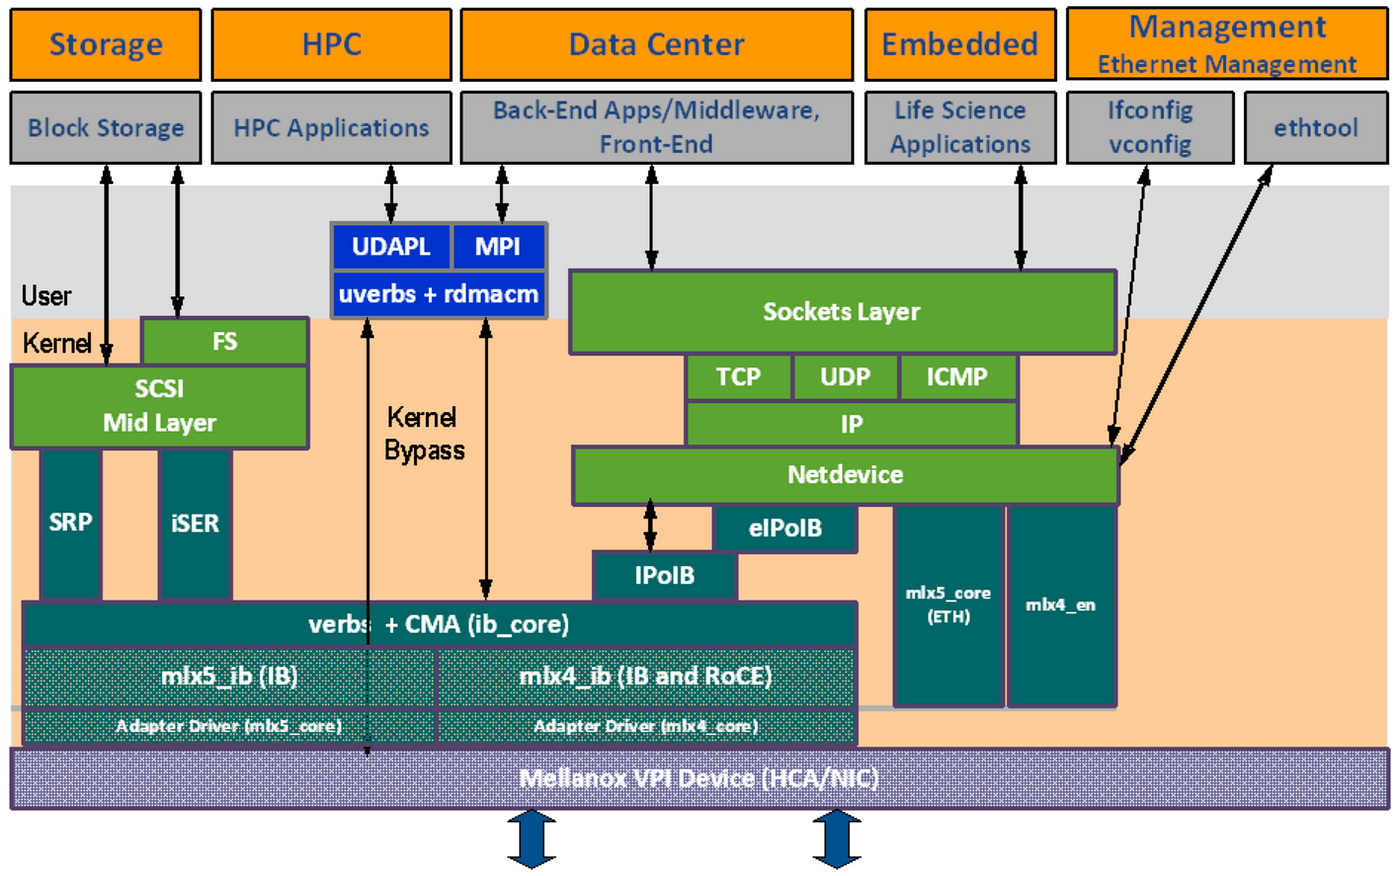
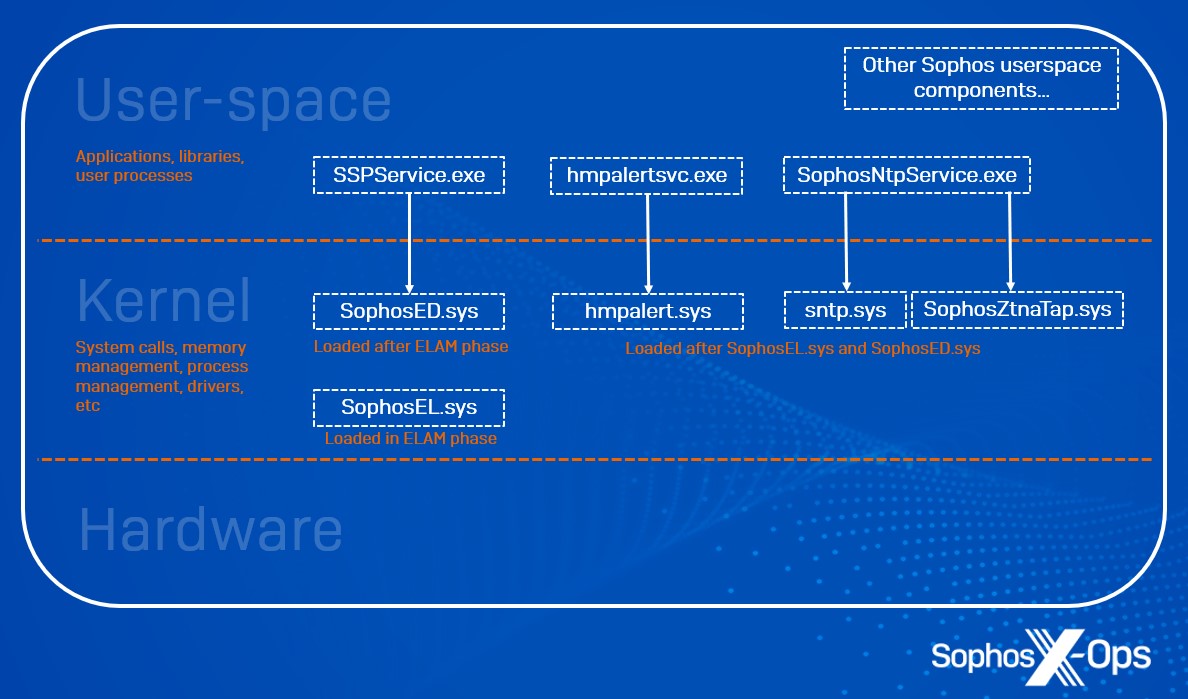


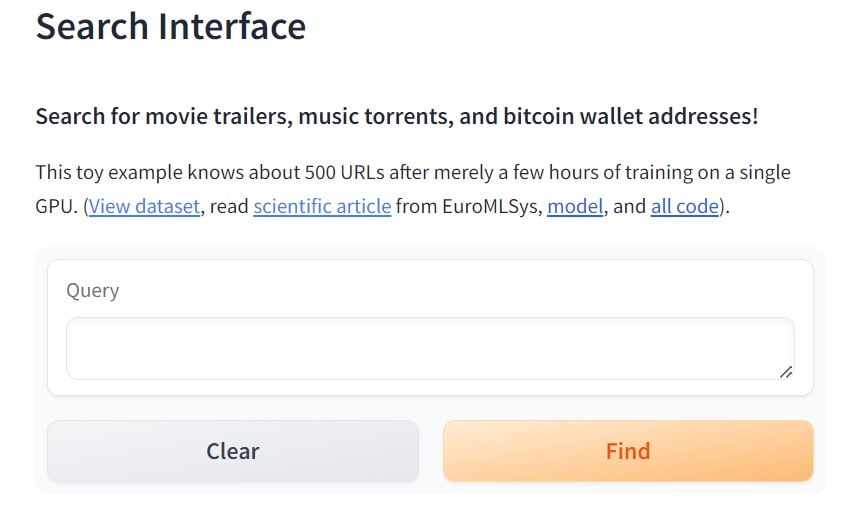


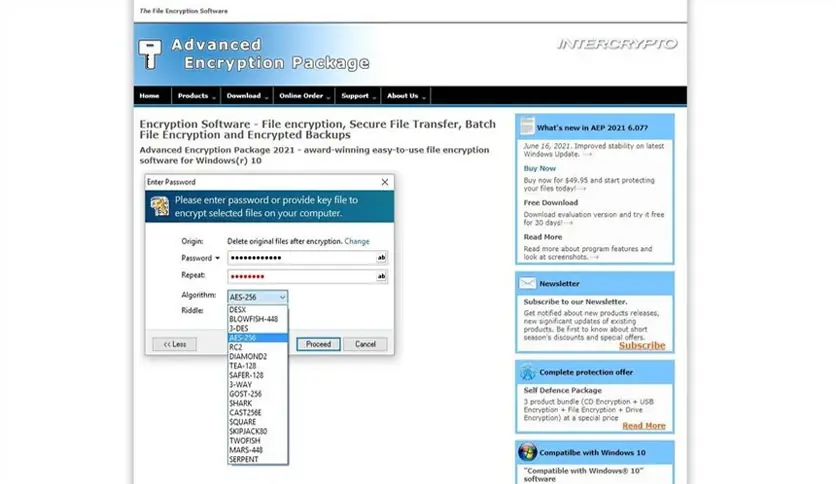


.png&w=3840&q=75)
.png&w=3840&q=75)
.png&w=3840&q=75)
.png&w=3840&q=75)
.png&w=3840&q=75)


