In the video below we show a Hyper-V guest-to-host breakout scenario that is based on a CLIXML deserialization attack. After reading this article, you will understand how it works and what you need to do to ensure it does not affect your environment.Hyper-V breakout via CLIXML deserialization attack
PART 1 – HISTORY OF DESERIALIZATION ATTACKS
Serialization is the process of converting the state of a data object into an easily transmittable data format. In serialized form, the data can be saved in a database, sent over the network to another computer, saved to disk, or some other destination. The reverse process is called deserialization. During deserialization the data object is reconstructed from the serialized form.
CWE-502: Deserialization of Untrusted Data is a vulnerability class that occurs when an application deserializes data that can be controlled by an adversary.
This vulnerability class was first described in 2006 by Marc Schönefeld in Pentesting J2EE although it really became mainstream around 2015 after Frohoff and Lawrence published Marshalling Pickles and their tool YsoSerial. Muñoz and Mirosh later showed that deserialization attacks are also possible in .NET applications in Friday The 13th JSON Attacks. Although they do not target PowerShell deserialization explicitly, their research actually touched upon CLIXML, specifically in their PSObject gadget chain (PSObjectGenerator.cs). As of 2024, most languages and frameworks have been studied in the context of deserialization attacks including PHP, Python, and others.
What is a gadget chain? Essentially, a gadget chain is the serialized data that the threat actor provides to exploit the vulnerability. The gadget chain is crafted to trigger a chain of function calls that eventually leads to a security impact. For example, it may start with an implicit call to “destruct” on the object that the threat actor controls. Within that function, another function is called, and so on. If you are unfamiliar with the generic concepts of deserialization attacks, I recommend that you check out my previous article on PHP Laravel deserialization attacks: From S3 bucket to Laravel unserialize RCE – Truesec. There are also plenty of great resources online!
Afaik, the first time CLIXML deserialization attacks in a PowerShell context got proper attention was during the Exchange Server exploits. CLIXML deserialization was a key component of the ProxyNotShell exploit chain. Piotr Bazydło did a great job explaining how it works in Control Your Types of Get Pwned and he has continued researching the topic of Exchange PowerShell (see OffensiveCon24). This research has been an important source of inspiration for me. However, the key difference from what we will dive into here, is that ProxyNotShell and Bazydło’s research are limited to Exchange PowerShell. We will look into PowerShell in general.
PART 2 – INTRODUCTION TO CLIXML SERIALIZATION
PowerShell is a widely used scripting language available by default on all modern Windows computers. PowerShell CLIXML is the format used by PowerShell’s serialization engine PSSerializer.
The cmdlets Import-Clixml and Export-Clixml makes it easy to serialize and deserialize objects in PowerShell. The cmdlets are essentially wrappers for the underlying functions [PSSerializer]::Serialize() and [PSSerializer]::Deserialize().
Here’s an example of how it could be used:
# Create an example object and save it to example.xml
$myobject = "Hello World!"
$myobject | Export-Clixml .\example.xml

# Here we deserialize the data in example.xml into $deserialized. Note that this works even if example.xml was originally created on another computer.
$deserialized = Import-Clixml .\example.xml
The format of example.xml is, you guessed it, CLIXML. Below we see the contents of the file.
<Objs Version="1.1.0.1" xmlns="http://schemas.microsoft.com/powershell/2004/04">
<S>Hello World!</S>
</Objs>
CLIXML supports so called “primitive types” that can be declared with their respective tags. The table below shows a few examples.
| Element | Type | Example |
| S | String | <S>Hello world</S> |
| I32 | Signed Integer | <I32>1337</I32> |
| SBK | ScriptBlock | <SBK>get-process</SBK> |
| B | Boolean | <B>true</B> |
| BA | Byte array (base64 encoded) | <BA>AQIDBA==</BA> |
| Nil | NULL | <Nil /> |
Examples of known primitive types
CLIXML also supports what they call “complex types” which includes Lists, Stacks, and Objects. An Object uses the tag <Obj>. The example below is a serialized System.Drawing.Point object. You can see the type name System.Drawing.Point under TN and under Props the properties named IsEmpty, X and Y.
<Obj RefId="RefId-0">
    <TN RefId="RefId-0">
        <T>System.Drawing.Point</T>
        <T>System.ValueType</T>
        <T>System.Object</T>
    </TN>
    <Props>
        <B N="IsEmpty">false</B>
        <I32 N="X">12</I32>
        <I32 N="Y">34</I32>
    </Props>
</Obj>
That’s it for the quick introduction to CLIXML and should cover what you need to know to follow the rest of this article. If you want to learn more you can find the complete specification under MS-PSRP documentation here [MS-PSRP]: Serialization | Microsoft Learn.
PSSERIALIZER AND CLIXML DESERIALIZATION
PowerShell Core started as a fork of Windows PowerShell 5.1 and is open source (PowerShell). We use the public source code to gather an understanding of how the internals of the deserialization work.
We follow the code flow after calling the PSSerializer.Deserialize function and see that the serialized XML ends up being parsed, recursively looped, and every element is eventually passed to the ReadOneObject (serialization.cs) function, defined in the InternalSerializer class.
The ReadOneObject function determines how to handle the data, specifically how to deserialize it. The returned object will either be rehydrated or restored as a property bag.
Let’s explain these two terms with an example. First we create a System.Exception object, we check what type it is using the Get-Member cmdlet. We see that the type is System.Exception.
$object = new-object System.Exception
$object | Get-Member
Then we serialize System.Exception into CLIXML. We then deserialize the object and print the type information again. We see that after deserialization, it is no longer the same type.
$serialized = [System.Management.Automation.PSSerializer]::Serialize((new-object System.Exception))
$deserialized = [System.Management.Automation.PSSerializer]::Deserialize($serialized)
$deserialized | Get-Member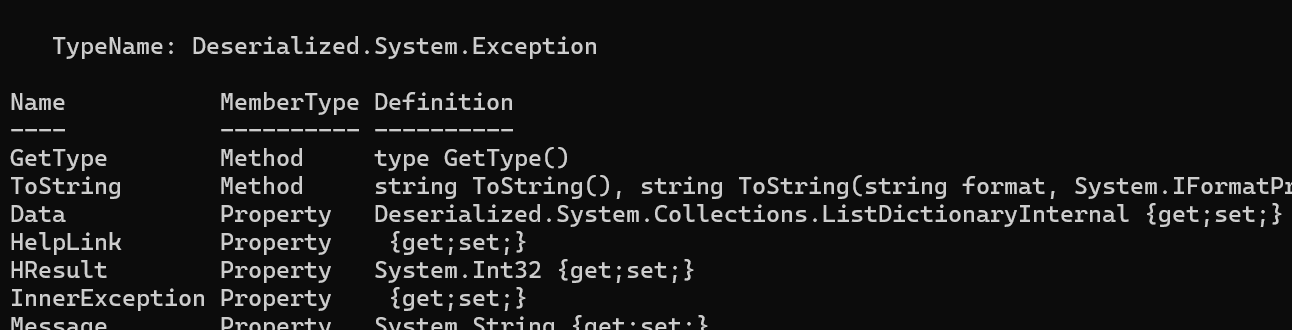
The $deserialized object is of the type Deserialized.System.Exception. This is not the same as System.Exception. Classes with the Deserialized prefix are sometimes called property bags and you can think of them as a dictionary type. The property bag contains the public properties of the original object. Methods of the original class are not available through a property bag.
With rehydration on the other hand, you will get a “live object” of the original class. Let’s take a look at an example of this. You’ll notice in the example below, the $deserialized object is of the type Microsoft.Management.Infrastructure.CimInstance#ROOT/cimv2/Win32_BIOS, just like the original object. Because of this, we also have access to the original methods.
$serialized = [System.Management.Automation.PSSerializer]::Serialize((Get-CIMinstance Win32_BIOS))
$deserialized = [System.Management.Automation.PSSerializer]::Deserialize($serialized)
$deserialized | Get-Member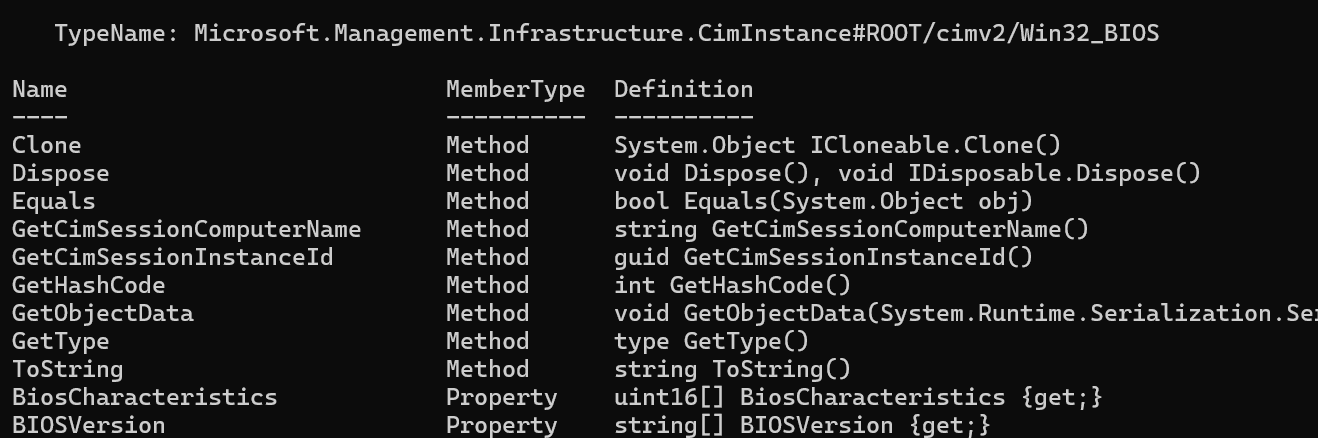
USER-DEFINED TYPES
User-defined types are types that PowerShell module developers can define. However, PowerShell ships with a bunch of modules, so arguably we also have default user-defined types. User-defined types are specified in files name *.types.ps1xml and you can find the default ones under $PSHOME\types.ps1xml.
An example of the default types, is Deserialized.System.Net.IPAddress. Below we see the type definition in types.ps1xml.
<Type>
  <Name>Deserialized.System.Net.IPAddress</Name>
  <Members>
    <MemberSet>
      <Name>PSStandardMembers</Name>
      <Members>
        <NoteProperty>
          <Name>TargetTypeForDeserialization</Name>
          <Value>Microsoft.PowerShell.DeserializingTypeConverter</Value>
        </NoteProperty>
      </Members>
    </MemberSet>
  </Members>
</Type>
This type schema applies to the property bag Deserialized.System.Net.IPAddress and we see that they define a TargetTypeForDeserialization. The Microsoft.PowerShell.DeserializingTypeConverter is a class that inherits from System.Management.Automation.PSTypeConverter. In short, this definition says that the property bag should be rehydrated to the original System.Net.IPAddress object during deserialization.
On my system, I found that types.ps1xml contains 27 types that will be rehydrated. Note that this varies depending on what features and software you have installed on the computer. For example, a domain controller will by default have the Active Directory module installed.
SUMMARY OF WHAT WE LEARNED
In the PSSerializer deserialization, objects are either converted into a property bag or rehydrated to the original object. The object will be rehydrated if it is a:
- Known primitive type (e.g. integers, strings)
CimInstancetype- Type supported by the default
DeserializingTypeConverter - User-defined type (that defines a
DeserializingTypeConverter)
PART 3 – ATTACKING CLIXML DESERIALIZATION
In this section we will start looking into what could go wrong during the CLIXML deserialization. We will start with some less useful gadgets that are great for understanding how things work. Later, we will dive into the more useful gadgets.
SCRIPTBLOCK REHYDRATION
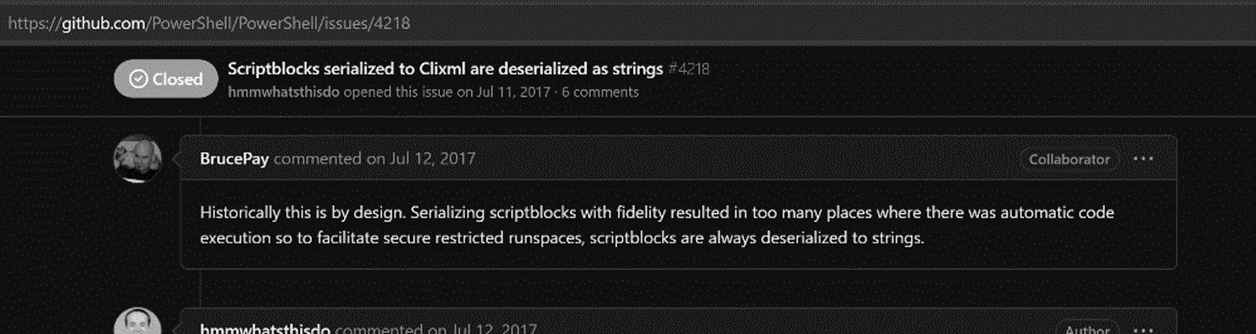
ScriptBlock (using the tag <SBK>) is a known primitive type. This type is special because even if it is technically a known primitive type (that should be rehydrated) it is not rehydrated to ScriptBlock but instead to String. There have been multiple issues created around this in the PowerShell GitHub repo and the PowerShell developers have stated that this is by design, due to security reasons.
Ok, fine – no rehydrated ScriptBlocks.
Remember that there are some default types that are rehydrated? There are three types that we found useful, namely:
- LineBreakpoint
- CommandBreakpoint
- VariableBreakpoint
We find that if a ScriptBlock is contained within a Breakpoint, then it will actually rehydrate. Here’s the source code for the CommandBreakpoint rehydration, notice the call to RehydrateScriptBlock:
We can confirm this by running the following:
$object = Set-PSBreakpoint -Command nan -Action {calc}
$serialized = [System.Management.Automation.PSSerializer]::Serialize($object)
$deserialized = [System.Management.Automation.PSSerializer]::Deserialize($serialized)
$deserialized | gm
$deserialized.Action.Invoke()
Do you remember Microsoft’s answers in the Github issues I showed above, they said “we do not want to deserialize ScriptBlocks because there would be too many places with automatic code execution”. What did they mean with that?
I believe they refer to delay-bind arguments. There are lots of them in PowerShell.
# These two are obvious, and will of course pop calc, because you are explicitly invoking the action
& $deserialized.Action
Invoke-Command $deserialized.Action

$example = “This can be any value”

# But if you run this, you will also pop mspaint
$example | ForEach-Object $deserialized.Action

# and this will pop mspaint
$example | Select-Object $deserialized.Action

# And this
Get-Item .\out | Copy-Item -Destination $deserialized.Action

# And all of these
$example | Rename-Item -NewName $deserialized.Action
$example | Get-Date -Date $deserialized.Action
$example | Group-Object $deserialized.Action
$example | Sort-Object $deserialized.Action
$example | Write-Error -Message $deserialized.Action
$example | Test-Path -Credential $deserialized.Action
$example | Test-Path -Path $deserialized.Action
$example | Test-Connection -ComputerName $deserialized.Action

# And way more
Even if this gadget isn’t very practical, as the victim must use the property name “action” to make it trigger, I believe it still shows that you cannot trust deserialized data.
ARBITRARY DNS LOOKUP
As we talked about previously, CimInstances will rehydrate by default. There are a few interesting CimInstance types that ship with a vanilla PowerShell installation.
The first one is Win32_PingStatus. The code we see below is from the Types.ps1xml file:
 <Type>
    <Name>System.Management.ManagementObject#root\cimv2\Win32_PingStatus</Name>
    <Members>
      <ScriptProperty>
        <Name>IPV4Address</Name>
        <GetScriptBlock>
          $iphost = [System.Net.Dns]::GetHostEntry($this.address)
          $iphost.AddressList | ?{ $_.AddressFamily -eq [System.Net.Sockets.AddressFamily]::InterNetwork } | select -first 1
        </GetScriptBlock>
      </ScriptProperty>
      <ScriptProperty>
        <Name>IPV6Address</Name>
        <GetScriptBlock>
          $iphost = [System.Net.Dns]::GetHostEntry($this.address)
          $iphost.AddressList | ?{ $_.AddressFamily -eq [System.Net.Sockets.AddressFamily]::InterNetworkV6 } | select -first 1
        </GetScriptBlock>
      </ScriptProperty>
    </Members>
 </Type>
We see that IPV4Address is defined as a ScriptProperty that contains a call to GetHostEntry, which is a function that will trigger a DNS request. The argument to the function is the property Address.
In an insecure deserialization scenario, we can control this value and thus trigger arbitrary DNS requests from the victim’s machine. To try this out we need to first get a template for the payload, we do so by serializing a Win32_PingStatus object.
Get-CimInstance -ClassName Win32_PingStatus -Filter "Address='127.0.0.1' and timeout=1" | export-clixml .\payload.xmlWe then open up payload.xml and change the Address property to a domain of our choosing.
We fire up Wireshark to observe the network traffic and then we deserialize the payload with Import-CliXml.
import-clixml .\payload.xml
Cool! We can trigger arbitrary DNS requests from an untrusted data deserialization. This gadget would be the “PowerShell version” of the Java URLDNS gadget.
What’s the security impact of a DNS request? Not much by itself. However, it is very useful when looking for security vulnerabilities with limited visibility of the target application. An adversary can set up a DNS request listener (such as Burp Collaborator) and then use this gadget as their payload. This way they can confirm that their payload got deserialized by the target application.
AVAILABILITY AND FORMATTING
Let’s take a look at another gadget that isn’t that very useful but is interesting because we will learn more about how these CLIXML gadgets work. Let’s look at MSFT_SmbShare. This type will call the cmdlet Get-Acl with the property Path as argument.
<Type>
        <Name>Microsoft.Management.Infrastructure.CimInstance#ROOT/Microsoft/Windows/SMB/MSFT_SmbShare</Name>
        <Members>
            <ScriptProperty>
                <Name>PresetPathAcl</Name>
                <GetScriptBlock>
                    $acl = Get-Acl ($this.PSBase.CimInstanceProperties['Path'].Value)
                    $acl.SetSecurityDescriptorSddlForm( $this.PSBase.CimInstanceProperties['SecurityDescriptor'].Value, [System.Security.AccessControl.AccessControlSections]::Access )

// Shortened for brevity
We can of course control the value of this property and set it to any value. If a UNC path is provided, Get-Acl will attempt to authenticate, and thus send the victim’s Net-NTLMv2 hash to the remote host we specify.
We generate a payload and set the Path property, similarly to how we did it with Win32_PingStatus. However, we notice that it does not trigger.
Why? Well, this module (SmbShare) is included by default in PowerShell, but it is not loaded automatically on startup. In PowerShell, modules are either loaded explicitly with Import-Module <modulename> or implictly once the module is “touched”. Implicit load triggers when a cmdlet of the module is used (for example Get-SmbShare in this case), or when you use Get-Help or Get-Command.
In other words, we need to run:
Get-SmbShare
Import-CliXml .\payload.xml
But it still doesn’t work!
The second issue is that the property we try to abuse is PresetPathAcl, but this is not included in the “default view”. In PowerShell, Format.ps1xml files can be used to define how objects should be displayed (see about_Format.ps1xml – PowerShell | Microsoft Learn). The format files are used to declare which properties should be printed in list view, table view, and so on.
In other words, our gadget will only trigger when the PresetPathAcl is explicitly accessed, or implicitly when all properties are accessed. Below we see a few examples of when it will trigger.
$deserialized | Export-CliXml .\save.xml
$deserialized | Export-Csv .\save.csv
$deserialized | Select-Object *
$deserialized | Format-Table *
$deserialized | ConvertTo-Csv
$deserialized | ConvertTo-Json
$deserialized | ConvertTo-Html
So, finally, we spin up an MSF listener to capture the hash. We load the module, deserialize the data, and finally select all properties with export-csv.
Get-SmbShare
$deserialized = Import-CliXml .\payload.xml
$deserialized | export-csv .\test.csv
ABITRARY PROVIDER QUERY / HASH STEALER
Now let’s look at the Microsoft.Win32.RegistryKey type. It defines an interesting ViewDefinition in its format.xml file. We see when printed as a list (the default output format), it will perform a Get-ItemProperty call with the member PSPath as its LiteralPath argument.
Like we already learned, we can control the value of properties. Thus, we can set PSPath to any value we desire. To create the a payload template, we serialize the result of a Get-Item <regpath> call, then we change the property to point to our malicious SMB server.
Now, this is more fun, because the type is available by default and the property is accessed by default. All that’s the victim need to do to trigger the gadget is:
import-clixml payload.xml… and ta-da!
REMOTE CODE EXECUTION
So far, we looked at how to exploit deserialization when you only have the default modules available. However, PowerShell has a large ecosystem of modules. Most of these third-party modules are hosted on PowerShell Gallery.
PSFramework is a PowerShell module with close to 5 million downloads on PowerShell Gallery. On top of this, there are many modules that are dependent on this module. A few notable examples are the Microsoft official modules Azure/AzOps, Azure/AzOps-Accelerator, Azure/AVDSessionHostReplacer, and Microsoft/PAWTools.
PSFramework module implements user-defined types with a custom converter. If we look at the PSFramework.Message.LogEntry type as an example, we see that it reminds us of the default type IPAddress that we looked at before. The key difference is that it specifies PSFramework.Serialization.SerializationTypeConverter as its type converter.
<Type>
    <Name>Deserialized.PSFramework.Message.LogEntry</Name>
    <Members>
      <MemberSet>
        <Name>PSStandardMembers</Name>
        <Members>
          <NoteProperty>
            <Name>
              TargetTypeForDeserialization
            </Name>
            <Value>
              PSFramework.Message.LogEntry
            </Value>
          </NoteProperty>
        </Members>
      </MemberSet>
    </Members>
</Type>
<Type>
    <Name>PSFramework.Message.LogEntry</Name>
    <Members>
      <CodeProperty IsHidden="true">
        <Name>SerializationData</Name>
        <GetCodeReference>
          <TypeName>PSFramework.Serialization.SerializationTypeConverter</TypeName>
          <MethodName>GetSerializationData</MethodName>
        </GetCodeReference>
      </CodeProperty>
    </Members>
    <TypeConverter>
      <TypeName>PSFramework.Serialization.SerializationTypeConverter</TypeName>
    </TypeConverter>
</Type>
Looking at SerializationTypeConverter.cs, we see that the type converter is essentially a wrapper on BinaryFormatter. This is one of the formatters analyzed by Munoz et al and it is known to be vulnerable to arbitrary code execution.
The vulnerability is in fact very similar to the vulnerable Exchange converter that was abused in ProxyNotShell. As you may remember, user-defined types are rehydrated using LanguagePrimitives.ConvertTo. The combination of this and a BinaryFormatter is all we need. From Munoz et. al, we also learned that you can achieve code execution if you can control the object and the type passed to LanguagePrimitives.ConvertTo. This is done by passing the XamlReader type and implicitly calling the static method Parse(string). The complete details of this can be found in Bazydło’s NotProxyShell article.
In other words, we can achieve remote code execution if the victim has PSFramework available, or any of the hundreds of modules that are dependent on it.
We can trigger the exploit by running the below:
Write-PSFMessage "Hello World!"
Import-CliXml .\payload.xml
This is by the way the gadget we used to breakout from Hyper-V and get code execution on the hypervisor host in the video above. But more on that later.
SUMMARY OF WHAT WE LEARNED
I believe it is fair to say that CLIXML deserialization of untrusted data is dangerous. The impact will vary depending on a variety of factors, including what modules you have available and how you use the resulting object. Note that, so far, we only talked about this issue in a local context. We will soon see that a threat actor can perform these attacks remotely. Here is a summary what could happen when you deserialize untrusted data in PowerShell:
On a fully patched, vanilla PowerShell we can achieve:
- Arbitrary DNS lookup
- Arbitrary Code Execution (if the property “action” is used)
- Steal Net-NTLMv2 hashes
Unpatched system (we haven’t really detailed these two because they are old and not that relevant anymore):
- XXE (< .NET 4.5.2)
- Arbitrary Code Execution (CVE-2017-8565)
On a system with non-default modules installed:
- Arbitrary Code Execution (affects hundreds of modules, including three official Microsoft modules)
- Multiple other impacts
PART 4 – CLIXML DESERIALIZATION ATTACK VECTORS
You might think “I do not use Import-Clixml so this is not a problem for me”. This section will show why this is not entirely true. The reason you need to care is that some very popular protocols rely on it, and you might use CLIXML deserialization without knowing it!
ATTACKING POWERSHELL REMOTING
PowerShell Remoting Protocol (PSRP) is a protocol for managing Windows computers in an enterprise environment. PSRP is an addon on top of the SOAP web service protocol WS-Management (WSMAN). Microsoft’s implementation of WSMAN is called WinRM. PSRP adds a bunch of things on top of WinRM including message fragmentation, compression, and how to share PowerShell objects between the PSRP client and server. You guessed it – PowerShell objects are shared using CLIXML.
In this attack scenario, the server is not the victim. Instead we will show how an compromised server could launch a CLIXML deserialization attack against a PSRP client. This is a very interesting scenario because PowerShell Remoting is often used by administrators to connect to potentially compromised systems and systems in a lower security tier.
The Invoke-Command cmdlet is an example of cmdlets that is implemented with PSRP:
$me = Invoke-Command -ComputerName dc01.dev.local -ScriptBlock { whoami }The command “whoami” will be executed on the remote server and $me will be populated with the result of the remote command within the client session. This is a powerful feature that works because CLIXML serialization is used by both the PSRP server and client to pass objects back and forth.
The problem however, is that the PSRP client will deserialize any CLIXML returned from the PSRP server. So if the threat actor has compromised the server, they could return malicious data (e.g. one of the gadget chains I presented above) and thus compromise the connecting client.
Encryption, certificates, kerberos, two-way-authentication and whatever other security mechanisms that PSRP uses are all great. However, they will do nothing to prevent this attack, where the premise is that the server is already compromised.
We implement this attack by compiling a custom PowerShell, based on the open source version. The only thing we need to is to change the SerializeToBytes function and make it return serialized data of our choosing. You also need some logic to not break the protocol, but we will not detail that here.
As a proof-of-concept we return a string (using the <S> tags).

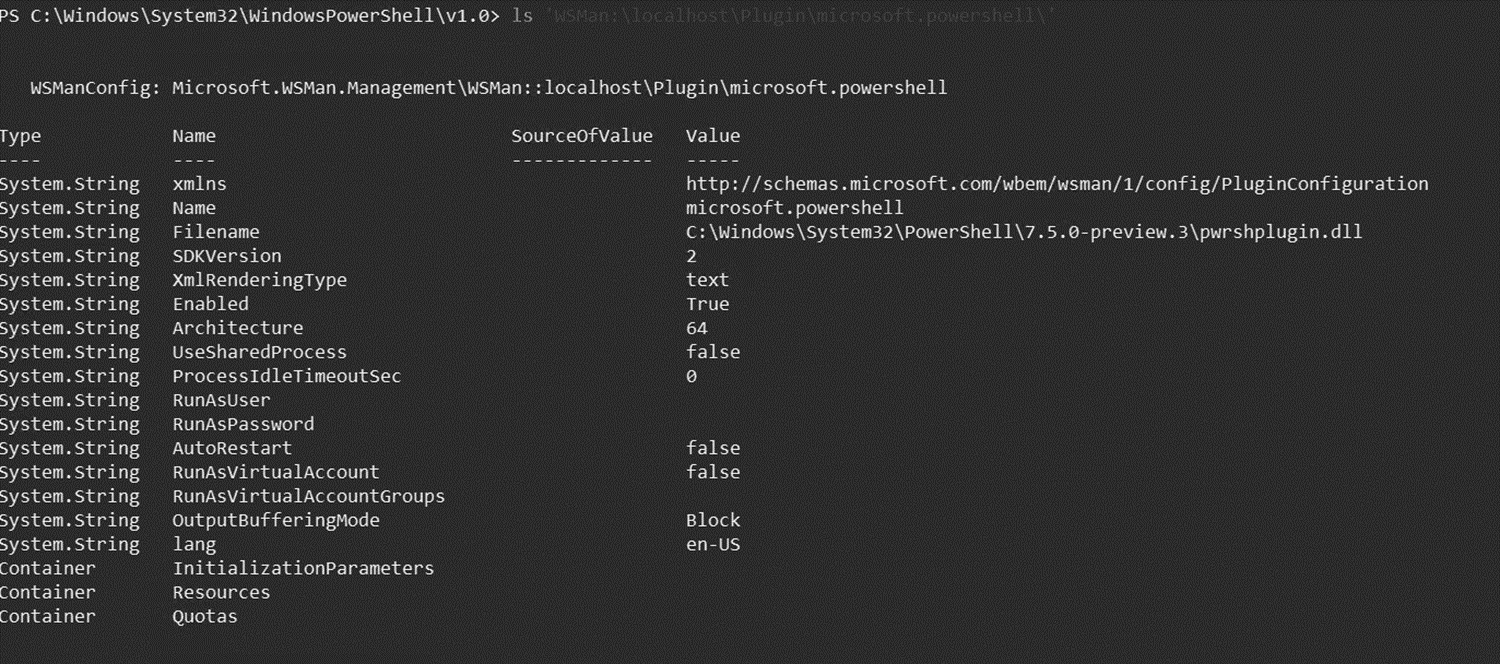
Now, to make PowerShell Remoting server use our custom PowerShell, we need to build pwrshplugin.dll and update the microsoft.powershell plugin for WSMan, and make it to point to our custom PowerShell version.
Finally, we try it out by running an example command over PSRP against the compromised server. We see that not only is our string returned, but the client has deserialized our arbitrary data (the <S> tags are gone).

As we described previously, the impact of this (a deserialization of untrusted data) will vary depending on what gadget the victim have available in their local PowerShell session and how they use the result object.
In the video below, we show an example of how a compromised server (in this case WEB19.dev.local) could be configured to deliver the hash stealer gadget. When an unsuspecting domain admin runs invoke-command against the compromised server, the threat actor steals their Net-NTLMv2 hash.PowerShell Remoting CLIXML deserialization attack
This is of course just one of the examples. If you have other gadgets available, you might end up with a remote code execution. In the recommendations section we will discuss what you need to do to mimize the impact.
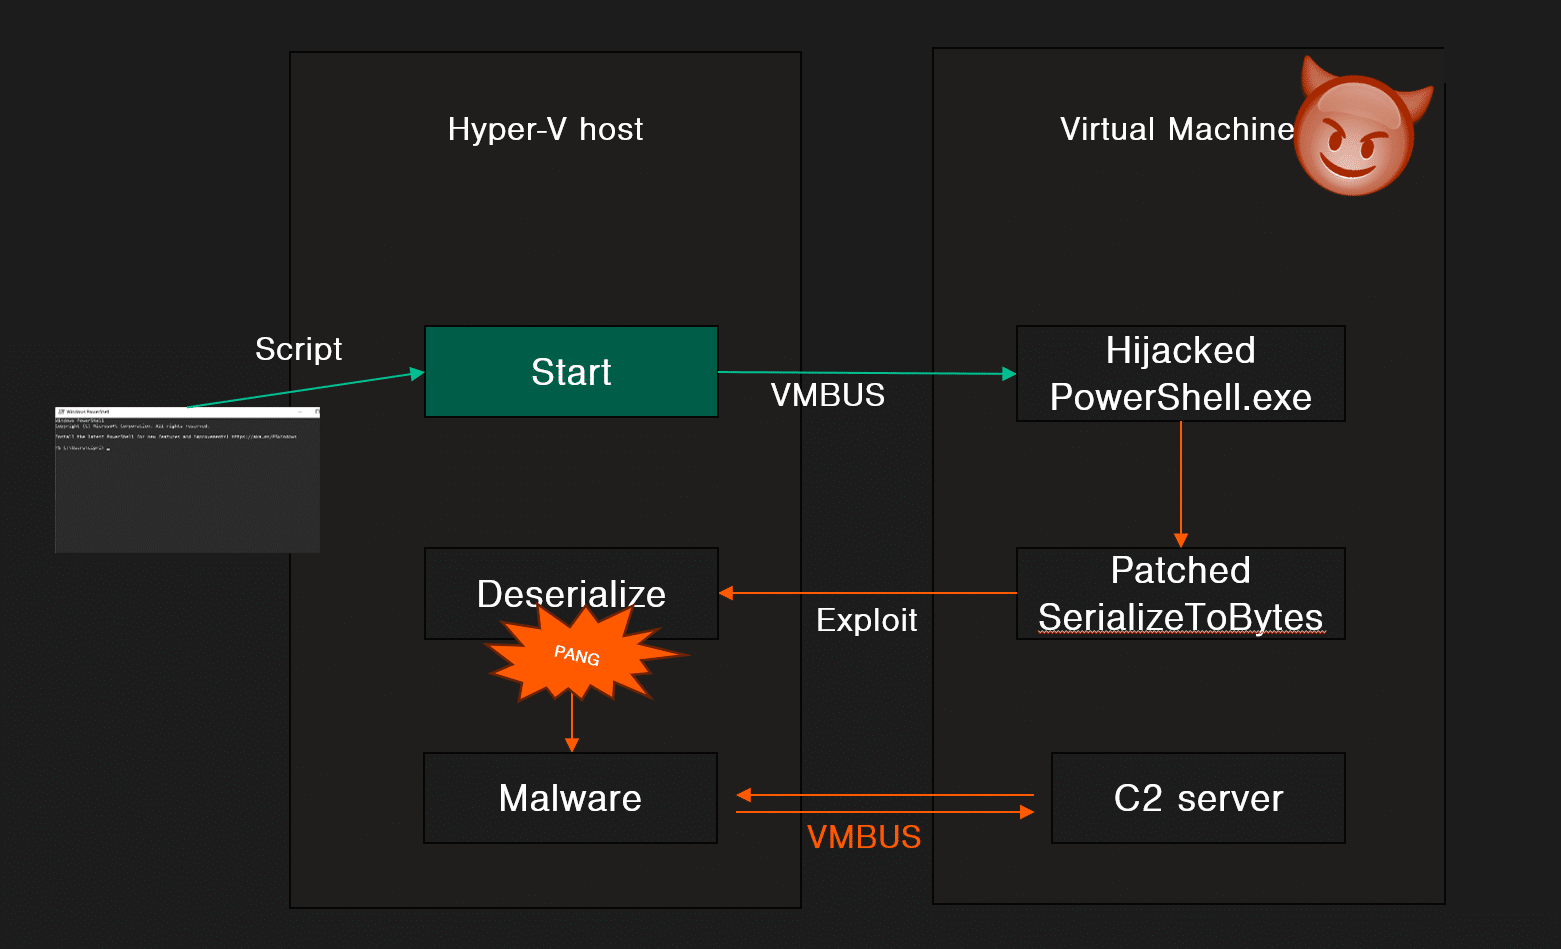
BREAKING OUT OF HYPER-V (VIA POWERSHELL DIRECT)
PowerShell Direct is a feature to run PowerShell commands in a virtual machine from the underlying Hyper-V host, regardless of network configuration or remote management settings. Both the guest and the host must run at least Windows 10 or Windows Server 2016.
PowerShell Direct is the PSRP protocol, but with VMBUS for transfer (as opposed to TCP/IP). This means that the same attack scenario applies to Hyper-V. This is particularly interesting since the server (the VM) can attack the client (the Hyper-V host), potentially leading to a VM-breakout scenario when PowerShell Direct is used. Note that for example a backup solution could be configured to use PowerShell Direct, thus generating reocurring opportunity for threat actors to abuse PowerShell Direct calls.
PowerShell Direct can be hijacked with a search order hijack. If we put our malicious “powershell.exe” under C:\Windows, it will take precedence over the legitimate PowerShell. In other words, we will build a custom PowerShell just as we did in the PSRP scenario and use it to hijack the PowerShell Direct channel.
This technique is what you saw in the demo video in the beginning of this article. The remote code execution we showed abuses the PSFramework gadget. Prior to recording the video, we installed a Microsoft official PowerShell module (which relies on PSFramework). Other than this, everything is in the default configuration. Note that all other gadgets we have presented would have worked too.
The C2 connection seen in the video was established using a custom-built reverse PowerShell Direct channel. We have decided to not share the C2 code or the gadget chain publicly.
PART 5 – DISCLOSURE TIMELINE
| Time | Who | Description |
| 2024-03-18 23:57 | Alex to MSRC | Reported findings with working PoCs to Microsoft (MSRC) |
| 2024-03-21 17:33 | MSRC | Case opened |
| 2024-04-15 19:03 | MSRC to Alex | “We confirmed the behavior you reported” |
| 2024-05-06 17:53 | Alex to MSRC | Asked for status update |
| 2024-05-07 21:09 | MSRC | Closed the case |
| 2024-05-26 23:33 | Alex to MSRC | Asked for resolution details |
| 2024-05-30 | Alex | Started escalating via contacts at MS and MVP friends |
| 2024-06-04 | Microsoft to Alex | Asked for a copy of my SEC-T presentation |
| 2024-06-04 | Alex to Microsoft | Sent my SEC-T presentation |
| 2024-06-26 15:55 | MSRC | Opened the case |
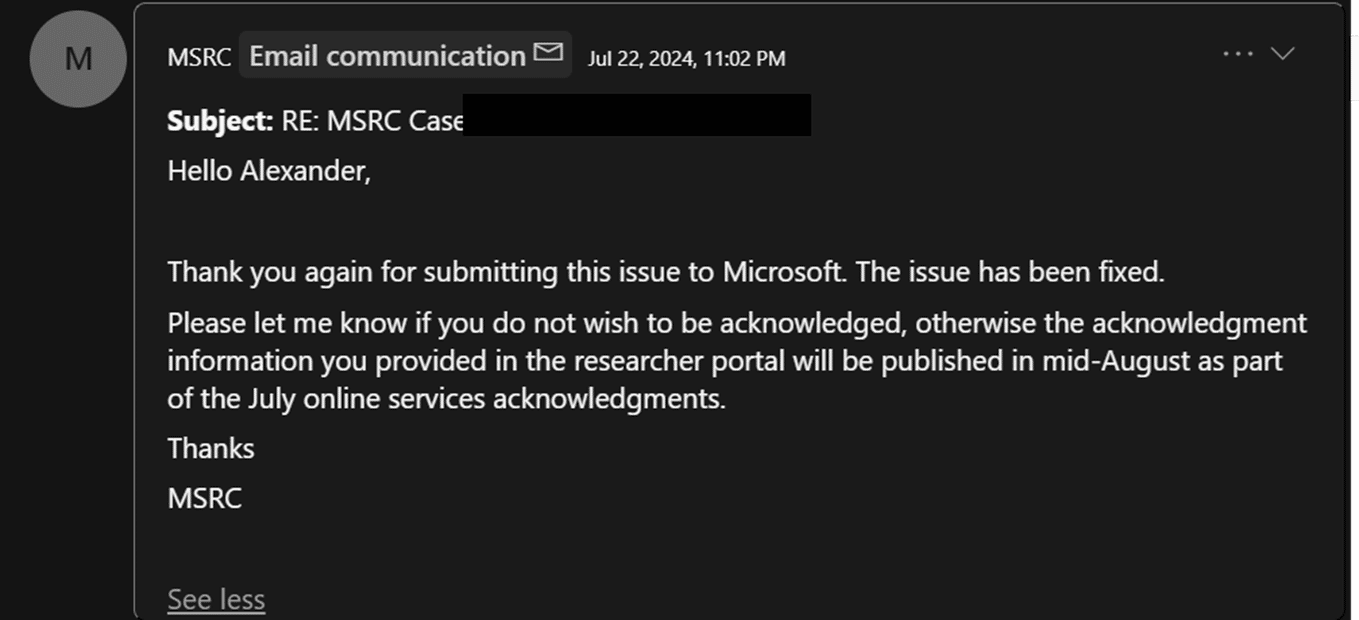
| 2024-07-22 23:02 | MSRC to Alex | “Thank you[…] The issue has been fixed.” |
| 2024-07-22 23:04 | MSRC | Closed the case |
| 2024-07-22 | Alex to MSRC | Offered to help validate the fix and for resolution details. |
| 2024-08-14 | Alex to Microsoft | Sent reminder asking if they want to give feedback on the presentation |
| 2024-08-19 | Alex to PSFramework | Started reachout to PSFramework. |
| 2024-08-28 | PSFramework | First contact. |
| 2024-08-29 | MSRC | Public acknowledgment. |
| 2024-09-13 | Alex | Presented at SEC-T. |
| 2024-09-14 | Alex | Published blog post. |
To me, it is still unclear what MSRC means with “The issue has been fixed” as they have not shared any resolution details. While it is obvious that PSRP and PSDirect still deserializes untrusted data, it appears that they also did not fix the remote code execution (due to PSFramework dependency) in Microsoft’s own PowerShell modules, although they are covered under MSRC according to their security.md files (Azure/AzOps, Azure/AzOps-Accelerator, Azure/AVDSessionHostReplacer, PAWTools).
On 2024-08-19 I decided to contact the Microsoft employee behind PSFramework myself. He instantly understood the issue and did a great job quickly resolving it (big kudos as he did it during his vacation!). Make sure to update to v1.12.345 in case you have PSFramework installed.
This research was publicly released 2024-09-14, which is 180 days after the initial private disclosure.
PART 6 – MITIGATIONS AND RECOMMENDATIONS
SECURE POWERSHELL DEVELOPMENT
When developing PowerShell Modules, it is important to keep deserialization attacks in mind – even if your module is not deserializing untrusted data. In fact, this could be an issue even if your module doesn’t perform any deserialzation at all.
It is particularily important if your module defines user-define types, converters, and formats. When you introduce new user-defined types to your end-users systems, it will extend the attack surface on their system. If you’re unlucky, your module could introduce a new gadget chain that can be abused when the end-user uses PowerShell Remoting, PowerShell Direct, or when they use any script or module that performs deserialization of untrusted data.
1. SECURING YOUR USER-DEFINED TYPES
- Be careful with types.ps1xml declarations. Keep in mind that the threat actor can control most of the object properties during deserialization.
- Be careful with format.ps1xml declarations. Keep in mind that the object could be maliciously crafted, thus, the threat actor could control most of the object properties.
- Be careful when you implement type converters. There are plenty of good reading online on how to write secure deserialization. Here is a good starting point: https://cheatsheetseries.owasp.org/cheatsheets/Deserialization_Cheat_Sheet.html#net-csharp
2. AVOID THE PROPERTY NAME ‘ACTION’
The property name action is dangerous and should be avoided. Using a property of the name action could lead to critical vulnerabilities in the most unexpected ways. For example, the following code is vulnerable to arbitrary code execution:
$obj = Import-Clixml .\untrusted.xml
$example = @("Hello","World!") # this can be any value
$example | Select-Object $deserialized.Action
RECOMMENDATIONS FOR IT OPS
PSRP is still a recommended method for managing your environment. You should not go back to RDP (Remote Desktop Protocol) or similar for lots of reasons. However, before using PSRP or PSDirect, there are a few things you need to keep in mind.
First off, you should ensure that the computer you are remoting from is fully patched. This will solve some of the problems, but not all.
Secondly, you should never use remoting from a computer that is littered with third-party PowerShell modules. In other words, you probably shouldn’t remote from your all-in-one admin PC. Use a privileged access workstation that is dedicated for admin tasks.
Thirdly, before you use remoting, follow thru with the following points:
1. REVIEW YOUR POWERSHELL MODULES
Check the modules loaded on startup by starting a fresh PowerShell prompt and run:
get-moduleNote however that modules will be implicitly loaded as soon as you use one of their cmdlets. So you should also check the available modules on your system.
get-module -ListAvailable2. REDUCE YOUR POWERSHELL MODULES
When you install a PowerShell module, it may introduce a new deserialization gadget on your system and your system will be exposed as soon as you use PSRP, PSDirect, or use any script that imports untrusted CLIXML.
Being restrictive with PowerShell modules is good practice in general, as third-party modules comes with other risks as well (e.g. supply chain attacks).
This is however not as easy as it may sound. Lots of software ships with their own set of PowerShell modules that will be installed on your system. You need to ensure that these don’t introduce gadgets.
3. MANUAL GADGET MITIGATION
As long as PSRP and PSDirect still relies on (untrusted) CLIXML deserialization, there will be a constant battle to find and defuse deserialization gadgets.
As an example, the “SMB stealing gadget” can be mitigated with a simple if statement. Find the following code in C:\Windows\System32\WindowsPowerShell\v1.0\Registry.format.ps1xml:
<ScriptBlock>
$result = (Get-ItemProperty -LiteralPath $_.PSPath | Select * -Exclude PSPath,PSParentPath,PSChildName,PSDrive,PsProvider | Format-List | Out-String | Sort).Trim()
$result = $result.Substring(0, [Math]::Min($result.Length, 5000) )
if($result.Length -eq 5000) { $result += "..." }
$result
</ScriptBlock>
Then add validation that ensures the PSPath property is legitimate. The updated formatter could look something like this:
<ScriptBlock>
$result = ""
if($_.PSPath.startswith("Microsoft.PowerShell.Core\Registry")){
   $result = (Get-ItemProperty -LiteralPath $_.PSPath | Select * -Exclude PSPath,PSParentPath,PSChildName,PSDrive,PsProvider | Format-List | Out-String | Sort).Trim()
   $result = $result.Substring(0, [Math]::Min($result.Length, 5000) )
   if($result.Length -eq 5000) { $result += "..." }
}
$result
</ScriptBlock>


 Figure 28: Creating a service with the name “9jzf5”


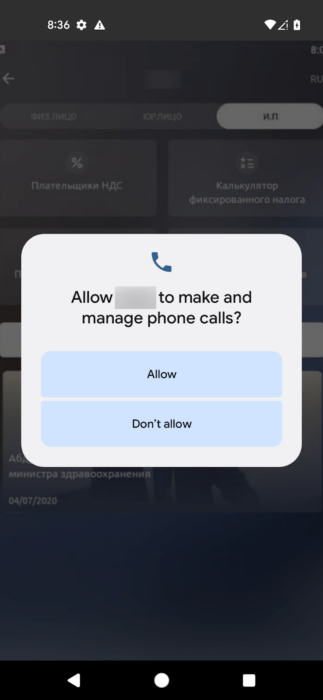


 Figure 4 – Target stored in cleartext within process memory


